Skip to Navigation


In our blog posts, we regularly provide tutorials on sending emails from different programming languages and frameworks. SMTP server is almost always among the discussed methods.
This time we’ve decided to unify all those resources and create a comprehensive guide on sending emails with SMTP. Below we’ll provide descriptions and code samples for PHP, Python, C#, Node.js, Java, and Ruby, as well as their corresponding frameworks.
Email sending options: SMTP or Web API?
Generally, there are two main ways of sending emails: via SMTP server or Web API.
An SMTP server is an app that transfers messages from a sender to the recipient’s inbound mail server. It operates using Simple Mail Transfer Protocol (or SMTP protocol) which defines the terms for sending emails. In that process, messages are moved between mail transfer agents (MTAs) that are often synonymous with SMTP relay servers.
To transmit messages successfully, the SMTP client has to establish a connection with the email server (as per RFC 5321). They are like old pals who met up for a drink to catch up. But instead of sentences, they communicate through SMTP commands and responses (for example, HELO, MAIL FROM, RCPT TO, DATA, AUTH, etc.). The SMTP connection is carried out using Transmission Control Protocol (TCP) through SMTP ports: 25, 465, 587, and 2525.
People usually opt for the SMTP server because:
- It’s easy to configure and doesn’t require advanced coding skills;
- It can be used with any platform or email-sending service;
- It’s easy to troubleshoot thanks to the detailed ‘conversation’ between the server and the client.
A Web API (application programming interface) makes it possible to integrate third-party services directly with your app or project. For emails, Web APIs are usually called Email APIs. They communicate with other services with HyperText Transfer Protocol (HTTP). In this case, the communication is more like a one-liner than a full-blown conversation.
Email APIs enable users to send emails directly from their app by integrating email service providers (ESPs).
Here’s why folks choose to use Email API:
- It’s faster compared to an SMTP server thanks to its short communication;
- Doesn’t encounter blockages;
- Provides excess to versatile and flexible functionalities;
- Offers increased security by requiring an API key.
For more on the differences between Web API and SMTP server, check out our dedicated blog post.
Before sending emails: choosing the SMTP server provider
You’ll need a reliable SMTP server provider to send high volumes of emails and maintain good email deliverability. To choose one, we recommend using the following criteria:
- Available functionalities, such as analytics, statistics, templates, and email logs for sending transactional emails, as well as automation, A/B testing, list management, and scheduled delivery for marketing emails.
- Scalability or the ability of the provider to handle higher volumes of emails and the ease of increasing sending limits.
- Reliability, including the state of the email infrastructure, deliverability rates, frequency of downtime, and implemented privacy and security protocols/measures.
- Pricing – does the provider offer flexible pricing plans? Do the included features correspond to the prices? Does the provider upsell essential features such as responsive customer support or access to sending capabilities?
- Ease of integration, including SMTP service, APIs, and ready-made SDKs. Pay attention to the available guides, tutorials, and the clarity of official documentation.
The majority of SMTP providers offer free SMTP servers along with their paid plans. These come in the shape of free trials or free tiers.
Most popular email providers include Mailgun, SendGrid, Mailchimp Transactional Email (former Mandrill), Postmark, Amazon SES, and Mailtrap.
Mailtrap is an email-sending solution for developer and product teams. It offers an SMTP service and highly customizable email API with high inboxing rates for transactional and promo emails.
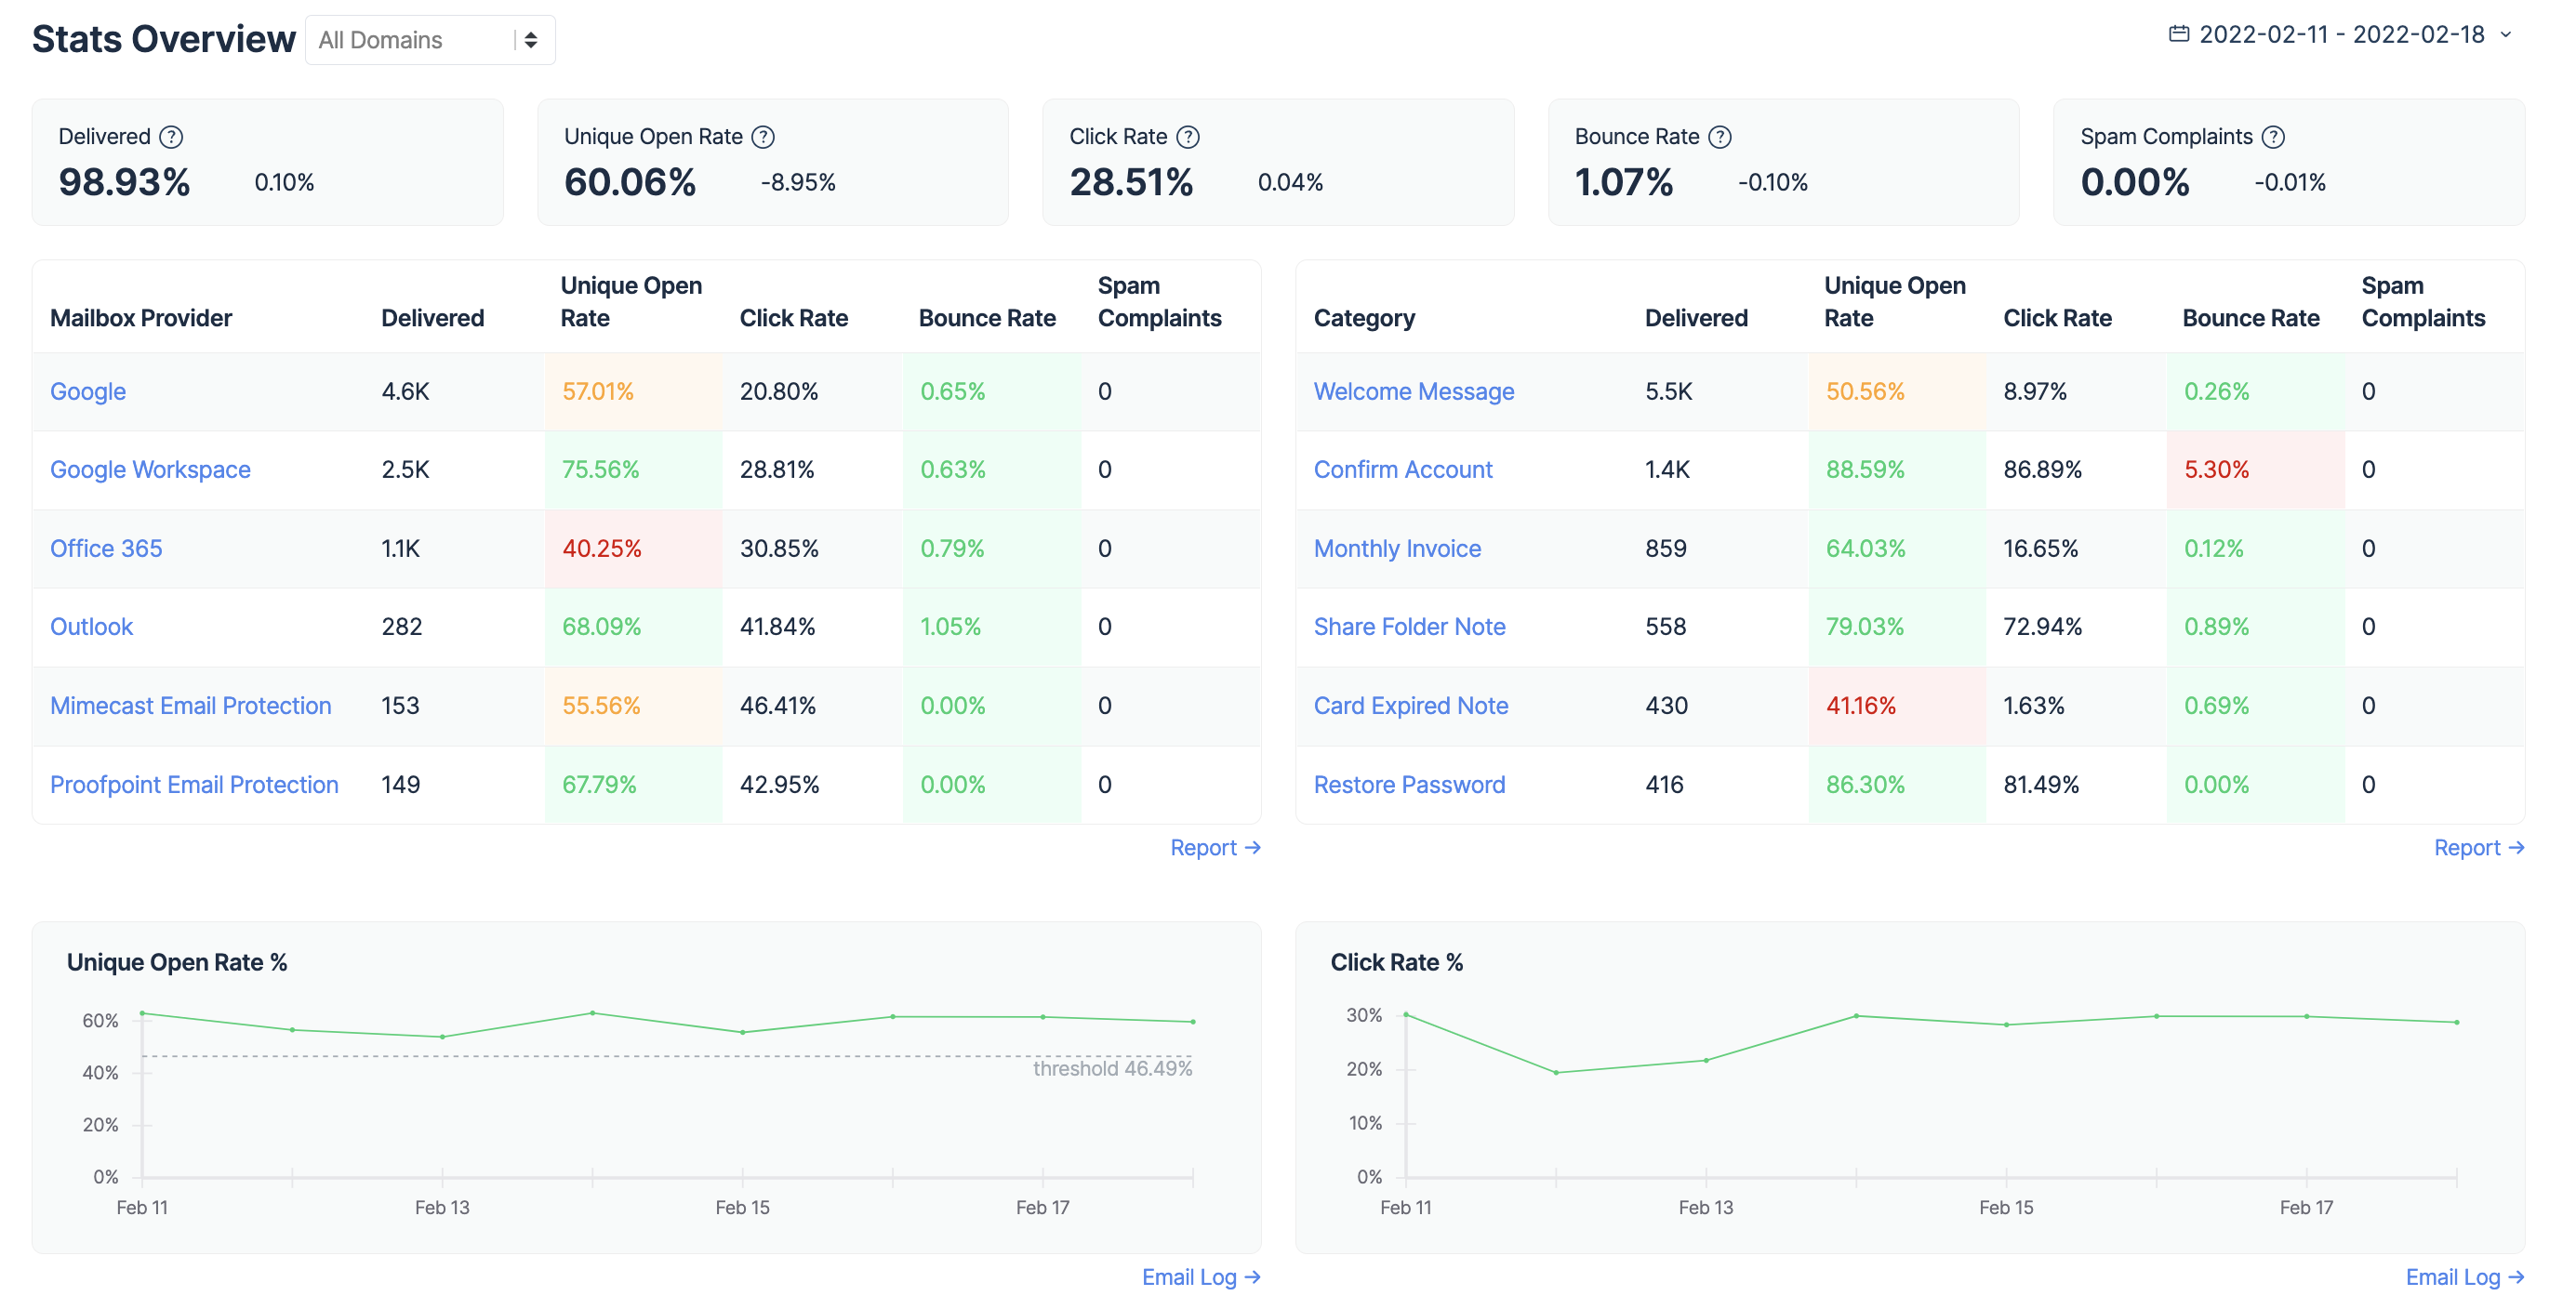
Apart from sending capabilities, Email API/SMTP comes with additional features such as actionable analytics. With its help, users get access to helicopter-view dashboards and drill-down reports for mailbox providers and categories. That way, it’s easy to troubleshoot unexpected sending issues if they do occur.
To start using Mailtrap Email API/SMTP, all you need to do is sign up and follow the in-app wizard to add and verify your domain. For detailed instructions, watch the video below or refer to our getting started guide.
Next, head over to the Sending Domains, click on the verified domain and navigate to the ‘SMTP/API Settings’ tab. There, you’ll need to pick between a transactional and bulk stream and between using Mailtrap Email API/SMTP’s SMTP service or email API.
In the API section, you’ll see ready-made snippets for different programming languages that you can insert directly into your project.
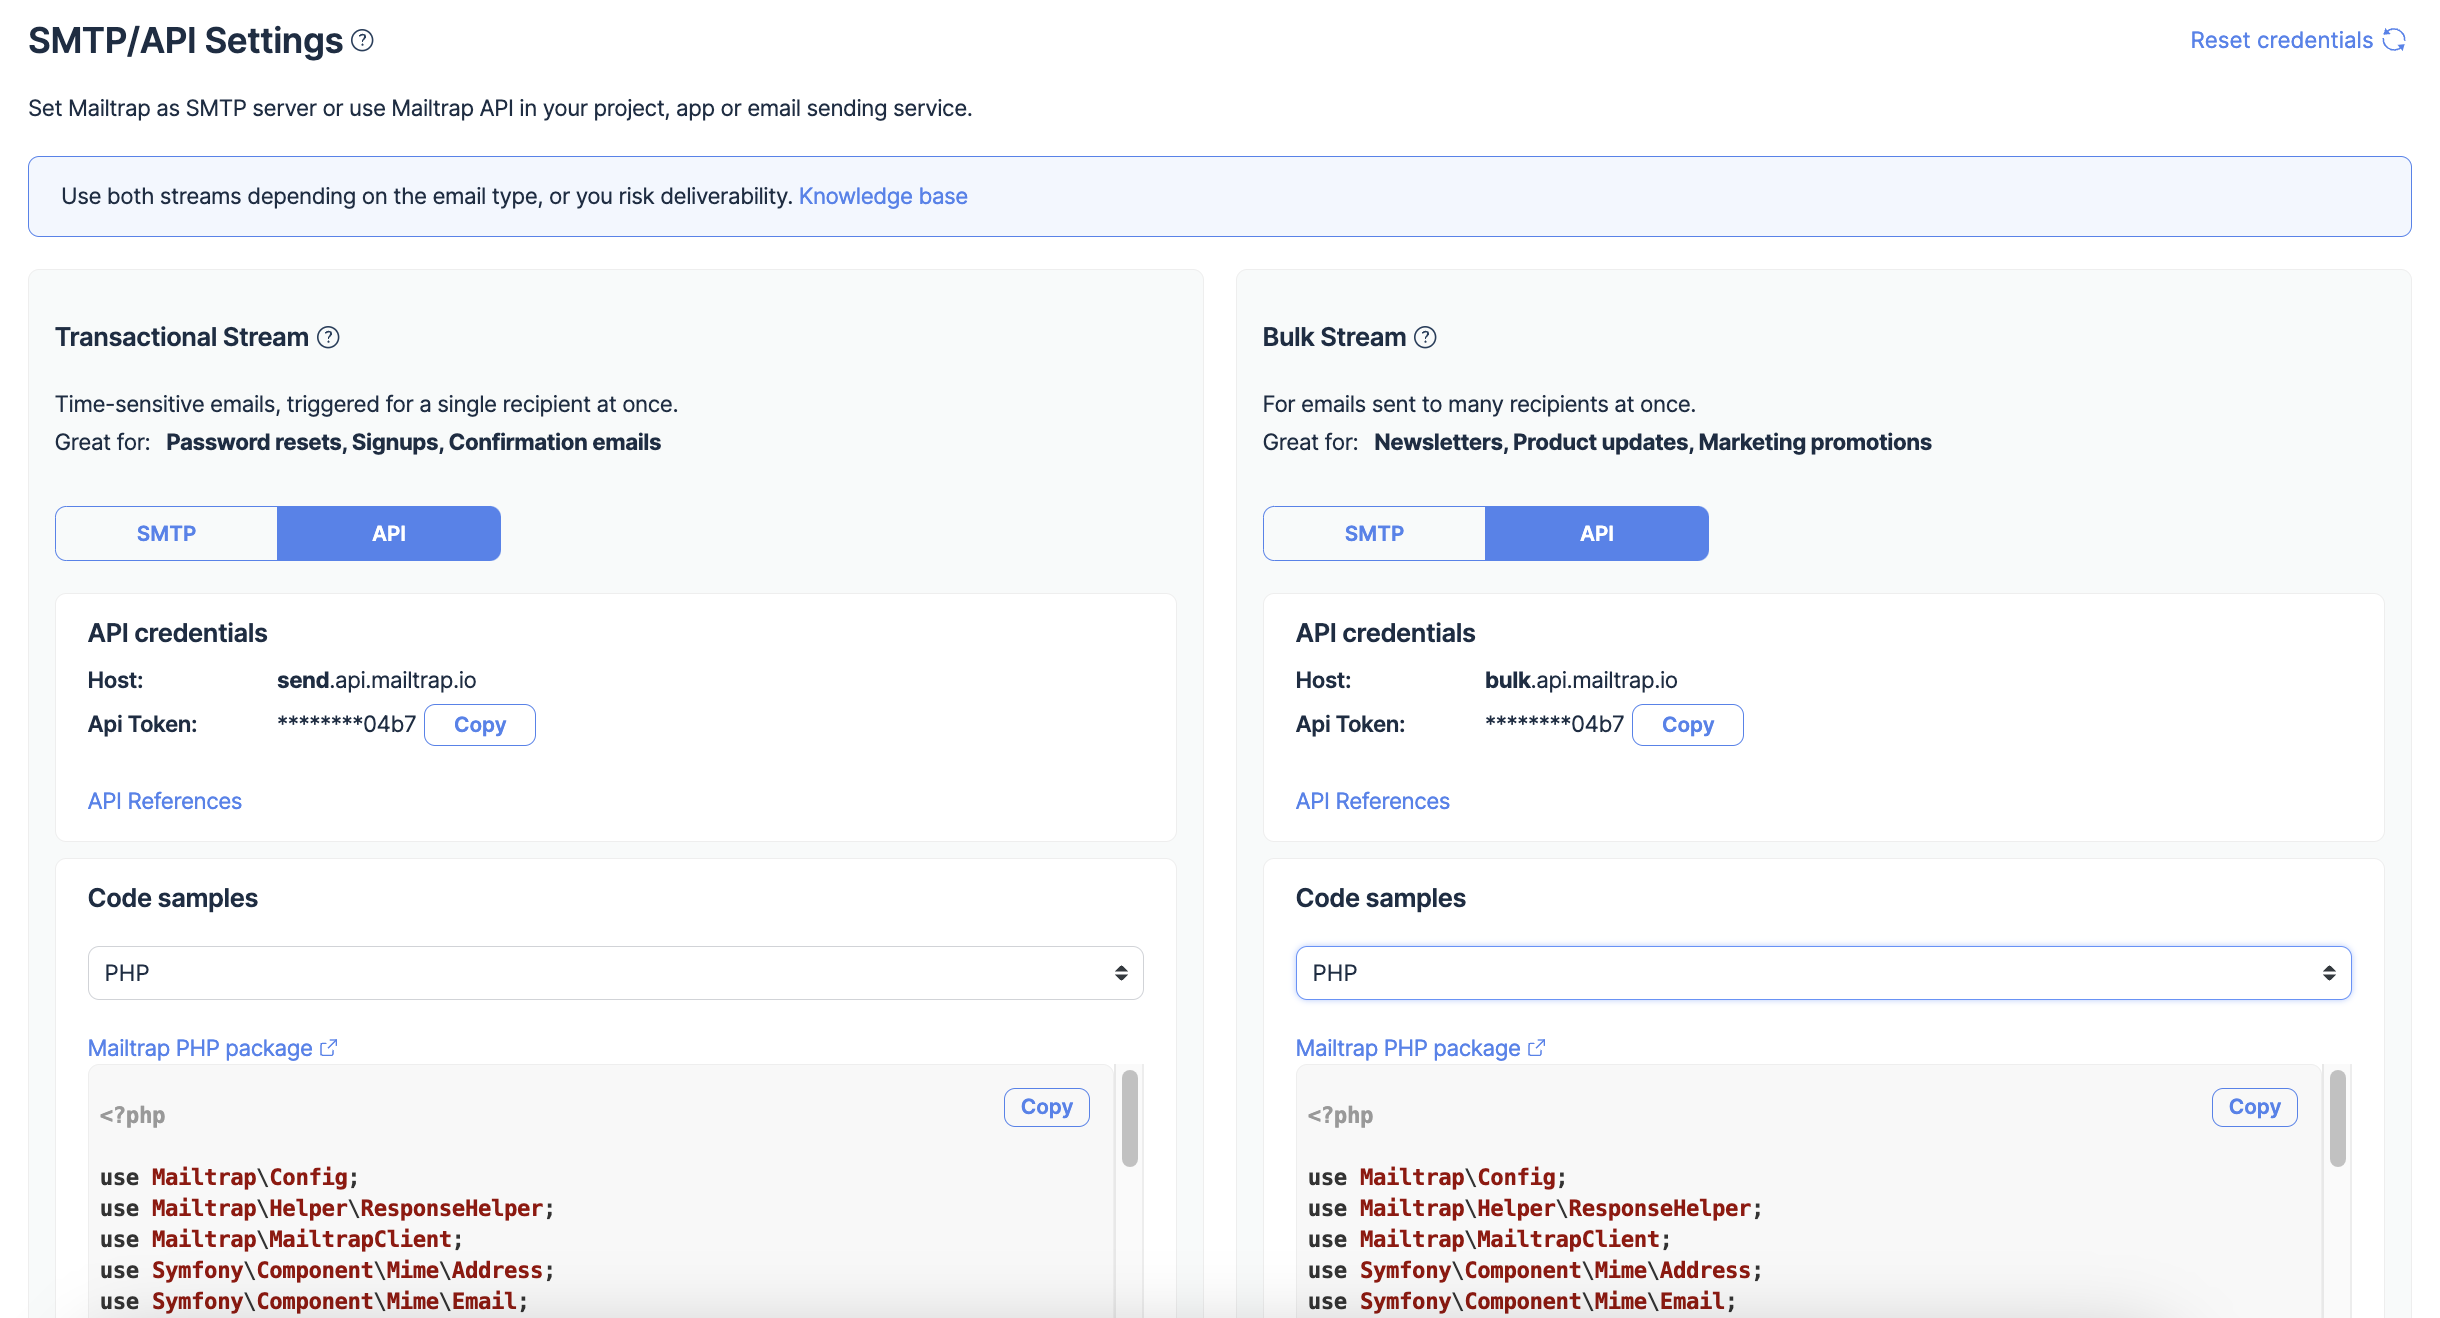
In the SMTP tab, you’ll find the necessary credentials to easily integrate Mailtrap with SMTP.
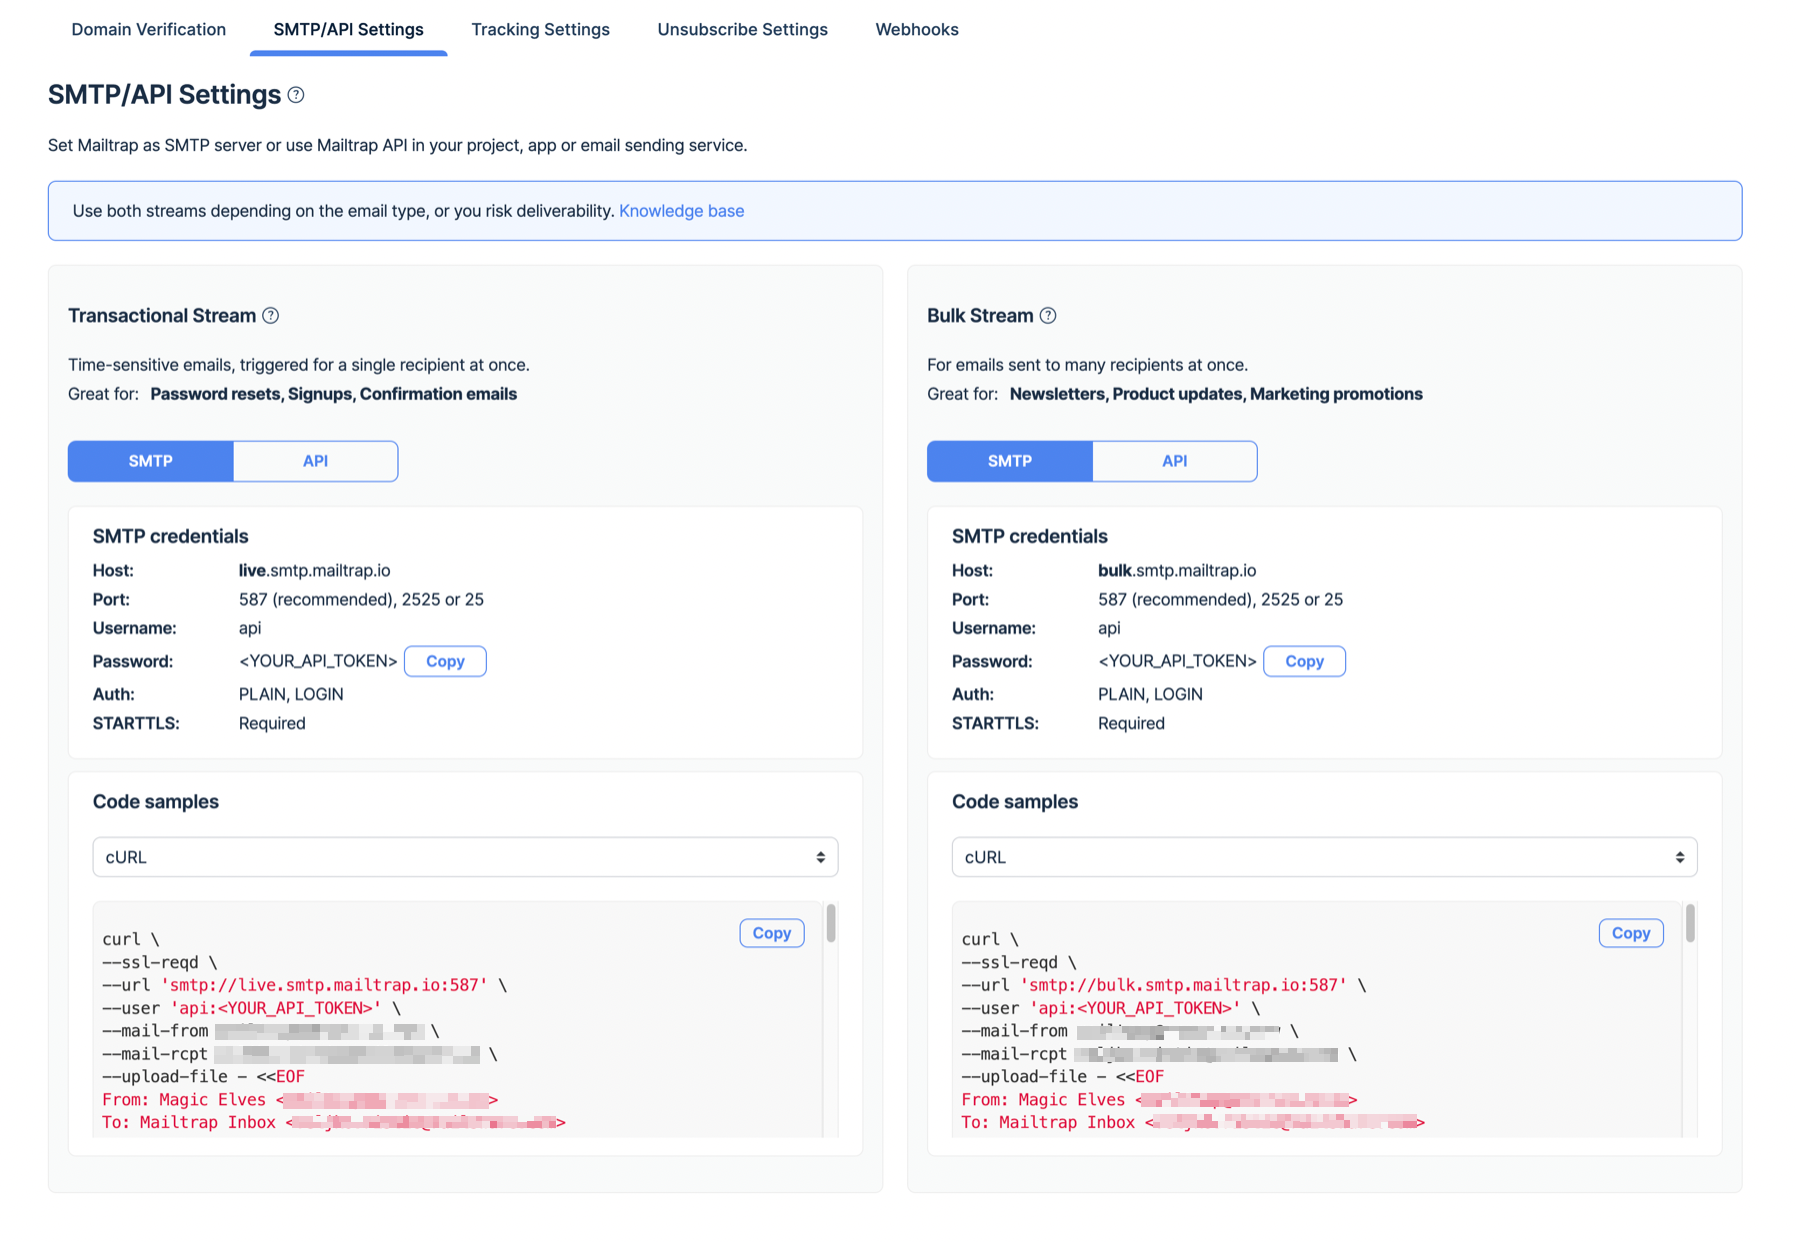
For the code snippets below, we’ll be using the SMTP credentials provided by Mailtrap Email API/SMTP.
Send emails with SMTP in PHP
The easiest and most popular way to send emails with SMTP in PHP is through PHPMailer. It’s compatible with PHP 5.5 and higher. This package supports SMTP authentication, TLS and SSL security layers, validates email addresses automatically, and protects against header injection attacks. Unlike PHP’s native mail() function, PHPMailer doesn’t have inherent deliverability issues.
To start using the package, you should install it via composer by adding the following code to your composer.json file:
"phpmailer/phpmailer": "^6.8.0" Alternatively, you can just run composer require phpmailer/phpmailer and PHPMailer will be installed.
After that, the first thing you need to do is import the PHPMailer classes in the global namespace. Then load the autoloader with the require statement. You also need to create an instance with the true parameter to enable the exceptions.
<?php
use PHPMailer\PHPMailer\PHPMailer;
use PHPMailer\PHPMailer\SMTP;
use PHPMailer\PHPMailer\Exception;

require 'vendor/autoload.php';

$mail = new PHPMailer(true);
Now it’s time to configure the SMTP server. For that, we need to go back to our Mailtrap Email API/SMTP account and copy the SMTP credentials. We also have to configure the encryption protocol. In this case, let’s choose STARTTLS with port number 587.
$mail->SMTPDebug = SMTP::DEBUG_SERVER;
$mail->isSMTP();
$mail->Host       = 'live.smtp.mailtrap.io';
$mail->SMTPAuth   = true;
$mail->Username   = 'api';
$mail->Password   = 'YOUR_API_TOKEN';
$mail->SMTPSecure = PHPMailer::ENCRYPTION_STARTTLS;
$mail->Port       = 587;
Once the SMTP is configured, we can set the sender and recipient addresses, reply-to address, as well as carbon copy (Cc) and blind carbon copy (Bcc) addresses.
$mail->setFrom('kate@mailtrap.io', 'Kate');
$mail->addAddress('noah@example.net', 'Joe User');
$mail->addAddress('denys@example.com');
$mail->addReplyTo('info@mailtrap.io', 'Information');
$mail->addCC('vika@example.com');
$mail->addBCC('oliver@example.com');
PHPMailer makes it possible to add attachments with addAttachment method and define the body of the email as HTML or plain text.
$mail->addAttachment('/var/tmp/file.tar.gz');
$mail->addAttachment('/tmp/image.jpg', 'new.jpg');

$mail->isHTML();
$mail->Subject = 'Mailtrap is awesome';
$mail->Body    = 'This is my first HTML email sent with Mailtrap <b>in bold!</b>';
$mail->AltBody = 'This is the plain text body if you’re using non-HTML email client';
The final step is to send the test message by calling the send method.
try {
    $mail->send();
    echo 'Message has been sent';
} catch (Exception $e) {
    echo $e->getMessage();
}
If you did everything correctly, you should receive an email in the selected inbox. After receiving the email, go back to the Mailtrap account and click ‘Verify Setup’ to start sending emails from your app.
Note: We won’t replicate this step in the following sections. Remember that it’s essential to verify your setup, no matter which programming language or framework you’re using.
For a more detailed tutorial and other examples, refer to our guide on sending emails with PHPMailer.
Also, if you decide that sending via SMTP in PHP isn’t for you, make sure to check out the official Mailtrap PHP client.
Send emails with SMTP in Laravel
Laravel is a free, open-source, scalable PHP framework suitable for building complex applications. And along with other perks, it also allows you to send emails with SMTP, HTTP, or API. This is done with the help of Symfony Mailer.
For today’s tutorial, we’ll assume that you already have a Laravel application up and running. Keep in mind that you should configure email services in config/mail.php and .env files.
To get started with SMTP sending, you should add the following lines of code to your .env file:
MAIL_DRIVER=smtp
MAIL_HOST=live.smtp.mailtrap.io
MAIL_PORT=587
MAIL_USERNAME=api
MAIL_PASSWORD=YOUR_API_TOKEN
MAIL_ENCRYPTION=tls
Note: Don’t forget to substitute MAIL_PASSWORD with the API token provided by Mailtrap. The username (api) is the same for every user.
The next step is to create a new mailable class. In Laravel, mailable classes represent the types of emails you send. They are stored in the app/Mail directory. Creating a new mailable class is easy as it requires running a simple command:
php artisan make:mail LaravelSMTPConfigurationWithin the mailable class, you can configure envelope, content, and attachment methods for deeper tweaks. The envelope is used for defining the subject and from address of the email.
use Illuminate\Mail\Mailables\Address;
use Illuminate\Mail\Mailables\Envelope;

/**
* Get the message envelope.
*/
public function envelope(): Envelope
{
    return new Envelope(
        from: new Address('kate@mailtrap.io', 'Kate from Mailtrap'),
        subject: 'Laravel SMTP Configuration',
    );
}
The content enables you to define the view i.e. choose which template to use for the content. Usually, templates operate on the Blade engine. This is useful if you want to send HTML emails. Plain-text email messages should also be stored as a template in your blade.php file and called alongside the HTML (this step is optional but recommended).
/**
* Get the message content definition.
*/
public function content(): Content
{
    return new Content(
        view: 'emails.smtp.configuration',
        text: 'emails.smtp.configuration-text'
    );
}
The final stage is to define the route in the routes/web.php file for sending the SMTP emails. For that, we need to import Mail facade and specify the recipient’s address.
<?php

use Illuminate\Support\Facades\Route;
use App\Mail\LaravelSMTPConfiguration;
use Illuminate\Support\Facades\Mail;

Route::get('/testroute', function() {
    $name = "Kate from Mailtrap";

    //The email sending is done using the to method on the Mail facade
    Mail::to('noah@example.com'')->send(new LaravelSMTPConfiguration($name));
});
Another option is to add a CLI command to send emails. Using CLI without WEB is easier in some cases.
use App\Mail\LaravelSMTPConfiguration;
use Illuminate\Foundation\Inspiring;
use Illuminate\Support\Facades\Artisan;
use Illuminate\Support\Facades\Mail;

/*
|--------------------------------------------------------------------------
| Console Routes
|--------------------------------------------------------------------------
|
| This file is where you may define all of your Closure based console
| commands. Each Closure is bound to a command instance allowing a
| simple approach to interacting with each command's IO methods.
|
*/

Artisan::command('inspire', function () {
    $this->comment(Inspiring::quote());
})->purpose('Display an inspiring quote');


Artisan::command('sendmail', function () {
    Mail::to('testreceiver@gmail.com')->send(
      new LaravelSMTPConfiguration("Kate from Mailtrap"));
})->purpose('Send test mail');
We’ve described this process in more detail in our dedicated tutorial on sending emails with Laravel. There, you’ll also find information on adding attachments and sending emails through an API. And on the Mailtrap bridge for Laravel framework [API] GitHub page, you can learn how to integrate this API into your app/project with ease.
If you’re using Symfony instead of Laravel, you’ll find all the necessary information here.
Send emails with SMTP in Python
Python has a native library for sending emails with an SMTP server. smtplib can be used to define an SMTP client and, of course, route outgoing emails. To start using the library, you should use import smtplib statement and create the SMTP object with the following code:
smtplib.SMTP(host='', port=0, local_hostname=None, [timeout, ]source_address=None)
We should also specify the sender, recipient, and the message itself. The final step is to send the email with SMTP.sendmail object.
An example with Mailtrap’s credentials will look like this:
import smtplib

sender = 'kate@mailtrap.io'
receivers = ['noah@example.com']
message = """From: Kate from Mailtrap <kate@mailtrap.io>
To: Noah Doe <noah@example.com>
Subject: Check out my awesome email


This is my first email sent with Python using Mailtrap's SMTP credentials. WDYT?
"""

try:
    smtpObj = smtplib.SMTP('live.smtp.mailtrap.io', 587)
    smtpObj.sendmail(sender, receivers, message)
    print("Successfully sent email")
except SMTPException:
    pass
Official documentation recommends using the features of the email package to build email messages and add MIME attachments. You might also want to have a look at our send with Python blog post for step-by-step instructions. And while you’re at it, don’t forget to check out our official Python client for cases when SMTP isn’t the right option.
Send emails with SMTP in Django
As a Python framework, Django’s email sending functionalities are based on smtplib we discussed above. However, the main code pieces are stored in the django.core.mail module.
Start by adding SMTP configuration to your settings.py file. Swap EMAIL_HOST variable with Mailtrap’s SMTP host and specify the port. Then go ahead and define the username and password of your host. Don’t forget to specify the encryption type (either EMAIL_USE_TLS or EMAIL_USE_SSL should be set to true).
EMAIL_BACKEND = 'django.core.mail.backends.smtp.EmailBackend'
EMAIL_HOST = 'live.smtp.mailtrap.io'
EMAIL_PORT = '587'
EMAIL_HOST_USER = 'api'
EMAIL_HOST_PASSWORD = 'your_api_token'
EMAIL_USE_TLS = True
EMAIL_USE_SSL = False
Let’s move on to sending emails. Begin the file by importing send_mail from django.core.mail file.
from django.core.mail import send_mail Continue by specifying four necessary components: subject, message, from_email, and recipient_list.
from django.core.mail import send_mail

send_mail(
    subject = 'My awesome email sent from Django'
    message = 'Look! I’ve enabled SMTP email sending in my Django app with Mailtrap. Isn’t that awesome?'
    from_email = 'kate@mailtrap.io'
    recipient_list = ['noah@example.com',]
    auth_user = 'Login'
    auth_password = 'Password'
    fail_silently = False,
)
To learn how to add multiple recipients, send mass emails, or define other parameters, read this blog post.
Send emails with SMTP in C# and .NET
For many years, the default way of sending emails with SMTP in C# was through .NET framework and SmtpClient class. However, SmtpClient is now obsolete as it doesn’t correspond to modern security requirements and protocols. Microsoft itself recommends using MailKit or other libraries.
For today’s tutorial, we’ll be using MailKit – a cross-platform .NET library.
As with other frameworks and programming languages, the first step is installation. Go to the Package Manager Console in the Visual Studio and run the following command:
Install-Package MailKitStart the code by importing the necessary namespaces such as System, MailKit.Net.Smtp, MailKit, and MimeKit. Then create a new MimeMessage class to represent the email message. Typically, you’ll also have to configure the sender, recipient, subject, and body. To send emails, it’s important to create a new SmtpClient class (don’t confuse it with .NET’s SmtpClient we mentioned above).
After specifying the SMTP server and port, you can send emails with send() method. This is what a sample code will look like after building the necessary components:
using System;


using MailKit.Net.Smtp;
using MailKit;
using MimeKit;


namespace TestClient
{
   class Program
   {
       public static void Main (string[] args)
       {
           using var email = new MimeMessage();


           email.From.Add(new MailboxAddress("Kate from Mailtrap", "kate@mailtrap.io"));
           email.To.Add(new MailboxAddress("Noah", "Noah@example.com"));


           email.Subject = "Now I’m even sending emails from C#!";
           email.Body = new TextPart(MimeKit.Text.TextFormat.Html) {
               Text = "<b>Check out my C# SMTP email sent with MailKit and Mailtrap’s SMTP credentials</b>"
           };


           using var smtp = new SmtpClient();
           smtp.Connect("live.smtp.mailtrap.io", 587, false);


           // Note: only needed if the SMTP server requires authentication
           smtp.Authenticate("api", "your_api_token");


           smtp.Send(email);
           smtp.Disconnect(true);
       }
   }
}
MailKit can be used to send emails from ASP.NET C# and ASP.NET Core. You’ll find more methods of sending emails in C# here.
Send emails with SMTP in Node.js
Nodemailer is the most popular option for sending emails with SMTP in Node.js. Even though other packages are also available, Nodemailer seems to be dominating the scene with its simple yet robust code. If you’re interested in other packages and sending options, refer to our detailed tutorial.
You can start sending emails in just a few steps:
- Install the package with
npm install nodemaileroryarn add nodemailercommands and import it using the following line of code:
const nodemailer = require('nodemailer') - Create an SMTP transport. General options include
host,port,auth, andauthMethod. However, you can also specify TLS, connection, security, debug, and other options here. Here’s a sample code with general options:
  const transporter = nodemailer.createTransport({
    host: 'live.smtp.mailtrap.io',
    port: 587,
    secure: false, // upgrade later with STARTTLS
    auth: {
      user: 'api',
      pass: 'your_api_token'
    }
})- Create an email message with the necessary parameters. Refer to the official documentation for more information on supported parameters.
  const message = {
    from: 'kate@mailtrap.io',
    to: 'noah@example.com',
    subject: 'This time I\'m using Nodemailer',
    text: 'This is my first email sent with Nodemailer and Mailtrap. Does it look good?',
    html: '<p>This is my first email sent with Nodemailer and Mailtrap. Does it look good?</p>'
}- Send the email.
  const info = await transporter.sendMail(message)
  console.log(`Email sent: ${info.response}`)
We also have a step-by-step guide on Nodemailer here.
Send emails with SMTP in Java
Similar to other programming languages, you’ll need a separate package to send emails in Java using the SMTP server. Angus Mail (former JakartaMail and JavaMail) is usually the primary choice for Java developers.
Note: The source codes of JakartaMail were moved to Eclipse Angus and the development continues there. Angus Mail is the successor of JakartaMail.
You have two main options to get started:
- Download angus-mail.jar (JakartaMail implementation) and jakarta.mail-api.jar and add them to the class or module path of the Angus Activation.
- Find angus-mail.jar in the Maven repository and add it to the Maven dependency:
<dependencies>
    <dependency>
        <groupId>jakarta.mail</groupId>
        <artifactId>jakarta.mail-api</artifactId>
        <version>2.1.1</version>
    </dependency>
    <dependency>
        <groupId>org.eclipse.angus</groupId>
        <artifactId>angus-mail</artifactId>
        <version>2.0.1</version>
        <scope>runtime</scope>
    </dependency>
</dependencies>
You can then start building your email by importing all the necessary parameters. public class JakartaEmail contains the main methods for sending emails and enables you to set to and from addresses and SMTP username and password.
SMTP host, port and other SMTP parameters can be set using the properties object. The message subject and content can be created using MimeMessage object.
To send the email, you’ll need to call Transport.send(message) method.
package org.example.jakartaemail;
import java.util.Properties;
import jakarta.mail.Message;
import jakarta.mail.MessagingException;
import jakarta.mail.PasswordAuthentication;
import jakarta.mail.Session;
import jakarta.mail.Transport;
import jakarta.mail.internet.InternetAddress;
import jakarta.mail.internet.MimeMessage;

public class JakartaEmail {
  public static void main(String[] args) {
      String to = "noah@example.com";
      String from = "kate@mailtrap.io";
      final String username = "api";      final String password = "your_api_token";
      String host = "live.smtp.mailtrap.io";
      Properties props = new Properties();
      props.put("mail.smtp.auth", "true");
      props.put("mail.smtp.starttls.enable", "true");
      props.put("mail.smtp.host", host);
      props.put("mail.smtp.port", "587");
      //create the Session object
      Session session = Session.getInstance(props,
        new jakarta.mail.Authenticator() {
            protected PasswordAuthentication getPasswordAuthentication() {
              return new PasswordAuthentication(username, password);
    }
        });
      try {
    //create a MimeMessage object
    Message message = new MimeMessage(session);
    //set From email field
    message.setFrom(new InternetAddress(from));
    //set To email field
    message.setRecipient(Message.RecipientType.TO, new InternetAddress(to));
    //set email subject field
    message.setSubject("Here comes my SMTP email from Java!");
    //set the content of the email message
    message.setText("Just discovered that it’s easy to send emails with SMTP using JakartaMail and Mailtrap");
    //send the email message
    Transport.send(message);
    System.out.println("Email Message Sent Successfully");
      } catch (MessagingException e) {
        throw new RuntimeException(e);
      }
  }
}
Send emails with SMTP in Ruby/Ruby on Rails
The last programming language and framework we have here are Ruby and Ruby on Rails, respectively. The preferred way of sending emails with SMTP for both of them is ActionMailer. For a Ruby-specific tutorial, check out this blog post.
Install ActionMailer using RubyGems by adding this line of code:
gem install actionmailerNow we need to create a new mailer file in the app/mailers directory of the Ruby app.
rails generate mailer UserEmail messages can be built using various helpers that allow you to format messages or add attachments. A simple email will look something like this:
class UserMailer < ApplicationMailer
  def simple_message(recipient)
    attachments["attachment.pdf"] = File.read("path/to/file.pdf")
    mail(
      to: recipient,
      subject: "I’ve even configured Ruby",
      content_type: "text/html",
      body: "<html><strong>I’m turning into a real SMTP pro</strong></html>"
    )
  end
end
Before sending the email, we need to edit config/environments/*.rb with the correct SMTP credentials like so:
config.action_mailer.delivery_method = :smtp
config.action_mailer.smtp_settings = {
  :address   => 'live.smtp.mailtrap.io',
  :port      => 587,
  :domain    => 'example.com',
  :user_name => 'api',
  :password  => 'your_api_token',
  :authentication => 'plain',
  :enable_starttls_auto => true
}
All that’s left is to call the deliver_now method on the return value.
message = UserMailer.simple_message("noah@example.com")
message.deliver_now
More detailed configurations using ActionMailer are available in this guide.
Sending limitations when using free SMTP server providers
While free SMTP servers are attractive because they are free, their providers usually limit sending significantly. This is particularly true for Gmail, Outlook, Yahoo!, and similar SMTP servers. Here’s a chart with the most popular email services and their limitations.
| Email service | Limitations |
| Gmail | 500 emails per day |
| Outlook | 300 emails per day |
| Yahoo! | N/A (doesn’t disclose exact numbers) |
| iCloud Mail | 1,000 emails per day |
| Zoho Mail | 150 emails per day (50 per confirmed user) |
| AOL | N/A (doesn’t disclose exact numbers) |
Sending limitations aside, email accounts with free domain names (such as @gmail.com, @yahoo.com, etc.) don’t provide access to DNS records. In other words, you can’t implement authentication protocols that are essential for building and maintaining high email deliverability rates.
Moreover, mass emails coming from such accounts are usually blocked or marked as spam by internet service providers (ISPs).
That’s why it’s recommended to use paid SMTP services to route your outgoing mail. For personal use or to send occasional emails, you can, of course, opt for free SMTP servers.
Send emails with Gmail SMTP
You can use Gmail SMTP with any of the methods we’ve described above. You’ll simply have to insert the credentials of Gmail’s SMTP server. However, keep in mind that you’ll need to sign in using app passwords. Learn how to create one here.
To configure Gmail SMTP, you should use the following credentials:
- SMTP host/server address: smtp.gmail.com
- SMTP port: 465 (for SSL) and 587 (for TLS)
- Username: <your_gmail_email_address>
- Password: <your_app_password>
Send emails with Outlook or Microsoft 365 SMTP
Similar to Gmail SMTP, Outlook or Microsoft 365 SMTP server can be used to send emails from your app. These are the credentials you’ll need:
- SMTP host/server address: smtp.office365.com
- SMTP port: 587
- Encryption method: STARTTLS
- Username: <your_outlook_email_address>
- Password: <your_outlook_password>