
With a speed faster than most web frameworks, it comes as no surprise that ASP.NET Core enjoys so much popularity.
In this article, I will try to cover the most important aspects of using ASP.NET Core to send emails with C#, from plain text to emails containing HTML code, attachments, and multiple recipients.
Note: As the email-sending functionality is not dependent on whether you are using MVC or Web API but instead relies on the .NET libraries, you can use the same code for sending emails in ASP.NET Core, ASP.NET Core MVC, and ASP.NET Core Web API.
Send email in ASP.NET Core using MailKit
MailKit is an open-source library for .NET that facilitates sending, receiving as well as processing emails. I’d recommend it to anyone who is looking to build a high-volume transactional email service, with features such as high security, high performance, and the option of including attachments, multiple recipients as well as embedded images. If you’re working on a larger project or need help with implementation, collaborating with an experienced ASP.NET development company can always be helpful for setting up email functionality efficiently.
So, what are the steps to get started with MailKit?
Step 1. Creating an ASP.NET Core Web API project
To send emails with MailKit, all your email-sending code should be contained in one ASP.NET Core Web API project. I created my project in Visual Studio from the File menu following these steps:
On the menu, select New -> Project. Then, in the search box, enter “Web API” and select ASP.NET Core Web API – a project template that can also be used for ASP.NET Core MVC views and controllers.
A new window labeled “Configure your new project” will appear where you need to give your project a name.
Finally, in the window labeled “Additional information”, choose .NET 7.0 (or later) as the framework and make sure the “Use controllers(uncheck to use minimal APIs)” option is checked before clicking Create.
Step 2. Integrating the ASP.NET Core project with Swagger UI
Swagger UI is a tool that presents APIs in a user-friendly and easy-to-understand manner so developers, testers, and end consumers can execute and monitor API requests and results.
I decided to integrate Swagger UI into my project so I could test code easily through a visual interface.
The integration process is initiated by going into the Visual Studio solution explorer and selecting the “Manage NuGet Packages” option. Then, after searching up “swagger” in the “Manage Packages for Solution” window, install the following three that show up as results:
- Swashbuckle.AspNetCore.Swagger
- Swashbuckle.AspNetCore.SwaggerGen
- Swashbuckle.AspNetCore.SwaggerUI
After the installation, include the Swagger service in the Startup.cs file, more specifically, its ConfigureServices() method as follows:
using Microsoft.OpenApi.Models;

var builder = WebApplication.CreateBuilder(args);
builder.Services.AddEndpointsApiExplorer();

services.AddSwaggerGen(c =>
            {
                c.SwaggerDoc("v1", new OpenApiInfo
                {
                    Title = "Example API",
                    Version = "v1",
                    Description = "An example of an ASP.NET Core Web API",
                    Contact = new OpenApiContact
                    {
                        Name = "Example Contact",
                        Email = "example@example.com",
                        Url = new Uri("https://example.com/contact"),
                    },
                });

            });
        }
Also in Startup.cs, add:
if (app.Environment.IsDevelopment())
{
    app.UseSwagger();

    app.UseSwaggerUI(options =>
    {
        options.SwaggerEndpoint("/swagger/v1/swagger.json", "v1");
    });
}

builder.Services.AddControllers();
app.UseHttpsRedirection();
app.UseAuthorization();

app.MapControllers();

app.Run();

app.UseSwagger(c =>
{
    options.SerializeAsV2 = true;
});

app.UseSwaggerUI(c =>
{
c.SwaggerEndpoint("/swagger/v1/swagger.json", "v1");
});
And with that, Swagger UI should be all set up!
Step 3. Adding the MailKit library
MailKit installation is quite simple and is done by right-clicking on your ASP.NET Core application project in Visual Studio solution explorer and selecting the “Manage NuGet Packages” option.
Doing this should open a window where you can search for the MailKit NuGet package. Once you find it, click Install, and you are done!
Step 4. Adding the SMTP server and email account details to the appsettings.json file
To add the SMTP email server and email account details to your appsettings.json file, just follow my example below.
In the example, I used the Mailtrap SMTP Service. You are, of course, free to use any SMTP server of your choice, and include its name and other details.
"MailSettings":
  {
    "Host": "live.smtp.mailtrap.io",
    "DefaultCredentials": false,
    "Port": 587,
    "Name": "Your sender name",
    "EmailId": "Your email ID",
    "UserName": "Your username",
    "Password": "Your password",
    "UseSSL": true
  }
Step 5. Making the SMTP server & email account details readable at runtime
Adding SMTP server and email account details to appsettings.json does make them part of the project, but it doesn’t make them readable at runtime.
To do this, I created a new folder named “Configuration” at the root of my project and, within it, a file containing a new class.
The class code looked like this:
public class MailSettings
{
    public string EmailId { get; set; }
    public string Name { get; set; }
    public string UserName { get; set; }
    public string Password { get; set; }
    public string Host { get; set; }
    public int Port { get; set; }
    public bool UseSSL { get; set; }
}
Then, I added this line of code in Startup.cs which handles the loading of data from appsettings.json into the new class using the Configure method:
builder.Services.Configure<MailSettings>(builder.Configuration.GetSection("MailSettings"));Step 6. Sending a plain-text email
Unlike some other programming languages/frameworks, in ASP.NET Core, the email-sending code is written in multiple different documents across a number of folders.
So to start, I created a model that will hold the data necessary to send an email:
public class MailData
{
    public string EmailToId { get; set; }
    public string EmailToName { get; set; }
    public string EmailSubject { get; set; }
    public string EmailBody { get; set; }
}
Then, I moved on to creating (in separate documents) an email-sending interface and a service implementing that interface in a folder named “Services” at the root of my project.
Interface code:
public interface IMailService
{
    bool SendMail(MailData Mail_Data);
}
Note: before moving forward with the code below add the following packages to your project:
- dotnet add package Mimekit
- dotnet add package MailKit
using Microsoft.Extensions.Options;
using MimeKit;
using MailKit.Net.Smtp;
Email service code:
public class MailService : IMailService
{
    MailSettings Mail_Settings = null;
    public MailService(IOptions<MailSettings> options)
    {
       Mail_Settings = options.Value;
    }
    public bool SendMail(MailData Mail_Data)
    {
        try
        {
//MimeMessage - a class from Mimekit
            MimeMessage email_Message = new MimeMessage();
            MailboxAddress email_From = new MailboxAddress(Mail_Settings.Name, Mail_Settings.EmailId);
         email_Message.From.Add(email_From);
            MailboxAddress email_To = new MailboxAddress(Mail_Data.EmailToName, Mail_Data.EmailToId);
            email_Message.To.Add(email_To);
           email_Message.Subject = Mail_Data.EmailSubject;
            BodyBuilder emailBodyBuilder = new BodyBuilder();
            emailBodyBuilder.TextBody = Mail_Data.EmailBody;
            email_Message.Body = emailBodyBuilder.ToMessageBody();
//this is the SmtpClient class from the Mailkit.Net.Smtp namespace, not the System.Net.Mail one
            SmtpClient MailClient = new SmtpClient();
            MailClient.Connect(Mail_Settings.Host, Mail_Settings.Port, Mail_Settings.UseSSL);
            MailClient.Authenticate(Mail_Settings.EmailId, Mail_Settings.Password);
            MailClient.Send(email_Message);
            MailClient.Disconnect(true);
            MailClient.Dispose();
            return true;
        }
        catch(Exception ex)
        {
            // Exception Details
            return false;
        }
    }
}
The service above then needed to be registered inside the application container. This I did in the Program.cs file.
builder.Services.AddTransient<IMailService, MailService>();Lastly, to inject the service into an API controller with the help of dependency injection and also add a POST method that will send off the email, I created a new file under Controllers and populated it with these lines of code:
using Microsoft.AspNetCore.Mvc;

[ApiController]
[Route("[controller]")]
public class MailController : ControllerBase
{
    IMailService Mail_Service = null;
//injecting the IMailService into the constructor
    public MailController(IMailService _MailService)
    {
         Mail_Service = _MailService;
    }
    [HttpPost]
    public bool SendMail(MailData Mail_Data)
    {
        return Mail_Service.SendMail(Mail_Data);
    }
}
To see how everything works, I ran my project and used Swagger UI.
If you also use Swagger, navigate to https://localhost:<port>/swagger, and there you will see all the controllers created and the methods within, which, in my case, are the Mail controller and the SendMail method.
For those of you that followed my code example, the SendMail method should come with a “Try it out” button which you can use to send your first email. And if everything goes well, Swagger UI should give you a positive response.
Here is an example of how an email-sending request looks like in Swagger:

Send email in ASP.NET Core using FluentMail
If you prefer simplicity when coding email-sending functionalities but also need the flexibility to switch between different email providers easily, then using MailKit might be a bit of a challenge. Luckily, there’s FluentEmail!
FluentEmail is a .NET library designed for simple and flexible email sending. So, if you need to add a basic sending functionality to a small web application, with support for both SMTP and potential API-based providers in the future, FluentEmail will give you a straightforward approach to handle this.
Here’s how I used FluentMail for my project!
Step 1. Creating an ASP.NET Core Project
The first step in using FluentMail is creating an ASP.NET Core Web API project.
I did this with the help of the .NET CLI and the following commands:
dotnet new webapi -n FluentEmailDemo
cd FluentEmailDemo
The first command creates a new ASP.NET Core Web API project named FluentEmailDemo, and the second command navigates to the project directory.
Step 2. Installing FluentEmail NuGet packages
After creating the project, I needed to install the necessary FluentEmail packages – FluentEmail Core and the SMTP sender package.
For this, I again used the .NET CLI and a few commands:
dotnet add package FluentEmail.Core
dotnet add package FluentEmail.Smtp
dotnet add package FluentEmail.Razor
Step 3. Configuring FluentEmail
Next came the configuration of FluentEmail, which I did by adding SMTP settings to the appsettings.json file. This file stores configuration settings in a JSON format, making it easy to manage and modify things.
Here’s an example of what the configuration settings might look like:
 {
  "SmtpSettings": {
    "Host": "live.smtp.mailtrap.io",
    "Port": 587,
    "UserName": "your-username",
    "Password": "your-password",
    "FromEmail": "your-email@example.com",
    "FromName": "Your Name"
  }
}
As you can see, the configuration settings include essential SMTP details such as the host (I used the host provided by the Mailtrap SMTP Service, but you can use any host of your choice), port, username, password, and the sender’s email address and name. These details are used to authenticate and send emails through the specified SMTP server.
To use the settings, I also needed to configure FluentEmail in Program.cs like so:
using FluentEmail.Core;
using FluentEmail.Smtp;
using System.Net.Mail;
var builder = WebApplication.CreateBuilder(args);
// Load SMTP settings from configuration
var smtpSettings =
builder.Configuration.GetSection("SmtpSettings").Get<SmtpSettings>();
builder.Services.AddSwaggerGen(c =>
            {
                c.SwaggerDoc("v1", new OpenApiInfo
                {
                    Title = "Example API",
                    Version = "v1",
                    Description = "An example of an ASP.NET Core Web API",
                    Contact = new OpenApiContact
                    {
                        Name = "",
                        Email = "",
                        Url = new Uri("https://example.com/contact"),
                    },
                });


            });
if (app.Environment.IsDevelopment())
{
    app.UseSwagger();


    app.UseSwaggerUI(options =>
    {
        options.SwaggerEndpoint("/swagger/v1/swagger.json", "v1");
    });
}

builder.Services.AddFluentEmail(smtpSettings.FromEmail, smtpSettings.FromName)
.AddRazorRenderer()
.AddSmtpSender(new SmtpClient(smtpSettings.Host)
{
Port = smtpSettings.Port,
Credentials = new System.Net.NetworkCredential(smtpSettings.UserName,
smtpSettings.Password),
EnableSsl = true,
});
builder.Services.AddControllers();
var app = builder.Build();
if (app.Environment.IsDevelopment())
{
app.UseDeveloperExceptionPage();
}
app.UseHttpsRedirection();
app.UseAuthorization();
app.MapControllers();
app.Run();

public class SmtpSettings
{
public string Host { get; set; }
public int Port { get; set; }
public string UserName { get; set; }
public string Password { get; set; }
public string FromEmail { get; set; }
public string FromName { get; set; }
}
Step 4. Creating a service to send emails
Finally, before attempting to deliver an email, I created a service to handle the email sending. This service encapsulates the email-sending logic, making it reusable and easy to manage.
For the service code, I started by creating an interface:
using FluentEmail.Core;
using System.Threading.Tasks;

public interface IEmailService
{
    Task SendEmailAsync(string toEmail, string subject, string body);
}
This interface defines a method for sending emails asynchronously.
After that, I implemented the interface in a service class:
using FluentEmail.Core;


public class EmailService : IEmailService
{
    private readonly IFluentEmail _fluentEmail;

    public EmailService(IFluentEmail fluentEmail)
    {
        _fluentEmail = fluentEmail;
    }

    public async Task SendEmailAsync(string toEmail, string subject, string body)
    {
        await _fluentEmail
            .To(toEmail)
            .Subject(subject)
            .Body(body)
            .SendAsync();
    }
}

The EmailService class uses FluentEmail to send emails. It takes the recipient's email, subject, and body as parameters and sends the email asynchronously.

Once the service was complete, all I needed to do was register it in Program.cs so it could be injected and used in controllers.

Here is the line facilitating the registration:

builder.Services.AddTransient<IEmailService, EmailService>();
Step 5. Sending a plain-text email
For email-sending requests with FluentEmail, I needed a controller that uses the email service to send emails based on incoming requests.
Here’s what my controller code looked like:
using Microsoft.AspNetCore.Mvc;
using System.Threading.Tasks;

[ApiController]
[Route("[controller]")]
public class MailController : ControllerBase
{
    private readonly IEmailService _emailService;

    public MailController(IEmailService emailService)
    {
        _emailService = emailService;
    }

    [HttpPost("SendMail")]
    public async Task<IActionResult> SendMail([FromBody] EmailRequest emailRequest)
    {
        await _emailService.SendEmailAsync(emailRequest.ToEmail, emailRequest.Subject, emailRequest.Body);
        return Ok("Email sent successfully!");
    }
}

public class EmailRequest
{
    public string ToEmail { get; set; }
    public string Subject { get; set; }
    public string Body { get; set; }
}
And that’s it! With the controller set up, FluentEmail is now able to start sending emails from my project!
Send email in ASP.NET Core using SMTP
Even if you’ve done your fair share of email sending, using MailKit and FluentEmail might sound unfamiliar to you. SMTP, on the other hand, will definitely ring a bell. And in ASP.NET Core, you can use it to send all sorts of emails.
Let me show you how!
I chose the SMTP server offered by the Mailtrap Email Delivery Platform and its Email Sending tool. This SMTP server comes with high deliverability rates as well as quick and easy integration.
All you have to do to start using it within your project is create an account and verify your domain, as shown in the video below:
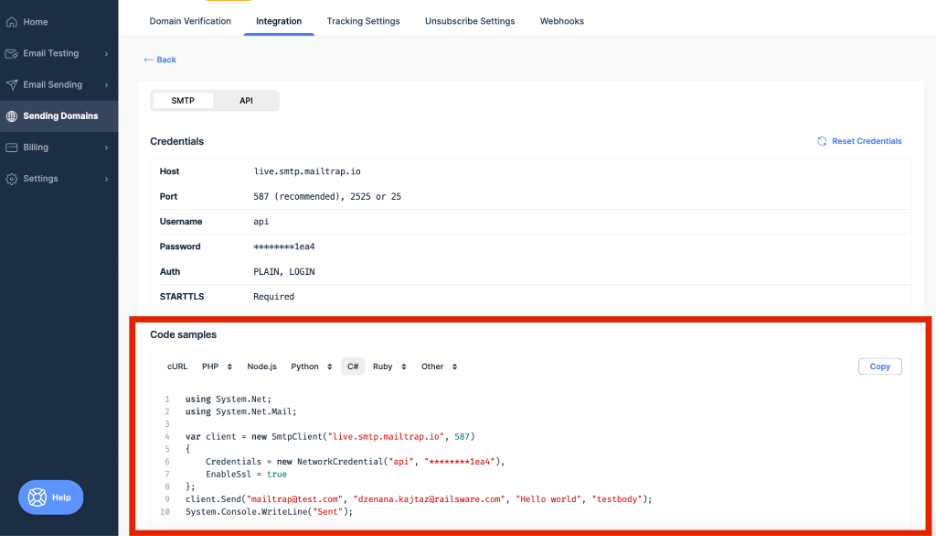
Then, proceed to copy the SMTP credentials provided by Mailtrap in the Sending Domains section under the Integration tab and save them in an easily accessible spot as you’ll need it for the email-sending script.
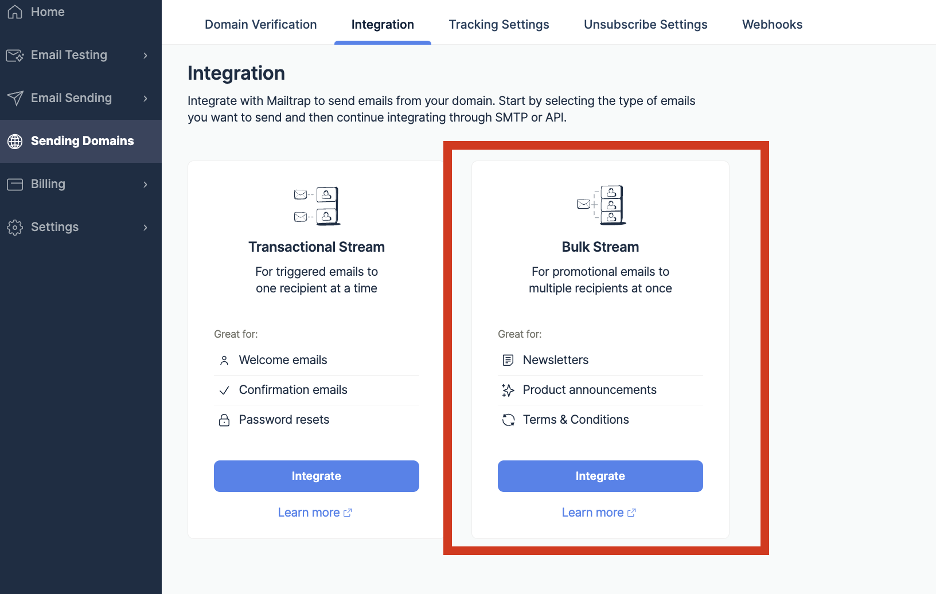
Note: Within Mailtrap, you’ll have access to two sending streams – transactional and bulk. For now, I’ll be using the Transactional Stream and will cover the Bulk Stream later in the article.

For the project, as is customary by now, I started off by creating it using the .NET CLI and the following commands:
dotnet new webapi -n SmtpEmailDemo
cd SmtpEmailDemo
With my project created, to define the necessary settings, I added the Mailtrap SMTP server configuration to the appsettings.json file:
{
  "SmtpSettings": {
    "Host": "live.smtp.mailtrap.io",
    "Port": 587,
    "UserName": "your-username",
    "Password": "your-password",
    "FromEmail": "your-email@example.com",
    "FromName": "Your Name",
    "EnableSsl": true
  }
}
This configuration includes the SMTP host server details, SMTP port, credentials, and sender information.
If your project allows, you can also add Email Sending’s SMTP server using a ready-made integration code snippet in C# available within your Mailtrap account. Using code snippets like these will save you time and effort when setting up email sending.
Note: In a lot of tutorials, you will see mentions of Gmail and its SMTP server, smtp.gmail.com. You are free to use any SMTP server of your choice and include its name and other details in appsettings.json.
Next, I defined the EmailSettings model:
Models/EmailSettings.cs:

public class EmailSettings
{
    public string Host { get; set; }
    public int Port { get; set; }
    public string UserName { get; set; }
    public string Password { get; set; }
    public string FromEmail { get; set; }
    public string FromName { get; set; }
    public bool EnableSsl { get; set; }
}
Then, I defined an email service interface:
Services/IEmailService.cs:

public interface IEmailService
{
    Task SendEmailAsync(string toEmail, string subject, string body);
}
Implemented this interface in a service class:
Services/EmailService.cs:

using System.Net;
using System.Net.Mail;
using System.Threading.Tasks;
using Microsoft.Extensions.Options;

public class EmailService : IEmailService
{
    private readonly EmailSettings _emailSettings;

    public EmailService(IOptions<EmailSettings> emailSettings)
    {
        _emailSettings = emailSettings.Value;
    }

    public async Task SendEmailAsync(string toEmail, string subject, string body)
    {
        var smtpClient = new SmtpClient(_emailSettings.Host, _emailSettings.Port)
        {
            Credentials = new NetworkCredential(_emailSettings.UserName, _emailSettings.Password),
            EnableSsl = _emailSettings.EnableSsl
        };

        var mailMessage = new MailMessage
        {
            From = new MailAddress(_emailSettings.FromEmail, _emailSettings.FromName),
            Subject = subject,
            Body = body,
            IsBodyHtml = false // Set to true if sending HTML email
        };

        mailMessage.To.Add(toEmail);

        await smtpClient.SendMailAsync(mailMessage);
    }
}
And registered the email service in Program.cs:
using Microsoft.Extensions.DependencyInjection;
using Microsoft.Extensions.Hosting;
using Microsoft.Extensions.Configuration;
using Microsoft.AspNetCore.Builder;
var builder = WebApplication.CreateBuilder(args);
// Load SMTP settings from configuration
builder.Services.Configure<EmailSettings>
(builder.Configuration.GetSection("SmtpSettings"));
builder.Services.AddTransient<IEmailService, EmailService>();
builder.Services.AddSwaggerGen(c =>
{
    c.SwaggerDoc("v1", new OpenApiInfo
    {
        Title = "Example API",
        Version = "v1",
        Description = "An example of an ASP.NET Core Web API",
        Contact = new OpenApiContact
        {
            Name = "Example Contact",
            Email = "example@example.com",
            Url = new Uri("https://example.com/contact"),
        },
    });
});

builder.Services.AddControllers();
var app = builder.Build();
if (app.Environment.IsDevelopment())
{
    app.UseSwagger();

    app.UseSwaggerUI(options =>
    {
        options.SwaggerEndpoint("/swagger/v1/swagger.json", "v1");
    });
}

app.UseHttpsRedirection();
app.UseAuthorization();
app.MapControllers();
app.Run();
By completing the steps thus far, I ensured that EmailService was available for dependency injection throughout the application.
Then, as the last step in sending via SMTP, I created a controller that uses the mentioned email service.
Within the controller, the SendMail method accepts an EmailRequest object from the request body. It then uses the IEmailService to send the email and return a success message.
Controllers/MailController.cs:

using Microsoft.AspNetCore.Mvc;
using System.Threading.Tasks;

[ApiController]
[Route("[controller]")]
public class MailController : ControllerBase
{
    private readonly IEmailService _emailService;

    public MailController(IEmailService emailService)
    {
        _emailService = emailService;
    }

    [HttpPost("SendMail")]
    public async Task<IActionResult> SendMail([FromBody] EmailRequest emailRequest)
    {
        await _emailService.SendEmailAsync(emailRequest.ToEmail, emailRequest.Subject, emailRequest.Body);
        return Ok("Email sent successfully!");
    }
}

public class EmailRequest
{
    public string ToEmail { get; set; }
    public string Subject { get; set; }
    public string Body { get; set; }
}
Send HTML email
Plain text emails are easy, but most of you will want to send HTML too. To modify my code and use it to send an HTML email instead of a plain text one, you only need to make one tweak.
In the EmailService class, set the IsBodyHtml property to true. This way, you ensure the email body is treated as HTML.
Here’s what the class should look like after making the necessary change:
Services/EmailService.cs:

using System.Net;
using System.Net.Mail;
using System.Threading.Tasks;
using Microsoft.Extensions.Options;

public class EmailService : IEmailService
{
    private readonly EmailSettings _emailSettings;

    public EmailService(IOptions<EmailSettings> emailSettings)
    {
        _emailSettings = emailSettings.Value;
    }

    public async Task SendEmailAsync(string toEmail, string subject, string body)
    {
        var smtpClient = new SmtpClient(_emailSettings.Host, _emailSettings.Port)
        {
            Credentials = new NetworkCredential(_emailSettings.UserName, _emailSettings.Password),
            EnableSsl = _emailSettings.EnableSsl
        };

        var mailMessage = new MailMessage
        {
            From = new MailAddress(_emailSettings.FromEmail, _emailSettings.FromName),
            Subject = subject,
            Body = body,
            IsBodyHtml = true // Set to true to send HTML email
        };

        mailMessage.To.Add(toEmail);

        await smtpClient.SendMailAsync(mailMessage);
    }
}
Send email with attachments
Unlike updating the code to change the email format, updating it to include an attachment requires making a number of changes.
So, first, I made changes in the IEmailService interface:
public interface IEmailService
{
    Task SendEmailAsync(string toEmail, string subject, string body, Stream attachment, string attachmentName);
}
Then, I modified the EmailService class to include a functionality for sending attachments.
Services/EmailService.cs:

using System.Net;
using System.Net.Mail;
using System.Threading.Tasks;
using Microsoft.Extensions.Options;
using System.IO;

public class EmailService : IEmailService
{
    private readonly EmailSettings _emailSettings;

    public EmailService(IOptions<EmailSettings> emailSettings)
    {
        _emailSettings = emailSettings.Value;
    }

    public async Task SendEmailAsync(string toEmail, string subject, string body, Stream attachment = null, string attachmentName = null)
    {
        var smtpClient = new SmtpClient(_emailSettings.Host, _emailSettings.Port)
        {
            Credentials = new NetworkCredential(_emailSettings.UserName, _emailSettings.Password),
            EnableSsl = _emailSettings.EnableSsl
        };

        var mailMessage = new MailMessage
        {
            From = new MailAddress(_emailSettings.FromEmail, _emailSettings.FromName),
            Subject = subject,
            Body = body,
            IsBodyHtml = false // Set to true if sending HTML email
        };

        mailMessage.To.Add(toEmail);

        if (attachment != null && attachmentName != null)
        {
            attachment.Position = 0; // Ensure the stream position is set to the beginning
            mailMessage.Attachments.Add(new Attachment(attachment, attachmentName));
        }

        await smtpClient.SendMailAsync(mailMessage);
    }
}
Next, I modified the EmailRequest model to handle attachments. By adding the IFormFile Attachment property, the model can now accept and process file attachments.
Controllers/EmailRequest.cs:

using Microsoft.AspNetCore.Http;

public class EmailRequest
{
    public string ToEmail { get; set; }
    public string Subject { get; set; }
    public string Body { get; set; }
    public IFormFile Attachment { get; set; } // Use IFormFile for file uploads in ASP.NET Core
}
Finally, I also modified MailController to handle file uploads and pass the attachment to the email service.
Controllers/MailController.cs:

using Microsoft.AspNetCore.Mvc;
using System.IO;
using System.Threading.Tasks;

[ApiController]
[Route("[controller]")]
public class MailController : ControllerBase
{
    private readonly IEmailService _emailService;

    public MailController(IEmailService emailService)
    {
        _emailService = emailService;
    }

    [HttpPost("SendMail")]
    public async Task<IActionResult> SendMail([FromForm] EmailRequest emailRequest) // Use [FromForm] to handle file uploads
    {
        Stream attachmentStream = null;
        if (emailRequest.Attachment != null)
        {
            attachmentStream = emailRequest.Attachment.OpenReadStream();
        }

        await _emailService.SendEmailAsync(emailRequest.ToEmail, emailRequest.Subject, emailRequest.Body, attachmentStream, emailRequest.Attachment?.FileName);
        return Ok("Email sent successfully!");
    }
}
Send email to multiple recipients
To send an email to multiple recipients using SMTP in ASP.NET Core, I needed to modify the code in the EmailRequest model and the controller.
So, first, I updated the EmailRequest model to handle multiple recipients. This involved changing the recipient email property to a list.
Controllers/MailController.cs:

public class EmailRequest
{
    public List<string> ToEmails { get; set; } // List of recipient emails
    public string Subject { get; set; }
    public string Body { get; set; }
}
Next, I added code to the SendEmailAsync method that iterates over the list of recipient emails and adds each one to the email message.
Services/EmailService.cs:

using System.Net;
using System.Net.Mail;
using System.Threading.Tasks;
using Microsoft.Extensions.Options;

public class EmailService : IEmailService
{
    private readonly EmailSettings _emailSettings;

    public EmailService(IOptions<EmailSettings> emailSettings)
    {
        _emailSettings = emailSettings.Value;
    }

    public async Task SendEmailAsync(List<string> toEmails, string subject, string body)
    {
        var smtpClient = new SmtpClient(_emailSettings.Host, _emailSettings.Port)
        {
            Credentials = new NetworkCredential(_emailSettings.UserName, _emailSettings.Password),
            EnableSsl = _emailSettings.EnableSsl
        };

        var mailMessage = new MailMessage
        {
            From = new MailAddress(_emailSettings.FromEmail, _emailSettings.FromName),
            Subject = subject,
            Body = body,
            IsBodyHtml = false // Set to true if sending HTML email
        };

        foreach (var toEmail in toEmails)
        {
            mailMessage.To.Add(toEmail);
        }

        await smtpClient.SendMailAsync(mailMessage);
    }
}
I then also updated the IEmailService interface to reflect the change in the method signature:
Services/IEmailService.cs:


using System.Collections.Generic;
using System.Threading.Tasks;

public interface IEmailService
{
    Task SendEmailAsync(List<string> toEmails, string subject, string body);
}
And finally, I updated the controller to use the modified email request model and service.
Controllers/MailController.cs:

using Microsoft.AspNetCore.Mvc;
using System.Threading.Tasks;

[ApiController]
[Route("[controller]")]
public class MailController : ControllerBase
{
    private readonly IEmailService _emailService;

    public MailController(IEmailService emailService)
    {
        _emailService = emailService;
    }

    [HttpPost("SendMail")]
    public async Task<IActionResult> SendMail([FromBody] EmailRequest emailRequest)
    {
        await _emailService.SendEmailAsync(emailRequest.ToEmails, emailRequest.Subject, emailRequest.Body);
        return Ok("Email sent successfully!");
    }
}

public class EmailRequest
{
    public List<string> ToEmails { get; set; } // List of recipient emails
    public string Subject { get; set; }
    public string Body { get; set; }
}
Send email with embedded image
Although I did cover attachments already and you can certainly attach an image to your email, sometimes embedding the image is what you’ll need to do instead.
To send an email with an embedded image in ASP.NET Core, I again used my old code and made some modifications.
First, I changed IEmailService code to the following:
public interface IEmailService
{
Task SendEmailAsync(string toEmail, string subject, string body, string imagePath);
}
Then, I updated the EmailService to handle embedding an image in the email.
Services/EmailService.cs:

using System.Net;
using System.Net.Mail;
using System.Threading.Tasks;
using Microsoft.Extensions.Options;

public class EmailService : IEmailService
{
    private readonly EmailSettings _emailSettings;

    public EmailService(IOptions<EmailSettings> emailSettings)
    {
        _emailSettings = emailSettings.Value;
    }

    public async Task SendEmailAsync(string toEmail, string subject, string body, string imagePath)
    {
        var smtpClient = new SmtpClient(_emailSettings.Host, _emailSettings.Port)
        {
            Credentials = new NetworkCredential(_emailSettings.UserName, _emailSettings.Password),
            EnableSsl = _emailSettings.EnableSsl
        };

        var mailMessage = new MailMessage
        {
            From = new MailAddress(_emailSettings.FromEmail, _emailSettings.FromName),
            Subject = subject,
            IsBodyHtml = true // Set to true for HTML email
        };

        mailMessage.To.Add(toEmail);

        // Create the HTML body with an embedded image
        var htmlView = AlternateView.CreateAlternateViewFromString(body + "<br><img src=cid:EmbeddedImage>", null, "text/html");
        var img = new LinkedResource(imagePath, "image/jpeg")
        {
            ContentId = "EmbeddedImage"
        };
        htmlView.LinkedResources.Add(img);

        mailMessage.AlternateViews.Add(htmlView);

        await smtpClient.SendMailAsync(mailMessage);
    }
}
Then, I simply updated the controller so it can accept the image path and pass it to the email service.
Controllers/MailController.cs:

using Microsoft.AspNetCore.Mvc;
using System.Threading.Tasks;

[ApiController]
[Route("[controller]")]
public class MailController : ControllerBase
{
    private readonly IEmailService _emailService;

    public MailController(IEmailService emailService)
    {
        _emailService = emailService;
    }

    [HttpPost("SendMail")]
    public async Task<IActionResult> SendMail([FromBody] EmailRequest emailRequest)
    {
        if (string.IsNullOrEmpty(emailRequest.ImagePath) || !System.IO.File.Exists(emailRequest.ImagePath))
        {
            return BadRequest("Invalid image path.");
        }

        await _emailService.SendEmailAsync(emailRequest.ToEmail, emailRequest.Subject, emailRequest.Body, emailRequest.ImagePath);
        return Ok("Email sent successfully!");
    }
}

public class EmailRequest
{
    public string ToEmail { get; set; }
    public string Subject { get; set; }
    public string Body { get; set; }
    public string ImagePath { get; set; } // Path to the image file to be embedded
}
Asynchronous email sending
When it comes to sending emails asynchronously via SMTP in ASP.NET Core, the convenient part is that the SmtpClient.SendMailAsync method I have used thus far is already asynchronous.
So essentially the only two changes you’d need to make to get the desired result is make sure the service and controller are properly using async/await.
To do so, change the service code to match the following:
using System.Net;
using System.Net.Mail;
using System.Threading.Tasks;
using Microsoft.Extensions.Options;

public class EmailService : IEmailService
{
 private readonly EmailSettings _emailSettings;

 public EmailService(IOptions<EmailSettings> emailSettings)
 {
 _emailSettings = emailSettings.Value;
 }

 public async Task SendEmailAsync(string toEmail, string subject, string body)
 {
 var smtpClient = new SmtpClient(_emailSettings.Host, _emailSettings.Port)
 {
 Credentials = new NetworkCredential(_emailSettings.UserName, _emailSettings.Password),
 EnableSsl = _emailSettings.EnableSsl
 };

 var mailMessage = new MailMessage
 {
 From = new MailAddress(_emailSettings.FromEmail, _emailSettings.FromName),
 Subject = subject,
 Body = body,
 IsBodyHtml = false // Set to true if sending HTML email
 };

 mailMessage.To.Add(toEmail);

 await smtpClient.SendMailAsync(mailMessage);
 }
And do the same for the MailController.
using Microsoft.AspNetCore.Mvc;
using System.Threading.Tasks;

[ApiController]
[Route("[controller]")]
public class MailController : ControllerBase
{
 private readonly IEmailService _emailService;

 public MailController(IEmailService emailService)
 {
 _emailService = emailService;
 }

 [HttpPost("SendMail")]
 public async Task<IActionResult> SendMail([FromBody] EmailRequest emailRequest)
 {
 await _emailService.SendEmailAsync(emailRequest.ToEmail, emailRequest.Subject, emailRequest.Body);
 return Ok("Email sent successfully!");
 }
}

public class EmailRequest
{
 public string ToEmail { get; set; }
 public string Subject { get; set; }
 public string Body { get; set; }
}
Send bulk email
Last but not least, for sending via SMTP, we’ll cover bulk emails.
For this, you can again use my initial code and then change its email service interface to include a method for sending bulk emails.
But before proceeding to do that, if you are using Mailtrap SMTP, go back into your account and navigate to the Sending Domains section and then the Integration tab. There, select the Bulk Stream and retrieve the provided SMTP credentials.
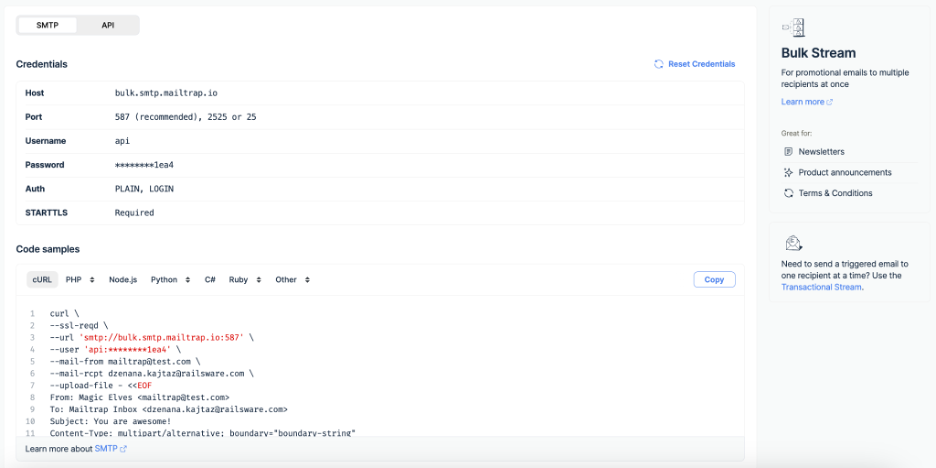
These credentials you’ll need to add to the appsettings.json file:
{
  "SmtpSettings": {
    "Host": "bulk.smtp.mailtrap.io",
    "Port": 587,
    "UserName": "your-username",
    "Password": "your-password",
    "FromEmail": "your-email@example.com",
    "FromName": "Your Name",
    "EnableSsl": true
  }
}
Once you’ve done that, you can change the mentioned interface:
public interface IEmailService
{
    Task SendEmailAsync(string toEmail, string subject, string body);
    Task SendBulkEmailAsync(List<string> toEmails, string subject, string body);
}
And implement the bulk email-sending method in the email service:
Services/EmailService.cs:

using System.Net;
using System.Net.Mail;
using System.Threading.Tasks;
using Microsoft.Extensions.Options;
using System.Collections.Generic;

public class EmailService : IEmailService
{
    private readonly EmailSettings _emailSettings;

    public EmailService(IOptions<EmailSettings> emailSettings)
    {
        _emailSettings = emailSettings.Value;
    }

    public async Task SendEmailAsync(string toEmail, string subject, string body)
    {
        await SendEmailInternalAsync(new List<string> { toEmail }, subject, body);
    }

    public async Task SendBulkEmailAsync(List<string> toEmails, string subject, string body)
    {
        await SendEmailInternalAsync(toEmails, subject, body);
    }

    private async Task SendEmailInternalAsync(List<string> toEmails, string subject, string body)
    {
        var smtpClient = new SmtpClient(_emailSettings.Host, _emailSettings.Port)
        {
            Credentials = new NetworkCredential(_emailSettings.UserName, _emailSettings.Password),
            EnableSsl = _emailSettings.EnableSsl
        };

        var mailMessage = new MailMessage
        {
            From = new MailAddress(_emailSettings.FromEmail, _emailSettings.FromName),
            Subject = subject,
            Body = body,
            IsBodyHtml = false // Set to true if sending HTML email
        };

        foreach (var toEmail in toEmails)
        {
            mailMessage.To.Add(toEmail);
        }

        await smtpClient.SendMailAsync(mailMessage);
    }
}
As you’ll also need an endpoint for sending bulk emails, finish things off by updating the MailController according to the example below:
Controllers/MailController.cs:

using Microsoft.AspNetCore.Mvc;
using System.Collections.Generic;
using System.Threading.Tasks;

[ApiController]
[Route("[controller]")]
public class MailController : ControllerBase
{
    private readonly IEmailService _emailService;

    public MailController(IEmailService emailService)
    {
        _emailService = emailService;
    }

    [HttpPost("SendMail")]
    public async Task<IActionResult> SendMail([FromBody] EmailRequest emailRequest)
    {
        await _emailService.SendEmailAsync(emailRequest.ToEmail, emailRequest.Subject, emailRequest.Body);
        return Ok("Email sent successfully!");
    }

    [HttpPost("SendBulkMail")]
    public async Task<IActionResult> SendBulkMail([FromBody] BulkEmailRequest bulkEmailRequest)
    {
        await _emailService.SendBulkEmailAsync(bulkEmailRequest.ToEmails, bulkEmailRequest.Subject, bulkEmailRequest.Body);
        return Ok("Bulk email sent successfully!");
    }
}

public class EmailRequest
{
    public string ToEmail { get; set; }
    public string Subject { get; set; }
    public string Body { get; set; }
}

public class BulkEmailRequest
{
    public List<string> ToEmails { get; set; }
    public string Subject { get; set; }
    public string Body { get; set; }
}
Send email in ASP.NET Core using using email API
Sending emails using an SMTP server is the traditional way of going about it. And don’t get me wrong. In this case, traditional doesn’t mean bad. Instead, it just means that doing most of the manual work will be your responsibility.
Those wanting to avoid this will often opt for using an email API as the right one can represent an automated, straightforward, and feature-packed solution.
When it comes to my choice of API, I stick with Mailtrap as its Email Sending tool offers both an SMTP and an email API.
This API, just like Mailtrap’s SMTP server, offers high deliverability. On top of that, it gives you greater email-sending flexibility and SDKs for smooth integration.
To start sending with the Email Sending API, create a Mailtrap account and verify your domain.
Then, under Sending Domains, navigate to the Transactional Stream -> Integration -> API and copy the configuration code in the language/framework suitable for your project.
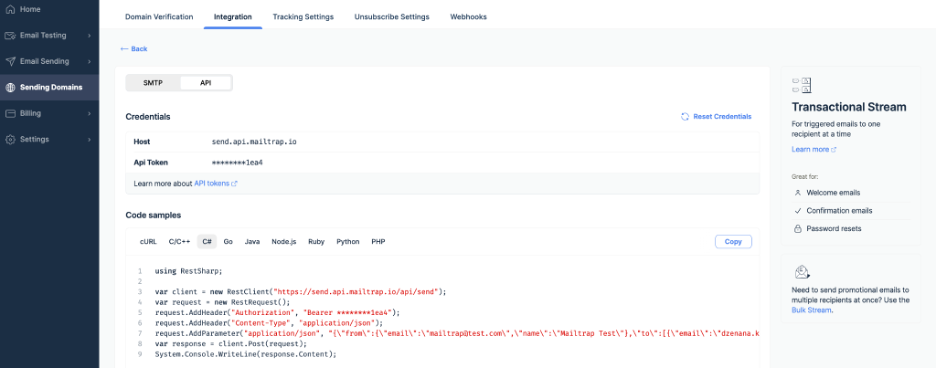
For ASP.NET Core, at the moment of writing, there isn’t an available configuration code. But no worries, as I’ll guide you through all the steps using my own example!
First, coming as no surprise, I created an ASP.NET Core Web API project using the .NET CLI.
dotnet new webapi -n EmailApiDemo
cd EmailApiDemo
Then, I added the properties ApiToken and ApiBaseUrl in the MailSettings.cs file:
public string Host { get; set; }
public int Port { get; set; }
public string UserName { get; set; }
public string Password { get; set; }
public string FromEmail { get; set; }
public string FromName { get; set; }
public bool EnableSsl { get; set; }
public string ApiToken { get; set; }
public string ApiBaseUrl { get; set;}
And in appSettings.json, I defined the values for the above properties.
"Host": "bulk.smtp.mailtrap.io",
"Port": 587,
"UserName": "--",
"Password": "--",
"FromEmail": "--",
"FromName": "Your Name",
"EnableSsl": true,
"ApiToken": "Get your api token from your MailTrap account",
"ApiBaseUrl": "https://send.api.mailtrap.io/api/"
For the structure and handling of email data, I defined three classes:
MailData Class:
public class MailData
{
     public string ToEmail { get; set; }
     public string ToName { get; set; }
     public string Subject { get; set; }
     public string Body { get; set; }
}
HTMLMailData class:
public class HTMLMailData
{
    public string ToEmail { get; set; }
    public string ToName { get; set; }
    public string Subject { get; set; }
    public string Body { get; set; }
}
MailDataWithAttachment class:
public class MailDataWithAttachment
{
    public string ToEmail { get; set; }
    public string ToName { get; set; }
    public string Subject { get; set; }
    public string Body { get; set; }
    public IFormFile[] Attachment { get; set; }
}
Once that was done, I added HttpClient to the application’s service container by including this code in the Services configuration section of the Program.cs file:
builder.Services.AddHttpClient("MailTrapApiClient", (services, client) =>
{
    var mailSettings = services.GetRequiredService<IOptions<MailSettings>>().Value;
    client.BaseAddress = new Uri(mailSettings.ApiBaseUrl);
    client.DefaultRequestHeaders.Add("Api-Token", mailSettings.ApiToken);
});
Next, I created a new service for sending emails using the Mailtrap Email Sending API by adding an interface called IAPIMailService in the Services folder.
public interface IAPIMailService
    {
        Task<bool> SendMailAsync(MailData mailData);
        Task<bool> SendHTMLMailAsync(HTMLMailData htmlMailData);
        Task<bool> SendMailWithAttachmentsAsync(MailDataWithAttachment mailDataWithAttachment);
    }
In the same folder, I created a class called APIMailService which implements the IAPIMailService interface. And in the constructor of the class, I injected the MailSettings class and the IHttpClientFactory interface.
Note: Installing the following package is required for the code below to work:
- dotnet add package NewtonSoft.Json
using Newtonsoft.Json;

public class APIMailService : IAPIMailService
    {
        private readonly MailSettings _mailSettings;
        private readonly HttpClient _httpClient;

        public APIMailService(IOptions<MailSettings> mailSettingsOptions, IHttpClientFactory httpClientFactory)
        {
            _mailSettings = mailSettingsOptions.Value;
            _httpClient = httpClientFactory.CreateClient("MailTrapApiClient");
        }

        public async Task<bool> SendHTMLMailAsync(HTMLMailData htmlMailData)
        {
            string filePath = Directory.GetCurrentDirectory() + "\\Templates\\Hello.html";
            string emailTemplateText = File.ReadAllText(filePath);

            var htmlBody = string.Format(emailTemplateText, htmlMailData.EmailToName, DateTime.Today.Date.ToShortDateString());

            var apiEmail = new
            {
                From = new { Email = _mailSettings.SenderEmail, Name = _mailSettings.SenderEmail },
                To = new[] { new { Email = htmlMailData.EmailToId, Name = htmlMailData.EmailToName } },
                Subject = "Hello",
                Html = htmlBody
            };

            var httpResponse = await _httpClient.PostAsJsonAsync("send", apiEmail);

            var responseJson = await httpResponse.Content.ReadAsStringAsync();
            var response = JsonConvert.DeserializeObject<Dictionary<string, object>>(responseJson);

            if (response != null && response.TryGetValue("success", out object? success) && success is bool boolSuccess && boolSuccess)
            {
                return true;
            }

            return false;
        }

        public async Task<bool> SendMailAsync(MailData mailData)
        {
            var apiEmail = new
            {
                From = new { Email = _mailSettings.SenderEmail, Name = _mailSettings.SenderEmail },
                To = new[] { new { Email = mailData.EmailToId, Name = mailData.EmailToName } },
                Subject = mailData.EmailSubject,
                Text = mailData.EmailBody
            };

            var httpResponse = await _httpClient.PostAsJsonAsync("send", apiEmail);

            var responseJson = await httpResponse.Content.ReadAsStringAsync();
            var response = JsonConvert.DeserializeObject<Dictionary<string, object>>(responseJson);

            if (response != null && response.TryGetValue("success", out object? success) && success is bool boolSuccess && boolSuccess)
            {
                return true;
            }

            return false;
        }

        public async Task<bool> SendMailWithAttachmentsAsync(MailDataWithAttachment mailDataWithAttachment)
        {
            var attachments = new List<object>();
            if (mailDataWithAttachment.EmailAttachments != null)
            {
                foreach (var attachmentFile in mailDataWithAttachment.EmailAttachments)
                {
                    if (attachmentFile.Length == 0)
                    {
                        continue;
                    }

                    using (MemoryStream memoryStream = new MemoryStream())
                    {
                        await attachmentFile.CopyToAsync(memoryStream);
                        attachments.Add(new
                        {
                            FileName = attachmentFile.FileName,
                            Content = Convert.ToBase64String(memoryStream.ToArray()),
                            Type = attachmentFile.ContentType,
                            Disposition = "attachment" // or inline
                        });
                    }
                }
            }

            var apiEmail = new
            {
                From = new { Email = _mailSettings.SenderEmail, Name = _mailSettings.SenderEmail },
                To = new[] { new { Email = mailDataWithAttachment.EmailToId, Name = mailDataWithAttachment.EmailToName } },
                Subject = mailDataWithAttachment.EmailSubject,
                Text = mailDataWithAttachment.EmailBody,
                Attachments = attachments.ToArray()
            };

            var httpResponse = await _httpClient.PostAsJsonAsync("send", apiEmail);

            var responseJson = await httpResponse.Content.ReadAsStringAsync();
            var response = JsonConvert.DeserializeObject<Dictionary<string, object>>(responseJson);

            if (response != null && response.TryGetValue("success", out object? success) && success is bool boolSuccess && boolSuccess)
            {
                return true;
            }

            return false;
        }
    }
A controller was also needed, so I created one in the Controllers folder using the code below:
 [Route("[controller]")]
    [ApiController]
    public class MailAPIController : ControllerBase
    {
        private readonly IAPIMailService _apiMailService;

        //injecting the IMailService into the constructor
        public MailAPIController(IAPIMailService apiMailService)
        {
            _apiMailService = apiMailService;
        }

        [HttpPost]
        [Route("SendMailAsync")]
        public async Task<bool> SendMailAsync(MailData mailData)
        {
            return await _apiMailService.SendMailAsync(mailData);
        }

        [HttpPost]
        [Route("SendHTMLMailAsync")]
        public async Task<bool> SendHTMLMailAsync(HTMLMailData htmlMailData)
        {
            return await _apiMailService.SendHTMLMailAsync(htmlMailData);
        }

        [HttpPost]
        [Route("SendMailWithAttachmentAsync")]
        public async Task<bool> SendMailWithAttachmentAsync([FromForm] MailDataWithAttachment mailDataWithAttachment)
        {
            return await _apiMailService.SendMailWithAttachmentsAsync(mailDataWithAttachment);
        }

    }
Send HTML email
Just like when using SMTP, emails sent through an API in ASP.NET Core can be in HTML format, not just plain text.
To send an HTML email, I had to make a few changes to the SendMailAsync method in the APIMailService class.
I’ll, of course, show you how I did this, but before I proceed, in case your MailData class doesn’t have a property for the HTML body, make sure you add one as follows:
public class MailData
{
    public string EmailToId { get; set; }
    public string EmailToName { get; set; }
    public string EmailSubject { get; set; }
    public string EmailBody { get; set; } // This will be used for the HTML content
}
Now, back to the SendMailAsync method!
To make sure my code can send an HTML email, I changed the property in the method used to set the email body. So, instead of setting the Text property with, you guessed it, plain text, the method sets the Html property with the HTML content of the email.
public class APIMailService : IAPIMailService
{
    private readonly MailSettings _mailSettings;
    private readonly HttpClient _httpClient;

    public APIMailService(IOptions<MailSettings> mailSettingsOptions, IHttpClientFactory httpClientFactory)
    {
        _mailSettings = mailSettingsOptions.Value;
        _httpClient = httpClientFactory.CreateClient("MailTrapApiClient");
    }

    public async Task<bool> SendHTMLMailAsync(HTMLMailData htmlMailData)
    {
        string filePath = Path.Combine(Directory.GetCurrentDirectory(), "Templates", "Hello.html");
        string emailTemplateText = await File.ReadAllTextAsync(filePath);

        var htmlBody = string.Format(emailTemplateText, htmlMailData.EmailToName, DateTime.Today.Date.ToShortDateString());

        var apiEmail = new
        {
            From = new { Email = _mailSettings.SenderEmail, Name = _mailSettings.SenderEmail },
            To = new[] { new { Email = htmlMailData.EmailToId, Name = htmlMailData.EmailToName } },
            Subject = "Hello",
            Html = htmlBody
        };

        var httpResponse = await _httpClient.PostAsJsonAsync("send", apiEmail);

        var responseJson = await httpResponse.Content.ReadAsStringAsync();
        var response = JsonConvert.DeserializeObject<Dictionary<string, object>>(responseJson);

        return response != null && response.TryGetValue("success", out object success) && success is bool boolSuccess && boolSuccess;
    }

    public async Task<bool> SendMailAsync(MailData mailData)
    {
        var apiEmail = new
        {
            From = new { Email = _mailSettings.SenderEmail, Name = _mailSettings.SenderEmail },
            To = new[] { new { Email = mailData.EmailToId, Name = mailData.EmailToName } },
            Subject = mailData.EmailSubject,
            Html = mailData.EmailBody // Changed from Text to Html
        };

        var httpResponse = await _httpClient.PostAsJsonAsync("send", apiEmail);

        var responseJson = await httpResponse.Content.ReadAsStringAsync();
        var response = JsonConvert.DeserializeObject<Dictionary<string, object>>(responseJson);

        return response != null && response.TryGetValue("success", out object success) && success is bool boolSuccess && boolSuccess;
    }

    public async Task<bool> SendMailWithAttachmentsAsync(MailDataWithAttachment mailDataWithAttachment)
    {
        var attachments = new List<object>();
        if (mailDataWithAttachment.EmailAttachments != null)
        {
            foreach (var attachmentFile in mailDataWithAttachment.EmailAttachments)
            {
                if (attachmentFile.Length == 0)
                {
                    continue;
                }

                using (var memoryStream = new MemoryStream())
                {
                    await attachmentFile.CopyToAsync(memoryStream);
                    attachments.Add(new
                    {
                        FileName = attachmentFile.FileName,
                        Content = Convert.ToBase64String(memoryStream.ToArray()),
                        Type = attachmentFile.ContentType,
                        Disposition = "attachment" // or inline
                    });
                }
            }
        }

        var apiEmail = new
        {
            From = new { Email = _mailSettings.SenderEmail, Name = _mailSettings.SenderEmail },
            To = new[] { new { Email = mailDataWithAttachment.EmailToId, Name = mailDataWithAttachment.EmailToName } },
            Subject = mailDataWithAttachment.EmailSubject,
            Html = mailDataWithAttachment.EmailBody, // Changed from Text to Html
            Attachments = attachments.ToArray()
        };

        var httpResponse = await _httpClient.PostAsJsonAsync("send", apiEmail);

        var responseJson = await httpResponse.Content.ReadAsStringAsync();
        var response = JsonConvert.DeserializeObject<Dictionary<string, object>>(responseJson);

        return response != null && response.TryGetValue("success", out object success) && success is bool boolSuccess && boolSuccess;
    }
}
Then, to support the changes made to the method, I also updated the controller. The controller’s endpoint remains the same, but it now correctly sends HTML emails.
[Route("[controller]")]
[ApiController]
public class MailAPIController : ControllerBase
{
    private readonly IAPIMailService _apiMailService;

    // Injecting the IMailService into the constructor
    public MailAPIController(IAPIMailService apiMailService)
    {
        _apiMailService = apiMailService;
    }

    [HttpPost]
    [Route("SendMailAsync")]
    public async Task<bool> SendMailAsync(MailData mailData)
    {
        return await _apiMailService.SendMailAsync(mailData);
    }

    [HttpPost]
    [Route("SendHTMLMailAsync")]
    public async Task<bool> SendHTMLMailAsync(HTMLMailData htmlMailData)
    {
        return await _apiMailService.SendHTMLMailAsync(htmlMailData);
    }

    [HttpPost]
    [Route("SendMailWithAttachmentAsync")]
    public async Task<bool> SendMailWithAttachmentAsync([FromForm] MailDataWithAttachment mailDataWithAttachment)
    {
        return await _apiMailService.SendMailWithAttachmentsAsync(mailDataWithAttachment);
    }
}
Send email with attachments
To add attachments to my emails sent through ASP.NET Core via an API, I again changed the SendMailAsync method, the MailAPIController controller, and the MailData class.
For the MailData class, I added a property to hold the attachments.
public class MailData
{
    public string EmailToId { get; set; }
    public string EmailToName { get; set; }
    public string EmailSubject { get; set; }
    public string EmailBody { get; set; }
    public List<IFormFile> EmailAttachments { get; set; } // Add this line
}
For the SendMailAsync method, I added code that:
- Creates a list to hold the attachments
- Iterates through each attachment in the mailData.EmailAttachments property
- Reads the contents of each attachment and converts them to a base64 string
- Adds the processed attachments to the list in the required format
- Includes this list in the apiEmail object under the Attachments property
- Sends the apiEmail object using the HttpClient to the Mailtrap API
public async Task<bool> SendMailAsync(MailData mailData)
{
    var attachments = new List<object>();
    if (mailData.EmailAttachments != null)
    {
        foreach (var attachmentFile in mailData.EmailAttachments)
        {
            if (attachmentFile.Length == 0)
            {
                continue;
            }

            using (var memoryStream = new MemoryStream())
            {
                await attachmentFile.CopyToAsync(memoryStream);
                attachments.Add(new
                {
                    FileName = attachmentFile.FileName,
                    Content = Convert.ToBase64String(memoryStream.ToArray()),
                    Type = attachmentFile.ContentType,
                    Disposition = "attachment" // or inline
                });
            }
        }
    }

    var apiEmail = new
    {
        From = new { Email = _mailSettings.SenderEmail, Name = _mailSettings.SenderEmail },
        To = new[] { new { Email = mailData.EmailToId, Name = mailData.EmailToName } },
        Subject = mailData.EmailSubject,
        Text = mailData.EmailBody,
        Attachments = attachments.ToArray()
    };

    var httpResponse = await _httpClient.PostAsJsonAsync("send", apiEmail);

    var responseJson = await httpResponse.Content.ReadAsStringAsync();
    var response = JsonConvert.DeserializeObject<Dictionary<string, object>>(responseJson);

    return response != null && response.TryGetValue("success", out object success) && success is bool boolSuccess && boolSuccess;
}
Lastly, for the controller, I used the the [FromForm] attribute on the mailData parameter, so that the controller can correctly process form data, including file uploads.
[HttpPost]
[Route("SendMailAsync")]
public async Task<bool> SendMailAsync([FromForm] MailData mailData)
{
    return await _apiMailService.SendMailAsync(mailData);
}
Send email to multiple recipients
Two, three, four, or more recipients aren’t in any way an issue when sending via an API. But to facilitate it, I needed to change the EmailToId and EmailToName properties from strings to lists like so:
public class MailData
{
    public List<string> EmailToIds { get; set; } = new List<string>();
    public List<string> EmailToNames { get; set; } = new List<string>();
    public string EmailSubject { get; set; }
    public string EmailBody { get; set; }
}
Then, I needed a recipient array so it could be included in the email data sent to the API.
I also included a validation check to ensure the number of email addresses matches the number of names, but this isn’t mandatory.
public async Task<bool> SendMailAsync(MailData mailData)
{
    if (mailData.EmailToIds.Count != mailData.EmailToNames.Count)
    {
        throw new ArgumentException("The number of email addresses must match the number of names.");
    }

    var recipients = mailData.EmailToIds
        .Select((email, index) => new { Email = email, Name = mailData.EmailToNames[index] })
        .ToArray();

    var apiEmail = new
    {
        From = new { Email = _mailSettings.SenderEmail, Name = _mailSettings.SenderEmail },
        To = recipients,
        Subject = mailData.EmailSubject,
        Text = mailData.EmailBody
    };

    var httpResponse = await _httpClient.PostAsJsonAsync("send", apiEmail);

    var responseJson = await httpResponse.Content.ReadAsStringAsync();
    var response = JsonConvert.DeserializeObject<Dictionary<string, object>>(responseJson);

    return response != null && response.TryGetValue("success", out object success) && success is bool boolSuccess && boolSuccess;
}
Finally, as you saw me do for the last three types of emails, I ensured the controller’s SendMailAsync method could process the updated MailData object.
[HttpPost]
[Route("SendMailAsync")]
public async Task<bool> SendMailAsync(MailData mailData)
{
    return await _apiMailService.SendMailAsync(mailData);
}
Send email with embedded image
When it comes to embedding images to emails sent via an API in ASP.NET Core, a MIME structure is necessary. What this means is that I had to expand my email-sending code so it could create a multipart message that contains both the HTML body and the embedded image.
To do so, I first included properties for the image path or base64 encoded image in the MailData class.
public class MailData
{
    public string EmailToId { get; set; }
    public string EmailToName { get; set; }
    public string EmailSubject { get; set; }
    public string EmailBody { get; set; }
    public string ImagePath { get; set; } // Path to the image file
}
Then, I added code to the SendMailAsync method for converting the image to a base64 string and embedding it within the HTML content of the email.
public async Task<bool> SendMailAsync(MailData mailData)
{
    string imageBase64;
    string imageCid = "embeddedImage";

    // Read the image file and convert it to base64 string
    using (var image = new FileStream(mailData.ImagePath, FileMode.Open))
    {
        using (var memoryStream = new MemoryStream())
        {
            await image.CopyToAsync(memoryStream);
            imageBase64 = Convert.ToBase64String(memoryStream.ToArray());
        }
    }

    // HTML body with embedded image
    var htmlBody = $@"
    <html>
        <body>
            <p>{mailData.EmailBody}</p>
            <img src='cid:{imageCid}' />
        </body>
    </html>";

    // Create the email with embedded image
    var apiEmail = new
    {
        From = new { Email = _mailSettings.SenderEmail, Name = _mailSettings.SenderEmail },
        To = new[] { new { Email = mailData.EmailToId, Name = mailData.EmailToName } },
        Subject = mailData.EmailSubject,
        Html = htmlBody,
        Attachments = new[]
        {
            new
            {
                Content = imageBase64,
                Type = "image/jpeg", // Change this if the image type is different
                Filename = "embeddedImage.jpg",
                Disposition = "inline",
                ContentId = imageCid
            }
        }
    };

    var httpResponse = await _httpClient.PostAsJsonAsync("send", apiEmail);

    var responseJson = await httpResponse.Content.ReadAsStringAsync();
    var response = JsonConvert.DeserializeObject<Dictionary<string, object>>(responseJson);

    return response != null && response.TryGetValue("success", out object success) && success is bool boolSuccess && boolSuccess;
}
Asynchronous email sending
The initial code implementation used in the send via an API part of this article already uses async and await keywords, which are suitable for asynchronous programming in C#.
However, if you want to have optimal usage of asynchronous patterns, some changes to the entire flow will need to be made.
When making the changes, I started with the IAPIMailService. There, I made sure all the methods were marked as async.
public interface IAPIMailService
{
    Task<bool> SendMailAsync(MailData mailData);
    Task<bool> SendHTMLMailAsync(HTMLMailData htmlMailData);
    Task<bool> SendMailWithAttachmentsAsync(MailDataWithAttachment mailDataWithAttachment);
}
Then, I also made sure that the methods in APIMailService are asynchronous and utilize await for all I/O-bound operations.
public class APIMailService : IAPIMailService
{
    private readonly MailSettings _mailSettings;
    private readonly HttpClient _httpClient;

    public APIMailService(IOptions<MailSettings> mailSettingsOptions, IHttpClientFactory httpClientFactory)
    {
        _mailSettings = mailSettingsOptions.Value;
        _httpClient = httpClientFactory.CreateClient("MailTrapApiClient");
    }

    public async Task<bool> SendHTMLMailAsync(HTMLMailData htmlMailData)
    {
        string filePath = Path.Combine(Directory.GetCurrentDirectory(), "Templates", "Hello.html");
        string emailTemplateText = await File.ReadAllTextAsync(filePath);

        var htmlBody = string.Format(emailTemplateText, htmlMailData.EmailToName, DateTime.Today.Date.ToShortDateString());

        var apiEmail = new
        {
            From = new { Email = _mailSettings.SenderEmail, Name = _mailSettings.SenderEmail },
            To = new[] { new { Email = htmlMailData.EmailToId, Name = htmlMailData.EmailToName } },
            Subject = "Hello",
            Html = htmlBody
        };

        var httpResponse = await _httpClient.PostAsJsonAsync("send", apiEmail);

        var responseJson = await httpResponse.Content.ReadAsStringAsync();
        var response = JsonConvert.DeserializeObject<Dictionary<string, object>>(responseJson);

        return response != null && response.TryGetValue("success", out object success) && success is bool boolSuccess && boolSuccess;
    }

    public async Task<bool> SendMailAsync(MailData mailData)
    {
        var apiEmail = new
        {
            From = new { Email = _mailSettings.SenderEmail, Name = _mailSettings.SenderEmail },
            To = new[] { new { Email = mailData.EmailToId, Name = mailData.EmailToName } },
            Subject = mailData.EmailSubject,
            Text = mailData.EmailBody
        };

        var httpResponse = await _httpClient.PostAsJsonAsync("send", apiEmail);

        var responseJson = await httpResponse.Content.ReadAsStringAsync();
        var response = JsonConvert.DeserializeObject<Dictionary<string, object>>(responseJson);

        return response != null && response.TryGetValue("success", out object success) && success is bool boolSuccess && boolSuccess;
    }

    public async Task<bool> SendMailWithAttachmentsAsync(MailDataWithAttachment mailDataWithAttachment)
    {
        var attachments = new List<object>();
        if (mailDataWithAttachment.EmailAttachments != null)
        {
            foreach (var attachmentFile in mailDataWithAttachment.EmailAttachments)
            {
                if (attachmentFile.Length == 0)
                {
                    continue;
                }

                using (var memoryStream = new MemoryStream())
                {
                    await attachmentFile.CopyToAsync(memoryStream);
                    attachments.Add(new
                    {
                        FileName = attachmentFile.FileName,
                        Content = Convert.ToBase64String(memoryStream.ToArray()),
                        Type = attachmentFile.ContentType,
                        Disposition = "attachment" // or inline
                    });
                }
            }
        }

        var apiEmail = new
        {
            From = new { Email = _mailSettings.SenderEmail, Name = _mailSettings.SenderEmail },
            To = new[] { new { Email = mailDataWithAttachment.EmailToId, Name = mailDataWithAttachment.EmailToName } },
            Subject = mailDataWithAttachment.EmailSubject,
            Text = mailDataWithAttachment.EmailBody,
            Attachments = attachments.ToArray()
        };

        var httpResponse = await _httpClient.PostAsJsonAsync("send", apiEmail);

        var responseJson = await httpResponse.Content.ReadAsStringAsync();
        var response = JsonConvert.DeserializeObject<Dictionary<string, object>>(responseJson);

        return response != null && response.TryGetValue("success", out object success) && success is bool boolSuccess && boolSuccess;
    }
}
For the controller, I changed all the methods to be asynchronous and made them use await for calling the service methods.
[Route("[controller]")]
[ApiController]
public class MailAPIController : ControllerBase
{
    private readonly IAPIMailService _apiMailService;

    // Injecting the IAPIMailService into the constructor
    public MailAPIController(IAPIMailService apiMailService)
    {
        _apiMailService = apiMailService;
    }

    [HttpPost]
    [Route("SendMailAsync")]
    public async Task<IActionResult> SendMailAsync(MailData mailData)
    {
        bool result = await _apiMailService.SendMailAsync(mailData);
        return Ok(result);
    }

    [HttpPost]
    [Route("SendHTMLMailAsync")]
    public async Task<IActionResult> SendHTMLMailAsync(HTMLMailData htmlMailData)
    {
        bool result = await _apiMailService.SendHTMLMailAsync(htmlMailData);
        return Ok(result);
    }

    [HttpPost]
    [Route("SendMailWithAttachmentAsync")]
    public async Task<IActionResult> SendMailWithAttachmentAsync([FromForm] MailDataWithAttachment mailDataWithAttachment)
    {
        bool result = await _apiMailService.SendMailWithAttachmentsAsync(mailDataWithAttachment);
        return Ok(result);
    }
}
Send bulk email
To finish off the sending part of this article, what’s left to cover is bulk email sending via an API.
To enable this, I updated the MailData class to include a list of recipient emails and names.
public class MailData
{
    public List<string> EmailToIds { get; set; }
    public List<string> EmailToNames { get; set; }
    public string EmailSubject { get; set; }
    public string EmailBody { get; set; }
}
Then, I modified the SendMailAsync method, so it takes a list of recipient emails and names and constructs the email payload accordingly.
public class APIMailService : IAPIMailService
{
    private readonly MailSettings _mailSettings;
    private readonly HttpClient _httpClient;

    public APIMailService(IOptions<MailSettings> mailSettingsOptions, IHttpClientFactory httpClientFactory)
    {
        _mailSettings = mailSettingsOptions.Value;
        _httpClient = httpClientFactory.CreateClient("MailTrapApiClient");
    }

    public async Task<bool> SendMailAsync(MailData mailData)
    {
        var recipients = new List<object>();
        for (int i = 0; i < mailData.EmailToIds.Count; i++)
        {
            recipients.Add(new { Email = mailData.EmailToIds[i], Name = mailData.EmailToNames[i] });
        }

        var apiEmail = new
        {
            From = new { Email = _mailSettings.SenderEmail, Name = _mailSettings.SenderEmail },
            To = recipients,
            Subject = mailData.EmailSubject,
            Text = mailData.EmailBody
        };

        var httpResponse = await _httpClient.PostAsJsonAsync("send", apiEmail);

        var responseJson = await httpResponse.Content.ReadAsStringAsync();
        var response = JsonConvert.DeserializeObject<Dictionary<string, object>>(responseJson);

        return response != null && response.TryGetValue("success", out object success) && success is bool boolSuccess && boolSuccess;
    }

    // Other methods remain the same
}
As the MailData class now included multiple recipients, I also updated the MailAPIController to accept a list of recipients and use it to send bulk emails.
[Route("[controller]")]
[ApiController]
public class MailAPIController : ControllerBase
{
    private readonly IAPIMailService _apiMailService;

    public MailAPIController(IAPIMailService apiMailService)
    {
        _apiMailService = apiMailService;
    }

    [HttpPost]
    [Route("SendMailAsync")]
    public async Task<bool> SendMailAsync(MailData mailData)
    {
        return await _apiMailService.SendMailAsync(mailData);
    }

    [HttpPost]
    [Route("SendHTMLMailAsync")]
    public async Task<bool> SendHTMLMailAsync(HTMLMailData htmlMailData)
    {
        return await _apiMailService.SendHTMLMailAsync(htmlMailData);
    }

    [HttpPost]
    [Route("SendMailWithAttachmentAsync")]
    public async Task<bool> SendMailWithAttachmentAsync([FromForm] MailDataWithAttachment mailDataWithAttachment)
    {
        return await _apiMailService.SendMailWithAttachmentsAsync(mailDataWithAttachment);
    }
}
Of course, as for bulk emails I need a different sending stream, for the last step, I retrieved the Mailtrap Bulk Stream API credentials and added them in appSettings.json.
"ApiToken": "Get your api token from your MailTrap account",
"ApiBaseUrl": "https://bulk.api.mailtrap.io/api/send"
Wrapping up
Choosing ASP.NET Core for your web development project might be a personal choice or a task requirement, but it will, without a doubt, help build blazing-fast web apps.
I hope that my instructions will come in handy when you’re implementing one of the crucial features of those apps – using ASP.NET Core to send emails!
If you want to read more content on sending emails with .NET, make sure to check out the ASP.NET send email and C# send email articles. For other technologies, have a look at the Mailtrap blog, where you’ll find other tutorials that you may find helpful.
Enjoyed this article on how to send email using ASP.NET Core? Then make sure to share it with your fellow devs!