
Since the server-side web application framework, Ruby on Rails, was written back in 2004, it has gained popularity as one of the most cost and time-effective solutions to build Ruby applications. If you’re developing such an app and want to understand how to send emails with Rails, this tutorial is for you.
What options do you have to send emails using Ruby on Rails?
Many developers from the best Ruby on Rails development companies look at email strategies early in the project lifecycle. The best part about Rails is that it’s a highly intuitive framework with many built-in Ruby gems (libraries), one of which is ActionMailer. Using mailer classes and views the gem helps add email-sending functionality to your Rails app.
This is an example of what a simple email using ActionMailer looks like:
class TestMailer < ActionMailer::Base
  default from: 'info@yourrubyapp.com'
  def simple_message(recipient)
    mail(
      to: recipient,
      subject: 'Any subject you want',
      body: 'Lorem Ipsum notifications'
    )
  end
end
Additionally, check out our how to send emails with Ruby tutorial that covers all of the other options available for Ruby apps specifically and not just those built with Rails.
How to send emails using ActionMailer?
Below we’ll go over all the steps you need to take to start sending with ActionMailer. In our example, we’ll include an attachment and HTML content.
The first step is to create a mailer model and views that your app will use.
$ Rails generate mailer NotifierAfter this, define built-in helper methods in the mailer model to generate an email message. In the mailer views, variables such as recipient address, attachments, and more can be set up.
Here’s what a script with different helpers set in it would look like:
class UserMailer< ApplicationMailer
  def simple_message(recipient)
    attachments["attachment.pdf"] = File.read("path/to/file.pdf")
    mail(
      to: “your@bestuserever.com”,
      subject: "New account information",
      content_type: "text/html",
      body: "<html><strong>Hello there</strong></html>"
    )
  end
How to send HTML emails?
The above mailer class example includes HTML content, so the next step that needs to be done is creating a corresponding view. This means that a template is used along with a mailer, so create a .erb file and give it the same name as the method in the mailer class.
Continuing with our above example, this would be new-account.html.erb and locate it in app/views/notifier_mailer/ .
Now any HTML-formatted email can use this HTML template. You can also create a text part for this email with a new-account.txt.erb file. Just remember to fill out the email templates with actual content before sending them.
How to send emails with attachments?
As shown in our example, if you want to send an email message with attachments, all that needs to be done is to define relevant helpers in the code. These can be either regular attachments or attachments.inline helper. After that, specify the file name and its path:
- add attachments:
attachments['filename.png'] = File.read('path/to/attachment.pdf') - add an inline attachment:
attachments.inline['filename.png'] = File.read('path/to/attachment.pdf')
At this stage, you’ll need to define a delivery method and do ActionMailer configuration. By default, SMTP is already set in ActionMailer and is configured with Port 25. The authentication option can be selected as one of these plain, login or cram_md5.
Here is an example of one possible configuration:
config.action_mailer.delivery_method = :smtp
config.action_mailer.smtp_settings = {
  address:              'smtp.yourserver.com',
  port:                 25,
  domain:               'yourrubyapp.com',
  user_name:            '<your username>',
  password:             '<your password>',
  authentication:       'plain',
  enable_starttls_auto: true
}
Using config.action_mailer.smtp_settings, the default SMTP server can be adjusted if needed. Additionally, other delivery methods such as sendmail, file (save emails to files), and test (save emails to ActionMailer::Base.deliveries array) can be selected.
Next is the actual sending stage. Since we already defined the delivery method, did the SMTP configuration, prepared a template, and attached the file, all that needs to be done is to call deliver_now. To learn how to apply more ActionMailer delivery methods, such as deliver_now!, deliver_later, check this documentation out.
How to send bulk emails?
If you want to send emails to multiple recipients with ActionMailer, set a list of email addresses to the :to key or :cc, and :bcc headers if needed. This can be done as a single string of email addresses separated by a comma or an array list of recipients. Here is an example:
class AdminMailer < ApplicationMailer
  default to: -> { Admin.pluck(:email) },
  from: 'info@yourrubyapp.com'
  def new_registration(user)
    @user = user
    mail(subject: "New User Signup: #{@user.email}")
  end
end
How to send email using Email API?
An alternative way of having to send functionality in your Rails application is using an API offered by email service providers. This is one of the most reliable ways to set up an automated email-sending function in your app quickly and not worry about constant deliverability issues popping up.
With a service such as Mailtrap Email Sending, you can also get additional control over your email deliverability. The dashboards with valuable insights and up to 60 days of email logs give an accurate understanding of where your email infrastructure stands.
After a quick setup of the Email AP/SMTP Relay, your app can start sending emails hassle-free. If any issues arise, the email deliverability alerts feature will always let you know. Email API’s system automatically checks your metrics every three hours, and in case of a critical drop in a predetermined threshold, the alert is sent on an hourly basis, thus giving you even more control over email deliverability. On top of that, there are weekly reports that help understand your performance.
If you use ActionMailer in your Rails app for email-sending functionality, thanks to a custom Mailtrap delivery method, the API can also be integrated with it.
Firstly add this line to your app’s Gemfile:
$ gem install mailtrapThen execute:
$ bundle installAlternatively, install it yourself:
$ gem install mailtrapNow set the API key and configure the delivery method in your ActionMailer configuration in Rails projects located in config/$ENVIRONMENT.rb :
config.action_mailer.delivery_method = :mailtrap
config.action_mailer.mailtrap_settings = {
  api_key: ENV.fetch('MAILTRAP_API_KEY')
}
Now ActionMailer can be used as usual with Mailtrp API as its delivery method, and you can add category and custom_variables to the mail generation if needed:
mail(
  to: 'your@email.com',
  subject: 'You are awesome!',
  category: 'Test category',
  custom_variables: { test_variable: 'abc' }
)
For more detailed instructions and source code, check out our GitHub page.
If you choose to use the SMTP Relay instead of Email API, in your Mailtrap account, select the verified sending domain and find your SMTP server credentials in the “SMTP/API Settings” tab.
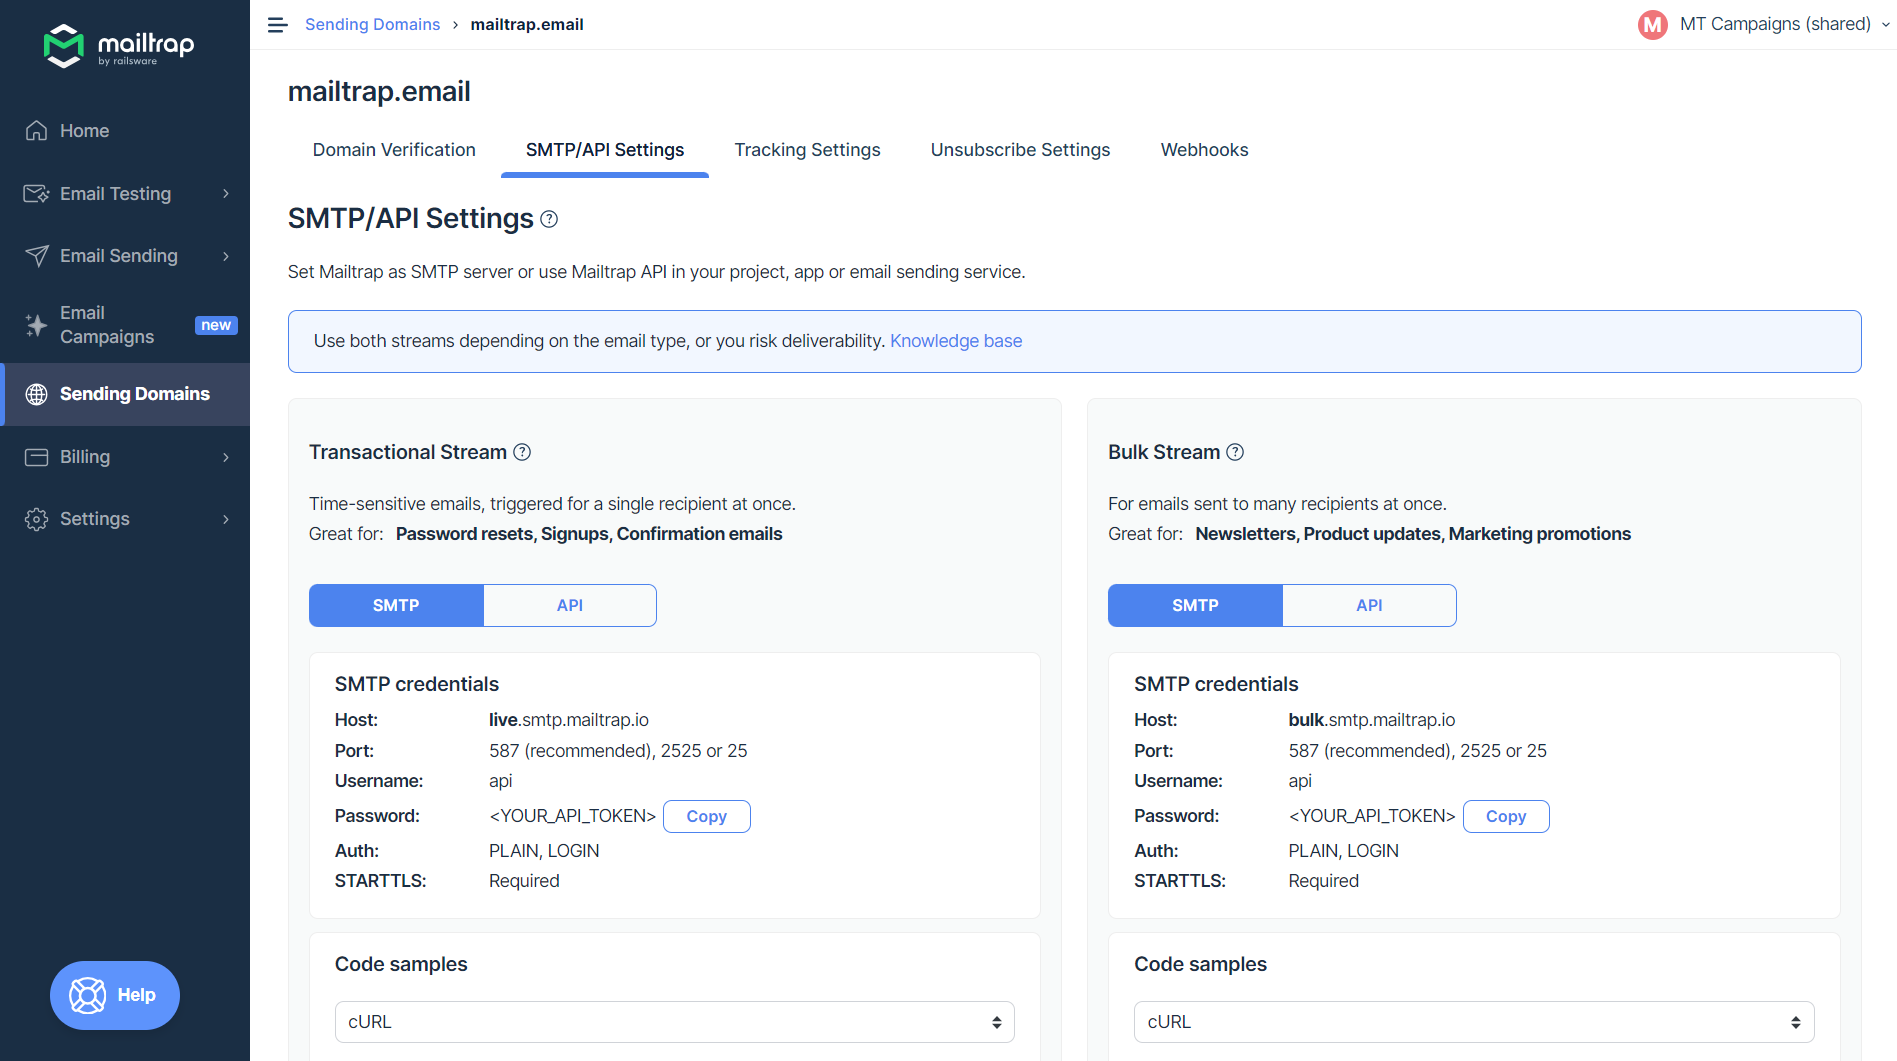
Here is an example of how the configuration should be:
config.action_mailer.delivery_method = :smtp
config.action_mailer.smtp_settings = {
  :address   => 'live.smtp.mailtrap.io',
  :port      => 587,
  :domain    => 'example.com',
  :user_name => 'api',
  :password  => '********059a',
  :authentication => 'plain',
  :enable_starttls_auto => true
}
To learn more about sending emails in Ruby on Rails with Mailtrap Email Sending’s SMTP relay, check out the video below:
How to send emails using Gmail SMTP?
Being one of the leading email service providers, there is a high demand for Gmail SMTP server use. If you want to use this option with ActionMailer, here is an example code for the configuration:
config.action_mailer.delivery_method = :smtp
config.action_mailer.smtp_settings = {
  :address => "smtp.gmail.com",
  :port => 587,
  :user_name => "your mail",
  :password => "your password",
  :authentication => :plain,
  :enable_starttls_auto => true
}
Get more information on Gmail SMTP settings here.
Summary
Using Rails for email sending might seem challenging at first, but it’s one of the most reliable solutions. Once everything is set and tested, it works like a clock, and very few issues happen. For a deeper understanding of how to develop Rails apps with robust email delivery, check out RailsGuides.