Skip to Navigation


With WordPress, the send email function could be tricky to master. Sure, there’s wp_mail, but it’s unreliable for several reasons.
For example, WordPress web hosting services have different PHP mail configurations. Or they even block sending entirely to prevent spamming. Then, the native wp_mail has very limited capabilities when it comes to the type of emails you can send.
There are WordPress hosting providers that include usable configuration for each WordPress site, but it’s an exception rather than the rule. And if you’re tech-savvy, it’s possible to configure WordPress manually to ensure your emails get delivered.
Either way, this is a developer-minded guide that will lead you through different scenarios and show you how to integrate Mailtrap SMTP (Simple Mail Transfer Protocol) with your WordPress site.
How does WordPress send emails?
In a nutshell, WP sends emails using PHP. And you have three options to send emails in WordPress – use the native wp_mail function, use a WordPress plugin, or manually set up an SMTP server using wp-config.php.
How to send emails from WordPress using wp_mail() function
Wp_mail() represents a PHPMailer class wrapper that utilizes the hosting web server when sending emails. But there are 24 more WP functions that use wp_mail(); combine that and web server sending, and it’s not surprising that this method is unreliable.
Here are the steps wp_mail() function takes when attempting to send your emails.
- The code snippet to specify the recipient, subject, message, etc., and prepare an email.
wp_mail( $to, $subject, $message, $headers, $attachments );- After preparation, wp_mail() calls the PHP mail function, which is in the PHPMailer lib, to give instructions to the server to send emails.
mail(to, subject, message, headers, parameters);- Your WordPress hosting provider attempts to deliver the email. More specifically, the hosting side servers request to use PHP mail to send emails. Then, these servers typically use SendMail or Postfix to route the emails to their destination, and the receiving host rejects or accepts them.
Rejects are quite often, and it’s not uncommon that your email won’t be sent out at all. As mentioned, this depends on several factors, primarily your WP hosting provider and the limitations of the wp_mail() function.
Note that the WordPress native function makes it tricky to build HTML templates or add attachments and images without additional tweaks. More importantly, it struggles with email headers, which is one of the reasons emails sent using native wp_mail() may land in spam.
How to send emails using the WordPress SMTP plugin
Installing a WordPress SMTP plugin resolves many of the native configuration issues and it can contribute to a better approach to WordPress plugin marketing by ensuring reliable email delivery and higher user satisfaction.
How?
For starters, a plugin reconfigures the wp_mail () function to use SMTP rather than relying on PHP. Then, a plugin routes the outgoing email through an email-sending service.
This may mean that you need to set up an account and verify your WordPress site with a third-party sending service.
Of course, there are a few steps to the process, and you’ll need an additional tool to get a reliable SMTP. But a combination of an email delivery platform such as Mailtrap and an email plugin gives you the upper hand to streamline your email delivery and protect your sender and domain reputation.
Mailtrap covers both API and SMTP use cases, offering fast delivery, strong inbox placement, and round-the-clock technical support. It also provides detailed analytics across major mailbox providers like Office 365, Outlook, Gmail, and Google Workspace, along with email logs that let you review message content, HTML rendering, spam score, and delivery status.
Let’s see how you can connect Mailtrap with your WordPress site using two different plugins.
Post SMTP
Post SMTP is a WordPress plugin that routes outgoing emails through authenticated SMTP or API-based delivery instead of relying on PHP mail. It provides a setup interface in the WordPress dashboard and includes basic tools for testing and logging email activity, making it easier to manage and troubleshoot WordPress email sending.
As the plugin integrates directly with Mailtrap, the connection between the two can be configured without additional custom settings. Here are the exact steps:
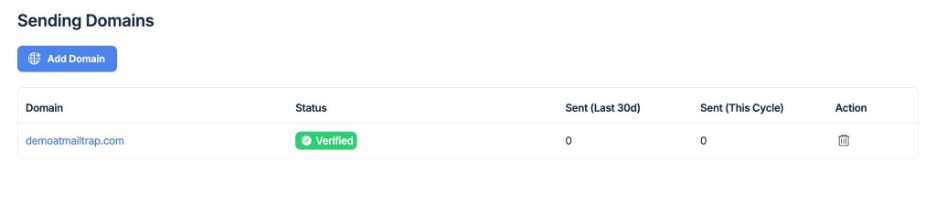
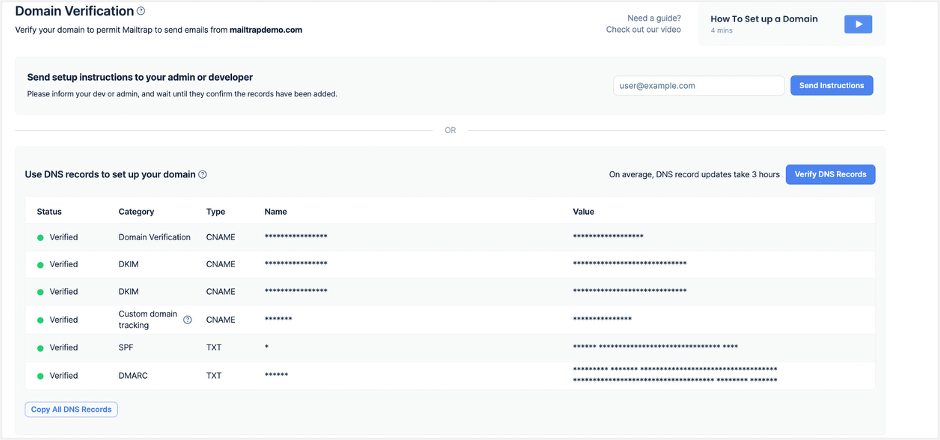
First, log in to your Mailtrap dashboard, open the Sending Domains section, and add the domain you’ll use as the sender.
Mailtrap will generate a set of DNS records that you need to copy into your domain provider’s settings. These records enable authentication and let receiving servers know that Mailtrap is authorized to send emails on behalf of your domain.
Verification runs automatically, but you can trigger a manual check if needed.
Once everything is checked, the domain status will change from Missing to Verified.
Note: At this stage, you’ll also be asked to complete a short business or personal details form. This step is required for compliance and must be completed before sending is enabled.
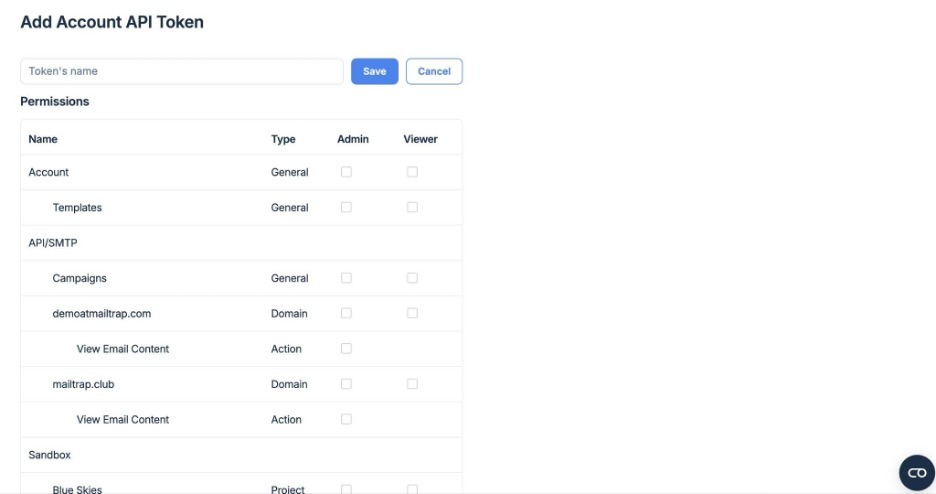
With the domain verified, the next step is to create an API token that Post SMTP will use to authenticate with Mailtrap.
So, in your Mailtrap dashboard, go to Settings → API Tokens, add a new token, and assign the appropriate permissions. After saving, copy the token and keep it somewhere secure – you’ll need it when configuring the plugin.
Now switch back to your WordPress dashboard and open Post SMTP.
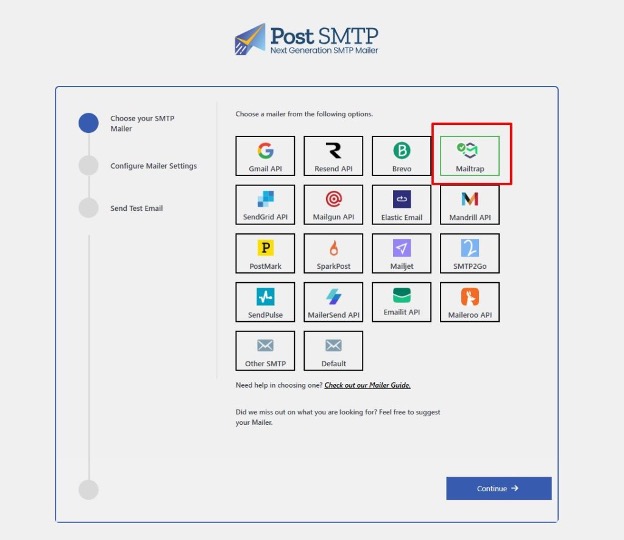
The plugin includes a setup wizard that guides you through the configuration.
Start the wizard and, when prompted to choose a mailer, select the Mailtrap integration.
You’ll then be asked to enter a few basic details:
- From Email – an address that belongs to the domain you verified in Mailtrap
- From Name – the sender name recipients will see in their inbox
- Mailtrap API token – used to authenticate the connection
After entering these details, save the settings and continue.

Note: If other plugins or your theme modify sender information, enable the option that prevents them from overriding the From Email and From Name. This helps keep your sender identity consistent and avoids spoofing-related issues.
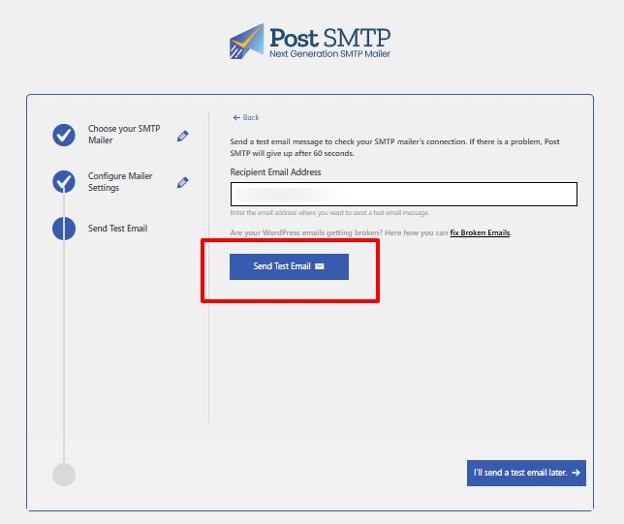
To confirm everything is set up correctly, send a test email directly from the Post SMTP interface by entering a recipient address and triggering the test.
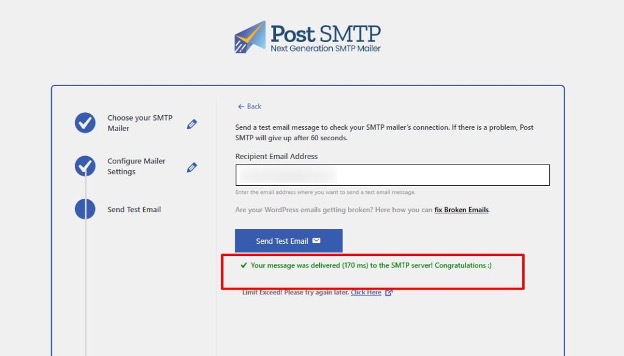
If the configuration is correct, you’ll see a success message, and the email should arrive in the inbox shortly after.
To exit the wizard, simply click Finish.
And with that, you’ve successfully connected Mailtrap and Post SMTP, allowing your WordPress site to send authenticated emails with improved email deliverability.
WP Mail SMTP
WP Mail SMTP comes in both free and paid versions and lets you either connect your own SMTP provider or use one of the supported email services. It also provides a configuration interface for setting sender details, authentication, and encryption, along with basic tools for testing email delivery.
Since WP Mail SMTP doesn’t include a native integration with Mailtrap, setting up the connection requires a manual configuration process. To get started, create an account in Mailtrap so you can generate the credentials needed to connect the plugin to the email-sending service.
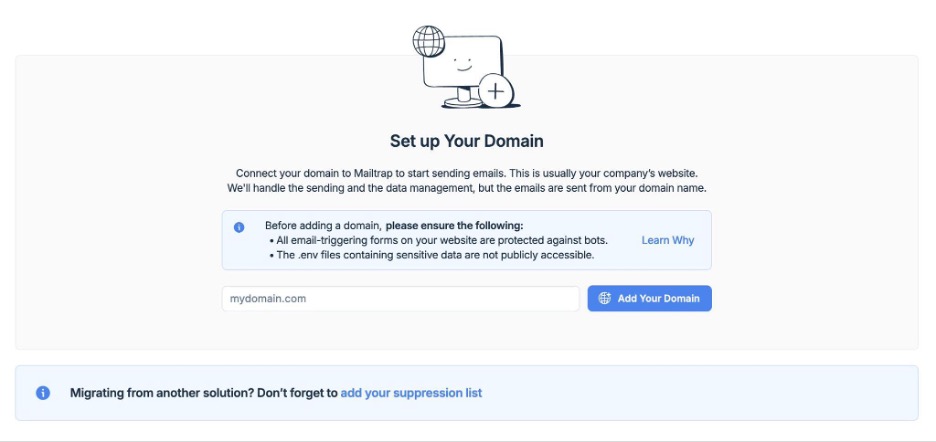
Then, type your domain name into the designated field and click the Add Your Domain button.
Next, copy and paste all DNS records that Mailtrap provides into your domain provider. For more information about domain verification, check our Sending Domain Setup guide.
After verifying your domain, go to Sending Domains, choose your domain, and select the email-sending stream that best fits your needs – transactional or bulk.
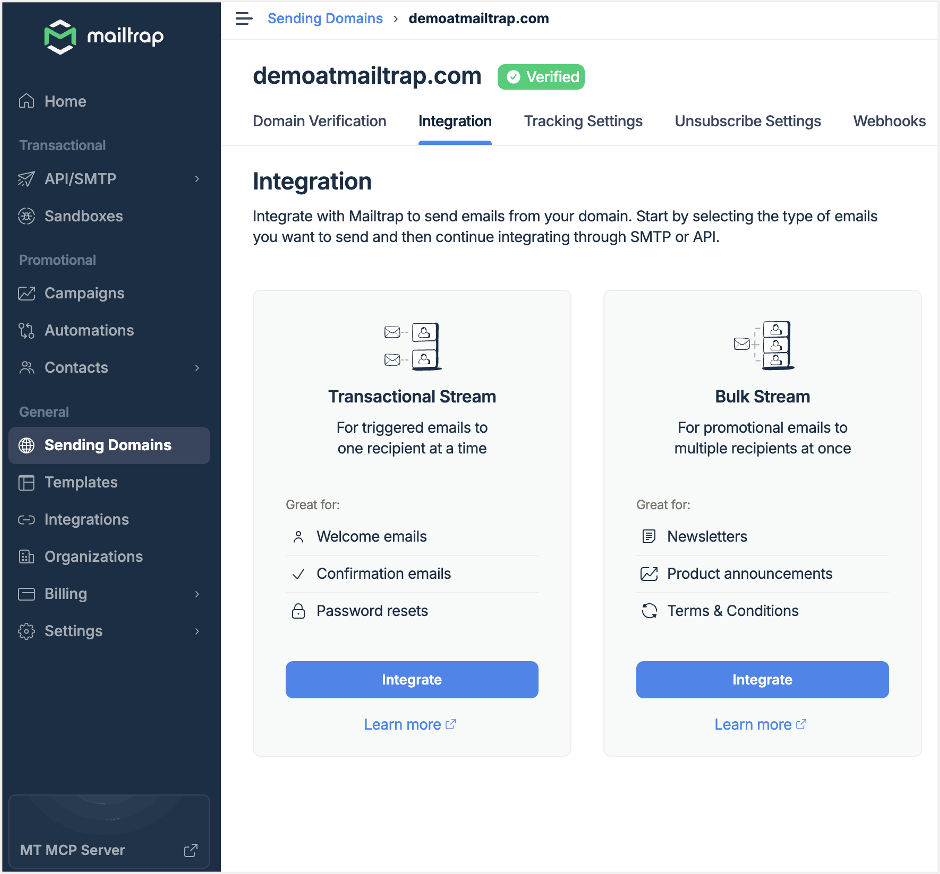
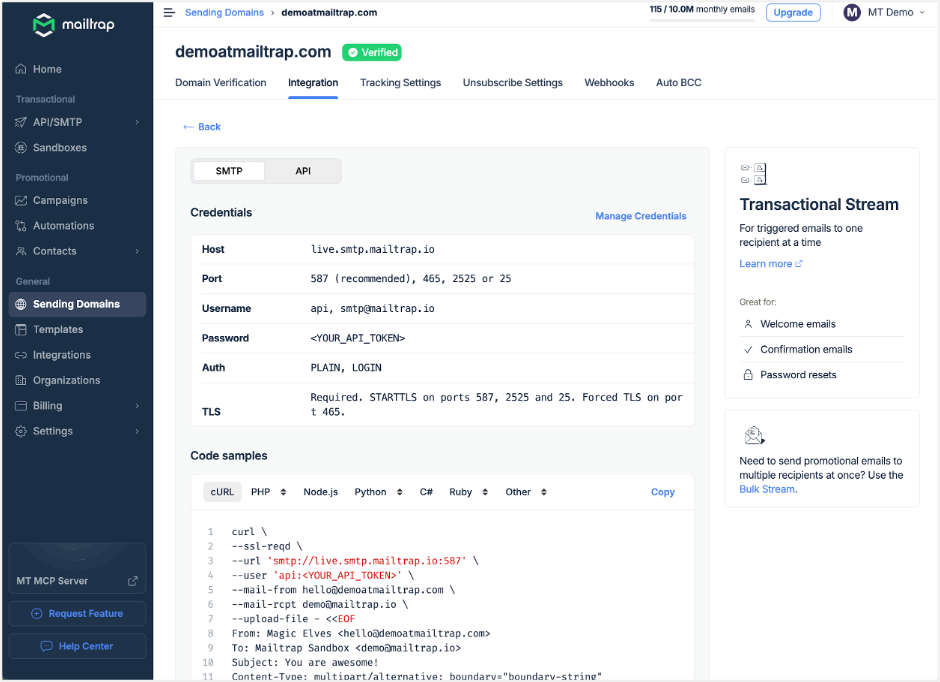
Then, under the Integration tab, select SMTP or API, and collect your sending credentials.
Next, open your WordPress admin dashboard in another window, select Plugins, then Add New, and install WP Mail SMTP by WP Forms.
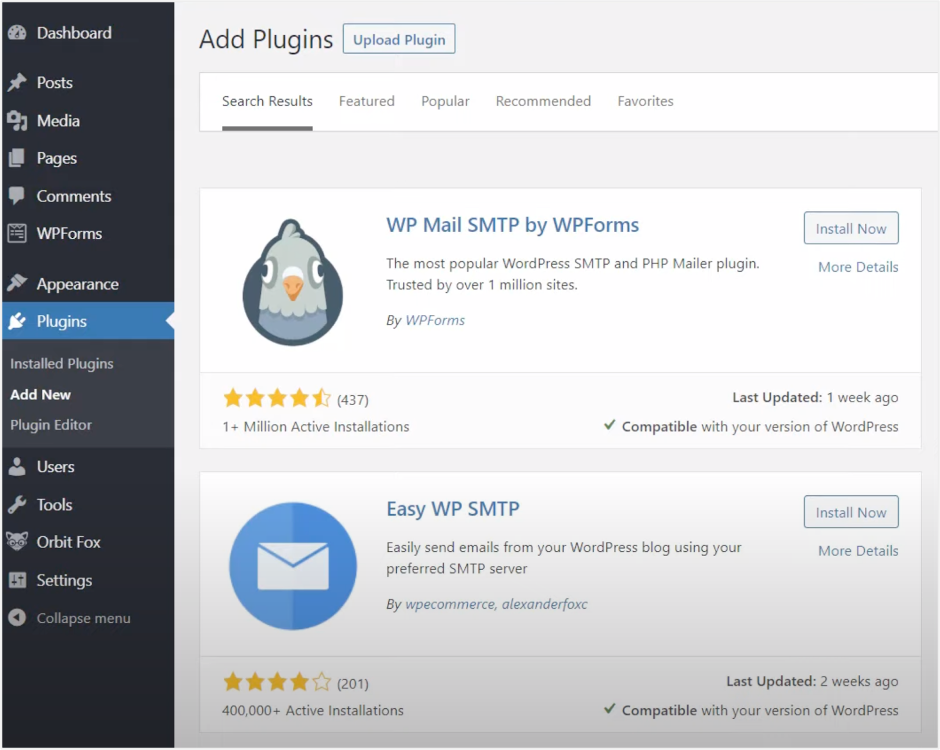
After the installation, hit Activate, go to WP Mail SMTP, and then navigate to the plugin’s settings page.
Under the General tab, you’ll find the From Email (email sender) and From Name. The plugin populates these automatically with the WordPress account email and your domain name, respectively, but you can change them if necessary.
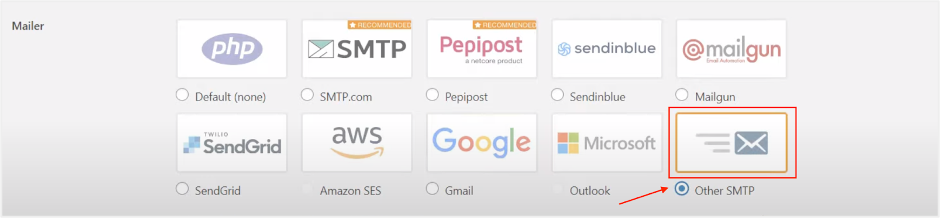
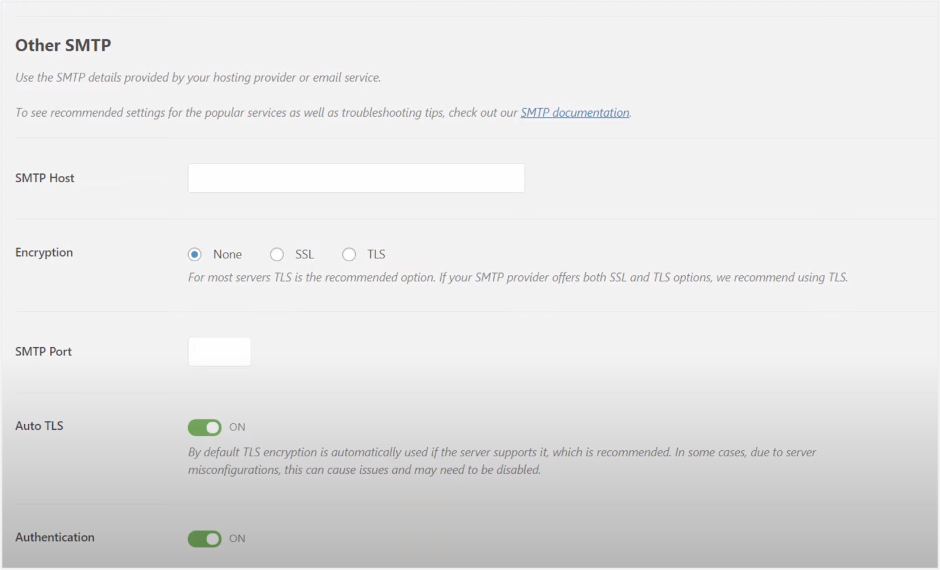
Next, scroll down to the Mailer section of the General tab and select Other SMTP to set up Mailtrap SMTP.
Then, scroll down to add credentials for Other SMTP, and start copy-pasting Mailtrap SMTP settings into the designated fields:
- SMTP Host: live.smtp.mailtrap.io (transactional) or bulk.smtp.mailtrap.io (bulk marketing emails)
- Encryption: None, SSL, or TLS (we recommend choosing either SSL or TLS for security reasons)
- SMTP Port: 465 (for SSL) and 587 (for TLS – Recommended)
- SMTP Authentication: On or off (always toggle On)
- SMTP Username: api
- SMTP Password: SMTP password you copied from your account (for extra security measures, you can store your password in the wp-config.php file. Refer to these instructions for more info on wp-config.php).
Once you click the Save Settings button, you’ll see a notification at the top of the WP Mail SMTP General tab confirming that your mailer configuration is complete.
If you want to test your setup, click the Email Test tab in the WP Mail SMTP plugin menu, enter an email into Send To, keep the HTML option toggled on, and hit the Send Email button.
Once the test email is successfully sent, you’ll get another notification at the top of the tab.
How to send an email from WordPress without plugins
This is the method for the tech-savvy as it requires manual SMTP configuration in WP via wp-config.php and some tweaks to your WordPress theme. But, when done right, this could be the most straightforward method that doesn’t bloat your WordPress website with additional plugins.
Sure, you’ll need an SMTP service to make it all work. And the following tutorial assumes you’ve set up Mailtrap and verified your domain. If not, check the previous section.
Also, you should be using the child theme of your WP site. Otherwise, the changes will be reverted back to PHP after the main theme update.
- Find the wp-config.php in the website’s root directory and edit it via SSH terminal or FTP server.
- Paste the settings below into the wp-config.php
Note: the settings should be located under the given file for security, and they’re geared for Mailtrap users. If you’re using Gmail SMTP, for example, the values will be different. For more advanced security practices and additional configuration options, learn how to properly manage SMTP credentials in wp-config.php.
// SMTP email settings
define( 'SMTP_username', 'api' );  // host username
define( 'SMTP_password', 'your-mailtrap-smtp-password' );   // Mailtrap SMTP password
define( 'SMTP_server', 'live.smtp.mailtrap.io' );     // SMTP server address
define( 'SMTP_FROM', 'youremail@example.com' );   // Your Email Address
define( 'SMTP_NAME', 'Your Name' );   //  Business From Name
define( 'SMTP_PORT', '587' );     // Server Port Number
define( 'SMTP_SECURE', 'tls' );   // Encryption - ssl or tls (recommended)
define( 'SMTP_AUTH', true );  // Use SMTP authentication (true|false)
define( 'SMTP_DEBUG', 0 ); // for debugging purposes only- After manually configuring SMTP, navigate to the functions.php (the theme functions file) by selecting WordPress dashboard, then Appearance, and finally Theme Editor. Then, you need to copy-paste the snippet below for the changes to take effect. To remind you, it’s best to use the child theme.
- Add the code snippet below to the functions.php file.
add_action( 'phpmailer_init', 'my_phpmailer_smtp' );
function my_phpmailer_smtp( $phpmailer ) {
    $phpmailer->isSMTP();
    $phpmailer->Host = SMTP_server;
    $phpmailer->SMTPAuth = SMTP_AUTH;
    $phpmailer->Port = SMTP_PORT;
    $phpmailer->Username = SMTP_username;
    $phpmailer->Password = SMTP_password;
    $phpmailer->SMTPSecure = SMTP_SECURE;
    $phpmailer->From = SMTP_FROM;
    $phpmailer->FromName = SMTP_NAME;
}- Save your new settings, and keep in mind that you can just copy-paste the code; no need to change anything.
- Lastly, you can test your new configuration and send an email via a contact us form.
How to send HTML email?
By default, all emails sent through WP are formatted to plain text. To show you how to change that, we will proceed with the configured SMTP or plugin, as described above.
Also, we suppose you already have an HTML template under templates/email-template.php, for example. Note that the given hierarchy isn’t necessary. The path to the template doesn’t matter; you can create it anywhere in the theme. And if you don’t have a template, use a plugin such as Email Templates to build it.
With that in mind, proceed to change the content_type header to get HTML formatting. Here are the steps.
- Navigate to wp_mail_content_type and switch from plain text to text/html.
function send_email_by_mailtrap_finish( $test ) {
  $email = 'your@example.com';
  $title = sprintf(
    __( 'Test "%s" finished', 'Mailtrap' ),
    $test->post_title
  );
  $body = '...';
  $content_type = function() { return 'text/html'; };
  add_filter( 'wp_mail_content_type', $content_type );
  wp_mail( $email, $title, $body );
  remove_filter( 'wp_mail_content_type', $content_type );
}- As said, you should already have a template at templates/email-template.php, and it might look something like the one below.
<!DOCTYPE html PUBLIC "...">
<html xmlns="https://www.yourwebsite.com/1999/xhtml">
<head>
  <title><?php echo esc_html( $title ); ?></title>
  <style>...</style>
</head>
<body>
  <p><?php echo $html; ?></p>
  ...
</body>
</html>
- Afterward, proceed to include your custom template in the email body.
function send_email_by_mailtrap_finish( $test ) {
  // ...
  $email = 'your@examole.com';
  $title = 'Title goes here';
  $html  = 'This is the <strong>content!</strong>';

  ob_start();
  include './templates/template.php';
  $content = ob_get_clean();

  // ...
  wp_mail( $email, $title, $content );
}- Finally, send a test email from your template to inspect the configuration.
How to send an email with an attachment
There are two ways to send emails with attachments in WordPress – native, using the wp_mail () function, and with a plugin. Here are quick tutorials for each:
1. Wp_mail () method
Save the attachment files to WP locally so they can be added to the email via $attachments. For example, an HTML-formatted email with attachments may look like the one below. And the given method involves setting custom headers.
$to = 'recipient@example.com';
$subject = 'Email subject';
$body = 'Email body content';
$headers = array('Content-Type: text/html; charset=UTF-8');

wp_mail( $to, $subject, $body, $headers );

// For attachment

$attachments = array( WP_CONTENT_DIR . '/uploads/file_to_attach.zip' );
$headers = 'From: Your business and <name@yourdomain.com>' . "\r\n";

wp_mail( 'test@example.org', 'subject', 'message', $headers, $attachments );
Tip:
It’s not necessary to set custom headers to send HTML-formatted emails with attachments. You can use $phpmailer–>AltBody to set an alternative body and add attachments.
Doing that switches the content type to multipart/alternative instead of multipart/mixed, and the PHPMailer will automatically do the rest without the need to manually set custom headers.
add_action('phpmailer_init','wp_mail_set_custom_body');
function wp_mail_set_custom_body($phpmailer) {
     $phpmailer->AltBody = strip_tags($phpmailer->Body);
}

$to = 'recipient@example.com';
$headers = array();
$attachments = array(dirname(__FILE__).'/test.txt');
wp_mail($to,$subject,$message,$headers,$attachments);
With attachments, your content type will be multipart/mixed. But there’s a multipart/alternative inside, and it has text/html and text/plain parts before the attachments.
2. The plugin method
Before taking the plugin route, think about what kind of attachments you want to send. In most cases, these are PDF invoices after an eCommerce or SaaS customer makes a purchase. So, we’ll quickly guide you through how to do it with WooCommerce PDF Invoices & Packing Slips.
Install and activate the plugin, then follow the setup wizard to customize its actions. The given plugin gives you the option to customize the invoice appearance and select which WordPress transactional emails should include the invoice.
How to send to multiple recipients
Again, there are two methods if you want to include CC and/or BCC in your WordPress emails.
- Wp_mail () method
WordPress accepts a comma-separated or an array list of email addresses, and you can define them under $to string|string[]. Here is the code snippet where you can define the multiple recipients array.
$adminmail = get_option(admin_email);
$adminmail2 = like an email address;
$multiple_recipients = array($adminmail,$adminmail2);
$subj = 'The email subject';
$body = 'This is the body of the email';
wp_mail( $multiple_recipients, $subj, $body );
Also, it’s possible to include CC and BCC recipients in an array. Check the code below.
$headers[] = 'From: Test <youremail@example.com>';
$headers[] = 'Cc: copy_to_1@email.com';
$headers[] = 'Cc: copy_to_2@email.com';
...
$headers[] = 'Bcc: bcc_to_1@email.com';
$headers[] = 'Bcc: bcc_to_2@email.com';
$success = wp_mail( $emails, $subject, $message, $headers );
And, there’s an option to get all that programmatically.
$headers[] = 'From: Test <youremail@example.com>';
foreach($copy_to as $email){
    $headers[] = 'Cc: '.$email;
}
foreach($bcc_to as $email){
    $headers[] = 'Bcc: '.$email;
}
$success = wp_mail( $emails, $subject, $message, $headers ); - Plugin method
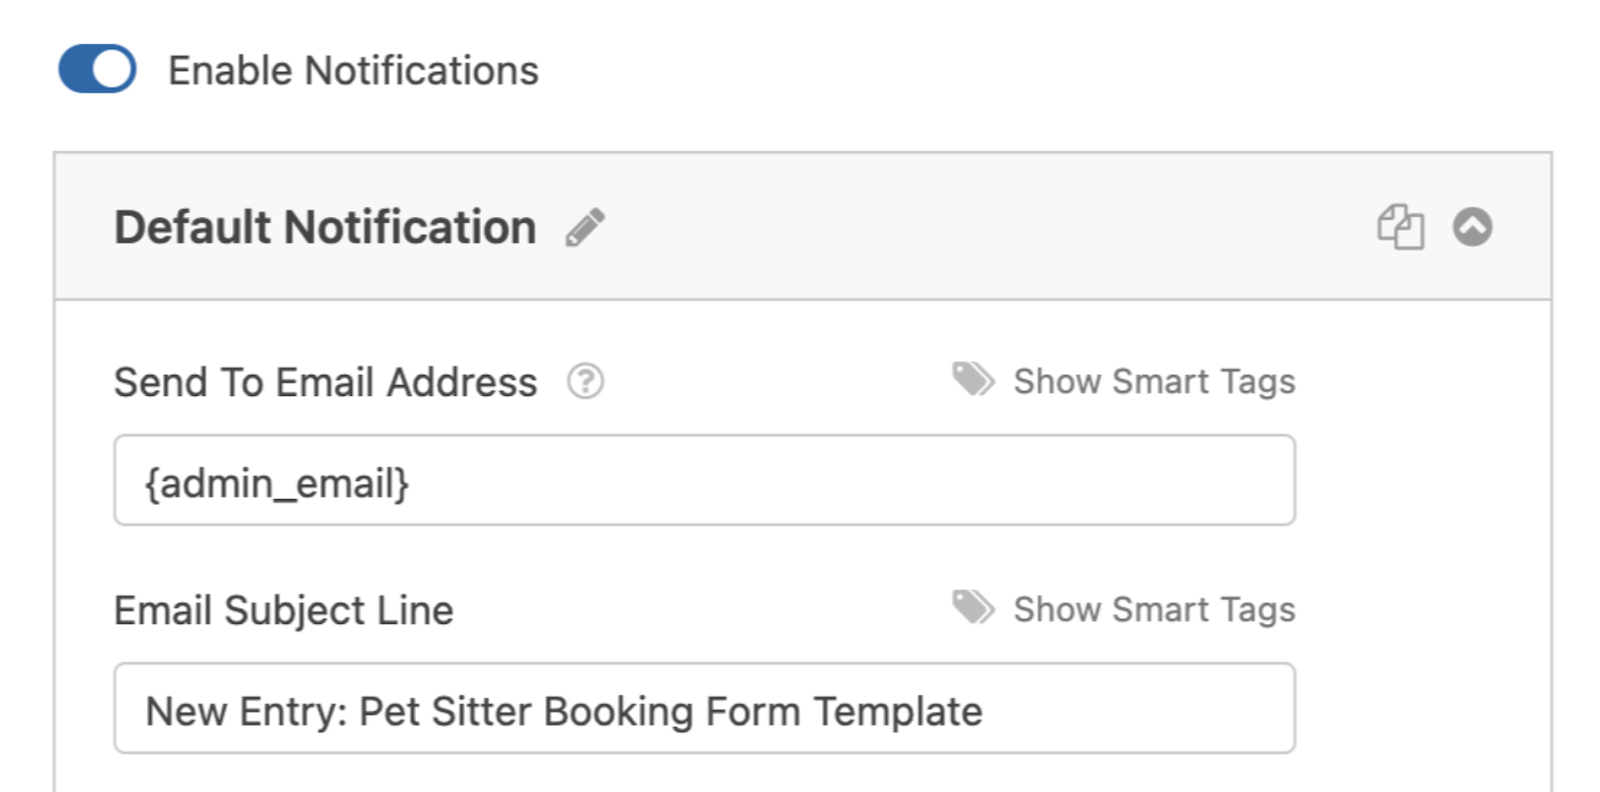
If you’re using a forms plugin, such as WPForms, it’s pretty straightforward to add multiple recipients to email notifications. But remember that this only works with the paid version of the plugin. And it’s designed to send emails to multiple recipients after a user fills out a form.
Anyway, you need to navigate to WPForms Settings and Enable Notifications by clicking the toggle. Then, type the recipients’ email addresses in the field under Send To Email Address, and make sure to separate them with commas.
Testing email sending in WordPress: Why and how?
The sections below cover a few ways to run tests. Either one should give you a clear picture of if your WordPress site can send emails and if you got the server configuration right.
- Outgoing email logging
If you choose the plugin route to configure email sending in WordPress, Post SMTP includes built-in email logging and debugging tools. After sending a test message, you can open the Email Log tab in the plugin dashboard to review send attempts, SMTP responses, and any errors that occurred during delivery.
Also, there’s an option to install third-party plugins just to log your emails. Comfort email SMTP logger is one such option that combines SMTP configuration with advanced email logging, allowing you to both send and track emails from a single interface.
That said, it’s important to understand the limits of WordPress-side logging.
Post SMTP can confirm that an email was successfully passed to the SMTP server, but it can’t tell you what happens after that – whether the message was accepted by the recipient’s mail server, filtered as spam, or bounced later.
For true delivery tracking and inbox placement insights, you still need provider-level logs from your email-sending service (like Mailtrap), which show delivery status, spam filtering signals, and rendering details – things no WordPress plugin can see on its own.
- WP password reset
In all frankness, this is more of a trick to check your configuration fast rather than a proper way to test and log your outgoing emails. But it works and will show you if your WordPress website can send emails or not.
Go to the login page of your site – it’s usually something like yourbrand.com/wp-login.php. Then, select the “Lost your password?” link next to “Register”.
On the following page, type the email account address you use for the website and hit the Get New Password button.
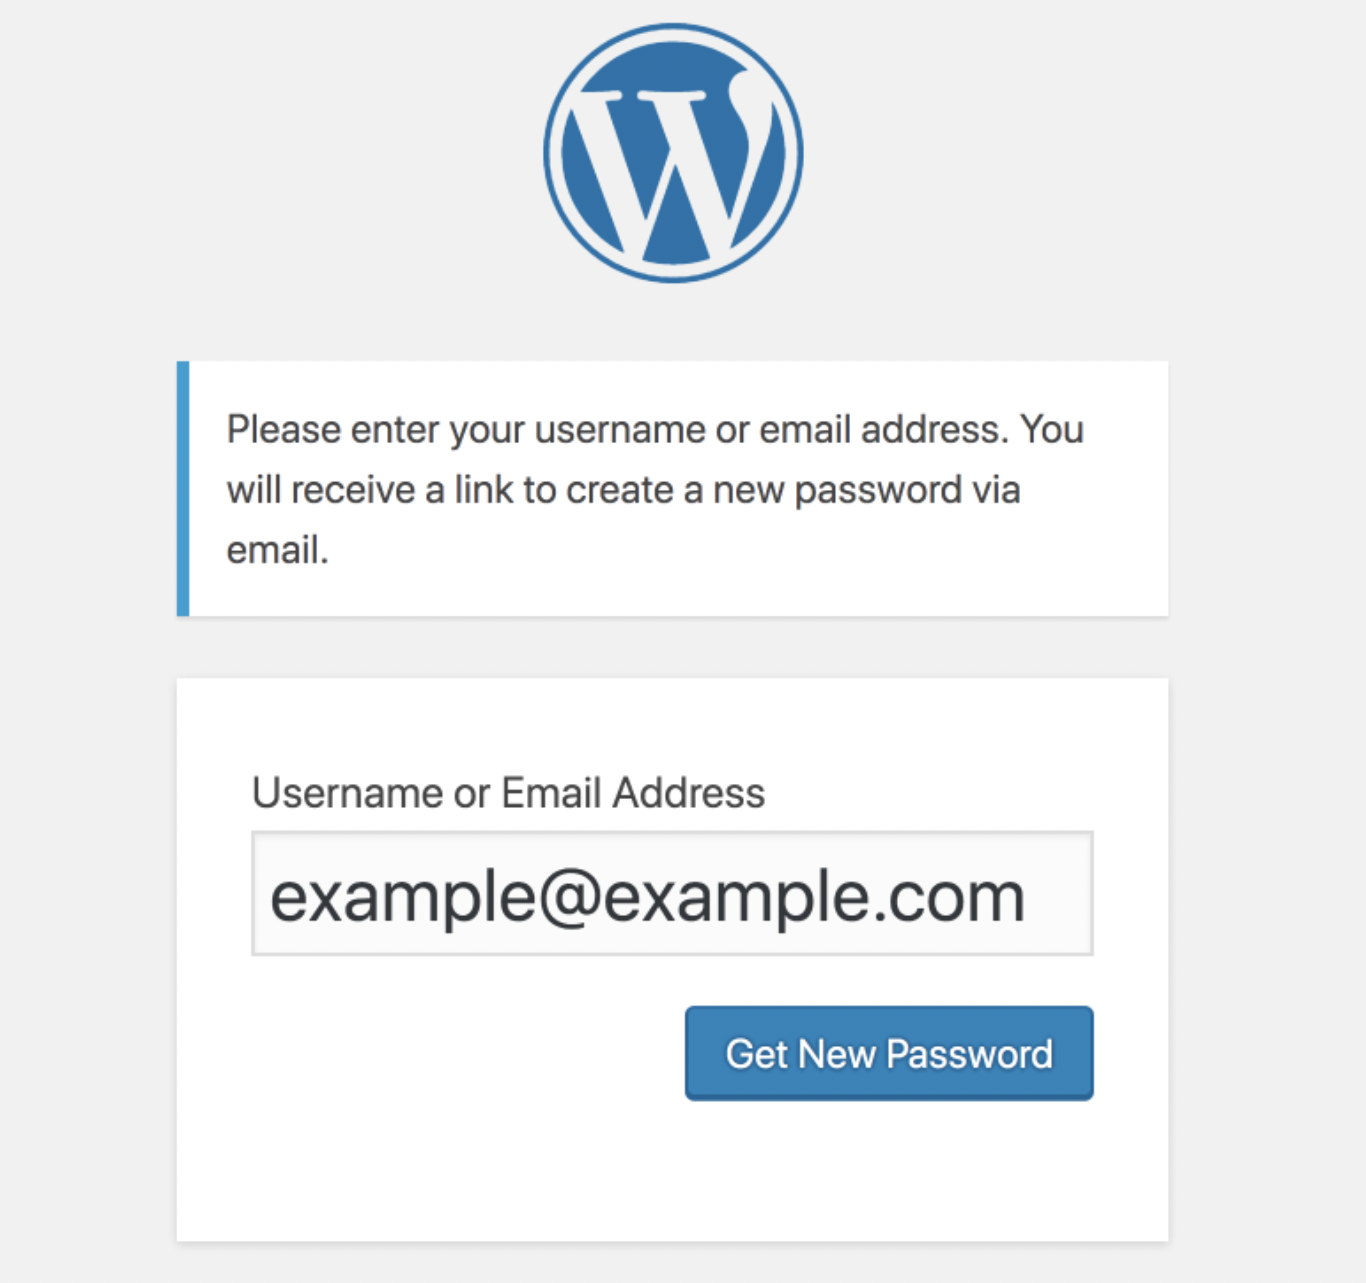
Note that you might not get the email immediately; it may take about 10 minutes for it to arrive. Should you wait longer than that, chances are your WP site is not sending emails at all.
But if you use a proper SMTP provider and tweak WP settings as explained in the previous sections, this scenario is highly unlikely.
- PHP script
This is a method for the tech-savvy, and there are a couple of ways to run the script below.
You can use SSH to log into your server and run the code directly with the command line. However, a lot of hosts block the command line access for users without a dedicated server or a VPS. So, it might be better to create a .php file (e.g., test-php-mail.php) and run it locally.
Here’s the script. Note that it works both in the command line or as a separate .php file:
<?php
    ini_set( 'display_errors', 1);
    error_reporting( E_ALL );
    $from = "example@yourdomain.com";
    $to = "email@yourdomain.com";
    $subject = "PHP Mail Test";
    $message = "It works! You can send email using PHP Mail";
    $headers = "From:" . $from;
    mail($to,$subject,$message, $headers);
    echo "Test email sent successfully";
?>
Should you choose to create a .php file, you need to save it, then run the script in your browser in the following format yourdomain.com/test-php-mail.php.
If there are any errors, they’ll appear at the top of the page.
Generally, it’s relatively straightforward to test whether your WP website can send emails or not. But, there’s a chance that you might need to dig deeper and find the root cause of the problem. Plus, your emails could be going to spam, and that’s not something you can easily troubleshoot with the tests covered above.
Troubleshooting sending emails in WordPress
From faulty server configurations to plugin issues, there could be many different reasons WP isn’t sending emails at all, or your emails land in spam. Here, you’ll find the most common problems and various tips and tricks to resolve them.
- WP send emails failed
If your emails aren’t getting through at all, the issue could be with unavailable or disabled PHP functions. Or, maybe, the server you’re using is sending too many emails, and that’s what’s blocking the attempts.
Whatever the reason, reconfiguring your settings to use an SMTP should resolve this problem, as your sending infrastructure won’t rely on PHP and hosting servers.
- Incorrect server configuration
Assuming you’re using Mailtrap Email Sending SMTP, there’s a confirmation popup that your email has been successfully sent. Then, you can inspect if the email indeed landed in the destination inbox.
Note that even if the email lands in the junk or spam folders, it means that the server configuration is okay.
- Contact form plugin problems
You might configure the plugin to automatically fill out the “From” field with the email address of the user who’s filling out the form. Since the email (or form) isn’t actually coming from the user but your WP website, email providers might label the email as a spoof.
The plugins most affected by these issues include Gravity Forms, Ninja Forms, weForms, Contact Form 7, Happy Forms, etc. If you want to know how to fix the issue with any of the given contact forms, check out this article from our friends at Kinsta.
- Plugins conflicts
A conflict between two plugins may happen due to their similarity. For example, SMTP and contact form plugins can get at odds with other similar plugins and basically block sending.
Unfortunately, there’s no easy way to fix this as you’ll need to deactivate all of them, and then activate and test them one by one until you can send emails again.
May your emails fly with WordPress
When all is said and done, the WordPress send email functionality doesn’t need to be a pain. There are two critical things to keep in mind – you need a reliable SMTP service and some tweaks to the PHPMailer class to make it all work.
But it’s not only about sending emails to their destination. You need to keep a close eye to ensure they’re delivered and how recipients respond to them. So, it pays to invest in an email delivery platform that can provide that on top of a reliable SMTP.
FAQ
What’s the difference between wp_mail() and PHP mail()?
wp_mail() is a wrapper around PHP’s mail() function. It adds some WordPress-specific handling, but both rely on the same server-side mail system and share the same limitations – mainly poor authentication and inconsistent deliverability.
Should I use a plugin or configure SMTP manually in wp-config.php?
A plugin is easier to set up and maintain, with built-in testing and logging. Manual configuration gives you more control but requires more technical work and ongoing maintenance.
For most sites, a plugin is the more practical option.
Do I need to configure SPF, DKIM, or DMARC for WordPress emails?
Yes. SPF and DKIM are essential for email authentication and deliverability. DMARC is optional but recommended if you want stronger protection against spoofing and better control over how unauthenticated emails are handled. For example, email service providers like Mailtrap provide automatic email authentication and DNS records setup.
Will switching my WordPress emails to SMTP affect site performance?
No, not in any noticeable way. The performance impact is minimal, and using a dedicated SMTP service often improves reliability compared to PHP mail without adding overhead.