Skip to Navigation


To say that sending emails from WordPress is a huge headache is an understatement. Yes, it’s possible to send messages to your customers directly from WP, but the chances are those messages will never be delivered to the inboxes.
And that’s something you want to avoid at all costs if you’re sending out important transactional emails such as password resets or order confirmations.
Luckily, there’s a simple solution. In this blog post, we’ll guide you through the process of setting up WordPress Gmail SMTP for sending emails and delivering them to your customers’ inboxes.
Why and when should you use Gmail SMTP?
Because most email providers see WordPress emails as ‘spammy’. By default, WP uses the wp_mail() function to send emails. It calls up PHP’s mail() function, which then asks the mail server to send emails. The problem is that this path doesn’t require header authentication. And without header authentication, emails become insecure.
Unsurprisingly, most WordPress web hosting providers block the wp_mail() function. This reduces email deliverability, i.e. instead of the inboxes, your emails end up in the spam folder or get discarded.
Plus, the wp_mail() function has limited capabilities when it comes to the types and volume of emails you can send.
Simple Mail Transfer Protocol or SMTP is a better option in that case, as it incorporates the security features the PHP mail function lacks.
Gmail’s SMTP server, in particular, is an easy fix for small WooCommerce stores or WordPress websites with moderate traffic.
Choosing between free Gmail SMTP and paid Google Workspace SMTP
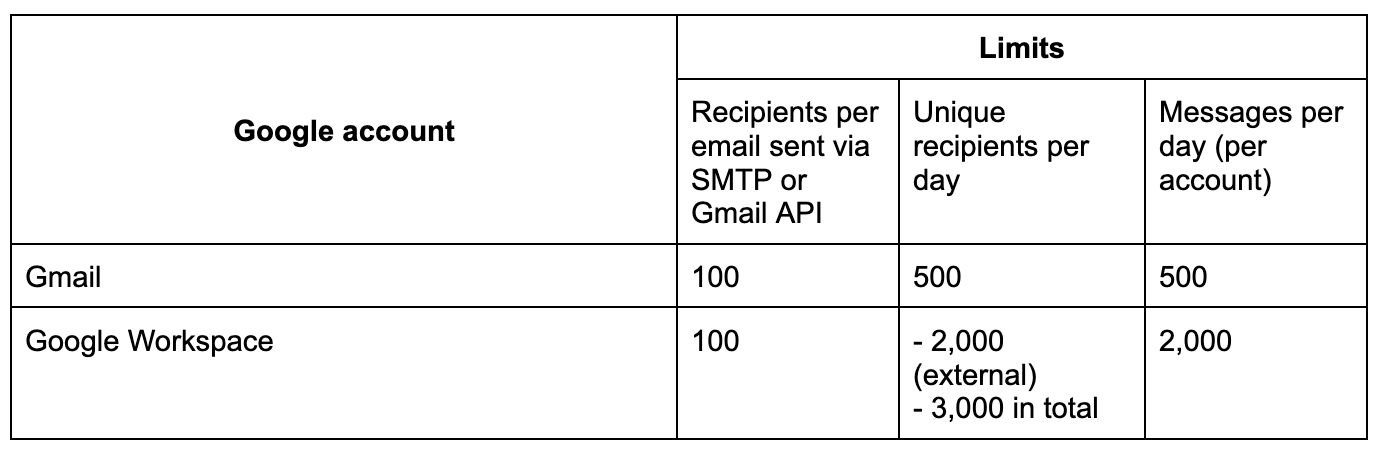
It’s fine to use free Gmail SMTP for your WordPress website, but you won’t be in charge of your domain’s DNS records or be able to send more than 500 emails per day.
With paid SMTP email server offered by Google Workspace (formerly G Suite), you can set up a custom domain (sender@your.website) and verify it using SPF, DKIM, and DMARC records. This will help you improve your sender reputation and successfully deliver emails from WP to your customers.
Keep in mind that Google Workspace also has limitations on sending volume. You won’t be able to send more than 10,000 emails per day (more info is available here). For bulk sending, it’s better to opt for a third-party email service such as Mailtrap Email API/SMTP. We’ll talk more about that in a bit.
Before we proceed, make sure you have either Google Workspace or a Gmail email account.
How to set up Gmail SMTP with the WP Mail SMTP plugin
WP Mail SMTP by WPForms is the most popular WordPress plugin for setting up Gmail SMTP. It ‘tells’ wp_mail() function to use the SMTP server instead of the PHP mail().
There are two main ways of setting up WordPress SMTP with Gmail and WP Mail SMTP plugin:
- Using Gmail API (more secure option);
- Using Gmail’s SMTP credentials (less secure option).
Even though Gmail API integration requires more tweaking, we recommend using it. We’ll still break down both options, just in case you have to use SMTP. But before we do that, we need to download and install the WP Mail SMTP plugin.
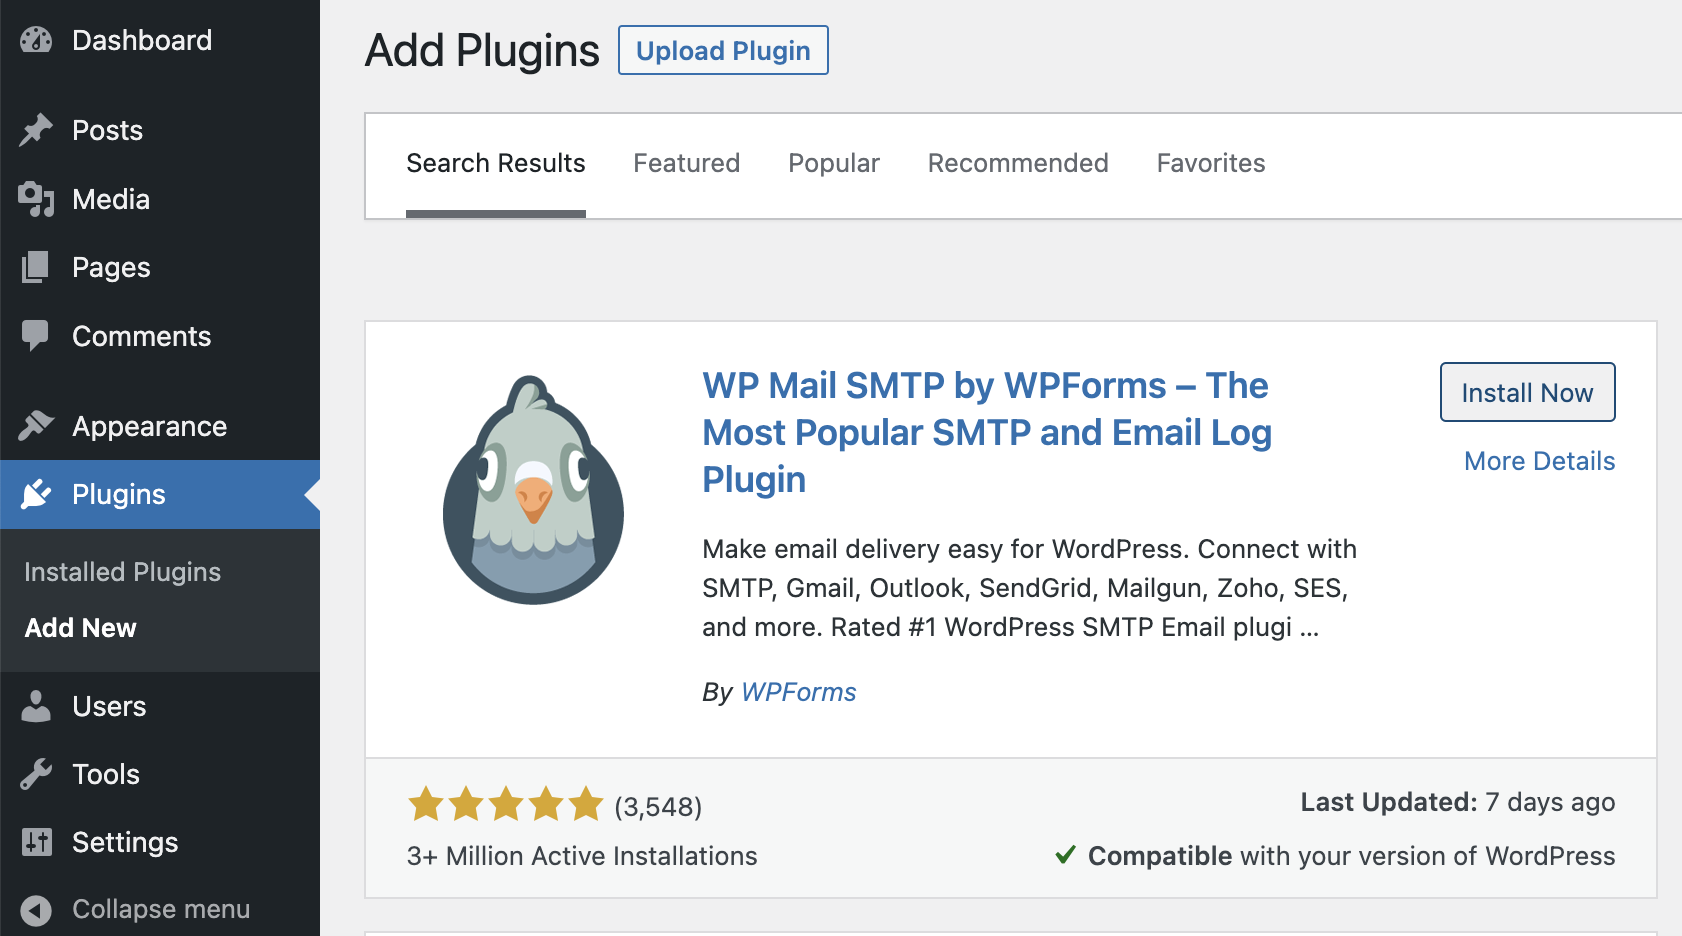
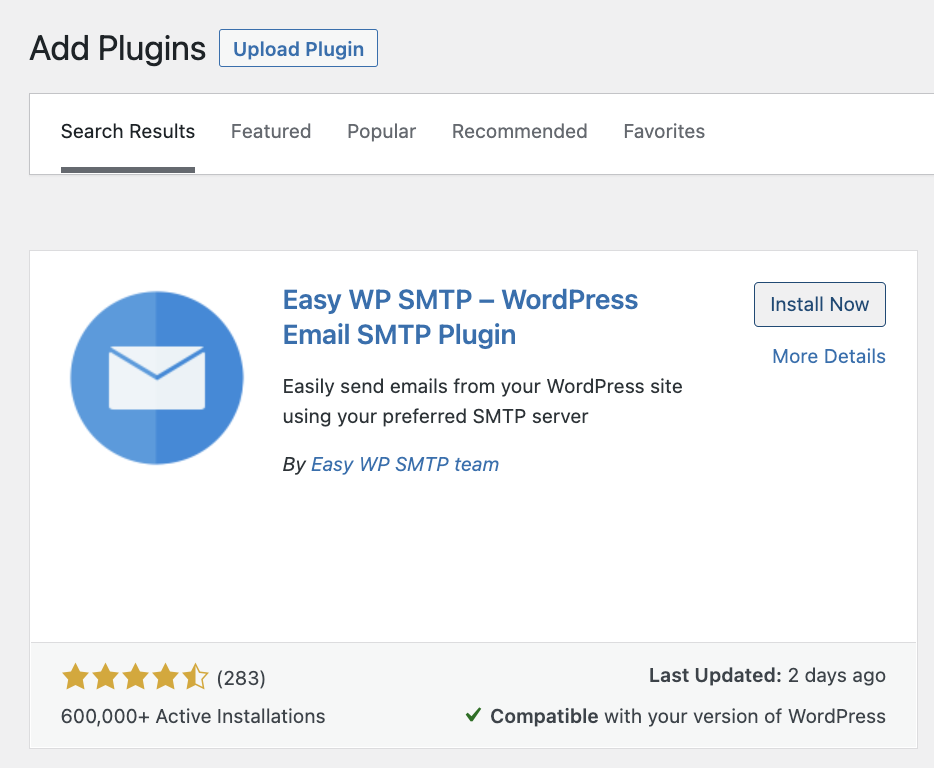
Go to your WordPress website and press ‘Plugins’ in the left navigation panel. Press ‘Add New’ and type ‘WP Mail SMTP’ in the search bar. You’ll see the plugin in the search results. Click ‘Install Now’ and then ‘Activate’.
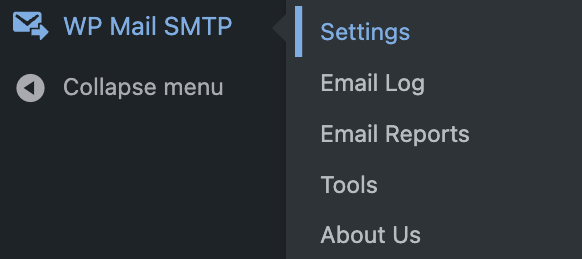
Once the plugin is activated, we need to configure its settings. Find WP Mail SMTP in the left navigation panel or press ‘Plugins’, choose ‘Installed Plugins’, and find the plugin there.
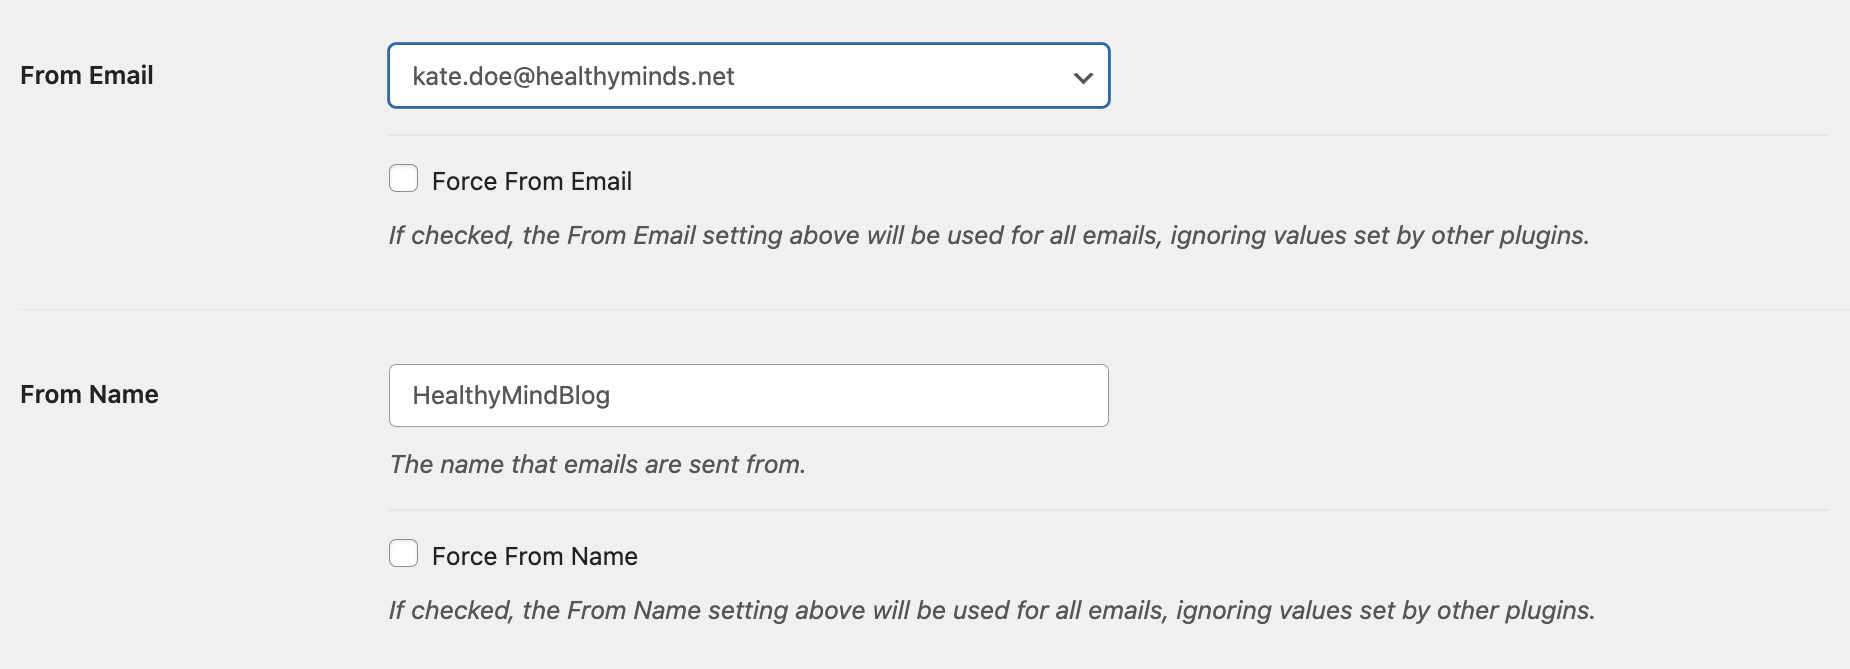
Click ‘Settings’ and scroll down to the ‘Primary Connection’ tab under ‘General’. Configure From Email address and From Name. These will be used while sending emails to your clients.
Note: Make sure you configure Google Mailer using Client ID if you can’t access the From Email right off the bat.
After this step, the instructions will be different for Gmail API and SMTP.
Gmail API integration
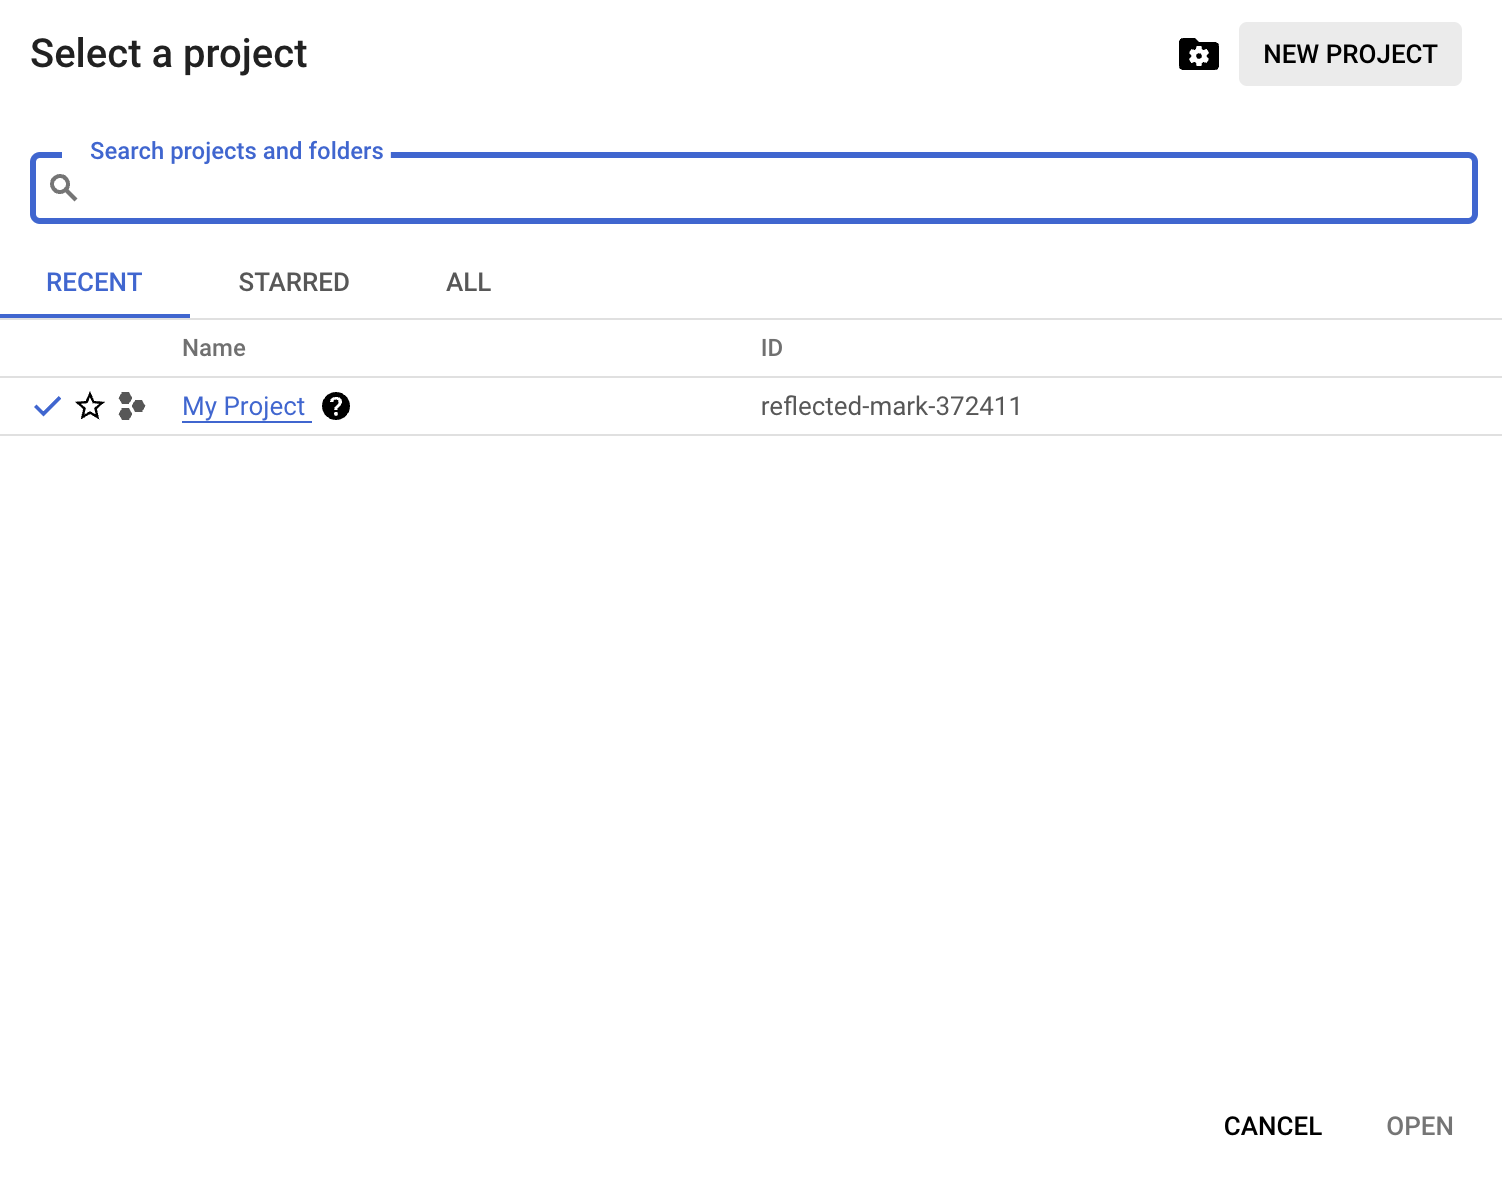
While you’re still in WordPress, choose Google/Gmail as your SMTP mailer. Then go to console.cloud.google.com and sign in with your Google Workspace or Gmail account. Select an existing project or create a new one.
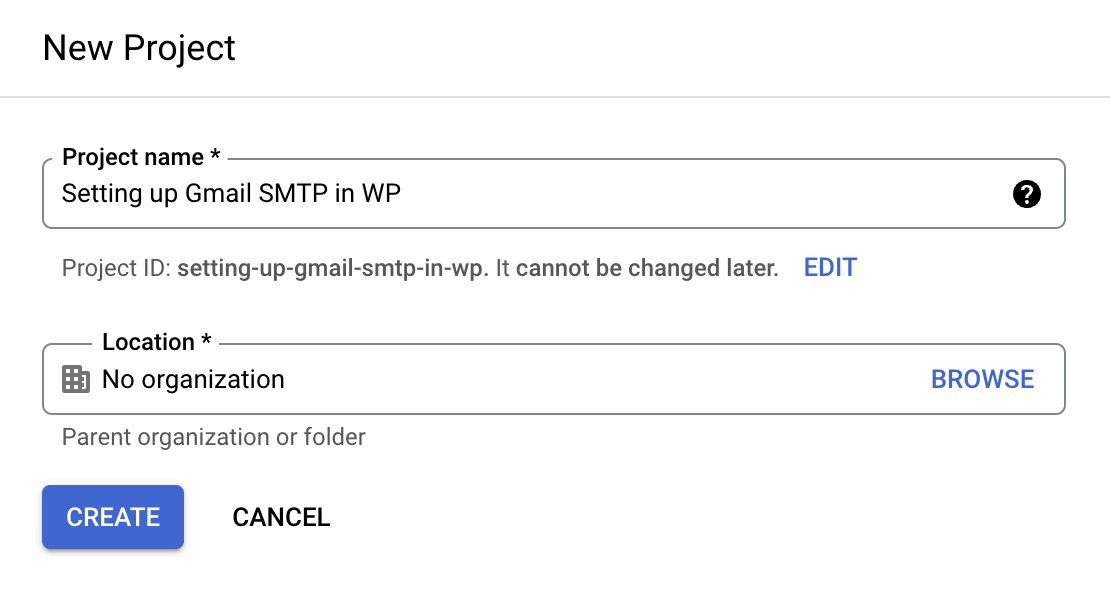
For the purpose of this article, let’s create a new project by clicking the ‘New project’ button in the top right corner.
Enter the necessary information, such as the name of your project and its location, and press ‘Create’.
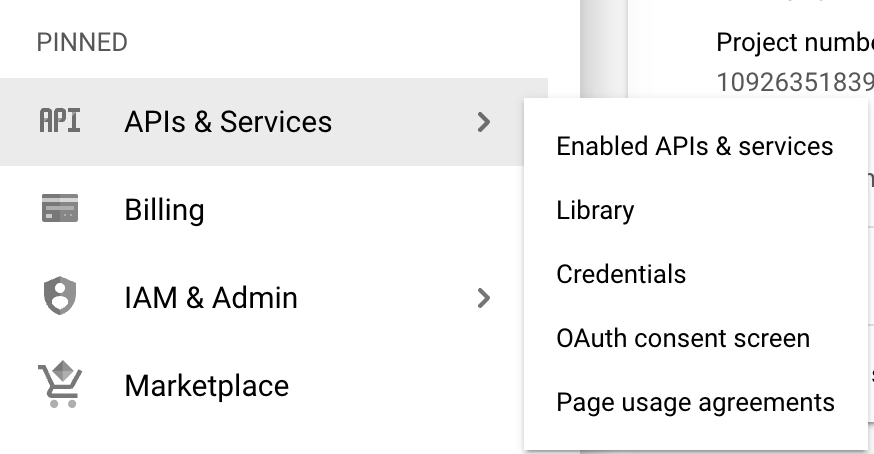
Once the project has been created, hover over the ‘APIs & Services’ tab and choose ‘Library’ from the dropdown menu.
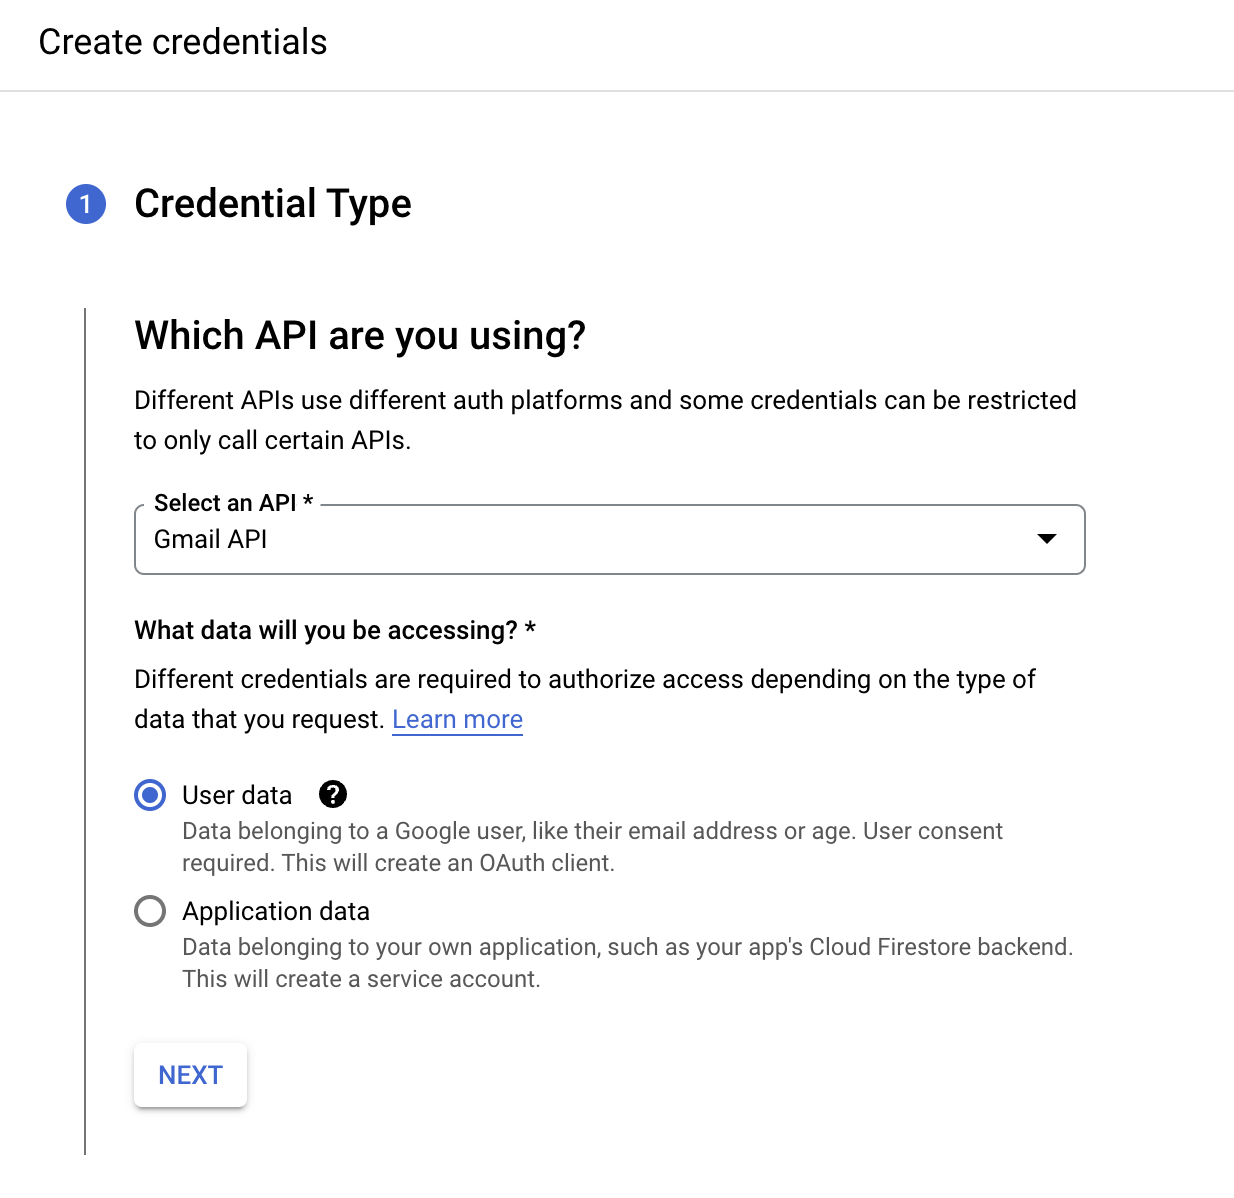
There, type ‘Gmail API’ in the search box. Open it and press ‘Enable’. Click ‘Create Credentials’ to generate your API keys. Make sure ‘Gmail API’ is selected under the tab ‘Which API are you using?’ and select ‘User data’ under the tab ‘What data will you be accessing?’ Once you’re done, press ‘Next’.
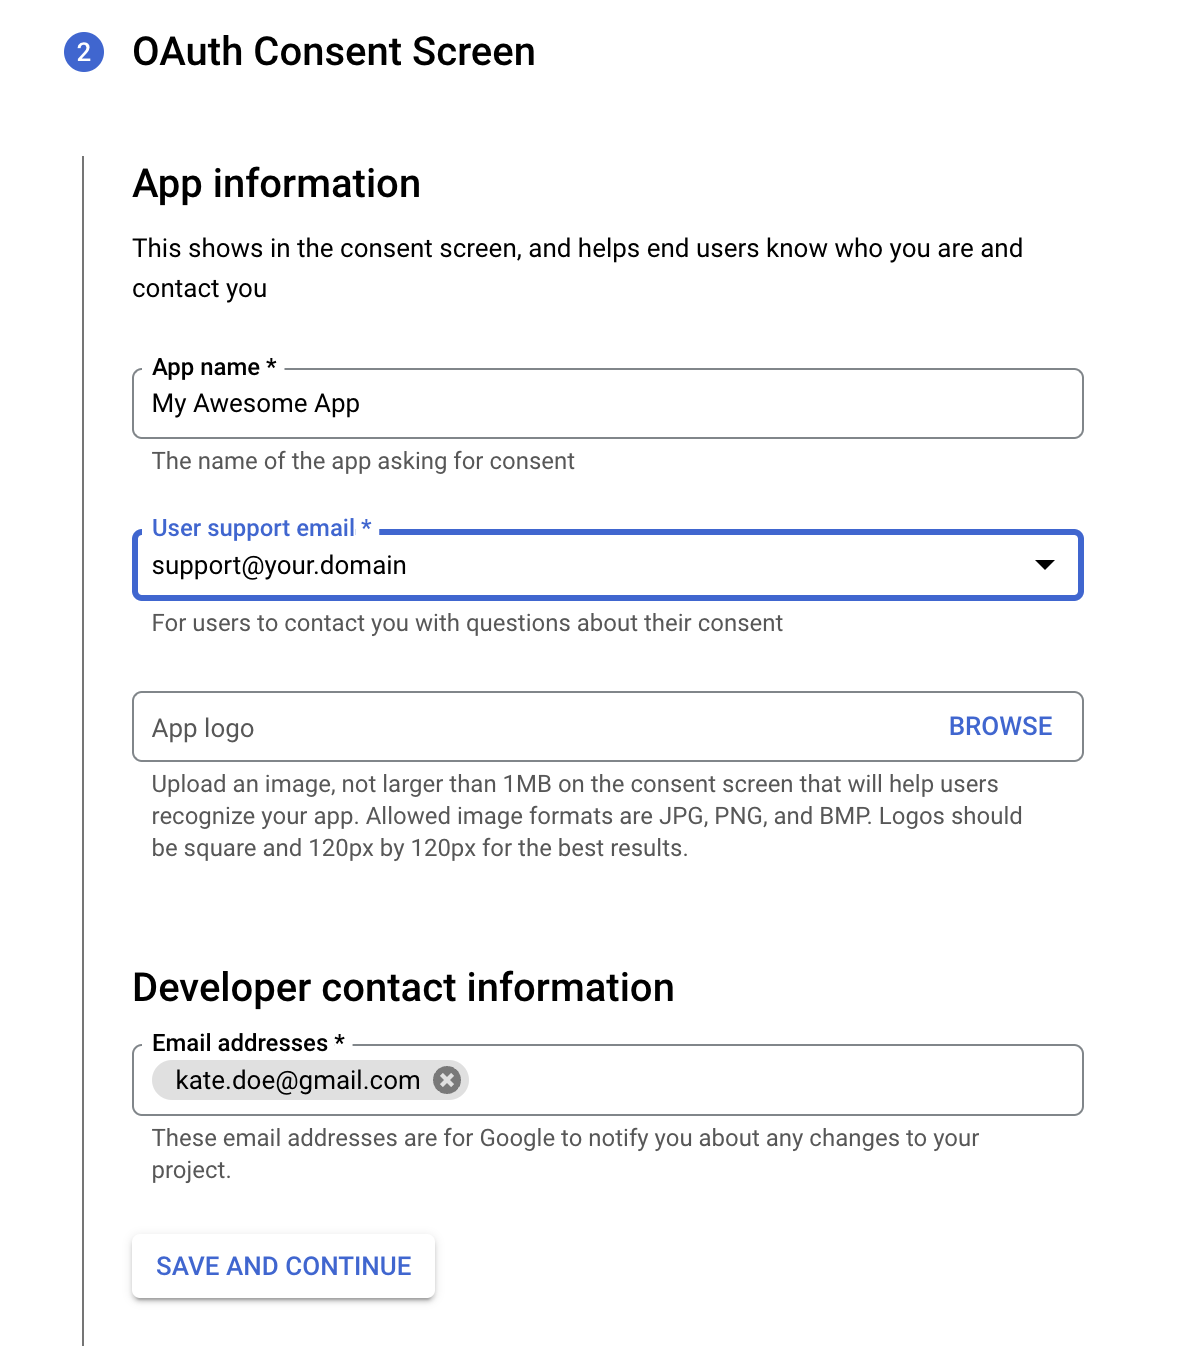
You’ll see the OAuth Consent screen, in which you should enter details such as the name of your app, support email, and developer email address. If you wish, you could also upload your app’s logo at this stage. Press ‘Save and continue’.
Optionally, you can configure the scopes. If you wish to skip this step, press ‘Save and continue’ right away.
Now it’s time to set up your OAuth Client ID. To do so, set ‘Web application’ as the application type. Additional parameters should appear.
Enter the name of your OAuth 2.0 Client and paste the following link: (https://connect.wpmailsmtp.com/google/) in the Authorized redirect URIs tab (ignore Authorized JavaScript origins – you won’t need it for this integration).

Click ‘Create’ and you’ll see the generated Client ID. You can copy or download it if you wish to, but it can be accessed later. Press ‘Done’.
Before we proceed with Gmail integration, we should Publish the Google app to ensure we don’t have limited features (this step is only necessary for a free Gmail account). For this, navigate to the tab ‘OAuth Consent Screen’ and press ‘Publish App’ under ‘Testing’.

A confirmation screen will pop up – just press ‘Confirm’ and the app will be published. The status will be changed from ‘Testing’ to ‘In Production’.

We’re finally ready to connect Gmail API with the WP Mail SMTP plugin. In the Google Developer Console, open ‘Credentials’, press the pencil icon across your OAuth client, and copy your Client ID and Client Secret.
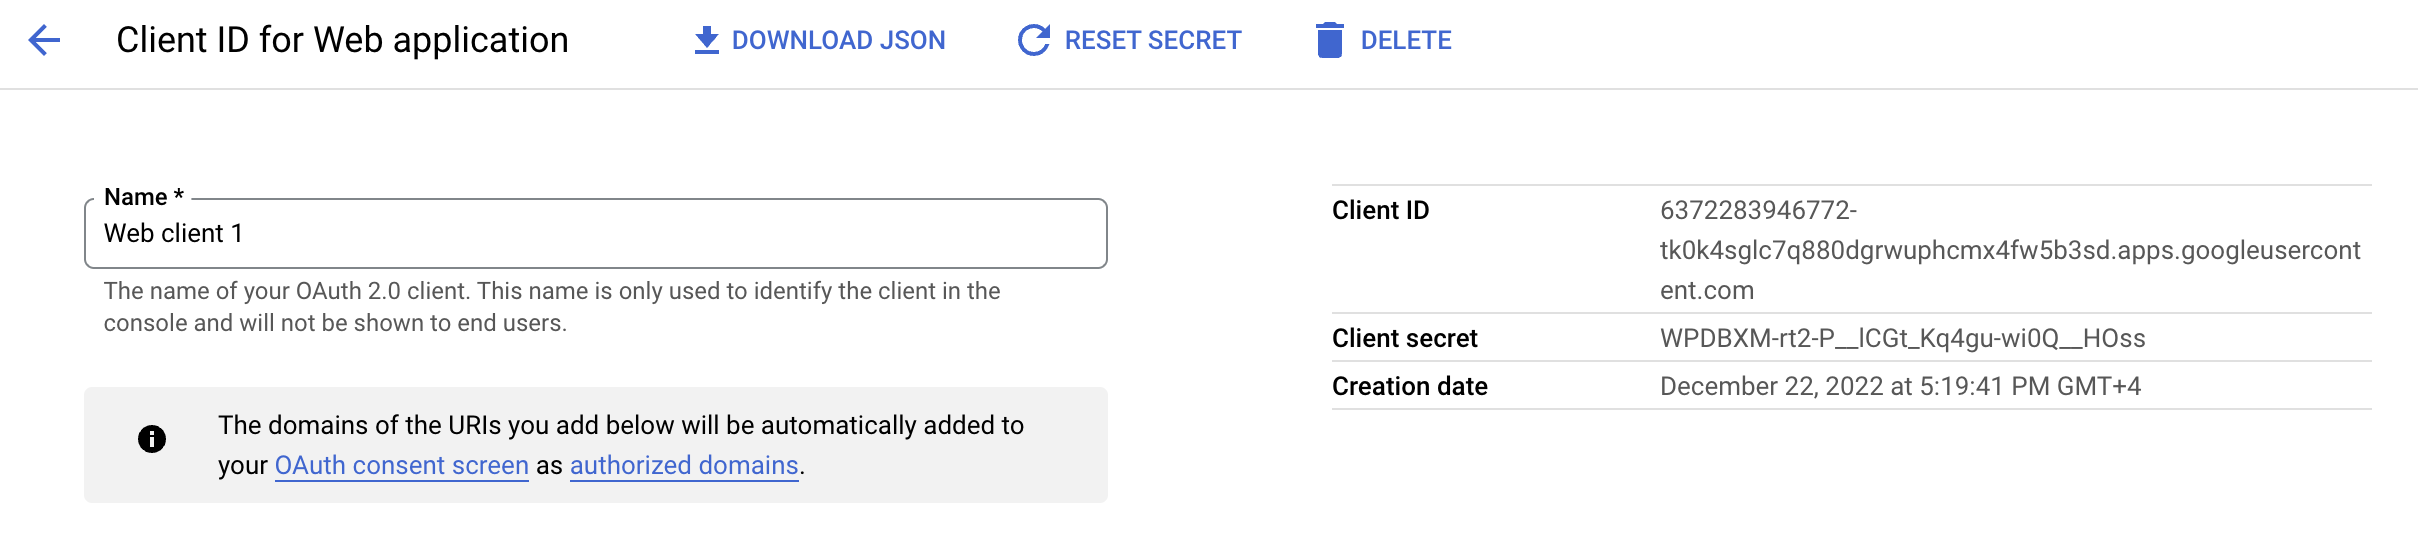
Return to your WordPress dashboard and WP SMTP Client plugin settings, scroll down to the Google/Gmail tab, and enter your credentials. Note: never reveal your Client ID and Client Secret to anyone.
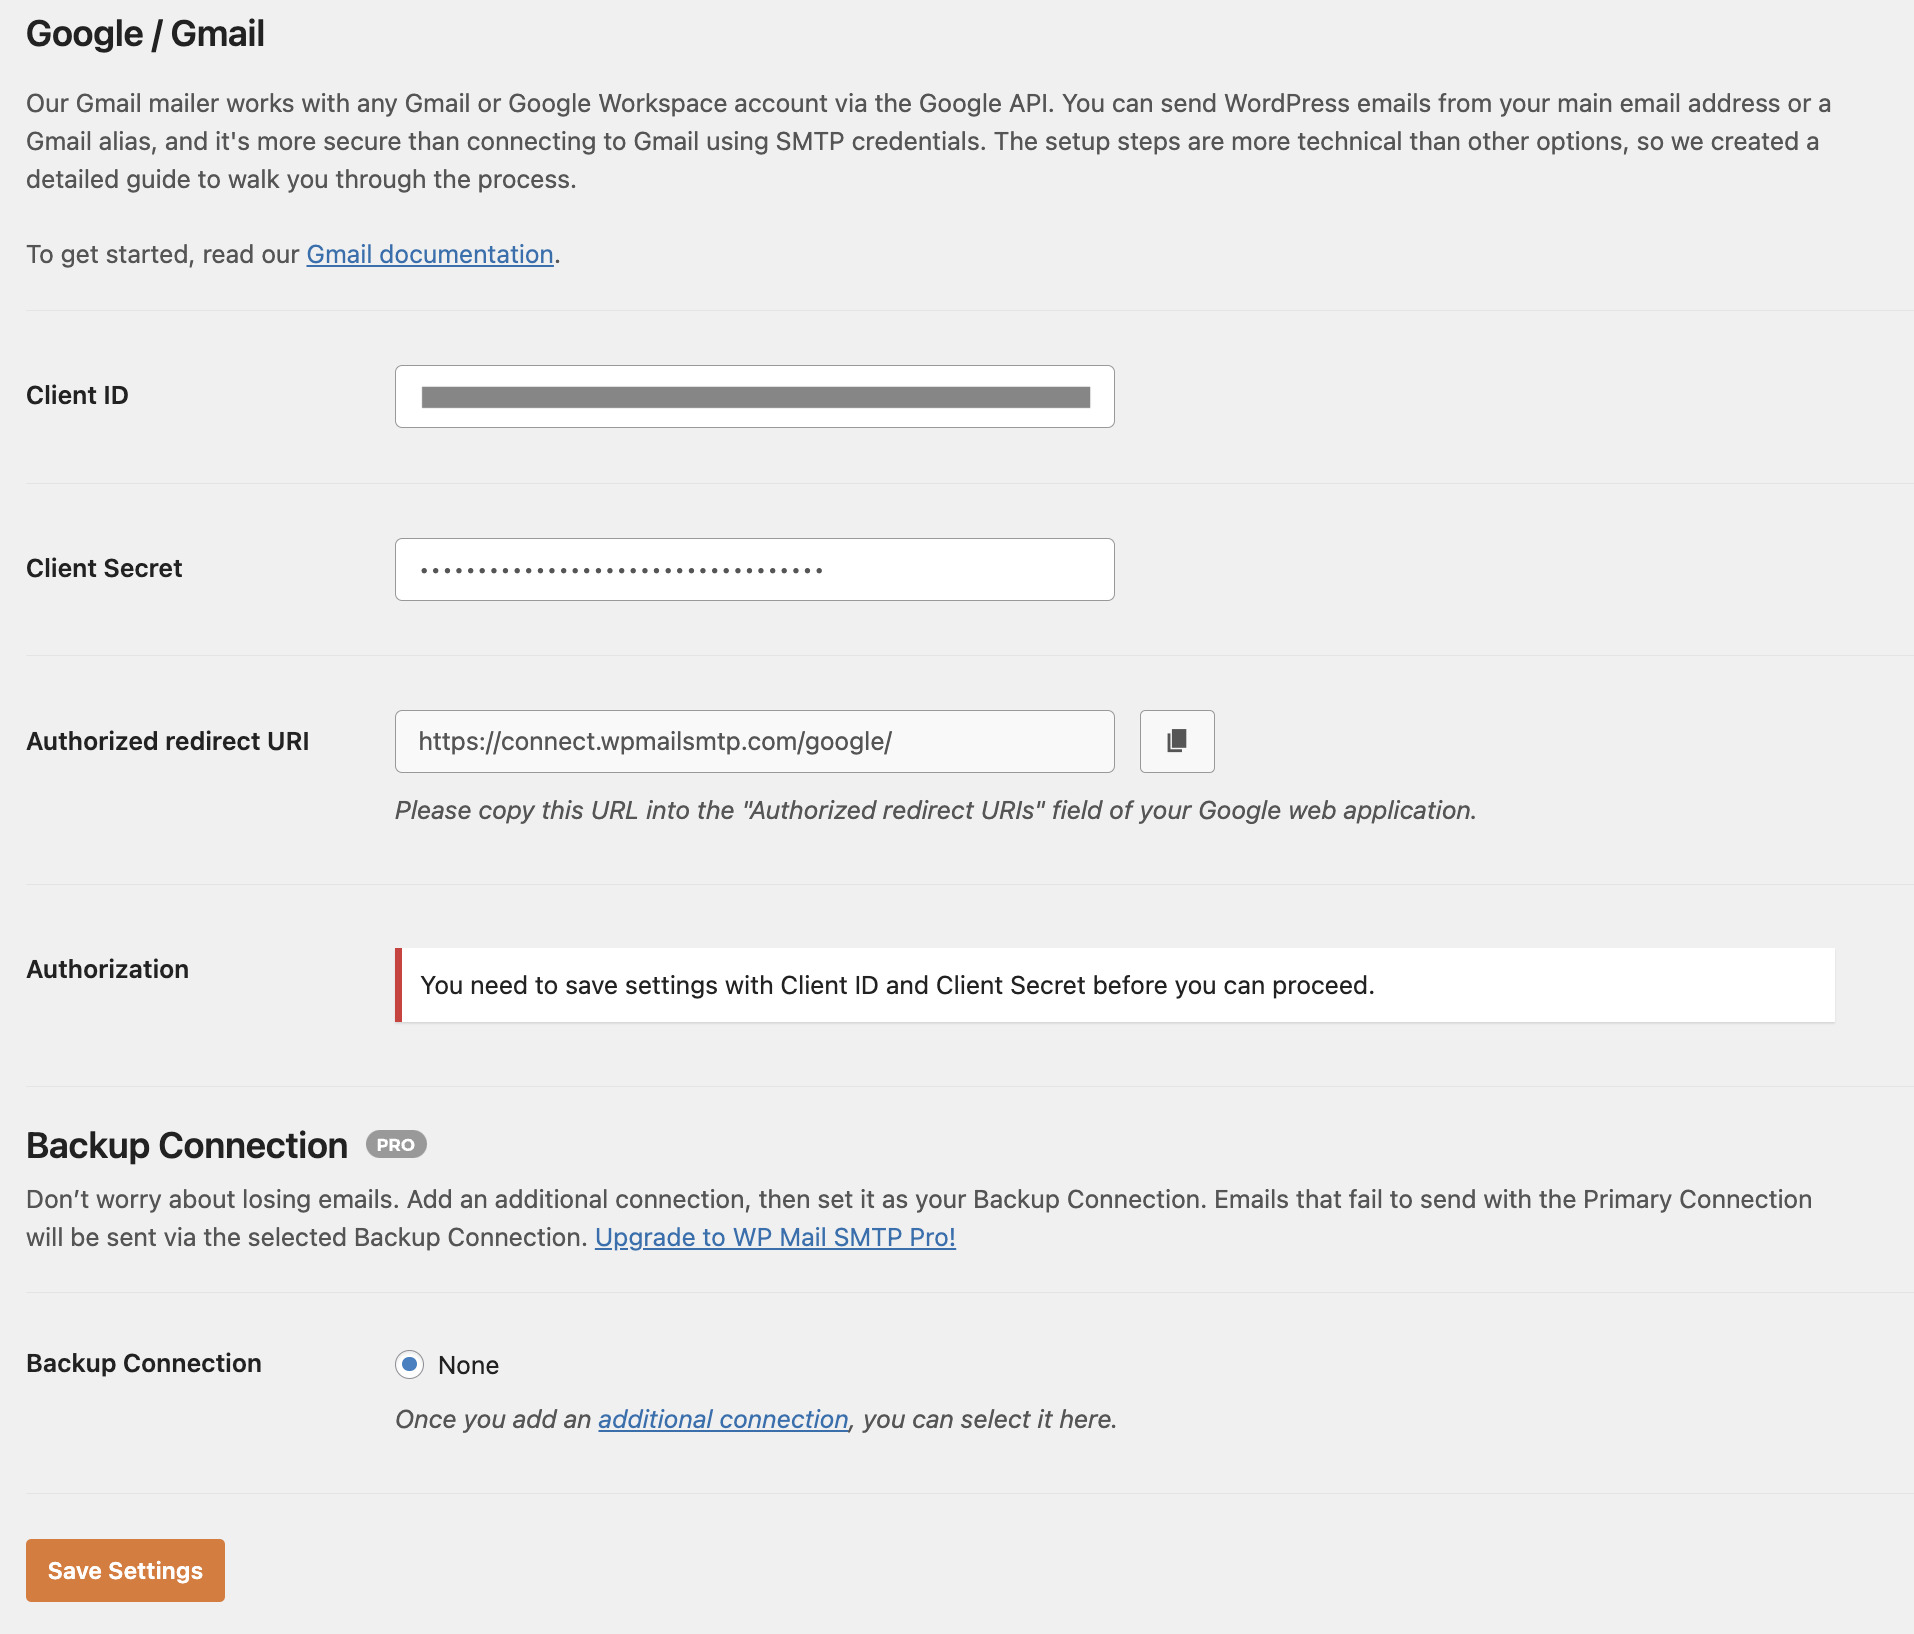
Press ‘Save Settings’ and then ‘Allow plugin to send emails using your Google account’.
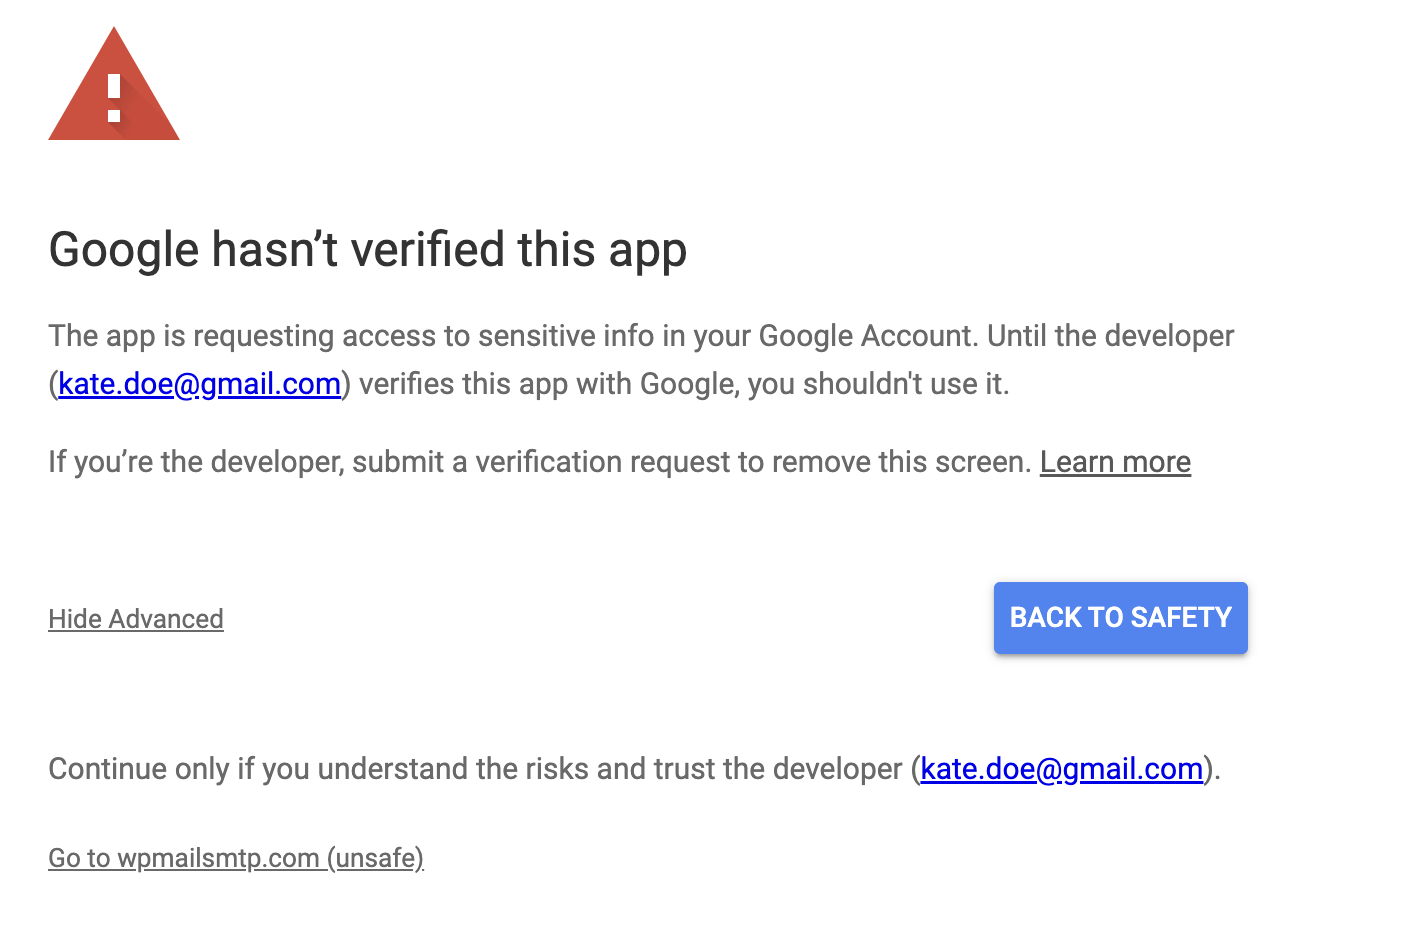
You’ll be prompted to sign into your Google account. If you’re using Gmail, you’ll see the warning ‘Google hasn’t verified this app’. Press ‘Advanced’ and click ‘Go to wpmailsmtp.com (unsafe)’. Then press ‘Continue’.
With Google Workspace, you’ll immediately see the window below. By clicking ‘Continue’, you’ll grant permission to the WP Mail SMTP to send emails.

Gmail SMTP is now connected to your WordPress website with Google API.
Check out our blog post to learn how to send emails with Gmail API from other programming languages.
Integration using SMTP credentials
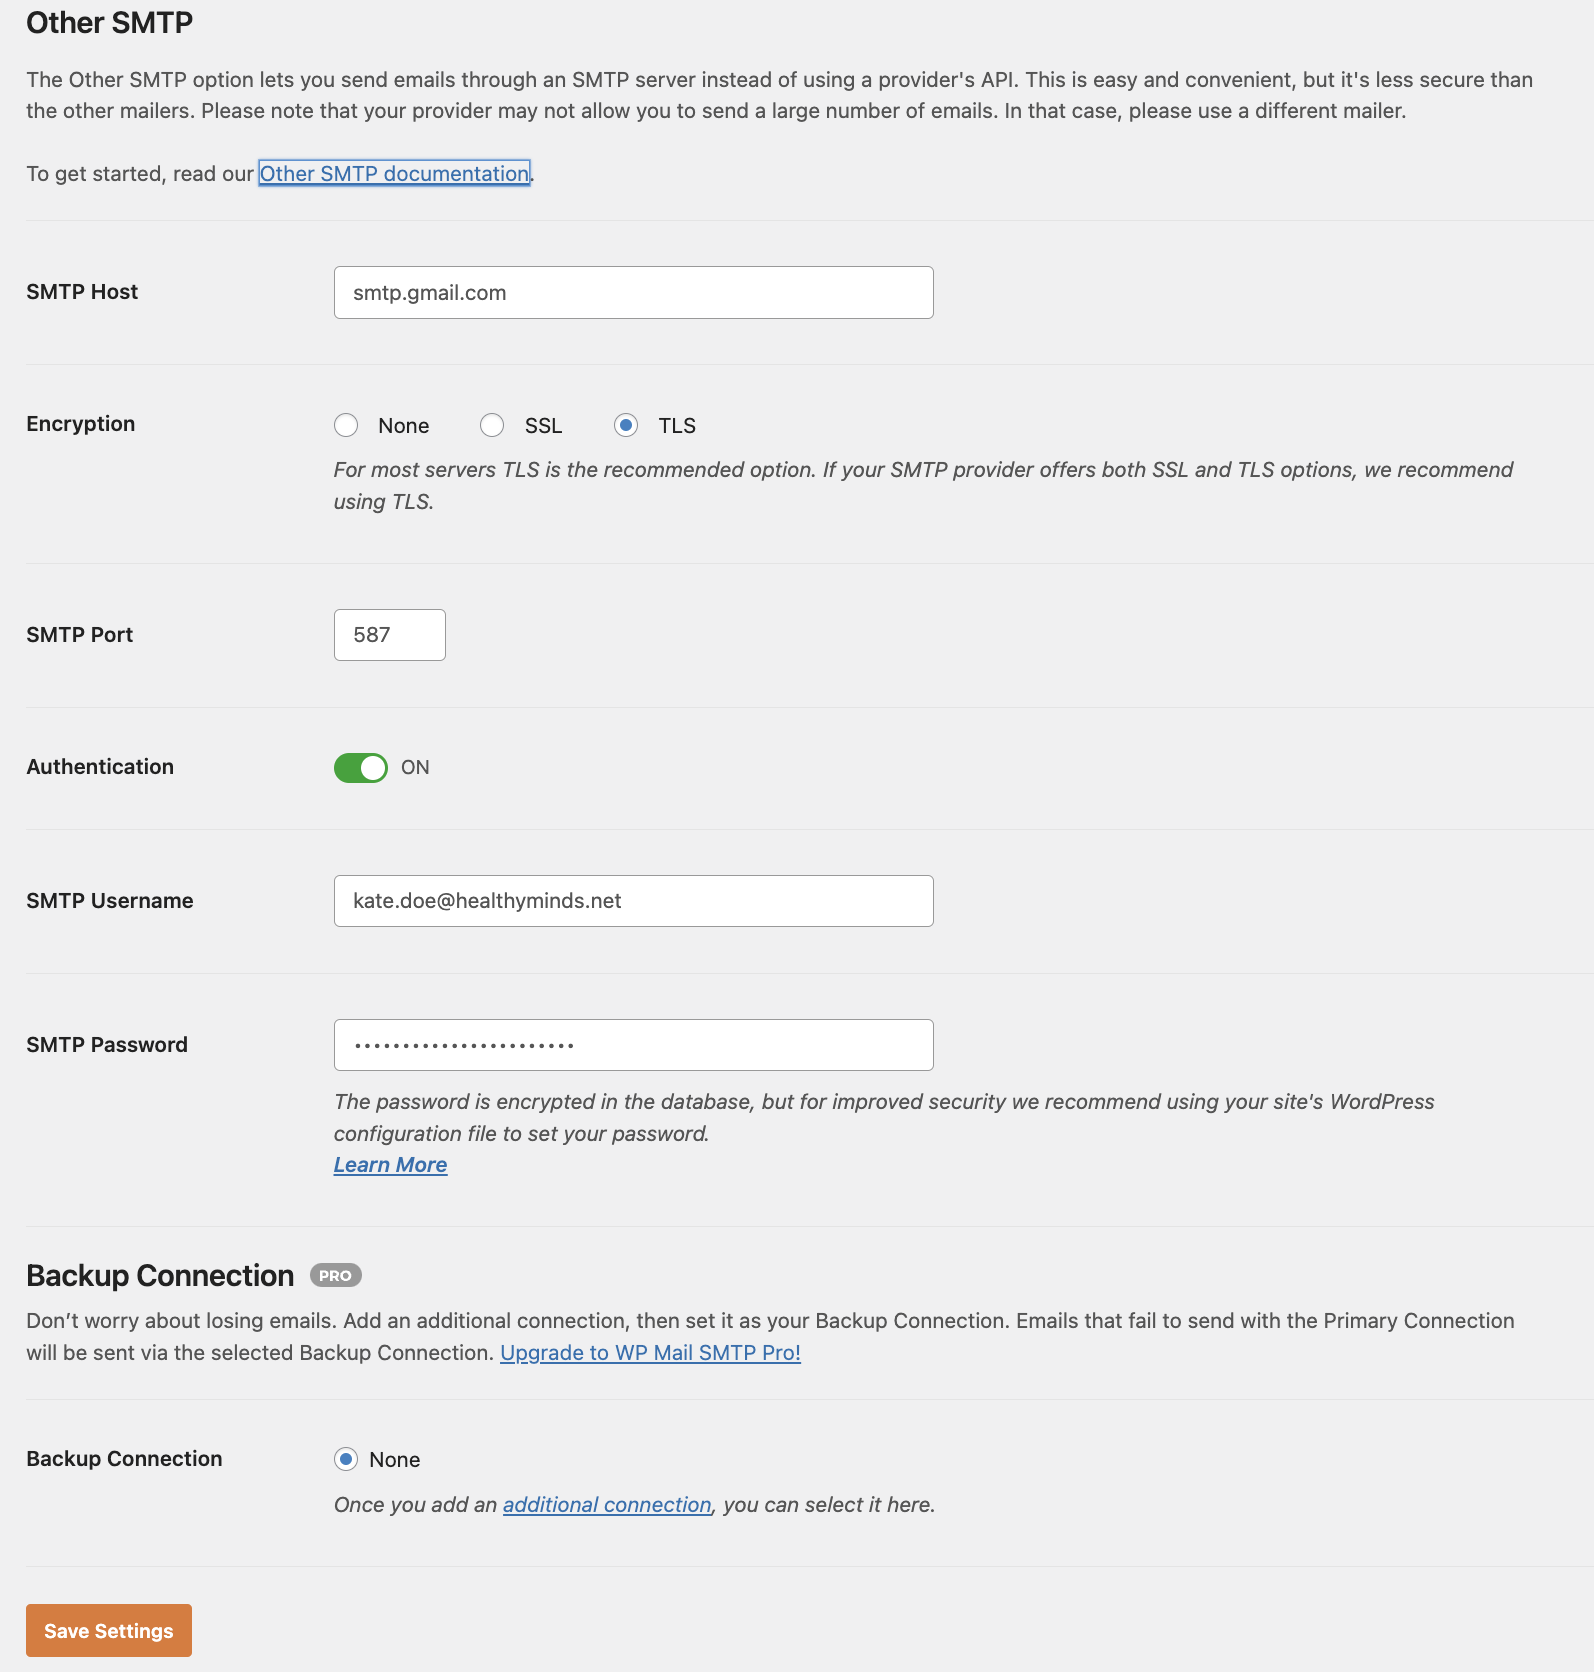
After configuring From Email and From Name in the WP Mail SMTP settings page, choose ‘Other SMTP’ instead of the ‘Google/Gmail’ mailer. ‘Other SMTP’ tab will appear underneath the mailer selector. Fill out the fields with the Gmail SMTP settings:
- SMTP Host: smtp.gmail.com;
- Encryption: None, SSL, or TLS (we recommend choosing either SSL or TLS for security reasons);
- SMTP Port: 465 or 587 (will be selected automatically when you choose encryption);
- Authentication: On or Off (we recommend toggling the switch on);
- SMTP Username: Your Gmail or Google Workspace email address (for example, kate.doe@healthyminds.net);
- SMTP Password: Your Google account app password (you’ll learn how to set up the app password here).
Click ‘Save Settings’ and you’ll be ready to use WP Mail SMTP with Gmail’s SMTP credentials.
WP Mail SMTP plugin can also be used to send emails from WooCommerce or Contact Form 7. The integration is similar to what we’ve described above. Refer to the WP Mail SMTP’s troubleshooting guides for more information.
Why is it better to set up SMTP with WP Mail SMTP using Email API?
As mentioned above, both Gmail and Google Workspace have limitations on sending volume.
These limits apply no matter which Google Workspace plan you purchase. This means that you won’t be able to scale your email infrastructure effectively when you start acquiring thousands of new users.
Consequently, an SMTP service is a better option for sending bulk transactional emails in WordPress.
Mailtrap Email API/SMTP API is an email-sending service for developers with highly customizable API and industry best analytics.. It combines multiple email deliverability best practices, including:
- Dedicated IP with automatic warmup;
- Domain verification with SPF, DKIM, and DMARC records;
- Suppression management;
- Ready-to-use unsubscribe links and footers;
- Email tracking with webhooks.
Unlike Gmail or Google Workspace, Mailtrap Email API/SMTP can be scaled by upgrading the plan and increasing sending volume.
In this tutorial, we’ll integrate Mailtrap Email API/SMTP using the SMTP credentials. The integration will be similar to Gmail’s SMTP integration. But first, you should go to Mailtrap.io, create an account, and verify your domain. You can find detailed instructions on that in our knowledge base guide.
After that, everything’s quite simple:
- Navigate to the ‘API and SMTP’ tab and choose ‘SMTP’;
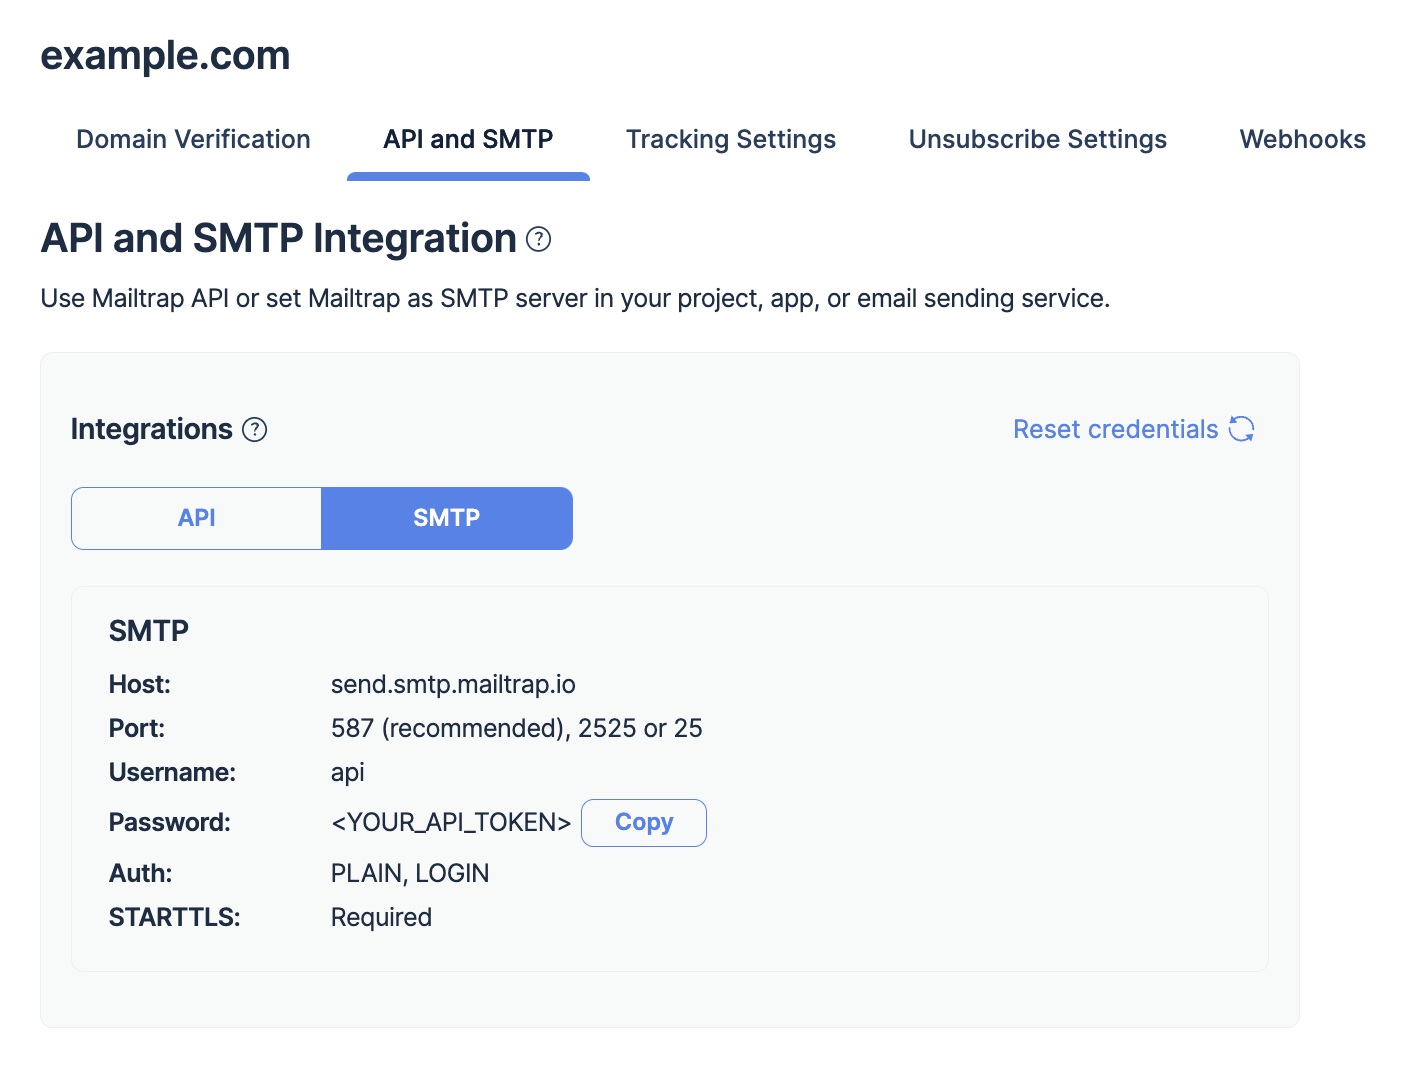
- Copy your credentials. While the username is set to api by default, the password is different for every user. Make sure you don’t reveal it to anyone. Storing and managing these passwords securely is crucial, and using a reliable password management tool can assist you in accomplishing this goal. Now go to your WordPress website;
- Similar to the Gmail SMTP setup, open the settings of WP Mail SMTP, scroll down and choose ‘Other SMTP’ as your mailer;
- Paste the credentials you copied from Mailtrap. The complete form should look like this:

- Click ‘Save Settings’ and you’ll see the confirmation message.
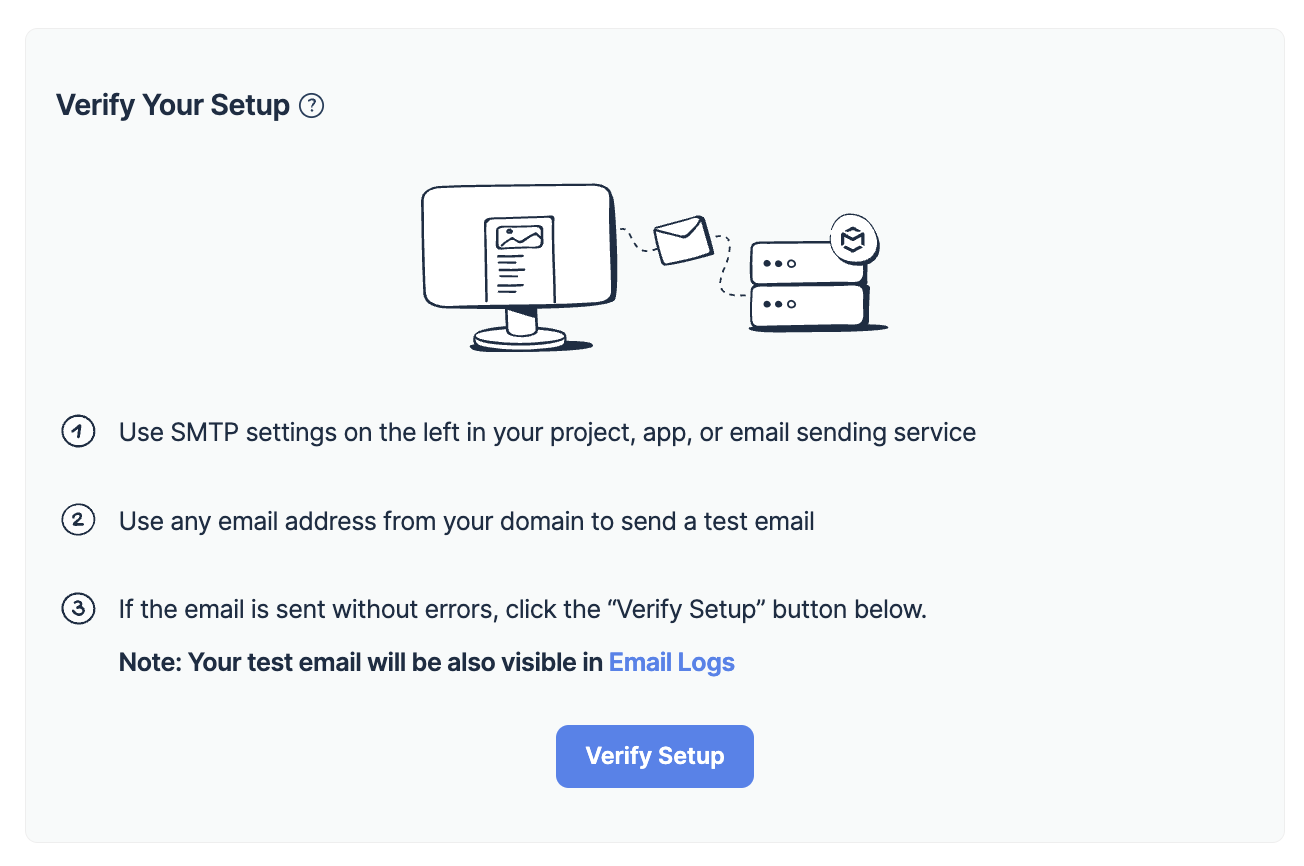
- Test the SMTP connection from the ‘Email Test’ tab;
- Once you see the test email in your inbox, go back to Mailtrap Email API/SMTP and click verify setup.
That’s it – you’re ready to start sending emails from WordPress with Mailtrap Email API/SMTP.
How to set up WordPress Gmail SMTP integration with Easy WP SMTP plugin
Integrating the Easy WP SMTP plugin is, well, quite easy. To get started, install and activate the plugin in your WordPress website.
Enter ‘Settings’ to configure WordPress SMTP settings. Type in From Email and From Name. Optionally, you can also set the ‘Reply-To’ address if you want to use another email in the reply-to header. It’s also possible to specify the BCC address for your emails.
After that, you’ll need the Google SMTP credentials we used above. Don’t forget to use the Google app password as the SMTP password.
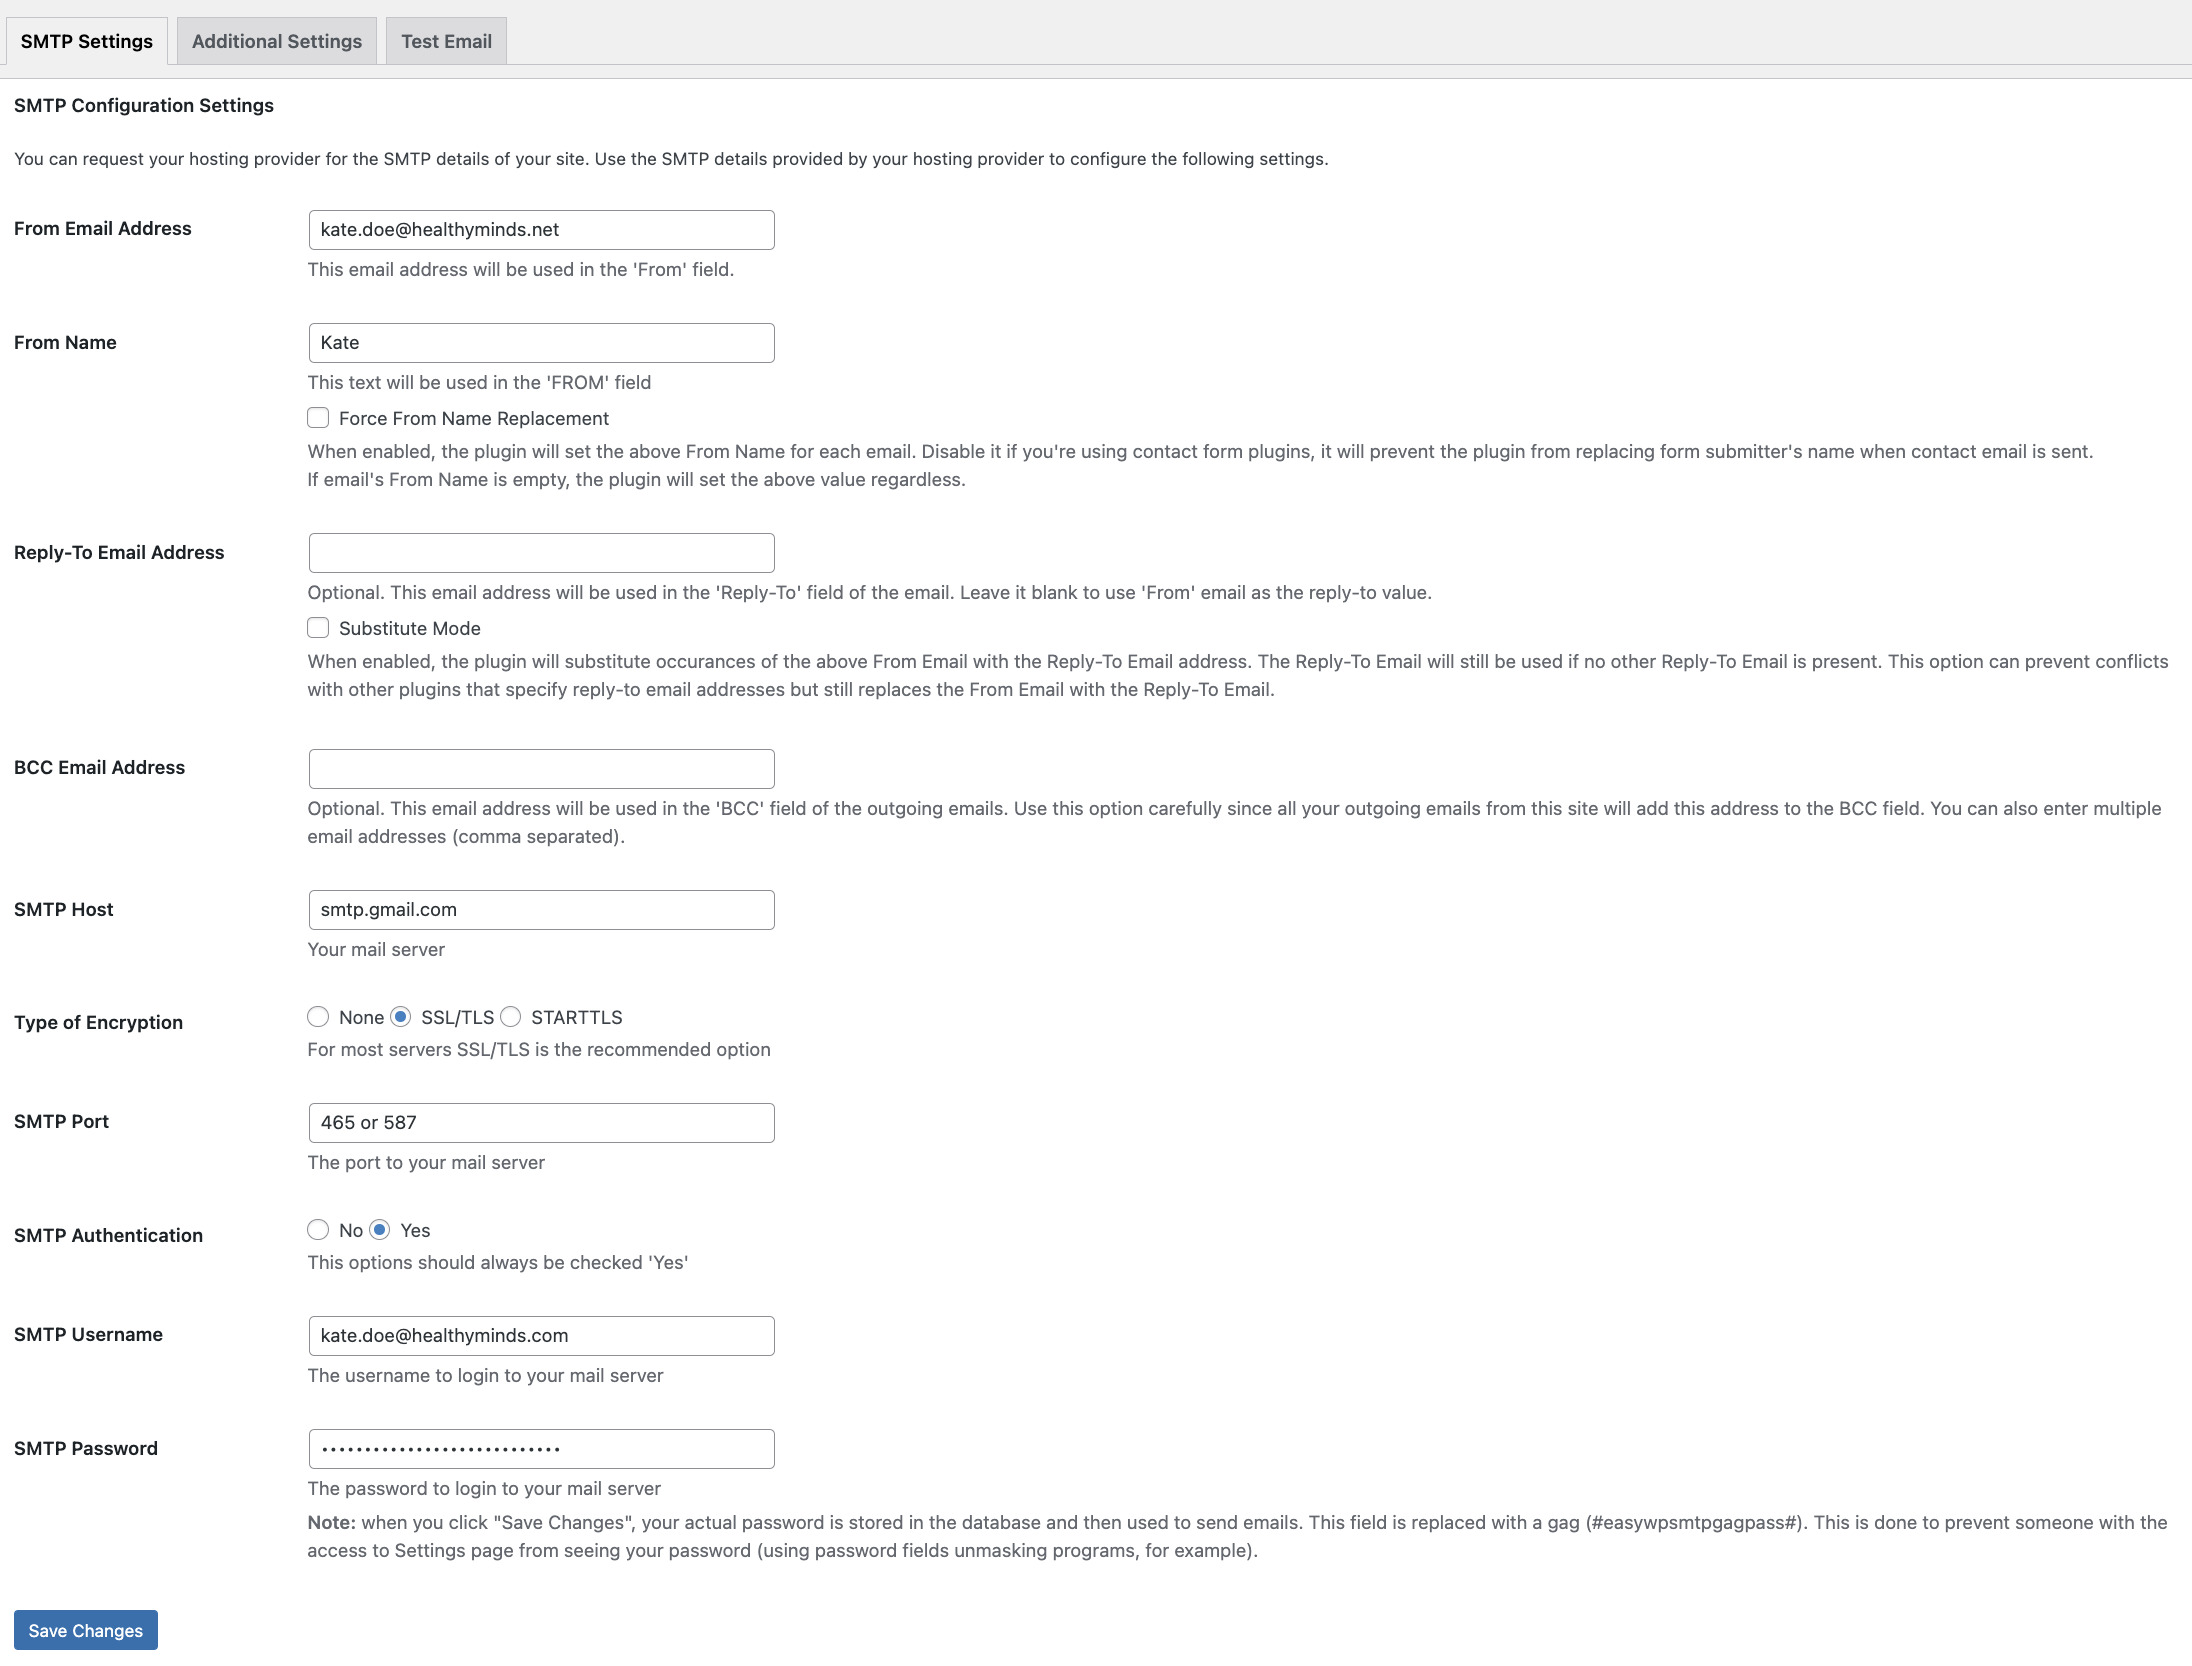
Click ‘Save Changes’ and the SMTP connection will be set up.
If you don’t want to use WP Mail SMTP or Easy WP SMTP plugins for some reason, you can opt for other options such as the Gmail SMTP plugin or Post SMTP Mailer/Email Log.
Can you set up WordPress Gmail SMTP without plugin?
You can certainly set up WordPress Gmail SMTP without a plugin, but it requires some technical tweaking. To be more precise, you’d have to modify the wp_config.php file and set SMTP settings manually. After that, you’d have to configure the functions.php file. For more details, check out our guide on sending emails from WordPress.
How can you test email sending in WordPress?
Testing email sending in WordPress is important to ensure everything we did above works the way it should. One way to do this is to send a test email with Gmail SMTP.
If you’re using the WP Mail SMTP plugin, go to the tab ‘Test Email’, enter the desired email address, and press ‘Send Email’. The message should end up in your inbox. You can then check ‘Email Logs’ to find the email you just sent. However, don’t expect detailed reports.
The same goes for Easy WP SMTP. It also has a ‘Test Email’ tab from which you can send the test email. This plugin provides email debug logs, but they are far from perfect if you need logs for analytical purposes.
Final words
This wraps up our tutorial on setting up WordPress Gmail SMTP. We discussed a few popular options with WP Mail SMTP and Easy WP SMTP plugins.
We also mentioned Mailtrap Email Delivery Platform that combines Email API and Email Sandbox. With its help, you can test emails in staging, send them to the inboxes, and control their performance.
Thanks for reading!