Skip to Navigation

As a robust CRM platform, Salesforce enables users to send all sorts of emails from its platform, from customer service emails to full-blown automated marketing campaigns.
However, it can be a bit hard to figure out which method you should be using. Should you send emails with Gmail or Yahoo? Should you use an Email Relay? Maybe you should build Flows and send automated emails?
In today’s comprehensive guide, we answer all these (and some other) questions and provide a step-by-step tutorial on sending emails from Salesforce.
Email sending limits in Salesforce
Salesforce has several sending limitations based on the type of account and plan you’re using.
Sending limits for licensed orgs
Each licensed Salesforce org (i.e., orgs using the paid services) is allowed to send single emails to up to 5,000 external email addresses per day. The daily email limit is based on GMT and is renewed after midnight. By ‘external’ emails, Salesforce means any addresses not associated with a Contact, User, or Lead. The same limitation applies while sending mass or list emails.
For orgs registered before Spring 2019, the daily limit is enforced only when using Apex or Salesforce APIs with the exception of REST APIs.
For orgs registered in Spring 2019 or later, the daily limit also applies to emails sent through email alerts, simple email actions, Send Email actions, and REST API.
Additionally, each user in the org has their own hourly limits – they can send emails to up to 250 external recipients per hour.
Do keep in mind that each email address in the ‘To’, ‘Cc’, and ‘Bcc’ fields counts as a separate call while sending emails from Apex or API. So, if you had one address in each, it would count as three emails.
If you attempt to send emails after reaching this limit, you’ll encounter an error (SINGLE_EMAIL_LIMIT_EXCEEDED).
For more details, refer to the official Salesforce documentation.
Sending limits for developer and trial accounts
Developer Edition and trial orgs have less generous daily limits. Each user can send emails to up to 50 recipients per day, with each email having a maximum of 15 recipients per day. Up to 10 recipients per day are allowed if you’re sending a List Email or Mass Email.
Also, you can have only 15 recipients per day in workflows.
These limits apply to user-to-user, Apex, workflow, mass, and single emails.
How to send email in Salesforce
There are multiple email-sending configurations both in Salesforce Classic and Salesforce Lightning Experience. These configurations vary based on the email service provider or email infrastructure you’re using.
How to send emails through external email services
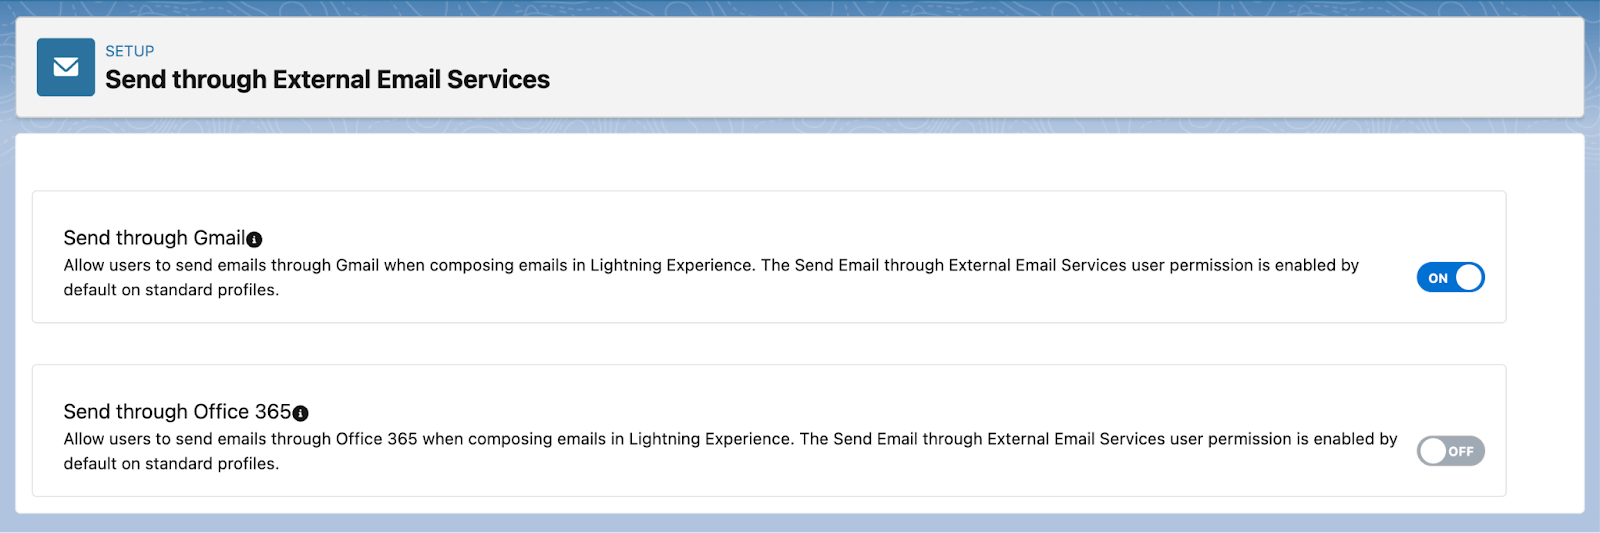
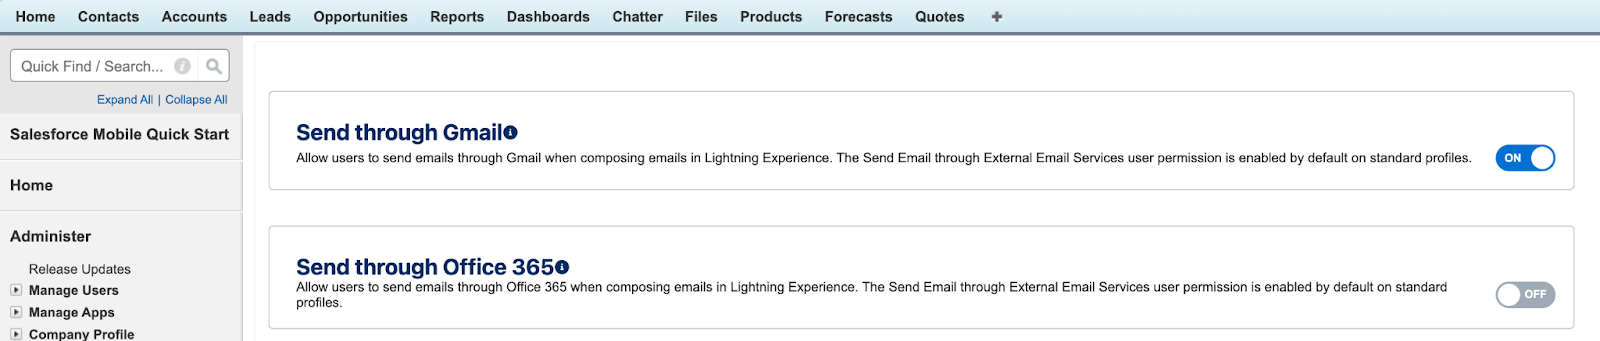
The easiest way to send emails from Salesforce is via Gmail or Microsoft 365 (labeled as Office 365 in the UI). You can switch on sending directly from the platform without having to go back and forth between your Gmail/Microsoft 365 and Salesforce accounts.
For all the instructions below, we’ll assume you’ve already set up Salesforce account. If not, go to salesforce.com, choose the desired subscription, and fill out the registration form (or contact support, depending on the product you’re choosing).
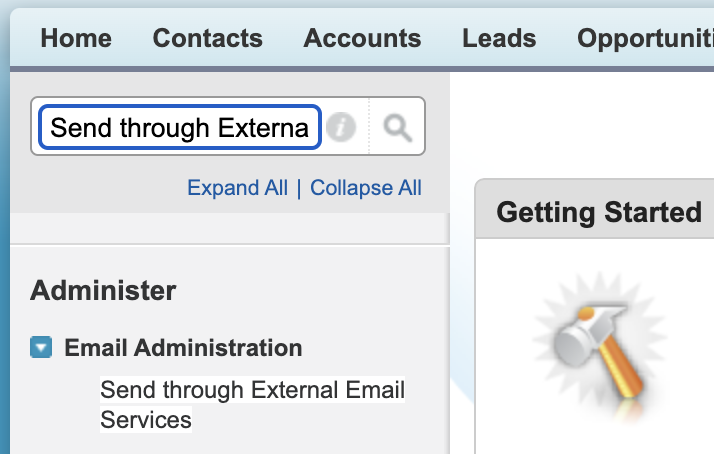
The following steps apply to both Lightning Experience and Classic versions.
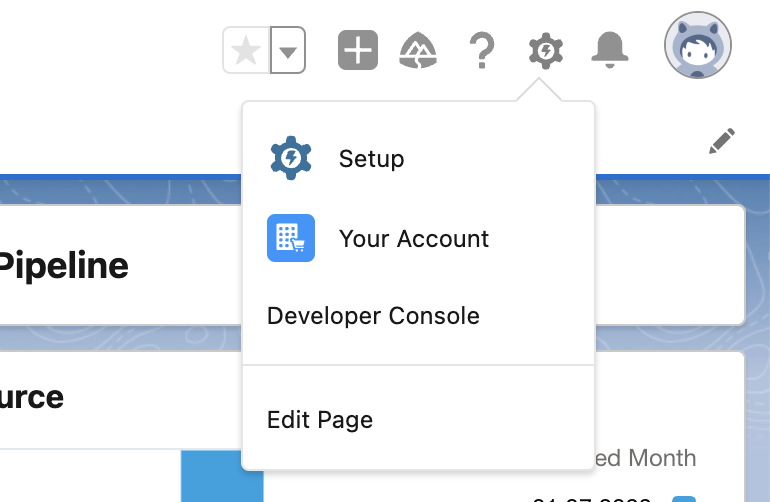
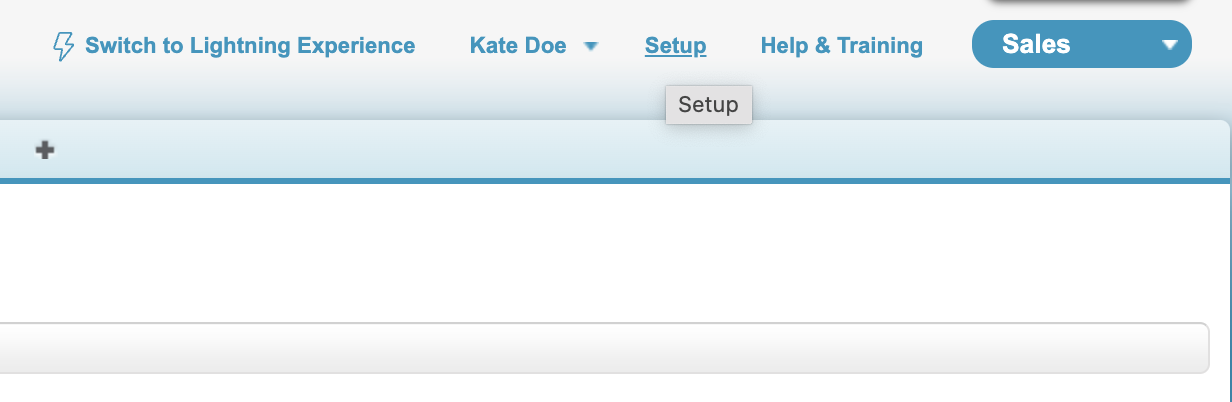
Sign into your Salesforce account and navigate to Setup.
In the Quick Find box, type in Send through External Email Services, hit enter, and click on the search result.
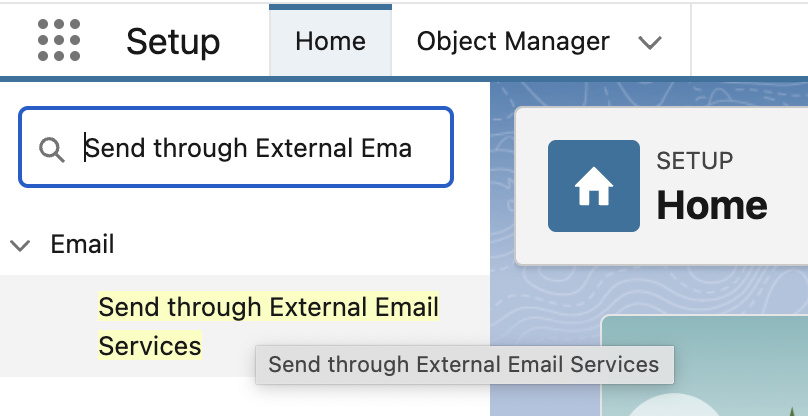
Toggle either Gmail or Office 365, depending on which one you will use.
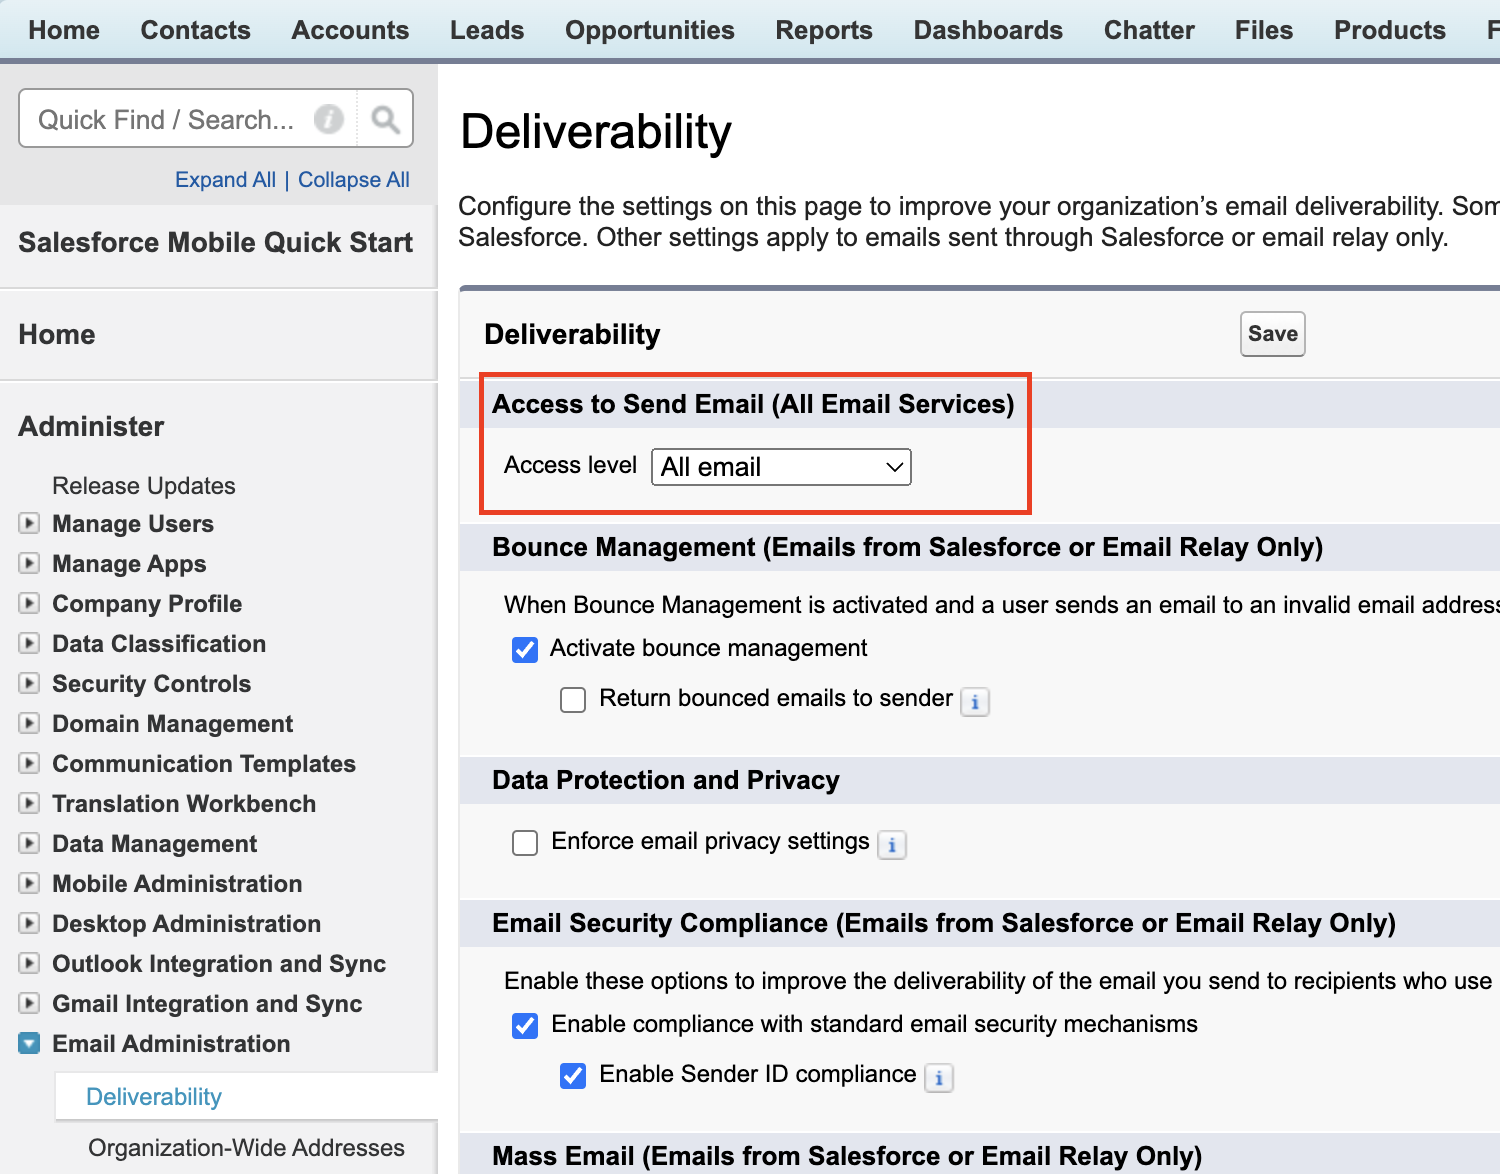
Then head over to the Deliverability under Email (Email Administration in Classic) in Setup and set Access to Send Email (All Email Services) to All Email. This will allow you to send all types of outbound emails.

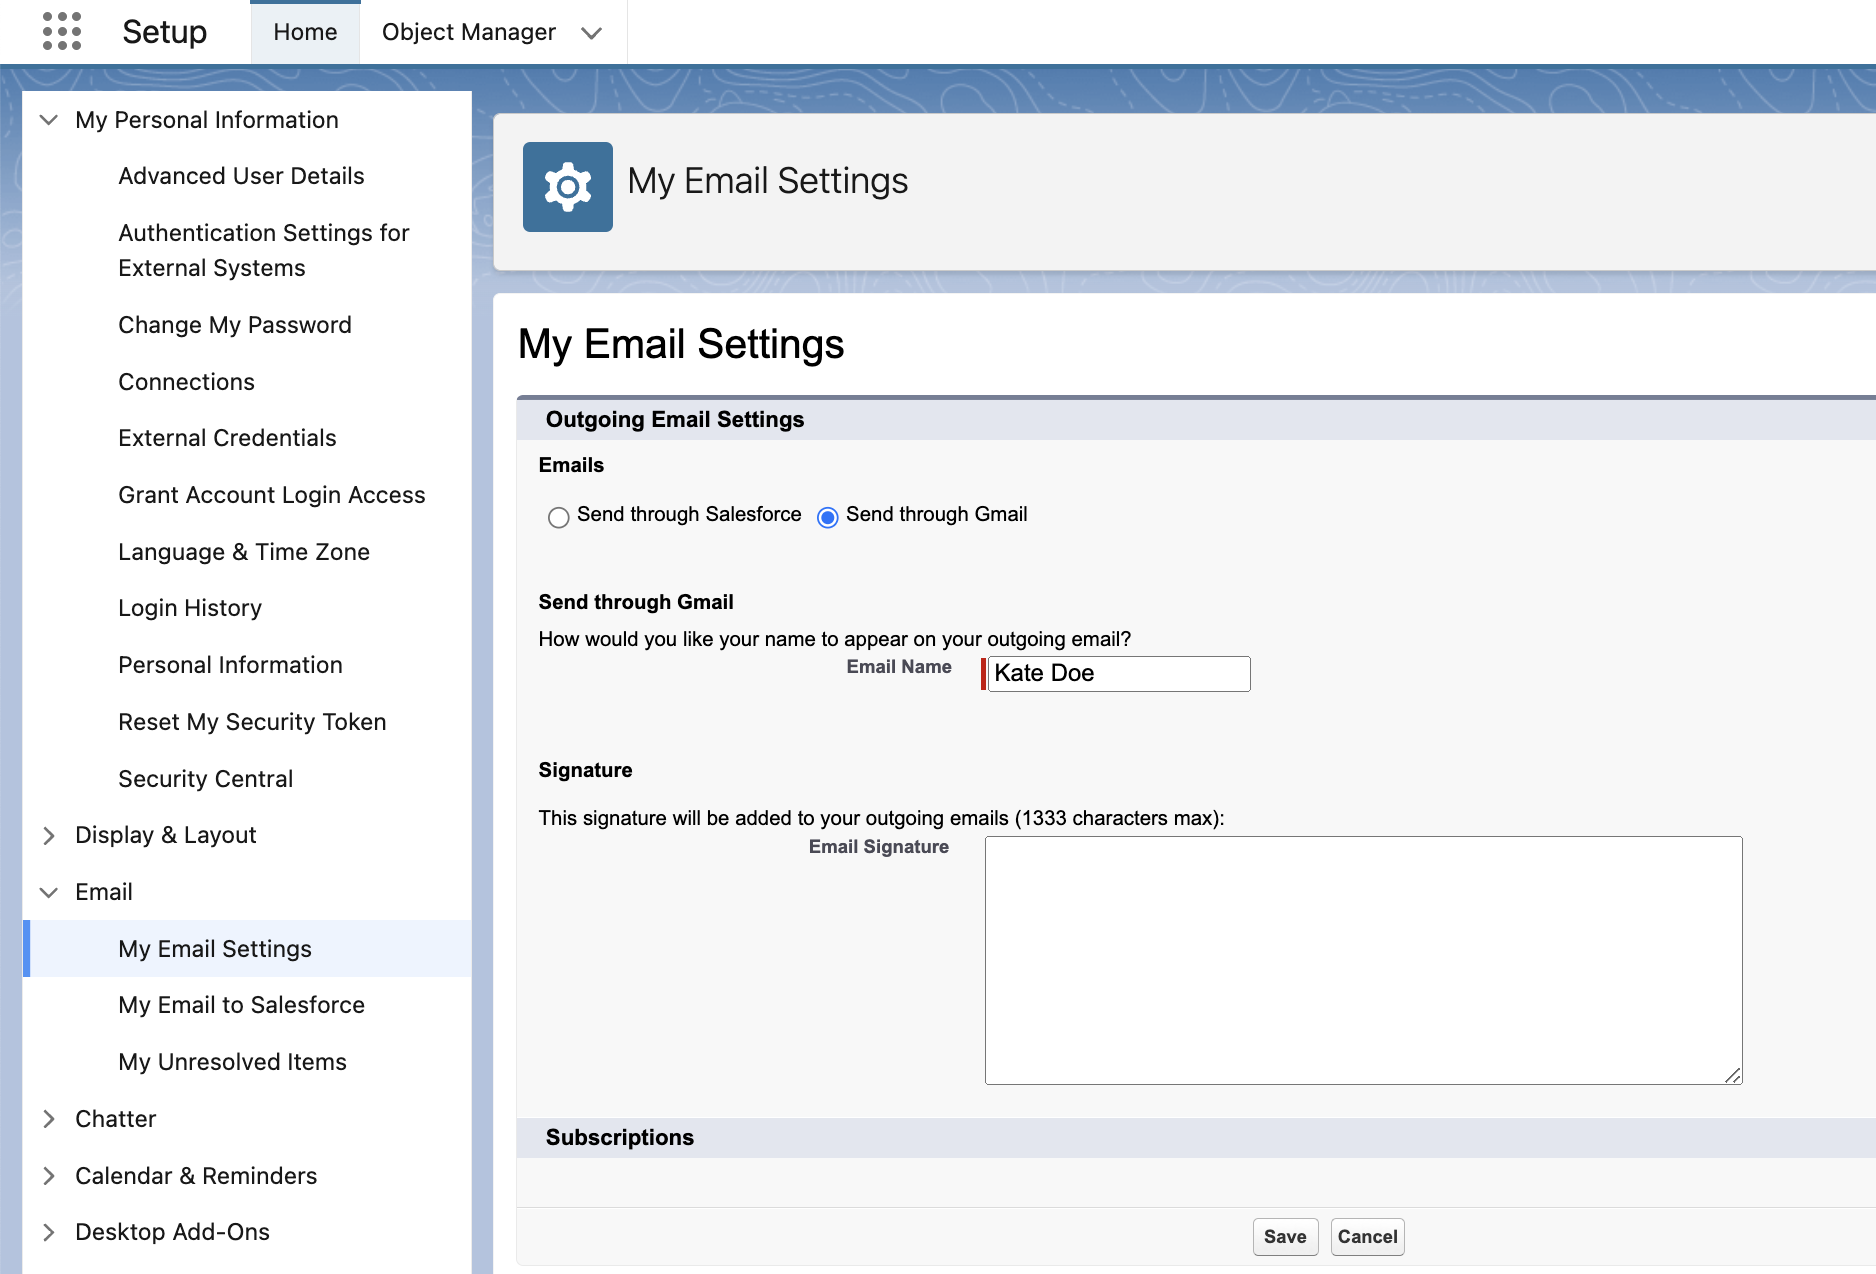
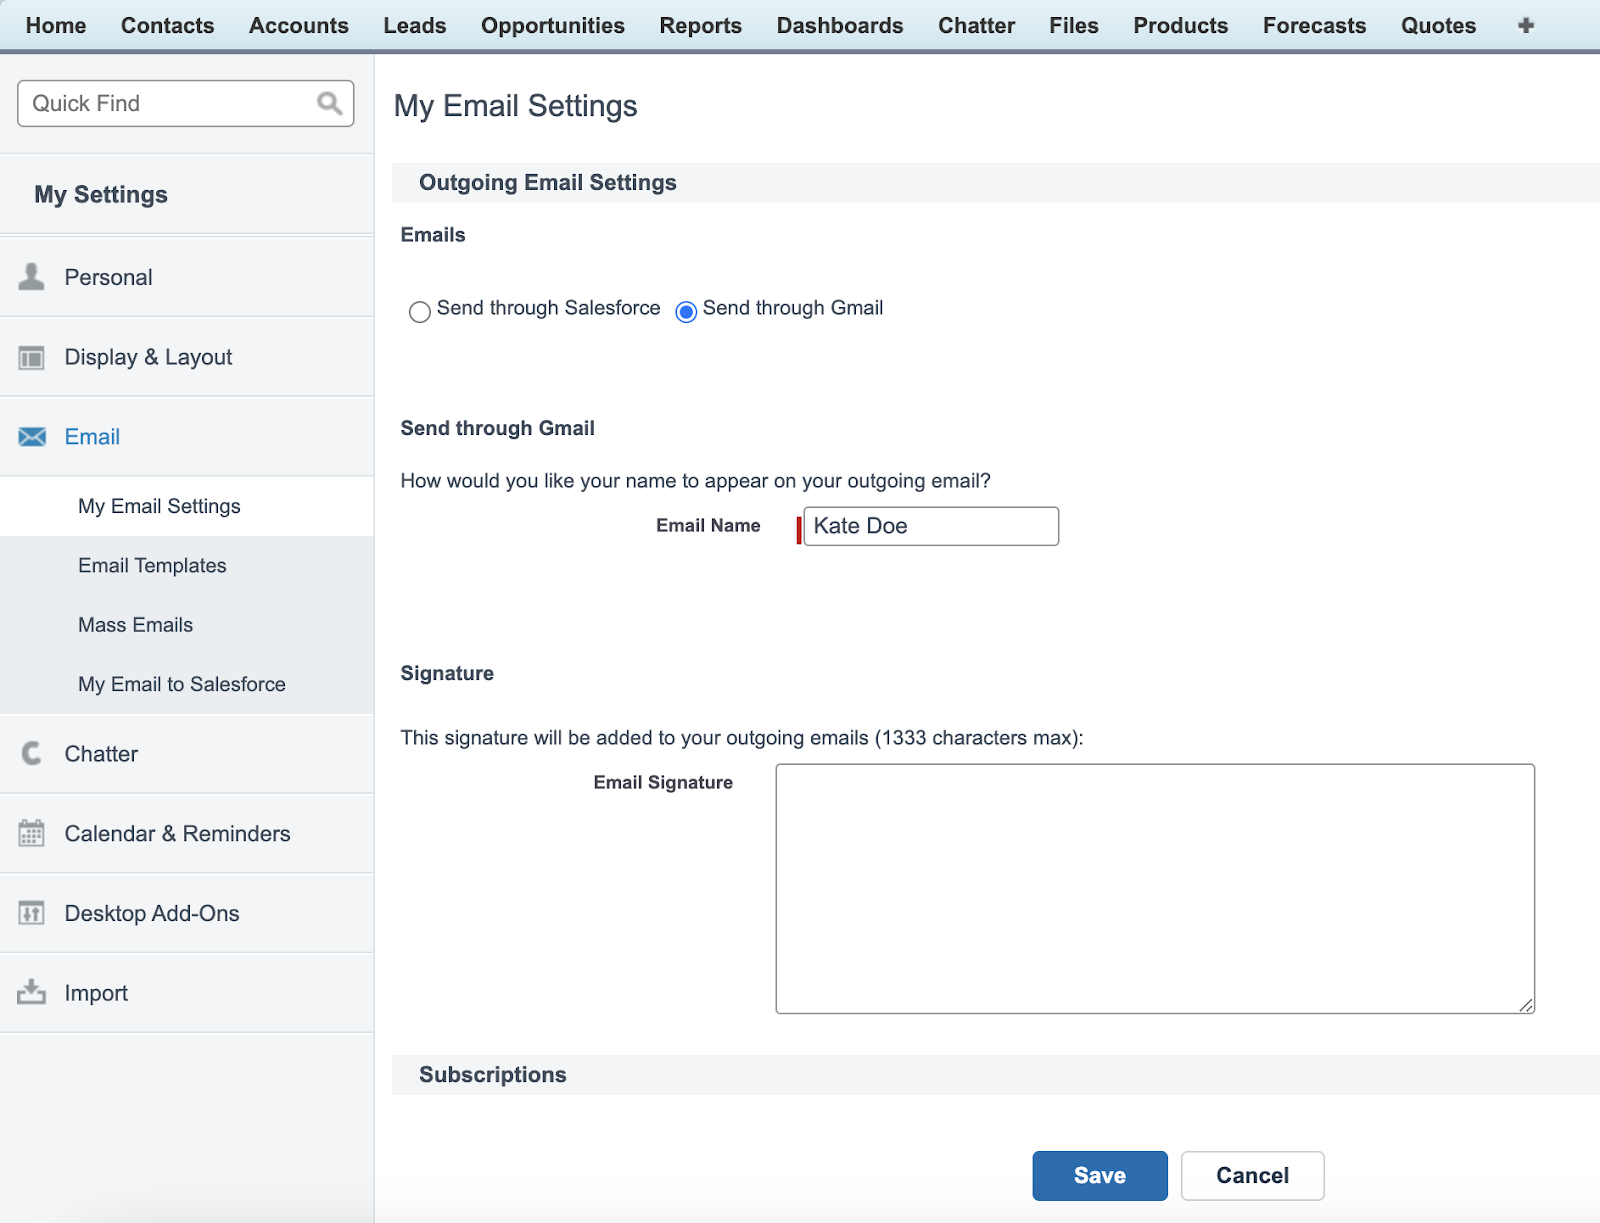
To configure email settings, go to Settings → My Email Settings. There, modify the sender name or set the email signature. You can also toggle between Send through Salesforce and Send through Gmail/Office 365 features. Once you’re done, click Save.
Note: The ability to change the sender name is only available for Gmail users. If you’re using Office 365, you won’t be able to access this feature.
Then, choose a contact to send an individual email or select a template. We go over different sending cases below.
Tip: Use Salesforce integration with Outlook and Gmail for seamless synchronization between the platforms. You’ll learn how to handle the setup here.
A couple of things to keep in mind:
- If you’re using Communities, you won’t be able to send emails with Gmail or Office 365.
- This feature isn’t available for Einstein Activity Capture and Salesforce Inbox users either.
- The emails you send through Gmail and Office 365 won’t be stored in Salesforce email logs, making it harder to track email delivery and deliverability. However, you can still access them in your email client or Gmail/Office 365 accounts.
- You can’t send emails from organization-wide email addresses with Gmail or Office 365. They are usually sent through Salesforce.
- Bounce management isn’t available with this feature.
- List emails and emails sent by triggers and workflow rules are sent from Salesforce, not from Gmail or Office 365.
How to send emails with your own domain and Salesforce
To sidestep the limitations of the Send through External Email Services feature, you can send emails directly from Salesforce. However, this functionality only works if you have your own domain. You could use Gmail, Outlook, or Yahoo/AOL accounts, but you’d still have to get a custom domain.
If you send emails directly from Salesforce, you’ll be leveraging the email servers provided by the platform itself.
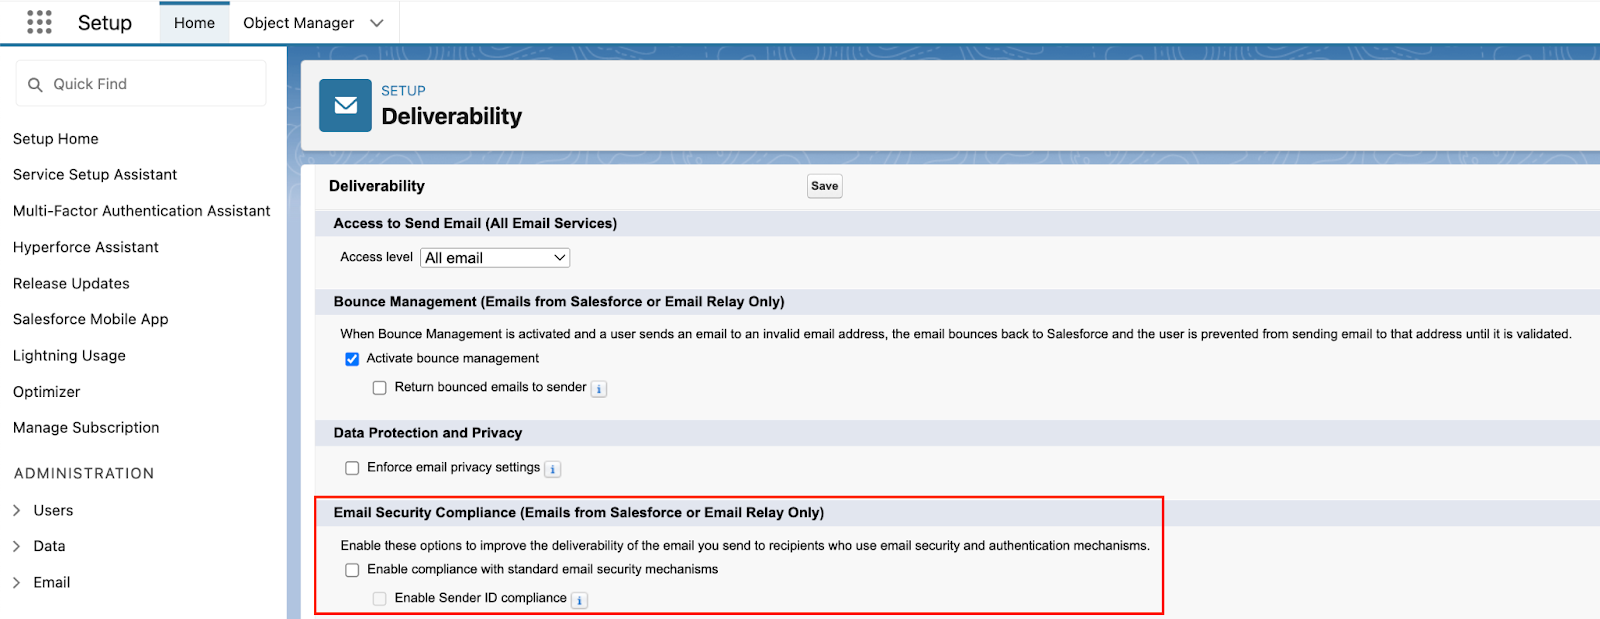
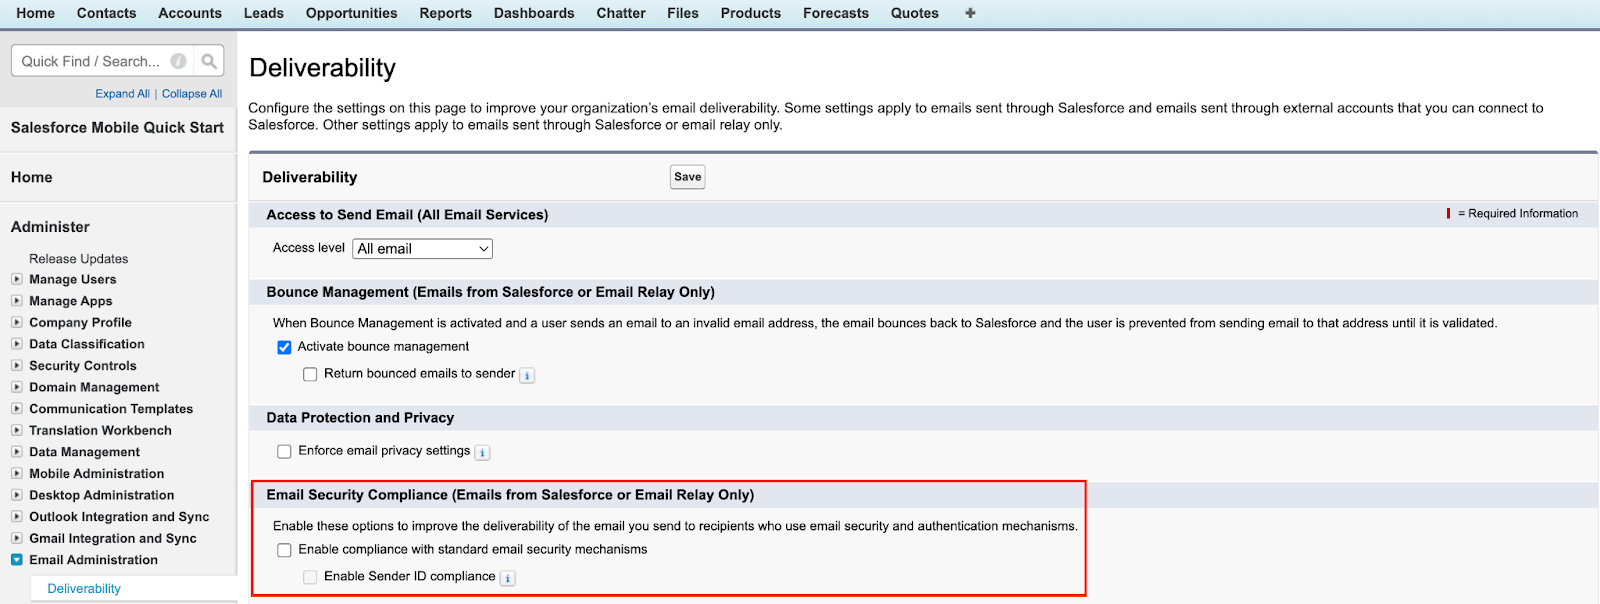
To enable it, head over to Setup → Email → Deliverability. Under the Email Security Compliance (Emails from Salesforce or Email Relay Only) tab, untick the box next to Enable compliance with standard email security mechanisms and Enable Sender ID Compliance.
Add Salesforce’s SPF record in the DNS records of your sending domain. For that, you’ll need access to the DNS control panel or the management console. The particular steps vary depending on your hosting provider so make sure you check their documentation for detailed instructions. Additional Salesforce-specific information is also available here.
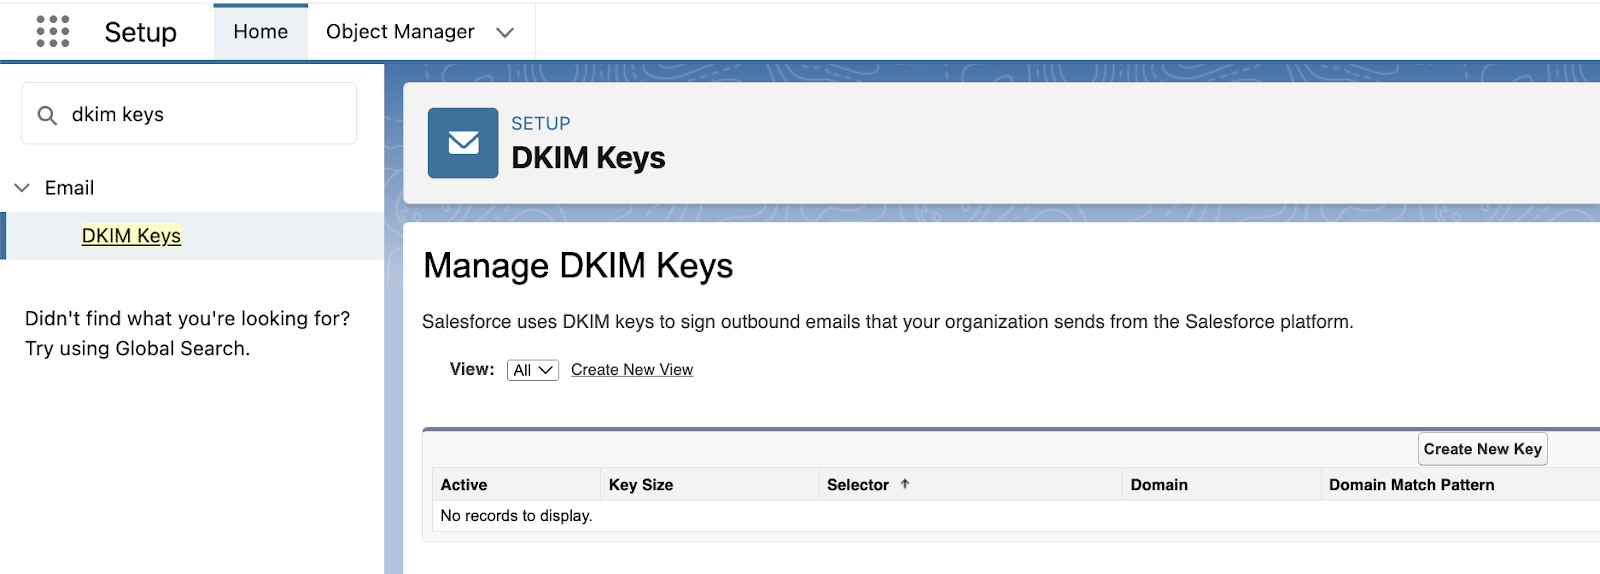
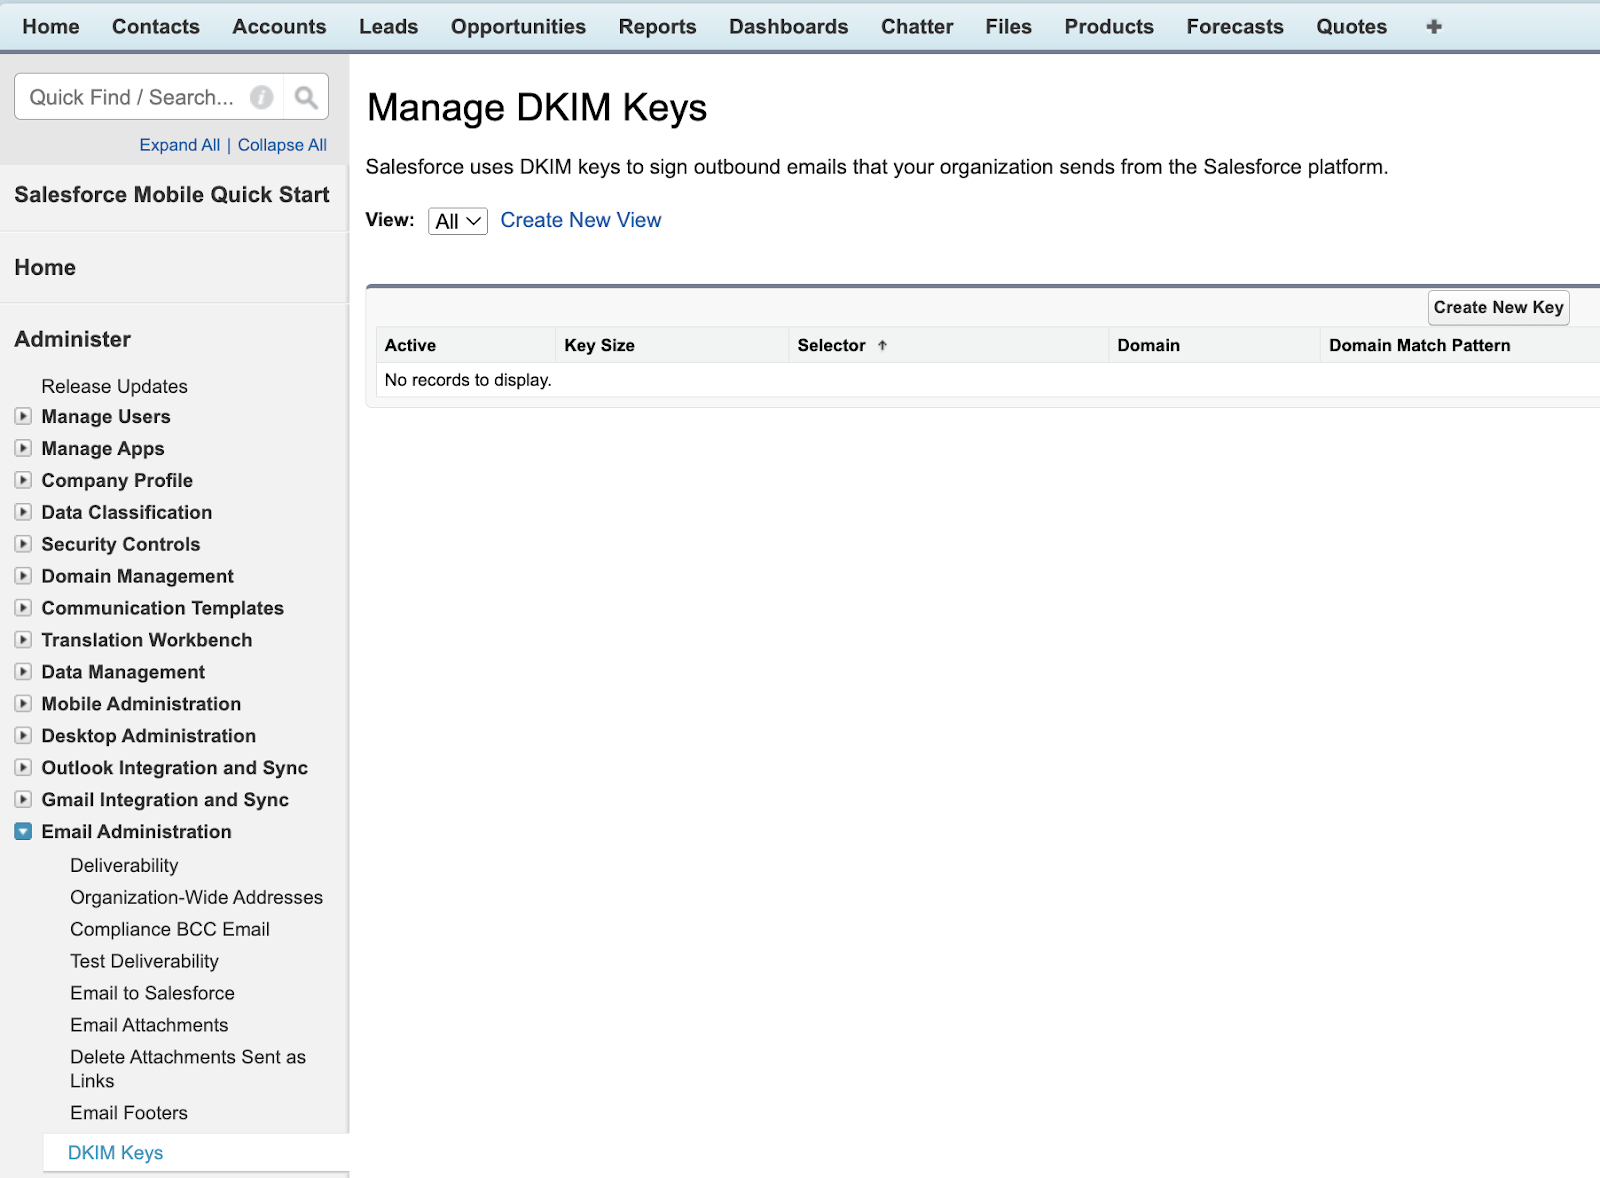
The final step is to set up Secure DKIM keys. This will ensure better email deliverability i.e., prevent email from going to spam.
Go to Setup and type DKIM keys in the quick find box. Click Create New Key.
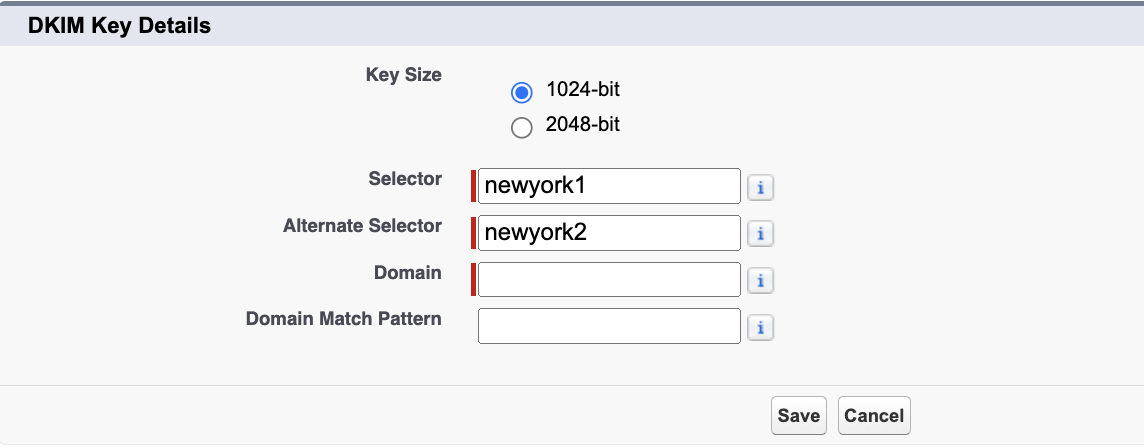
Choose the size of the RSA key. It’s recommended to use 2048-bit for more security, but you can use 1080-bit depending on the email recipients’ limitations.
Then enter unique values in the Selector and Alternate Selector fields. The latter will allow Salesforce to rotate your keys automatically.
The instructions on creating a DKIM key can be found here. Alternatively, read our blog post for more information or watch the video below.
Enter the domain name and configure the Domain Match Pattern. The pattern determines at what level the DKIM signature should be matched: domain, subdomain, or both. It should be a comma-separated list. For example, the pattern example.com,*.example.com will match at the domain and subdomain level.
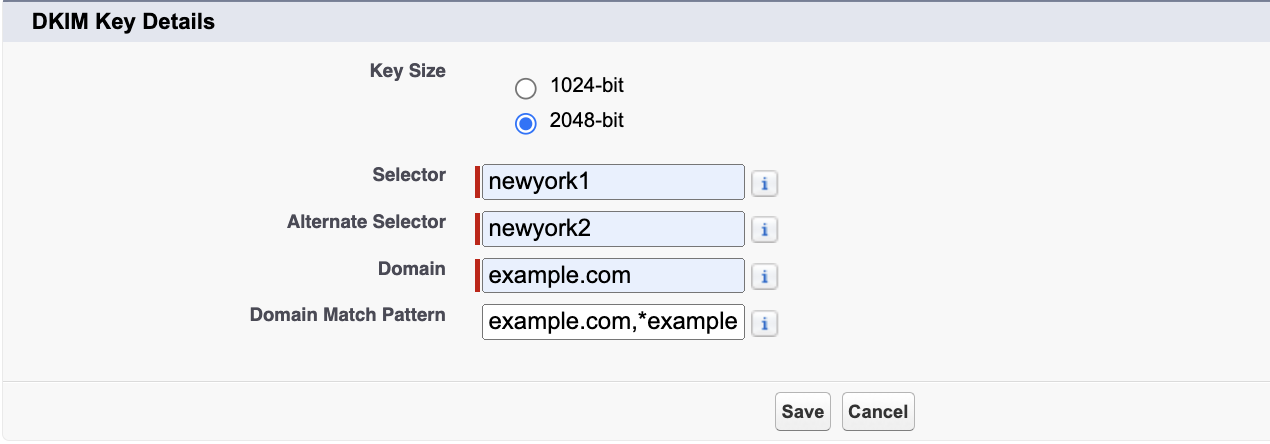
Click Save. At this point, Salesforce will publish your TXT records to DNS. Publication may take some time. Once it’s complete, you’ll be able to see your CNAME and alternate CNAME on the DKIM Key Details page.
Publish CNAME and alternate CNAME to your domain’s DNS and activate the DKIM keys from the DKIM Key Details page.
After that, you’ll be able to send emails from Salesforce Lightning Experience and Salesforce Classic with your own domain.
How to send an email from Salesforce with a third-party SMTP server and Email Relay
Salesforce also has an Email Relay feature that allows users to route their emails through the desired sending provider’s SMTP server or leverage any other SMTP server.
Opting for a reliable email service provider (ESP) is a good idea if you want to ensure high deliverability rates and send emails without volume restrictions. This is important whether you’re sending email marketing campaigns, mass emails, or vital transactional emails.
One such option is Mailtrap Email Sending – an infrastructure with high deliverability rates offering both SMTP and Email API services. Thanks to its smooth SMTP integration, you can easily add it to your Salesforce platform.
Of course, you’ll need to create an account to get started. Go to the sign-up page and follow the simple steps to register and add your domain. More instructions are available in the Getting Started Guide.
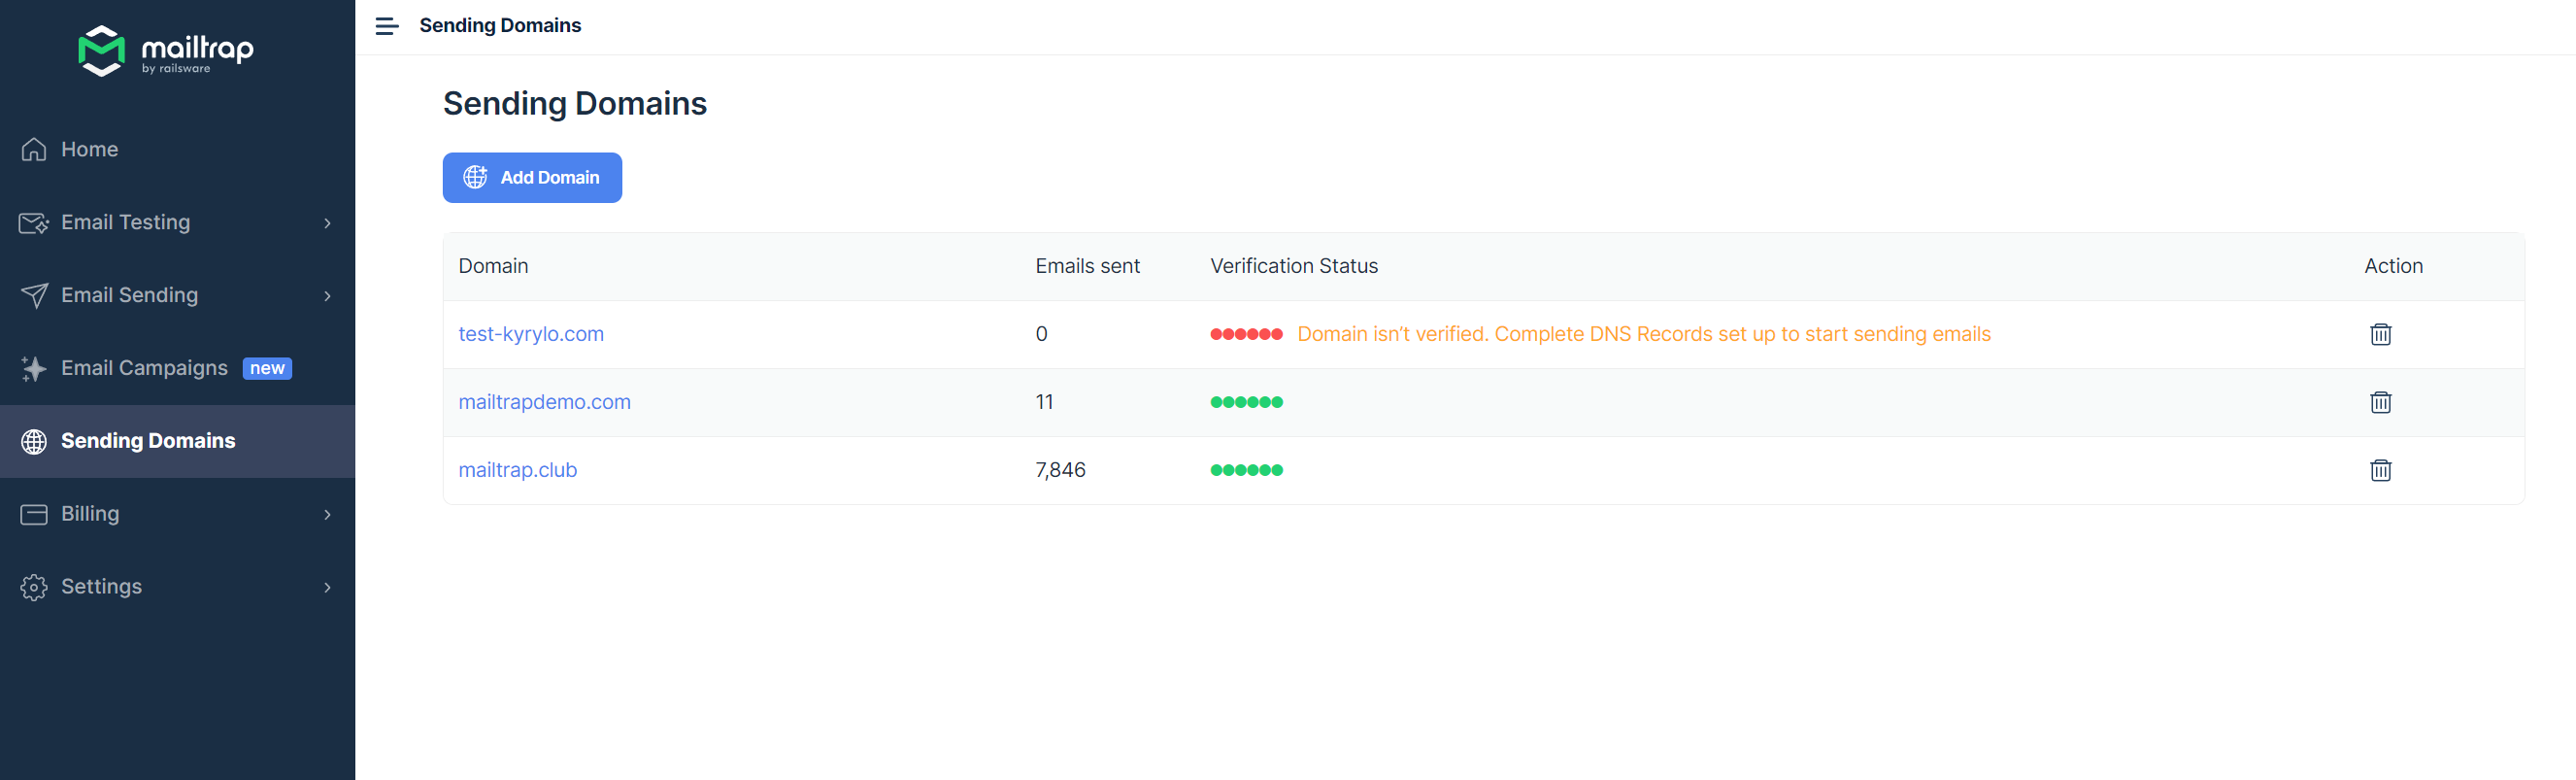
Note: You should verify your domain to start sending emails.
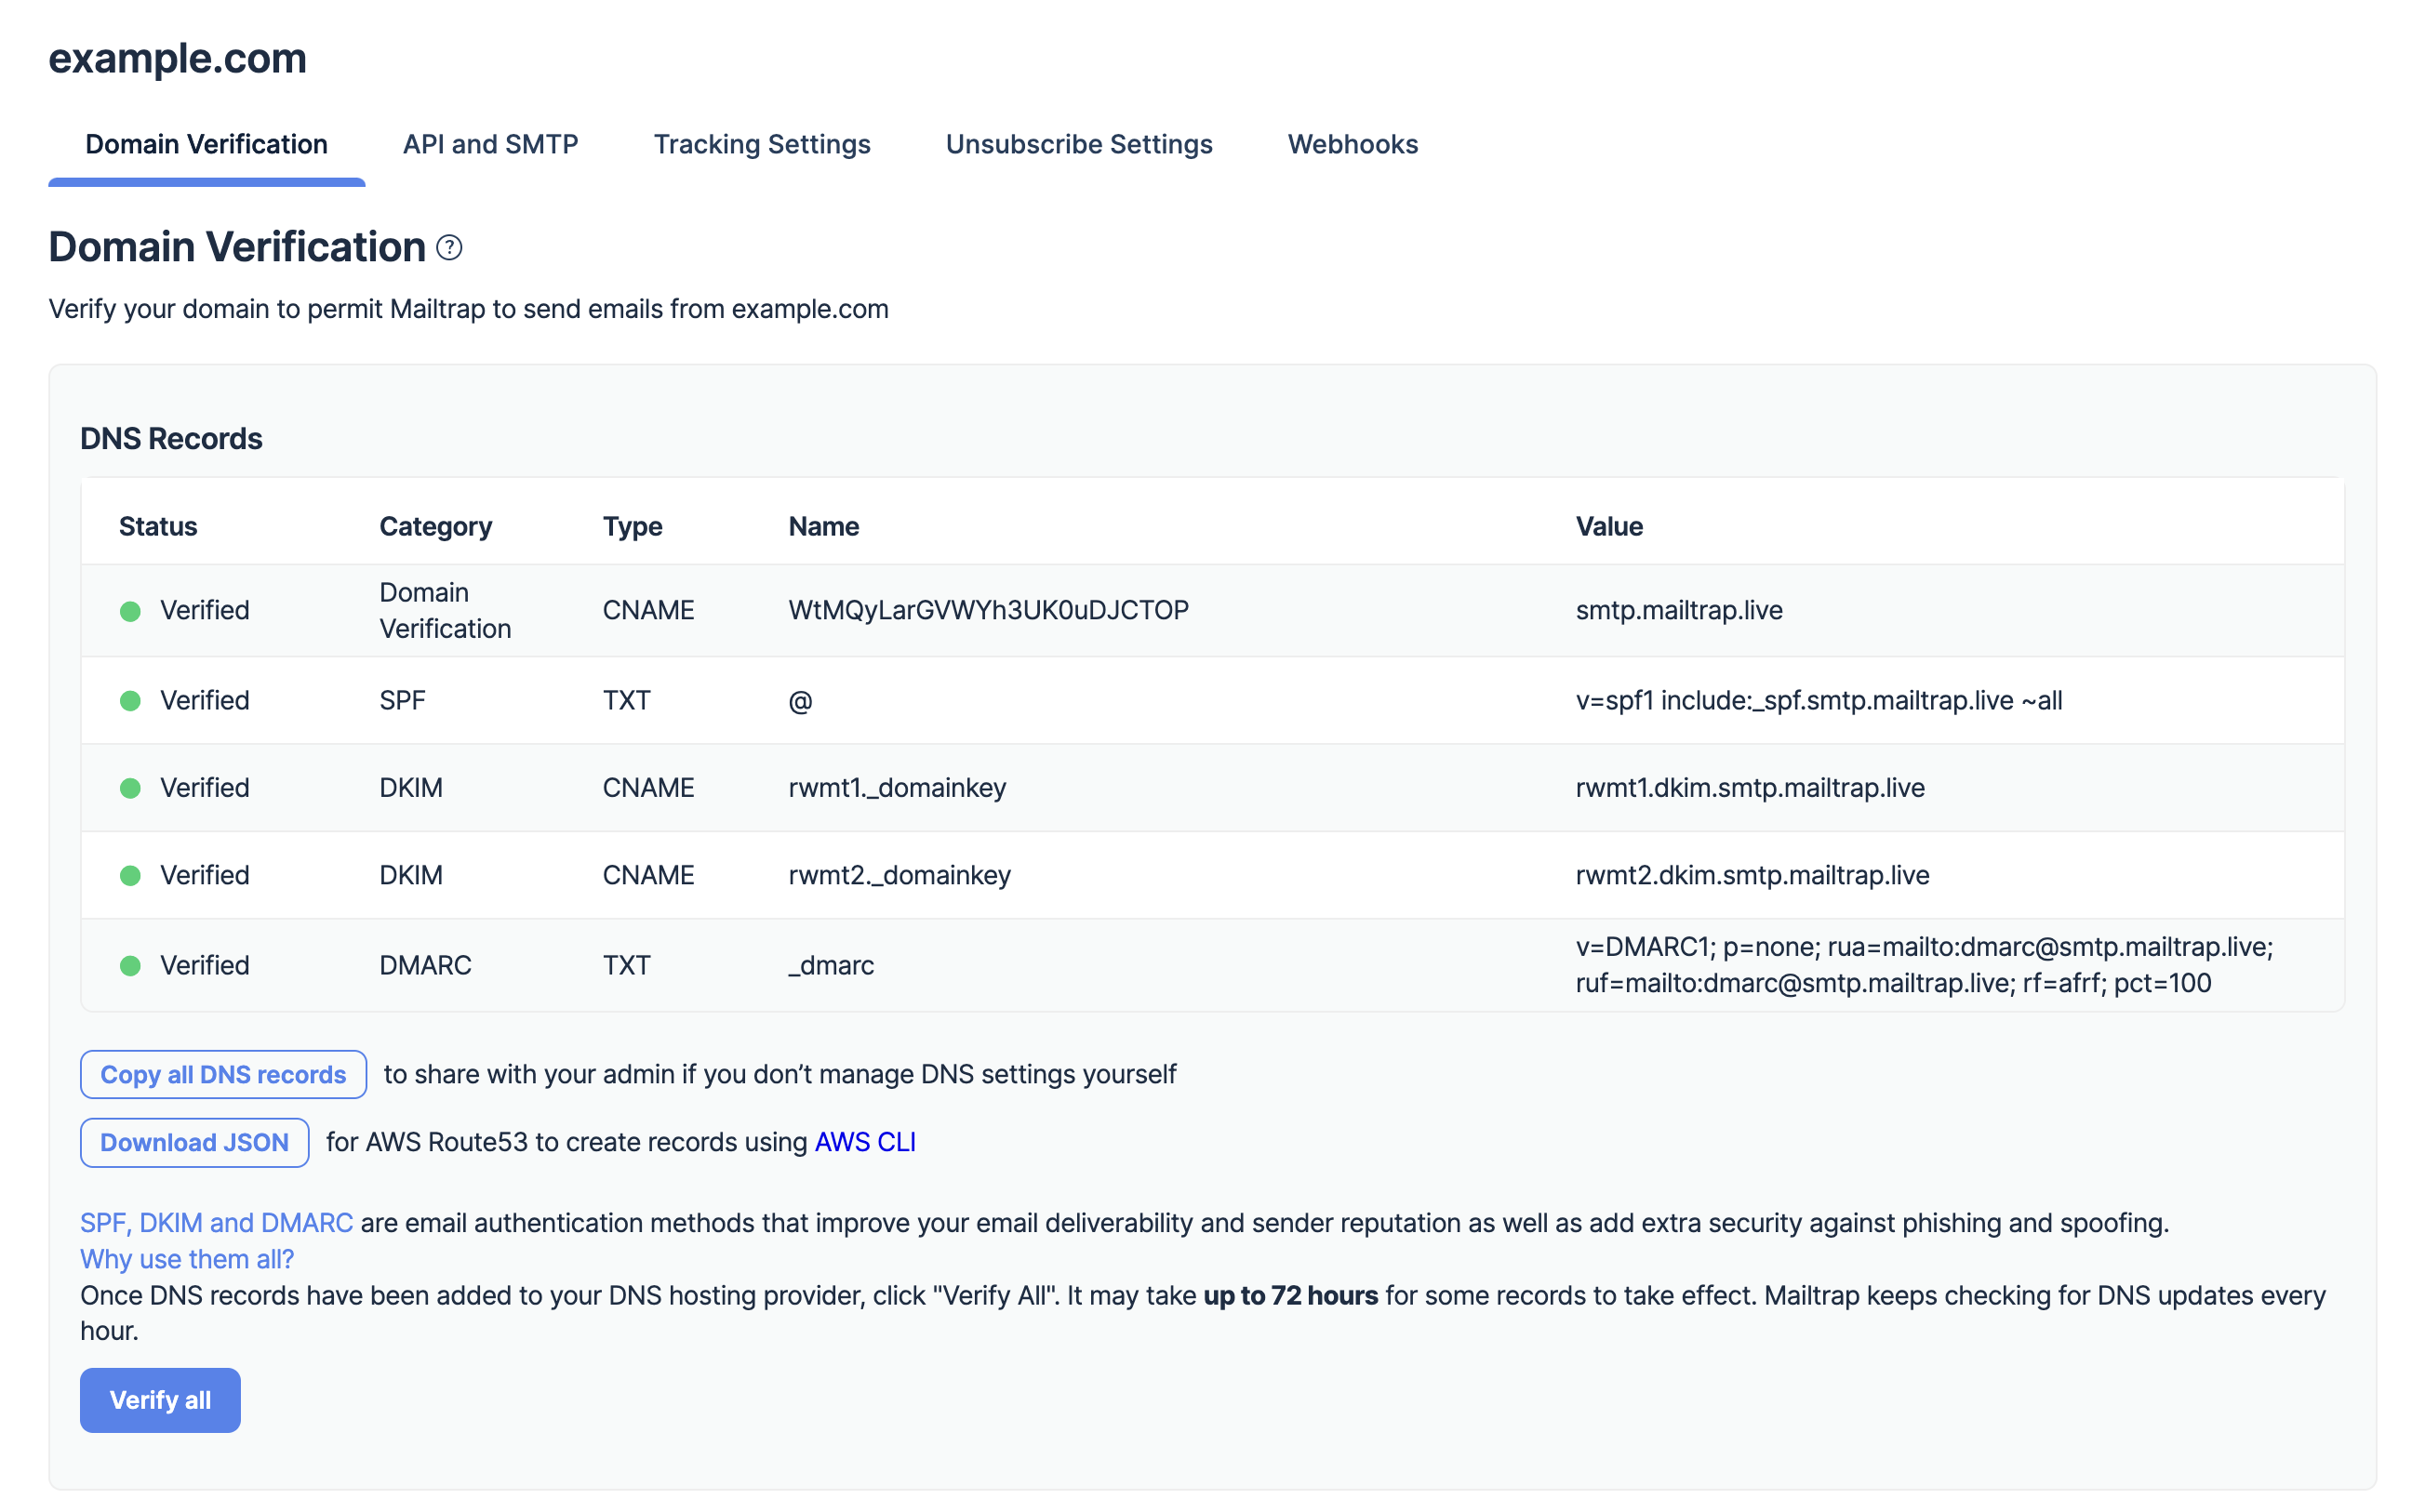
Once your Email Sending account is up and running, go to the Sending Domains tab and click on your domain.
Navigate to the SMTP/API Settings and select SMTP to reveal your SMTP credentials.
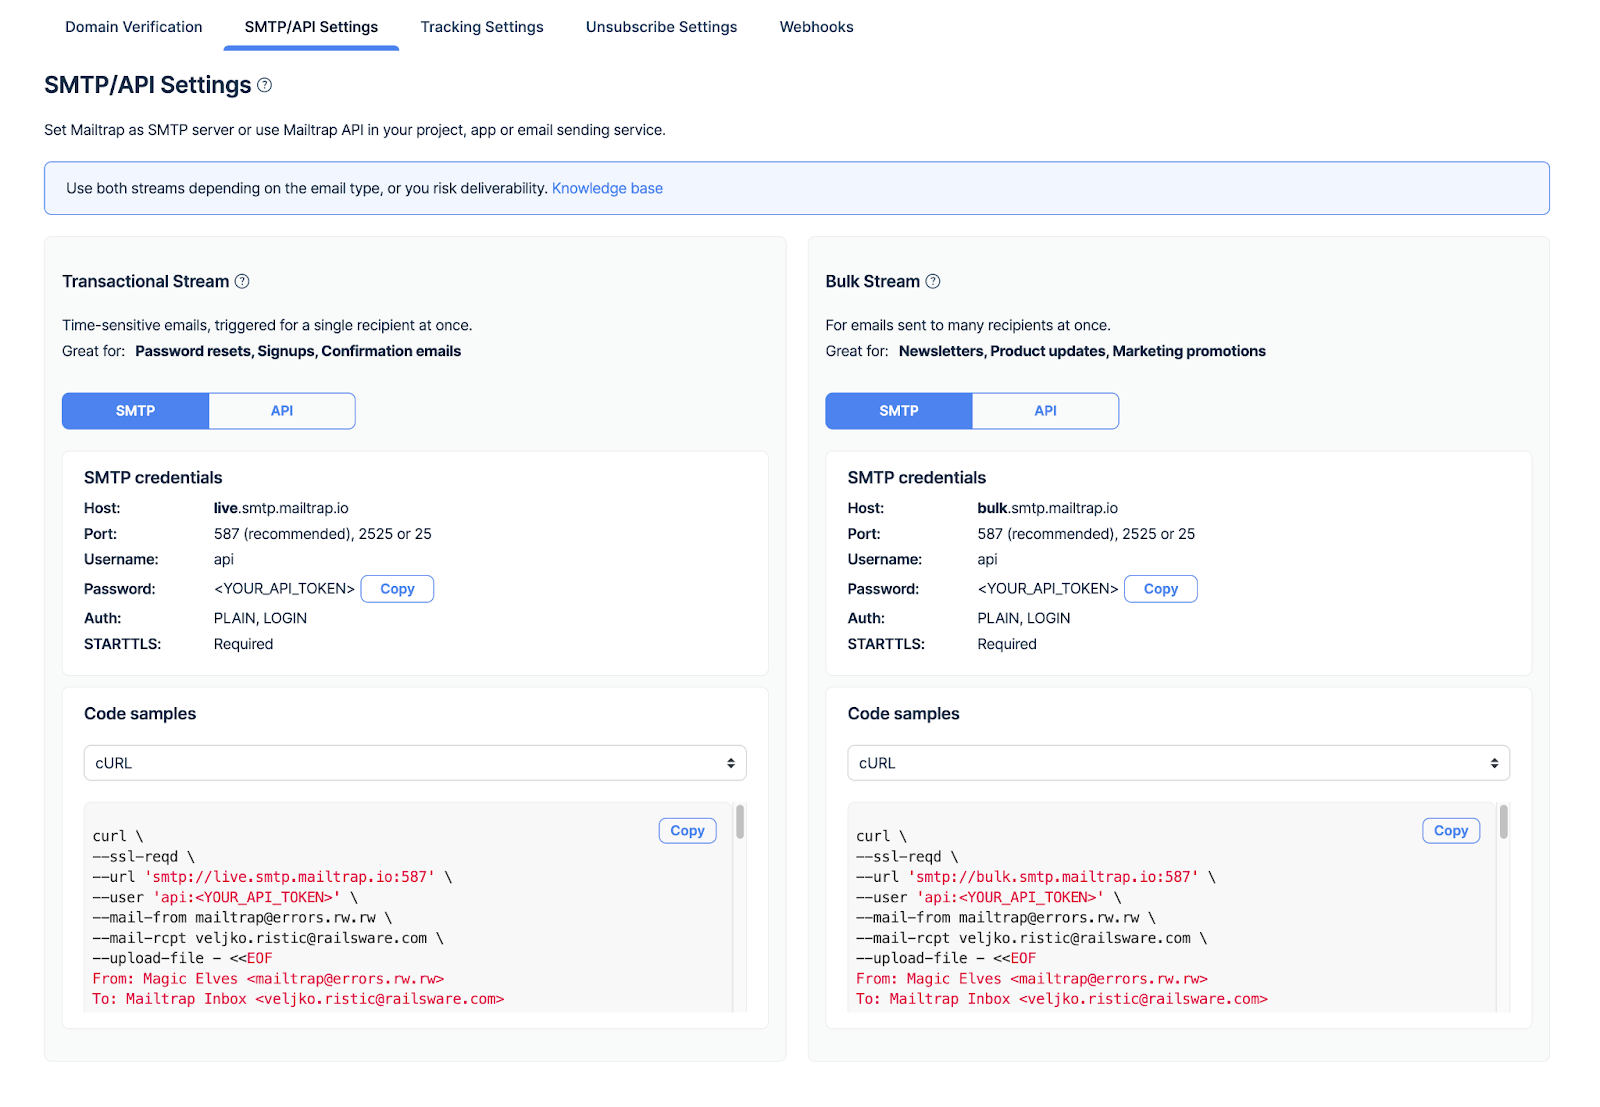
Now return to Salesforce and go to Setup → Email (under Administration) → Email Delivery Settings → Email Relays.
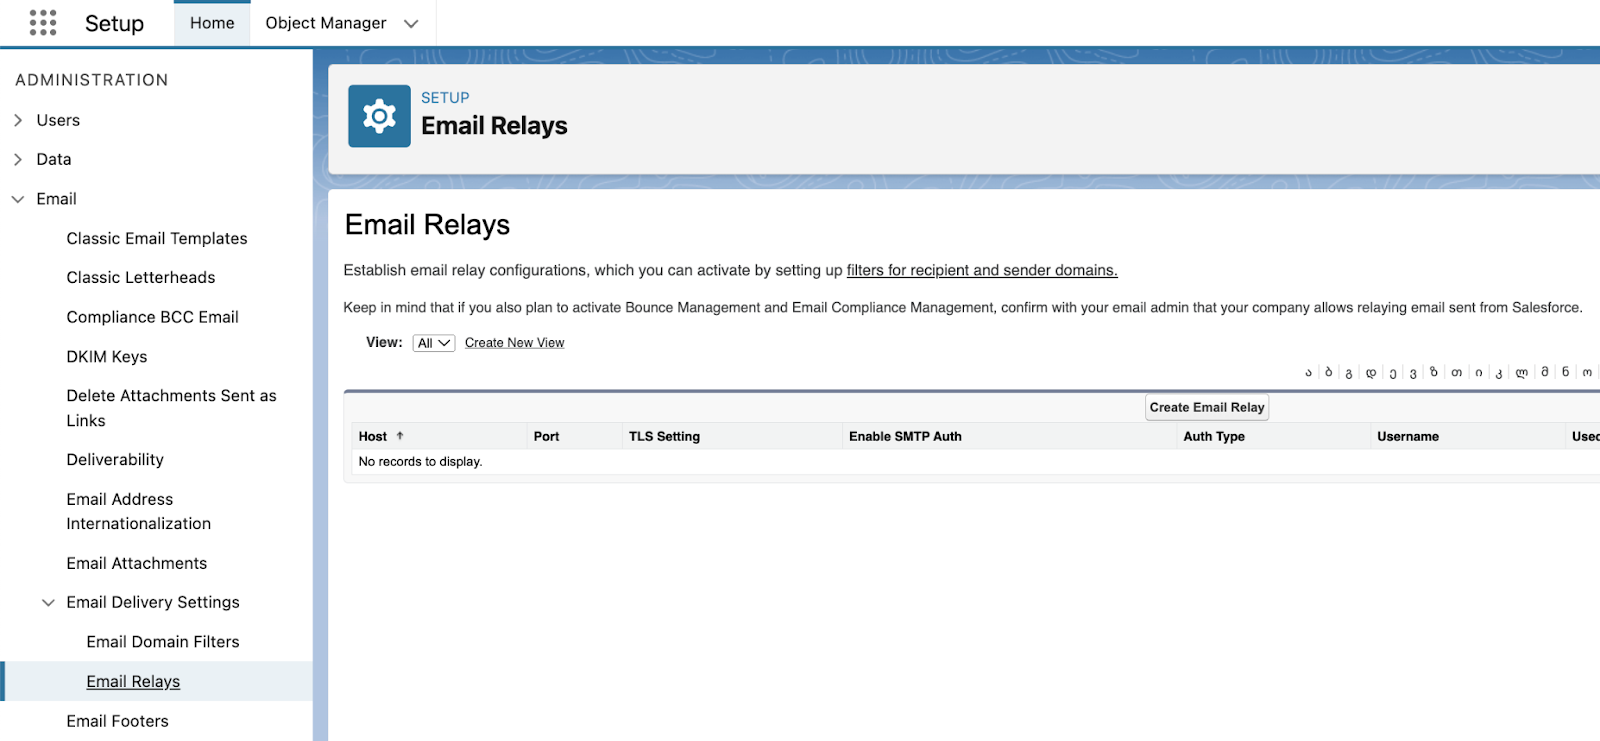
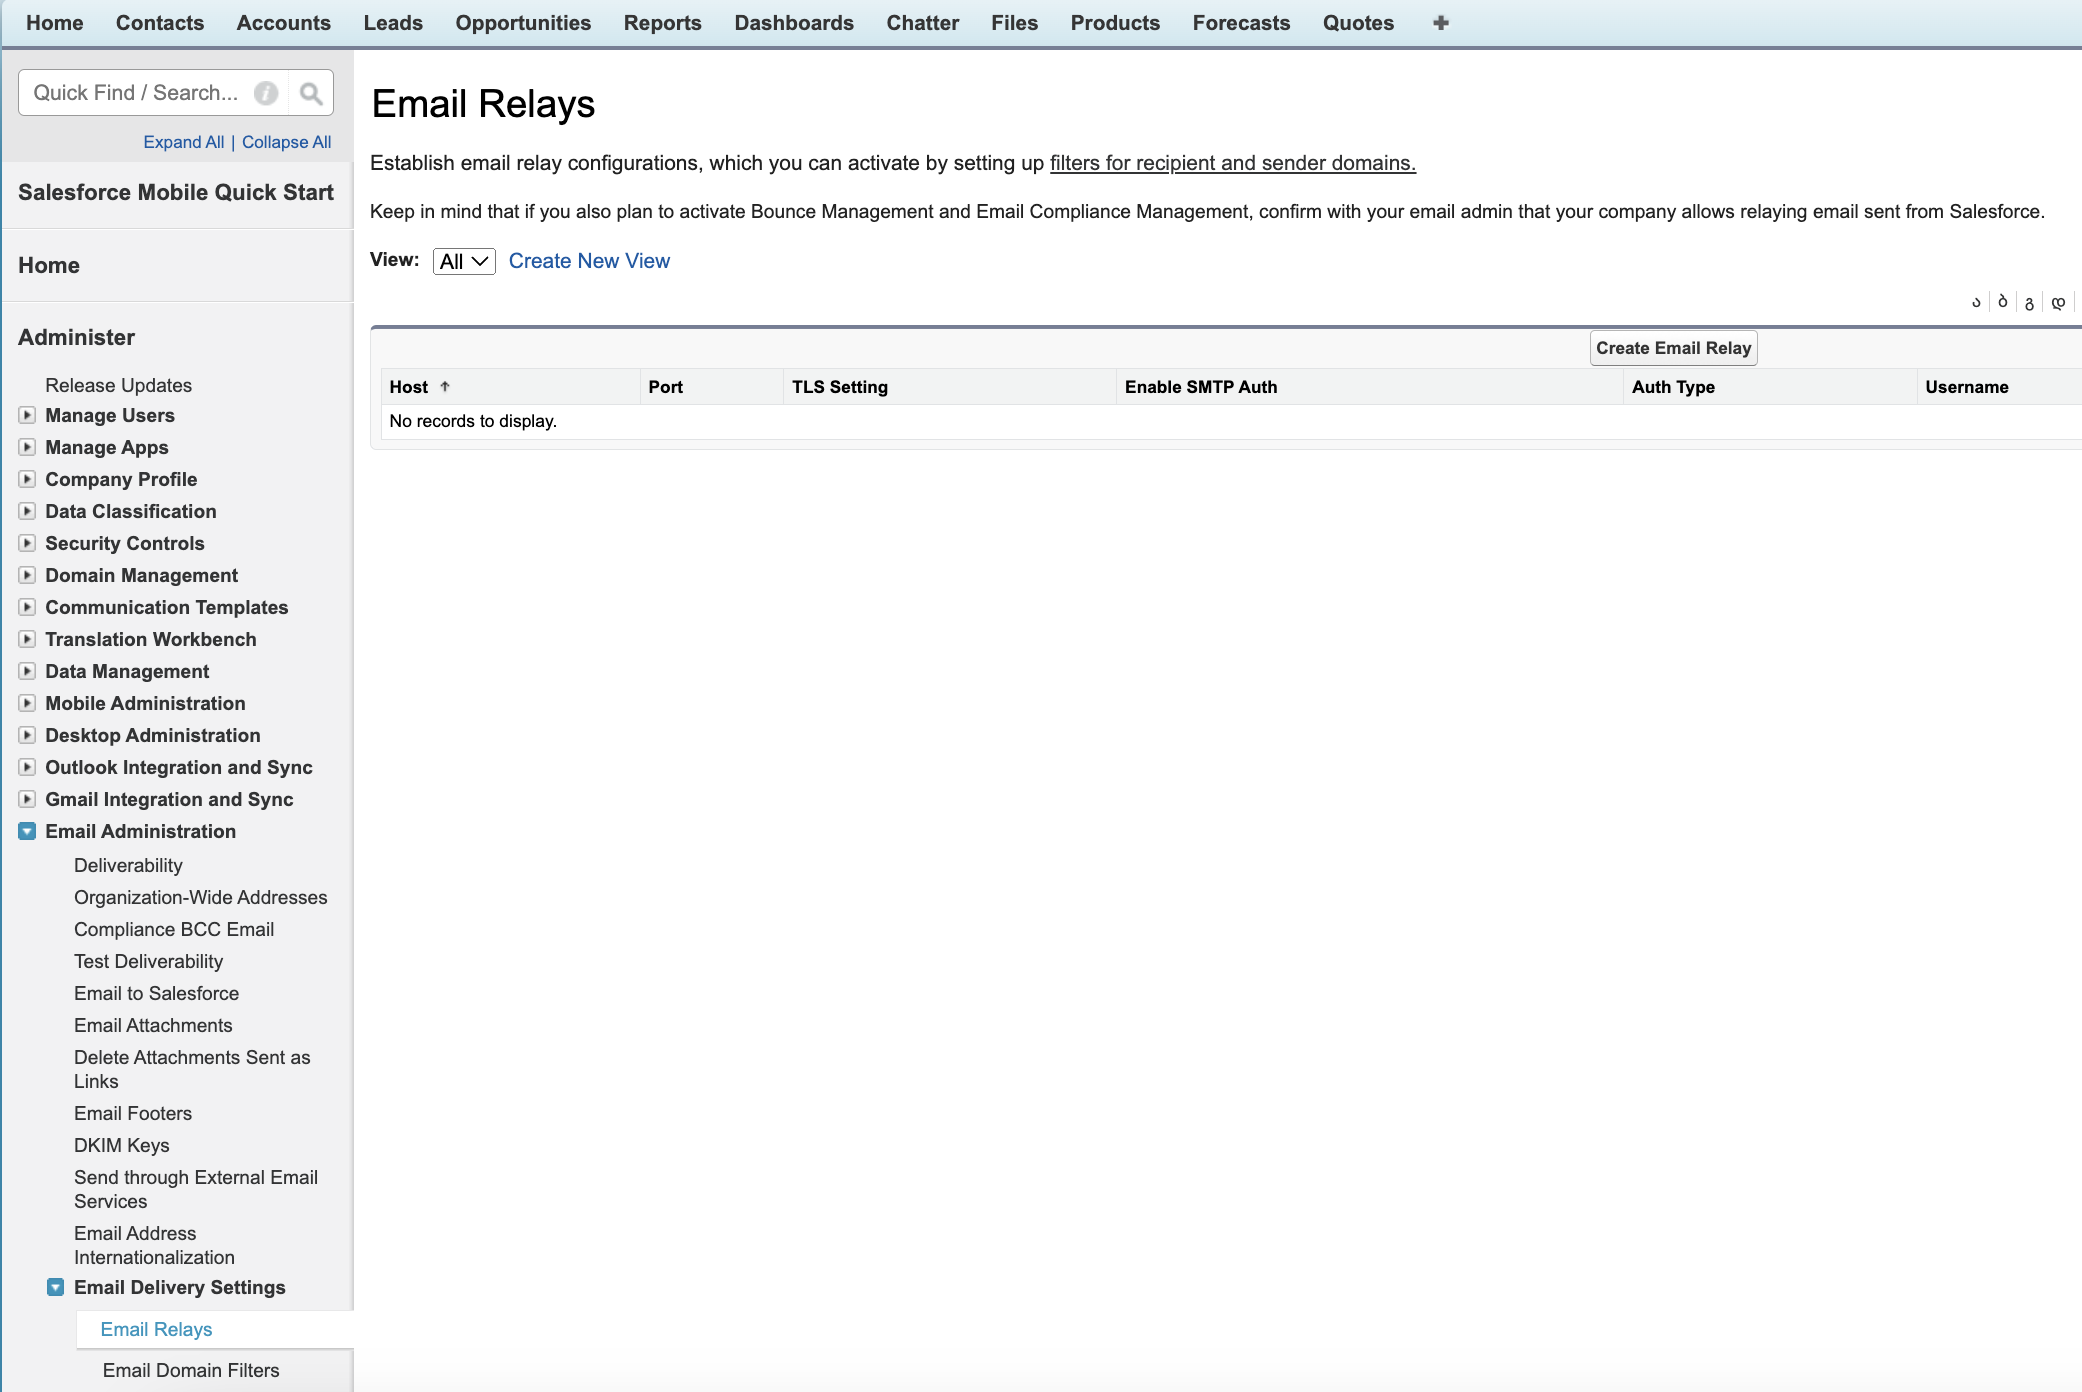
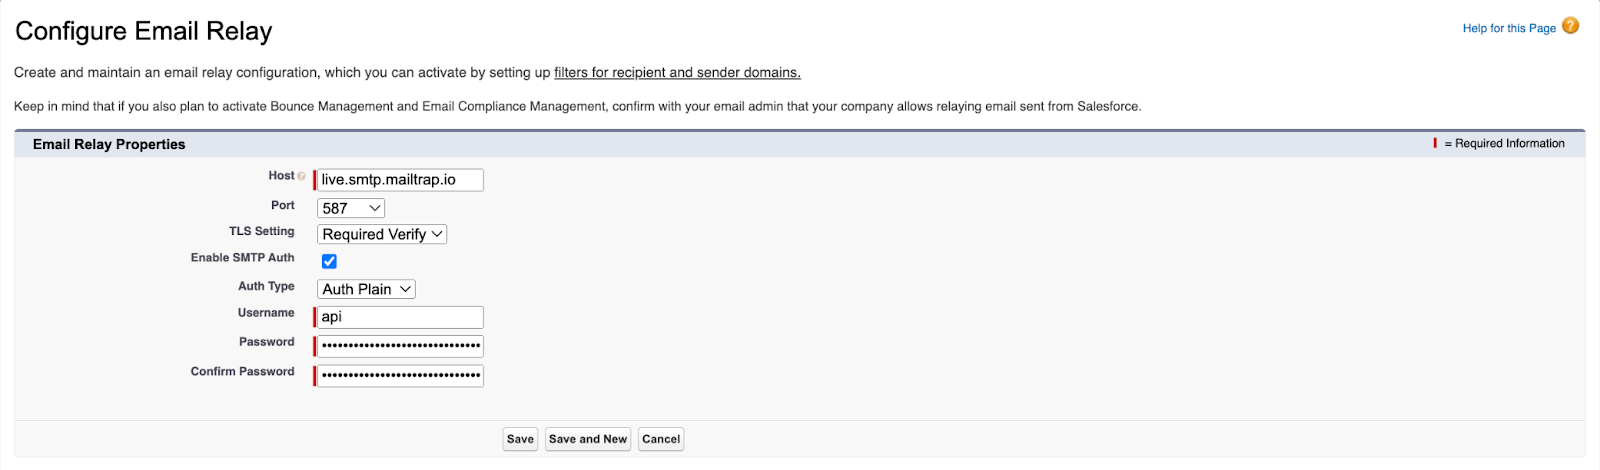
Click Create Email Relay and fill out the empty fields with Email Sending’s SMTP credentials as shown in the screenshot below:

Tick the box next to Enable SMTP Auth, choose the authentication method (plain or login), and enter your SMTP username and password. Click Save.
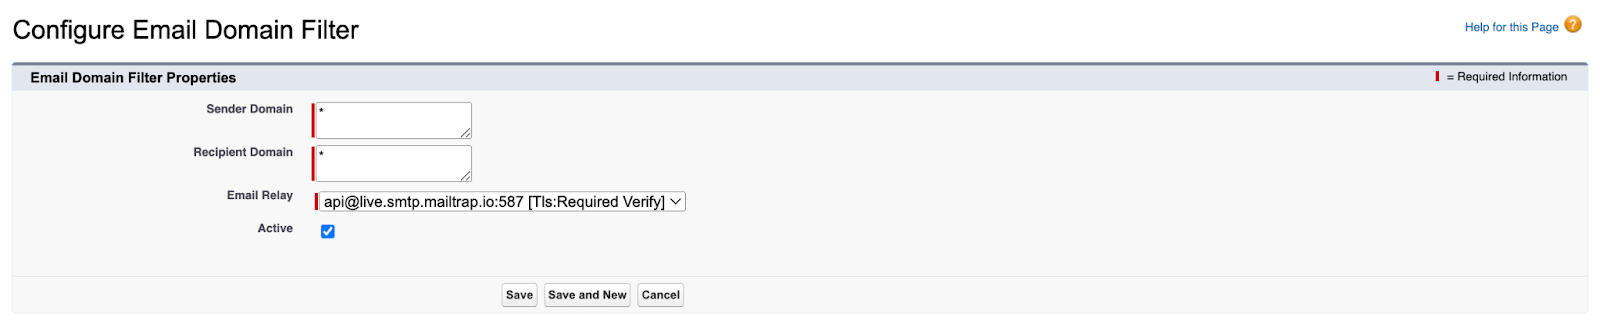
Then, navigate to Email Domain Filters and press Create Email Domain Filter, otherwise your relay won’t be activated.
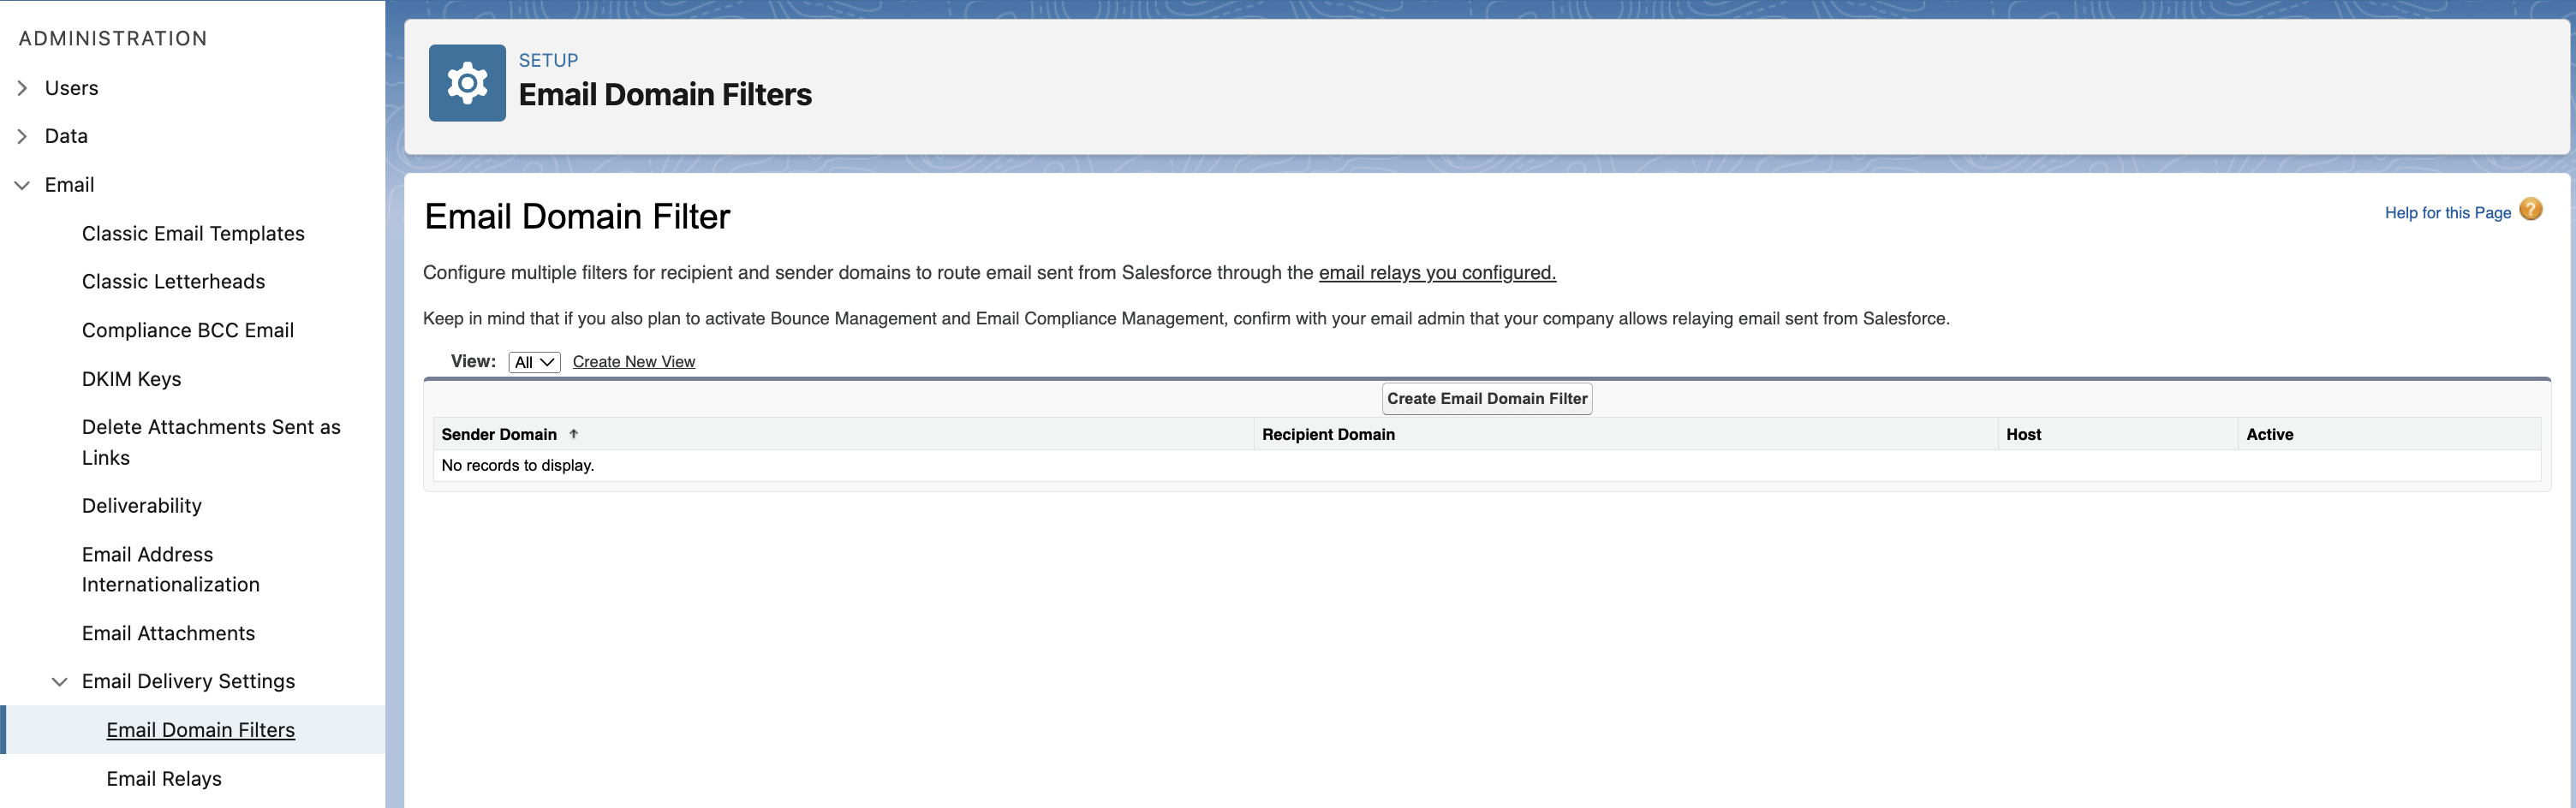
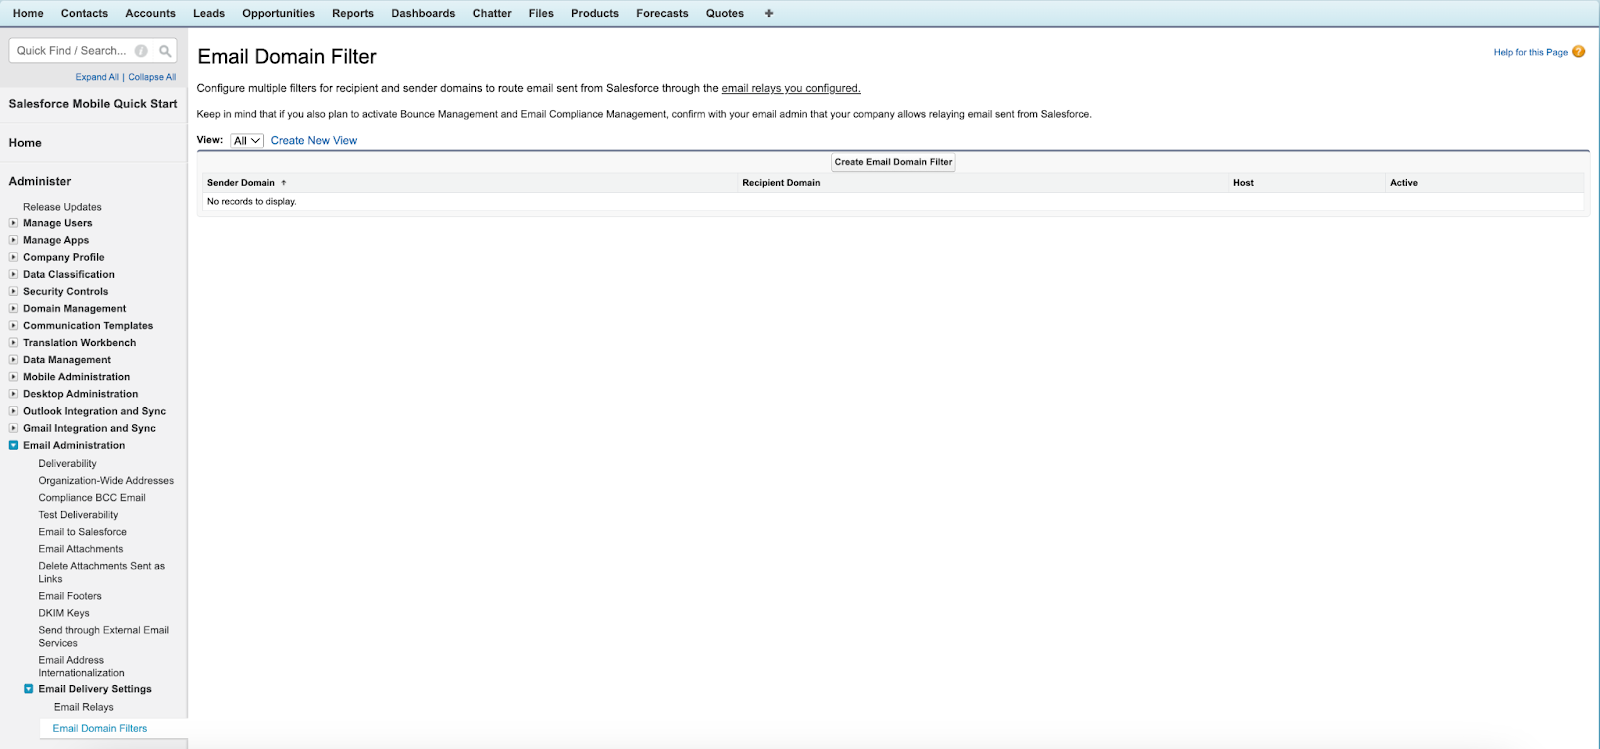
In the Sender Domain and Recipient Domain fields, enter ‘*’ as the default wildcard. Tick the box next to Active and click Save.
Now you can send emails with Mailtrap Email Sending’s SMTP server. In the email-sending options in the following sections, we’ll be using Mailtrap’s configuration.
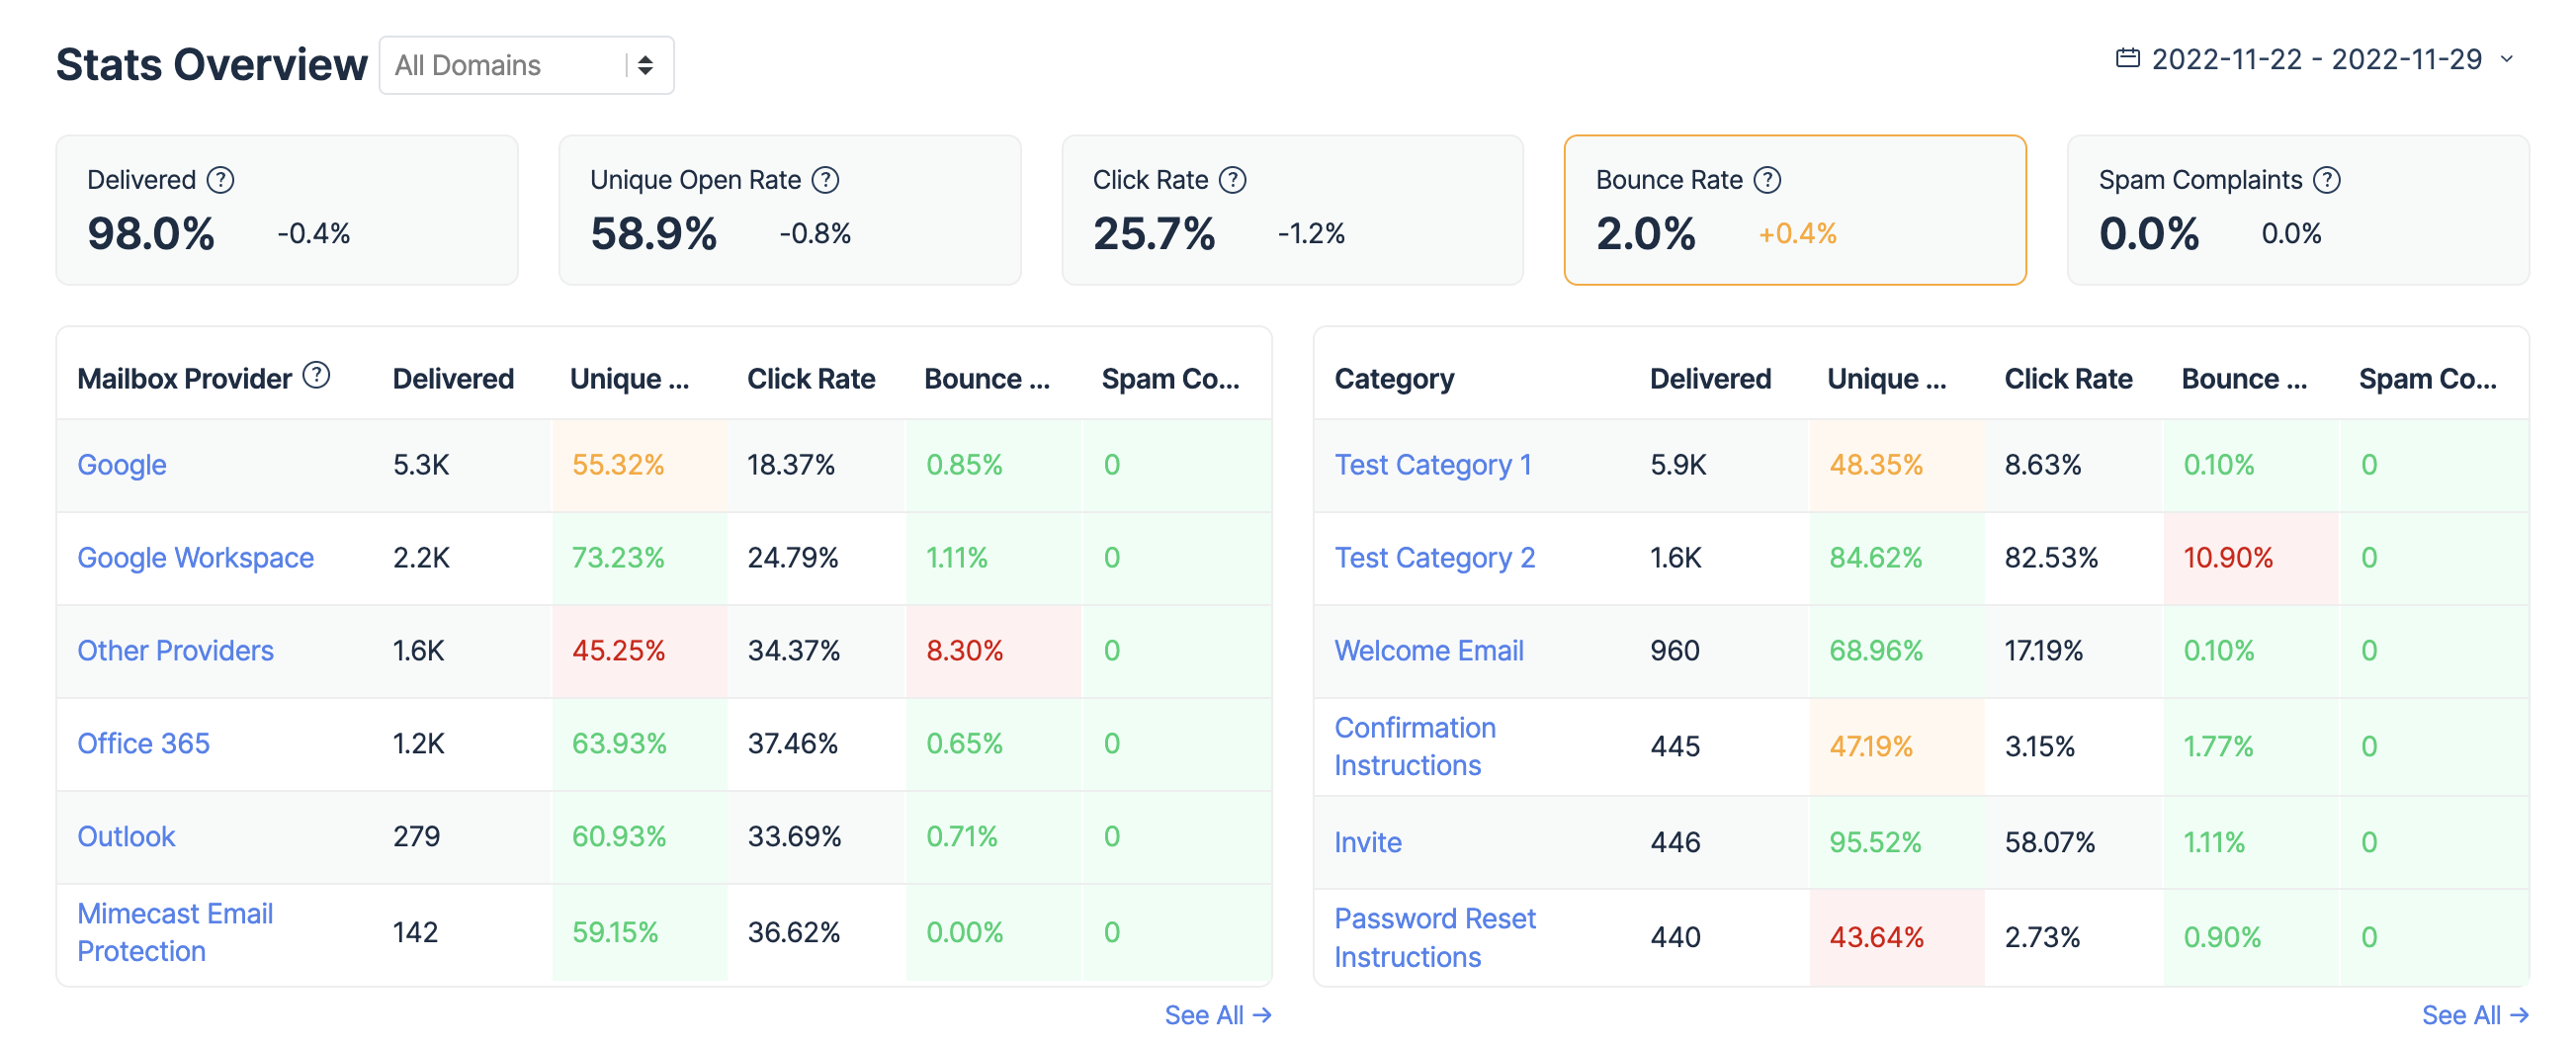
After sending a test email, click Verify Setup in the API and SMTP tab in Email Sending and you’ll be all set. Then, analyze the performance of your emails with the Actionable Analytics feature with stats for categories and mailbox providers.
How to send different emails in Salesforce Lightning Experience
In Lightning Experience, you have multiple options to send emails depending on your usage of the platform, including sending emails from a record, using merge fields with email templates, adding attachments, and sending emails from action. Let’s go over each use case.
Sending an email from a Salesforce record
Lightning Experience enables you to send emails directly from the record you’re on. You can use this option to contact existing customers or anyone in your system who has a valid email address. With this method, you can send rich or plain text emails using email templates or by compiling them manually. It’s also possible to add attachments, images, and links.
To get started, navigate to the record you want to send an email from. This can be an account, contact, lead, opportunity, case, or even a custom object.
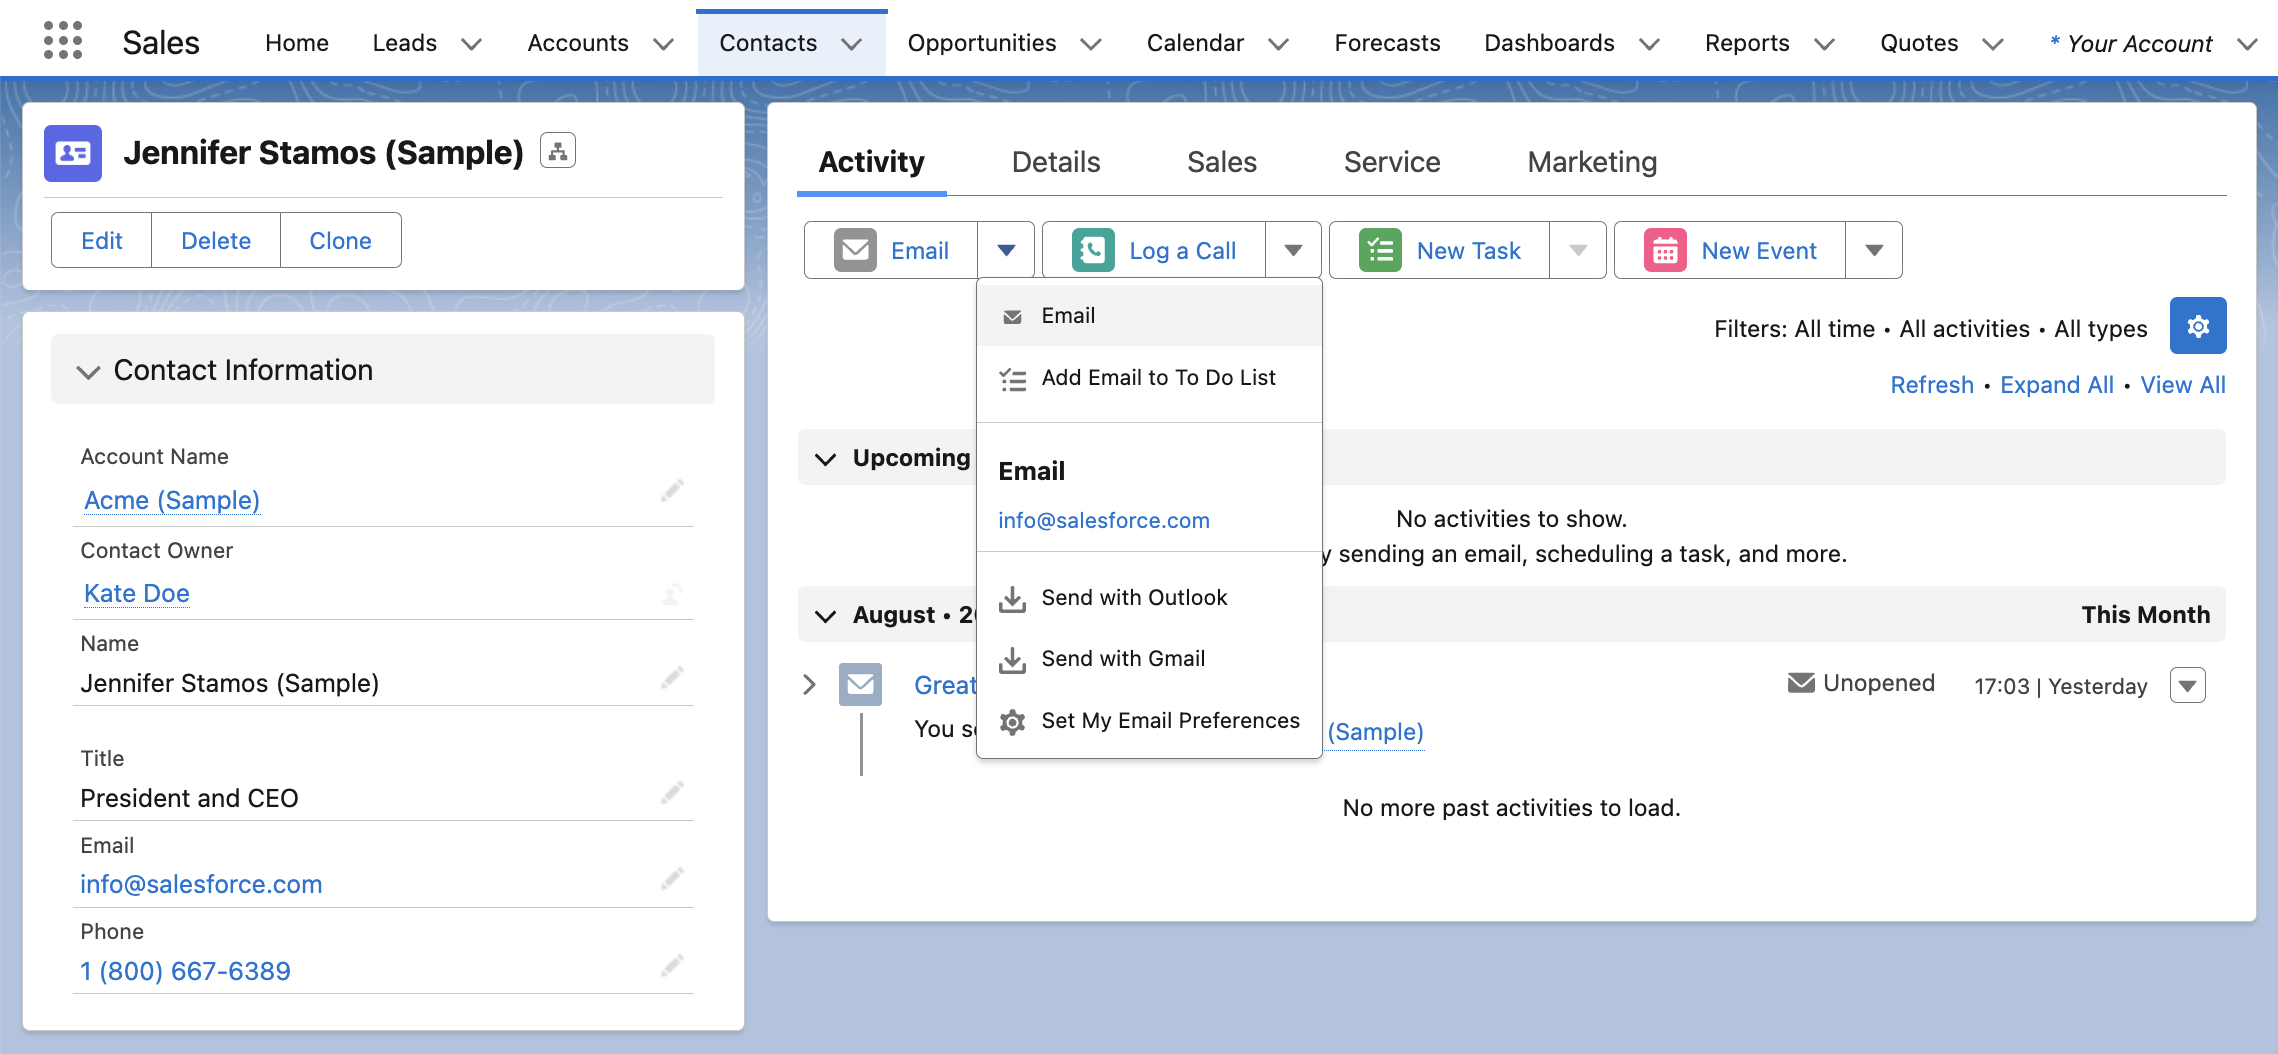
Open the record and locate Email in the Activity tab. Press a downward arrow to choose email-sending options (Gmail or Outlook) or click on the Email button directly if your configurations are already set.

A simple email editor will pop up. Insert a Lightning email template or create a custom email message. You’ll find more information about available templates and instructions on using email template builder here.
To verify the details of the contact or account, you can scroll the record page without closing the editor.
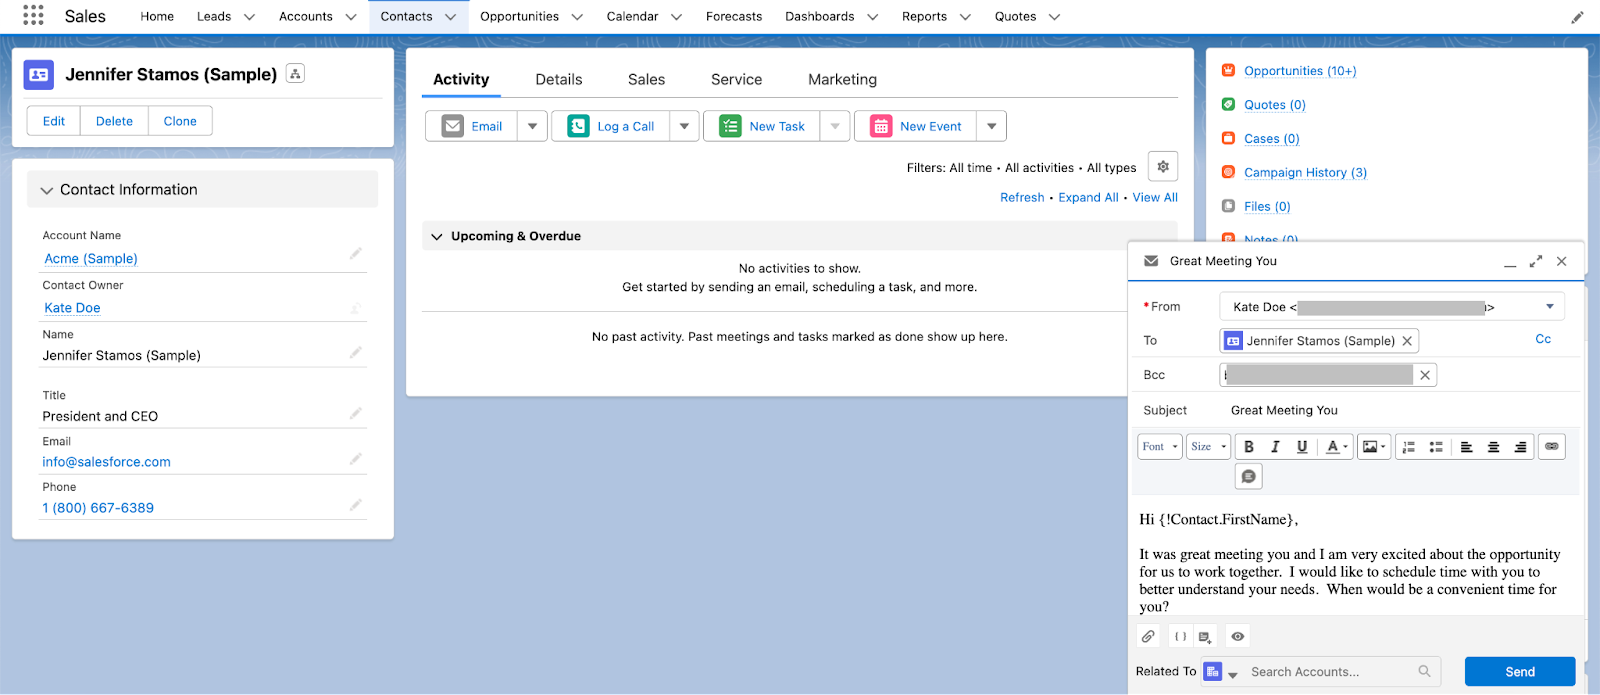
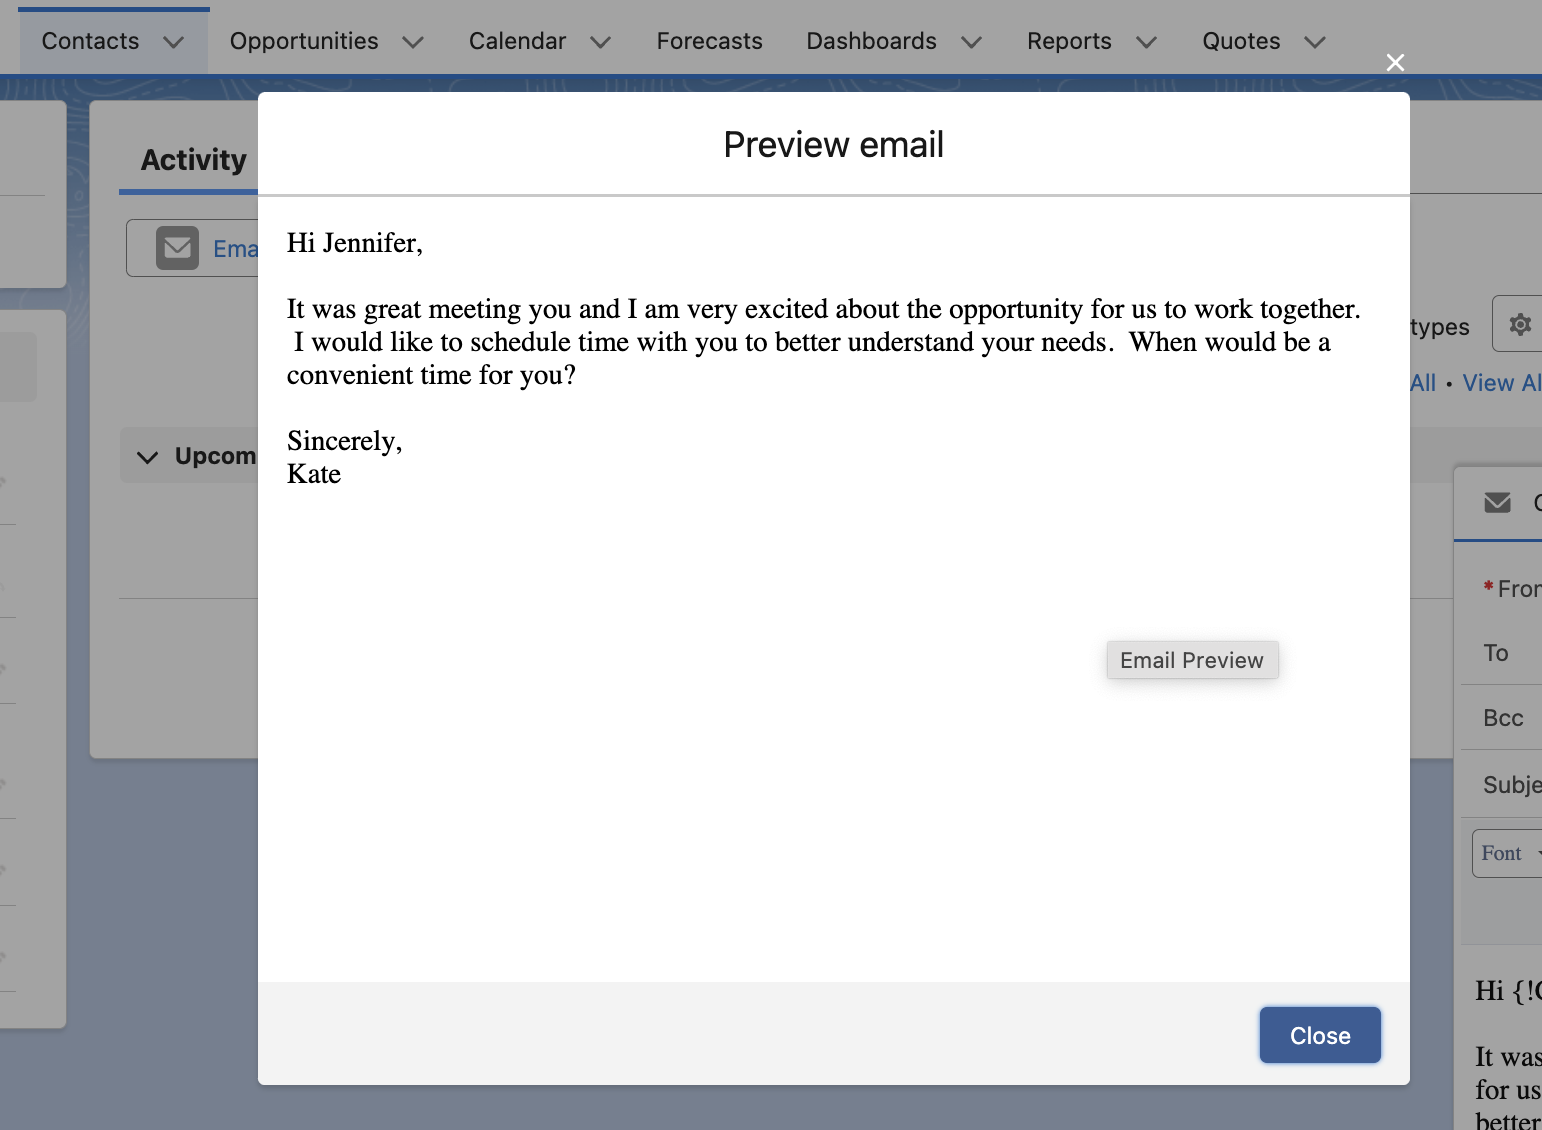
If you decide to use templates, add attachments or images, preview the email before sending it. That way, you’ll verify merge fields and ensure everything looks as expected.
Once you’re done compiling the email, click Send. If you have Automatic Bcc enabled in My Email Settings, you’ll immediately receive a copy of the message to the indicated return address. The email log will also appear in the Activity tab of the record you sent an email to and in the related records (such as an account, for example).
To track the engagement (email open and click rates, conversions, bounce rates, etc.) and analyze the results of your campaigns, you should enable email tracking in your org. Go to Setup → Activity Settings and mark the checkbox next to Enable Email Tracking. Save the settings and you’ll be good to go. Read our dedicated blog post for more information on email tracking options in various Salesforce editions.
Sending emails from Email Quick Actions
Salesforce Lightning Experience streamlines the email-sending process for sales reps with the help of email quick actions. These allow you to create custom actions, predefine fields, and send emails without having to fill out field values manually.
If you don’t have email action, you can create it using the instructions below. If you already have one, a custom email quick action can be added for a specific account, opportunity, or business event.
Navigate to Setup → Global Actions and click the New Action button.
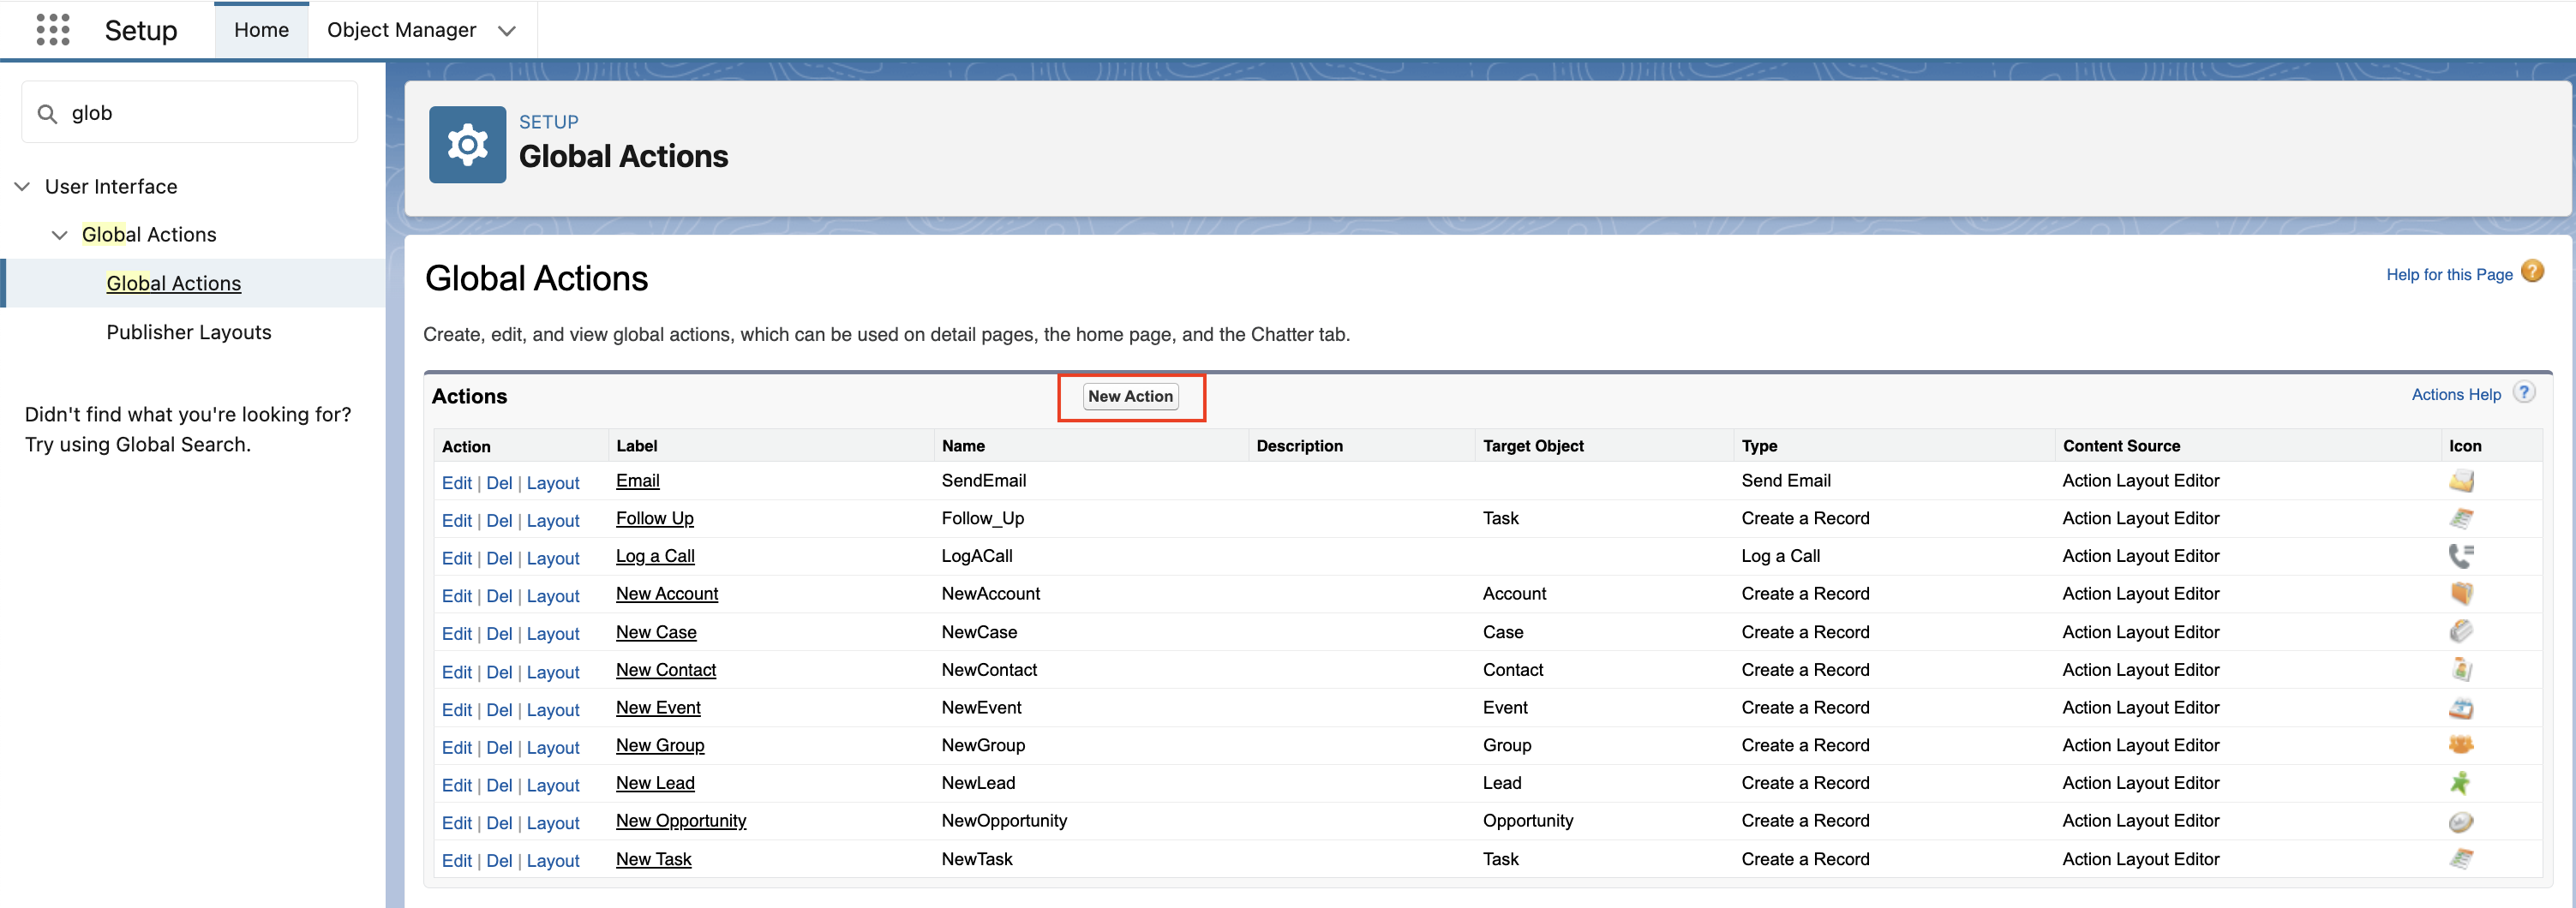
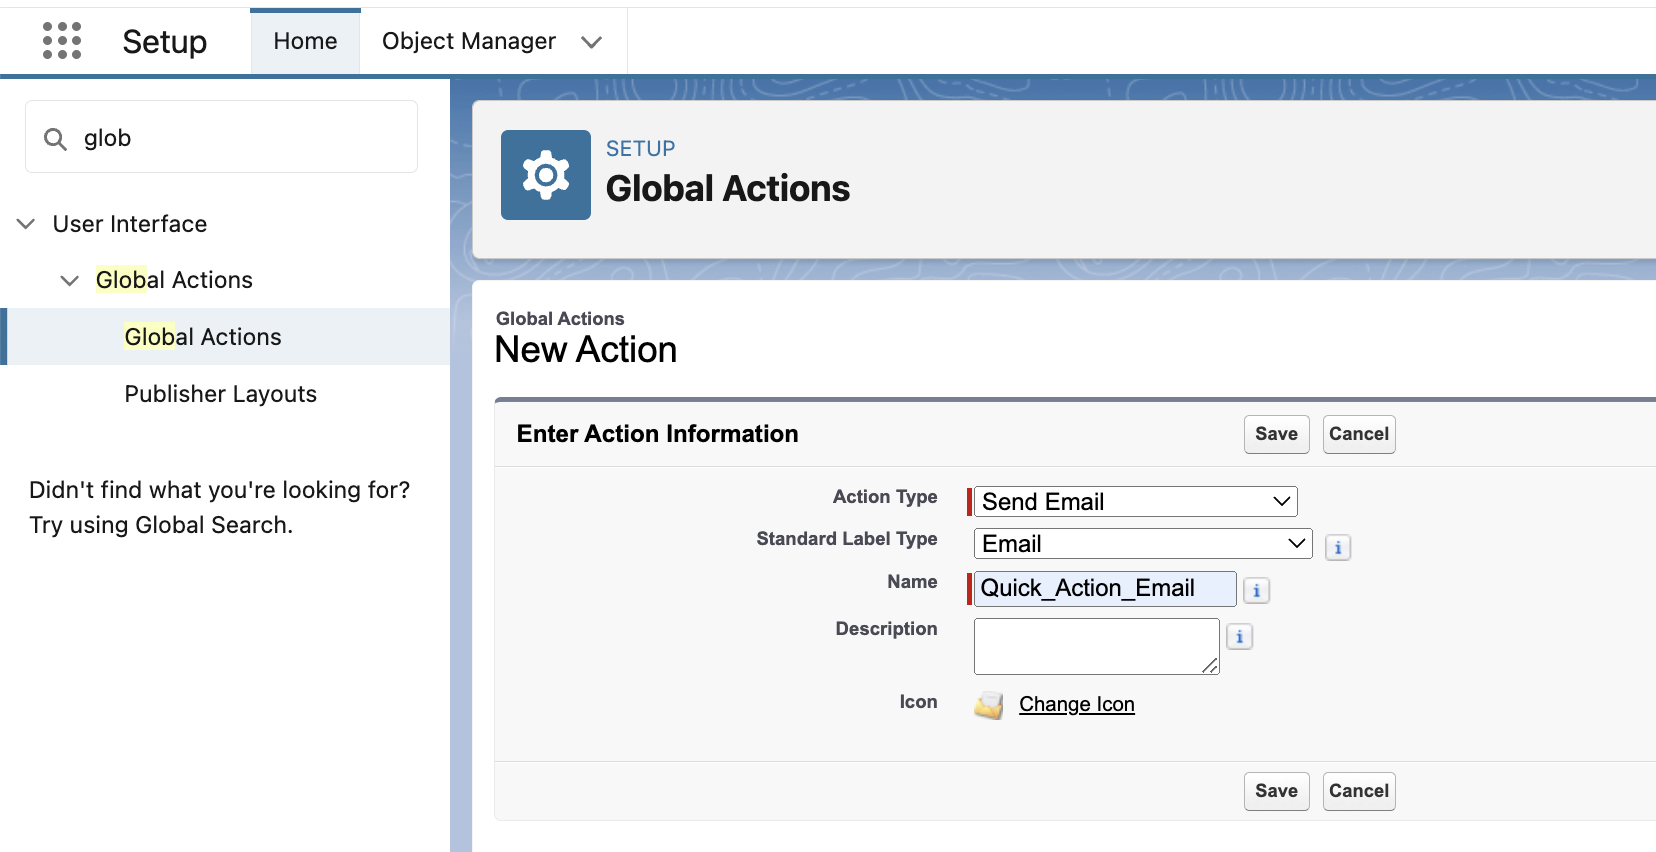
Choose Send Email as the Action type and Email as the Standard Label Type. Come up with a unique name for the action to avoid errors while executing API calls. Click Save.
A page layout editor window will appear. You can either accept the default configuration or adjust the properties for each field manually. Once you’re done, click Save.
Go to a record to check if the newly-created quick action is in place.
To automate processes even more, it’s possible to create predefined field values, such as To, Cc, or Bcc.
Navigate to Global Actions in Setup once again, open the email action you want to edit, and click New under Predefined Field Values.
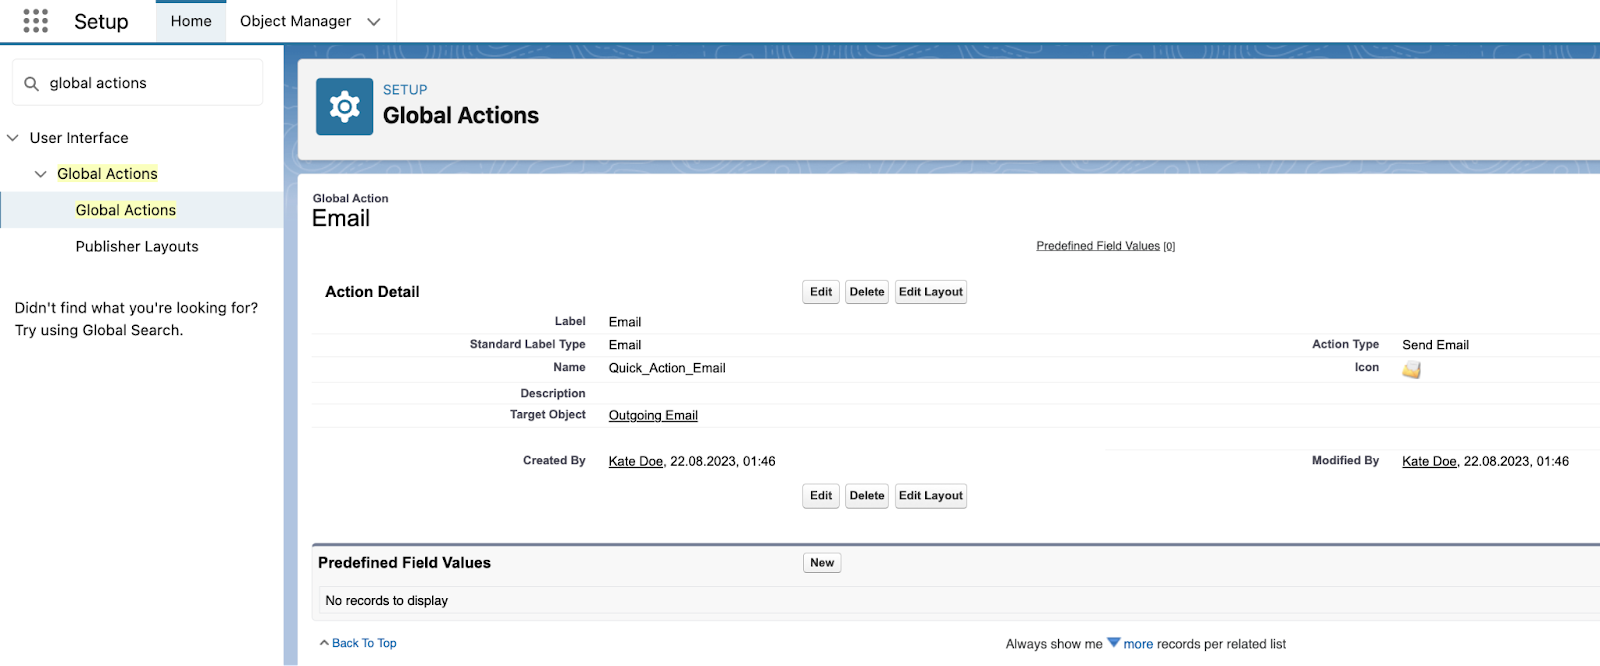
Select To, Cc, or Bcc in the Field Name dropdown menu. Use the formula editor and JUNCTIONIDLIST function to associate the selected field with a Salesforce record. Click Save.
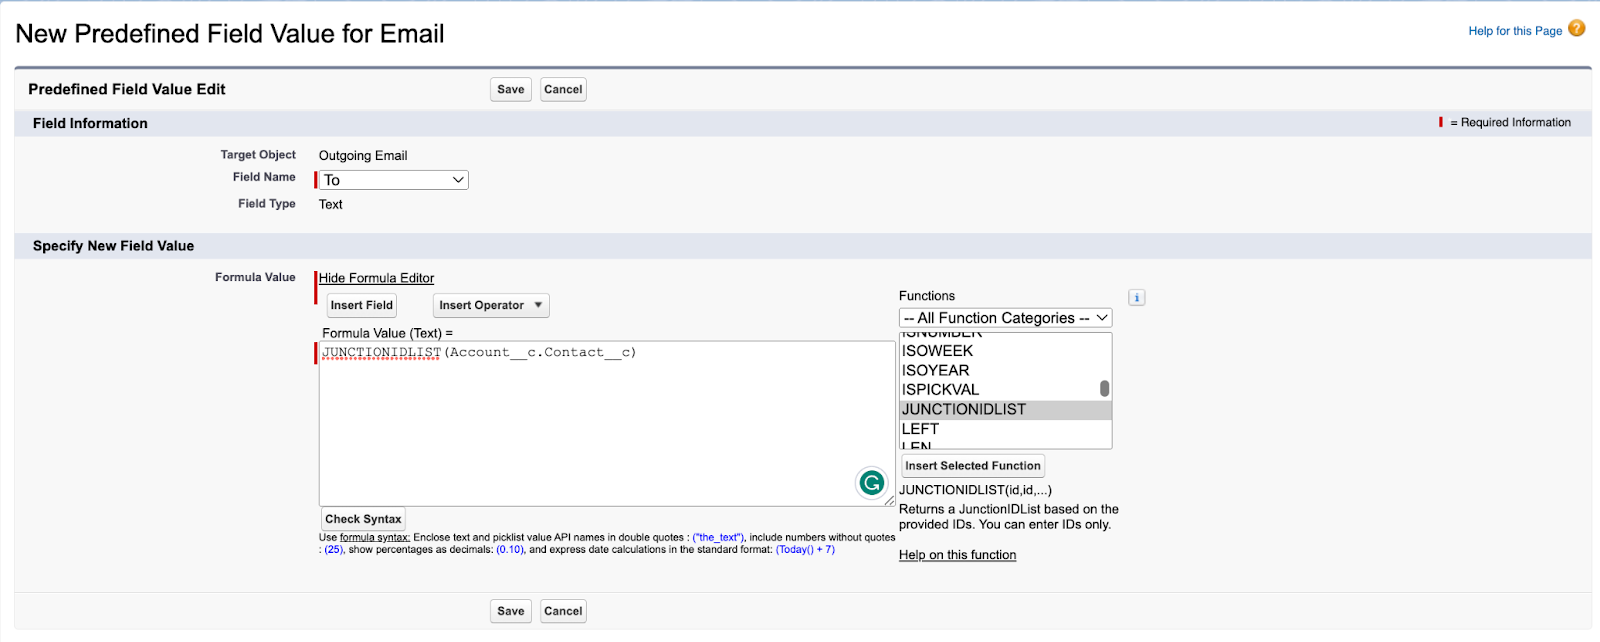
Note: JUNCTIONIDLIST is only necessary when using values with multiple IDs.
That’s it. When you create a new email, the From (filled automatically by Salesforce) and To fields will be automatically defined. Then you can send emails as we did in the previous section.
How to send emails in Salesforce Classic
Similar to Lightning Experience, Salesforce Classic also enables you to send a single email message from a particular record.
Open a specific record such as a contact, account, lead, opportunity, etc., and go to Activity History.
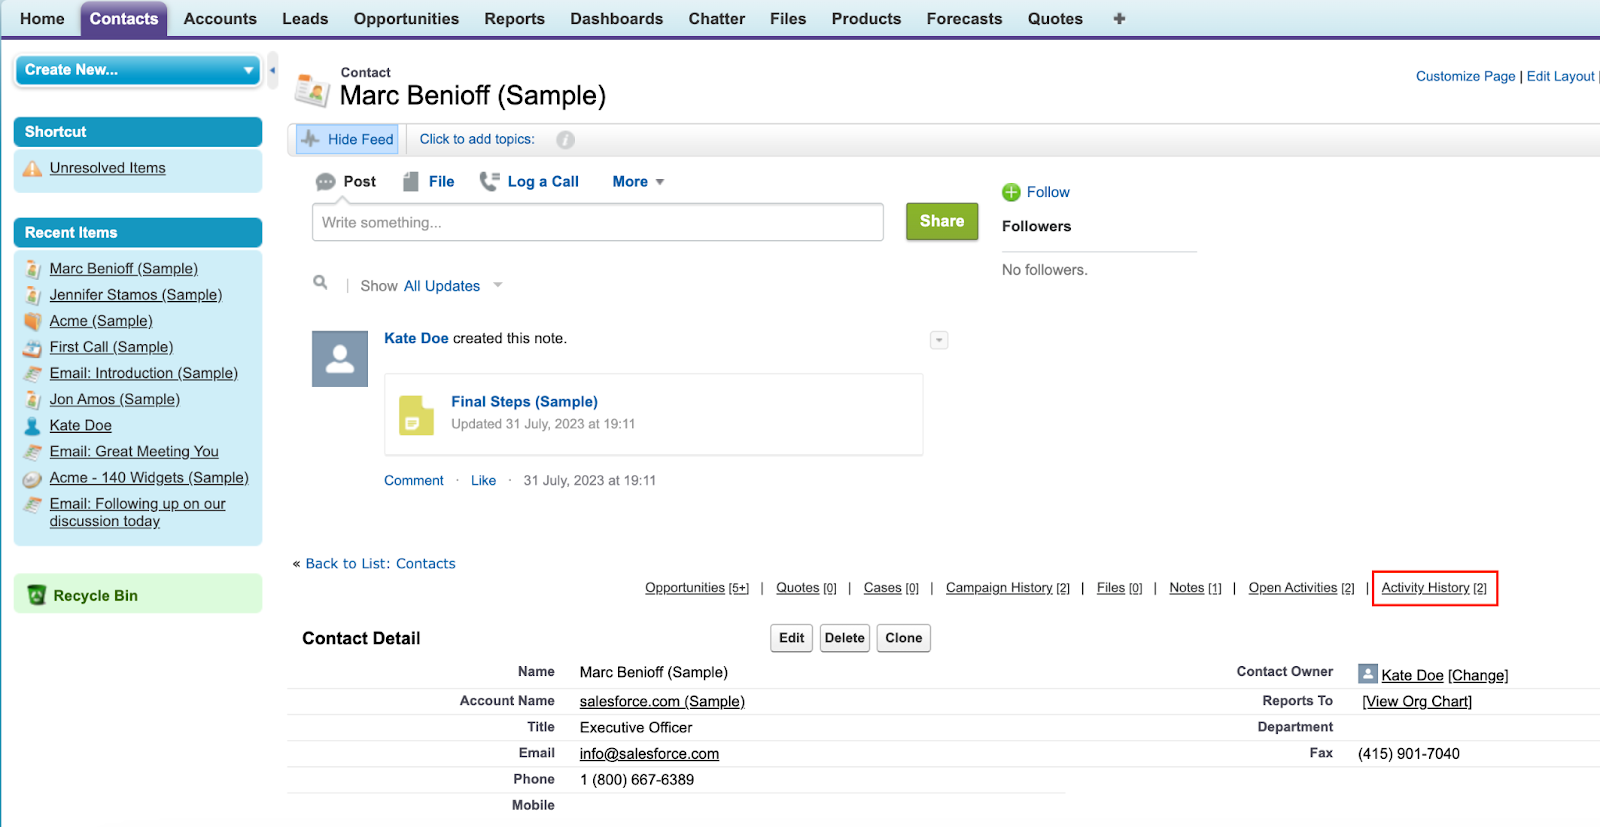
Press the Send an Email button to open the email composer.

Choose between text and HTML editors and fill in the empty fields. Craft the email content manually or use one of the Salesforce Classic templates. You could also send emails with attachments from here.
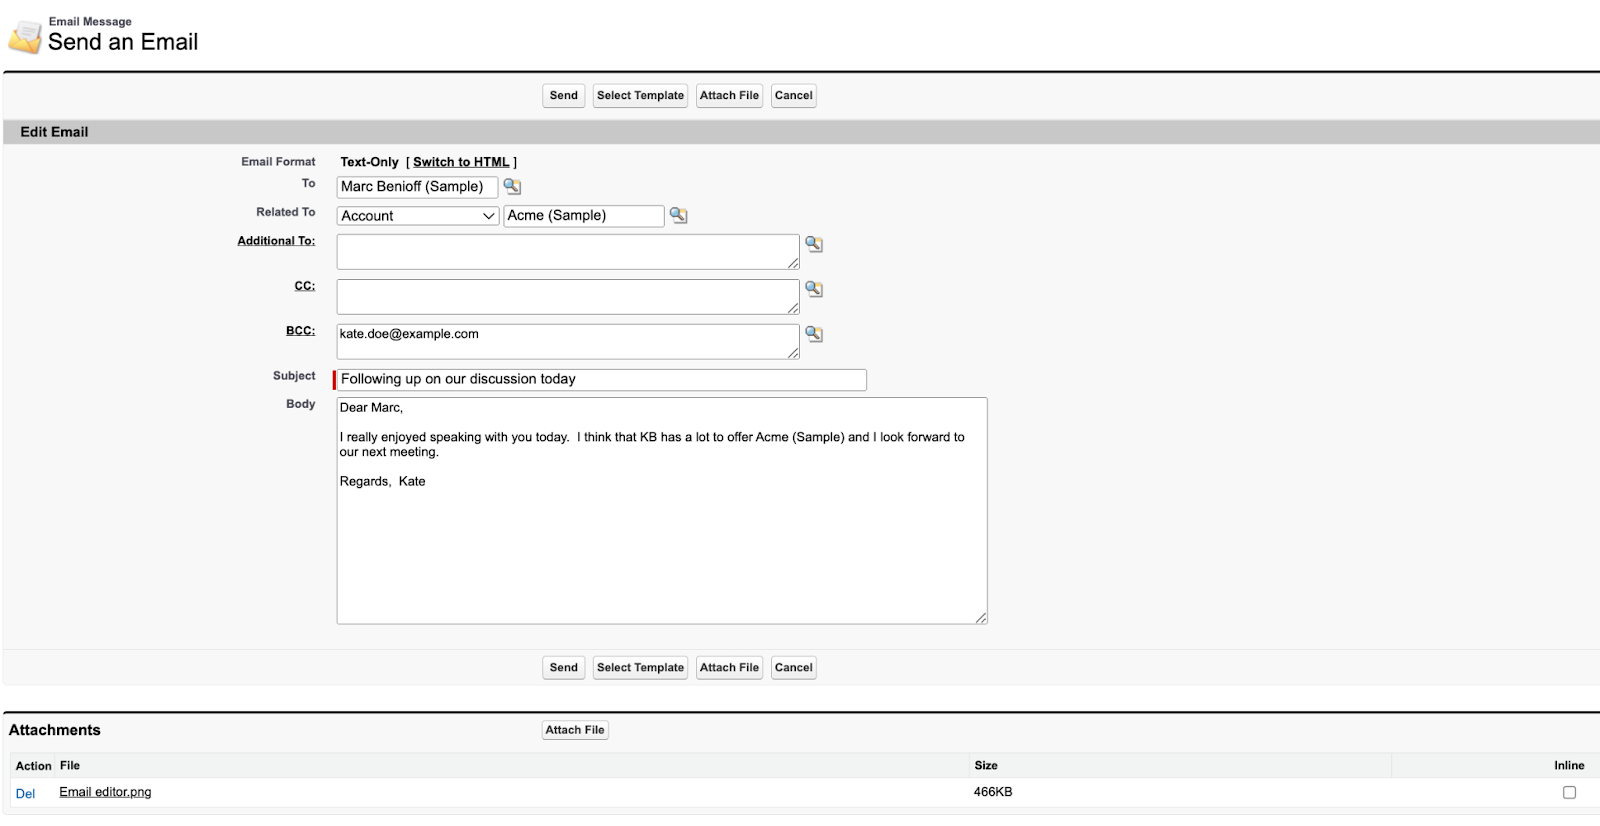
Click Send and check the email in your inbox if you defined the Bcc field.
Remember that Email Composer takes note of the opt-outs. If you attempt to send an email to an unsubscribed user, you’ll see a warning message. However, this rule doesn’t apply to Additional To, Cc, and Bcc fields.
How to send emails in Salesforce from Apex
Apex is an object-oriented programming language that provides access to the Salesforce back-end database and allows for controlling/modifying most of the platform’s system logic. Here’s how you can send different types of emails from the Apex script.
Send a simple email
We’ll need a built-in Messaging class and within it, the Messaging.SingleEmailMessage object that will allow us to create and send an email.
With the code sample below, you can send emails to multiple recipients and define the subject and the body of the message. This snippet supports both plain text and HTML body formats. The email sending is handled by the Messaging.sendEmail method.
public class SendSingleEmail {
  public void sendSingleEmailMethod() {

    Messaging.reserveSingleEmailCapacity(2);
    Messaging.SingleEmailMessage mymail = new Messaging.SingleEmailMessage();
    String[] toaddresses = new String[] {'user1@example.com'};
    String[] ccaddresses = new String[] {'user2@example.com'};
    String[] bccaddresses = new String[] {'user3@example.com'};

    mymail.setToAddresses(toAddresses);
    mymail.setCcAddresses(ccAddresses);
    mymail.setBccAddresses(bccAddresses);
    mymail.setReplyTo('support@example.com');
    mymail.setSenderDisplayName('Salesforce Support');
    mymail.setSubject('An email from Salesforce');
    mymail.setPlainTextBody('This email has been sent through Apex');
    mymail.setHtmlBody('<p> This email has been sent through Apex</p>');

    Messaging.sendEmail(new Messaging.SingleEmailMessage[] { mymail });
  }
Send an email with attachments
Apex also allows you to add attachments. But before we get to the script, first we need to create a document in Salesforce.
On your homepage, scroll down to locate the Sales Operations window. Open Data and click on Files.
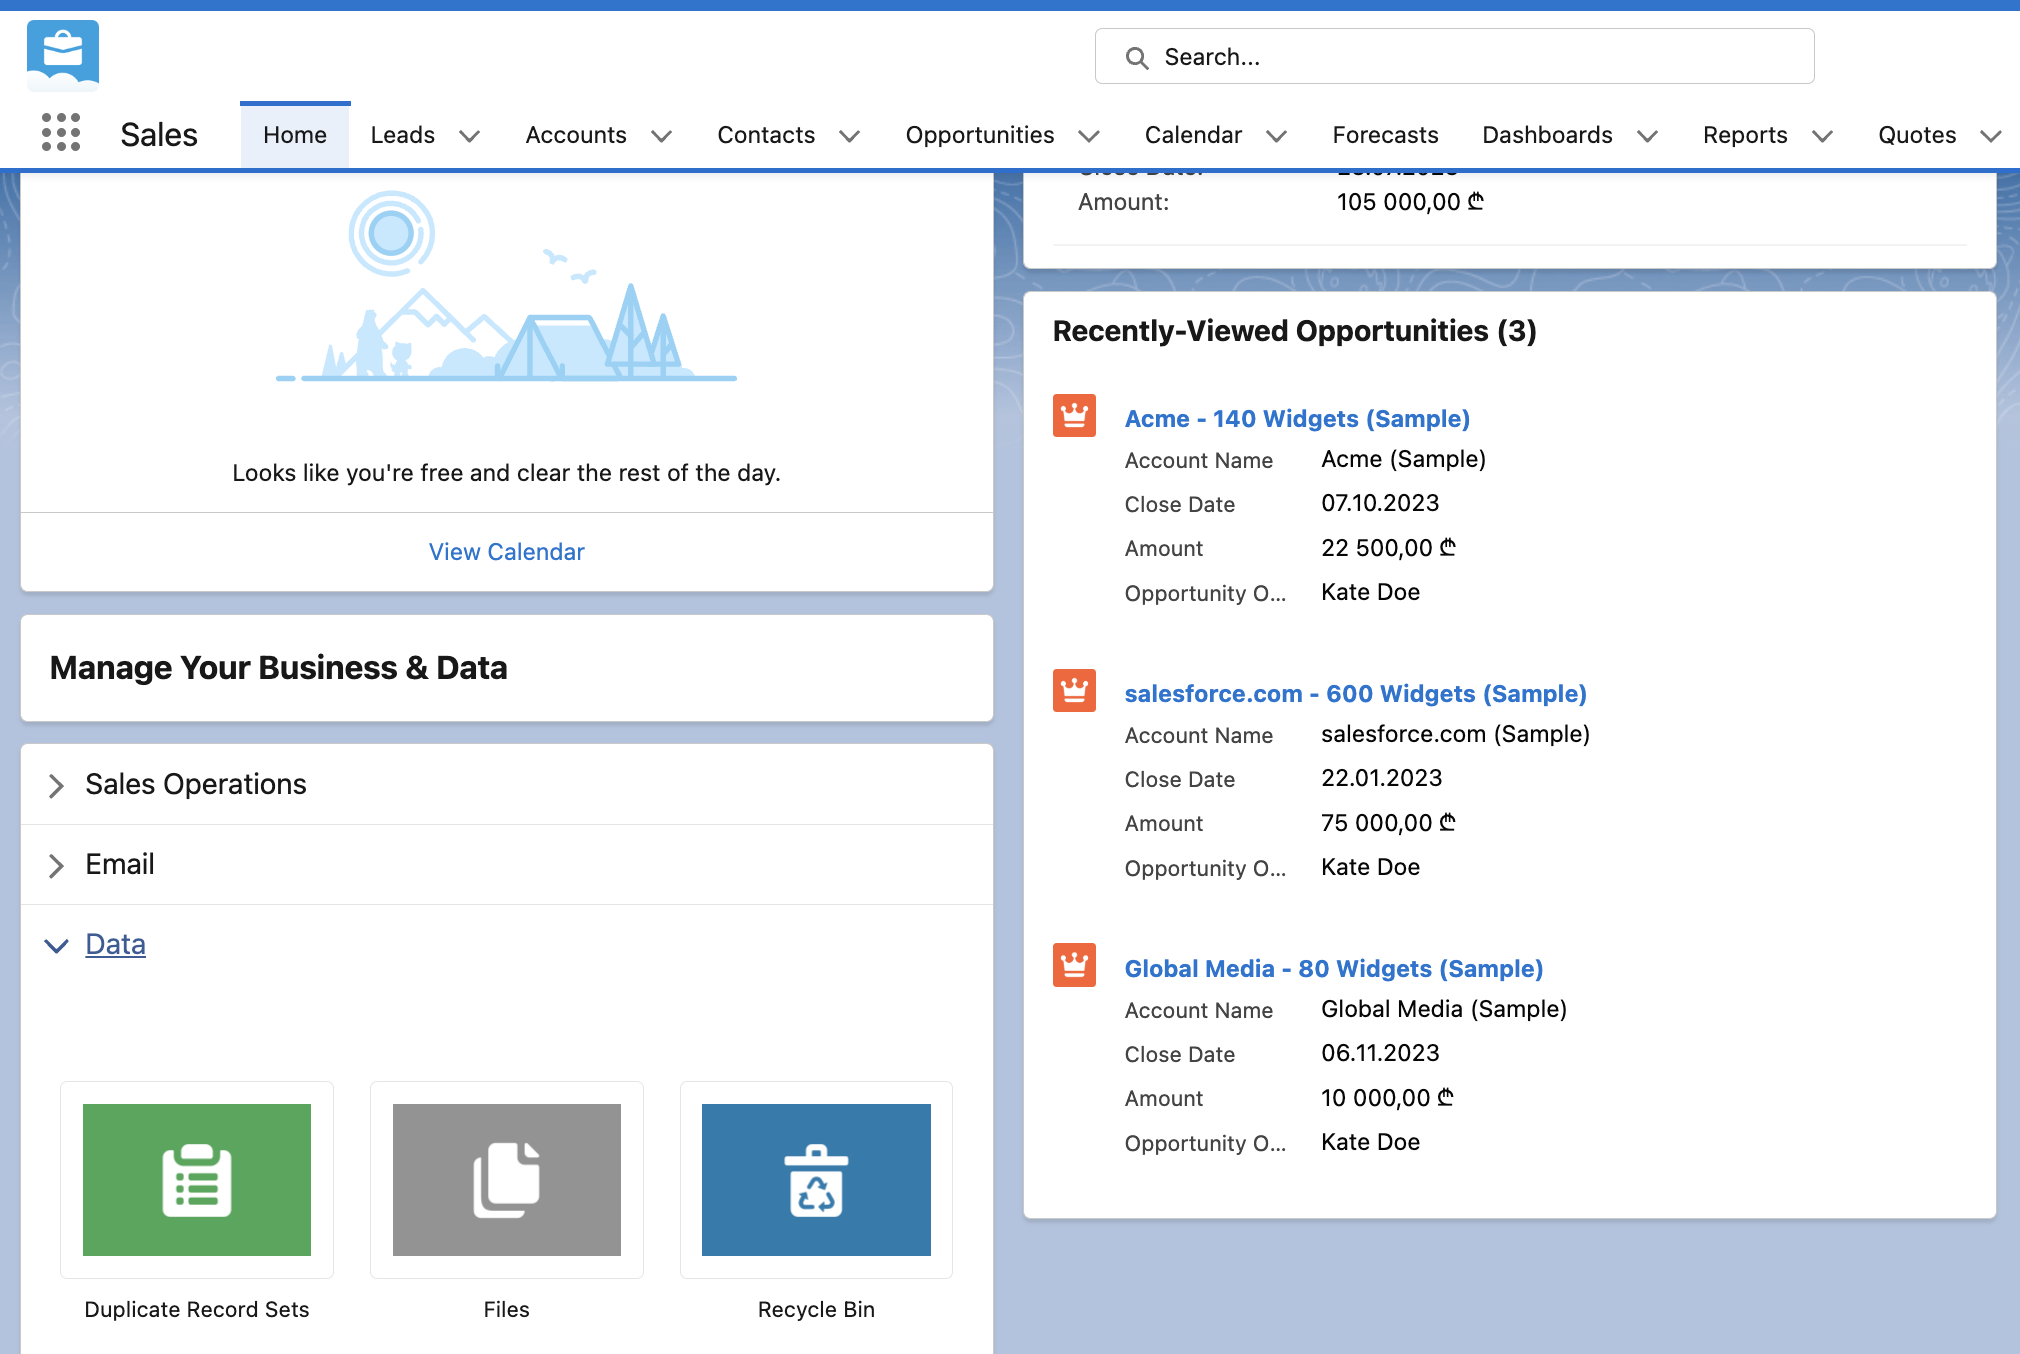
Press Upload Files and choose the desired file from your computer. Remember its name as you’ll need to specify it in your Apex code.
Then, modify the following script with the desired data and execute the code:
public class EmailsAttachment {
  public static void emailerAttachment() {
        // Email sending with attachment
        ContentVersion contentVersion = [SELECT Id FROM ContentVersion WHERE Title = 'Invoice' LIMIT 1];
        List<ID> docid=new List<ID>();
        docid.add(contentVersion.id);
        Messaging.SingleEmailMessage semail = new Messaging.SingleEmailMessage();
        semail.setEntityAttachments(docid);
      semail.setUseSignature(false);
        semail.setSubject('Sending document as attachemnt');
        String[] sendTo = new String[]{'somtobeeze@gmail.com'};
        semail.setToAddresses(sendTo);
        semail.setPlainTextBody('Please inspect the document attached');
        Messaging.sendEmail(new Messaging.SingleEmailMessage[]{semail});

    }
}
Use Batch class to send emails
A Batch class can be used to split the processing of a large number of records into smaller pieces or ‘batches’. This is beneficial to avoid hitting the platform’s governor limits. When used for sending emails, a Batch class makes it possible to send a high volume of emails asynchronously and maintain the stability of the system.
First, create a batch class and gather the necessary records in the start method. Then, prepare and process emails in the execute method. The final step is to send a report of the batch job with the finish method.
global class ContactEmailBatch implements Database.Batchable<sObject> {

    global Database.QueryLocator start(Database.BatchableContext bc) {
        // Gather all contacts with the specific criteria
        return Database.getQueryLocator('SELECT Id, Email, FirstName FROM Contact WHERE Status__c = \'SpecificValue\'');
    }

    global void execute(Database.BatchableContext bc, List<sObject> records) {
        List<Messaging.SingleEmailMessage> emailsToSend = new List<Messaging.SingleEmailMessage>();

        for (sObject record : records) {
            Contact c = (Contact) record;

            Messaging.SingleEmailMessage email = new Messaging.SingleEmailMessage();
            email.setToAddresses(new List<String> {c.Email});
            email.setSubject('Notification from Salesforce');
            email.setPlainTextBody('Hello ' + c.FirstName + ', this is a notification...');

            emailsToSend.add(email);
        }

        // Send emails
        Messaging.sendEmail(emailsToSend);
    }

    global void finish(Database.BatchableContext bc) {
        // You can send a notification or report about the completion of the job
        // For example: Sending a summary email to the admin
    }
}
Batch emails can be scheduled or sent immediately.
To run the code right away, use the following script:
ContactEmailBatch batchInstance = new ContactEmailBatch();
Database.executeBatch(batchInstance, 200); // Adjust batch size as necessary
For scheduling, create a scheduled class.
global class ScheduleContactEmailBatch implements Schedulable {
    global void execute(SchedulableContext sc) {
        ContactEmailBatch batchInstance = new ContactEmailBatch();
        Database.executeBatch(batchInstance, 200); // Adjust batch size as necessary
    }
}
Then schedule the emails from the Salesforce platform by going to Setup → Apex Classes → Schedule Apex or using a programmatic method:
ScheduleContactEmailBatch scheduler = new ScheduleContactEmailBatch();
// Schedule it to run every day at a specific time
String cronExp = '0 0 10 * * ?'; // Example: Every day at 10 AM
System.schedule('Contact Email Batch Job', cronExp, scheduler);
Send an email to a public group
If you have external users on your Salesforce platform, you can create a public group and send them an email.
Simply go to Setup and type Public groups in the quick find box. Click New, enter Label and unique Group Name, and move desired members from Available Members to Selected Members. Save the settings.
Then configure your Apex code to send emails to all members of the public group using the sample script below:
public class EmailSender {

    public void sendMail() {
        List<String> emailAddresses = getEmailAddresses();

        if(emailAddresses.size() > 0) {
            Messaging.SingleEmailMessage mail = new Messaging.SingleEmailMessage();
            mail.setToAddresses(emailAddresses);
            mail.setSubject('This is the subject');
            mail.setPlainTextBody('This is the body.');

            try {
                Messaging.sendEmail(new Messaging.SingleEmailMessage[] { mail });
            } catch(Exception e) {
                // Handle the email sending exception here (e.g., log it, notify an admin, etc.)
                System.debug('Error sending email: ' + e.getMessage());
            }
        }
    }

    private List<String> getEmailAddresses() {
        List<String> idList = new List<String>();
        List<String> mailToAddresses = new List<String>();

        // Fetching group members
        List<GroupMember> groupMembers = [SELECT userOrGroupId FROM GroupMember WHERE Group.Name = 'MyPubGroup'];
        for (GroupMember gm : groupMembers) {
            idList.add(gm.userOrGroupId);
        }

        // Fetching user emails. It's assumed all members are users. If nested groups are there, another query and logic would be needed.
        List<User> users = [SELECT email FROM User WHERE Id IN :idList];
        for(User u : users) {
            if(u.email != null) {  // Ensure email is not null
                mailToAddresses.add(u.email);
            }
        }

        return mailToAddresses;
    }
}
Add the following line of code to your Visualforce page:
<apex:commandbutton value="Send Mail" action="{!sendMail}"/>Send an email using a trigger
In Salesforce, a triggered email is an email sent in response to the customer’s actions. There are two main ways to send emails using triggers: with Apex code or Email Studio in Salesforce Marketing Cloud. And since we’re talking about Apex, let’s first discuss this option.
To get started, you should create a trigger class that will send an email before or after a specific action: Insert, Update, Delete, Merge, and Upsert.
In this example, we’ll send an email when a record is created. In other words, we’ll use contact creation as an email trigger.
Create a new Apex trigger file in your Salesforce account and assign a desired name to it.
In the Object dropdown menu, select Contact.
Build the trigger class and prepare an email like so:
trigger ContactEmailTrigger on Contact (after insert) {
    List<Messaging.SingleEmailMessage> mailList = new List<Messaging.SingleEmailMessage>();

    for (Contact myContact : Trigger.new) {
        if (myContact.Email != null && myContact.FirstName != null) {
            // Initialize the single send email object
            Messaging.SingleEmailMessage newMail = new Messaging.SingleEmailMessage();

            // Set the recipient's email address
            newMail.setToAddresses(new List<String> { myContact.Email });

            // Set the email attributes
            newMail.setSubject('Your contact details have been added');

            String body = 'Hello ' + myContact.FirstName + ', ';
            body += 'Your details have been added and your contact has been created.';
            newMail.setHtmlBody(body);

            // Add the email to the list
            mailList.add(newMail);
        }
    }

    // Send all emails in the list and capture the results
    Messaging.SendEmailResult[] results = Messaging.sendEmail(mailList);

    // Check results for errors and log them
    for (Messaging.SendEmailResult result : results) {
        if (!result.isSuccess()) {
            System.debug('Failed to send email. Reason: ' + result.getErrors()[0].getMessage());
            // Further logging or handling can be added here if necessary
        }
    }
}
How to send email using a trigger in Salesforce Marketing Cloud
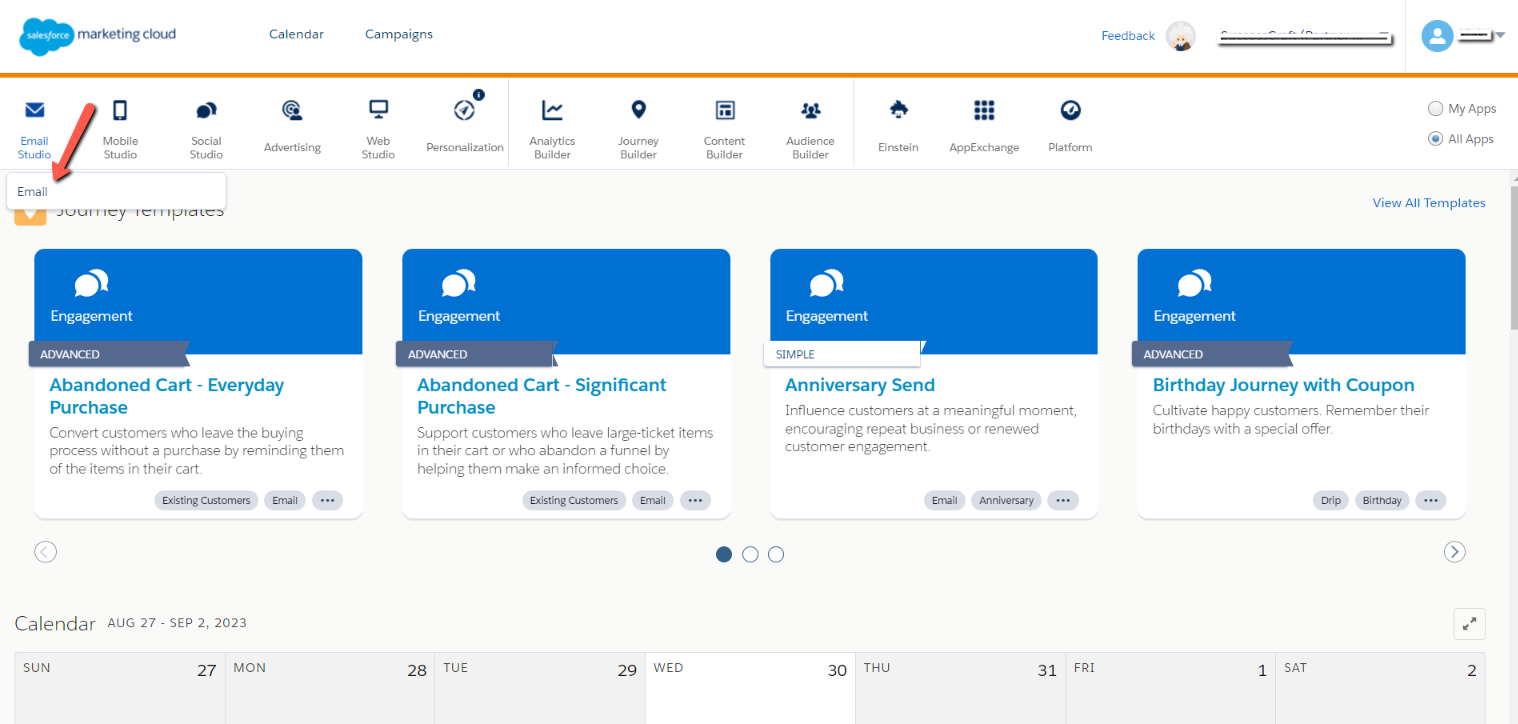
Salesforce Marketing Cloud has an Email Studio in which you can configure triggered sends. You can set interactions i.e., customer actions that will trigger relevant emails.
Note: This feature isn’t available to CRM or Service users.
To send notification emails in response to the user actions, you have to complete the following steps:
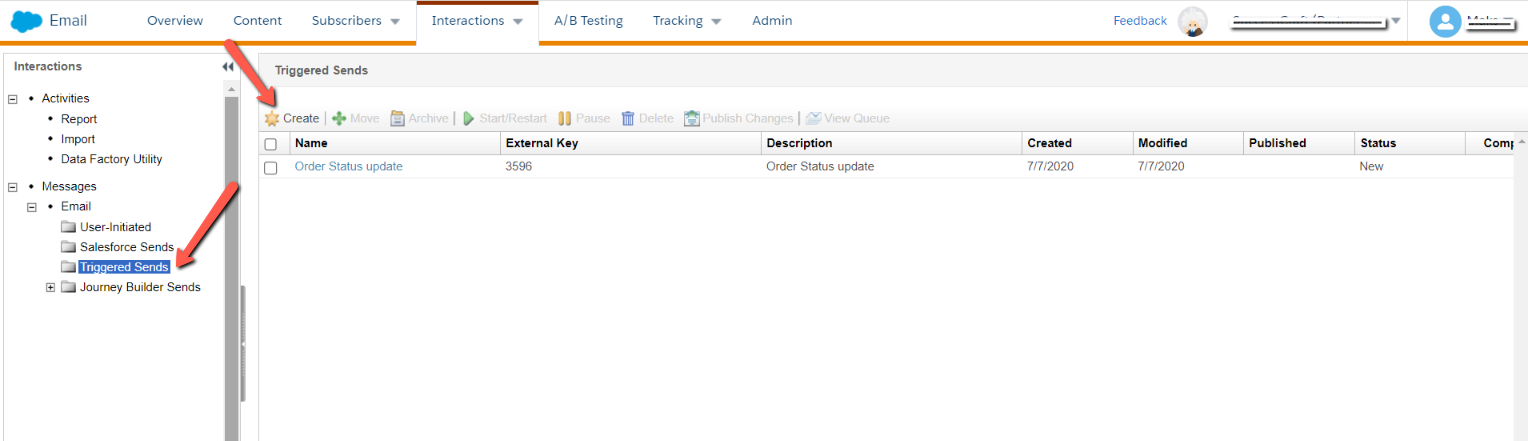
- Locate the Email Studio navigation menu and the Interactions dropdown menu. Choose Triggered Emails.
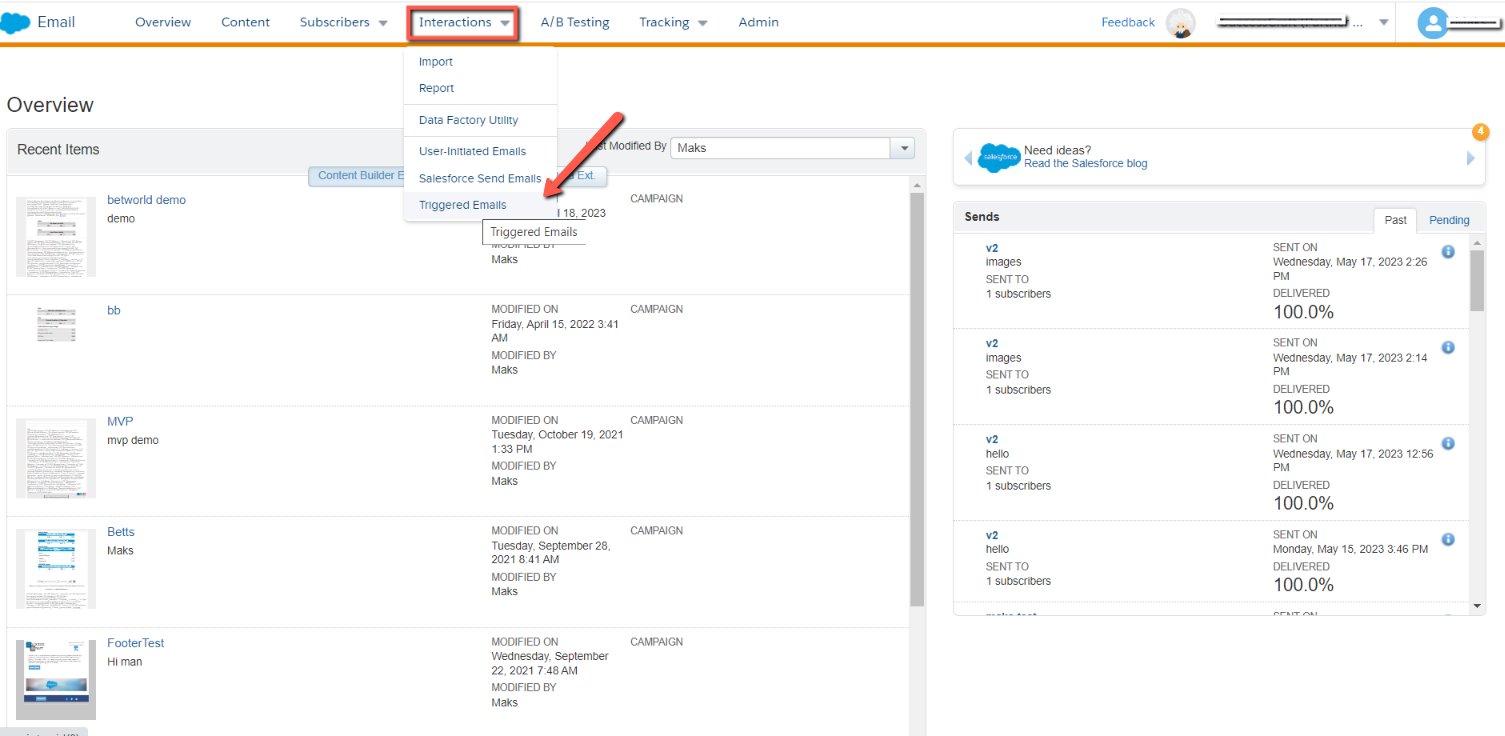
- Then, go to Interactions → Messages → Email → Triggered → Create.
- Click Create Triggered Send for standard triggered emails.
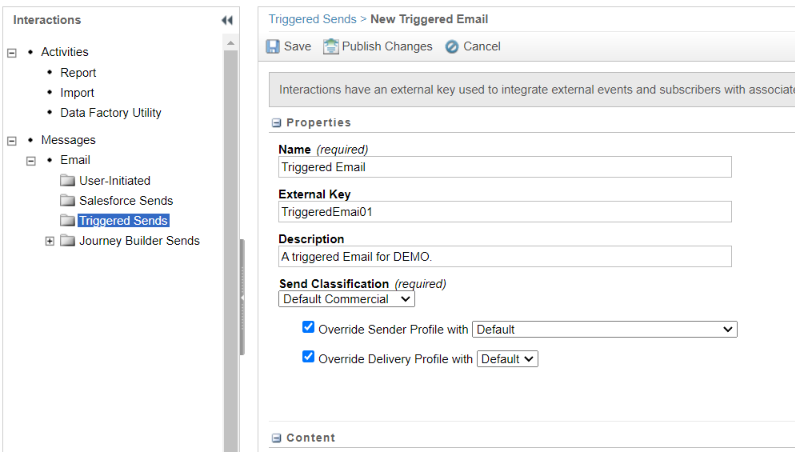
- Complete Properties such as Name, External Key, Description, Send Classification, Override Sender Profile, and Override Delivery Profile. Check out Salesforce’s official docs to find out the meaning of each property.
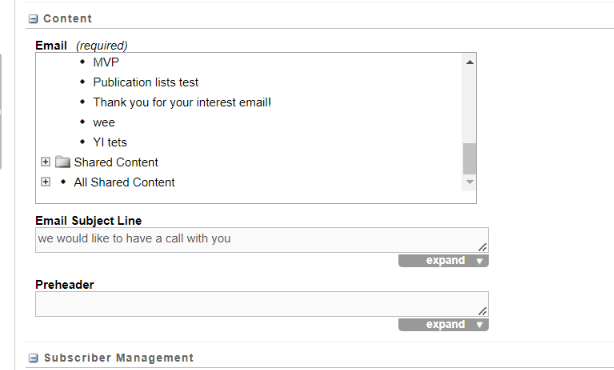
- Define the content, such as Email (the message body) and Subject Line.
- Complete Subscriber Management with List, Trigger Send Data Extension, Add subscribers to this list, and Update Subscribers values.
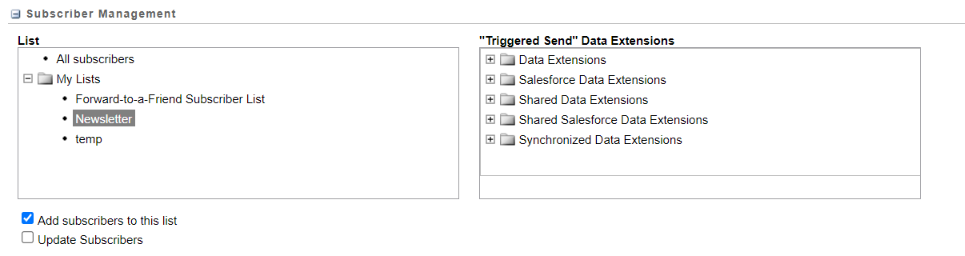
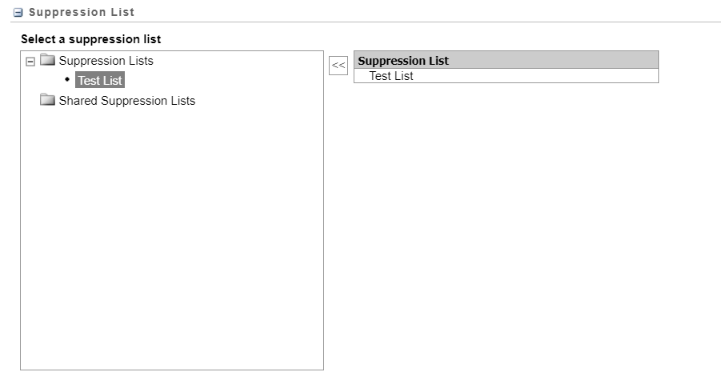
- At this point, you can also add a suppression list to avoid sending emails to subscribers who have opted out of marketing communications.
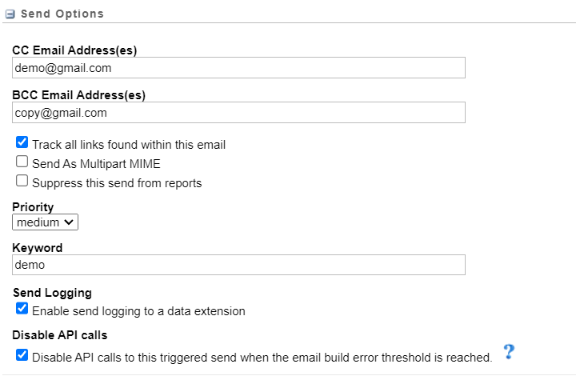
- Optionally, complete Send Options to set Cc or Bcc email addresses, send triggered emails as MIME multipart messages, etc.
- Save the changes.

Once that’s done, start the interaction by navigating to Interactions → Triggered Emails and choosing the interaction you’re willing to commence. Press Start/Restart. Next time your subscribers complete the specified action, they will receive an email automatically.
How to send mass emails in Salesforce
Instead of jamming out the same email to thousands of subscribers, Salesforce enables sending mass emails that are individual and personalized. This feature is called List Email in Lightning Experience and mass email in Salesforce Classic.
Keep in mind that Salesforce has several mass email limits (apart from sending volume limitations we discussed at the beginning of this article):
- Mass emails can’t be sent from Visualforce email templates;
- Duplicate email addresses count toward your daily sending limits;
- You can’t select more than 200 contacts or leads manually from a contact or lead list view;
- The character limit is 32,000 for the email body and 3,000 for the subject;
- The maximum email size is 32 MB including email headers, subject, body, and attachments.
Send List Emails in Lightning Experience
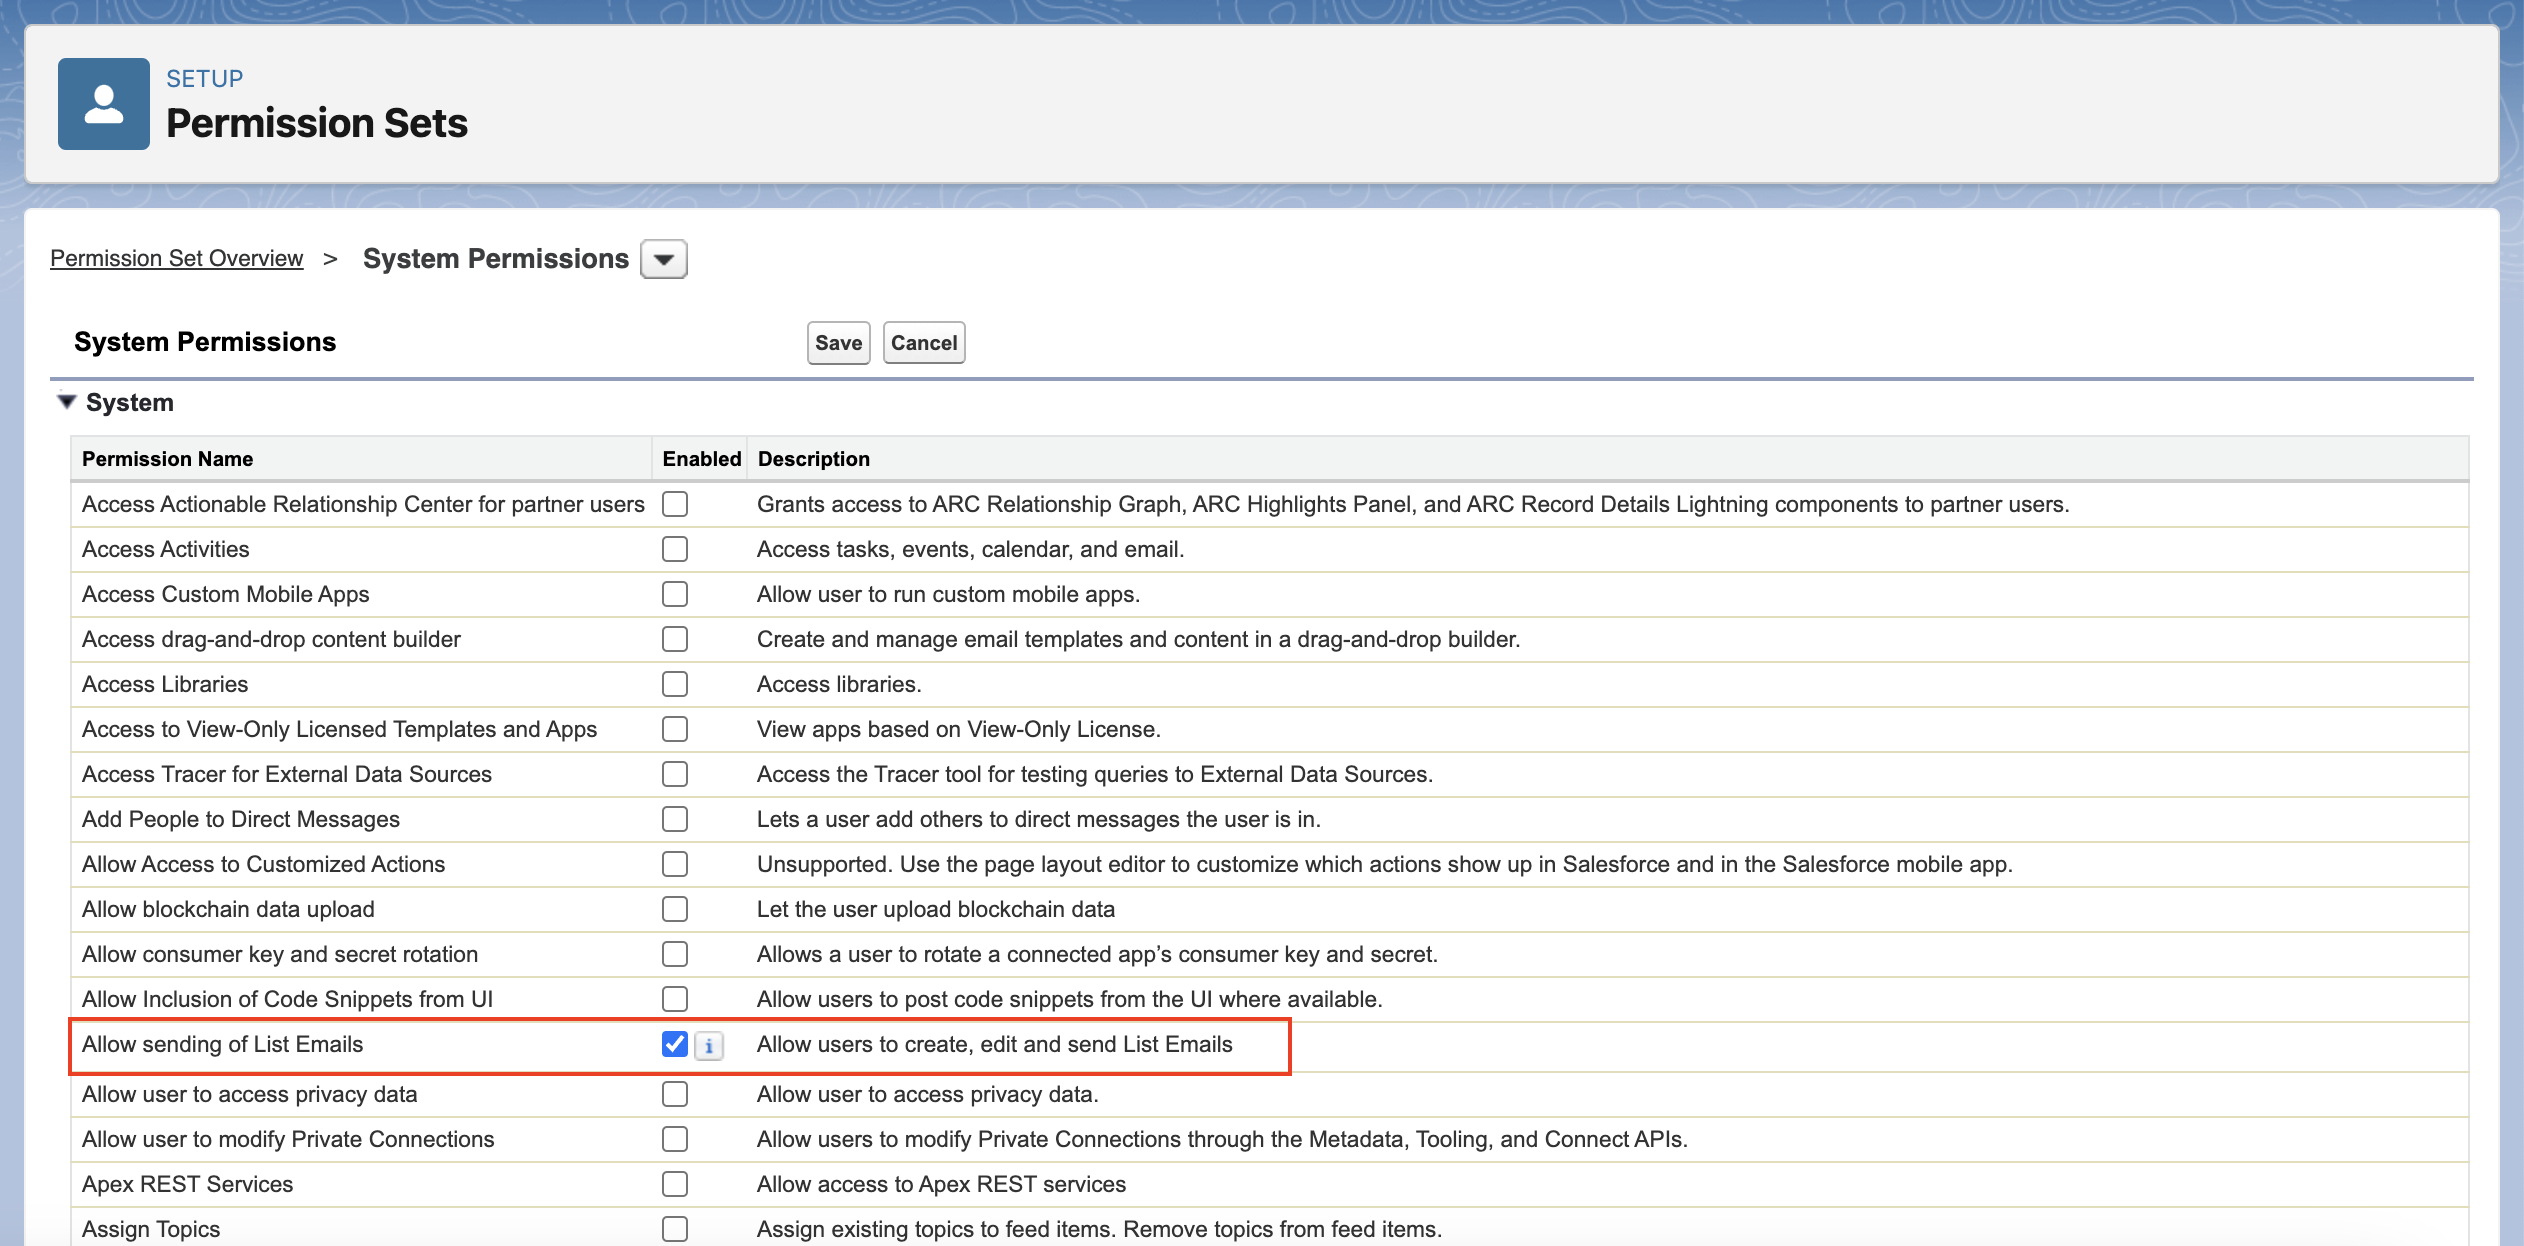
If you’ve been using Salesforce for a while, you’ll know that you need specific permission to do virtually anything on the platform. List Emails are no exception. So, before you start sending, you have to enable it.
Go to setup and type Permission Sets in the quick find box and select it.
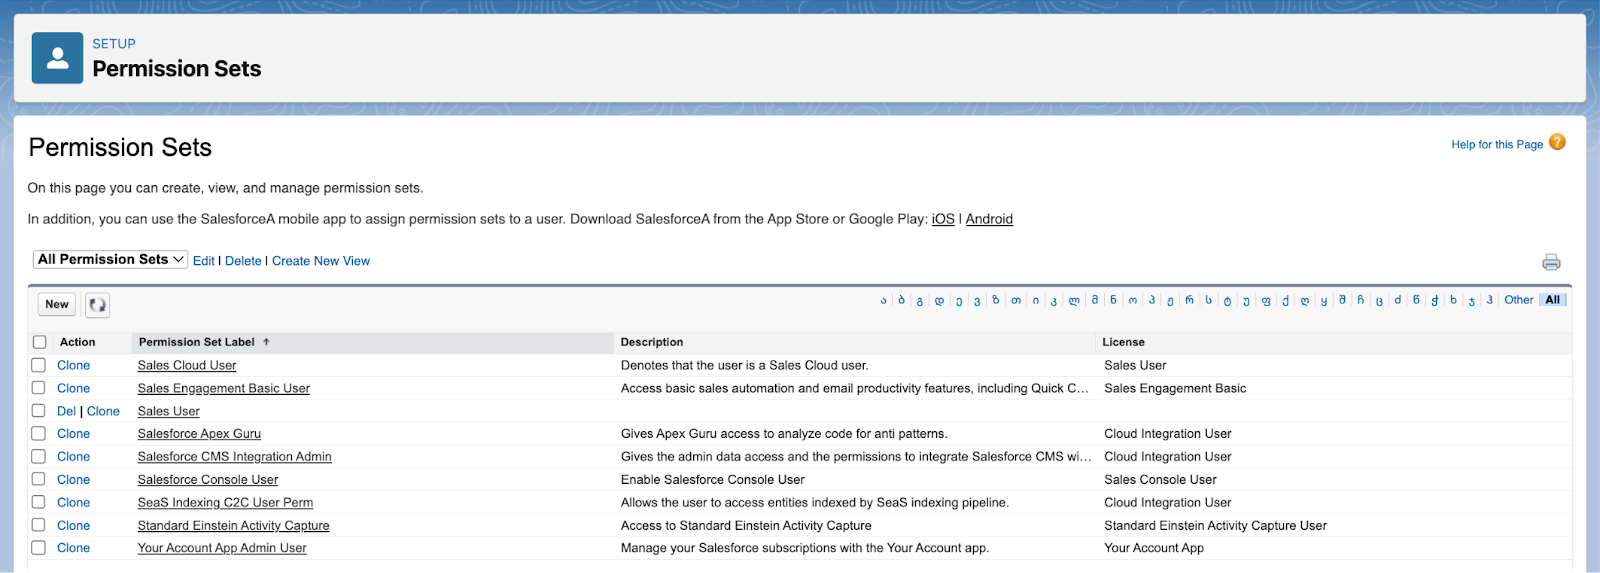
Click on one of the standard permission sets. In this case, we’ll choose a Sales User. Scroll down to find System Permissions and click on it.
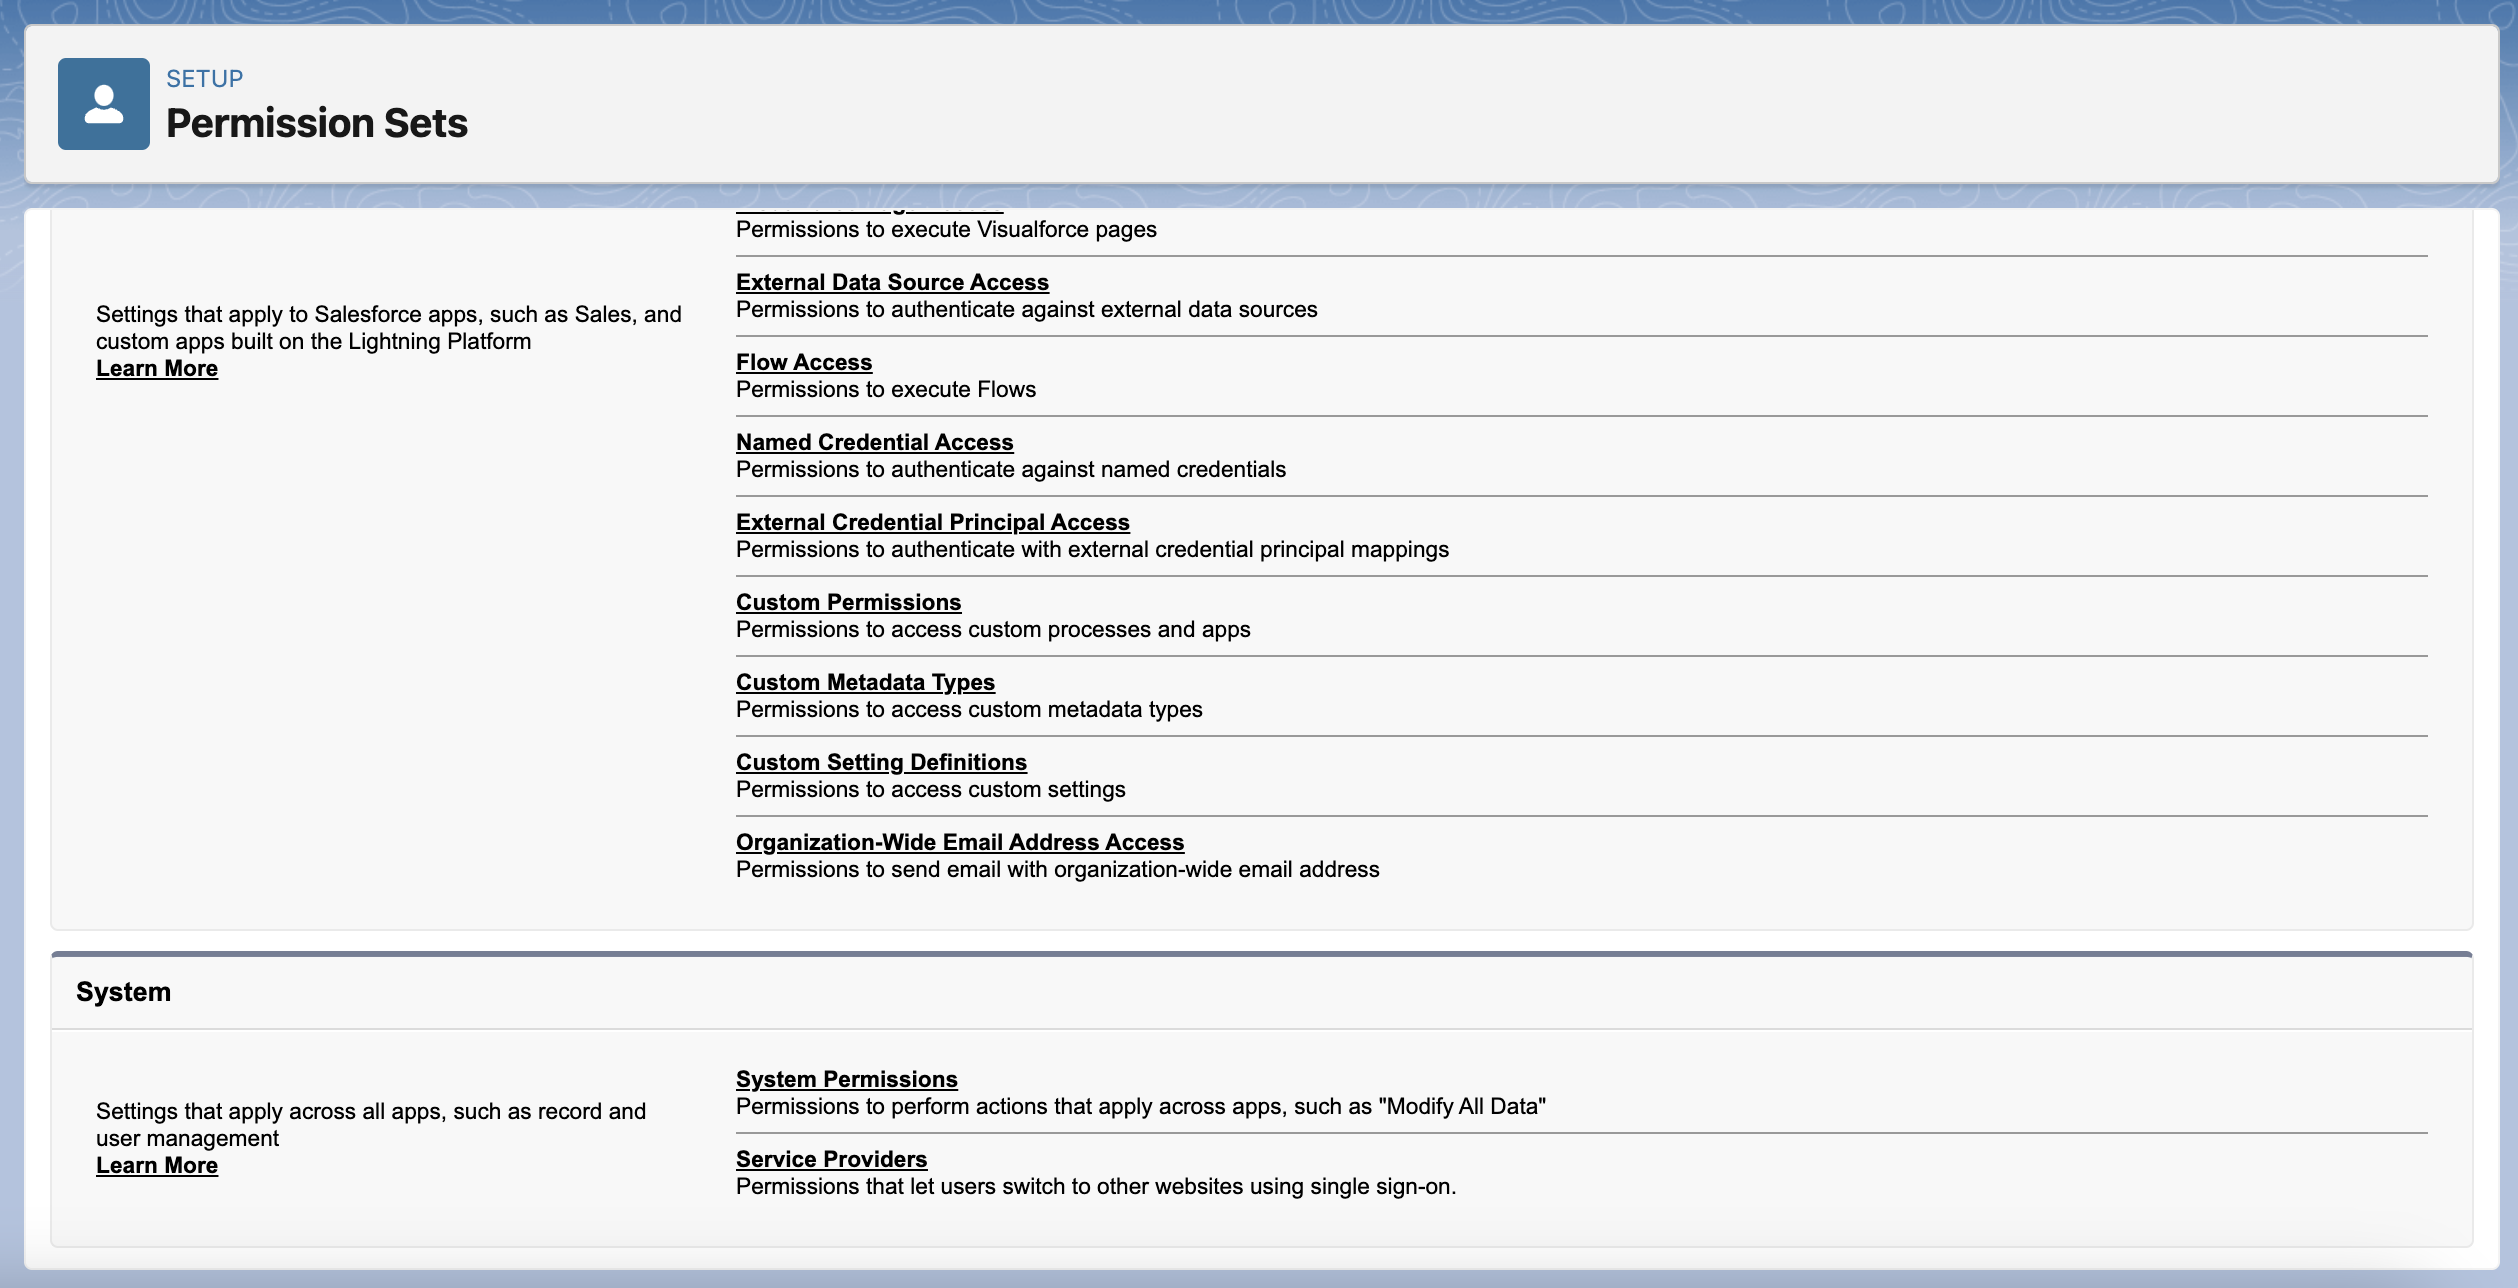
Press Edit, locate Allow sending of List Emails, and mark the box next to it. Save the settings.
With the list email permission enabled, we can start sending mass emails. Of course, we’ll need a contact or lead list view with desired recipients.
Note: If you want to send an email template to your list, you should create it before you get started with list emails.
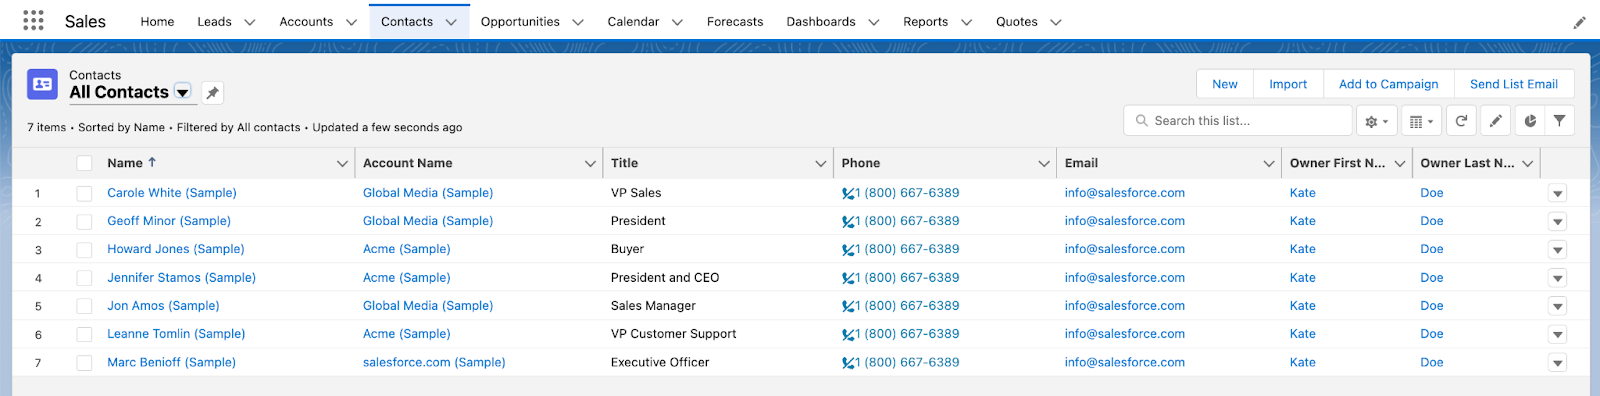
Navigate to Contacts or Leads and prepare the list of recipients. Mark all contacts/leads or select particular ones.
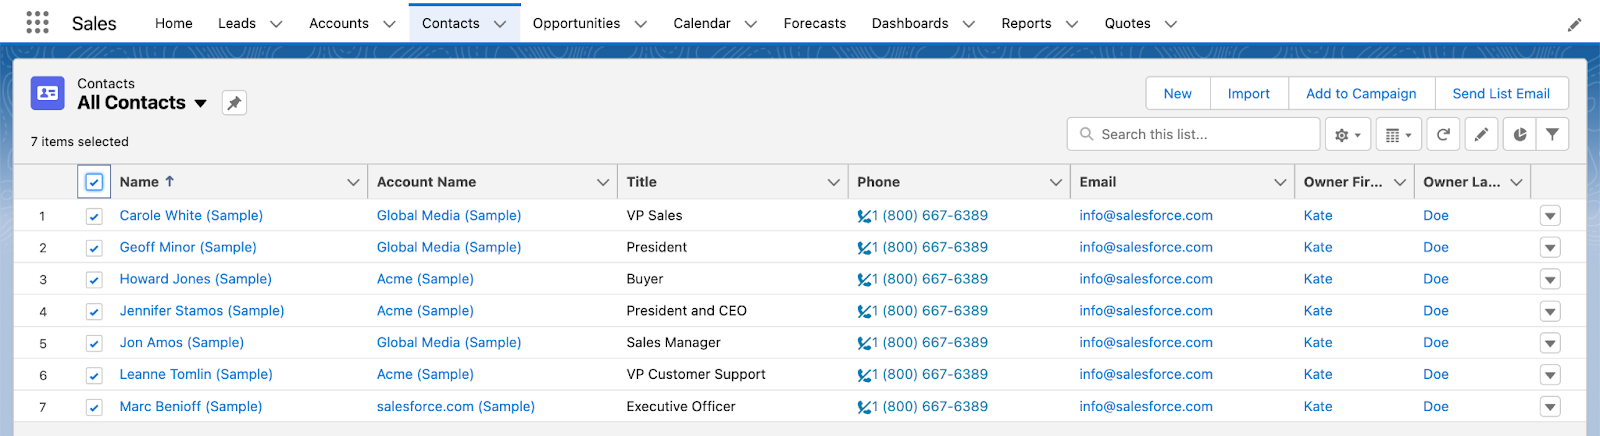
Click Send List Email. An email tool will appear. There, insert a template or craft a new email from scratch. Customize the template the way you want – use merge fields, add attachments, insert media and links, etc.
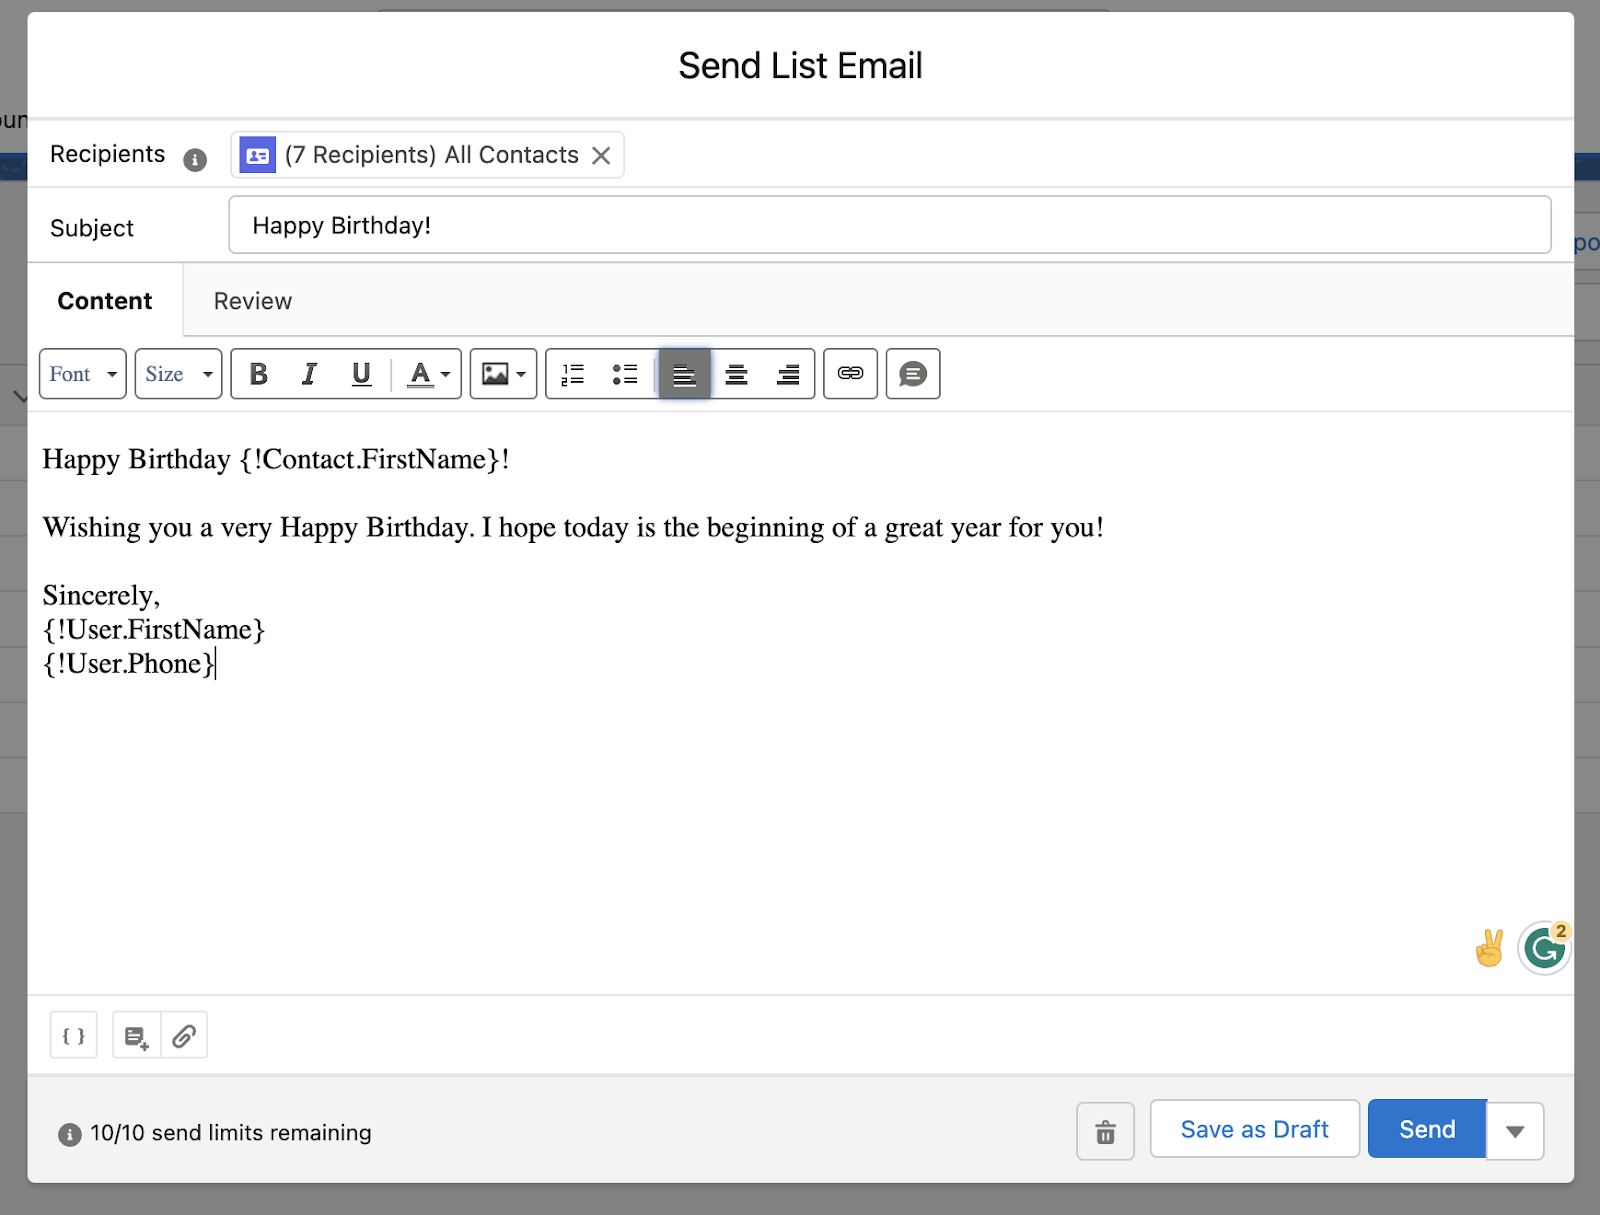
When you’re done, click Review to preview the email. Check how the email looks and click on recipients’ names to ensure merge fields work properly.
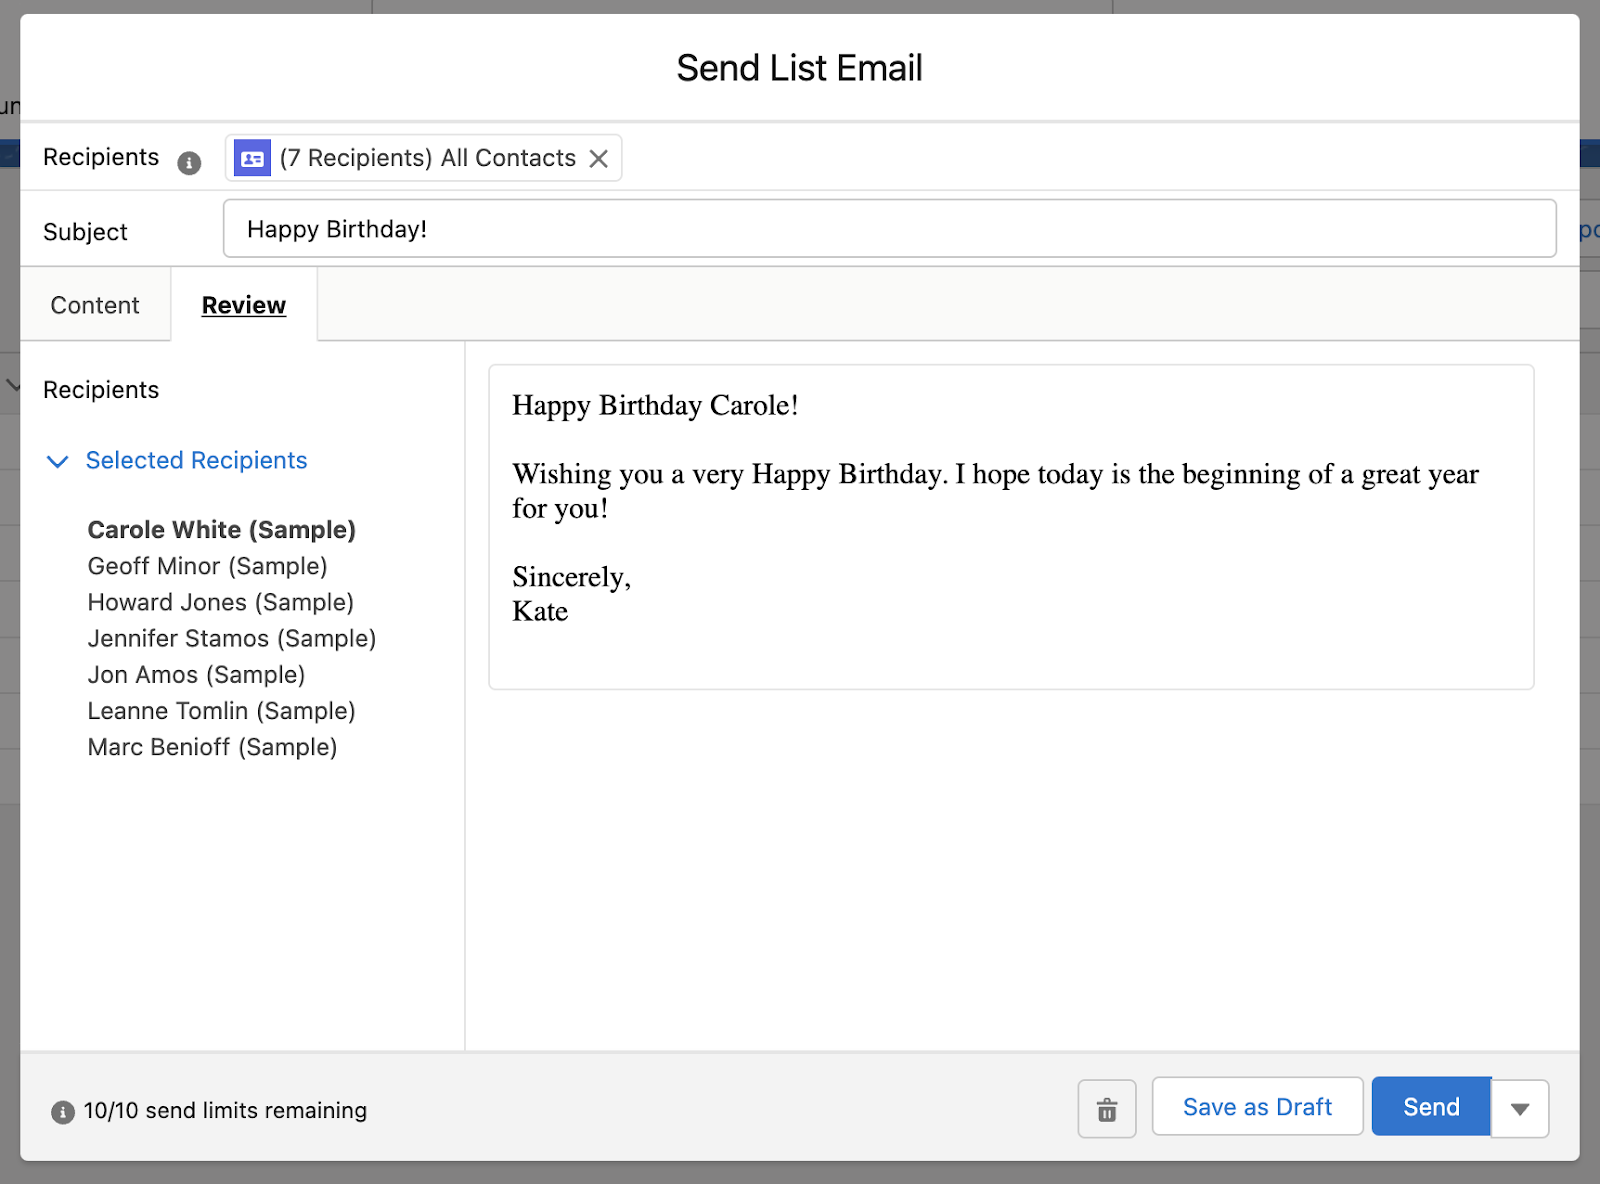
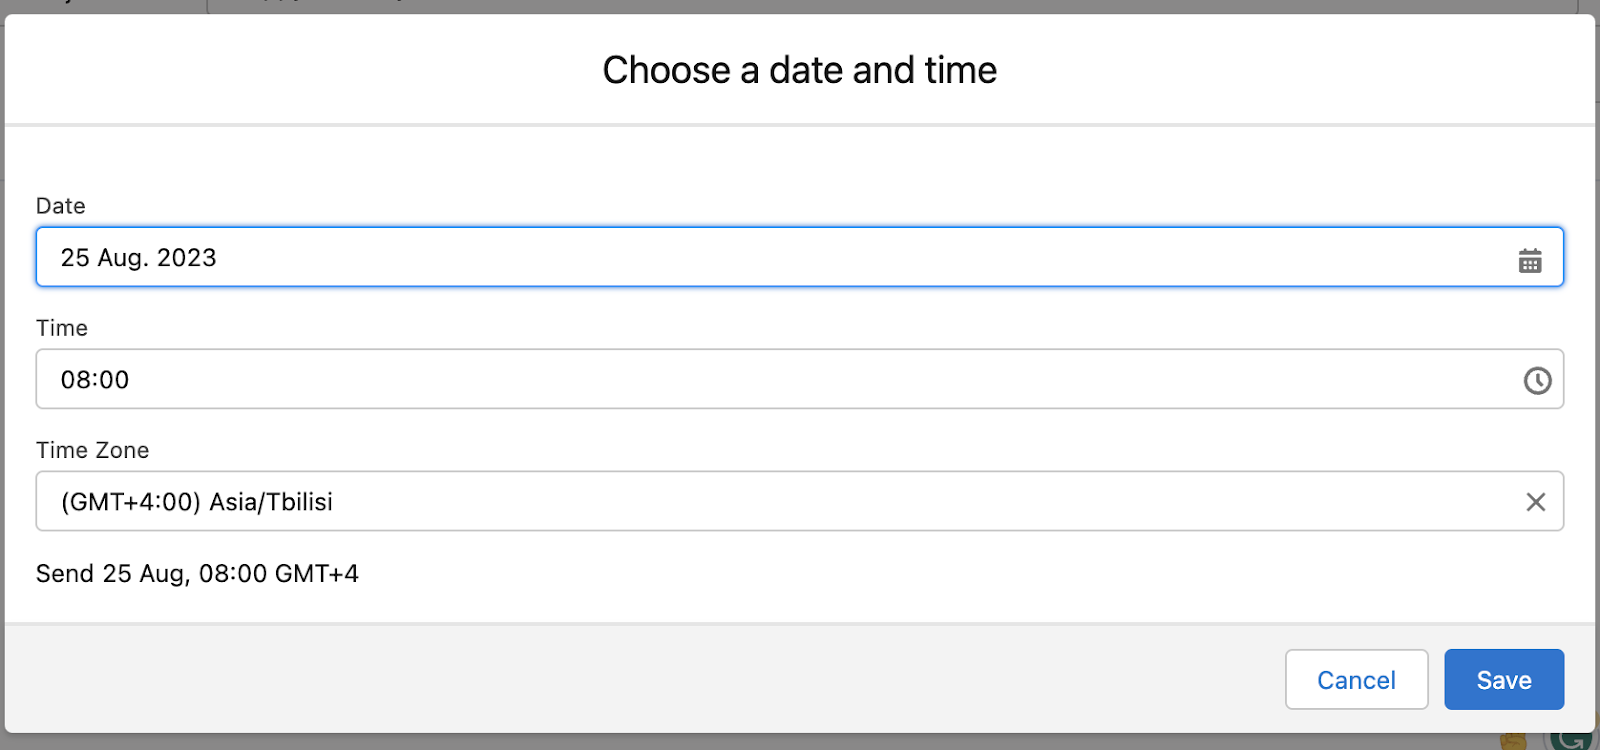
Finally, save the draft, send a list email immediately, or schedule it. For the latter, click on the downwardfacing arrow next to Send, choose Send Later, and set the desired date for sending the campaign. You’ll be notified by email when the emails get sent.
Send mass emails in Salesforce Classic
The logic behind sending mass emails in Salesforce Classic is virtually the same as with Lightning Experience. However, the UI is slightly different so let’s take a look at the step-by-step process.
The initial steps vary based on the type of recipients: contacts, leads, or coworkers.
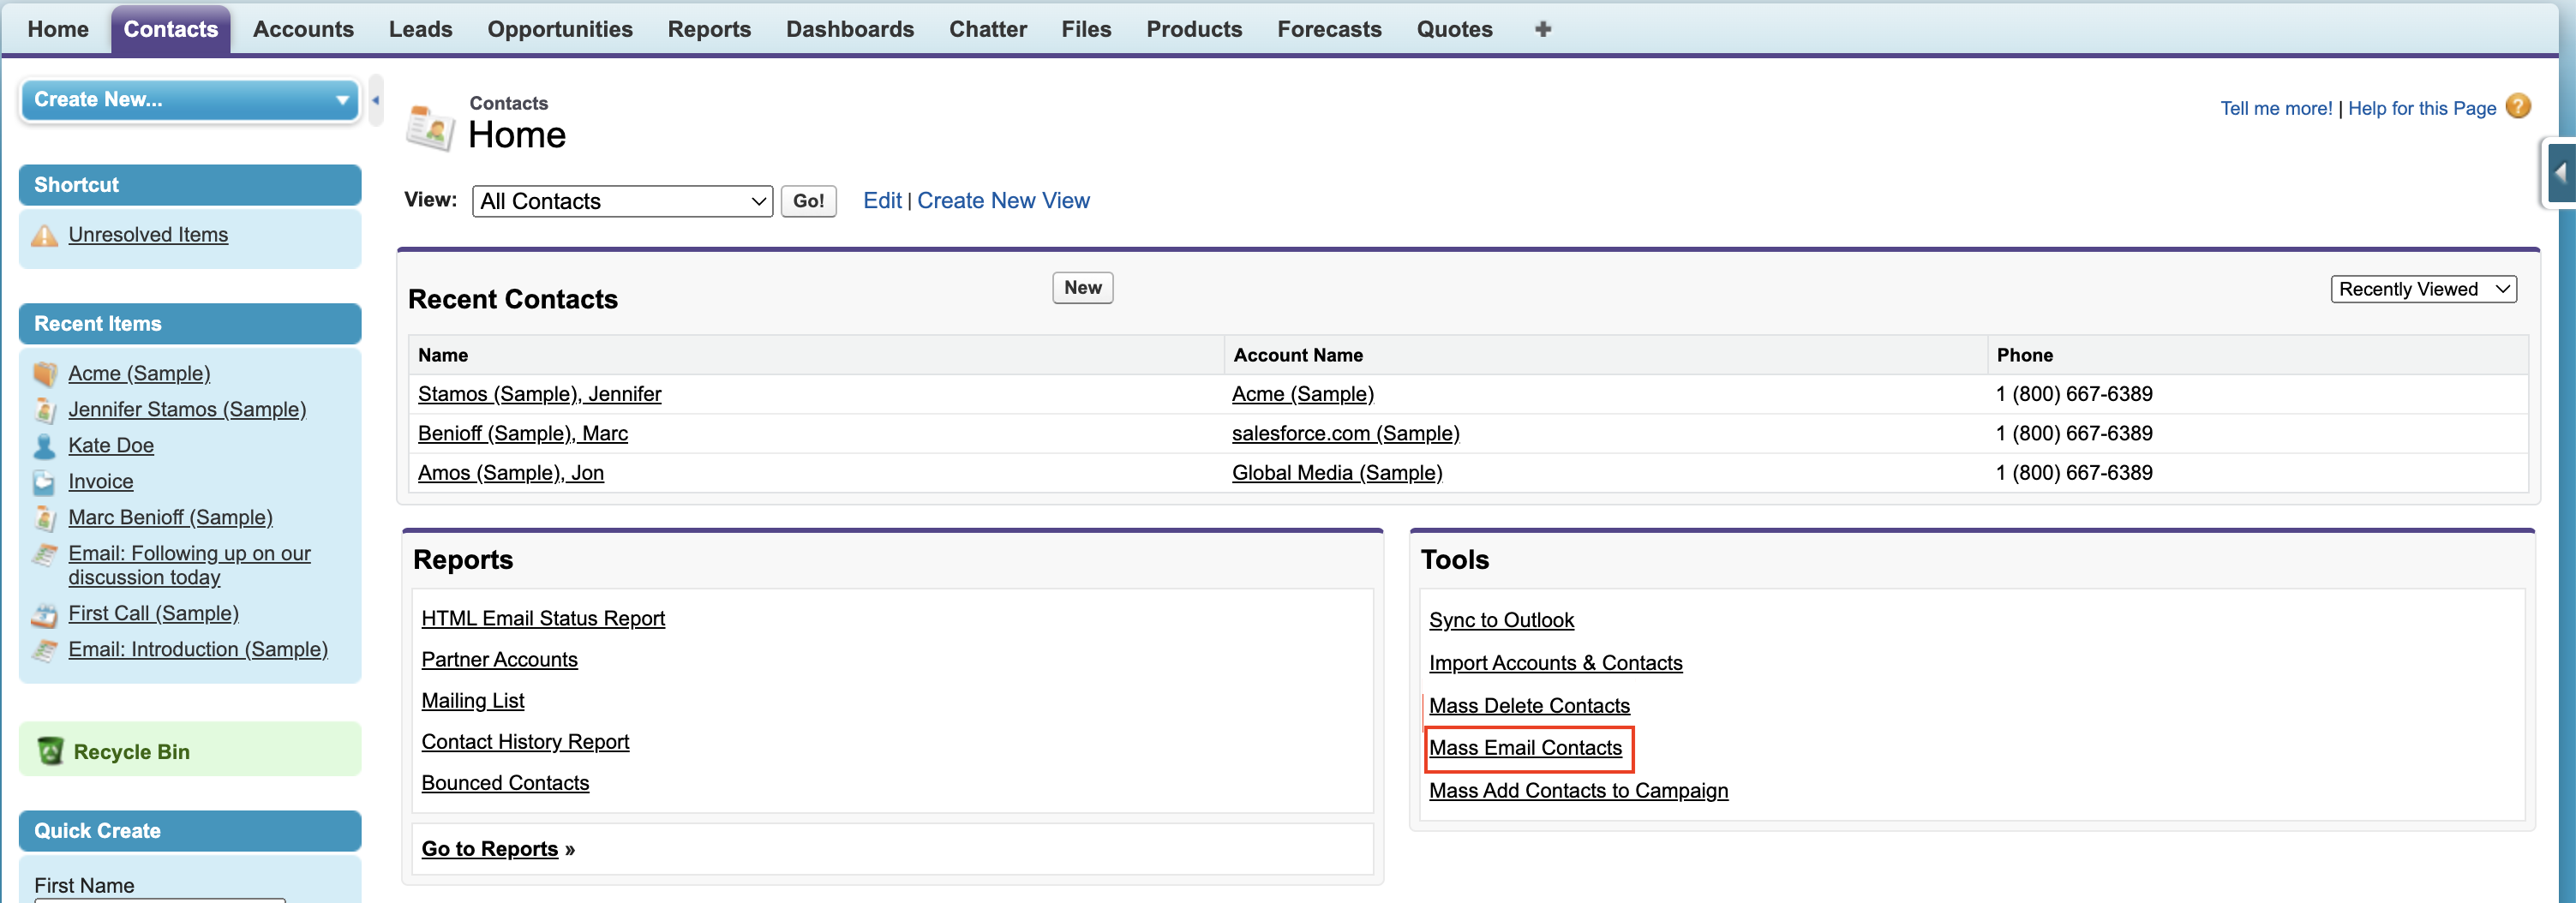
- To send bulk emails to contacts, go to the Contacts tab and locate Tools at the bottom of the page. Choose Mass Email Contacts.
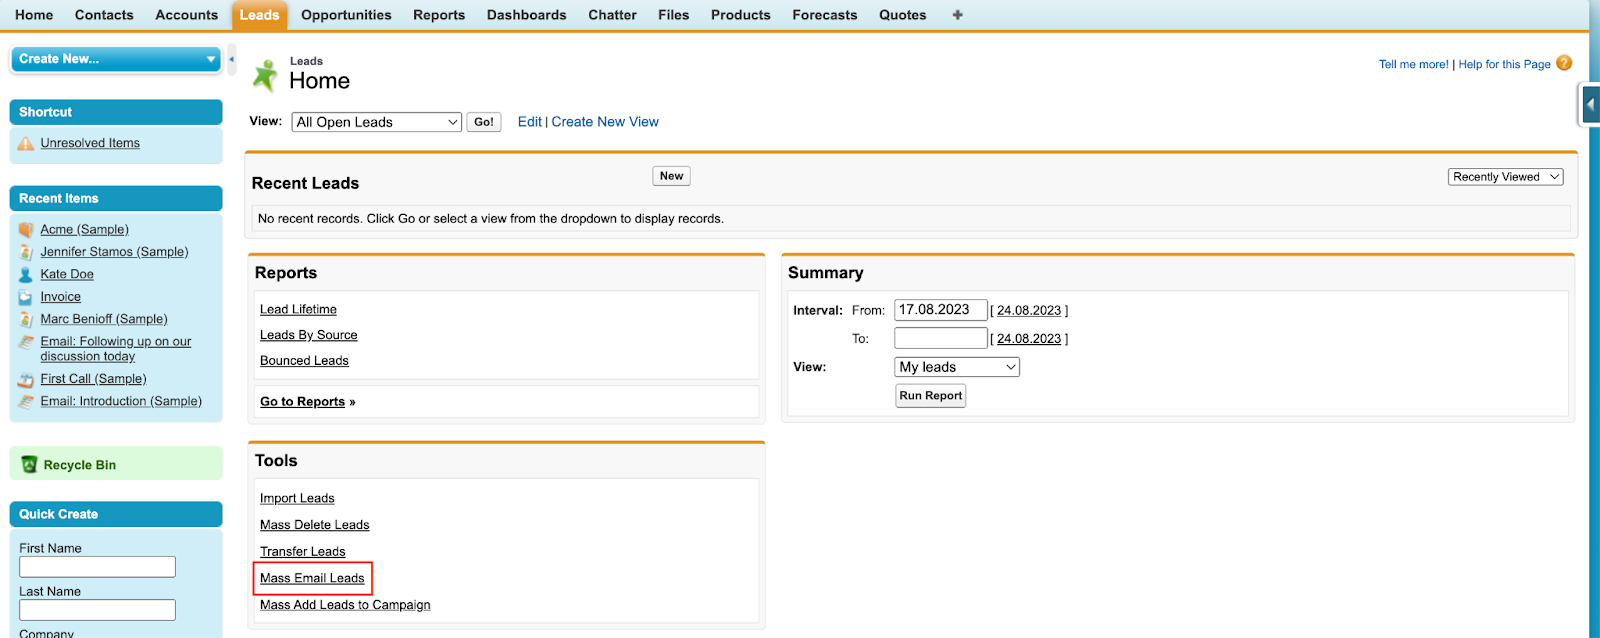
- For leads, go to the Leads tab, find the Tools section, and click Mass Email Leads.
- To send mass emails to users, go to Setup, type Mass Email Users in the quick find box, and click on it.
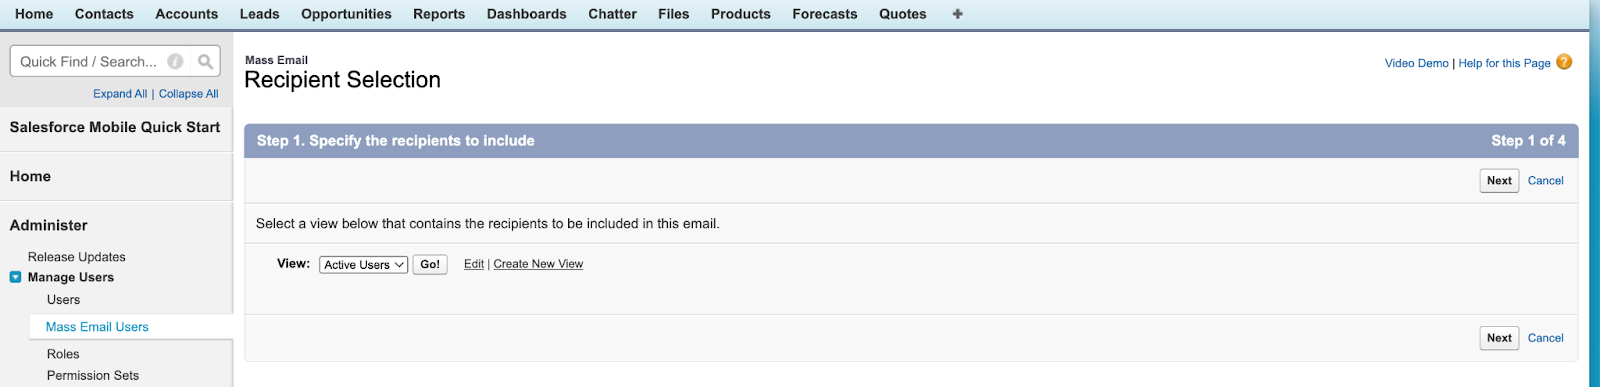
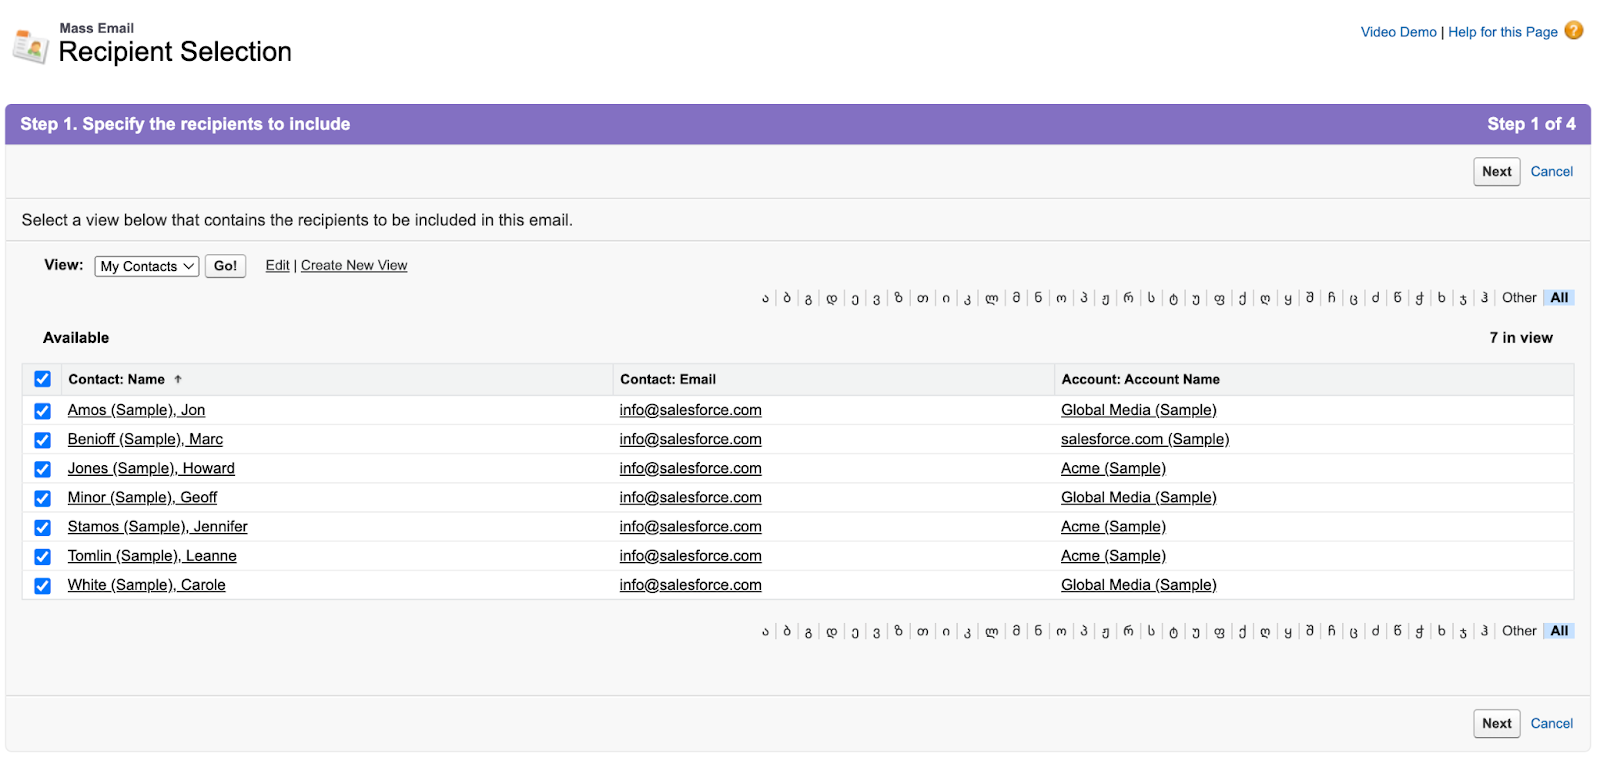
In the mass email wizard, choose the desired view and tick/untick recipients, click Go, and then Next.
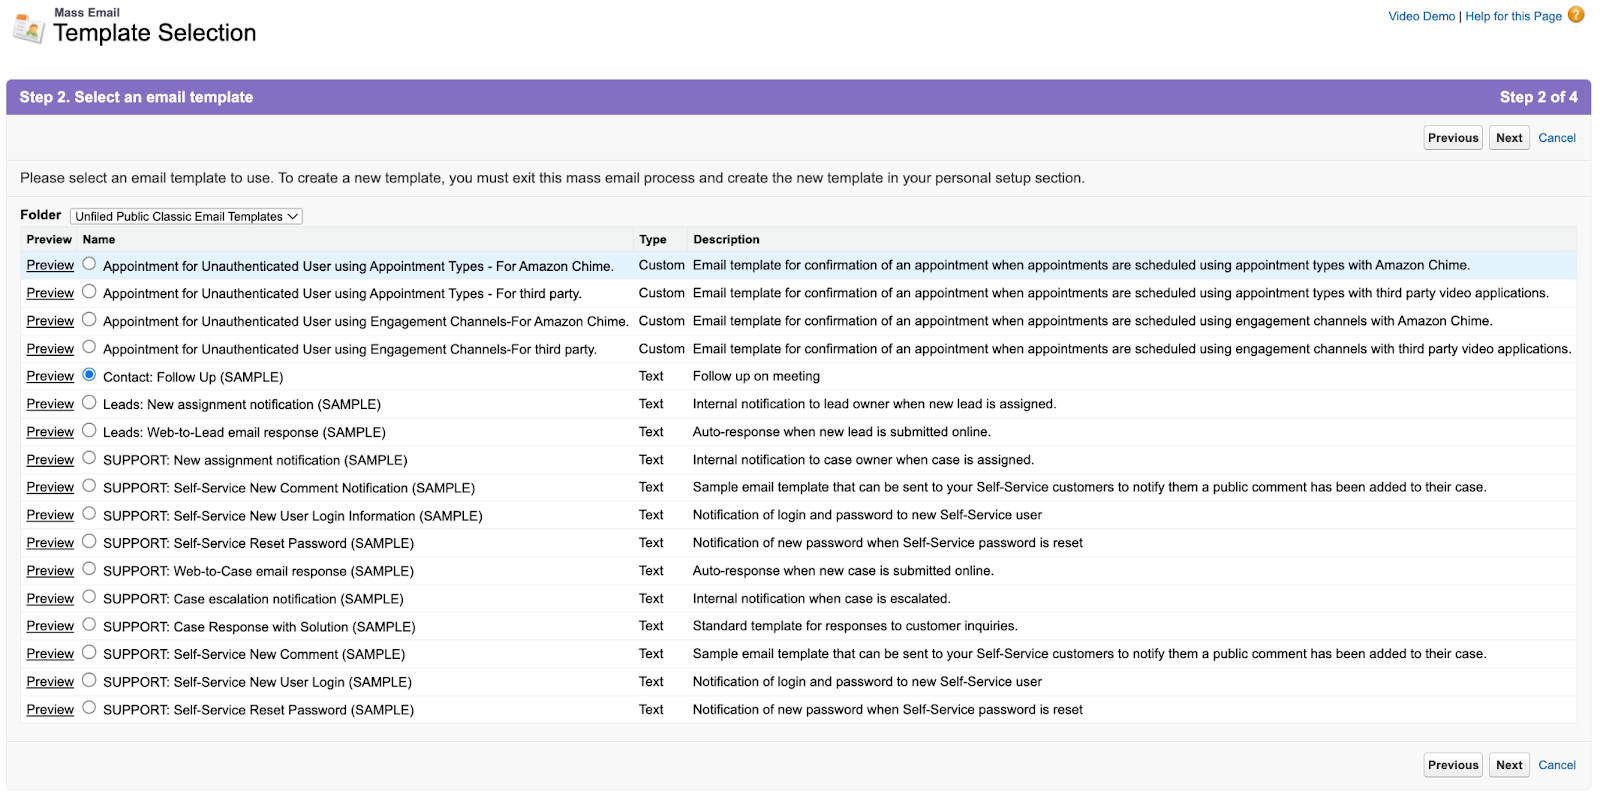
Select the template you want to send (or preview several of them to find a suitable option) and press Next once more.
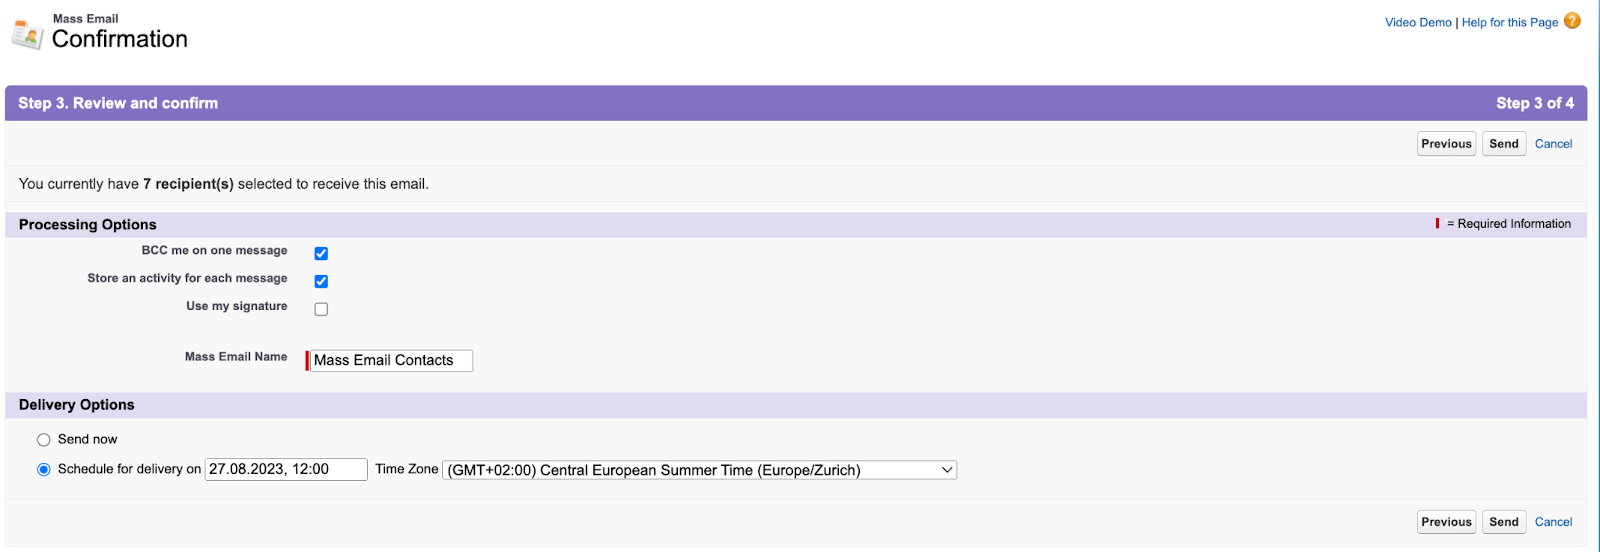
On the confirmation page, select the suitable options. Decide whether you want the emails to be BCCed to you, should the activity be stored, and should the emails use your signature.
Set the Mass Email Name to identify the campaign later (the name won’t appear in the emails).
Finally, configure Delivery Options – send the emails right away or schedule them for improved deliverability. Click Send.
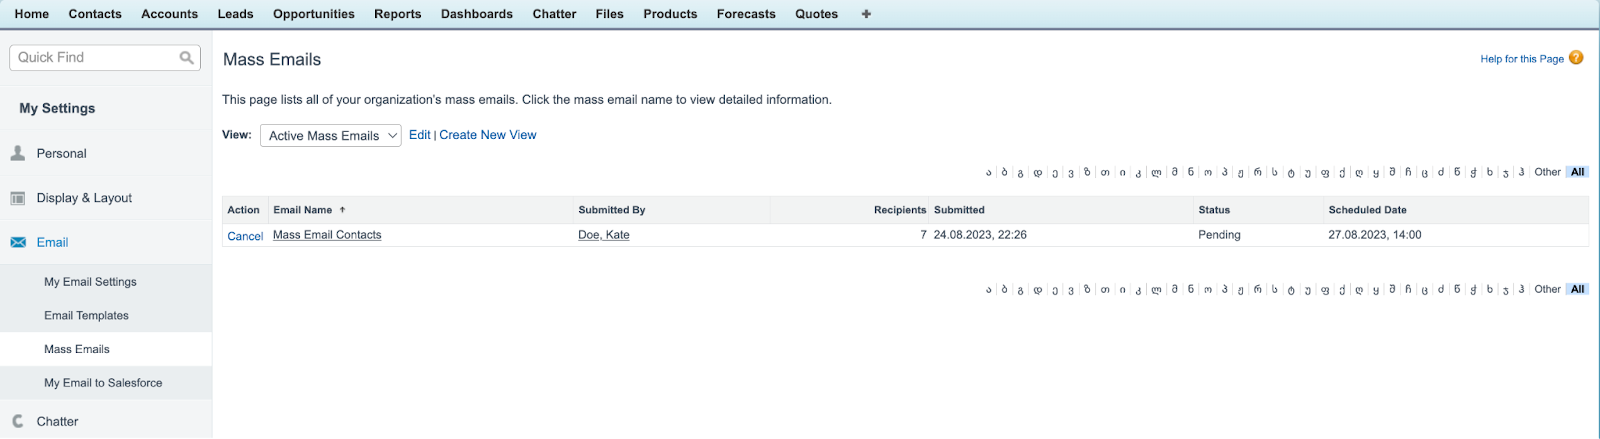
If you made a mistake and want to end mass emails (applies to scheduled emails), you also have that option. Click on your username and then choose My Settings.
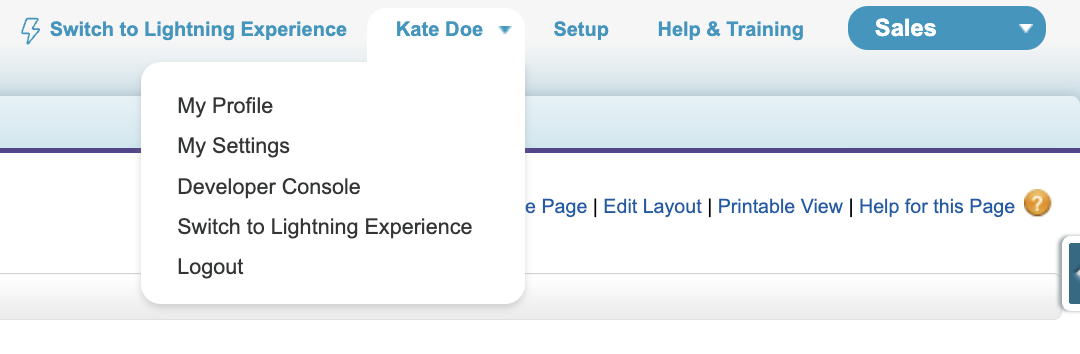
Select Mass Emails under the Email tab and click Cancel. Verify your request in the confirmation window and your mass emails will be cancelled.
That’s it. Now, you can successfully send email blasts from your Salesforce platform.
How to send emails from Salesforce Flow
Previously, it was possible to set up marketing automation and other automation processes using the Process Builder and Workflow Rules. Now, both of these features are migrated to Flow – an easier interface for building triggered processes that also include automated emails.
Send a simple email from Flow
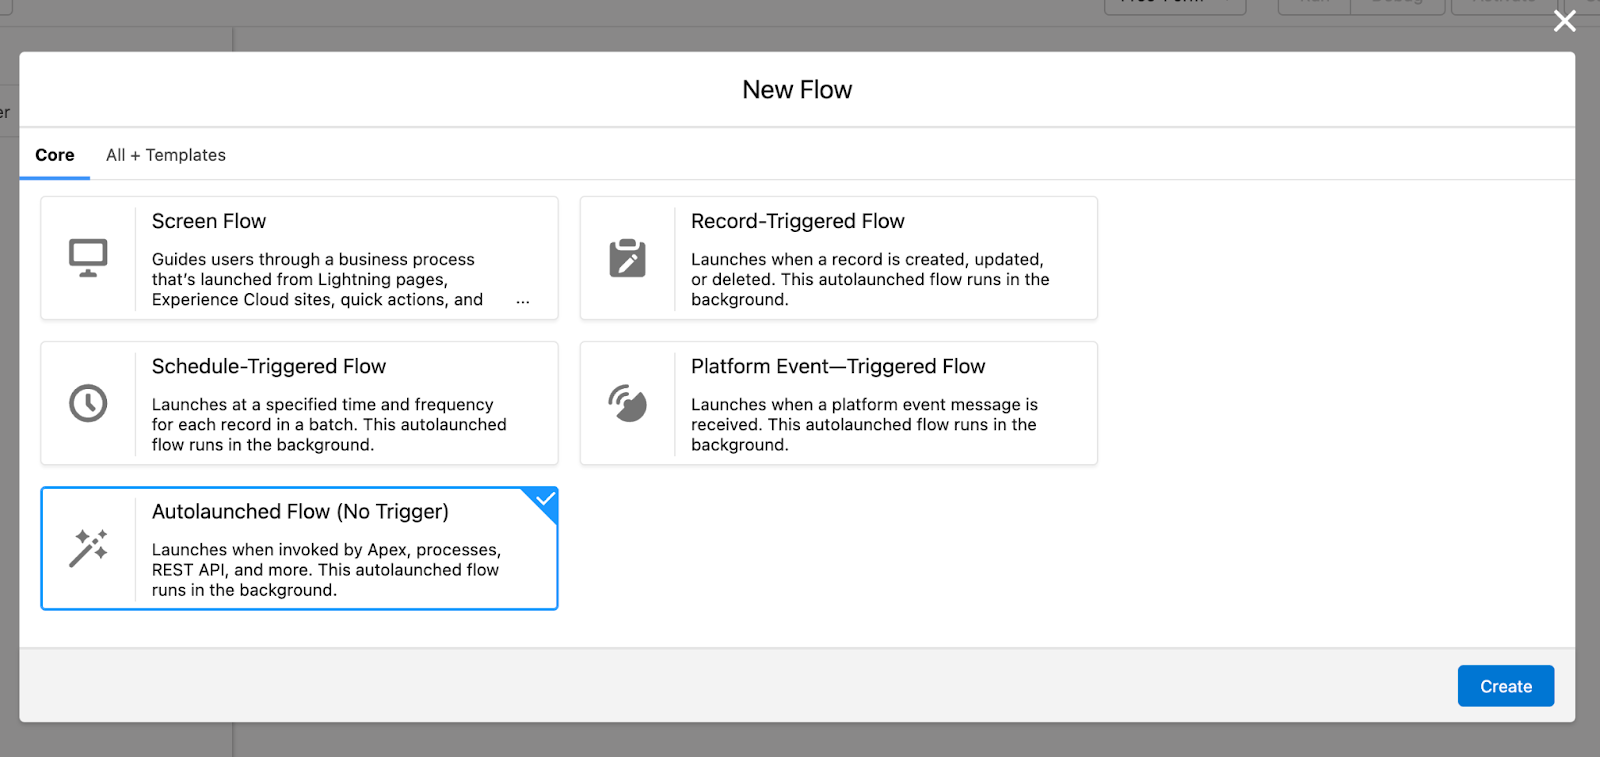
From your Salesforce platform, navigate to Setup → Process Automation → Flows. Click New Flow to open the Flow Builder.

Choose the type of Flow you want to create. In this example, we use Autolaunched Flow (No Trigger).
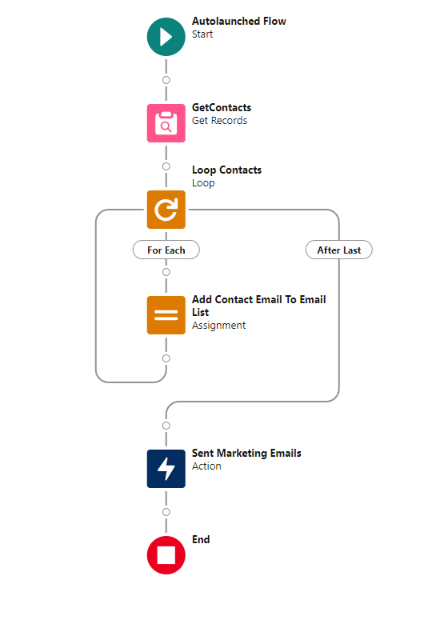
Configure the Flow by adding a Get Contacts element and a contact Loop. Then, insert the action which is sending emails in this case.
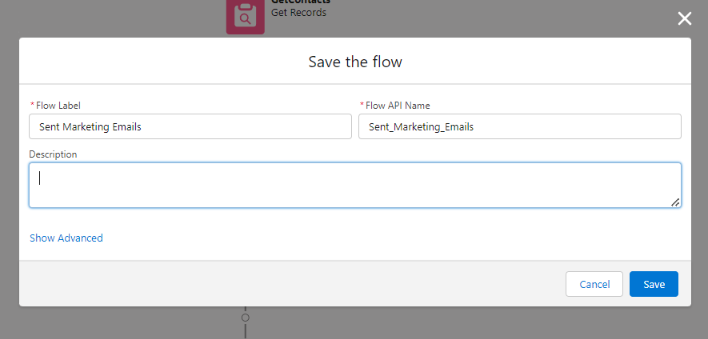
Press the Save button. In the pop-up window, set Flow Label, Flow API Name, and an optional Description. Press the Save button once again.
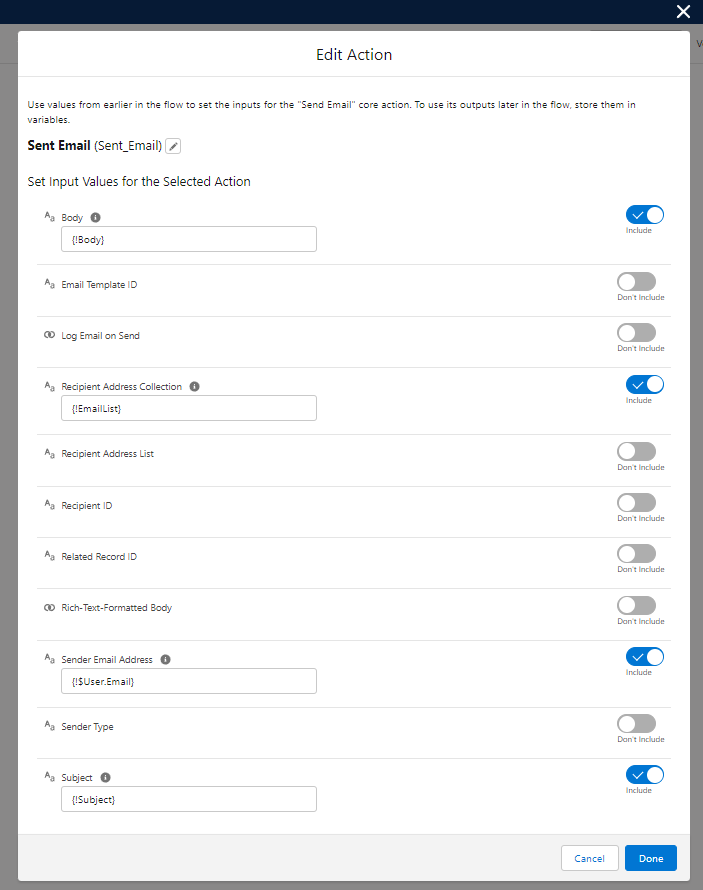
To configure the automated emails, add the Send Email action as a new element to your flow.
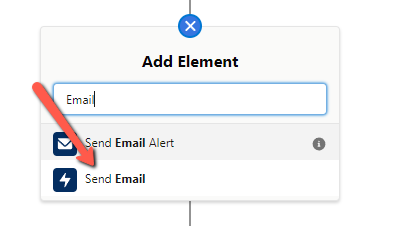
Set the input values: add the email body and subject line, define the recipients and the sender, and so on until you’re happy with the results. If you want to send an email template from Flow, you can configure it here. Click Done.
Your Flow setup is complete at this point. Read this article about Salesforce email automation to learn more about additional configurations, custom triggers, testing options, and more.
Send email alert from flow
Email alerts are triggered emails sent after a specific action to designated recipients.
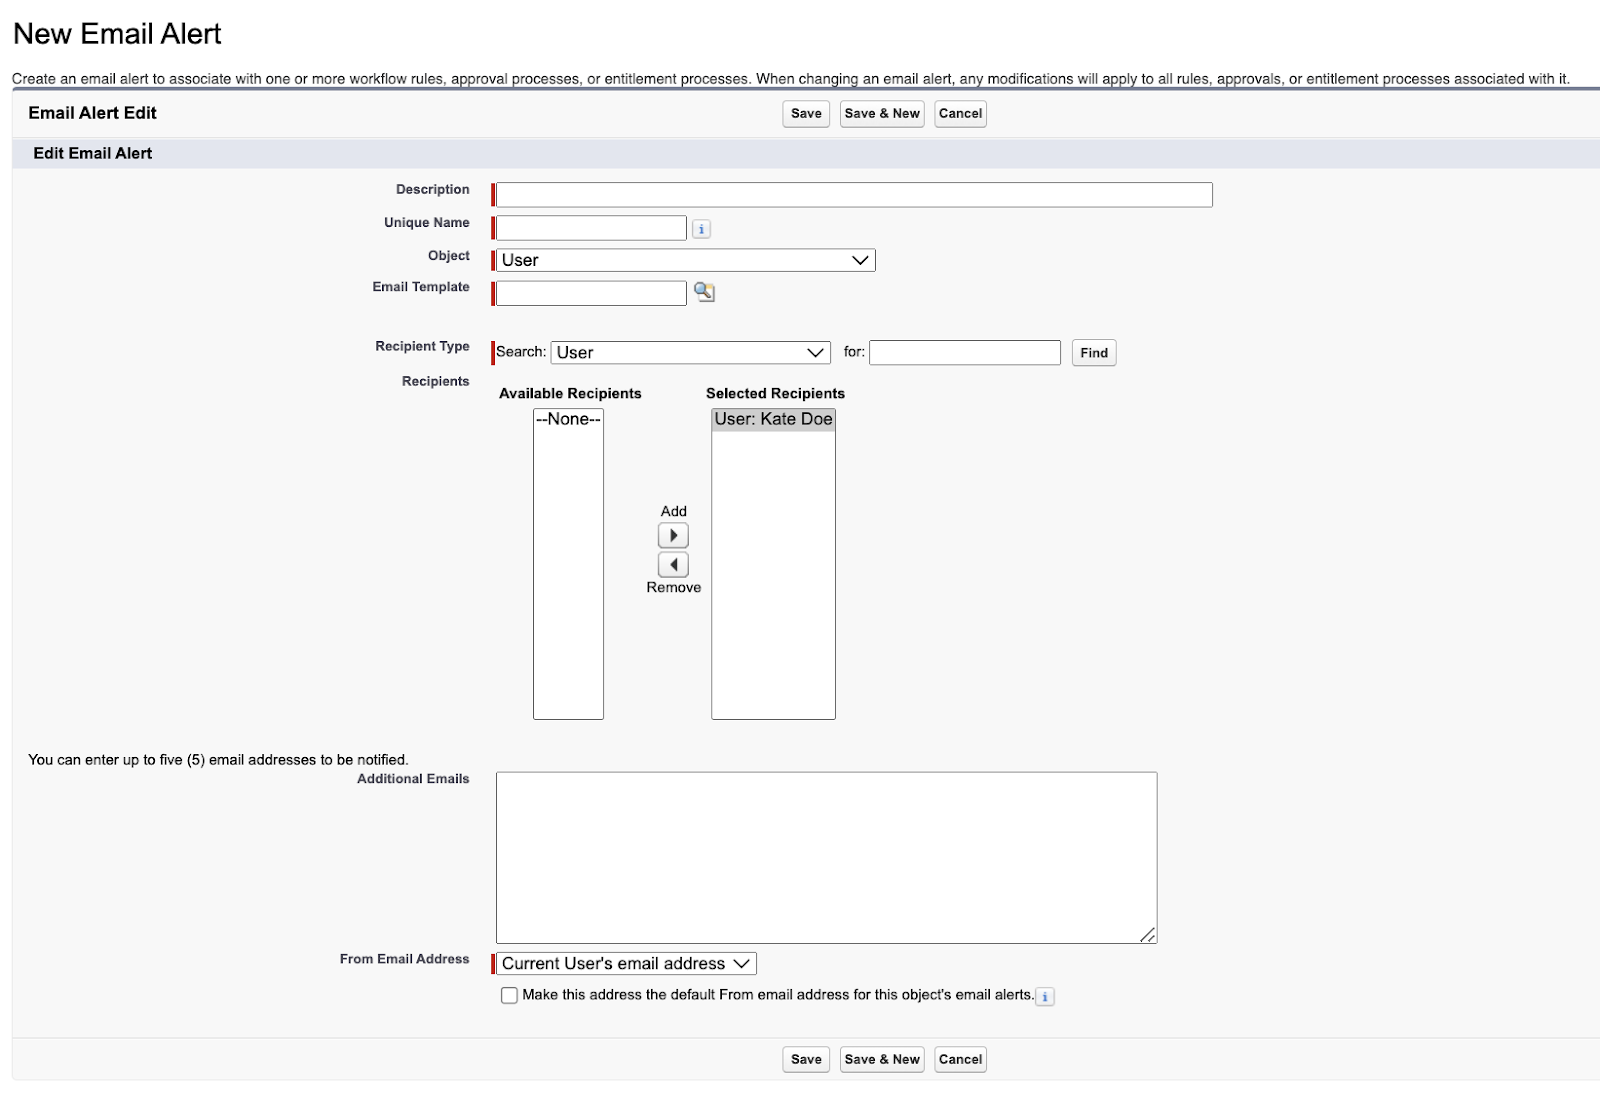
To create them, head over to Setup and find them using the quick find box. Hit the New Email Alert button.
Fill out the necessary fields, such as the object the email alert relates to, Unique Name, and Email Template, and configure the list of recipients. Click Save.
Head to the Flow Builder. Either create a new Flow or edit an existing one.
- In the Elements tab, select the Action element and drop it into your Flow;
- In the New Action window, select Email Alert as the Action Type and choose the email alert you created;
- Configure any additional settings if necessary and click Done;
- Connect this action to the Flow logic where you want the email to be triggered;
- Save everything and activate the Flow.
Note: Before you start sending email alerts, make sure you test it to ensure the trigger works as it should.
How to send email from Case in Salesforce
Users who want to send an email from a case in Salesforce have multiple options such as using the email-to-case feature, using flows or email alerts, or even Apex. The most popular of them is email-to-case, and that’s what we’ll be explaining below.
Email-to-case turns customer emails into support cases and makes it easy to communicate with customers directly from the Service Console.
Keep in mind that this feature has org limits as well. Check out Salesforce documentation for more information.
Email-to-case setup
You have two email-to-case setup options: a guided flow and a manual setup. We’ll go with the second option as the guided flow is quite self-explanatory.
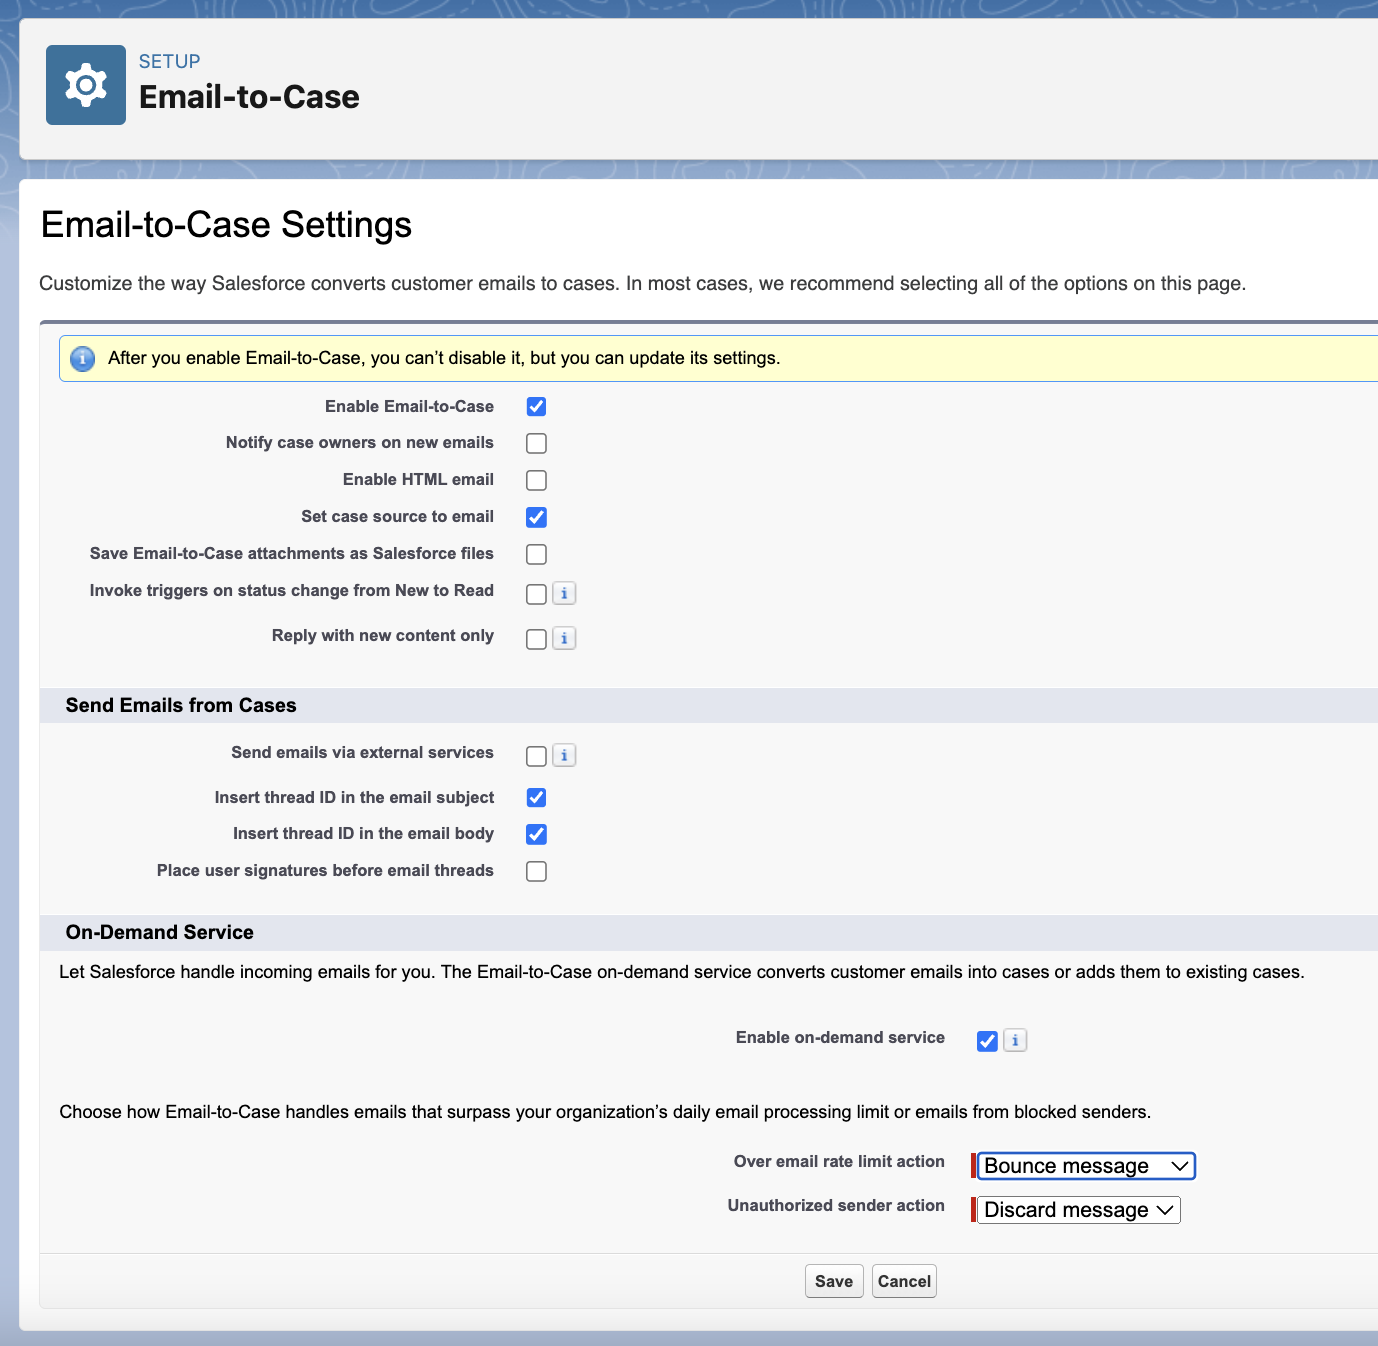
In the Setup, find Email-to-case and click on it. Hit Edit.
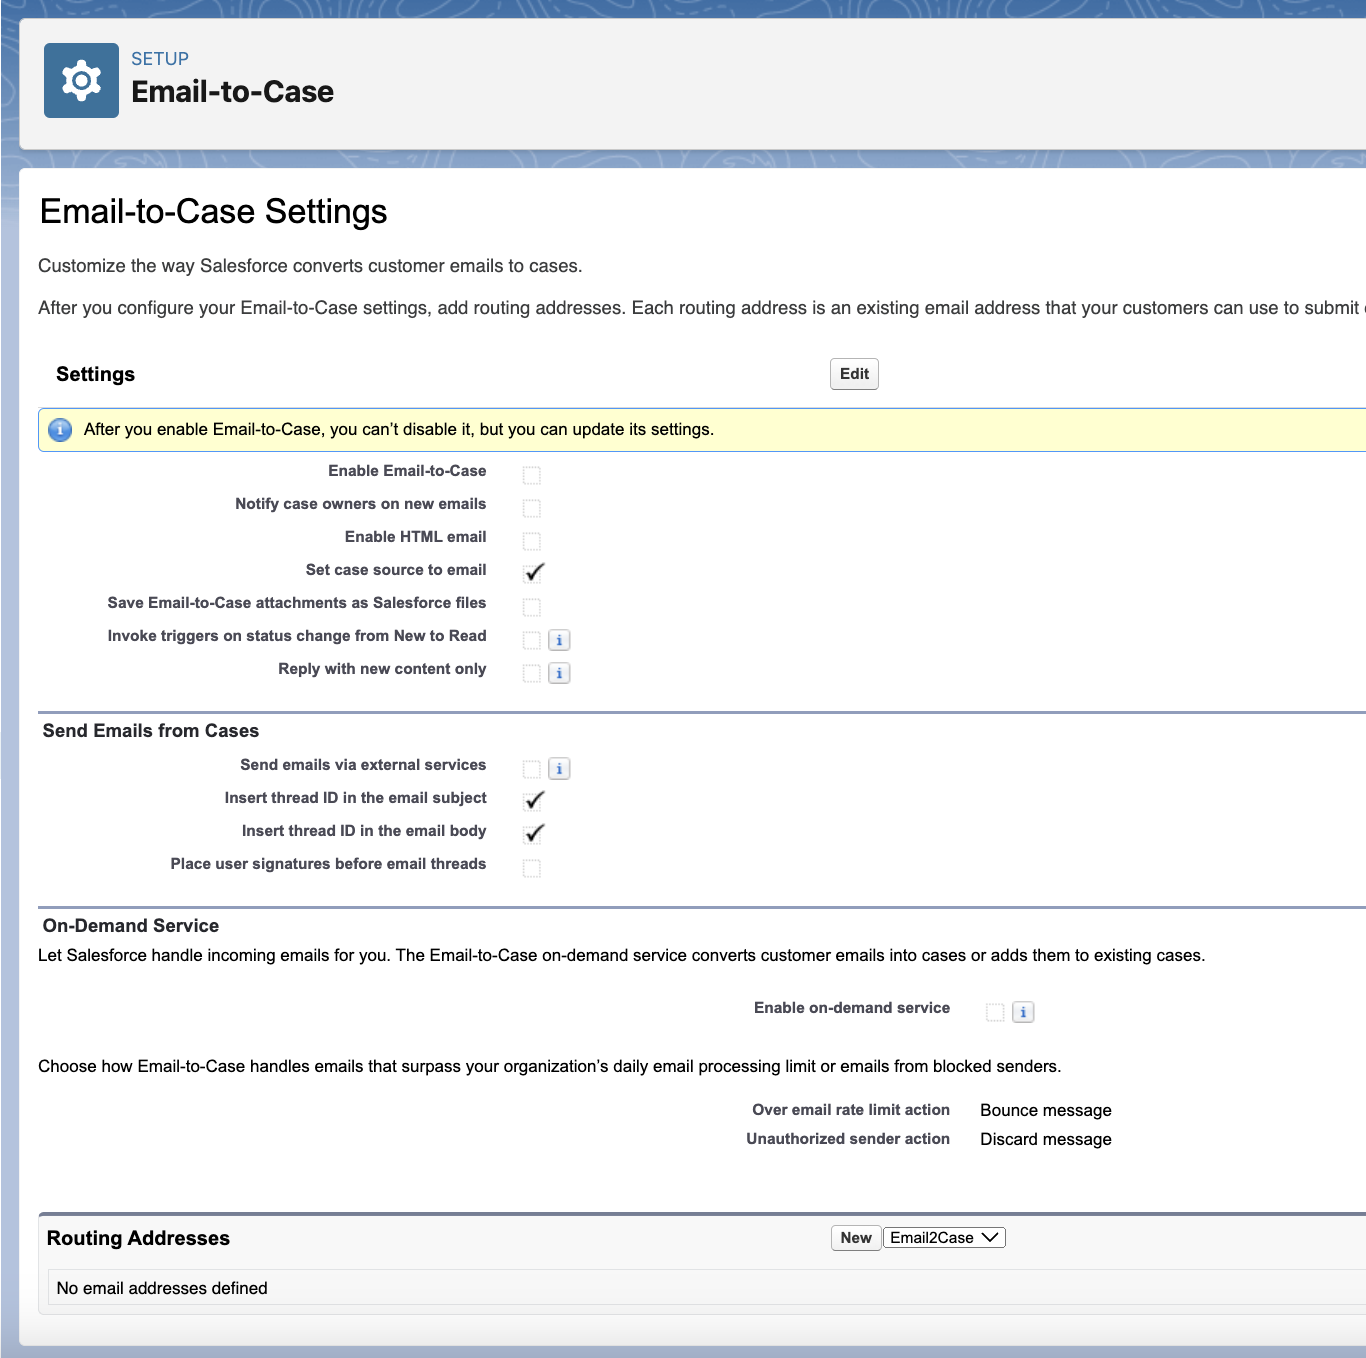
Mark the checkboxes next to Enable Email-to-Case and Enable on-demand services, and click Save.
Once the email-to-case is enabled, the Send Email quick action will be automatically created.
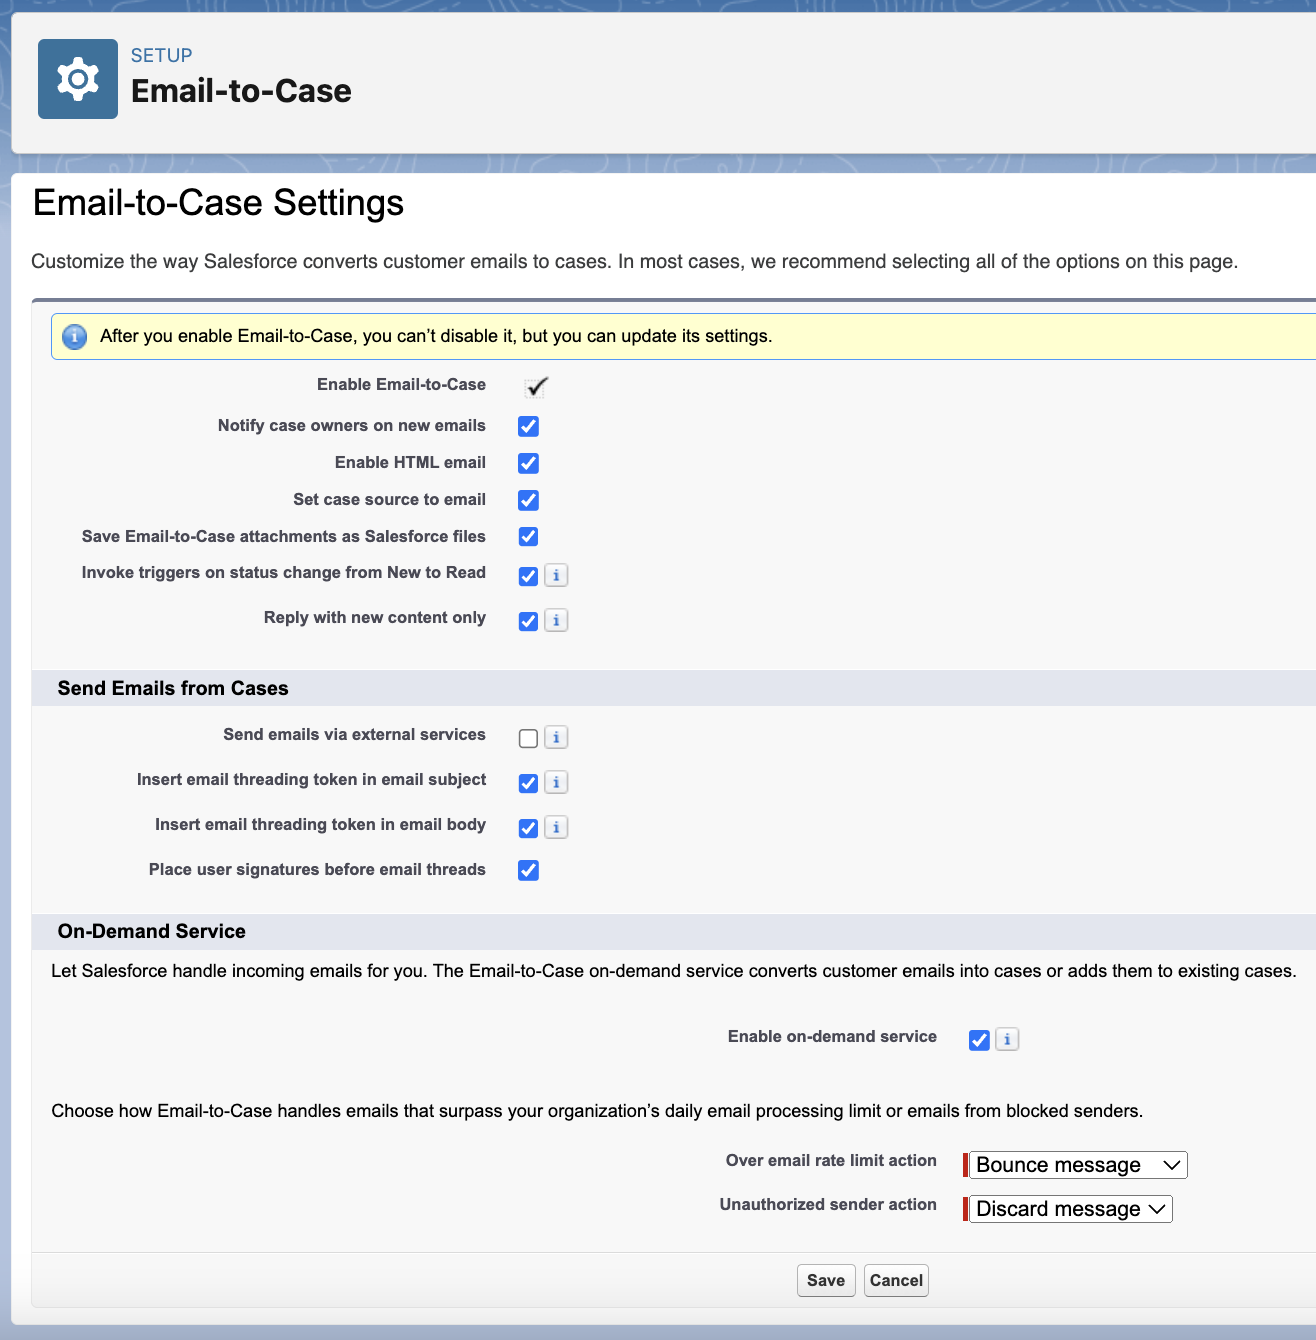
Now, it’s time to do some configurations. Salesforce recommends selecting all the available options. Click Save again.
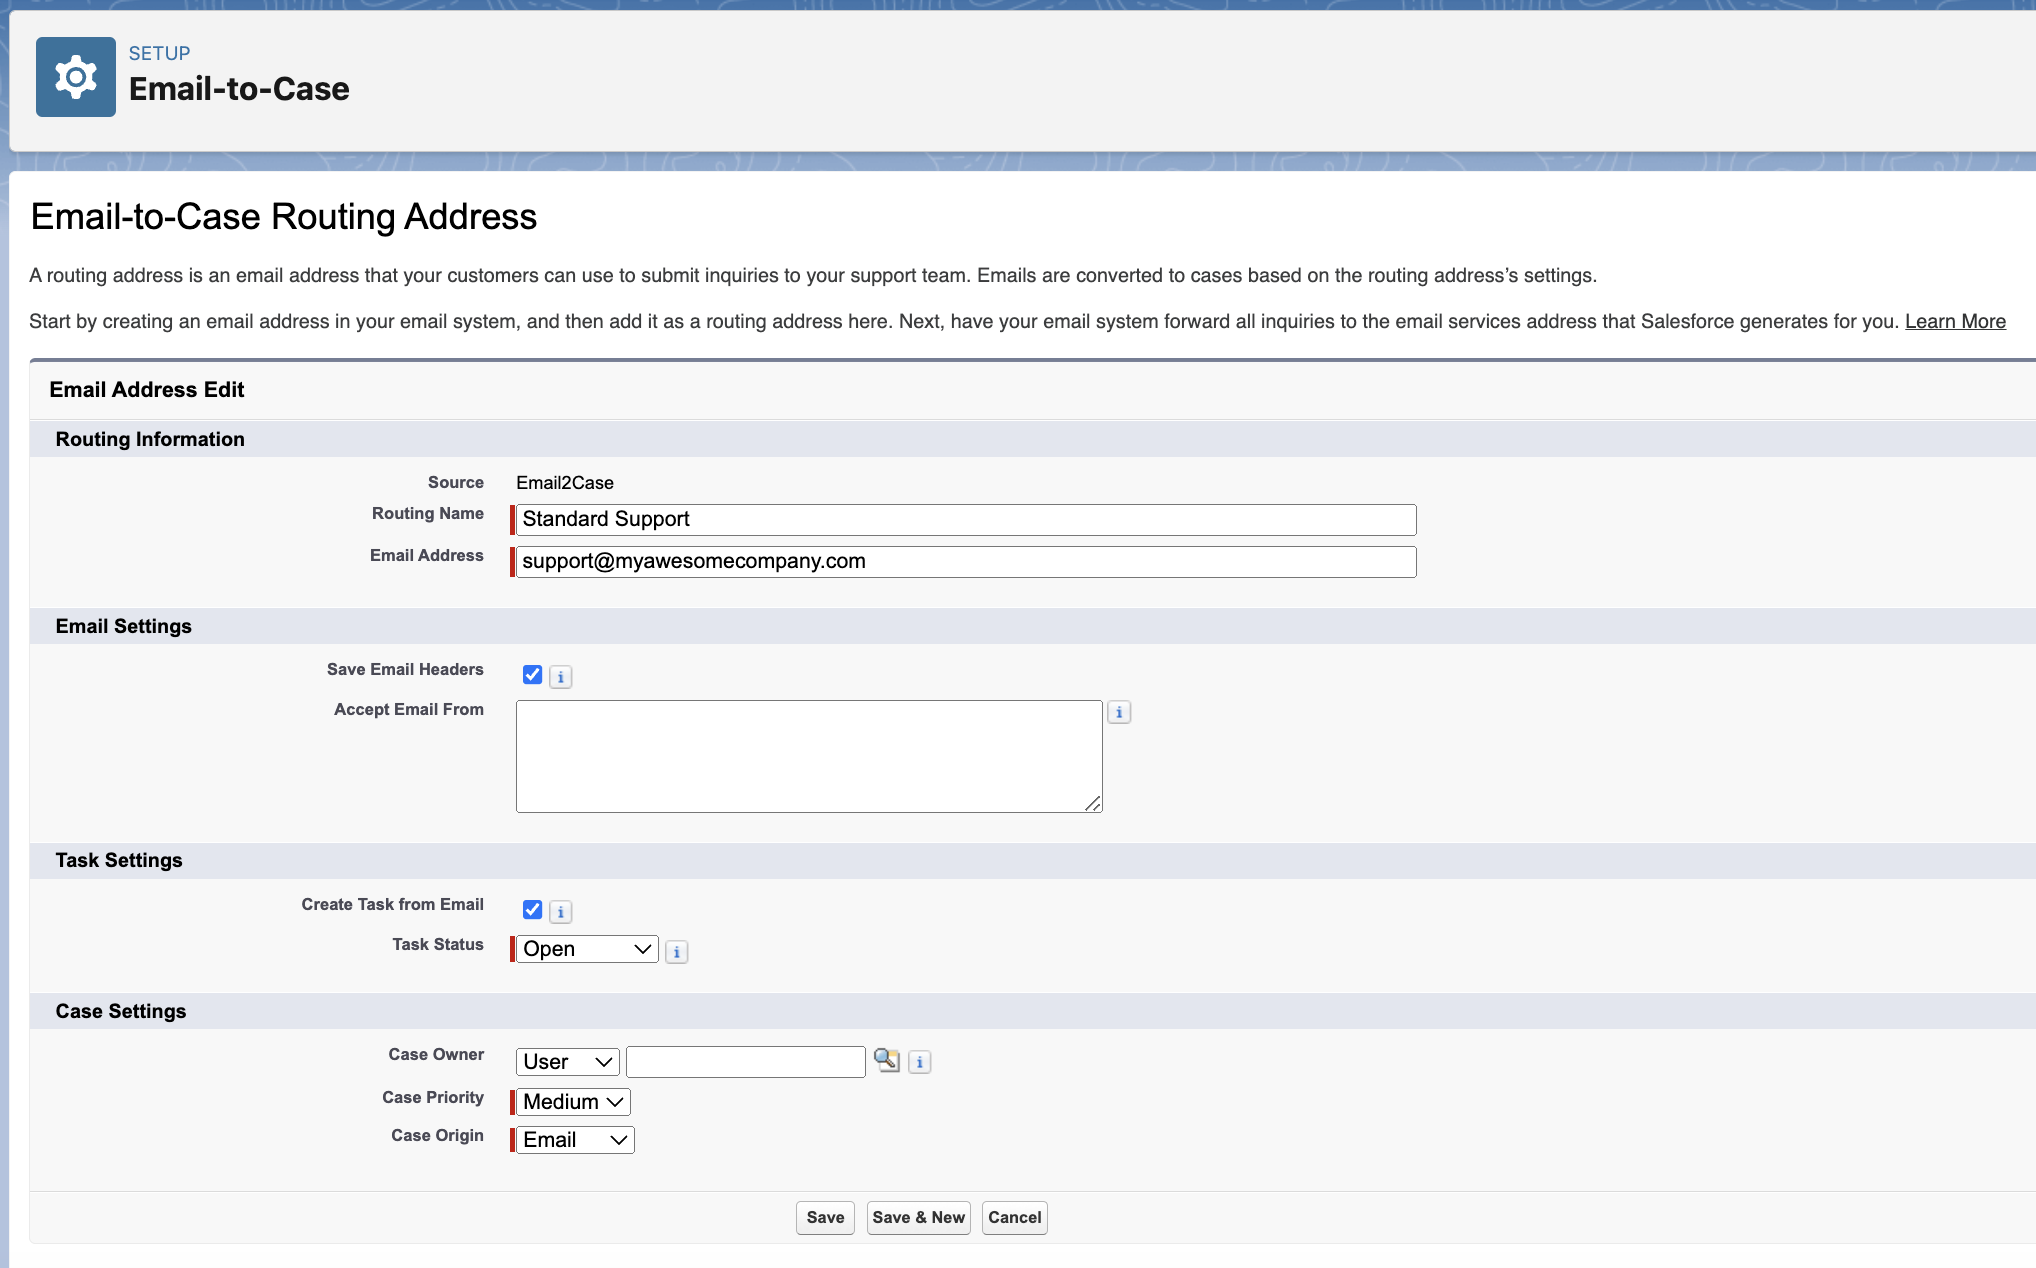
The final step is to add routing addresses that your customers will use to submit support queries that will later be turned into cases.
On the Email-to-Case page in Setup, find Routing addresses and click New. Fill out the necessary fields and configure the settings. Then press Save.
Salesforce won’t activate the routing address unless it’s verified. You’ll receive an email in your routing address mailbox with a link to verify the email.
As soon as the email is verified, Salesforce will create an email services address for your routing address.

Use the generated email address to set up forwarding in your email service provider. The steps vary depending on the provider you’re using, so we recommend checking out their documentation.
Then, test the setup by manually sending an email to the routing address. The case should be created.
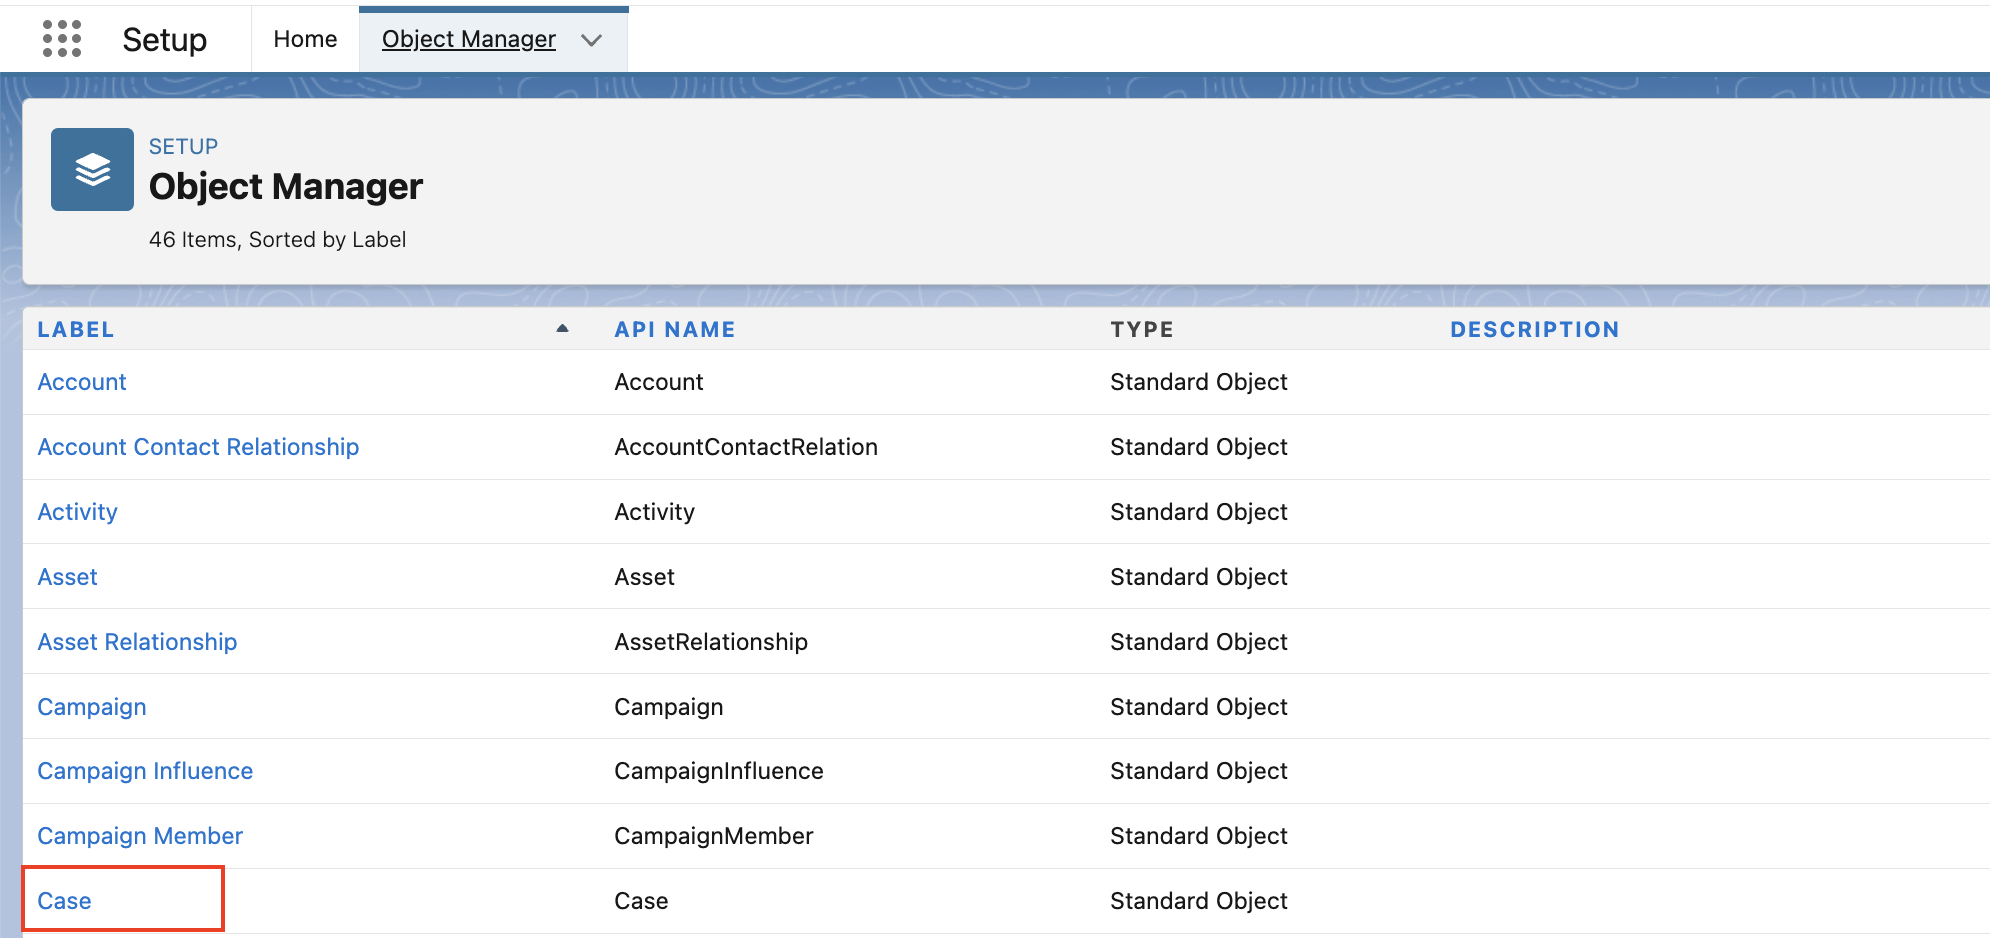
The recommended next step is to configure the universal From field on the Email action. That way, all the responses to customer emails are sent from a general customer support address by default. Not only does this help with maintaining credibility, but it also preserves email threads.
Navigate to the Object Manager in Setup and click on Case.
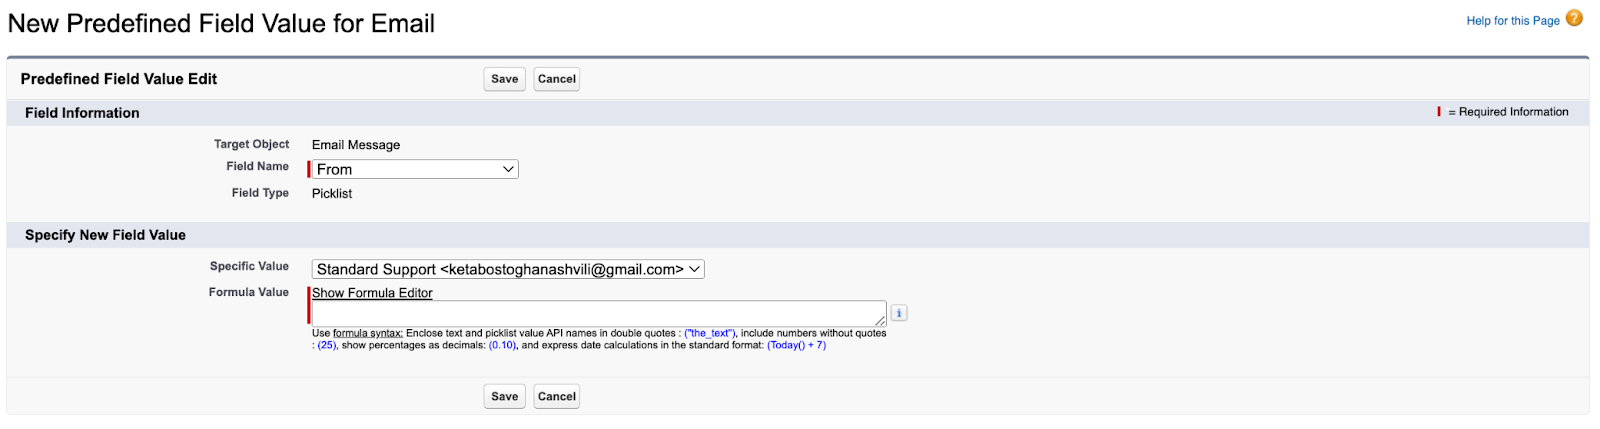
Go to Buttons, Links, and Actions and select Email. Find the Predefined Field Values section and click New.
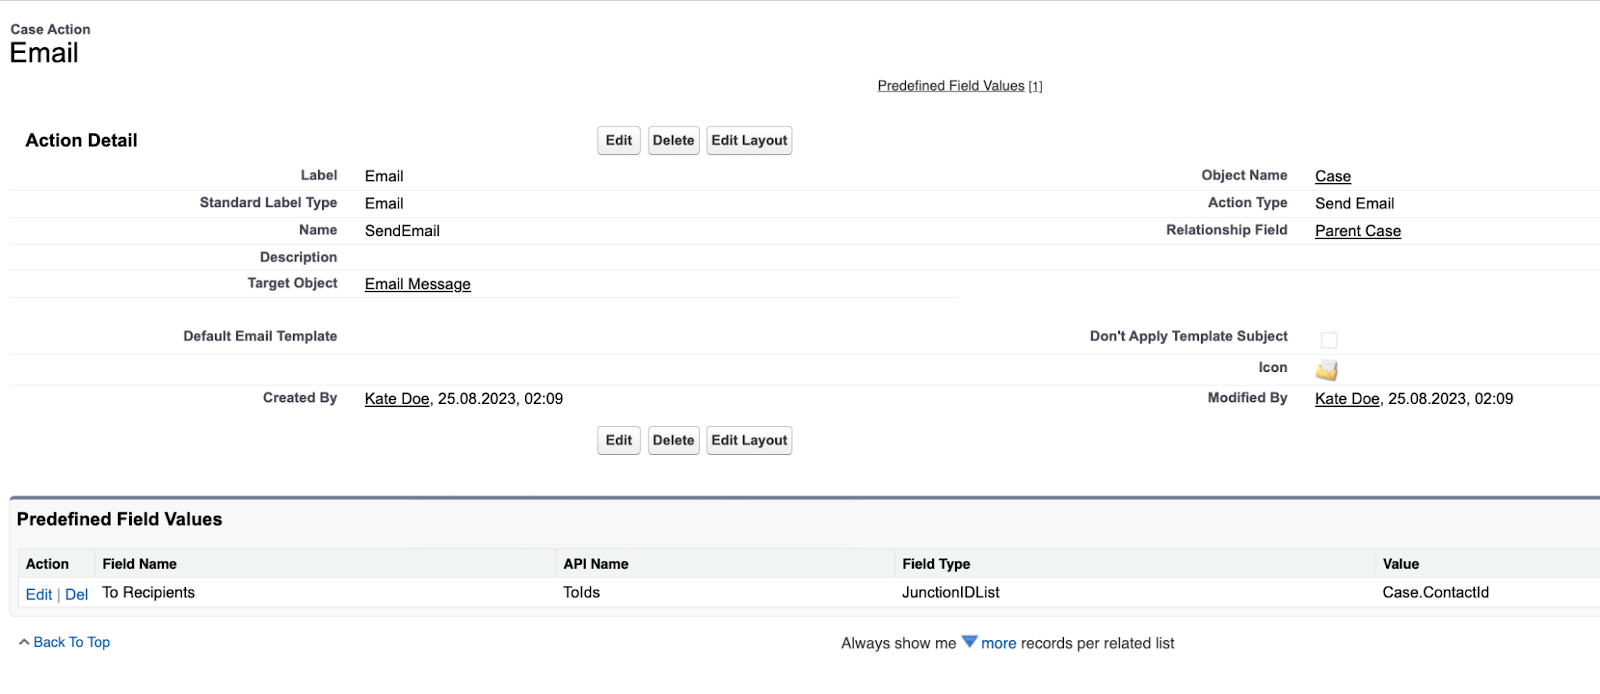
Choose From as the Field Name. In Specific Value, choose your standard customer support address and save the settings.
May the Sales Force be with you
This wraps up our extensive tutorial on sending emails in Salesforce. We did our best to cover most common scenarios be it on the platform itself or the Apex code. And for the topics we couldn’t cover in this article (such as how to send emails to queue members or how to send encrypted emails), explore Salesforce documentation.
Check out our other articles on Salesforce: