Apex, the object-oriented programming language, helps users access the Salesforce platform back-end database and client-server interfaces. With Apex, a multitude of tasks can be performed, including sending emails/email notifications.
And while in this article, we won’t be touching upon each and every use case of this programming language, we will go in-depth on how to send emails with Apex.
So, if this is something you have been eager to learn, then get your Salesforce Developer Console ready, and make sure to read the rest of this article!
The limit on sending emails in Apex
Before getting into any technical steps or code snippets, we have to address one important thing – the limits Salesforce places on resource usage. Why? Because these limits will also affect the number of emails you can send with Apex, be it single or mass emails.
That being said, please use the following information as a guide when implementing your email-sending functionality:
- Max total of 5000 single emails to external addresses per day
- Max total of 5000 mass emails to external addresses per day
- Max total of 150 email recipients specified in the to, cc, and bcc fields
- Max size of 4,000 bytes for the to, cc, and bcc fields
Note: Each email sent to a duplicate email address counts as an individual email.
In case you exceed any of the mentioned limits, Salesforce will stop your code from running and provide you with either of the following errors: SINGLE_EMAIL_LIMIT_EXCEEDED or MASS_MAIL_LIMIT_EXCEEDED.
To prevent your code from sending any emails past a certain limit and thus avoid facing errors, the following method can be used Messaging.reserveMassEmailCapacity(50); with the number in the brackets indicating the max number of emails.
How to send a single email in Apex
Now that you know your limits, it’s time to learn how to write the Apex email-sending code.
As an example, below, you can find the code snippet we used to send a simple single email. The snippet covers how to send email to multiple recipients, set an email-sending limit, create an instance of the SingleEmailMessage object, specify the replyto address, and define other aspects of the email message, such as the sender name, subject, plain text, and HTML body.
At the bottom of the snippet, you will also see the sendEmail method being called, which is responsible for the actual sending.
public class sendSingleEmail {
  Public void sendSingleEmailMethod(){

Messaging.reserveSingleEmailCapacity(2);
Messaging.SingleEmailMessage mymail = new Messaging.SingleEmailMessage();
String[] toaddresses = new String[] {'user1@example.com'};
String[] ccaddresses = new String[] {'user2@example.com'};
String[] bccaddresses = new String[] {'user3@example.com’};

mymail.setToAddresses(toAddresses);
mymail.setCcAddresses(ccAddresses);
mymail.setBccAddresses(bccAddresses);
mymail.setReplyTo('support@example.com');
mymail.setSenderDisplayName('Salesforce Support');
mymail.setSubject('An email from Salesforce');
mymail.setPlainTextBody('This email has been sent through Apex');
mymail.setHtmlBody(‘<p> This email has been sent through Apex</p>`);

Messaging.sendEmail(new Messaging.SingleEmailMessage[] { mymail });
  }
}
How to send mass emails in Apex
In our first code snippet, we demonstrated how to send an email to only a few email addresses at a time – the to, cc, and bcc addresses. But if we wanted to do the same for, let’s say, 200 addresses, things would get pretty messy.
To tackle this challenge, you can use the MassEmailMessage object intended to send bulk emails with the IDs from your contact list.
In case you don’t have a contact list already, you can create one in Salesforce by clicking on the settings icon in the top right corner and then navigating to Service Console -> Contacts.
An important thing to note when sending mass emails is that we will no longer be using the setToAddresses method. Instead, we will use setTargetObjectIds through which we can specify a list of contacts that will receive the email.
 public static void SendEmail()
  {
     EmailTemplate et = [SELECT Id,Subject, Body FROM EmailTemplate WHERE Name ='ApexEmailTemplateMessage'];
        List<Contact> contacts=[Select Id,Email From Contact Where LastName='Eze'];
        List<Id> conIds=new List<Id>();
        List<Id> whatIds=new List<Id>();
        for(Contact c: contacts) {
            conIds.add(c.Id);
            whatIds.add(et.Id);
        }
		system.debug(conIds);
        Messaging.MassEmailMessage email = new Messaging.MassEmailMessage();
        email.setTargetObjectIds(conIds);
        email.setTemplateId(et.id);
        Messaging.SendEmail(New Messaging.MassEmailMessage[] {email});

  }
}
How to send emails with a template in Apex
To help you save time and also have consistent messaging across your emails, Salesforce allows you to use templates for both single and mass emails. What’s more, if you use Salesforce templates with merge fields, your emails can include field data from records such as contacts, leads, or opportunities.
When looking at the code we used to send an email with a template, most of your attention should be directed to the line where we create an instance of the EmailTemplate object. This object is assigned an ID value and later passed to the setTemplateId method.
Do keep in mind that before writing your own version of the code, you will need to go into your Salesforce account, create a template and retrieve its name/ID.
public class sendEmailTemplate {
    public static void SendEmailTemplateWithTemplate() {
        EmailTemplate et = [SELECT Id,Subject, Body FROM EmailTemplate WHERE Name ='ApexEmailTemplateMessage'];
        List<string> toAddress = new List<string>();
        toAddress.add('ezenagusomtobechukwu@gmail.com');
        Contact con = [Select Id, Email from Contact where LastName ='Eze'];
            system.debug(et);
        Messaging.SingleEmailMessage mail = new Messaging.SingleEmailMessage();
            mail.setTemplateId(et.Id);
            mail.setToAddresses(toAddress);
            mail.setSubject(et.subject);
            mail.setHTMLBody(et.Body);
            mail.setTargetObjectId(con.Id);
            mail.setWhatId(et.Id);
            mail.setSaveAsActivity(false);
            mail.setUseSignature(false);
        List<Messaging.SingleEmailMessage> allmsg = new List<Messaging.SingleEmailMessage>();
        allmsg.add(mail);

        try {
            Messaging.sendEmail(allmsg,false);
            return;
        } catch (Exception e) {
            System.debug(e.getMessage());
        }
    }
};
How to send triggered emails in Apex
In case you are unfamiliar, triggered emails are used to respond to actions performed in Salesforce. And to create them, you need to create a trigger class that will be responsible for shooting out an email before or after a specific action such as Insert, Update, Delete, Merge, and Upsert.
For demonstration purposes, we will now go over how to use a Salesforce trigger to send emails every time a new contact is created.
First, you start off by creating a new Apex trigger file in your Salesforce account. You can name this file whatever you want. In our case, we went for “ContactEmailTrigger”.
Once the file is named, you need to then select “Contact” for the sObject using the dropdown menu.
Finally, to implement the trigger class, you can follow this code example:
trigger ContactEmailTrigger on Contact (before insert) {
    // Access all emails in the list
    List<Messaging.SingleEmailMessage> mailList =  new List<Messaging.SingleEmailMessage>();

    for (Contact myContact : Trigger.new) {
    if (myContact.Email != null && myContact.FirstName != null) {

      // initialize the single send email id object
      Messaging.SingleEmailMessage newMail = new Messaging.SingleEmailMessage();

      // Specify who receives the email
      List<String> sendToAddressesList = new List<String>();

      sendToAddressesList.add(myContact.Email);

      newMail.setToAddresses(sendToAddressesList);

       // Set the attributes of the email.
      newMail.setSubject('Your contact detail have been added');

      String body = 'Hello ' + myContact.FirstName + ', ';
      body += 'Your details have been added and your contact has been created.';
      newMail.setHtmlBody(body);

      // Add the email to the list
     mailList.add(newMail);
    }
  }
  // Send all emails in the list
  Messaging.sendEmail(mailList);
How to send emails with attachments in Apex
If you are looking to send email with attachments in Apex, the good news is that you can do so with a range of file types, including binary (blob) files. Plus, the process is pretty simple!
To begin, in your Salesforce account, create a new document, specify its name and upload the document file. Also, be sure to remember the filename, as we will need it in the code.
Then, simply use your version of the following snippet to first fetch the document from your Salesforce account and then add it to your email with setEntityAttachments – a method that accepts IDs of Document, ContentVersion, and Attachment items.
public class EmailsAttachment {
   public static void emailerAttachment(){
        // Email sending with attachment
        Document doc = [SELECT Id,Name FROM Document WHERE Name = 'attachmentDocument'];
        list<ID> docid=new list<ID>();
        docid.add(doc.id);
        Messaging.SingleEmailMessage semail = new Messaging.SingleEmailMessage();
        semail.setEntityAttachments(docid);
    	semail.setUseSignature(false);
        semail.setSubject('Sending document as attachemnt');
        String[] sendTo = new String[]{'somtobeeze@gmail.com'};
        semail.setToAddresses(sendTo);
        semail.setPlainTextBody('Please inspect the document attached');
        Messaging.sendEmail(new Messaging.SingleEmailMessage[]{semail});

    }
};
How to send emails using Mailtrap Email Sending in Apex
Sending emails is one thing, but ensuring high deliverability and monitoring your email performance falls into a totally different category. That is why many devs resort to using solutions such as Mailtrap Email Sending.
With Mailtrap Email Sending, your emails can reach customer inboxes in seconds. And thanks to its dashboard with major email stats, weekly health checks, critical deliverability alerts, and up to 60 days of email logs, you get to troubleshoot any unexpected sending issues quickly and easily.
To learn more about this reliable sending solution, check out the video below:
Now, let’s see just how straightforward it is to use Mailtrap Email Sending in practice.
First, you create a Mailtrap account.
Then, you proceed to add and verify your domain.
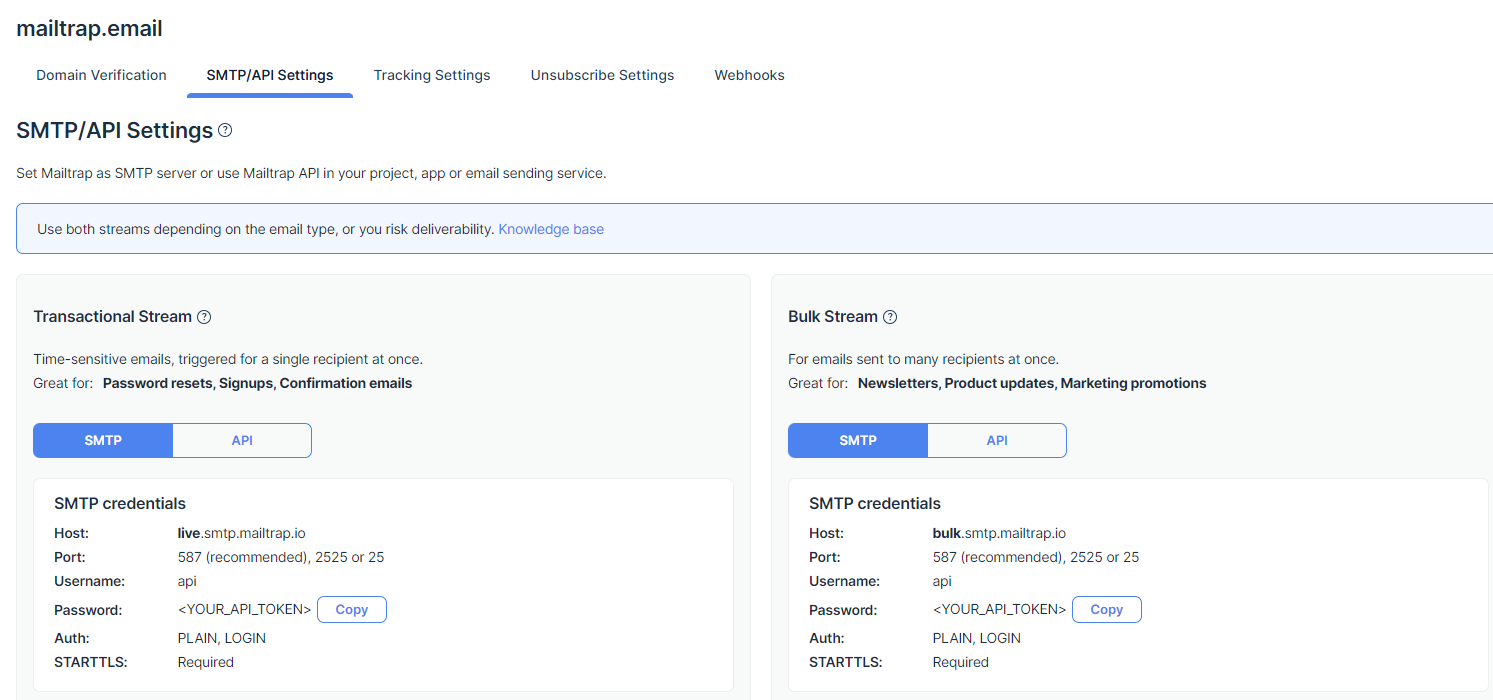
Upon domain verification, navigate to the SMTP/API Settings page, where you can find the API example code in different programming languages as well as SMTP credentials for sending emails from your domain.
Just make sure to pick the right email-sending stream based on your needs!
For Apex, the API integration code should look something like this:
public class MailTrapEmailAPI {
   public static void sendMail(){
      String body = '{"to": [{"email": "johndoe@example.com", "name": "John Doe"}],  "cc": [    {      "email": "johnny@example.com",      "name": "Jane Doe"}],  "bcc": [{"email": "emmanuelezenagu5@gmail.com", "name": "Jim Doe"}],  "from": {"email": "emailer@mailtrap.io", "name": "Mailtrap sent this message"},  "subject": "Your Example Order Confirmation",  "html": "<p>Congratulations on your order no. <strong>1234</strong>.</p>",  "text": "Congratulations on your order no. 1234",  "category": "API Test",  "custom_variables": {"user_id": "45982", "batch_id": "PSJ-12"}, "headers": {"X-Message-Source": "example.yourdomain.com"}}';

       Http http = new Http();
       HttpRequest request = new HttpRequest();
       request.setEndpoint('https://send.api.mailtrap.io/api/send');
       request.setMethod('POST');
       request.setHeader('Api-Token', 'Your_MailrapSending_APIToken');
       request.setHeader('Content-Type', 'application/json;charset=UTF-8');
       request.setBody(body);
       System.debug('1 ' + request);
       HttpResponse response = http.send(request);
       System.debug('2 ' + response);
   }
}
Run the code, and you should see the email sent with Mailtrap Email Sending in your account under Email Sending-> Email Logs, where you can also check out its status, preview, events history, HTML source, and statistics.
Note: Before running the code, make sure to add Mailtrap Email Sending as a remote site under Setup -> Security -> Remote Site Settings. Otherwise, you might receive the systemCalloutException: Unauthorized Endpoint error (more on that in the next section of this article).
How to test emails in Apex
While trying to send emails in Apex for the first time, it is normal to encounter a couple of hiccups. Luckily, Apex provides debugging support through the developer console and debug logs, which will alert you about any errors, with the most common ones being:
No_mass_mail_permission – An error often encountered by people using trial Salesforce accounts as these accounts can’t send mass emails. The error can also stem from not having the appropriate permissions in non-trial accounts, which can be modified under Setup -> Administration -> Email Administration -> Deliverability by setting the access level to “All emails”.
systemCalloutException: Unauthorized Endpoint – An error caused by your application attempting to access an external endpoint that has not been listed in your Salesforce account. To solve it, navigate to Setup -> Security -> Remote Site Settings and add a new remote site.
MALFORMED_ID – An error caused by specifying the wrong ID.
LIMIT_EXCEEDED – An error caused by exceeding the email sending limit.
INVALID_EMAIL_ADDRESS – An error caused by passing an invalid email.
REQUIRED_FIELD_MISSING – An error caused by not entering a value for a mandatory field.
For more information about these and other errors, please refer to the Apex documentation.
Besides the developer console and debugs logs, you can also test your email-sending code with the Apex test class as well as third-party solutions. So let’s explore those, shall we?
Apex test class
The Apex test class is used to test the functionality of your Apex code, and a common practice is to write one for each of your standard Apex classes. This is done by placing the @isTest keyword before a specific class or method, such as:
@isTest
public class ApexEmailSampleTestClass {
    @testsetup static void data_create(){
        Contact cont1 = new Contact();
        cont1.FirstName = 'John';
        cont1.LastName = 'Doe';
        cont1.email = 'tochieze669@gmail.com';

        insert cont1;
    }

    @istest static void test_method(){
        Contact cont1 = [Select id,name,email from Contact WHERE name = 'John Doe'];
        System.debug(cont1);
        ApexEmailSample.sendEmail(cont1.email);
    }
}
In the above class code, two methods are marked as test methods – data_create and test_method. These methods will not produce standard execution results as they are, you guessed it, just for testing.
So, upon error-free execution of ApexEmailSampleTestClass and the methods within it, you should see a contact email logged in your debug console. But, if you head over to your Salesforce account, you will not find a new contact or a new entry in your email logs.
Third-party testing solution: Mailtrap Email Testing
While the Apex test class and debugging support will allow you to test the functionality of your code, you are sort of left on your own if you want to see what your emails look like in different email clients, analyze their HTML/CSS code, check their spam score, and gain insight into detailed tech info.
For this, you will need the help of tools intended specifically for advanced email testing.
One such tool is Mailtrap Email Testing, which catches all SMTP traffic from staging and dev environments so you can inspect and debug the emails making up that traffic. Thanks to this way of functioning, Mailtrap Email Testing creates a safe environment for email testing and puts you at no risk of spamming users with testing emails.
With Mailtrap Email Testing, you also get to switch from manual testing to automated test flows and scenarios and preserve your domain reputation, as your personal inbox is no longer being used to send out testing emails.
To get started with this tool, you’ll first need to create a Mailtrap account (if you haven’t already). Then, in your account, go to Email Testing -> Inboxes -> SMTP Settings and click on “Show Credidentials” to retrieve your virtual inbox SMTP credentials.
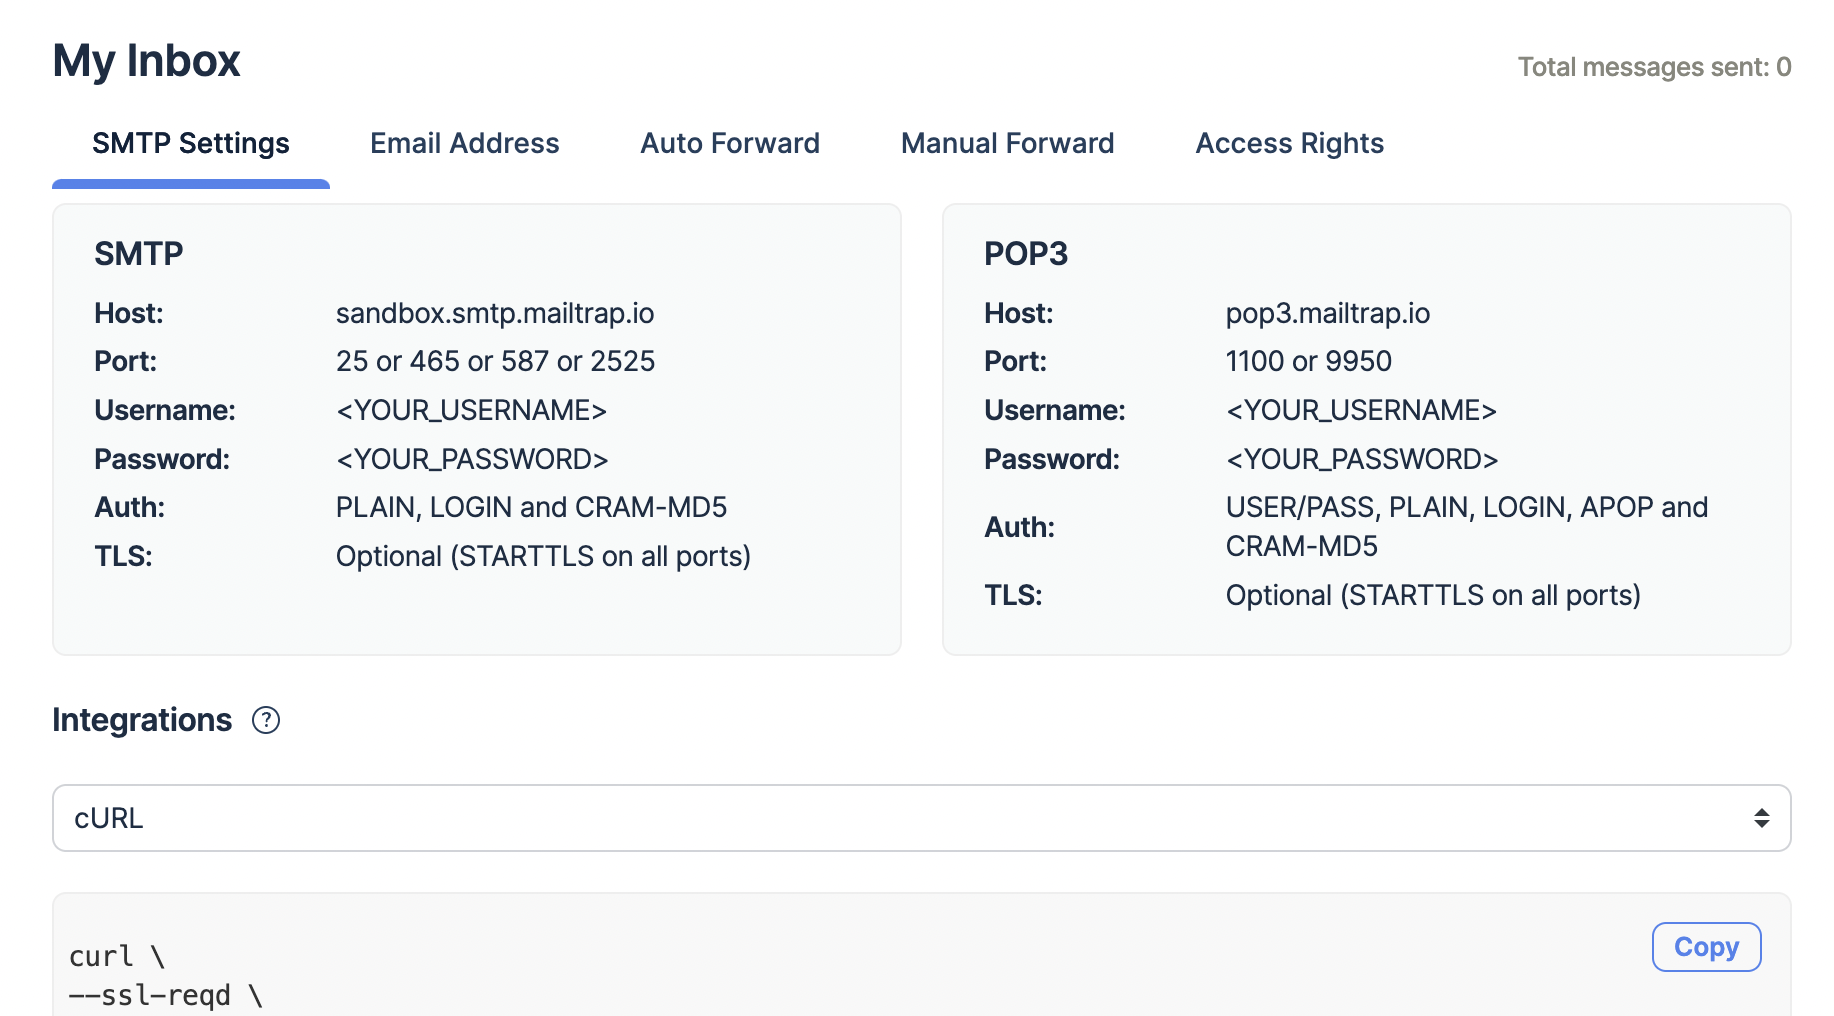
Save these in a convenient spot, as you will need them very soon.
Next, in Salesforce, configure an email relay by clicking on the “Create Email Relay” button under Setup->Email Relays and insert the credentials you retrieved earlier.
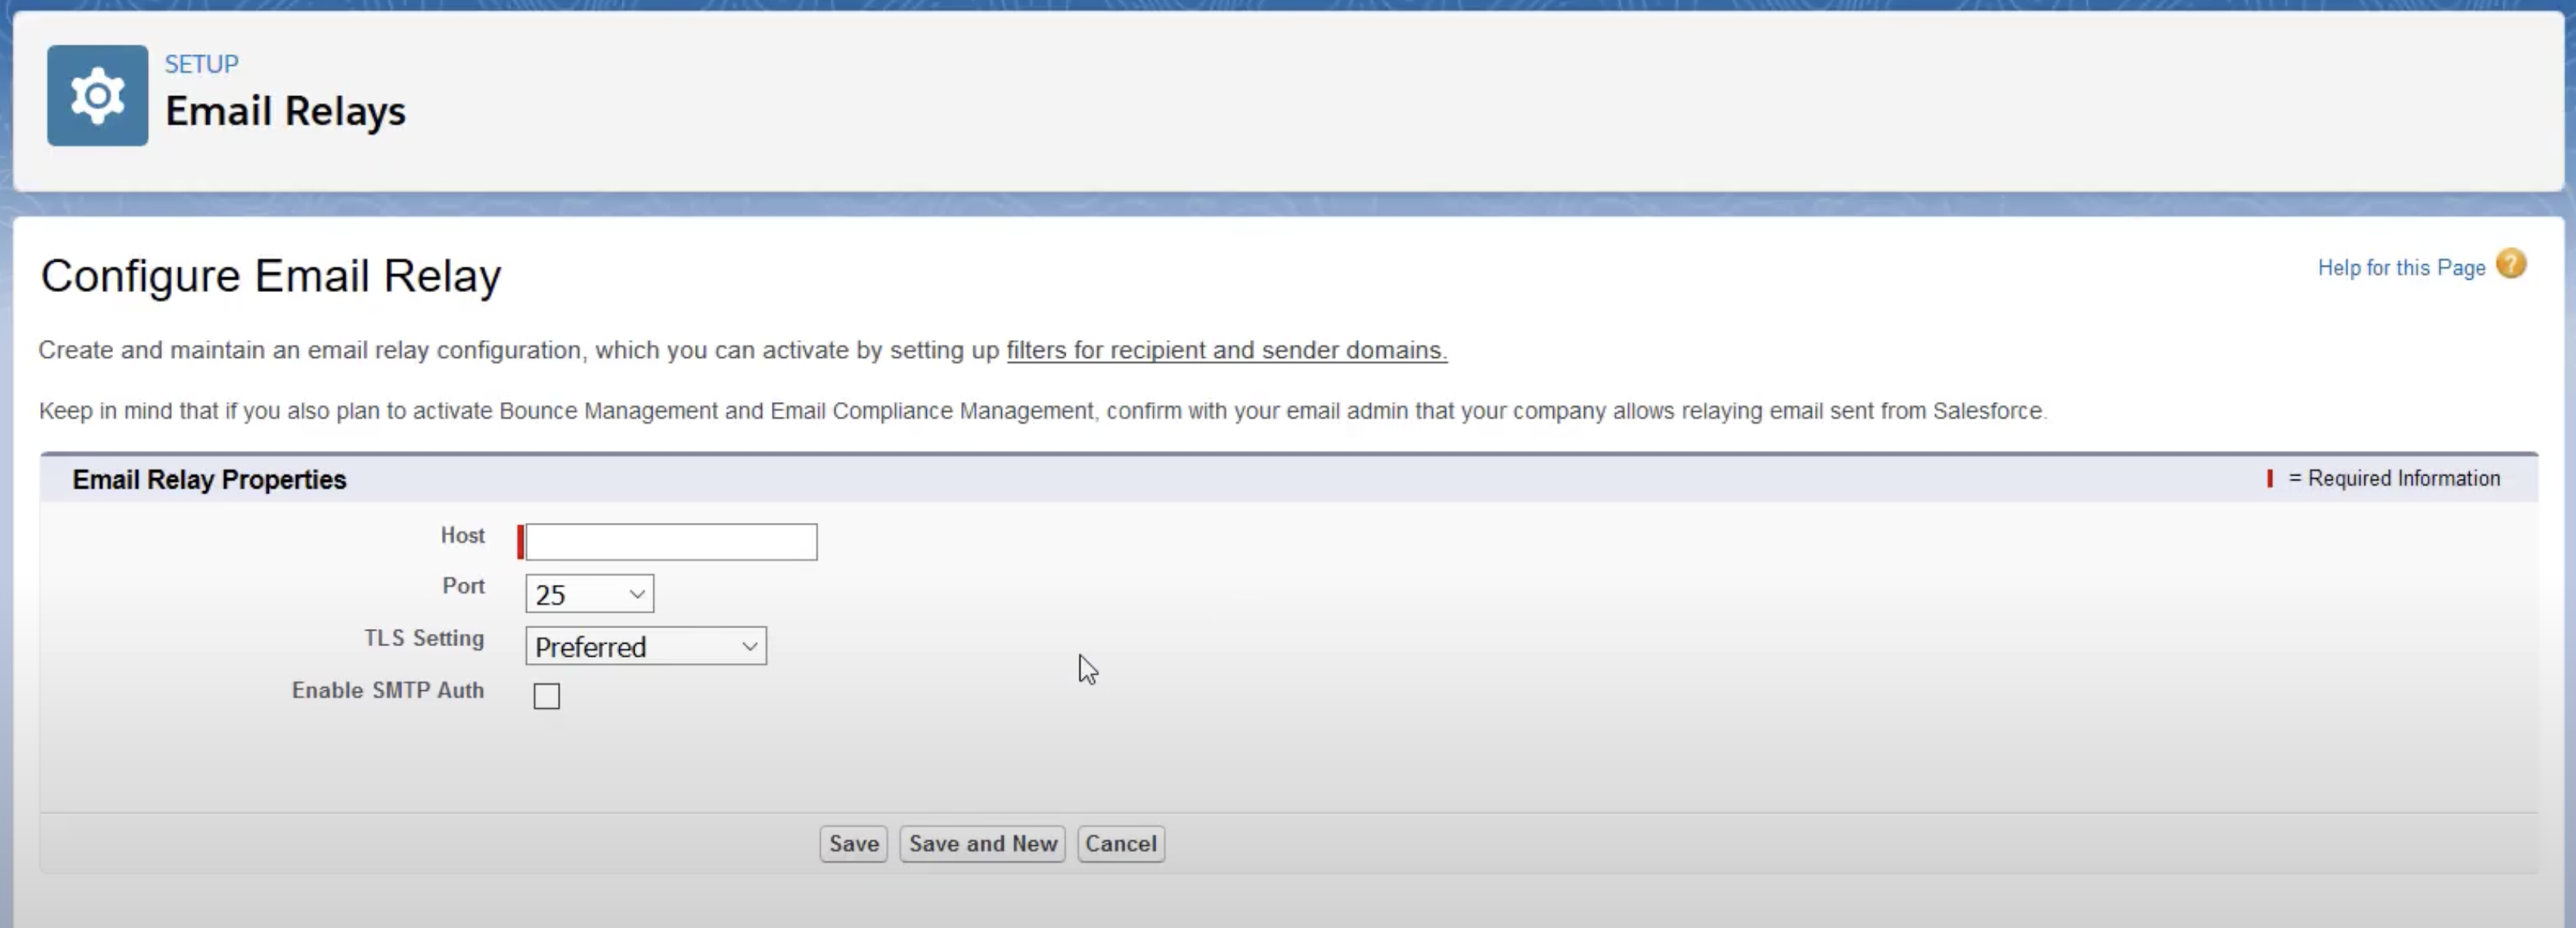
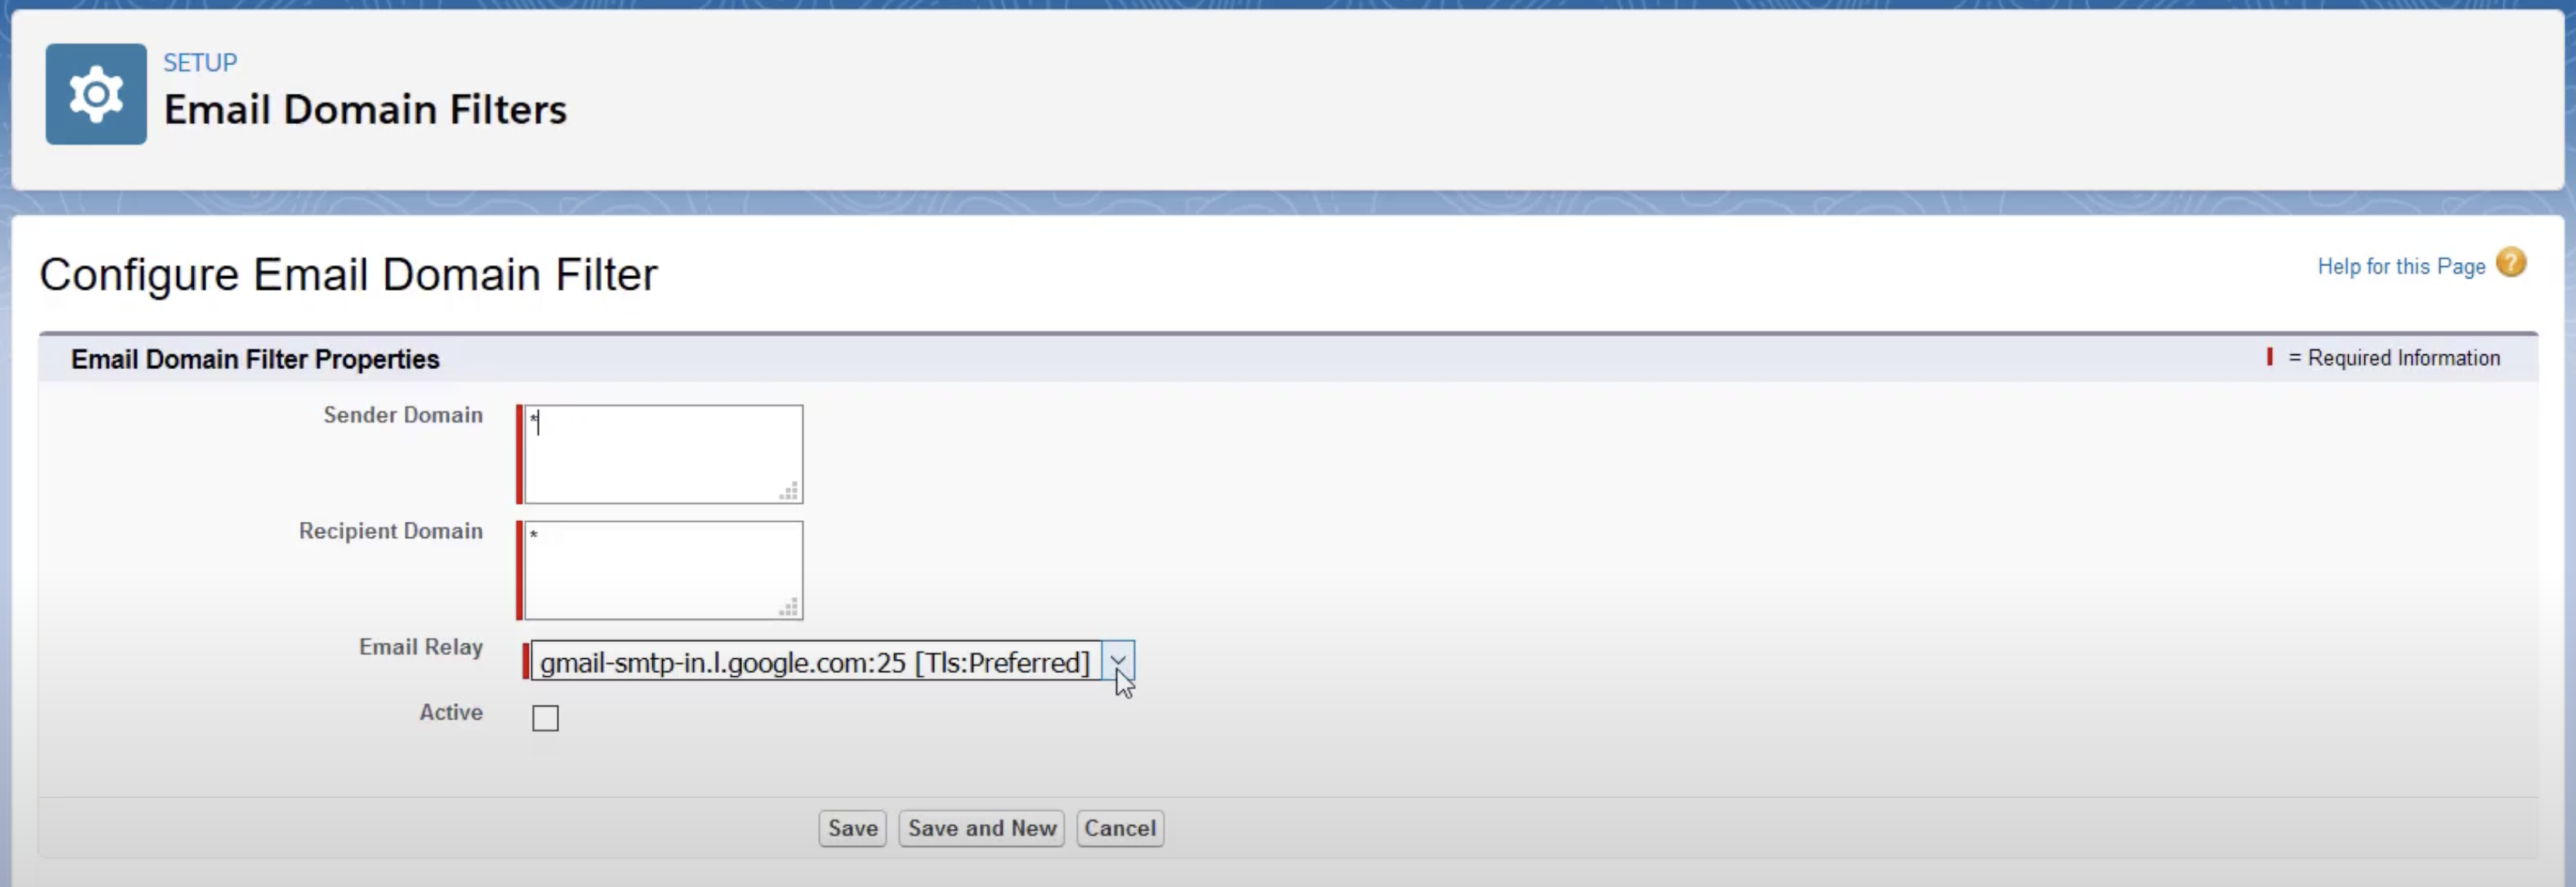
To now activate this email relay, you need to create a domain filter by navigating to Setup->Email Domain Filters and inserting “*” as the default wildcard for “Sender Domain” and “Recipient Domain”.
With all of that out of the way, you can proceed with using this code, which will send your first test email to Mailtrap Email Testing.
public class ApexEmailSample {
    public static void sendEmail(String useremail){
    Messaging.reserveSingleEmailCapacity(20);
        Messaging.SingleEmailMessage mymail = new Messaging.SingleEmailMessage();
        String[] toaddresses = new String[] {useremail};
        String[] toccaddresses = new String[] {'som****@gmail.com'};
        String[] tobccaddresses = new String[] {'ez*****@gmail.com'};

        mymail.setToAddresses(toaddresses);
        mymail.setCcAddresses(toccaddresses);
        mymail.setBccAddresses(tobccaddresses);
        mymail.setReplyTo('support@example.com');
        mymail.setSenderDisplayName('Salesforce Support');
        mymail.setSubject('An email from Salesforce');
        mymail.setPlainTextBody('This email has been sent through Apex');
        mymail.setHtmlBody('<p>This email has been sent through Apex.</p>');

        Messaging.sendEmail(new Messaging.SingleEmailMessage[] { mymail });
    	system.debug(useremail);
    }
}Wrapping things up
In this article, we touched upon all the most important aspects of sending emails in Apex. So now, whenever you want to send single or mass emails, use templates/attachments/triggers, or simply put your email-sending code through some testing, you can always refer to this article.
For other topics related to emails in Salesforce that we didn’t cover in this article, such as “send email to public groups”, “send visualforce email template”, “send email alert”, “send email to queue members”, and so on, please consult Salesforce’s documentation.