
Today, Salesforce.com is still the leading CRM used by organizations worldwide.
What makes this CRM so greatly helpful is its robust email capabilities, which enable contacting leads, customers, and other parties, easily and effectively.
Unfortunately, due to the strict spam filtering by email service providers, some Salesforce emails end up going to spam, thus leading to a low email marketing ROI, messages not reaching recipients, and of course, the time and effort put into creating the emails wasted.
So how can a Salesforce platform user stop their emails from bearing the “spam” label? By implementing the tips and proactive steps described in this article!
Let’s dig in!
Why are emails sent from Salesforce going to spam?
Labeling email messages as spam is the job of two actors – email service providers (ESPs)/ internet service providers (ISPs), and the email recipients themselves.
ESPs and ISPs use multiple parameters (more on that in a bit) to ensure an email is okay to land in a recipient’s main inbox. Email recipients, on the other hand, take a more independent approach and can send any email that isn’t relevant to them to the spam folder.
How relevant an email is, of course, varies from person to person. But, ESPs and ISPs do take notes from recipients when it comes to flagging emails and will directly send an email to spam if its sender has been flagged by a recipient multiple times before.
What are the other parameters used to categorize emails into spam and non-spam? There are quite a few, with the most common being:
- Content and content structure – content sprinkled with lots of promotional language and subject lines that are misleading, full of symbols, exclamation points, and so on are perhaps the top no-gos when it comes to the non-technical aspects of an email. On top of this, bad formatting, as well as suspicious-looking attachments, can also be seen as red flags.
- Sender reputation – one of the pillars of email deliverability is sender reputation. So, if a sender has a poor reputation thanks to unsolicited sending and getting flagged as spam by recipients, chances are all of their emails will start going to spam automatically.
- Authentication – when scanning emails, spam filters are looking for the lack of email authentication protocols such as SPF (Sender Policy Framework) and DKIM (DomainKeys Identified Mail). If that is the case, the filters will view an email as suspicious, as its legitimacy and origin will be hard to determine.
- Recipient engagement – low open rates, high bounce rates, and plenty of spam complaints are all indicators of low engagement. This low engagement is a signal to spam filters that an email is likely to be junk or just irrelevant.
- Blacklist presence – having your IP address or domain blacklisted also means having your emails land in the spam folder. To make things worse, as ESPs and spam monitoring organizations exchange blacklists, being present on one likely means you’ll be added to a few more.
- Sending schedule – although it might seem irrelevant, any sending schedule that is not typical can make you look suspicious. So, at all costs, avoid sending an increased volume of emails suddenly and at odd hours. Also, try not to abruptly change your sending frequency, as this can also be seen as unusual.
It’s important to note that these are not the only parameters taken into consideration when an ESP, ISP, or email recipient is deciding whether or not an email belongs in the inbox or the well-hidden spam section. Still, making sure that none of the mentioned red flags are present when your emails go under inspection is the only way to make sure they do make it to the intended recipient.
How to prevent email from going to spam? (Salesforce knowledge base tips)
Knowing why emails go to spam doesn’t mean one also knows how to prevent the same from happening. But don’t stress, as we’ve got you covered on that front as well!
Here are some useful tips you can follow!
Check your settings
In the Salesforce knowledge base, at the time of writing, it’s recommended to check your deliverability settings, DNS settings, as well as the settings of your email server.
Outbound email/deliverability settings
Configuring these settings can improve the email deliverability of your organization. And depending on the setting, it can apply to emails sent through Salesforce and emails sent through external accounts connected to Salesforce, or only emails sent through Salesforce or an email relay.
The settings include:
- Access to send email
- Bounce management
- Data protection and privacy
- Email security compliance
- Transport Layer Security
- Email sending ownership
DNS settings for your domain
Configuring DNS settings for your domain includes the creation of an SPF record and a DKIM key.
SPF is intended for checking if a message conforms to the policy described for a domain it comes from. The record is configured by the domain owner for each DNS zone.
DKIM, on the other hand, is a key used to sign outbound emails on behalf of your organization, so the recipient can make sure the messages have been processed as emails from your organization.
For more in-depth information on these authentication methods, check out our dedicated articles and tools:
- SPF Record Explained
- Multiple SPF Records Do’s and Don’ts
- Free SPF Record Checker tool
- DKIM Explained
- Create and Implement a DKIM Record
- Free DKIM Record Checker tool
Email server settings
Email server settings cover the settings necessary to set up an email relay. Using an email relay can help remove the “email spoofing” label some emails sent from Salesforce receive, but it also has other benefits, such as:
- Leveraging an existing email infrastructure to send emails from within Salesforce. This includes an email server, SMTP settings, authentication protocols, email templates, etc.
- Improving deliverability by sending through a trusted email server.
- Tracking detailed information on email delivery, opens, bounces, clicks, and other metrics.
- Using advanced security and authentication mechanisms.
If you’re looking to reap the mentioned benefits by setting up an email relay but don’t have an email infrastructure in place yet, consider signing up for the Mailtrap Email Delivery Platform. The platform, intended for developer and product teams with high inboxing rates and fast email delivery.
Mailtrap Email API/SMTP is, a part of the above-mentioned platform, and a solution that offers both an API and an SMTP service for delivering emails at an average time of ~1 second. Its setup is smooth as well as secure, and you don’t need to fill out lengthy forms or provide a lot of validation credentials in the process.
Users of the sending solution get access to unique monitoring features for staying on top of deliverability numbers and troubleshooting unexpected sending issues quickly and easily. These features include:
- Helicopter-view dashboards
- Drill-down email reports for mailbox providers
- Extended email history with historical data up to 60 days
- Email body preview after the email is sent
- Weekly reports with week-on-week comparison
- Critical alerts if numbers suddenly drop
To use Mailtrap’s email-sending solution in Salesforce, after singing up for your Mailtrap account, you will have to add and verify a domain as described in the video below:
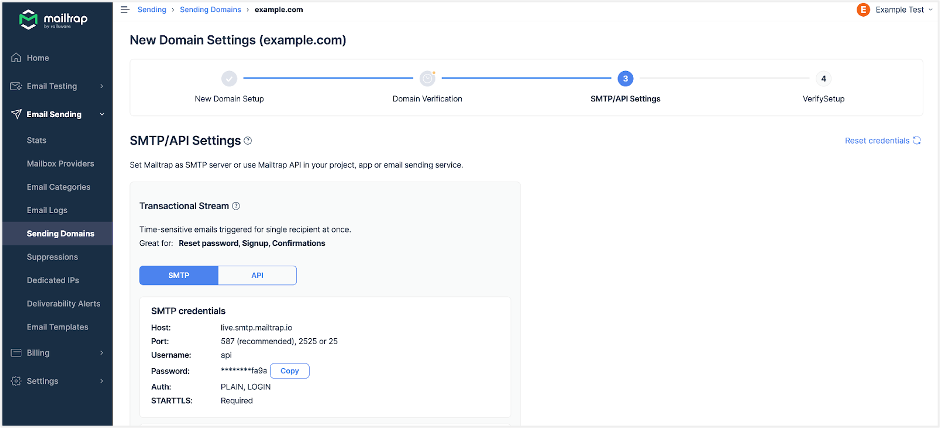
After that, you can find the necessary credentials for adding the relay by navigating to Sending Domains → Choosing a domain → SMTP/API Settings.
Next, move onto add a new email relay to Salesforce. Once all the steps are complete, you can send a test email to verify that you have configured everything correctly. To do so, use the following Apex code snippet with any necessary modifications made beforehand.
public with sharing class MailTrapEmailApi {
public static void sendMail(){
String body = '<your body>';

Http http = new Http();
HttpRequest request = new HttpRequest();
request.setEndpoint('https://send.api.mailtrap.io/api/send');
request.setMethod('POST');
request.setHeader('Api-Token', '<yourMailtrapAPIToken>');
request.setHeader('Content-Type', 'application/json;charset=UTF-8');
request.setBody(body);
System.debug('1 ' + request);
HttpResponse response = http.send(request);
System.debug('2 ' + response);
}Best practices to avoid triggering spam filters
Polish the email content and structure
Content is by far the most important element of an email – it’s what delivers your message, provides value to the reader, and encourages clicks of your CTAs. That being said, it’s crucially important that this content doesn’t come off as spammy by containing overly promotional words, links with bad reputations, or irrelevant attachments.
Just as important is having subject lines that match the content and are not misleading, and, of course, are completely free of spammy language.
Once you make sure your content and subject lines will not trigger spam filters, you should also make sure your content is truly valuable to the recipients so they don’t manually send your message to the spam email folder.
The other content-related tips to keep in mind include:
- Using both text and HTML versions of an email to ensure visibility on all platforms
- Maintaining the simplicity and cleanliness of your code
- Avoiding interactive content (JavaScript, RSS feeds, forms)
- Maintaining a low image-to-text ratio
- Avoiding URL shorteners in your emails
- Remembering to include your physical address and a way for recipients to opt out of future emails
Monitor and improve your sender reputation
Email sender reputation is an indicator of how trustworthy and credible an email sender is based on their past sending behavior. It’s also a factor email providers take very seriously when deciding how incoming emails from that sender will be treated.
By combining your IP reputation and domain reputation, the sender reputation can be determined. But what affects how good or bad the sender reputation will be? A few things:
- Spam complaints – complaints filed by email recipients by reporting your emails as spam
- Bounce rate – number of emails that didn’t get delivered to recipients either because of temporary email delivery issues or faulty/non-existent recipient email addresses
- Sending history – previous sending volumes and frequency
- Engagement – previous engagement metrics such as clicks, opens, reply frequency, etc.
- Unsubscribe rate – the rate at which you’ve lost people from your email subscribers list
Some effective ways to improve your sender reputation include authenticating your domain, growing the email subscribers list organically, cleaning your email subscribers list regularly, boosting engagement, and so on.
We cover the topic in detail in our email sender reputation article.
Modify your “from” name
Reviving an email from a sender with a very generic name can, in some cases, cause some confusion and mistrust in the minds of the recipients. For that reason, it’s very smart to change your from or sender name into something more professional, thus avoiding the situation where your email address looks like spam.
So, for instance, instead of “outreach@comany.com” you can go with “john@company.com”. This will make the recipients feel like the email was sent by an actual person and not a bot, making them more keen to open and read it and, of course, less likely to send it to spam.
Spot potential trap email addresses
To catch spammers, bots, and other malicious actors, ESPs might resort to using trap email addresses. If you contact these addresses via email, you will get blacklisted, and in turn, your emails will be automatically sent to a recipient’s spam folder.
You can avoid this scenario by resorting to the use of software and techniques intended to identify trap email addresses.
Enable easy unsubscribing
You don’t want to be bombarded by emails you find irrelevant, and neither do your email list subscribers. That is why unsubscribing from the emails you send should be an accessible and simple process.
If this isn’t the case, you risk getting marked as a spammer and potentially even breaking email-sending laws and regulations.
Stay off of blacklists
Earlier in the article, we explained the consequences of being blacklisted by ESPs. Taking that into consideration, you have to put serious effort into avoiding getting blacklisted, as well as thoroughly checking the most popular blacklists for your sender IP or domain.
In the unfortunate event that you end up on one of the infamous lists, you’ll need to rethink your sending practices.
Don’t use purchased email lists
Although it might seem like a great way to reach lots of people fast, using a purchased email list is the fastest way to tank your domain reputation and get the spammer label attached to you.
So, instead of doing this, take your time to build a quality email list and make sure you use a double opt-in so people who sign up to receive emails from you/your business are truly interested in that.
Keep your emails out of the spam club
Salesforce email going to spam is a nightmare for anyone in charge of sending out communication using this popular CRM. Luckily, there are plenty of tips to try which can help your emails land in the inbox and not the spam folder.
In this article, we listed the most effective tips, so study them well and start by implementing the ones that might create the biggest change in your email performance!