

If you’ve been on the lookout for the ‘Java send email Gmail’ article that has it all, then look no further!
After looking for such an article myself, I’ve decided to sit down and go over the process in depth to help you add the email-sending functionality to your Java app a bit more easily.
I’ll show you exactly how I did it step by step, from sending emails in Java with Gmail’s SMTP server to using Gmail’s API.
So buckle up, we’ve got a lot to cover!
How to send email in Java using Gmail SMTP?
For the purposes of this Java email tutorial, I’ve used Visual Studio Code, but you can use any editor you prefer.
I also installed Java Development Kit (JDK), Java Extension Pack, and Maven, so go ahead and install them if you don’t have them already.
All set? Let’s go.
Step 1: Setup and initialize your project
The first thing I did was create a folder for my project, which I named “emailproject” for the purposes of this guide.
In the same folder, I created a pom.xml file, which essentially tells Maven to download JakartaMail, the library we need to send emails from Java and handle jar files.
Another benefit of Maven is that it also handles the inclusion of ‘mail.jar’ (now ‘jakarta.mail.jar’, depending on the version) automatically. You don’t need to download it manually, simply specify it as Jakarta Mail dependency.
Then, in the pom.xml file, I pasted the following Maven configuration:
<project xmlns="http://maven.apache.org/POM/4.0.0"
         xmlns:xsi="http://www.w3.org/2001/XMLSchema-instance"
         xsi:schemaLocation="http://maven.apache.org/POM/4.0.0 http://maven.apache.org/xsd/maven-4.0.0.xsd">
    <modelVersion>4.0.0</modelVersion>
    <groupId>com.example</groupId>
    <artifactId>emailproject</artifactId>
    <version>1.0-SNAPSHOT</version>

    <dependencies>
        <dependency>
            <groupId>com.sun.mail</groupId>
            <artifactId>jakarta.mail-api</artifactId>
            <version>2.1.2</version>
        </dependency>
    </dependencies>
</project>
Step 2: Create Java files
After configuring pom.xml, I created a new folder structure, which goes something like this:
- src/main/java/com/emailproject
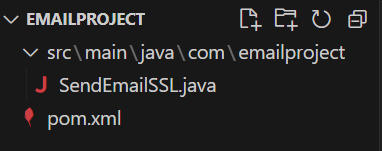
In the ‘emailproject’ folder, I created the “SendEmailSSL.java” file, which contains our key code snippet that uses SSL, instead of TLS connection, for improved security:
package com.emailproject;

import jakarta.mail.*;
import jakarta.mail.internet.InternetAddress;
import jakarta.mail.internet.MimeMessage;
import java.util.Properties;

public class SendEmailSSL {

    public static void main(String[] args) {

        final String username = "username@gmail.com";
        final String password = "password";

        Properties prop = new Properties();
		prop.put("mail.smtp.host", "smtp.gmail.com");
        prop.put("mail.smtp.port", "465");
        prop.put("mail.smtp.auth", "true");
        prop.put("mail.smtp.socketFactory.port", "465");
        prop.put("mail.smtp.socketFactory.class", "javax.net.ssl.SSLSocketFactory");

        Session session = Session.getInstance(prop,
                new jakarta.mail.Authenticator() {
                    protected PasswordAuthentication getPasswordAuthentication() {
                        return new PasswordAuthentication(username, password);
                    }
                });

        try {

            Message message = new MimeMessage(session);
            message.setFrom(new InternetAddress("from@gmail.com"));
            message.setRecipients(
                    Message.RecipientType.TO,
                    InternetAddress.parse("to_username_a@gmail.com, to_username_b@yahoo.com")
            );
            message.setSubject("Testing Gmail SSL");
            message.setText("Dear Mail Crawler,"
                    + "\n\n Please do not spam my email!");

            Transport.send(message);

            System.out.println("Done");

        } catch (MessagingException e) {
            e.printStackTrace();
        }
    }

}
Notes:
- Replace “username@gmail.com” and “password” with your actual Gmail address
- Specify the recipient’s email address in the
setRecipientsmethod - For sending to work, use an app password and enable 2-step verification on your account since Google discounted the Less Secure Apps access feature
Step 3: Compile and run
It’s time to compile our Java code, run it, and send an email using the Gmail SMTP server, as specified in the code. To do this, I used the following two commands:
mvn clean compile– This command cleans any previous builds, compiles your Java sources, and places the compiled .class files in the target/classes directorymvn exec:java– This command will run the main method of the SendEmailTLS class
After running the program, the console prints ‘Done’ and we can check the recipient email to see the message.
Some potential issues you might encounter are:
- Dependency errors – Make sure your Java project uses the latest version of Jakarta Mail. At the time of writing this article, the latest version is 2.1.2, which you can download here.
- Firewall or antivirus interference – When I was first trying to run my test project, I was blocked by my firewall. So I had to configure my firewall and antivirus to allow outgoing connections on ports 587 and 465.
- Disable your VPNs – If you’re encountering issues with Gmail’s SMTP server, try disabling your VPNs, which might be blocking them.
- Change package and folder name – As you might have noticed, the package name is “package com.emailproject;” and the folder name is “emailproject,” but, you can change it according to your liking. Just make sure you use lowercase to avoid conflicts on case-insensitive filesystems.
Sending HTML emails
To send an email HTML email using Gmail STMP, I replaced the setText(String text) method with the setContent(Object o, String type) one and put text/html as the second method argument.
For example, I used the following code:
MimeMessage message = new MimeMessage(session);
message.setFrom(new InternetAddress("from@gmail.com"));
message.setRecipients(Message.RecipientType.TO, InternetAddress.parse("to@example.com"));
message.setSubject("HTML Email");
String htmlContent = "<h1>This is a Heading</h1><p>This is a paragraph in HTML.</p>";
message.setContent(htmlContent, "text/html"); // Set the MIME type to text/html
Transport.send(message);
Tip: you can modify htmlContent with any HTML content as per your requirements.
On the other hand, if you want to send a message with both plain text and HTML, you need to build it with a MimeMultipart (“alternative”) object.
To do this, you simply create two different parts manually and insert them separately – text/plain body as the first part and the text/html body as the second part.
For a more detailed customization, check out our dedicated article on sending HTML in Java.
Sending email with embedded images
You have three options for sending emails with images in Java, namely:
- CID image embedding
- Inline embedding or Base64 encoding (not recommended)
- Linked images
For CID image embedding, simply create a MIME multipart/related message with the following code:
Multipart multipart = new MimeMultipart("related");
        MimeBodyPart htmlPart = new MimeBodyPart();
        //add reference to your image to the HTML body <img src="cid:some-image-cid" alt="img" />
        htmlPart.setText(messageBody, "utf-8", "html");
        multipart.addBodyPart(htmlPart);
        MimeBodyPart imgPart = new MimeBodyPart();
        // imageFile is the file containing the image
        imgPart.attachFile(imageFile);
        // or, if the image is in a byte array in memory, use
        // imgPart.setDataHandler(new DataHandler(
        //      new ByteArrayDataSource(bytes, "image/whatever")));
        imgPart.setContentID("<some-image-cid">");
        multipart.addBodyPart(imgPart);
        message.setContent(multipart);
If you want to go with inline embedding or base64 encoding, include the encoded image data in the HTML body like this:
<img src="data:image/jpeg;base64,base64-encoded-data-here" />And finally, for linked images (images hosted on an external server that you can link to) you can use the imp tag in the HTML body:
<img src="/wp-content/uploads/2018/11/blog/-illustration-email-embedding-images.png" alt="img" />Here’s a full code example:
String to = "johndoe@gmail.com";
String from = "yourmail@example.com";
final String username = "1a2b3c4d5e6f7g";//generated by Mailtrap
final String password = "1a2b3c4d5e6f7g";//generated by Mailtrap
String host = "smtp.mailtrap.io";
Properties props = new Properties();
props.put("mail.smtp.auth", "true");
props.put("mail.smtp.starttls.enable", "true");
props.put("mail.smtp.host", host);
props.put("mail.smtp.port", "2525");
// Get the Session object.
Session session = Session.getInstance(props,
       new jakarta.mail.Authenticator() {
           protected PasswordAuthentication getPasswordAuthentication() {
               return new PasswordAuthentication(username, password);
           }
       });
try {
   // Create a default MimeMessage object.
   Message message = new MimeMessage(session);
   message.setFrom(new InternetAddress(from));
   message.setRecipients(Message.RecipientType.TO,
           InternetAddress.parse(to));
   message.setSubject("My HTML message");
   // Put your HTML content using HTML markup
   message.setContent(
           "<p> The text and the <strong>image</strong> <img src=\"/wp-content/uploads/2018/11/blog/-illustration-email-embedding-images.png\" alt=\"img\" /> ",
           "text/html");
   // Send message
   Transport.send(message);
   System.out.println("Sent message successfully....");
} catch (MessagingException e) {
   e.printStackTrace();
   throw new RuntimeException(e);
}
Notes:
- Remember to replace the “path/to/image.jpg” with the actual path to the image file you want to include.
- The
cid:imageinhtmlContentstring is a Content-ID that links the HTML part with the image part. - The
cidreferenced in the HTML should match the Content-ID set in the image part’s header.
Sending emails with attachments
If you want to send emails with attachments, you can do so with the MimeMultipart object I mentioned above. The first part of the object is the main one (the text) and the other part is the attachment (e.g., a .txt, .png, etc.)
Take a look at the following code snippet:
// Setup the session and create a MimeMessage as before
MimeMessage message = new MimeMessage(session);

// Create multipart
Multipart multipart = new MimeMultipart();

// Text part
MimeBodyPart textPart = new MimeBodyPart();
textPart.setText("This is the email body.");

// File part
MimeBodyPart filePart = new MimeBodyPart();
DataSource source = new FileDataSource(new File("path/to/file"));
filePart.setDataHandler(new DataHandler(source));
filePart.setFileName("filename.ext");

multipart.addBodyPart(textPart);
multipart.addBodyPart(filePart);

// Set content and send
message.setContent(multipart);
Transport.send(message);
Notes:
- Similarly to images, make sure to replace the
path/to/filewith the actual file path you want to attach. - Replace
filename.extinfilePart.setFileName(“filename.ext”)with the name and extension of the file you want to appear in the email.
Gmail SMTP limitations
If you decide to use Gmail SMTP to send email in Java, you should be aware of its limitations, which Google has put in place to prevent abuse and ensure service quality.
Namely, they include:
- Sending limits – If you have a personal Gmail account, your application will be able to send between 100 to 150 emails per day, and up to 2,000 if you have a Google Workspace account.
- Attachment size limit – The maximum size of attachments you are allowed to send is 25 MB per email.
- Recipient limits – For each email sent, you can address a maximum of 500 recipients; this includes to, cc, and bcc. The limits vary for Google Workspace accounts.
- Connection requirements – To use Gmail’s SMTP server, you must use either SSL (port 465) or TLS (port 587) as previously described in the article.
- Authentication requirements – Lastly, for security purposes, you can’t use Gmail’s SMTP server if you don’t authenticate with your Gmail account credentials, enable 2-step verification and use an app password like mentioned above.
You should also consider the new email sender requirements, effective February 1, 2024, as well as note that Google’s policies and limitations evolve over time.
Sending email in Java with Gmail API
Now that you’re familiar with sending email via Gmail’s SMTP server, let me show you how to do it with Gmail’s API.
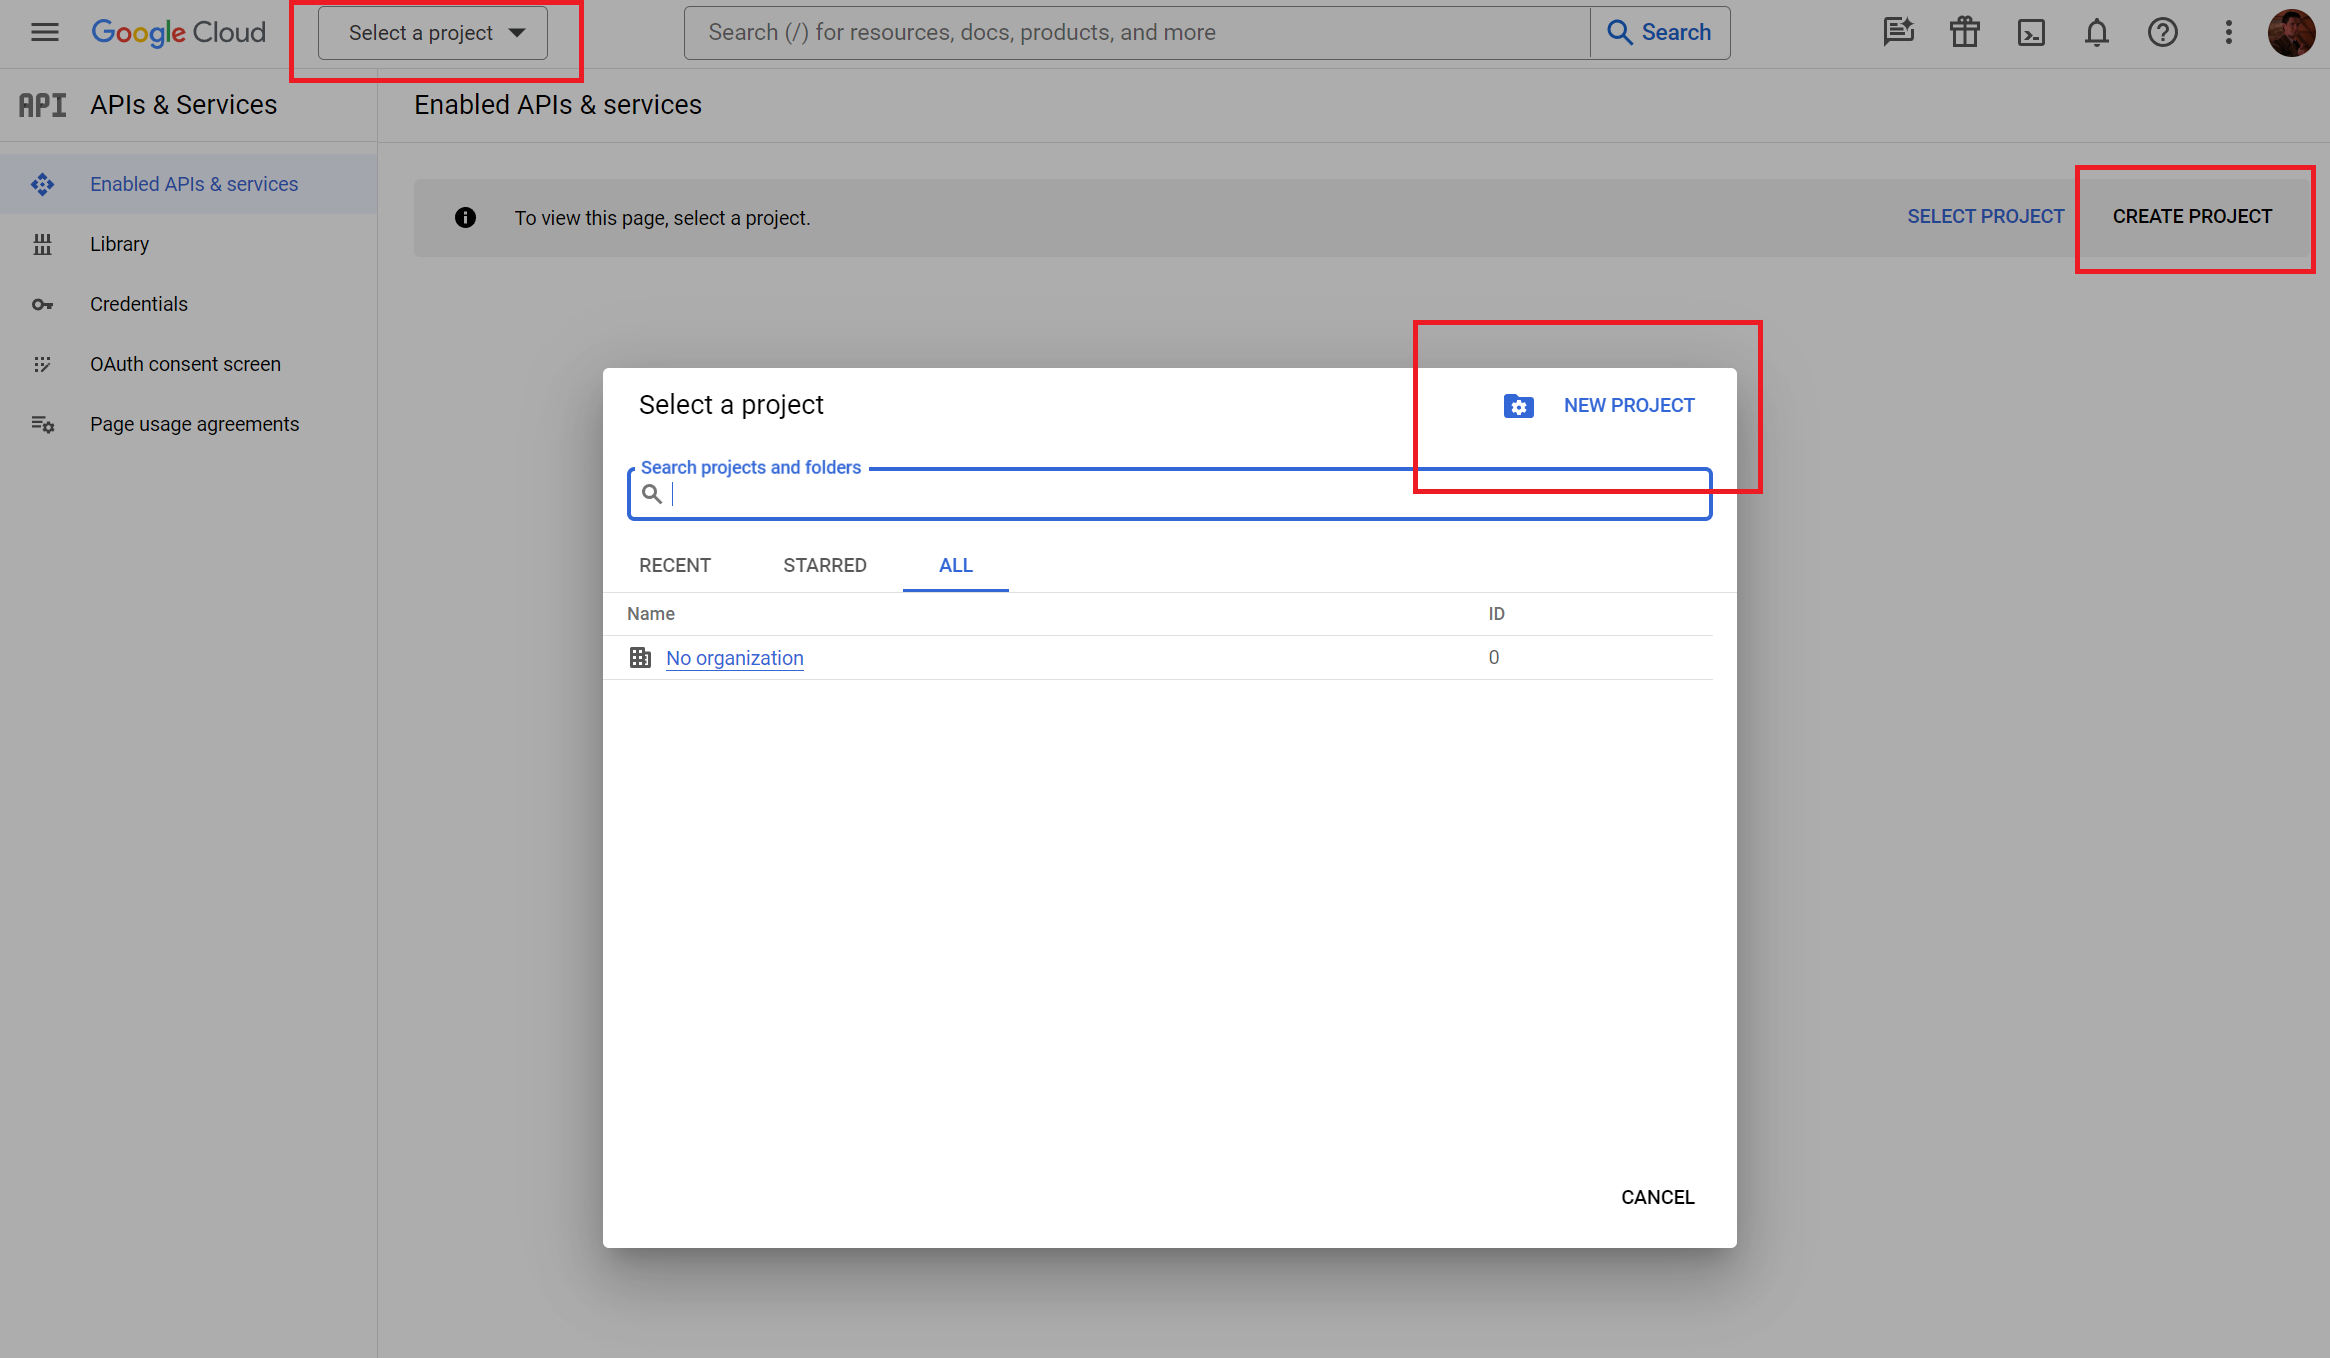
Step 1: Create a project
The first thing we have to do is visit the Google Developers Console, which gives our apps, either web or mobile, access to Gmail.
Keep in mind that if you’re visiting this page for the first time, you’ll have to agree with the Terms of Service and pick your Country of residence. Once you’re done with that, simply click on Select a project or Create project, name it, and press Create.
Step 2: Enable Gmail API
Next, go to the API Library page by clicking on the Library tab on the left.
Find the ‘Gmail API’ (you can type it in the search bar), click on it, and press Enable.
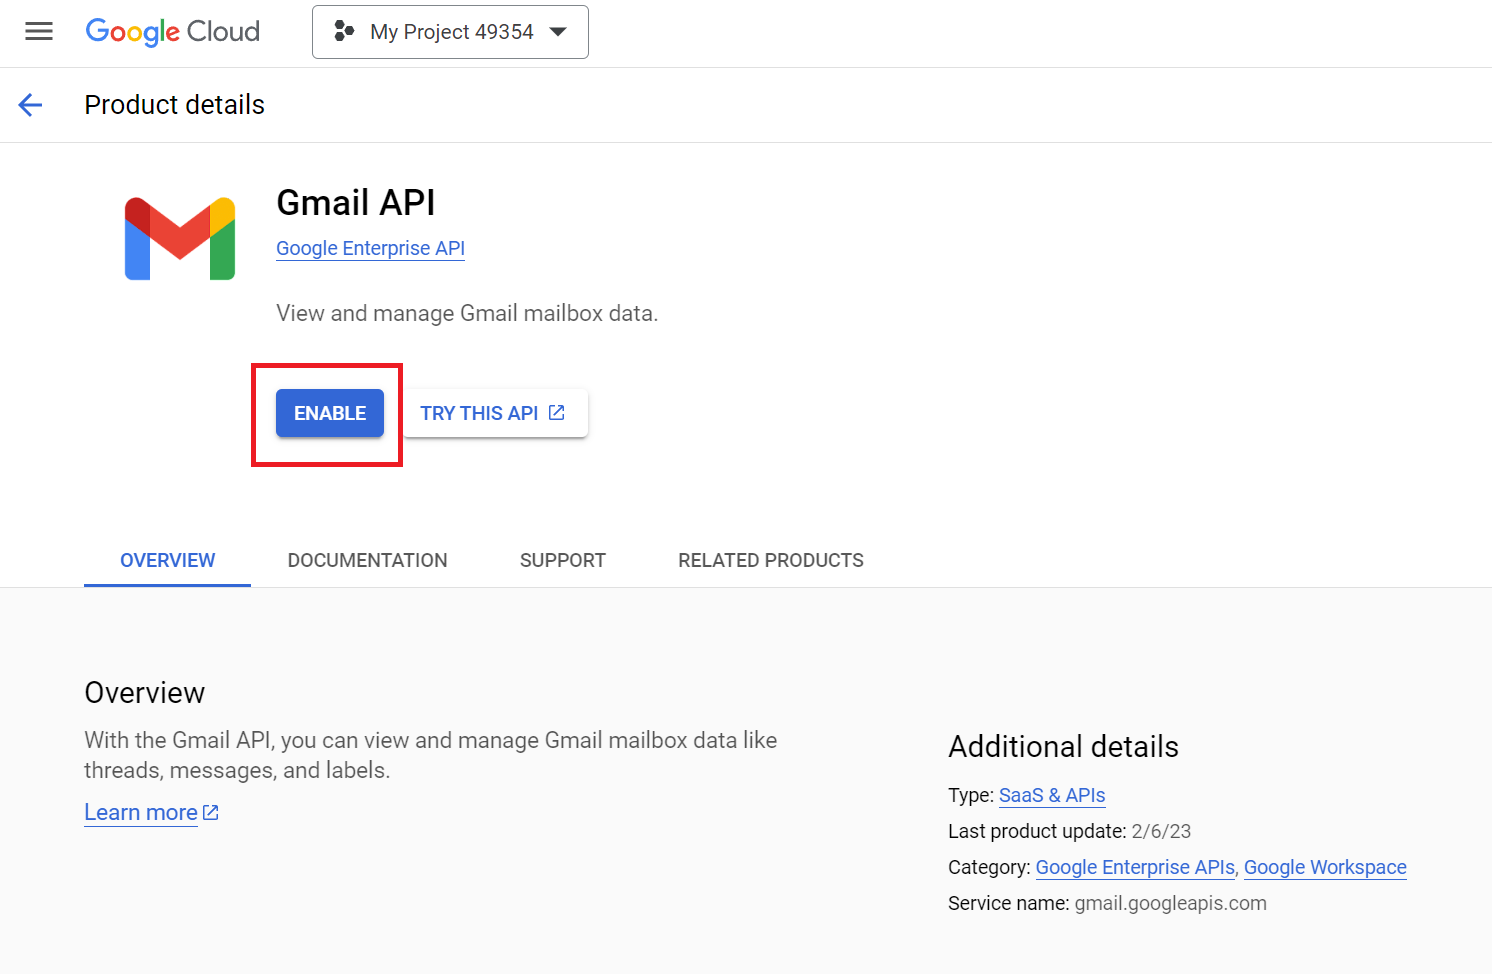
If you’re working on multiple projects, you’ll have to enable the Gmail API separately for each one.
Step 3: Create credentials and set up the OAuth 2.0 Authorization
After we’ve enabled the Gmail API, the console will take us to a dashboard where we need to enter our credentials.
You can either click on Create credentials and answer a series of questions to find out what kind of credentials you need, but you don’t have to do that as we need OAuth client ID. This is the unique identifier that’s assigned to an application, which allows it to request OAuth 2.0 authorization to access protected resources on behalf of a user.
So, pick OAuth client ID from the drop-down list of the Create Credentials button in the Credential tab.
On the next screen, you’ll have to submit the consent questionnaire, which requires you to enter the basic information about your app.
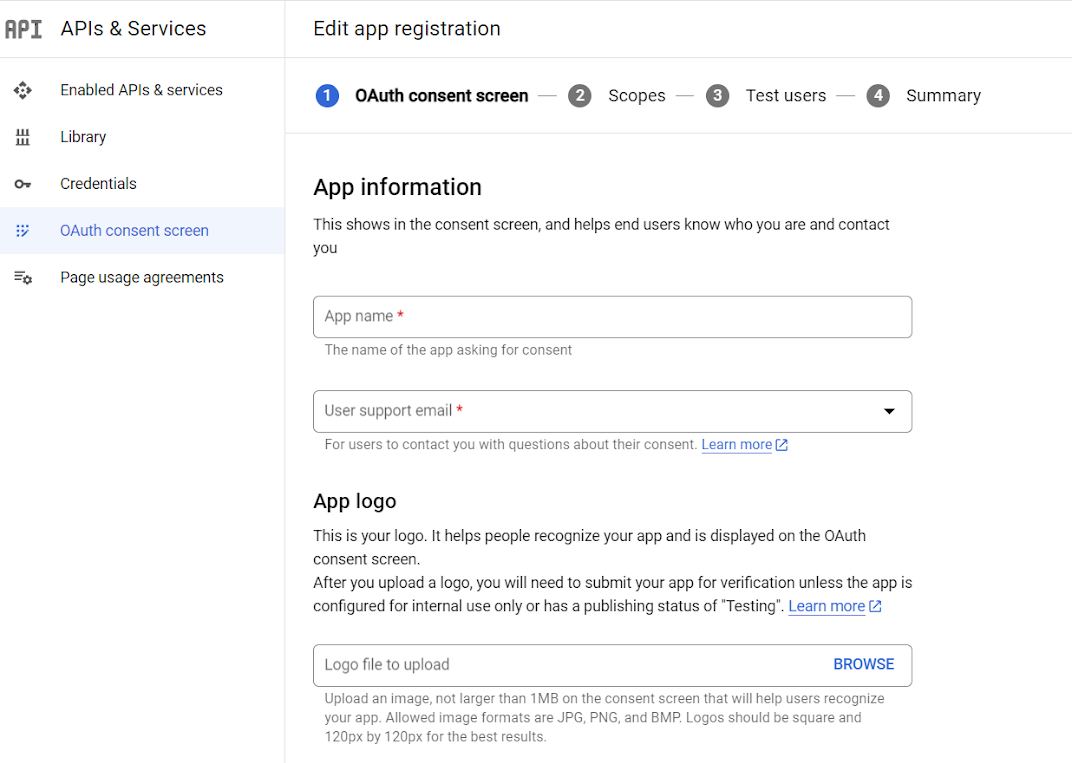
When you’re done, you’ll be able to fill out credentials, pick the type of your app (e.g., Android, Chrome App, iOS, web app, etc.), and name your OAuth Client ID.
We’ll also have to enter JavaScript origins and redirect domains for use with a request from both a browser or a web server.
To finalize the creation, click Create, and we’re done.
Just remember to download the JSON file with your credentials as we’ll need it later during the process.
Step 4: Pick a quickstart guide
Next, we need to select the quickstart guide for Java.
Make sure to go over the Prerequisites section and make sure you have:
- Java 1.8 or greater
- Gradle 7.0 or greater
- A Google Cloud project
- A Google account with Gmail enabled
You’ll also need to create a new project structure and, similarly to sending with SMTP, the directory that looks like this:
- src/main/resources
Then, in this directory copy the JSON file (credentials.json) to this directory and replace the content of the build.grade file with this code:
apply plugin: 'java'
apply plugin: 'application'

mainClassName = 'GmailQuickstart'
sourceCompatibility = 11
targetCompatibility = 11
version = '1.0'

repositories {
    mavenCentral()
}

dependencies {
    implementation 'com.google.api-client:google-api-client:2.0.0'
    implementation 'com.google.oauth-client:google-oauth-client-jetty:1.34.1'
    implementation 'com.google.apis:google-api-services-gmail:v1-rev20220404-2.0.0'
}
For more details, you can check out the official GitHub page.
Step 5: Install the client libraries
Now, let’s create a new Java file in the src/main/java directory that matches the mainClassName value in our build.gradle file.
After creating the Java file, we just need to authorize access to your Gmail account from the app, which will allow you to manage emails.
To do so, simply include the following code in it:
import com.google.api.client.auth.oauth2.Credential;
import com.google.api.client.extensions.java6.auth.oauth2.AuthorizationCodeInstalledApp;
import com.google.api.client.extensions.jetty.auth.oauth2.LocalServerReceiver;
import com.google.api.client.googleapis.auth.oauth2.GoogleAuthorizationCodeFlow;
import com.google.api.client.googleapis.auth.oauth2.GoogleClientSecrets;
import com.google.api.client.googleapis.javanet.GoogleNetHttpTransport;
import com.google.api.client.http.javanet.NetHttpTransport;
import com.google.api.client.json.JsonFactory;
import com.google.api.client.json.gson.GsonFactory;
import com.google.api.client.util.store.FileDataStoreFactory;
import com.google.api.services.gmail.Gmail;
import com.google.api.services.gmail.GmailScopes;
import com.google.api.services.gmail.model.Label;
import com.google.api.services.gmail.model.ListLabelsResponse;
import java.io.FileNotFoundException;
import java.io.IOException;
import java.io.InputStream;
import java.io.InputStreamReader;
import java.security.GeneralSecurityException;
import java.util.Collections;
import java.util.List;

/* class to demonstrate use of Gmail list labels API */
public class GmailQuickstart {
  /**
   * Application name.
   */
  private static final String APPLICATION_NAME = "Gmail API Java Quickstart";
  /**
   * Global instance of the JSON factory.
   */
  private static final JsonFactory JSON_FACTORY = GsonFactory.getDefaultInstance();
  /**
   * Directory to store authorization tokens for this application.
   */
  private static final String TOKENS_DIRECTORY_PATH = "tokens";

  /**
   * Global instance of the scopes required by this quickstart.
   * If modifying these scopes, delete your previously saved tokens/ folder.
   */
  private static final List<String> SCOPES = Collections.singletonList(GmailScopes.GMAIL_LABELS);
  private static final String CREDENTIALS_FILE_PATH = "/credentials.json";

  /**
   * Creates an authorized Credential object.
   *
   * @param HTTP_TRANSPORT The network HTTP Transport.
   * @return An authorized Credential object.
   * @throws IOException If the credentials.json file cannot be found.
   */
  private static Credential getCredentials(final NetHttpTransport HTTP_TRANSPORT)
      throws IOException {
    // Load client secrets.
    InputStream in = GmailQuickstart.class.getResourceAsStream(CREDENTIALS_FILE_PATH);
    if (in == null) {
      throw new FileNotFoundException("Resource not found: " + CREDENTIALS_FILE_PATH);
    }
    GoogleClientSecrets clientSecrets =
        GoogleClientSecrets.load(JSON_FACTORY, new InputStreamReader(in));

    // Build flow and trigger user authorization request.
    GoogleAuthorizationCodeFlow flow = new GoogleAuthorizationCodeFlow.Builder(
        HTTP_TRANSPORT, JSON_FACTORY, clientSecrets, SCOPES)
        .setDataStoreFactory(new FileDataStoreFactory(new java.io.File(TOKENS_DIRECTORY_PATH)))
        .setAccessType("offline")
        .build();
    LocalServerReceiver receiver = new LocalServerReceiver.Builder().setPort(8888).build();
    Credential credential = new AuthorizationCodeInstalledApp(flow, receiver).authorize("user");
    //returns an authorized Credential object.
    return credential;
  }

  public static void main(String... args) throws IOException, GeneralSecurityException {
    // Build a new authorized API client service.
    final NetHttpTransport HTTP_TRANSPORT = GoogleNetHttpTransport.newTrustedTransport();
    Gmail service = new Gmail.Builder(HTTP_TRANSPORT, JSON_FACTORY, getCredentials(HTTP_TRANSPORT))
        .setApplicationName(APPLICATION_NAME)
        .build();

    // Print the labels in the user's account.
    String user = "me";
    ListLabelsResponse listResponse = service.users().labels().list(user).execute();
    List<Label> labels = listResponse.getLabels();
    if (labels.isEmpty()) {
      System.out.println("No labels found.");
    } else {
      System.out.println("Labels:");
      for (Label label : labels) {
        System.out.printf("- %s\n", label.getName());
      }
    }
  }
}
And again, you can check out the code in more detail on GitHub if you’re interested.
Step 6: Run the sample code
To run the sample code, use:
gradle runThe first time you run the sample, it will prompt you to authorize access. Sign in when prompted if you’re not already signed in, or select one account for authorization if you’re signed in to multiple accounts.
Once you authorize it, your Java application will run and call the Gmail API.
Conveniently, you won’t be prompted for authorization the next time you run the sample code, as the information is stored in the file system.
Step 7: Create and send an email message
And we’re almost done! We can now either create a draft for later use or send an email directly.
All you have to do is:
- Create a MIME message compliant with RFC 2822
- Convert the message into a base64url encoded string
- Use
drafts.createto save the message as a draft - Use
users.messages.sendto send the message immediately
To do all this, simply integrate the following code into your Java project that has access to the Gmail API:
import com.google.api.client.util.Base64;
import com.google.api.services.gmail.Gmail;
import com.google.api.services.gmail.model.Message;
import java.io.IOException;
import java.util.ArrayList;
import java.util.List;

public class GmailIntegration {

    private final Gmail service;

    public GmailIntegration(Gmail service) {
        this.service = service;
    }

    // Method to create and send an email directly without using JavaMail api
    public Message sendEmail(String userId, String to, String from, String subject, String bodyText) throws IOException {
        String emailBody = createRawEmailString(to, from, subject, bodyText);
        byte[] emailBytes = emailBody.getBytes("UTF-8");
        String encodedEmail = Base64.encodeBase64URLSafeString(emailBytes);

        Message message = new Message();
        message.setRaw(encodedEmail);
        message = service.users().messages().send(userId, message).execute();

        System.out.println("Sent email with ID: " + message.getId());
        return message;
    }

    // Helper method to create a raw MIME string for an email
    private String createRawEmailString(String to, String from, String subject, String bodyText) {
        List<String> headers = new ArrayList<>();
        headers.add("To: " + to);
        headers.add("From: " + from);
        headers.add("Subject: " + subject);
        headers.add("Content-Type: text/plain; charset=\"UTF-8\"");
        headers.add("MIME-Version: 1.0");

        String headerString = String.join("\r\n", headers);
        return headerString + "\r\n\r\n" + bodyText;
    }
}
As with SMTP sending, make sure you replace “username@gmail.com” and “password” with your actual Gmail address and password or OAuth2 tokens as fitting. Again, you should also enable 2-step authentication and use an app specific password.
Note that the code example uses basic error logging with System.err.println. I’d strongly advise you to use a more sophisticated logging framework for error reporting and diagnostics in a production environment.
Sending HTML email
Sending HTML email with Gmail API is quite easy, as all you have to do is follow this code snippet:
import com.google.api.client.util.Base64;
import com.google.api.services.gmail.Gmail;
import com.google.api.services.gmail.model.Message;
import java.io.ByteArrayOutputStream;
import java.util.Properties;
import javax.mail.MessagingException;
import javax.mail.Session;
import javax.mail.internet.InternetAddress;
import javax.mail.internet.MimeMessage;

public class GmailHTMLSender {

    public static Message sendHtmlEmail(Gmail service, String userId, String recipientEmail,
                                         String fromEmail, String subject, String htmlBody) throws MessagingException, IOException {
        // Setup Mail Session
        Properties props = new Properties();
        Session session = Session.getDefaultInstance(props, null);

        // Create a MimeMessage using the session created above
        MimeMessage email = new MimeMessage(session);
        email.setFrom(new InternetAddress(fromEmail));
        email.addRecipient(javax.mail.Message.RecipientType.TO, new InternetAddress(recipientEmail));
        email.setSubject(subject);
        email.setContent(htmlBody, "text/html; charset=utf-8");

        // Encode and wrap the MimeMessage into a Gmail Message
        ByteArrayOutputStream buffer = new ByteArrayOutputStream();
        email.writeTo(buffer);
        byte[] bytes = buffer.toByteArray();
        String encodedEmail = Base64.encodeBase64URLSafeString(bytes);
        Message message = new Message();
        message.setRaw(encodedEmail);

        // Send the email
        message = service.users().messages().send(userId, message).execute();

        System.out.println("HTML email sent successfully.");
        return message;
    }
}- Make sure to replace the
bodyTextparameter withhtmlBodyin yoursendEmailmethod when calling this function. - Ensure that the HTML content is passed as
htmlBody.
Send an email with an embedded image
To send an email with an embedded image, we need to:
- Setup dependencies in the ‘pom.xml’ file to handle email creation and encoding, more specifically for handling MIME types and base64 encoding
<dependency>
    <groupId>javax.mail</groupId>
    <artifactId>javax.mail-api</artifactId>
    <version>1.6.2</version>
</dependency>
<dependency>
    <groupId>com.google.apis</groupId>
    <artifactId>google-api-services-gmail</artifactId>
    <version>v1-rev20200404-1.30.9</version>
</dependency>- Prepare the HTML content by referencing the image with a Content-ID (
cid) that you assign to the image part. Here’s an example:
String htmlBody = "<html><body><h1>Hello, world!</h1>" +
"<img src=\"cid:imageId\"></body></html>";- Create a multipart MIME message where one part is your HTML content and the other is the image. The image will have a header that assigns it a ‘Content-ID’ matching the
cidused in the HTML.
import com.google.api.client.util.Base64;
import com.google.api.services.gmail.Gmail;
import com.google.api.services.gmail.model.Message;

import javax.activation.DataHandler;
import javax.activation.DataSource;
import javax.activation.FileDataSource;
import javax.mail.MessagingException;
import javax.mail.Session;
import javax.mail.internet.*;
import javax.mail.util.ByteArrayDataSource;
import java.io.ByteArrayOutputStream;
import java.io.IOException;
import java.util.Properties;

public class GmailImageSender {

    public static Message sendEmailWithImage(Gmail service, String userId, String to,
                                             String from, String subject, byte[] imageBytes,
                                             String imageName) throws MessagingException, IOException {
        Properties props = new Properties();
        Session session = Session.getDefaultInstance(props, null);

        MimeMessage email = new MimeMessage(session);
        email.setFrom(new InternetAddress(from));
        email.addRecipient(javax.mail.Message.RecipientType.TO, new InternetAddress(to));
        email.setSubject(subject);

        // Create the email body part
        MimeBodyPart htmlPart = new MimeBodyPart();
        htmlPart.setContent(htmlBody, "text/html; charset=utf-8");

        // Create the image part
        MimeBodyPart imagePart = new MimeBodyPart();
        DataSource fds = new ByteArrayDataSource(imageBytes, "image/png"); // Adjust the type accordingly
        imagePart.setDataHandler(new DataHandler(fds));
        imagePart.setHeader("Content-ID", "<imageId>"); // Ensure this matches the CID in your HTML
        imagePart.setFileName(imageName);

        // Combine the parts
        MimeMultipart multipart = new MimeMultipart("related");
        multipart.addBodyPart(htmlPart);
        multipart.addBodyPart(imagePart);

        // Set the multipart as the email content
        email.setContent(multipart);

        // Encode and send the email
        ByteArrayOutputStream buffer = new ByteArrayOutputStream();
        email.writeTo(buffer);
        byte[] bytes = buffer.toByteArray();
        String encodedEmail = Base64.encodeBase64URLSafeString(bytes);
        Message message = new Message();
        message.setRaw(encodedEmail);
        message = service.users().messages().send(userId, message).execute();

        System.out.println("Email sent with image embedded.");
        return message;
    }
}
Sending emails with an attachments
The process of sending an email with an attachment is similar to sending an HTML email, with the difference being that we need to include the attachment in the MIME message.
Here’s how to do it:
import com.google.api.client.util.Base64;
import com.google.api.services.gmail.Gmail;
import com.google.api.services.gmail.model.Message;
import javax.activation.DataHandler;
import javax.activation.DataSource;
import javax.activation.FileDataSource;
import javax.mail.MessagingException;
import javax.mail.Session;
import javax.mail.internet.MimeBodyPart;
import javax.mail.internet.MimeMessage;
import javax.mail.internet.MimeMultipart;
import java.io.ByteArrayOutputStream;
import java.io.IOException;
import java.util.Properties;

public class GmailAttachmentSender {

    public static Message sendEmailWithAttachment(Gmail service, String userId, String to,
                                                  String from, String subject, String bodyText,
                                                  String filePath) throws MessagingException, IOException {
        Properties props = new Properties();
        Session session = Session.getDefaultInstance(props, null);

        MimeMessage email = new MimeMessage(session);
        email.setFrom(new InternetAddress(from));
        email.addRecipient(javax.mail.Message.RecipientType.TO, new InternetAddress(to));
        email.setSubject(subject);

        // Body
        MimeBodyPart mimeBodyPart = new MimeBodyPart();
        mimeBodyPart.setContent(bodyText, "text/plain");

        // Attachment
        MimeBodyPart attachmentPart = new MimeBodyPart();
        DataSource source = new FileDataSource(filePath);
        attachmentPart.setDataHandler(new DataHandler(source));
        attachmentPart.setFileName(source.getName());

        // Combine body and attachment parts
        MimeMultipart multipart = new MimeMultipart();
        multipart.addBodyPart(mimeBodyPart);
        multipart.addBodyPart(attachmentPart);

        // Set the email content to multipart
        email.setContent(multipart);

        // Encode and wrap the MimeMessage into a Gmail Message
        ByteArrayOutputStream buffer = new ByteArrayOutputStream();
        email.writeTo(buffer);
        byte[] bytes = buffer.toByteArray();
        String encodedEmail = Base64.encodeBase64URLSafeString(bytes);
        Message message = new Message();
        message.setRaw(encodedEmail);

        // Send the email
        message = service.users().messages().send(userId, message).execute();

        System.out.println("Email sent with attachment.");
        return message;
    }
}
Gmail API limitations
Now, we must go over Google’s official limitations designed to ensure fair usage and protect the service’s infrastructure. Understanding them is crucial for managing your application’s interactions with Gmail efficiently.
Some of the limitations include:
- Quota limits – There’s a daily quota limit on the number of requests made from your application. This is measured in quota units, which represent Gmail resource usage. The exact number of quota units available varies by project.
- Per-user rate limits – Calculated as a moving average, the per-user rate limits 250 quota units per user per second, which allows for short bursts of activity without exceeding the overall permitted rate.
- Per-method quota usage – Depending on the complexity and resource usage of your operation, you will have a different amount of usable quota units. For example, sending an email (
messages.send) consumes 100 quota units. - Bandwidth limits – There’s a bandwidth limit for data upload and download that’s separate from the quota units.
- Attachment size limit – The maximum size of a single email, with all attachments, is 25 MB, which is similar to Gmail’s standard attachment size limit. For larger files, you can use Google Drive and include the link in the email.
- Rate limits and error handling – Any application which exceeds rate limits will receive
429 Too Many Requestserror, which is why implementing error handling strategies (e.g. exponential backoff) is recommended. - Concurrent requests – Gmail API may limit the number of concurrent connections from a single user account or OAuth client to prevent abuse.
- User-specific limits – Actions such as sending emails are subject to Gmail’s standard sending limits to prevent spam.
Lastly, you should note that these limitations are subject to change and are often updated by Google.
Differences between Gmail SMTP and Gmail API
Take a look at the table below if you can’t decide between Gmail SMTP and API:
| Gmail SMTP | Gmail API |
| Primarily for sending emails | Offers extensive Gmail functionalities other than sending |
| Simple SMTP settings | OAuth 2.0 setup, API client initialization |
| Less complex, straightforward email sending | More complex due to OAuth and API integration |
| Involves using Jakarta Mail | Google provides official API client libraries |
| Uses SSL/TLS connection, supports app-specific passwords | More secure with OAuth 2.0 |
| Requires username and password | Requires OAuth 2.0 |
Is there an alternative?
If neither Gmail SMTP nor API work for you, don’t worry — there are alternatives that can send emails just as well and also make sure they get delivered where they’re supposed to.
Among the many SMTP servers and email APIs in the industry, I’ve found that Mailtrap Sending is by far the best option.
First and foremost, this sending solution allows you to send emails with an impressive sending throughput of 10,000 emails per second.
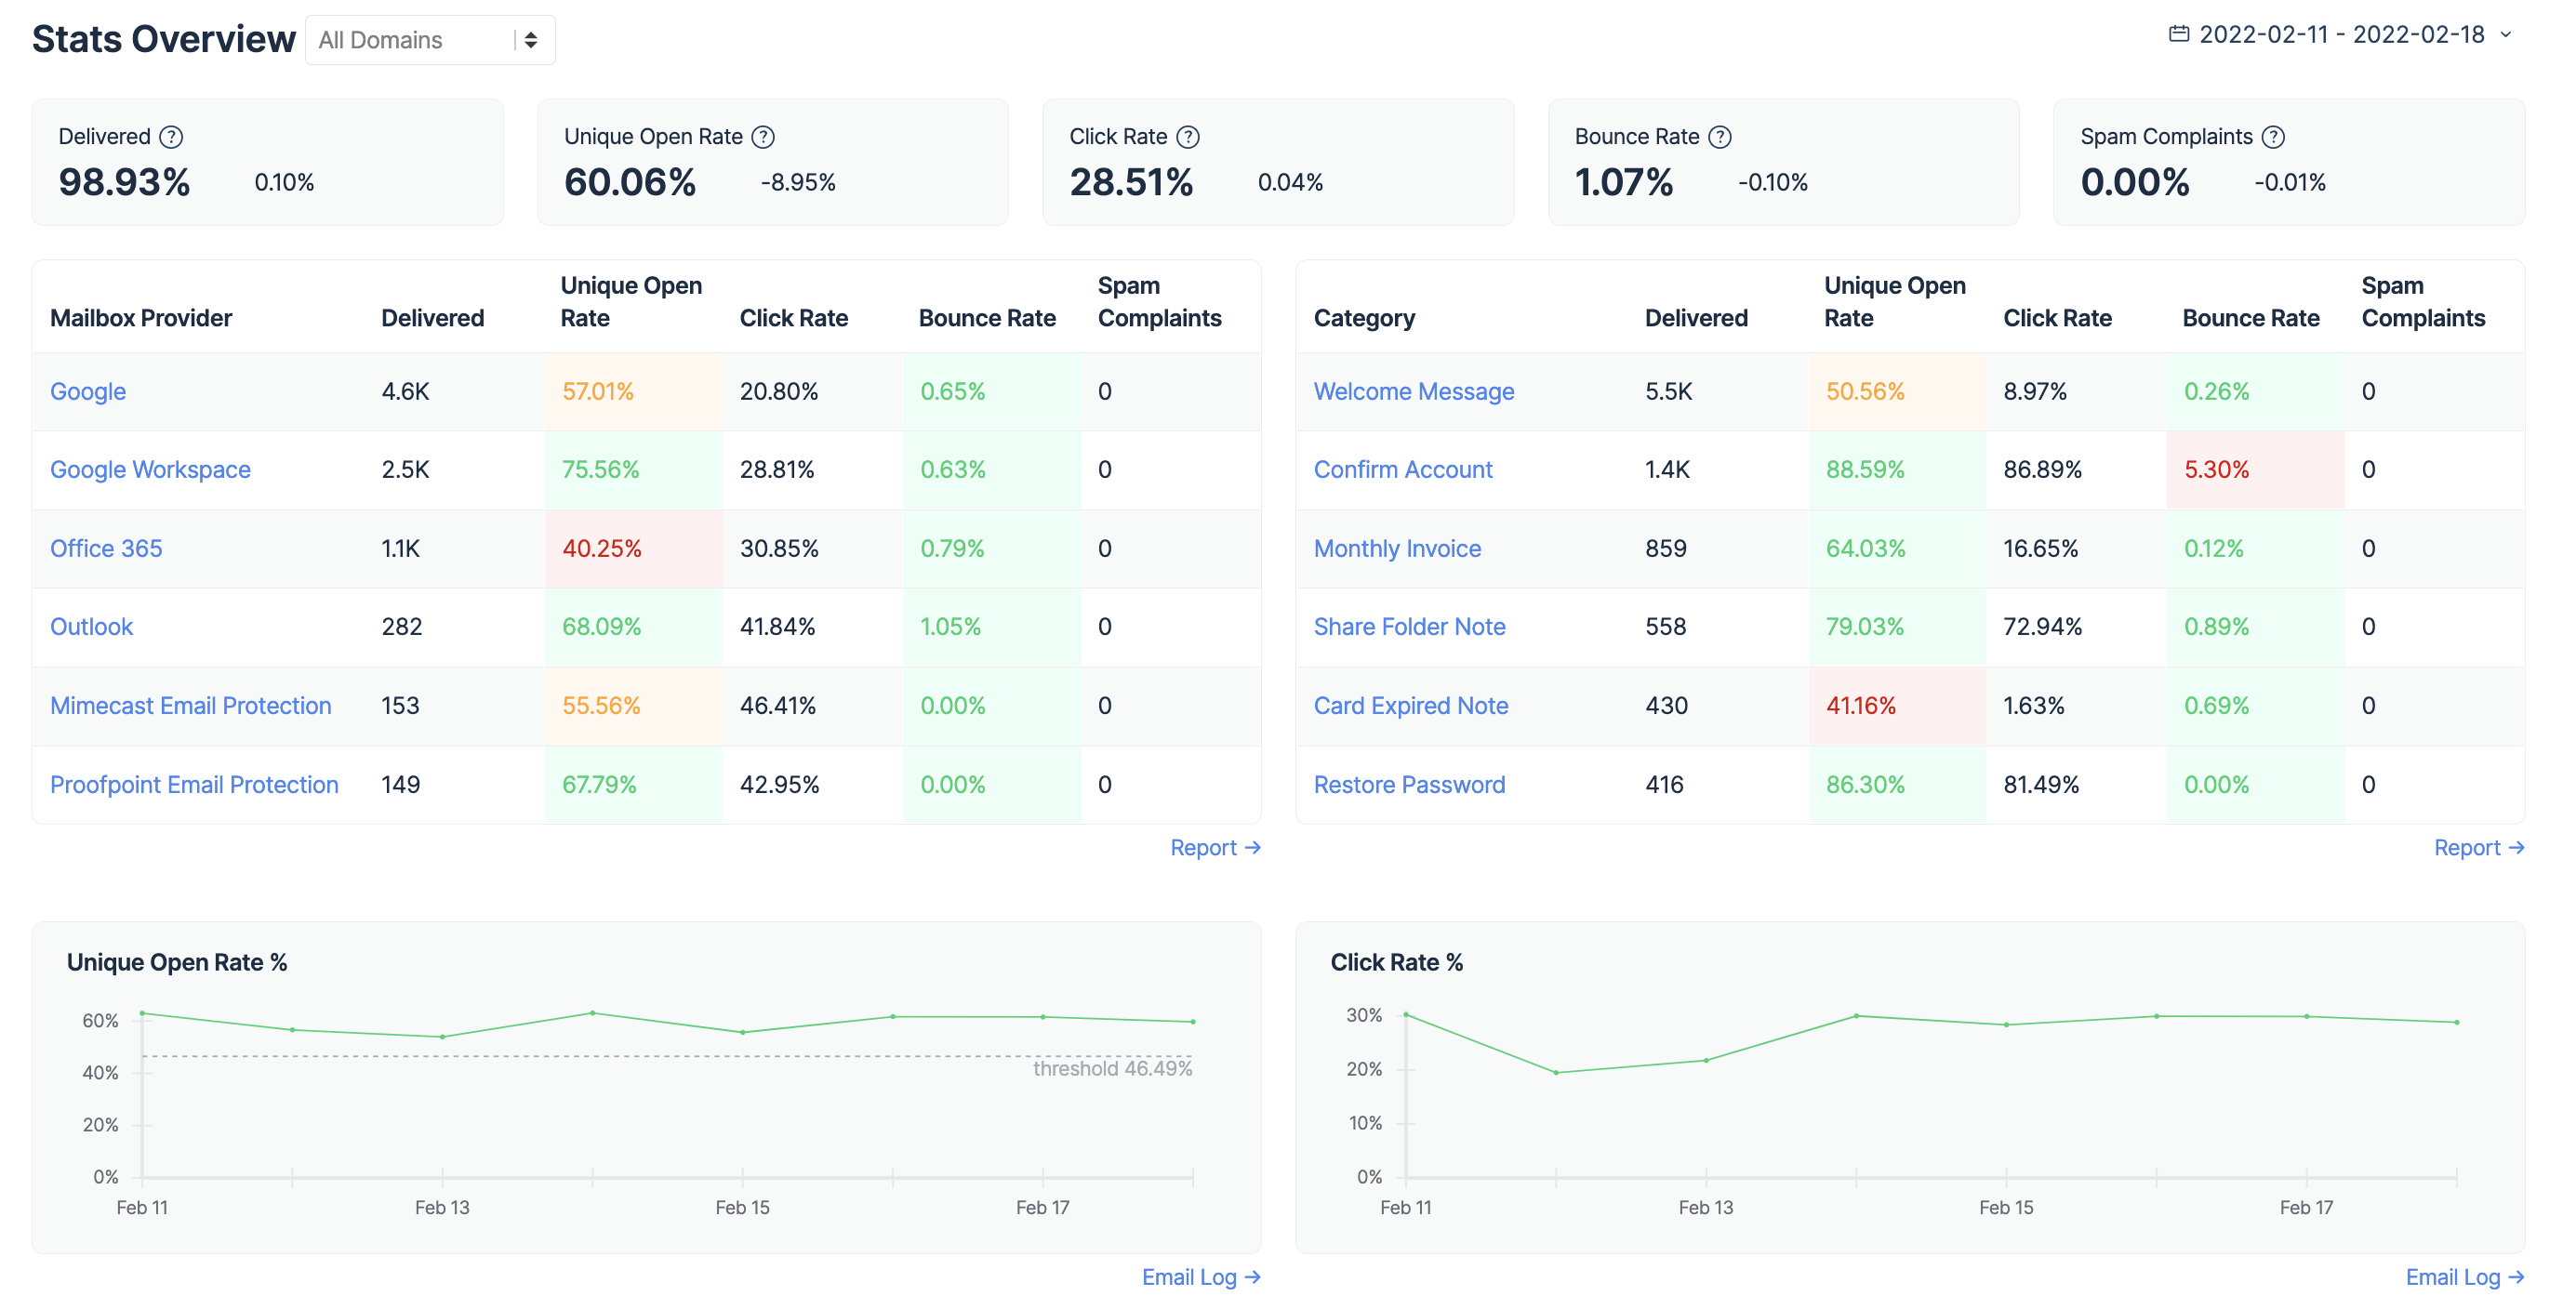
Mailtrap also offers various analytics features that provide you with information about your deliverability in real-time, send you daily and weekly alerts on issues affecting your domain authority and sending reputation, and many other stats.
There are also dedicated IPs, auto IP warmups, suppression lists, and more features that are designed to help improve your email deliverability.
Check it out!
But what I love the most is that sending with Mailtrap is super easy, whether you want to send via API or SMTP.
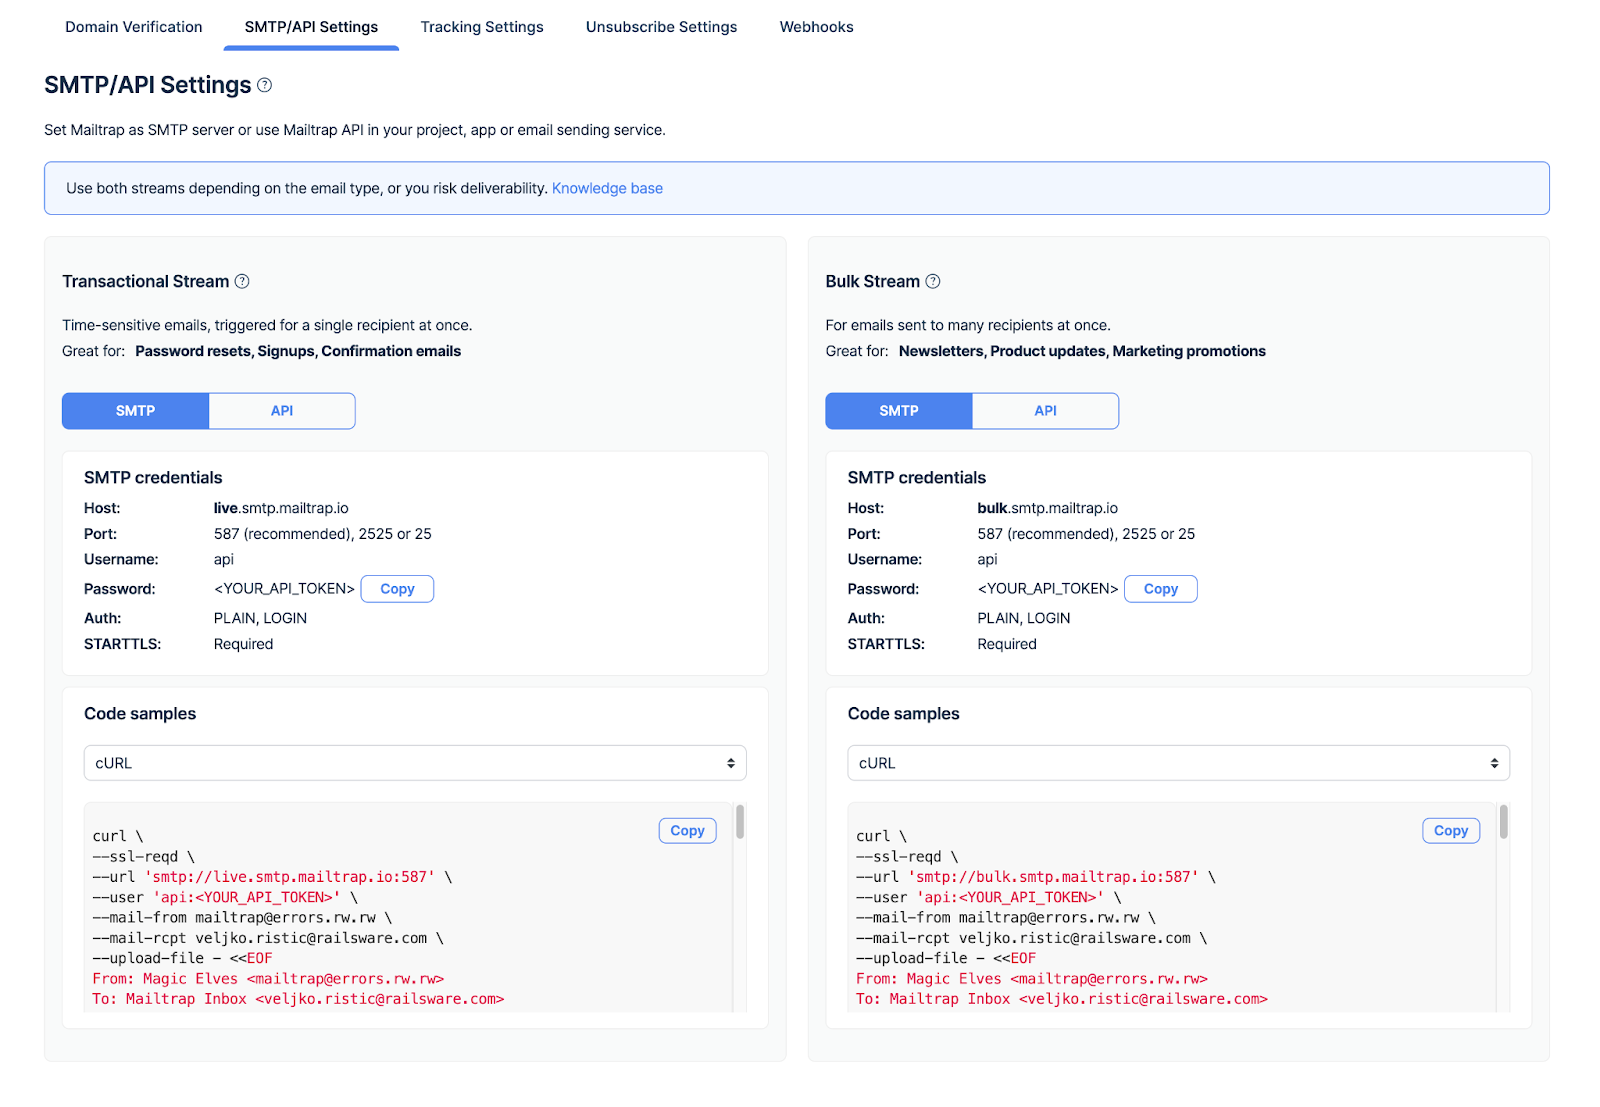
For sending via Mailtrap API, all you have to do is copy an API example code and run it with your app. The code will be generated based on the programming language you choose.
For sending via SMTP, you just set up Mailtrap as an SMTP server in your project by using the given credentials provided to you by Mailtrap, and you’re good to go!
Conclusion
With that said, we’ve come to the end of our all-in-one ‘Java send email Gmail’ article.
If you go with the SMTP route, you’ll be able to send mail without having access to other Gmail functionalities while enjoying a simpler setup.
On the other hand, Gmail API is a more secure and versatile option, especially if your application needs integrations with more Gmail features that go beyond sending emails.
If you’ve found this tutorial useful, you can also check out Mailtrap’s blog for more articles on Java-related content, such as:
- How to Send Emails in Java
- How to Send HTML Emails in Java
- Simple Email Validation in Java
- Jakarta Mail Tutorial
- Sending Emails with Spring Boot
And if you’re confused by the different namespaces used in Java development, make sure to give our YouTube video a watch:
