
Using the appropriate email client, Java developers can utilize JavaMail and the JavaMail API to efficiently send, receive, and manage emails. Furthermore, activation emails, often used for confirming user registrations, are easily managed with this framework. Let’s dive deeper into this tutorial, where we demonstrate how to send HTML emails using Java.
Send an HTML email using SMTP
SMTP (Simple Mail Transfer Protocol) is used to send emails online. Most email clients, like Gmail, Microsoft Outlook, etc., heavily rely on SMTP. So, setting up an SMTP server is essential to ensure seamless email sending in Java before getting to the coding part.
In our case, we use Mailtrap, an Email Delivery Platform that offers Email Sending, equipped with specialized monitoring tools such as helicopter-view dashboards and critical alerts, ensuring an efficient and consistent dispatch.
This combination ensures that emails are sent efficiently and verified in a secure environment before reaching their intended recipients.
- Firstly, ensure the necessary libraries are imported into your project. Start by importing the JavaMail library to help bring in essential classes for your email operations.
import javax.mail.*;
import javax.mail.internet.*;- Once done, create an account on Mailtrap. After registration, go to the “Sending Domains” section on your dashboard. Add and verify your domain, choose Transactional or Bulk stream, and configure it to send emails via SMTP under the “SMTP/API Settings” tab.
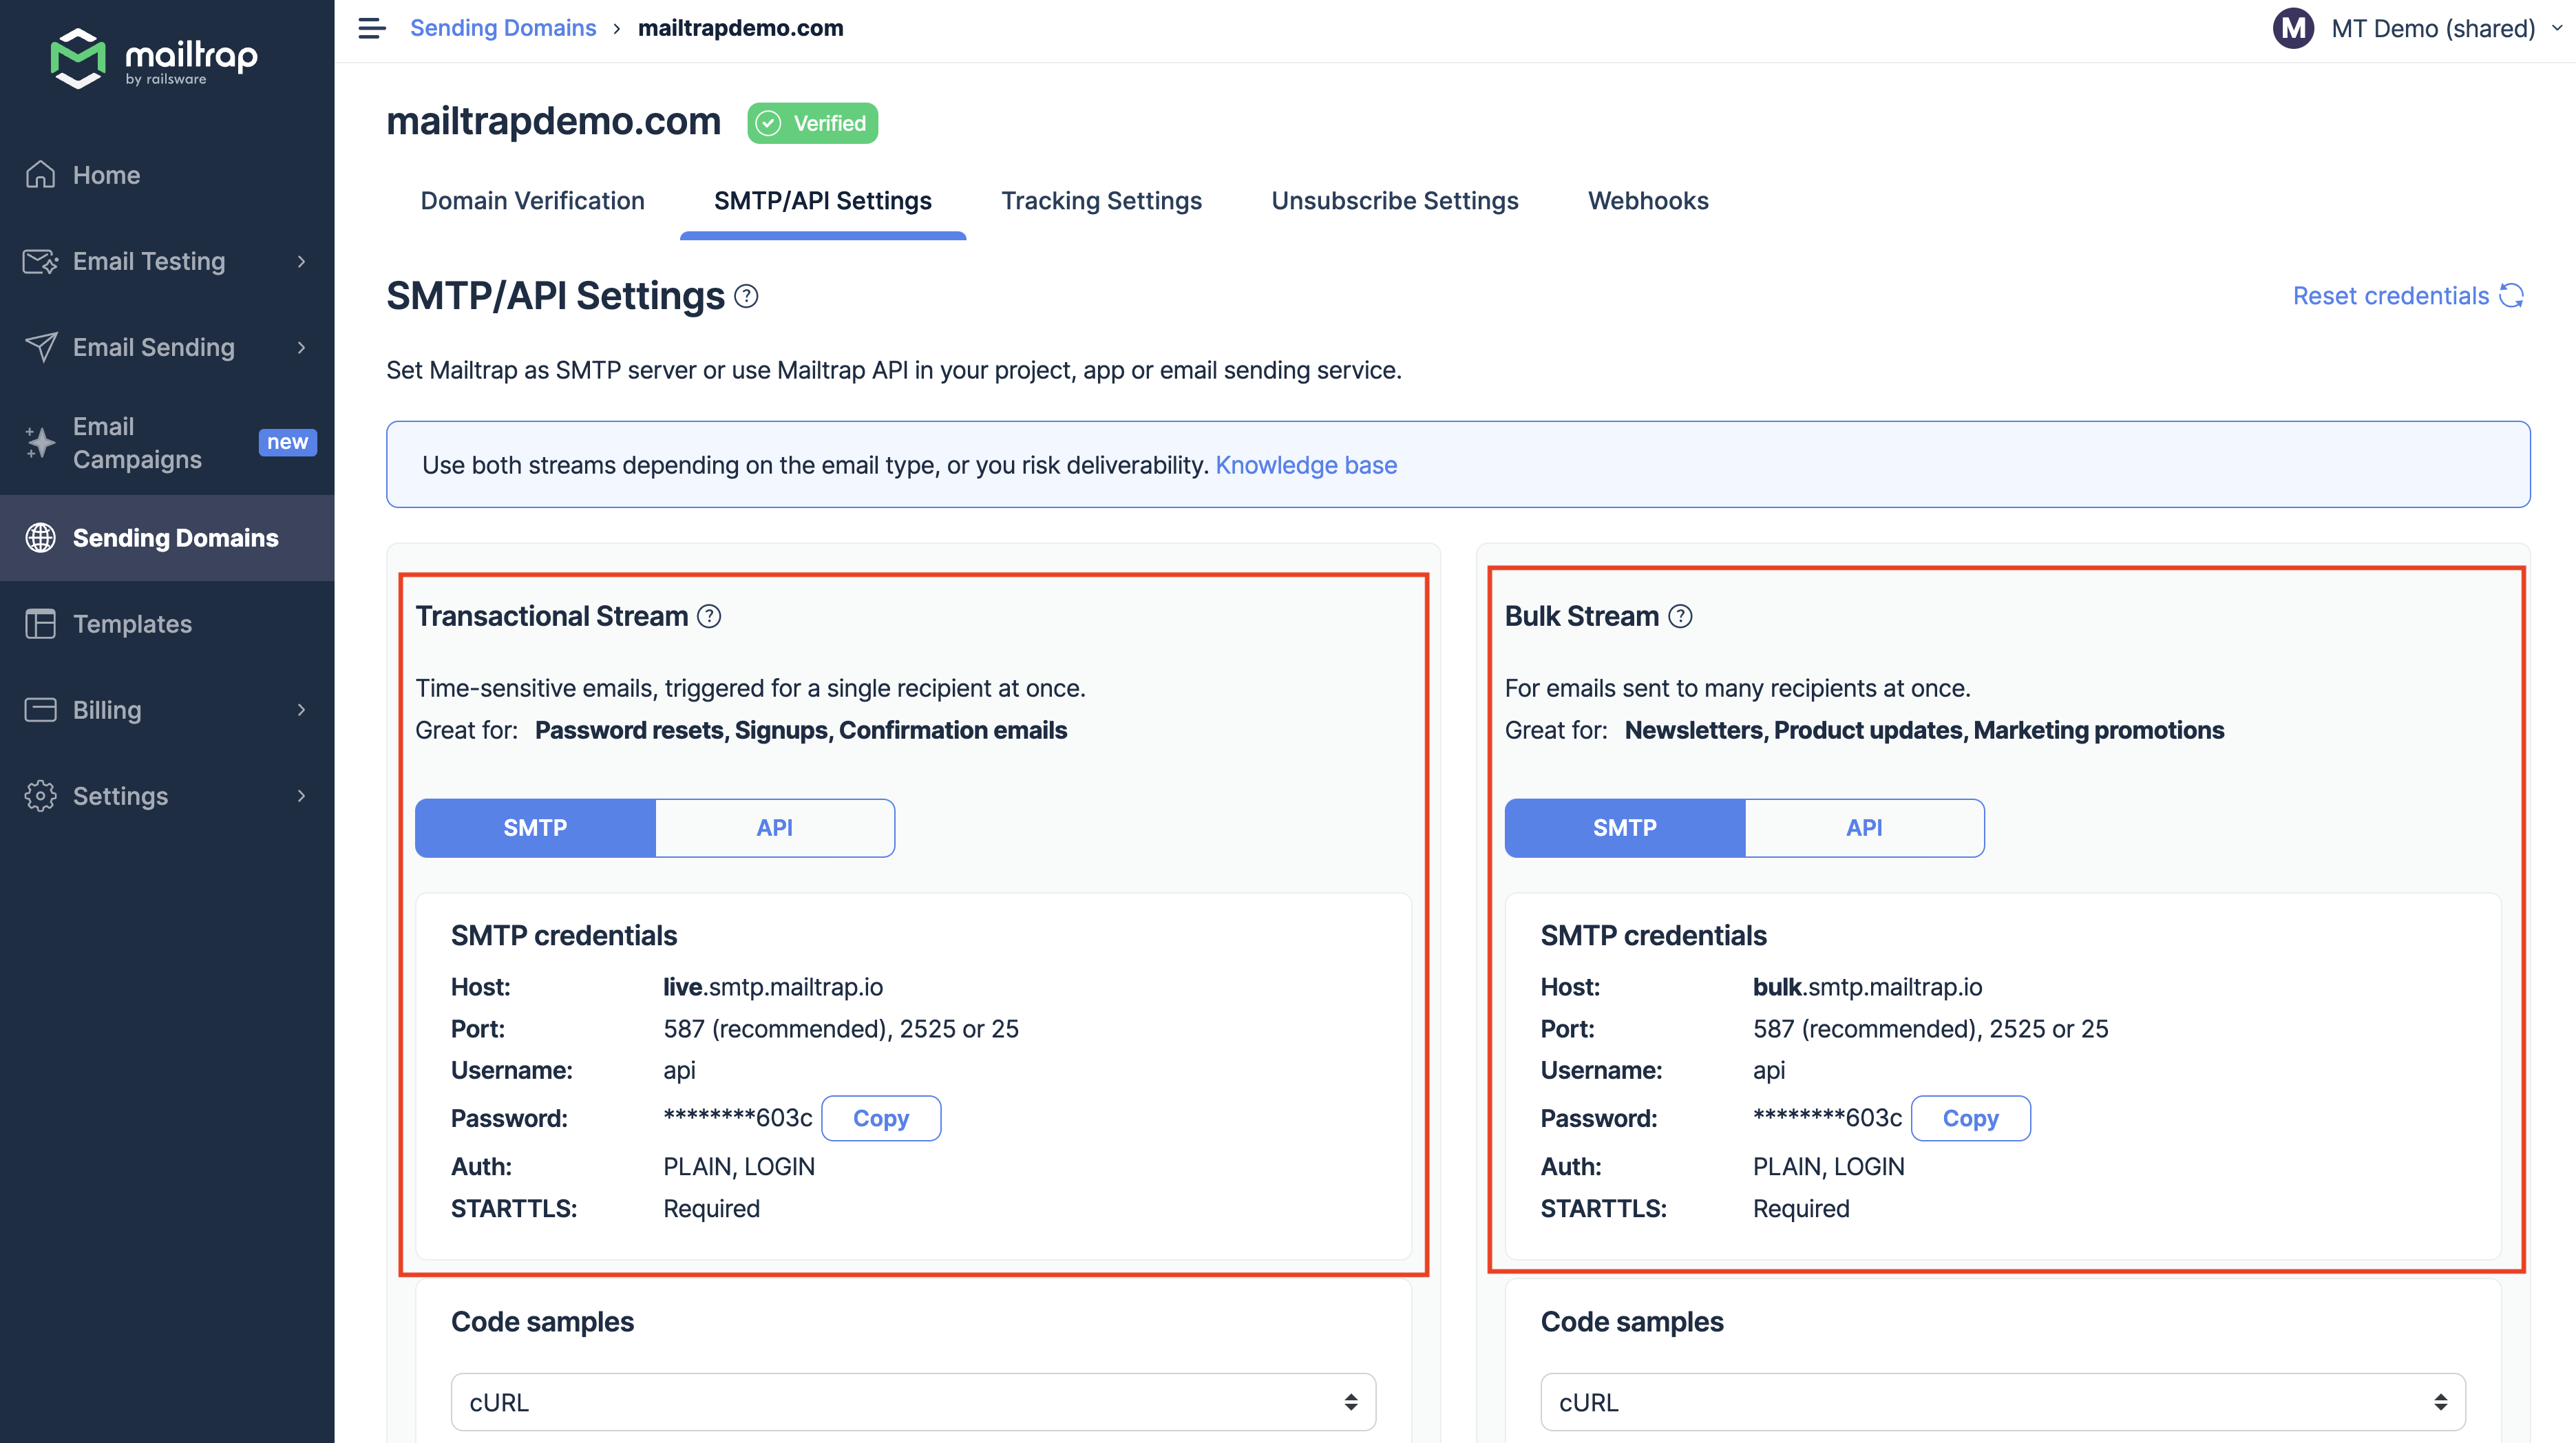
- In your Java code, initialize the properties with email server details from your Mailtrap account. This primarily includes settings for the host, username, and password.
Properties props = new Properties();
props.put("mail.smtp.auth", "true");
props.put("mail.smtp.starttls.enable", "true");
props.put("mail.smtp.host", "live.smtp.mailtrap.io");
props.put("mail.smtp.port", "587"); // Recommended port- After setting the properties, initiate the session. Here, we use STARTTLS to ensure the connection uses SSL for enhanced security.
Session session = Session.getInstance(props,
    new javax.mail.Authenticator() {
        protected PasswordAuthentication getPasswordAuthentication() {
            return new PasswordAuthentication("api", "********123"); // Update your actual password here.
        }
});- Now, it’s time to craft the actual email. The MimeMessage class lets you easily set up the content, subject, sender, and recipients.
Message message = new MimeMessage(session);
message.setFrom(new InternetAddress("from-email@example.com"));
message.setRecipients(Message.RecipientType.TO, InternetAddress.parse("to-email@example.com"));
message.setSubject("Test Email");
message.setText("Hello, this is a text message sent from our tutorial!");- Once your email is ready, use the Transport class’s send() method to ensure your crafted email gets sent through the SMTP server you’ve configured and delivered to the specified recipients.
Transport.send(message);Send HTML email with embedded image
Integrating images directly within an email usually enhances its visual appeal. Unlike linked images from external servers, embedded images load even when offline. However, be cautious since this can considerably increase the email size, especially for large images, which might be a concern when sending in bulk.
The ins and outs of embedding images within HTML emails come down to understanding the MIME type. This foundational concept dictates how the HTML body and its accompanying image are rendered. To avoid inconsistencies when viewed across a myriad of email clients, encoding in UTF-8 is paramount.
For the image embedding, it’s best to choose formats like .jpg or .png. It’s also important to optimize the image size for good quality and fast email loading. Don’t forget to ensure the image is saved in a directory your Java code can easily access.
Here is the code example that will help you understand how to manifest all of this:
MimeMessage message = new MimeMessage(session);
message.setFrom(new InternetAddress("mailtrap@mailtrap.club"));
message.addRecipient(Message.RecipientType.TO, new InternetAddress("to-email@example.com"));
message.setSubject("Email with Embedded Image");
MimeMultipart multipart = new MimeMultipart("related");

// Create a new MimeBodyPart for the email content.
BodyPart messageBodyPart = new MimeBodyPart();

// Define the HTML content of the email with a placeholder for the embedded image.
String htmlText = "<H1>Hello</H1><img src=\"cid:image\">";

// Set the HTML content to the MimeBodyPart.
messageBodyPart.setContent(htmlText, "text/html");

// Add the email content part to the multipart.
multipart.addBodyPart(messageBodyPart);

// Create a new MimeBodyPart for the embedded image.
messageBodyPart = new MimeBodyPart();

// Use a DataSource to load the image from the given path.
DataSource fds = new FileDataSource("path-to-image");

// Set the loaded image to the MimeBodyPart using a DataHandler.
messageBodyPart.setDataHandler(new DataHandler(fds));

// Set the Content-ID header for the image; it matches the "cid" used in the HTML content.
messageBodyPart.setHeader("Content-ID", "<image>");

// Add the image part to the multipart.
multipart.addBodyPart(messageBodyPart);

// Combine both the email content and image as the content of the MimeMessage.
message.setContent(multipart);

// Send the email with the embedded image.
Transport.send(message);
Send HTML email with attachments
If you’re looking to send emails with attachments using Java, the Apache Commons Email library is a useful tool for that. This library streamlines the creation of email messages, enabling smooth integration of text content and file attachments.
Before diving into the code, make sure the file you want to attach is stored in a location your Java application can easily access and that it has the necessary permissions to read it. Once you’ve verified the file’s accessibility, refer to the following example code for guidance and of course, tailor it to your specific requirements:
MimeMessage message = new MimeMessage(session);
message.setFrom(new InternetAddress("mailtrap@mailtrap.club"));
message.addRecipient(Message.RecipientType.TO, new InternetAddress("to-email@example.com"));
message.setSubject("Email with Attachment");

BodyPart messageBodyPart = new MimeBodyPart();
messageBodyPart.setText("Please find the attachment below.");
Multipart multipart = new MimeMultipart();
multipart.addBodyPart(messageBodyPart);

// Creating a MimeBodyPart for the file attachment.
messageBodyPart = new MimeBodyPart();

// Setting the file source for attachment.
DataSource source = new FileDataSource("path-to-file");

// Attaching the file to the email using DataHandler.
messageBodyPart.setDataHandler(new DataHandler(source));

// Naming the attached file.
messageBodyPart.setFileName("filename.ext");

// Adding the attachment to the multipart content.
multipart.addBodyPart(messageBodyPart);

message.setContent(multipart);
Transport.send(message);
Send HTML email to multiple recipients
In many applications, there’s a frequent need to send emails to multiple recipients. JavaMail API streamlines this process and allows you to send an email to several recipients simultaneously without iterating through each one individually.
MimeMessage message = new MimeMessage(session);
message.setFrom(new InternetAddress("mailtrap@mailtrap.club"));

// Here's how you set multiple recipients for the email.
InternetAddress[] recipients = {
    new InternetAddress("first@example.com"),
    new InternetAddress("second@example.com")
};
message.addRecipients(Message.RecipientType.TO, recipients);

message.setSubject("Email to Multiple Recipients");
message.setText("Hello all!");

// Send the email using the Transport class.
Transport.send(message);***Note: Remember to set up the necessary configurations as demonstrated in the previous sections before trying out this code.
Send an HTML email using Email API
An email API offers tools and methods that allow software components to communicate. Specifically for sending emails, an API such as JavaMail provides an interface for your application to directly engage with the email service without manually working through the intricacies of the underlying email protocol.
In this example, similar to our SMTP approach, we utilize Mailtrap Email Sending in conjunction with Java.
- Set up your Mailtrap account and go to your dashboard’s “Sending Domains” section. Add your domain, and in the “SMTP/API Settings” tab, choose the correct stream select “API” to extract your unique API token.
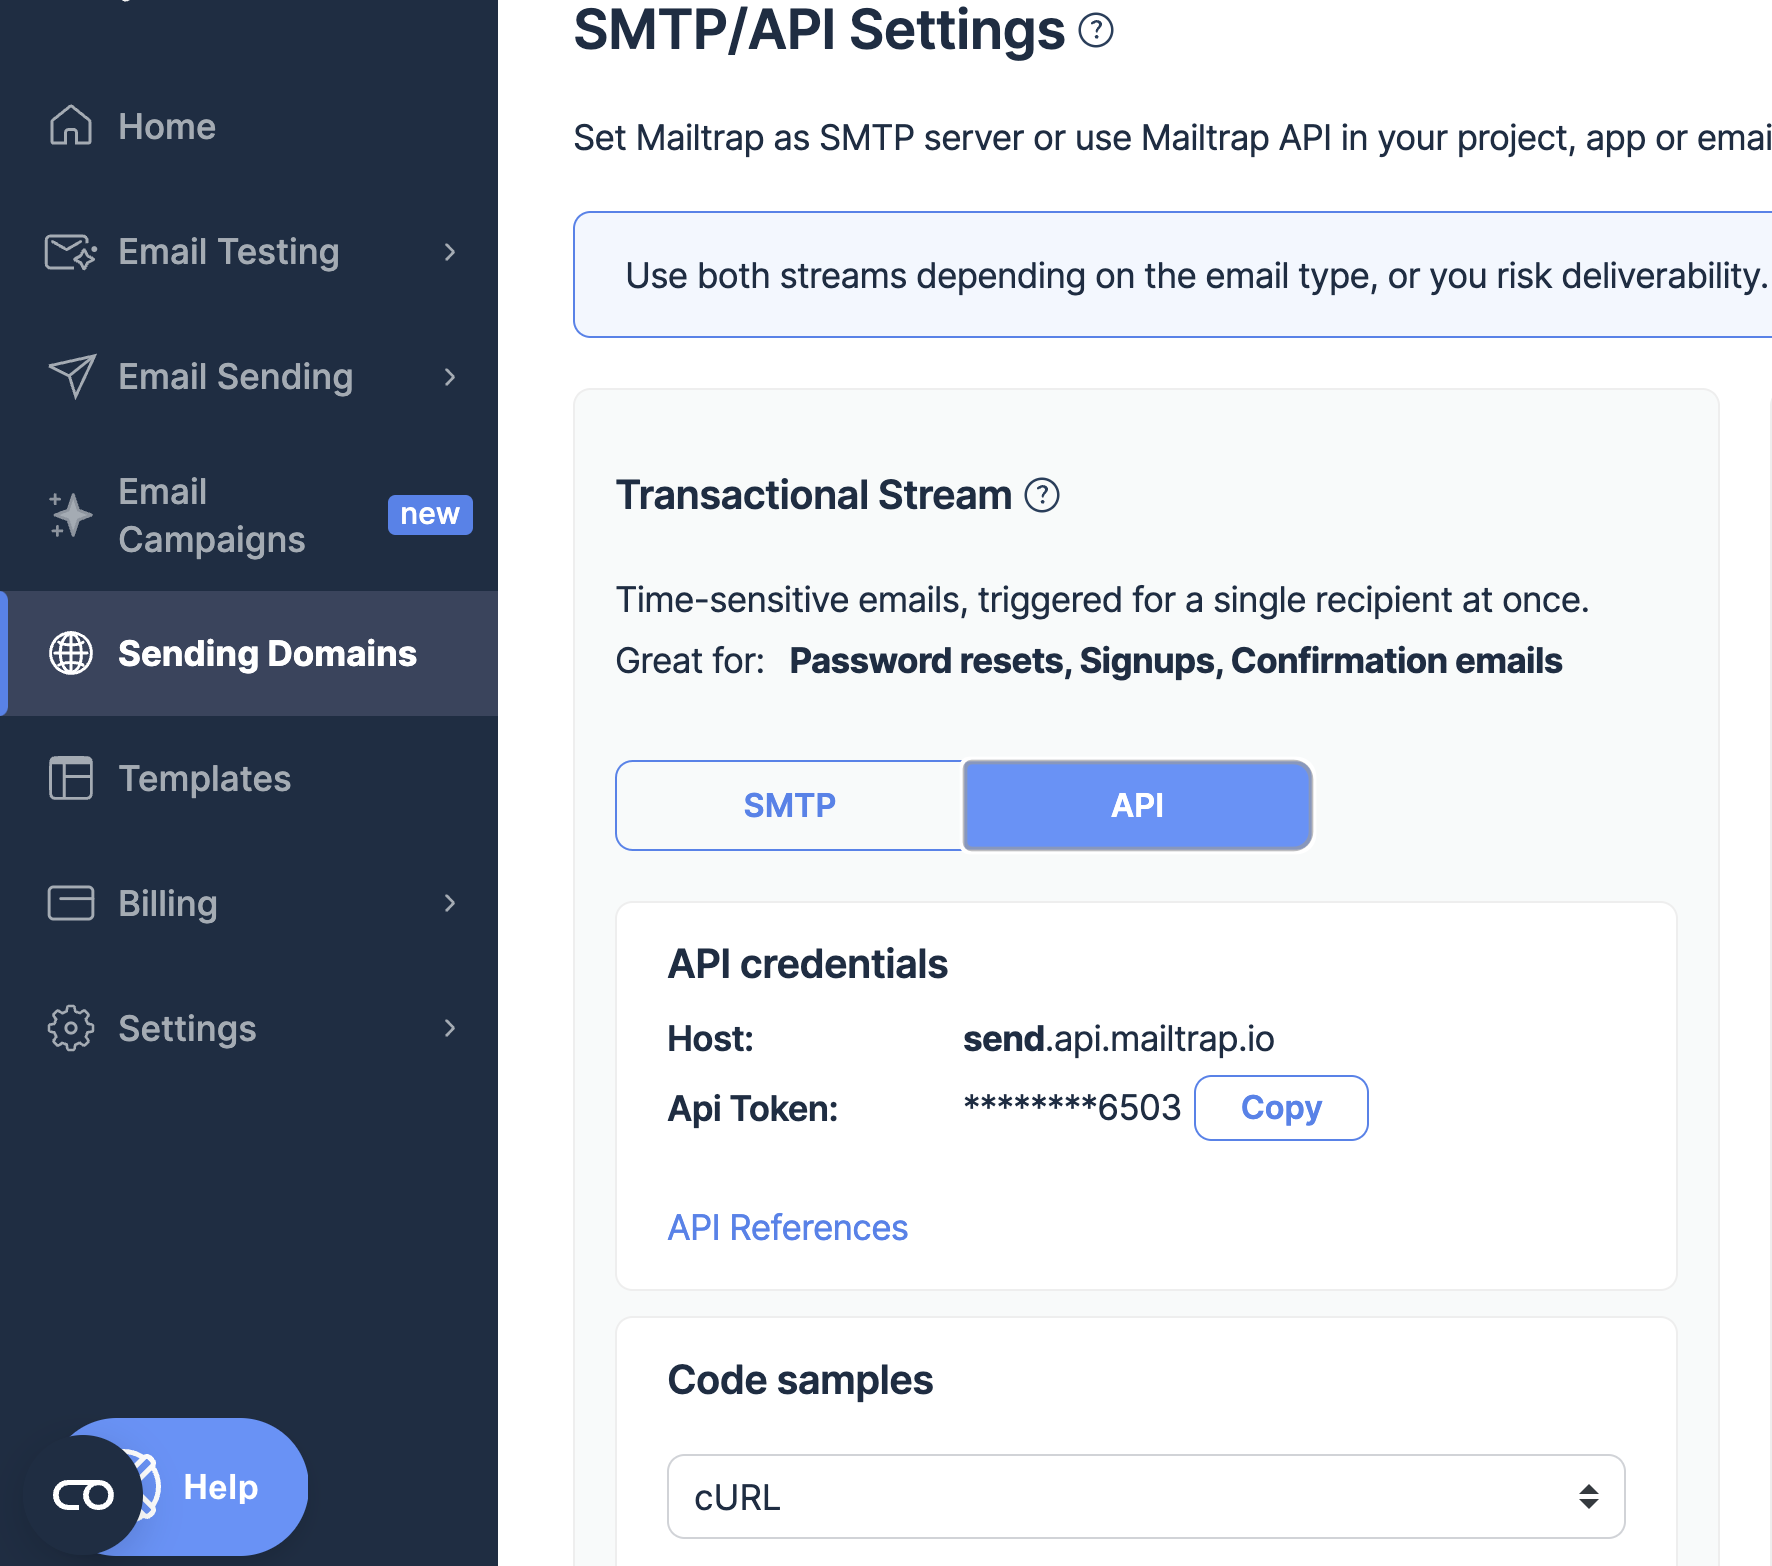
- Next, you must incorporate the necessary libraries into your project. In this instance, we’re employing the OkHttp library to manage our HTTP requests. You can read more about the library on its GitHub page.
<dependency>
  <groupId>com.squareup.okhttp3</groupId>
  <artifactId>okhttp</artifactId>
  <version>4.2.2</version>
</dependency>- Now, you can specify the API endpoint, the unique URL designated for your email requests. Then, initialize headers to set your request’s key parameters and authentication details. Lastly, craft the email content, detailing the message’s sender, recipient, subject, and body.
// Initialize the OkHttpClient to manage HTTP requests.
OkHttpClient client = new OkHttpClient().newBuilder().build();

// Define the type of content we're sending (in this case, JSON).
MediaType mediaType = MediaType.parse("application/json");

// Construct the body of the email. This includes the sender, recipient, subject, message text, and other details.
RequestBody body = RequestBody.create(
      "{\"from\":{\"email\":\"mailtrap@mailtrap.club\",\"name\":\"Mailtrap Test\"},\"to\":[{\"email\":\"you@example.com\"}],\"subject\":\"You are awesome!\",\"text\":\"Congrats for sending test email with Mailtrap!\",\"category\":\"Integration Test\"}",
      mediaType);

// Create the HTTP request to send the email.
// Here, we specify the API endpoint, HTTP method, headers (including authorization token), and the previously crafted body.
Request request = new Request.Builder()
      .url("https://send.api.mailtrap.io/api/send")
      .method("POST", body)
      .addHeader("Authorization", "Bearer ******123")  // Be sure to replace this with your actual API token.
      .addHeader("Content-Type", "application/json")
.build();- Once all is crafted, trigger the email-sending command with the following lines:
try {
  Response response = client.newCall(request).execute();
  System.out.println(response.body().string());  // Monitoring the email sending outcome.
} catch (IOException e) {
  e.printStackTrace();  // Handling potential errors during the process.
}
Conclusion
Sending HTML emails or plain text using Java has been simplified significantly thanks to robust frameworks and third-party tools. With the aid of the JavaMail API and platforms like Mailtrap, developers can efficiently manage and send.
If you found this article helpful and gained a clear insight into HTML email handling with Java, it’s worth noting that we’ve delved even deeper in our “How to Send Emails in Java” guide.
More helpful Java related content:
