The popular Java-based framework, Spring Boot, has a reputation for helping developers build standalone production-grade applications that rarely have bugs and “just run.” Built on top of the Spring framework, Spring Boot is a game changer when it comes to developing web applications time-efficiently.
In this tutorial, we will go over all of the steps and options on how to send emails with Spring Boot from a web application. We’ll cover how to configure the necessary components and demonstrate how to send both simple and complex emails.
How to send email in Java Spring Boot and SMTP?
Before you can start sending with Spring Boot, add the spring-boot-starter-mail dependency by using the spring init command in Spring CLI (Command Line Interface) and selecting the spring-boot-starter-mail option when prompted:
spring init -d=mail <directory>The maven dependency can also be added by modifying your project’s pom.xml file to include the following:
<dependency>
    <groupId>org.springframework.boot</groupId>
    <artifactId>spring-boot-starter-mail</artifactId>
</dependency>
After that, create EmailService class and add @Service annotation.
Now you’ll need to import the below classes from the org.springframework package to the EmailService class:
import org.springframework.beans.factory.annotation.Autowired;
import org.springframework.mail.SimpleMailMessage;
import org.springframework.mail.javamail.JavaMailSender;
import org.springframework.stereotype.Service;
These import statements should be placed at the beginning of your code file after the package declaration (if any).
For example, if your code file is called MyClass.java and it is in the com.example package, your code should look something like this:
package com.example;

import org.springframework.beans.factory.annotation.Autowired;
import org.springframework.mail.SimpleMailMessage;
import org.springframework.mail.javamail.JavaMailSender;
import org.springframework.stereotype.Service;

public class MyClass {
    // Your code goes here
}
Now you can use the JavaMailSender interface, which supports MIME messages.
JavaMailSender uses the JavaMail API to send emails and is typically configured with the help of a properties file that specifies the details of the mail server to use. Read more about the JavaMail API on their GitHub page.
Here is how you can access the JavaMailSender interface in your code and use it to send emails using SMTP.
- Using the
@Autowiredannotation, inject theJavaMailSenderinterface into theEmailServiceclass. - Create a
SimpleMailMessageobject. - Add email properties using appropriate methods (
setTo,setSubject,setText). - Call the
send()method to send the email message.
Here is the full code for these steps:
@Service
public class EmailService {

    @Autowired
    private JavaMailSender mailSender;

    public void sendEmail(String to, String subject, String body) {
        SimpleMailMessage message = new SimpleMailMessage();
        message.setTo(to);
        message.setSubject(subject);
        message.setText(body);

        mailSender.send(message);
    }
}
Note that you will need to configure your SMTP server settings in your application.properties file. In addition, include mail.smtp.auth to enable SMTP authentication, which is necessary for the application to connect to the server, and mail.smtp.starttls.enable to enable the use of Transport Layer Security (TLS) to encrypt the connection. Here is an example:
spring.mail.host=smtp.example.com
spring.mail.port=25
spring.mail.username=setusername
spring.mail.password=setpassword
spring.mail.properties.mail.smtp.auth=true
spring.mail.properties.mail.smtp.starttls.enable=true
You can also follow along with the instructions for sending emails via SMTP in our dedicated Mailtrap tutorial:
How to send emails to multiple recipients from Spring Boot?
If your email is intended for multiple recipients’, then there is a simple way to do bulk email sending with Spring Boot. This can be done by following the same steps outlined above, adding a String[] in message.setTo method and provide the list of recipient email addresses separated by a comma.
message.setTo(new String[] {"recipient1@example.com", "recipient2@example.com", "recipient3@example.com"});The nice thing about sending emails to multiple recipients using Spring Boot is that you can customize the content of the email for each recipient with a feature called “template variables”:
String recipient = "john.doe@example.com";
String subject = "Hello, ${firstName}!";
String template = "Hello, ${firstName}!\n\n"
                  + "This is a message just for you, ${firstName} ${lastName}. "
                  + "We hope you're having a great day!\n\n"
                  + "Best regards,\n"
                  + "The Spring Boot Team";

Map<String, Object> variables = new HashMap<>();
variables.put("firstName", "John");
variables.put("lastName", "Doe");

sendEmail(recipient, subject, template, variables);
Being able to personalize the message for each person in the group, can help increase engagement and response rates.
How to send HTML emails in Spring Boot?
To send HTML emails in Spring Boot, similarly to a regular email, you must use the JavaMailSender interface. Instead of a SimpleMailMessage, use the MimeMessage, which will allow you to set the email’s content as HTML with the setContent method:
@Autowired
private JavaMailSender mailSender;

public void sendHtmlEmail() throws MessagingException {
    MimeMessage message = mailSender.createMimeMessage();

    message.setFrom(new InternetAddress("sender@example.com"));
    message.setRecipients(MimeMessage.RecipientType.TO, "recipient@example.com");
    message.setSubject("Test email from Spring");

    String htmlContent = "<h1>This is a test Spring Boot email</h1>" +
                         "<p>It can contain <strong>HTML</strong> content.</p>";
    message.setContent(htmlContent, "text/html; charset=utf-8");

    mailSender.send(message);
}
Another way, and one that is more likely to be used, is sending the email using an HMTL template. Depending on the specific use case, the template can be saved as a separate HTML file in the same directory as your Java code, your application’s classpath, or a separate database.
To use the HTML template in an email, you can create a String variable containing the content of the template and then use that variable to set the email’s content:
@Autowired
private JavaMailSender mailSender;

public void sendEmailFromTemplate() throws MessagingException {
  MimeMessage message = mailSender.createMimeMessage();

  message.setFrom(new InternetAddress("sender@example.com"));
  message.setRecipients(MimeMessage.RecipientType.TO, "recipient@example.com");
  message.setSubject("Test email from my Springapplication");

  // Read the HTML template into a String variable
  String htmlTemplate = readFile("template.html");

  // Replace placeholders in the HTML template with dynamic values
  htmlTemplate = htmlTemplate.replace("${name}", "John Doe");
  htmlTemplate = htmlTemplate.replace("${message}", "Hello, this is a test email.");

  // Set the email's content to be the HTML template
  message.setContent(htmlTemplate, "text/html; charset=utf-8");

  mailSender.send(message);
}
How to send emails with attachments using Java Spring Boot?
The first step, like in the previous examples, is to use JavaMailSender, create a new MimeMessage, and with MimeMessageHelper, set the recipient, subject, and body of the email.
The next step is to create a FileSystemResource object that points to the file you want to attach, then use the addAttachment() method of the MimeMessageHelper to attach it to the email and sender.send(message) to send the email.
    FileSystemResource file = new FileSystemResource(new File("attachment.jpg"));
    helper.addAttachment("attachment.jpg", file);
It’s important to note that Spring Boot does not have any inherent limitations to attaching files. However, the ability to attach files may be limited by the application or framework used in combination. Of course, these limitations would also depend on the email provider and server settings.
Here is the full code example:
public void sendEmailWithAttachment(String to, String subject, String body) throws MessagingException, IOException {

MimeMessage message = javaMailSender.createMimeMessage();
MimeMessageHelper helper = new MimeMessageHelper(msg, true);

helper.setTo(to);
helper.setSubject(subject);
helper.setText(body);

FileSystemResource file = new FileSystemResource(new File("attachment.jpg"));
helper.addAttachment("attachment.jpg", file);

mailSender.send(message);
}
How to send emails via Spring Boot and Email API?
Another method of sending emails with Spring Boot is using a third-party email API service. There is JavaMail API, but for various reasons, such as performance or scalability limitations, lack of support, and personal or professional preference, a developer might want to consider other tools as well.
One example of such a tool is Mailtrap Email Sending, a powerful tool that gives you complete control over your email deliverability. With a quick and uncomplicated setup, you can send emails without worrying about potential issues. The dashboard provides valuable insights and up to 60 days of email logs, giving you an accurate understanding of the state of your email infrastructure.
Additionally, the email deliverability alerts feature ensures that you are always aware of any unexpected issues if they occur. The system automatically checks your metrics every three hours, and if there is a critical drop in performance, the alert is sent hourly. This allows you to stay on top of your email deliverability and take action as needed. Weekly reports also help you understand your overall performance and identify areas for improvement.
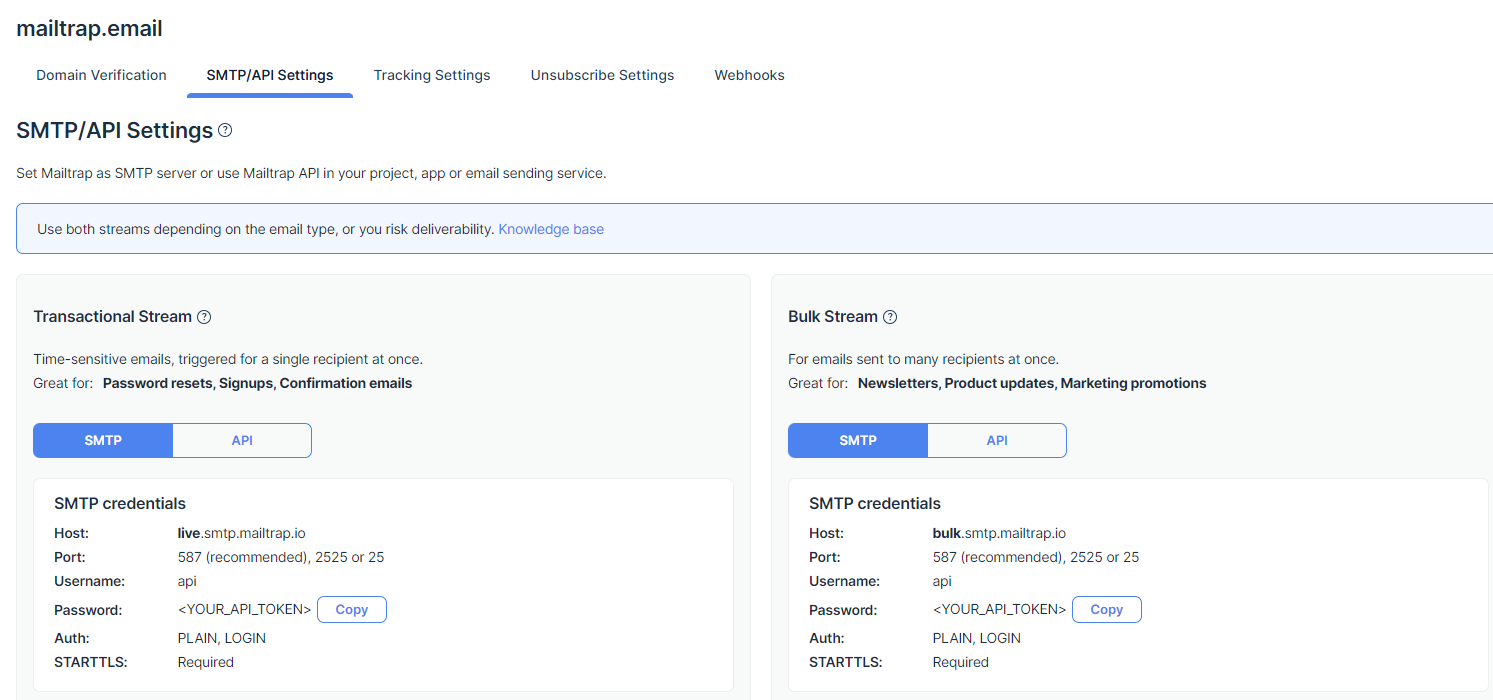
To start using Mailtrap Email Sending, after registering an account and verifying your domain name, from the “SMTP/API Settings” tab, choose API, select Java from the dropdown menu, and the API code with your credentials in it will appear. Here is an example:
OkHttpClient client = new OkHttpClient().newBuilder()
    .build();
MediaType mediaType = MediaType.parse("application/json");
RequestBody body = RequestBody.create(mediaType, "{\"from\":{\"email\":\"mailtrap@mailtrap.club\",\"name\":\"Mailtrap Test\"},\"to\":[{\"email\":\"example@railsware.com\"}],\"subject\":\"You are awesome!\",\"text\":\"Congrats for sending test email with Mailtrap!\",\"category\":\"Integration Test\"}");
Request request = new Request.Builder()
    .url("https://send.api.mailtrap.io/api/send")
    .method("POST", body)
    .addHeader("Authorization", "Bearer ********67a4")
    .addHeader("Content-Type", "application/json")
    .build();
Response response = client.newCall(request).execute();
To use this code in a Spring Boot application, you will need to Add the OkHttpClient library to your projects pom.xml file:
<dependency>
    <groupId>com.squareup.okhttp3</groupId>
    <artifactId>okhttp</artifactId>
    <version>4.8.1</version>
</dependency>
Next, in your Spring Boot application, create a new class that will be used to make the API request. This class should have a method that constructs the request and sends it using OkHttpClient.
Finally, in the class where you want to make the API request, inject an instance of the class you created and call the method that makes the request and handles the response as needed.
Here is an example of how Mailtrap Email Sending can be implemented in your Spring Boot application:
// The class used to make the API request
@Service
public class MailtrapClient {

  private final OkHttpClient client;

  public MailtrapClient() {
    this.client = new OkHttpClient().newBuilder().build();
  }

  public void sendEmail(String from, String to, String subject, String text, String category) throws IOException {
    MediaType mediaType = MediaType.parse("application/json");
    RequestBody body = RequestBody.create(mediaType,
        "{\"from\":{\"email\":\"" + from + "\",\"name\":\"Mailtrap Test\"},\"to\":[{\"email\":\"" + to + "\"}],\"subject\":\"" + subject + "\",\"text\":\"" + text + "\",\"category\":\"" + category + "\"}");
    Request request = new Request.Builder()
        .url("https://send.api.mailtrap.io/api/send")
        .method("POST", body)
        .addHeader("Authorization", "Bearer ********67a4")
        .addHeader("Content-Type", "application/json")
        .build();
    Response response = client.newCall(request).execute();
  }
}

// The class where the API request is made
@Controller
public class MyController {

  private final MailtrapClient mailtrapClient;

  public MyController(MailtrapClient mailtrapClient) {
    this.mailtrapClient = mailtrapClient;
  }


  @GetMapping("/send-email")
  public void sendEmail() {
    try {
      mailtrapClient.sendEmail("mailtrap@mailtrap.club", "example@railsware.com",
          "You are awesome!", "Congrats for sending test email with Mailtrap!", "Integration Test");
    } catch (IOException e) {
      // Handle the error
    }
  }
}
You can also follow along with the instructions for sending emails via API in our dedicated Mailtrap tutorial:
Alternatively, if you want to use the SMTP option, configure the SMTP settings in the application.properties file. Here is an example:
spring.mail.host=live.smtp.mailtrap.io
spring.mail.port=587
spring.mail.username=api
spring.mail.password=*******0000
spring.mail.auth=plain
spring.mail.starttls.enable=true
Your SMTP credentials can be found when selecting “SMTP” as shown below.
How to send emails from Spring Boot using Gmail SMTP?
Once you’ve added the required dependencies to your project, as shown in previous examples, you can use the JavaMailSender interface to send emails with Gmail SMTP. Simply specify the Gmail SMTP server and the authentication credentials in your application.properties file:
spring.mail.host=smtp.gmail.com
spring.mail.port=587
spring.mail.username=<your-gmail-username>
spring.mail.password=<your-gmail-password>
spring.mail.properties.mail.smtp.auth=true
spring.mail.properties.mail.smtp.starttls.enable=true
Using Gmail’s SMTP server, you can take advantage of Gmail’s features, such as spam filtering and support for sending mail from custom domains. This can be particularly useful if you are developing an application that needs to send emails to many users or if you want to ensure that your emails are delivered successfully.
You can also follow along with the instructions for sending emails via Gmail SMTP in our dedicated Mailtrap tutorial:
Summing up
Whether you’re sending a quick notification or a complex message, sending emails with Spring Boot is a simple and efficient way to add email functionality to your application. With just a few configurations and dependencies, you can easily send emails using the built-in JavaMailSender interface. Find out more about the most popular option for sending emails with Java.