
Gmail is one of the most popular email services, and you very well may want to use it as a mailbox for your web or mobile app. It is safe and credible, which is crucial to preventing your emails from going into the spam folder. That’s why we decided to flesh out how to send emails with Gmail API.
Gmail API – why you should consider using it
The API provides you with a RESTful access to the features you usually have with Gmail:
- Send and receive HTML emails
- Send and receive emails with attachments
- CRUD (create, read, update, and delete) operations with messages, drafts, threads, and labels
- Access control of your Gmail inbox
- Full search capabilities of the web UI
- Perform specific queries
- And many more…
Developers love Gmail API because it’s easy to implement. We’ll talk about that a bit later. Also, you can use this option for versatile cases like:
- Automated email sending
- Mail backup
- Mail migration from other email services
Resource types and methods
With Gmail API, you can deal with several resource types and manage them using the following methods:
| Resource type | Method |
|---|---|
| Draft an unsent message that you can modify once created | |
| Message an immutable resource that you cannot modify | |
| Thread a collection of messages within a single conversation | |
| Label a resource to organize messages and threads (for example, inbox, spam, trash, etc.) | |
| History a collection of changes made to the mailbox | |
| Settings setting up Gmail features |
How to make your app send emails with Gmail API
Step 1: Create a project at Google API Console
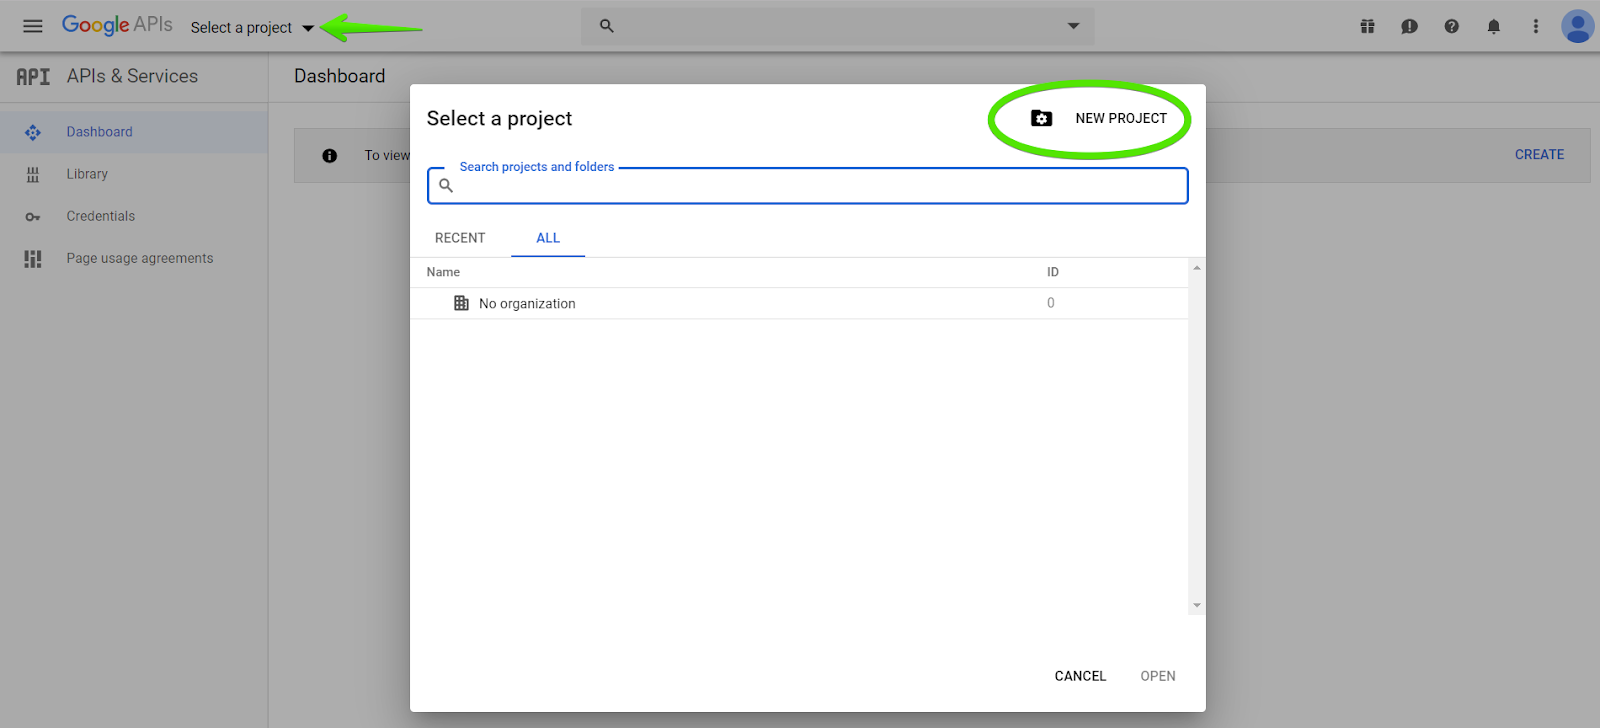
If you want to have access to your Gmail from your mobile or web app, you should start with Google Developers Console. Those who visit this page for the first time ever will have to agree with the Terms of Service and pick their Country of residence. Then click Select a project and create a new one.
Name your new project and press Create at the bottom.
Step 2: Enable Gmail API
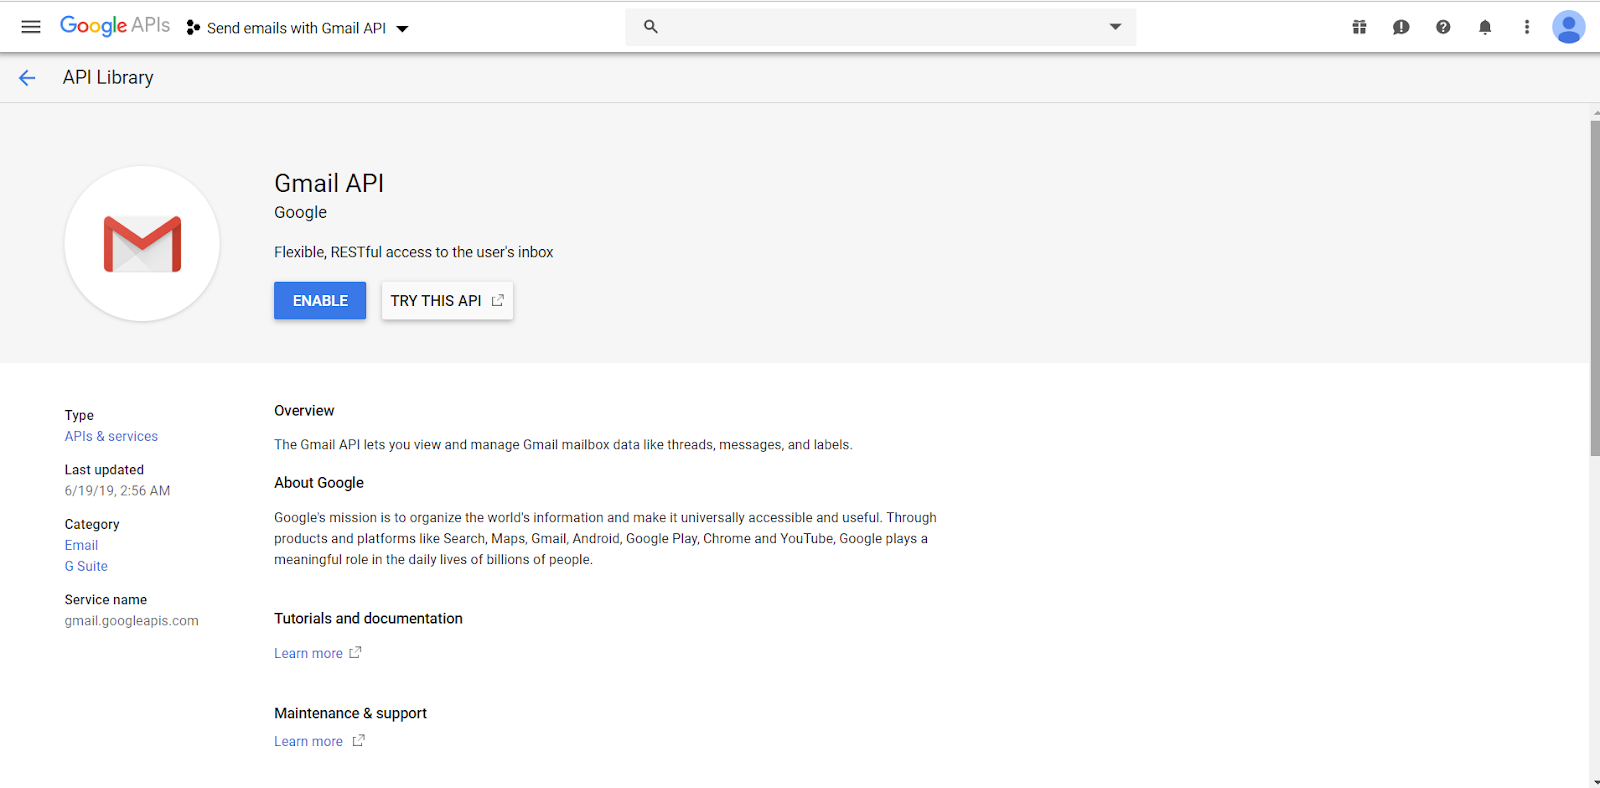
Once that’s done, you can press the Library tab on the left and find yourself in the API Library page. Enter “Gmail API” in the search bar and click on it once found. Now, you need to enable the API for your project.
Note that you’ll have to enable it separately for each new project you work on.
Step 3: Credentials and authentication with OAuth 2.0
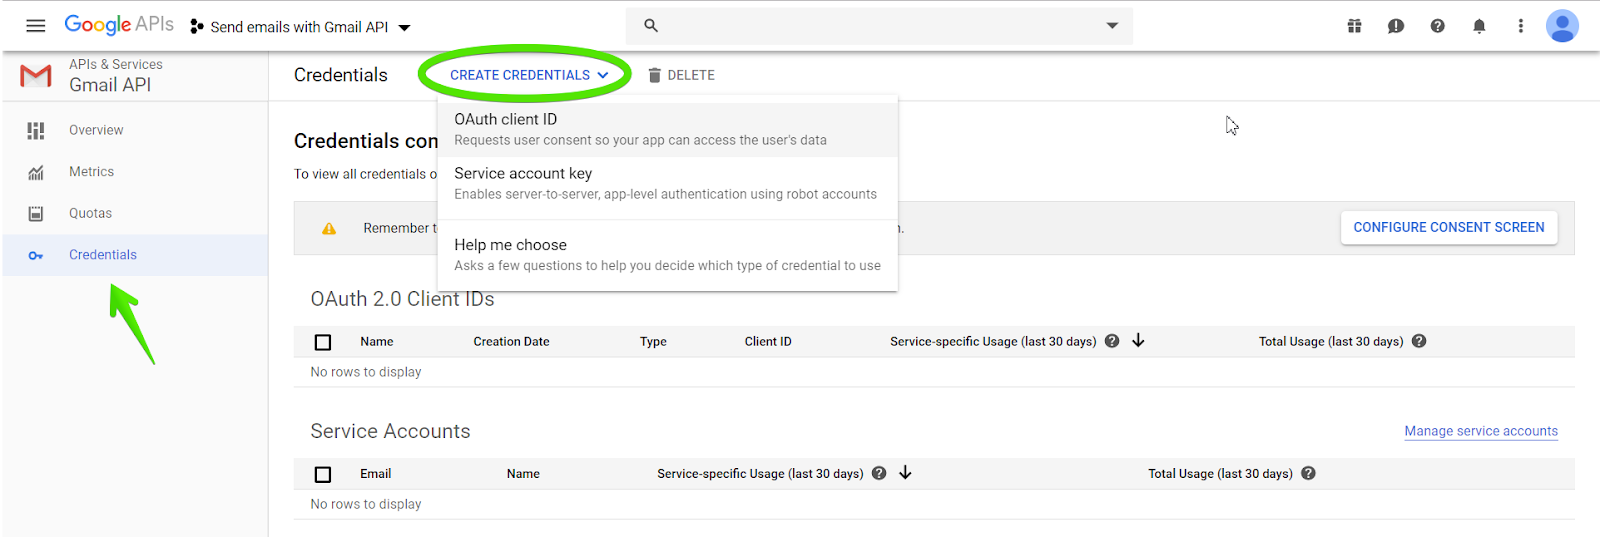
Once the API is enabled, you’ll be taken to a nice dashboard that says, “To use this API, you may need credentials”. If you click Create credentials, you’ll have to pass through a set of questions to find out what kind of credentials you need. We advise you to go another way since we already know what it is: OAuth client ID. So, click the Credential tab on the left, and then pick OAuth client ID from the drop-down list of the Create Credentials button.
You’ll see the Configure consent screen button. It will bring you to a page with many fields. You can just enter the name of your app and specify authorized domains. Fill in other fields if you want.

Click save and then pick the type of your app (web app, Android, Chrome App, iOS, or other). After that, name your OAuth Client ID. Also, enter JavaScript origins and redirect domains for use with requests from a browser or a web server, respectively. Click create to finalize. That’s it. Download a JSON file with your credentials – you’ll need it later.
Step 4: Pick a quickstart guide
The next step is to select a quickstart guide according to the technology your app is built with. So far, there are the following options:
- API for Go
- API for Java
- API for Ruby
- API for .NET
- API for Node.js
- API for PHP
- API for Python
- API for browser (JavaScript)
For mobile apps, there are G Suite APIs for iOS and Android as well.
What you need first in this quickstart guide is the Prerequisites section. Let’s say your choice is PHP. In this case, make sure your PHP version corresponds to the given one. Also, install the JSON extension and the Composer dependency management tool if you haven’t already. After that, you can install the Google Client Library. For Java, you’ll need to create a new project structure and the src/main/resources/ directory. Then, copy the JSON file with credentials to this directory and replace the content of the build.gradle file with this code. So, pay attention when preparing your project.
Step 5: API client library
Google provides client libraries to work with the API:
# Installation
go get -u google.golang.org/api/gmail/v1
go get -u golang.org/x/oauth2/google// Installation via Gradle
repositories {
mavenCentral()
}
dependencies {
compile 'com.google.api-client:google-api-client:1.30.2'
}# Installation
gem install google-api-client// Installation via NuGet Package Manager Console:
Install-Package Google.Apis.Gmail.v1# Installation via npm
npm install googleapis@39 --save# Installation via Composer
composer require google/apiclient:"^2.0"# Installation
pip install --upgrade google-api-python-client google-auth-httplib2 google-auth-oauthlib
# or
easy_install --upgrade google-api-python-client google-auth-httplib2 google-auth-oauthlibStep 6: Access to Gmail
In this step, we need to authorize access to your Gmail account from the app, and then you’ll be able to manage emails. For this, you need to create a file in your working directory. Below you’ll find the specific file names for each technology. Copy-paste a corresponding code sample from the chosen Quickstart Guide and run it. Here are the links to the code samples:
Go
- Filename: quickstart.go
- Directory: gmail/quickstart/
- Code sample for Go
- Run with:
go run quickstart.go
Java
- Flinename: GmailQuickstart.java
- Directory: src/main/java/
- Code sample for Java
- Run with:
gradle run
Ruby
- Filename: quickstart.rb
- Directory: gmail/quickstart/
- Code sample for Ruby
- Run with:
ruby quickstart.rb
.NET
- Filename: GmailQuickstart.cs
- Directory: gmail/GmailQuickstart/
- Code sample for .NET
- Run by clicking Start in the Visual Studio toolbar
Node.js
- Filename: index.js
- Directory: gmail/quickstart/
- Code sample for Node.js
- Run with:
node .
PHP
- Filename: quickstart.php
- Directory: gmail/quickstart/
- Code sample for PHP
- Run with:
php quickstart.php
Python
- Filename: quickstart.py
- Directory: gmail/quickstart/
- Code sample for Python
- Run with:
python quickstart.py
JavaScript (browser)
- Filename: index.html
- Directory: gmail/quickstart/
- Code sample for browser (JavaScript)
- Replace <YOUR_CLIENT_ID> with your client ID and <YOUR_API_KEY> with your API key. Run with:
python -m SimpleHTTPServer 8000– for Python 2+python -m http.server 8000– for Python 3+
It worked… or not. Google will warn you about a probable failure of the sample you run to open a new window in your default browser. If this happens, you’ll need to do it manually. Copy the URL from the console and paste it in the browser. It will look like this:

Next, you’ll be asked to either log into your Google account or select one account for authorization. Press allow and you’ll see all your inbox labels in the SSH shell like this:

Congrats! Gmail API works, and you can send your first email.
Step 7: Create an email
To send a message, first, you need to create one. For this, your app can use the drafts.create method, which includes:
- Creation of a MIME message
- Conversion of the message into a base64url encoded string
- Creation of a draft
Let’s see how this is done in practice with Python:
def create_message(sender, to, subject, message_text):
  message = MIMEText(message_text)
  message['to'] = to
  message['from'] = sender
  message['subject'] = subject
  raw_message = base64.urlsafe_b64encode(message.as_string().encode("utf-8"))
  return {
    'raw': raw_message.decode("utf-8")
  }

def create_draft(service, user_id, message_body):
  try:
    message = {'message': message_body}
    draft = service.users().drafts().create(userId=user_id, body=message).execute()
    print("Draft id: %s\nDraft message: %s" % (draft['id'], draft['message']))
    return draft
  except Exception as e:
    print('An error occurred: %s' % e)
    return None
and PHP
/**
* @param $sender string sender email address
* @param $to string recipient email address
* @param $subject string email subject
* @param $messageText string email text
* @return Google_Service_Gmail_Message
*/
function createMessage($sender, $to, $subject, $messageText) {
  $message = new Google_Service_Gmail_Message();
  $rawMessageString = "From: <{$sender}>\r\n";
  $rawMessageString .= "To: <{$to}>\r\n";
  $rawMessageString .= 'Subject: =?utf-8?B?' . base64_encode($subject) . "?=\r\n";
  $rawMessageString .= "MIME-Version: 1.0\r\n";
  $rawMessageString .= "Content-Type: text/html; charset=utf-8\r\n";
  $rawMessageString .= 'Content-Transfer-Encoding: quoted-printable' . "\r\n\r\n";
  $rawMessageString .= "{$messageText}\r\n";
  $rawMessage = strtr(base64_encode($rawMessageString), array('+' => '-', '/' => '_'));
  $message->setRaw($rawMessage);
  return $message;
}

/**
* @param $service Google_Service_Gmail an authorized Gmail API service instance.
* @param $user string User's email address or "me"
* @param $message Google_Service_Gmail_Message
* @return Google_Service_Gmail_Draft
*/
function createDraft($service, $user, $message) {
  $draft = new Google_Service_Gmail_Draft();
  $draft->setMessage($message);
  try {
    $draft = $service->users_drafts->create($user, $draft);
    print 'Draft ID: ' . $draft->getId();
  } catch (Exception $e) {
    print 'An error occurred: ' . $e->getMessage();
  }
  return $draft;
}
Step 8: Send an email
Once you have created your message, you can either call messages.send or drafts.send to send it. Here is how it may look:
Python
def send_message(service, user_id, message):
  try:
    message = service.users().messages().send(userId=user_id, body=message).execute()
    print('Message Id: %s' % message['id'])
    return message
  except Exception as e:
    print('An error occurred: %s' % e)
    return None
and PHP
/**
* @param $service Google_Service_Gmail an authorized Gmail API service instance.
* @param $userId string User's email address or "me"
* @param $message Google_Service_Gmail_Message
* @return null|Google_Service_Gmail_Message
*/
function sendMessage($service, $userId, $message) {
  try {
    $message = $service->users_messages->send($userId, $message);
    print 'Message with ID: ' . $message->getId() . ' sent.';
    return $message;
  } catch (Exception $e) {
    print 'An error occurred: ' . $e->getMessage();
  }
  return null;
}
Step 8.1: Send an email with attachments
You can also create and send a multi-part MIME message. For example, this is how it looks with Python:
def send_message(service, user_id, message):
  try:
    message = service.users().messages().send(userId=user_id, body=message).execute()
    print('Message Id: %s' % message['id'])
    return message
  except Exception as e:
    print('An error occurred: %s' % e)
    return None

def create_message_with_attachment(sender, to, subject, message_text, file):
  message = MIMEMultipart()
  message['to'] = to
  message['from'] = sender
  message['subject'] = subject
  msg = MIMEText(message_text)
  message.attach(msg)
  content_type, encoding = mimetypes.guess_type(file)
  if content_type is None or encoding is not None:
    content_type = 'application/octet-stream'
  main_type, sub_type = content_type.split('/', 1)
  if main_type == 'text':
    fp = open(file, 'rb')
    msg = MIMEText(fp.read().decode("utf-8"), _subtype=sub_type)
    fp.close()
  elif main_type == 'image':
    fp = open(file, 'rb')
    msg = MIMEImage(fp.read(), _subtype=sub_type)
    fp.close()
  elif main_type == 'audio':
    fp = open(file, 'rb')
    msg = MIMEAudio(fp.read(), _subtype=sub_type)
    fp.close()
  else:
    fp = open(file, 'rb')
    msg = MIMEBase(main_type, sub_type)
    msg.set_payload(fp.read())
    fp.close()
  filename = os.path.basename(file)
  msg.add_header('Content-Disposition', 'attachment', filename=filename)
  message.attach(msg)
  raw_message = base64.urlsafe_b64encode(message.as_string().encode("utf-8"))
  return {'raw': raw_message.decode("utf-8")}
Step 9: Read a specific email from your inbox
It would be weird if you can’t use the API to read messages from Gmail. Luckily you can by using the get method by the message ID. Here is how it may look in a Python app:
import base64
import email

def get_messages(service, user_id):
  try:
    return service.users().messages().list(userId=user_id).execute()
  except Exception as error:
    print('An error occurred: %s' % error)

def get_message(service, user_id, msg_id):
  try:
    return service.users().messages().get(userId=user_id, id=msg_id, format='metadata').execute()
  except Exception as error:
    print('An error occurred: %s' % error)

def get_mime_message(service, user_id, msg_id):
  try:
    message = service.users().messages().get(userId=user_id, id=msg_id,
                                             format='raw').execute()
    print('Message snippet: %s' % message['snippet'])
    msg_str = base64.urlsafe_b64decode(message['raw'].encode("utf-8")).decode("utf-8")
    mime_msg = email.message_from_string(msg_str)
    return mime_msg
  except Exception as error:
    print('An error occurred: %s' % error)
If the message contains an attachment, expand your code with the following:
def get_attachments(service, user_id, msg_id, store_dir):
  try:
    message = service.users().messages().get(userId=user_id, id=msg_id).execute()
    for part in message['payload']['parts']:
      if(part['filename'] and part['body'] and part['body']['attachmentId']):
        attachment = service.users().messages().attachments().get(id=part['body']['attachmentId'], userId=user_id, messageId=msg_id).execute()
        file_data = base64.urlsafe_b64decode(attachment['data'].encode('utf-8'))
        path = ''.join([store_dir, part['filename']])
        f = open(path, 'wb')
        f.write(file_data)
        f.close()
  except Exception as error:
    print('An error occurred: %s' % error)
What is a good alternative to sending with Gmail API?
If you don’t want to use Gmail API, there are alternatives that will send your emails and also help you make sure those emails end up in a recipient’s inbox and not their spam folder.
One such alternative is Mailtrap Email API – the email-sending solution of the Mailtrap email delivery platform.
You can use Email API to send emails from any application with a sending throughput of up to ~10000 emails/second. What’s more, this sending solution will allow you to gain more control over your email deliverability.
Users of Email API have access to a batch of actionable analytics features which you can spot and fix sending issues in the early stages, and these features include:
- High deliverability rates – land in your recipients’ main inboxes instead of ending up in spam folder.
- In-depth analytics – insights into metrics related to your email performance you can filter by domain, category, and mailbox provider.
- Expert support – talk to our deliverability experts and rely on our 24/7 customer support team.
- 30-day email logs – message history going up to 30 days back, valuable for inspecting, debugging, and troubleshooting.
- Webhooks – information about your deliverability provided almost in real-time.
Email API also offers suppression lists, dedicated IPs, auto IP warmups, and more features, all geared toward helping you boost your deliverability.
To start sending with Email API, you will need to create a Mailtrap account and then complete the processes of adding and verifying your domain, demonstrated in the video below.
With Email API, you have the option of sending via API or SMTP.
For sending via API, you will copy an API example code provided to you and run it with your app. The code is generated based on your selection of programming language from a dropdown menu.
For sending via SMTP, you will need to set up Mailtrap as an SMTP server in your project, app, or email sending service by using the SMTP credentials again provided to you by the solution.
For those of you looking to learn more about Gmail alternatives, Mailtrap has a dedicated video on the topic:
Why is Gmail API better or worse than traditional SMTP?
Email protocol used
Simple Mail Transfer Protocol (SMTP) is a set of rules for sending emails either from the sender to the email server or between servers. Most email service providers use SMTP to send emails and POP3/IMAP4 to receive them. To learn more about these protocols, you can read our IMAP vs. POP3 vs. SMTP blog post. Google also provides the Gmail SMTP server as a free SMTP service. Application Programming Interface (API) is an interaction channel used by apps, platforms, and codes to reach each other. With Gmail API, you can send emails using only HyperText Transfer Protocol (HTTP), a set of rules that defines how messages are formatted and transmitted.
How are emails sent?
You can call the API from the app to communicate with an email service that is used to send emails from another server.
For SMTP, a client establishes a TCP connection to the SMTP server and transfers an email. After authorization, the server sends the email to the recipient’s SMTP server, which, in turn, forwards it to the IMAP4 or POP3 server. Client and server communicate with each other using SMTP commands and responses.
Authentication
Gmail API uses open authentication (Oauth2), which only lets you request the scope of access you need. SMTP provides full access to the account using client login and password SMTP authentication.
Quota
The usage limit of Gmail API is one billion quota units per day. Each method requires a particular number of quota units. For example, a drafts.create is 10 units and a messages.send is 100 units. Gmail API enforces standard daily mail sending limits. Also, keep in mind that the maximum email size in Gmail is 25MB.
SMTP or API?
Each option has its own pros and cons. SMTP is a widely adopted and easy-to-set-up solution to send emails. Moreover, you don’t need any coding skills to handle stuff.
As for API, it is a great option to automate processes and provide a wide range of functionality for the app. Also, an API can bring an extra level of security, which is crucial if you deal with sending sensitive data in emails.


Comments
13 replies
View all comments