

In this tutorial, I explain how to send emails in Java and provide you with code snippets for the following methods:
- Jakarta Mail
- Java Spring Mail
- Apache Commons Mail
- Simple Java Mail
- Jakarta Mail + Mailtrap SMTP
- Java + Mailtrap Email API
Note that the code snippets I provide in this article are compatible with Java SE 8 and higher, but I recommend using SE 17+.
Disclaimer: Every bit of code in this article has been prepared and tested by a developer before publication.
Send email using Jakarta Mail (formerly JavaMail)
Jakarta Mail, formerly known as JavaMail, is a Java API with which you can send emails via SMTP or receive them via IMAP or POP. It’s perfect for more advanced applications that require comprehensive email functionality.
Key features:
- Integration with Jakarta EE
- Various message types, including:
- Plain-text
- HTML
- Multipart messages
- Inline/embedded images
- STARTTLS and SSL/TLS
- Attachment handling (e.g., MIME types like PDF, docs, etc.)
- Asynchronous sending
- Extensibility for advanced features like OAuth2
Note that if you have an older JavaMail project, you’ll need to migrate it to Jakarta Mail, which our dedicated article can help you with. We’ve covered everything from setting up classpath to outdated jar files like mail.jar. 👀
And here’s how to configure Jakarta Mail if you’re starting fresh:
1. Download Jakarta Mail or use build systems
Download the latest version of the API from the official GitHub page. Or, simply use build systems like Maven or Gradle, which will handle versions and updates automatically in your stead, making updates and migrations easier.
Maven
Generate a pom.xml file by running the following command:
mvn archetype:generateThen, paste the following dependency inside pom.xml:
<?xml version="1.0" encoding="UTF-8"?>
<project xmlns="http://maven.apache.org/POM/4.0.0"
         xmlns:xsi="http://www.w3.org/2001/XMLSchema-instance"
         xsi:schemaLocation="http://maven.apache.org/POM/4.0.0 http://maven.apache.org/xsd/maven-4.0.0.xsd">
    <modelVersion>4.0.0</modelVersion>

    <groupId>org.mailtrap</groupId>
    <artifactId>java-email-mvn</artifactId>
    <version>1.0-SNAPSHOT</version>

    <properties>
        <maven.compiler.source>21</maven.compiler.source>
        <maven.compiler.target>21</maven.compiler.target>
        <project.build.sourceEncoding>UTF-8</project.build.sourceEncoding>
    </properties>

    <dependencies>
        <dependency>
            <groupId>org.eclipse.angus</groupId>
            <artifactId>angus-mail</artifactId>
            <version>2.0.3</version>
        </dependency>
    </dependencies>

    <build>
        <plugins>
            <plugin>
                <groupId>org.codehaus.mojo</groupId>
                <artifactId>exec-maven-plugin</artifactId>
                <version>3.4.1</version>
                <configuration>
                    <mainClass>org.mailtrap.Main</mainClass>
                </configuration>
            </plugin>
        </plugins>
    </build>
</project>
Gradle
Generate a basic Gradle project structure with:
gradle initAlong with the necessary project structure, the provided command will create the build.gradle file in your root directory. Inside the build.gradle, paste the following lines:
plugins {
    id 'java'
    id 'application'
}

group = 'org.mailtrap'
version = '1.0-SNAPSHOT'

repositories {
    mavenCentral()
}

application {
    mainClass = 'Main' // Replace 'Main' with your main class name
}

dependencies {
    implementation 'org.eclipse.angus:angus-mail:2.0.3' // Latest version of Angus Mail
}
2. Setup email-sending functionality
Locate your Main.java file, which should be somewhere around here:

Then, simply paste the following code snippet to start sending plain-text emails:
package org.mailtrap;

import jakarta.mail.*;
import jakarta.mail.internet.InternetAddress;
import jakarta.mail.internet.MimeMessage;

import java.util.Properties;

public class Main {
    public static void main(String[] args) {

        // provide recipient's email ID
        String to = "your.recipient@email.com";
        // provide sender's email ID
        String from = "john.doe@your.domain";

        // provide account credentials
        final String username = "YOUR_USERNAME";
        final String password = "YOUR_PASSWORD";

        // provide host address
        String host = "YOUR_HOST_ADDRESS";

        // configure SMTP details
        Properties props = new Properties();
        props.put("mail.smtp.auth", "true");
        props.put("mail.smtp.starttls.enable", "true");
        props.put("mail.smtp.host", host);
        props.put("mail.smtp.port", "587");

        // create the mail Session object
        Session session = Session.getInstance(props,
            new Authenticator() {
                @Override
                protected PasswordAuthentication getPasswordAuthentication() {
                    return new PasswordAuthentication(username, password);
                }
            });

        try {
            // create a MimeMessage object
            Message message = new MimeMessage(session);
            // set From email field
            message.setFrom(new InternetAddress(from));
            // set To email field
            message.setRecipient(Message.RecipientType.TO, new InternetAddress(to));
            // set email subject field
            message.setSubject("Hello from the Mailtrap team");
            // set the content of the email message
            message.setText("Enjoy sending emails from Jakarta Mail!");

            // send the email message
            Transport.send(message);

            System.out.println("Email Message Sent Successfully!");

        } catch (MessagingException e) {
            throw new RuntimeException(e);
        }
    }
}
To run the code, simply execute Main.java.
However, if you’ve used Maven or Gradle, you’ll need to run the following:
# Maven
mvn clean compile
mvn exec:java

# MacOS/Linux
./gradlew clean build
./gradlew run

# Windows
.\gradlew.bat clean build
.\gradlew.bat run
P.S. I’ve noticed that Session.getDefaultInstance() is recommended on the internet, but it’s better to use Session.getInstance() as it gives you more flexibility in creating sessions with different configs.
Send email using Java Spring Mail
Java Spring Mail is a utility library and a part of the Spring Framework that’s also feature-packed like Jakarta, making it ideal for larger projects and Spring Boot-based applications.
It supports the following:
- Integration with Spring Boot via
spring-boot-starter-mail - Plain-text and HTML emails with attachments
- Template engines like Thymeleaf or Freemarker
- Asynchronous email sending
And here’s how to start sending emails with Java Spring Mail:
1. Install the necessary dependencies
To start using Spring Mail, add the spring-boot-starter-mail dependency with the spring init command in Spring CLI:
spring init -d=mail --package-name=org.mailtrap <directory>When prompted, select the spring-boot-starter-mail option.
As of writing this article, the latest Spring version is 3.3.4.
Note: You can also use Spring Initializr to create a project and select necessary dependencies, like Java Email Sender, for example.
2. Configure email-sending functionality
Finally, to start sending plain-text emails, copy the following code into your main application file (e.g., EmailService.java):
package org.mailtrap.sendemail;

import org.springframework.mail.SimpleMailMessage;
import org.springframework.mail.javamail.JavaMailSender;
import org.springframework.scheduling.annotation.Async;
import org.springframework.stereotype.Service;

@Service
public class EmailService {

    private final JavaMailSender mailSender;

    public EmailService(JavaMailSender mailSender) {
        this.mailSender = mailSender;
    }

    @Async
    public void sendEmail(String to, String subject, String body) {
        SimpleMailMessage message = new SimpleMailMessage();
        message.setTo("your.recipient@email.com");
        message.setFrom("john.doe@your.domain");
        message.setSubject(subject);
        message.setText(body);

        mailSender.send(message);
    }
}
As you can notice, there are no SMTP credentials in this code, so we’ll have to add them in a separate file, application.properties, located under source → resources:
spring.mail.host=live.smtp.mailtrap.io
spring.mail.port=587
spring.mail.username=api
spring.mail.password=your_password_here
spring.mail.properties.mail.smtp.auth=true
spring.mail.properties.mail.smtp.starttls.enable=true
3. Bootstrap the Spring Boot app
Lastly, to run the code, bootstrap the Spring Boot application and call the Run method to execute the email-sending functionality. For this, use the following code:
package org.mailtrap.sendemail;

import org.springframework.boot.SpringApplication;
import org.springframework.boot.autoconfigure.SpringBootApplication;
import org.springframework.context.ApplicationContext;

@SpringBootApplication
public class SendEmailApplication {

    private final EmailService emailService;

    public SendEmailApplication(EmailService emailService) {
        this.emailService = emailService;
    }

    public static void main(String[] args) {
        ApplicationContext context = SpringApplication.run(SendEmailApplication.class, args);
        SendEmailApplication app = context.getBean(SendEmailApplication.class);

        app.run();
    }

    private void run() {
        emailService.sendEmail(
            "your_email@example.com",
            "Email From JavaSpringBoot",
            "Hi There, this is an email from JavaSpringBoot"
        );
    }
}
Then, we can run the script with mvn spring-boot:run.
If you’re interested in more sending cases and methods with Spring Mail, be sure to read the article my colleague Denys has written on the topic.
Send email using Apache Commons Email
Like Jakarta Mail and Spring Mail, Apache Commons Email is also built on top of the JavaMail API with the aim of simplifying it. It’s perfect for simple email-sending tasks that don’t require complex configuration.
However, it’s not as complex as the previous two libraries, but it still supports:
- Classes for building and sending HTML emails
- Emails with attachments
- Emails with embedded images
Apache Commons Email can be used as a base for other email wrappers as well. For example, mailR for sending emails using R or Play Framework.
Because it’s a bare-bones library, I’m not going to dive into the details of Apache Commons Email. Instead, I’ll just demonstrate how you can send a plain-text email.
1. Add the necessary dependencies
As is common practice, start with adding the dependency into your pom.xml file:
#for Javax

<dependency>
    <groupId>org.apache.commons</groupId>
    <artifactId>commons-email2-javax</artifactId>
    <version>2.0.0-M1</version>
</dependency>

#for Jakarta

<dependency>
    <groupId>org.apache.commons</groupId>
    <artifactId>commons-email2-jakarta</artifactId>
    <version>2.0.0-M1</version>
</dependency>
The latest Apache Commons version is 2.0.0-M1.
2. Configure the main application file
After that, we proceed with code that will complete the rest of the steps upon running it:
package app;
import org.apache.commons.mail.DefaultAuthenticator;
import org.apache.commons.mail.EmailException;
import org.apache.commons.mail.HtmlEmail;

public class App {
  public static void main(String[] args) throws EmailException {
    HtmlEmail mail = new HtmlEmail();
    mail.setHostName("live.smtp.mailtrap.io");
    mail.setSmtpPort(587);
    mail.setSSLOnConnect(true);
    mail.setAuthenticator(new DefaultAuthenticator("1a2b3c4d5e6f7g", "1a2b3c4d5e6f7g"));
    mail.setFrom("from@example.com", "From");
    mail.addTo("to@example.com", "To");
    mail.setSubject("Apache Commons email test");

    // Send plain-text message instead of HTML
    mail.setMsg("Here is your plain-text example message.");

    mail.send();
  }
}
If you want, you can replace the msg methods setMsg() with setHtmlMsg() if you want to send an HTML email.
Send email using Simple Java Mail
Simple Java Mail is a mailing library ‘with a super clean API’ and, as its creators say, ‘the easiest to use Java mailing library in the world with SMTP.
Precisely because of this simplicity, I’d recommend it only for smaller projects that require quick email integration with minimal code.
Key features:
- HTML emails
- Embedded images
- SSL / TLS encryption
- DKIM signing
- Multiple files, content disposition
- Embedded images
- Basic attachment handling
For explanatory purposes, here’s how you can send a plain-text email with Simple Java Mail:
1. Add the necessary dependencies
If you’re using Maven, copy the following code into your pom.xml file:
<dependency>
    <groupId>org.simplejavamail</groupId>
    <artifactId>simple-java-mail</artifactId>
    <version>8.12.2</version> <!-- or the latest version -->
</dependency>
Or, if you’re a Gradle-person, add the following line to your build.grade file:
implementation 'org.simplejavamail:simple-java-mail:8.12.2' // or the latest version2. Configure the main application file
Simply paste this code snippet into your Main.java file:
import org.simplejavamail.api.email.Email;
import org.simplejavamail.email.EmailBuilder;
import org.simplejavamail.mailer.Mailer;
import org.simplejavamail.mailer.MailerBuilder;
import org.simplejavamail.transport.TransportStrategy;

public class Main {
    public static void main(String[] args) {

        // Create the email
        Email email = EmailBuilder.startingBlank()
            .from("lollypop", "lolly.pop@pretzelfun.com")
            .to("C. Cane", "candycane@candyshop.org")
            .cc("C. Bo <chocobo@candyshop.org>")
            .withSubject("hey")
            .withPlainText("We should meet up! ;)")
            .buildEmail();

        // Create the mailer object with SMTP server settings
        Mailer mailer = MailerBuilder
            .withSMTPServer("live.smtp.mailtrap.io", 587, "1a2b3c4d5e6f7g", "password")
            .withTransportStrategy(TransportStrategy.SMTP)
            .buildMailer();

        // Send the email
        mailer.sendMail(email);
    }
}
For HTML emails, simply replace the .withPlainText()with the .withHTMLText()method.
Send email in Java using SMTP
In this section, I’ll show you how to leverage Jakarta Mail with Mailtrap SMTP as it’s the option that offers the highest deliverability rates + it’s straightforward to set up.
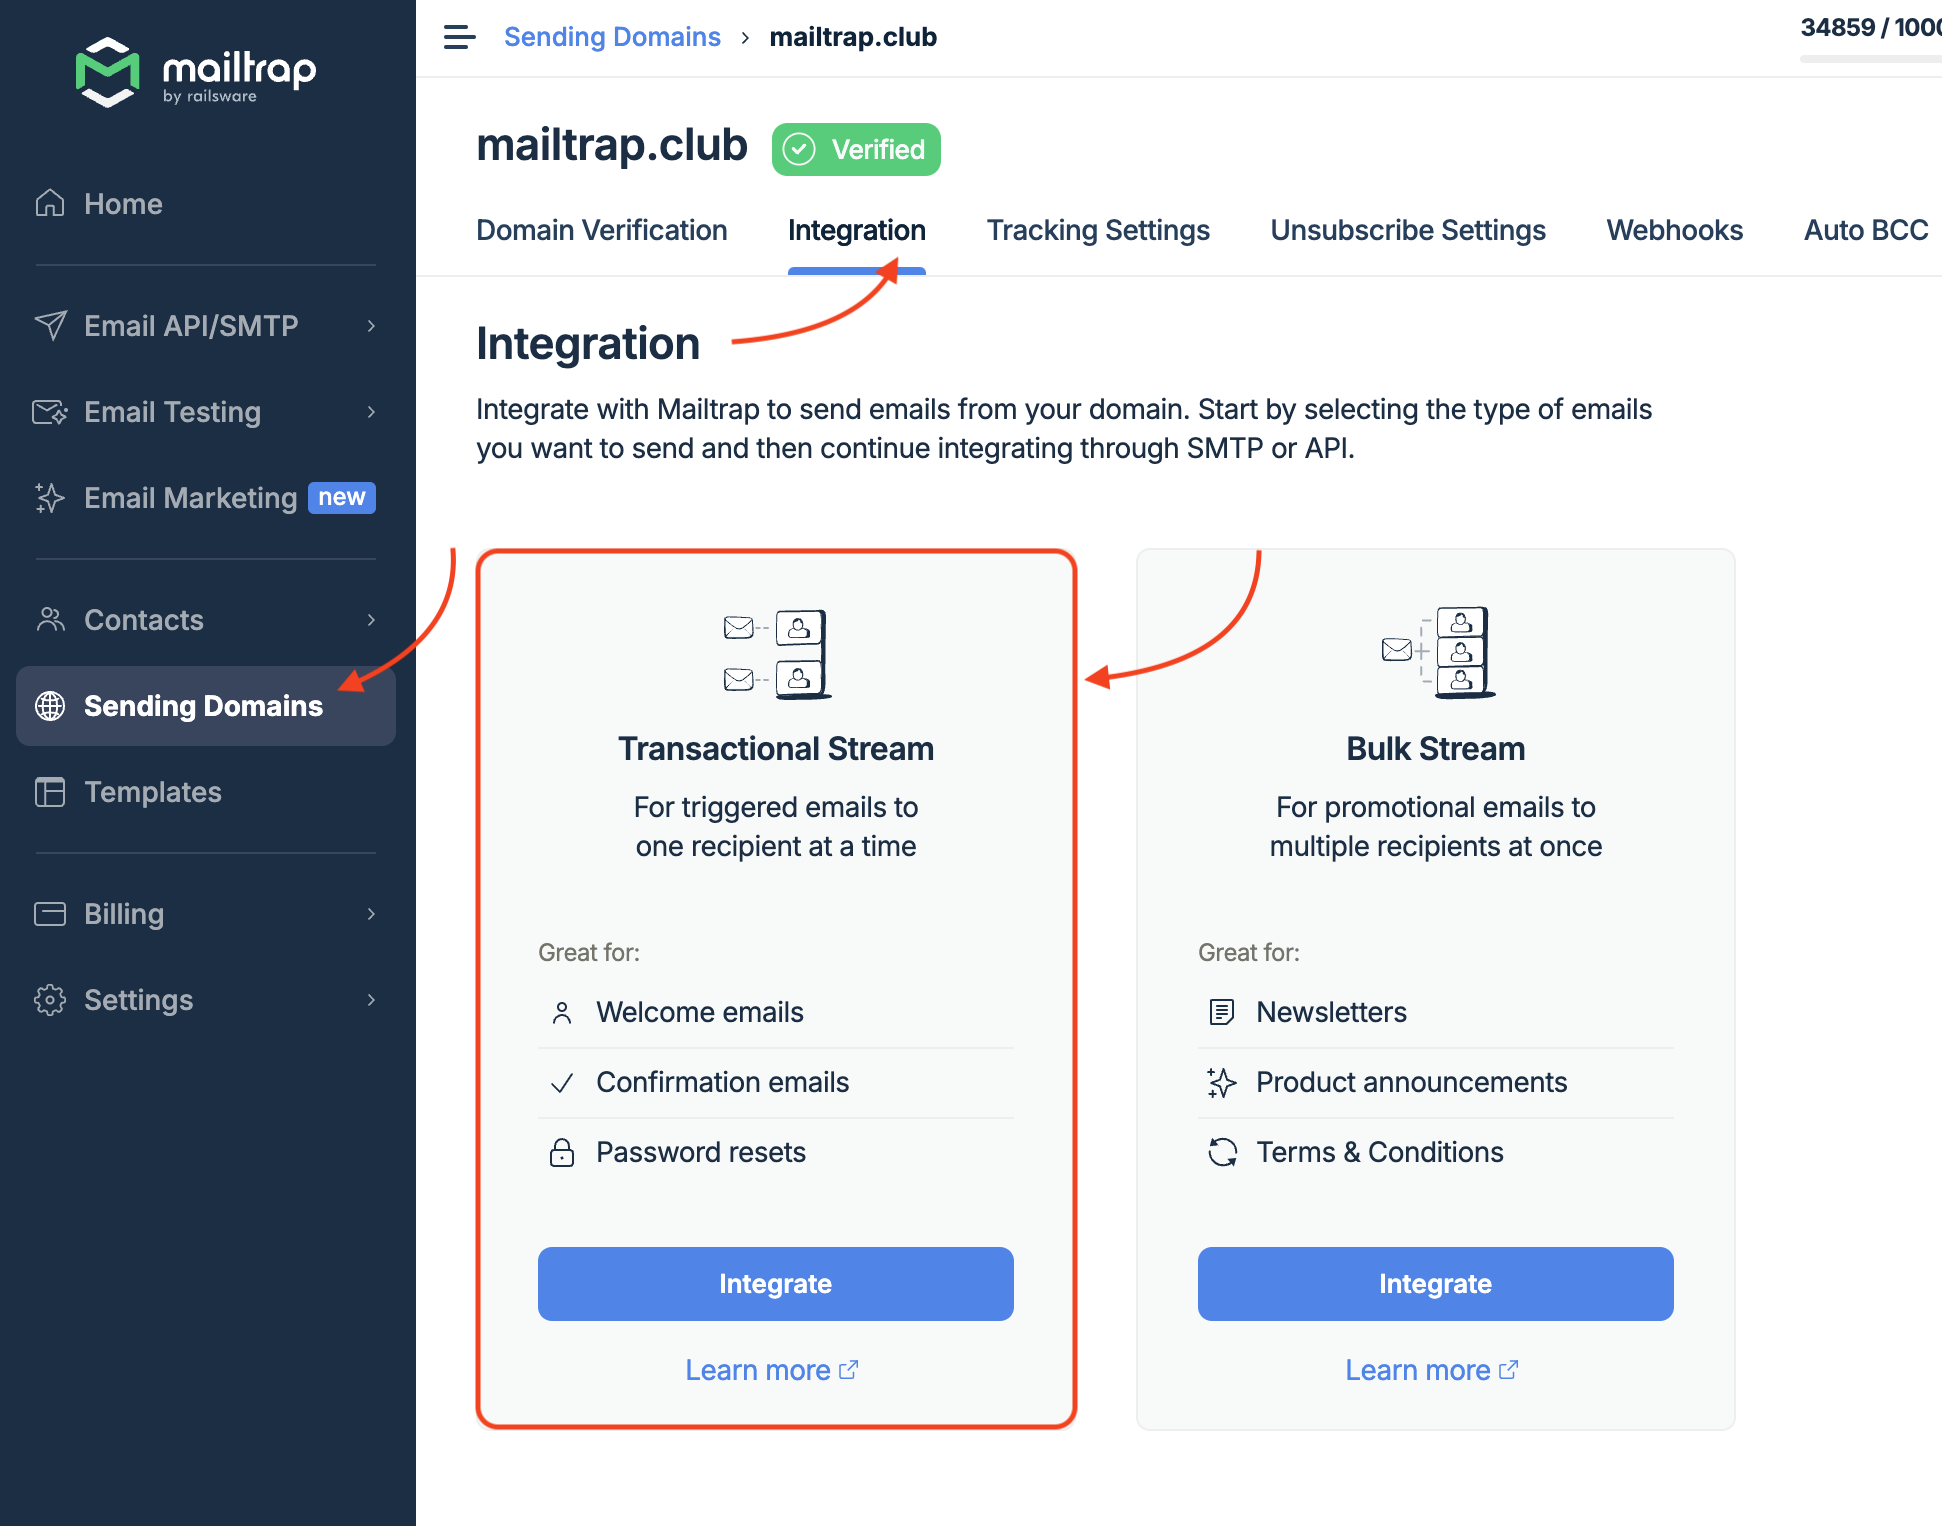
Start by creating a free Mailtrap account and verifying your email-sending domain. For this part, you can follow along our detailed step-by-step Knowledge Base article. 👀
Then, click on Sending Domains, choose the domain you verified, and click on the Integration tab. You’ll be prompted to select between two sending streams: here, we’ll go with the Transactional one, as we’ll go over the Bulk Stream later.
Now, all you need to do is find the SMTP credentials provided by Mailtrap and copy them into your Main.java file. For example:

And here’s the code snippet you can copy to start sending plain-text emails:
package org.mailtrap;

import jakarta.mail.*;
import jakarta.mail.internet.InternetAddress;
import jakarta.mail.internet.MimeMessage;

import java.util.Properties;

public class Main {
    public static void main(String[] args) {

        // provide recipient's email ID
        String to = "your.recipient@email.com";
        // provide sender's email ID
        String from = "john.doe@your.domain";

        // provide Mailtrap's username
        final String username = "api";
        final String password = "9c8aee72e7e4ebdd64b57bf2df163e1e";

        // provide Mailtrap's host address
        String host = "live.smtp.mailtrap.io";

        // configure Mailtrap's SMTP details
        Properties props = new Properties();
        props.put("mail.smtp.auth", "true");
        props.put("mail.smtp.starttls.enable", "true");
        props.put("mail.smtp.host", host);
        props.put("mail.smtp.port", "587");

        // create the Session object
        Session session = Session.getInstance(props,
            new Authenticator() {
                @Override
                protected PasswordAuthentication getPasswordAuthentication() {
                    return new PasswordAuthentication(username, password);
                }
            });

        try {
            // create a MimeMessage object
            Message message = new MimeMessage(session);
            // set From email field
            message.setFrom(new InternetAddress(from));
            // set To email field
            message.setRecipient(Message.RecipientType.TO, new InternetAddress(to));
            // set email subject field
            message.setSubject("Hello from the Mailtrap team");
            // set the content of the email message
            message.setText("Enjoy sending emails from Jakarta Mail!");

            // send the email message
            Transport.send(message);

            System.out.println("Email Message Sent Successfully!");

        } catch (MessagingException e) {
            throw new RuntimeException(e);
        }
    }
}
To run the script, you can execute Main.java.
Send HTML email
For sending HTML emails in Jakarta, you can use the following code snippet:
package org.mailtrap;

import jakarta.mail.*;
import jakarta.mail.internet.InternetAddress;
import jakarta.mail.internet.MimeBodyPart;
import jakarta.mail.internet.MimeMessage;
import jakarta.mail.internet.MimeMultipart;

import java.util.Properties;

public class Main {
    public static void main(String[] args) {

        // provide recipient's email ID
        String to = "your.recipient@email.com";
        // provide sender's email ID
        String from = "john.doe@your.domain";

        // provide Mailtrap's username
        final String username = "api";
        final String password = "9c8aee72e7e4ebdd64b57bf2df163e1e";

        // provide Mailtrap's host address
        String host = "live.smtp.mailtrap.io";

        // configure Mailtrap's SMTP details
        Properties props = new Properties();
        props.put("mail.smtp.auth", "true");
        props.put("mail.smtp.starttls.enable", "true");
        props.put("mail.smtp.host", host);
        props.put("mail.smtp.port", "587");

        // create the Session object
        Session session = Session.getInstance(props,
            new Authenticator() {
                @Override
                protected PasswordAuthentication getPasswordAuthentication() {
                    return new PasswordAuthentication(username, password);
                }
            });

        try {
            // create a MimeMessage object
            Message message = new MimeMessage(session);
            // set From email field
            message.setFrom(new InternetAddress(from));
            // set To email field
            message.setRecipient(Message.RecipientType.TO, new InternetAddress(to));
            // set email subject field
            message.setSubject("Hello from the Mailtrap Team!");

            // create the multipart message
            Multipart multipart = new MimeMultipart("alternative");

            // create the plain-text part
            MimeBodyPart textPart = new MimeBodyPart();
            textPart.setText("Just discovered that Jakarta Mail is fun and easy to use!");

            // create the HTML part
            MimeBodyPart htmlPart = new MimeBodyPart();
            String htmlContent = "<h1>Welcome to Jakarta Mail!</h1><p>This is an HTML email!</p>";
            htmlPart.setContent(htmlContent, "text/html");

            // add both parts to the multipart message
            multipart.addBodyPart(textPart);
            multipart.addBodyPart(htmlPart);

            // set the content of the message to the multipart
            message.setContent(multipart);

            // send the email message
            Transport.send(message);

            System.out.println("HTML Email Sent Successfully!");

        } catch (MessagingException e) {
            throw new RuntimeException(e);
        }
    }
}
Code breakdown:
setContent()replaces thesetText()method for plain-text.text/htmlis now the second argument.String htmlContentis used for adding HTML content.- MimeMultipart(“alternative”) object is for having plain-text in the message along with the HTML content, in case some of your recipients don’t render HTML properly.
Oh, and by the way, did I forget to mention we have a detailed guide on sending HTML in Java? Be sure to give it a read!
Send email to multiple recipients
Have more than one recipient? Simply use the setRecipients() method instead of setRecipient() and specify a list of email addresses, like so:
package org.mailtrap;

import jakarta.mail.*;
import jakarta.mail.internet.InternetAddress;
import jakarta.mail.internet.MimeMessage;

import java.util.Properties;

public class Main {
    public static void main(String[] args) {

        // provide recipients' email IDs
        String to = "your.recipient@email.com, your.recipient2@email.com, your.recipient3@email.com";
        // provide sender's email ID
        String from = "john.doe@your.domain";

        // provide Mailtrap's username
        final String username = "api";
        final String password = "9c8aee72e7e4ebdd64b57bf2df163e1e";

        // provide Mailtrap's host address
        String host = "live.smtp.mailtrap.io";

        // configure Mailtrap's SMTP details
        Properties props = new Properties();


        props.put("mail.smtp.auth", "true");
        props.put("mail.smtp.starttls.enable", "true");
        props.put("mail.smtp.host", host);
        props.put("mail.smtp.port", "587");

        // create the Session object
        Session session = Session.getInstance(props,
            new Authenticator() {
                @Override
                protected PasswordAuthentication getPasswordAuthentication() {
                    return new PasswordAuthentication(username, password);
                }
            });

        try {
            // create a MimeMessage object
            Message message = new MimeMessage(session);
            // set From email field
            message.setFrom(new InternetAddress(from));
            // set multiple To email addresses using parse
            message.setRecipients(Message.RecipientType.TO, InternetAddress.parse(to));
            // set email subject field
            message.setSubject("Hello from the Mailtrap team");
            // set the content of the email message
            message.setText("Just discovered that Jakarta Mail is fun and easy to use!");

            // send the email message
            Transport.send(message);

            System.out.println("Email Message Sent Successfully!");

        } catch (MessagingException e) {
            throw new RuntimeException(e);
        }
    }
}Notes:
- Make sure to insert email addresses as a comma-separated string with
InternetAddress.parse()splitting them. - If you wish to send to CC and BCC recipients, add the following lines of code after calling the
message.SetRecipient()for the main recipient:
Message.RecipientType.CC

# or

Message.RecipientType.BCC

# or both 🙂
Moreover, you can use the addRecipients() if you need to send an email to multiple recipients incrementally or add them to an existing list without removing any previously set recipients. For example:
message.addRecipients(Message.RecipientType.TO, new InternetAddress[]{new InternetAddress("recipient3@example.com"), new InternetAddress("recipient4@example.com")});Send email with attachments
If you want to add attachments to your emails in Jakarta, all you have to do is create an instance of the MimeMultipart object. It will combine the email’s body and the attachment, whereas the Transport.send() will forward the two in a message.
And here’s the code you can use:
package org.mailtrap;

import jakarta.mail.*;
import jakarta.mail.internet.InternetAddress;
import jakarta.mail.internet.MimeBodyPart;
import jakarta.mail.internet.MimeMessage;
import jakarta.mail.internet.MimeMultipart;

import java.io.File;
import java.util.Properties;

public class Main {
    public static void main(String[] args) {

        // provide recipient's email ID
        String to = "your.recipient@email.com";
        // provide sender's email ID
        String from = "john.doe@your.domain";

        // provide Mailtrap's username
        final String username = "api";
        final String password = "9c8aee72e7e4ebdd64b57bf2df163e1e";

        // provide Mailtrap's host address
        String host = "live.smtp.mailtrap.io";

        // configure Mailtrap's SMTP details
        Properties props = new Properties();
        props.put("mail.smtp.auth", "true");
        props.put("mail.smtp.starttls.enable", "true");
        props.put("mail.smtp.host", host);
        props.put("mail.smtp.port", "587");

        // create the Session object
        Session session = Session.getInstance(props,
            new Authenticator() {
                @Override
                protected PasswordAuthentication getPasswordAuthentication() {
                    return new PasswordAuthentication(username, password);
                }
            });

        try {
            // create a MimeMessage object
            Message message = new MimeMessage(session);
            // set From email field
            message.setFrom(new InternetAddress(from));
            // set To email field
            message.setRecipient(Message.RecipientType.TO, new InternetAddress(to));
            // set email subject field
            message.setSubject("Hello from the Mailtrap team");

            // create the message body part
            MimeBodyPart messageBodyPart = new MimeBodyPart();
            messageBodyPart.setText("Just discovered that Jakarta Mail is fun and easy to use!");

            // create a second MimeBodyPart to hold the attachment
            MimeBodyPart attachmentPart = new MimeBodyPart();
            String filename = "/path/to/your/file.txt"; // Specify the file path
            attachmentPart.attachFile(new File(filename));

            // create a Multipart object to combine the message body and the attachment
            Multipart multipart = new MimeMultipart();
            multipart.addBodyPart(messageBodyPart);  // Add message body
            multipart.addBodyPart(attachmentPart);   // Add attachment

            // set the content of the email to the Multipart object
            message.setContent(multipart);

            // send the email message
            Transport.send(message);

            System.out.println("Email Message Sent Successfully with Attachment!");

        } catch (MessagingException | java.io.IOException e) {
            throw new RuntimeException(e);
        }
    }
}Important: Don’t forget to insert the correct file path for the filename variable.
Send email with embedded image
To send an email with an inline image displayed within the email body, copy the following script into your Main.java file:
package org.mailtrap;

import jakarta.mail.*;
import jakarta.mail.internet.InternetAddress;
import jakarta.mail.internet.MimeBodyPart;
import jakarta.mail.internet.MimeMessage;
import jakarta.mail.internet.MimeMultipart;

import java.io.File;
import java.util.Properties;

public class Main {
    public static void main(String[] args) {

        // provide recipient's email ID
        String to = "your.recipient@email.com";
        // provide sender's email ID
        String from = "john.doe@your.domain";

        // provide Mailtrap's username
        final String username = "api";
        final String password = "9c8aee72e7e4ebdd64b57bf2df163e1e";

        // provide Mailtrap's host address
        String host = "live.smtp.mailtrap.io";

        // configure Mailtrap's SMTP details
        Properties props = new Properties();
        props.put("mail.smtp.auth", "true");
        props.put("mail.smtp.starttls.enable", "true");
        props.put("mail.smtp.host", host);
        props.put("mail.smtp.port", "587");

        // create the Session object
        Session session = Session.getInstance(props,
            new Authenticator() {
                @Override
                protected PasswordAuthentication getPasswordAuthentication() {
                    return new PasswordAuthentication(username, password);
                }
            });

        try {
            // create a MimeMessage object
            Message message = new MimeMessage(session);
            // set From email field
            message.setFrom(new InternetAddress(from));
            // set To email field
            message.setRecipient(Message.RecipientType.TO, new InternetAddress(to));
            // set email subject field
            message.setSubject("Here comes Jakarta Mail with an embedded image!");

            // Create the MimeMultipart object to hold the email content (HTML + image)
            MimeMultipart multipart = new MimeMultipart("related");

            // First part: the HTML content with an embedded image reference
            MimeBodyPart htmlPart = new MimeBodyPart();
            String htmlContent = "<h1>Welcome to Jakarta Mail!</h1>"
                    + "<p>This is an HTML email with an embedded image.</p>"
                    + "<img src='cid:image_id'>";
            htmlPart.setContent(htmlContent, "text/html");

            // Second part: the image
            MimeBodyPart imagePart = new MimeBodyPart();
            String imagePath = "/path/to/your/image.jpg";  // Update with the actual path
            imagePart.attachFile(new File(imagePath));
            imagePart.setHeader("Content-ID", "<image_id>");  // Image identifier used in HTML

            // Add both parts (HTML and image) to the multipart
            multipart.addBodyPart(htmlPart);
            multipart.addBodyPart(imagePart);

            // Set the content of the message to the multipart object
            message.setContent(multipart);

            // send the email message
            Transport.send(message);

            System.out.println("Email Message Sent Successfully with Embedded Image!");

        } catch (MessagingException | java.io.IOException e) {
            throw new RuntimeException(e);
        }
    }
}
Code breakdown:
MimeMultipartholds the HTML content and the image together.MimeBodyPartis for the HTML content and the image reference.- An additional
MimeBodyPartis for the image itself Content-IDheader references the image in the HTMLMultipartis set as the content of the messageimagePathis to be replaced with the actual file path of the image.
Asynchronous email sending
For asynchronously sending emails with Jakarta, we’ll use CompletableFuture, with which our Java application can continue in a separate thread without having to wait for the email-sending process to complete.
Here’s the code you can use:
import java.util.concurrent.CompletableFuture;
import jakarta.mail.*;
import jakarta.mail.internet.InternetAddress;
import jakarta.mail.internet.MimeMessage;
import java.util.Properties;

public class Main {
    public static void main(String[] args) {

        // provide recipient's email ID
        String to = "your.recipient@email.com";
        // provide sender's email ID
        String from = "john.doe@your.domain";

        // provide Mailtrap's username
        final String username = "api";
        final String password = "9c8aee72e7e4ebdd64b57bf2df163e1e";

        // provide Mailtrap's host address
        String host = "live.smtp.mailtrap.io";

        // configure Mailtrap's SMTP mail server details
        Properties props = new Properties();
        props.put("mail.smtp.auth", "true");
        props.put("mail.smtp.starttls.enable", "true");
        props.put("mail.smtp.host", host);
        props.put("mail.smtp.port", "587");

        // Run the email task asynchronously
        CompletableFuture<Void> future = CompletableFuture.runAsync(() -> {
            try {
                // create the Session object
                Session session = Session.getInstance(props, new Authenticator() {
                    @Override
                    protected PasswordAuthentication getPasswordAuthentication() {
                        return new PasswordAuthentication(username, password);
                    }
                });

                // create a MimeMessage object
                Message message = new MimeMessage(session);
                // set From email field
                message.setFrom(new InternetAddress(from));
                // set To email field
                message.setRecipient(Message.RecipientType.TO, new InternetAddress(to));
                // set email subject field
                message.setSubject("Hello from the Mailtrap team!");
                // set the content of the email message
                message.setText("Just discovered that Jakarta Mail is fun and easy to use!");

                // send the email message
                Transport.send(message);

                System.out.println("Email Message Sent Successfully!");

            } catch (MessagingException e) {
                e.printStackTrace();
            }
        }).exceptionally(ex -> {
            System.out.println("Failed to send email: " + ex.getMessage());
            return null;
        });

        future.join();

        System.out.println("Email task submitted for asynchronous execution!");
    }
}
Send bulk email
For sending large amounts of emails, we can use ExecutorService, a package that gives you fine-grained control over threads and a significant amount of flexibility for handling concurrent tasks.
Here’s how it works:
package org.mailtrap;

import jakarta.mail.*;
import jakarta.mail.internet.InternetAddress;
import jakarta.mail.internet.MimeMessage;

import java.util.ArrayList;
import java.util.List;
import java.util.Properties;
import java.util.concurrent.ExecutorService;
import java.util.concurrent.Executors;

public class Main {
    public static void main(String[] args) {

        // List of recipient email IDs (you can expand this as needed)
        List<String> recipientList = List.of("recipient1@example.com", "recipient2@example.com", "recipient3@example.com", "recipient4@example.com", "recipient5@example.com");

        // provide sender's email ID
        String from = "john.doe@your.domain";

        // provide Mailtrap's username and password
        final String username = "api";
        final String password = "9c8aee72e7e4ebdd64b57bf2df163e1e";

        // provide Mailtrap's host address
        String host = "bulk.smtp.mailtrap.io";

        // configure Mailtrap's SMTP details
        Properties props = new Properties();
        props.put("mail.smtp.auth", "true");
        props.put("mail.smtp.starttls.enable", "true");
        props.put("mail.smtp.host", host);
        props.put("mail.smtp.port", "587");

        // Create a batch size and delay for rate limiting
        int batchSize = 2; // Number of emails to send per batch
        long delayBetweenBatches = 10_000; // Delay in milliseconds (10 seconds)

        // Create batches from the recipient list
        List<List<String>> batches = createBatches(recipientList, batchSize);

        // create a fixed thread pool executor for bulk email sending
        ExecutorService executor = Executors.newFixedThreadPool(5); // 5 threads for sending emails concurrently

        // Iterate over each batch
        for (List<String> batch : batches) {
            // Submit tasks for each email in the batch
            for (String to : batch) {
                executor.submit(() -> sendEmail(to, from, props, username, password));
            }

            // Introduce a delay between batches for rate limiting
            try {
                System.out.println("Waiting for " + delayBetweenBatches / 1000 + " seconds before sending the next batch...");
                Thread.sleep(delayBetweenBatches);
            } catch (InterruptedException e) {
                Thread.currentThread().interrupt();  // Handle the interruption properly
                System.out.println("Batch processing interrupted");
            }
        }

        // Shutdown the executor service gracefully after all tasks are submitted
        executor.shutdown();
    }

    // Method to send individual email
    public static void sendEmail(String to, String from, Properties props, final String username, final String password) {
        // create the Session object
        Session session = Session.getInstance(props, new Authenticator() {
            @Override
            protected PasswordAuthentication getPasswordAuthentication() {
                return new PasswordAuthentication(username, password);
            }
        });

        try {
            // create a MimeMessage object
            Message message = new MimeMessage(session);
            // set From email field
            message.setFrom(new InternetAddress(from));
            // set To email field
            message.setRecipient(Message.RecipientType.TO, new InternetAddress(to));
            // set email subject field
            message.setSubject("Hello from the Mailtrap team!");
            // set the content of the email message
            message.setText("Just discovered that Jakarta Mail is fun and easy to use!");

            // send the email message
            Transport.send(message);

            System.out.println("Email sent to: " + to);

        } catch (MessagingException e) {
            throw new RuntimeException(e);
        }
    }

    // Helper method to create batches from the recipient list
    public static List<List<String>> createBatches(List<String> recipientList, int batchSize) {
        List<List<String>> batches = new ArrayList<>();
        int totalSize = recipientList.size();

        for (int i = 0; i < totalSize; i += batchSize) {
            int end = Math.min(i + batchSize, totalSize);
            batches.add(recipientList.subList(i, end));
        }

        return batches;
    }
}
The code I provided above can easily handle bulk email sending while giving you the flexibility to increase or decrease batch sizes and delay intervals, based on your needs.
I’ve also used the Mailtrap Bulk Stream, which I mentioned previously, as you can notice from the host name bulk.smtp.mailtrap.io. With it, I can send bulk email at a high sending throughput while my deliverability remains superb.
Send email in Java using email API
If you want to automate your sending process, you can do so easily with Mailtrap’s very own Email API. The API has a sending throughput of up to ~10,000 emails per second and comes with a plethora of advanced features such as dedicated IPs, suppressions lists, IP auto-warm up, and more!
Here’s how you can use it:
- Sign up for a free Mailtrap account.
- Verify your domain and update DNS records.
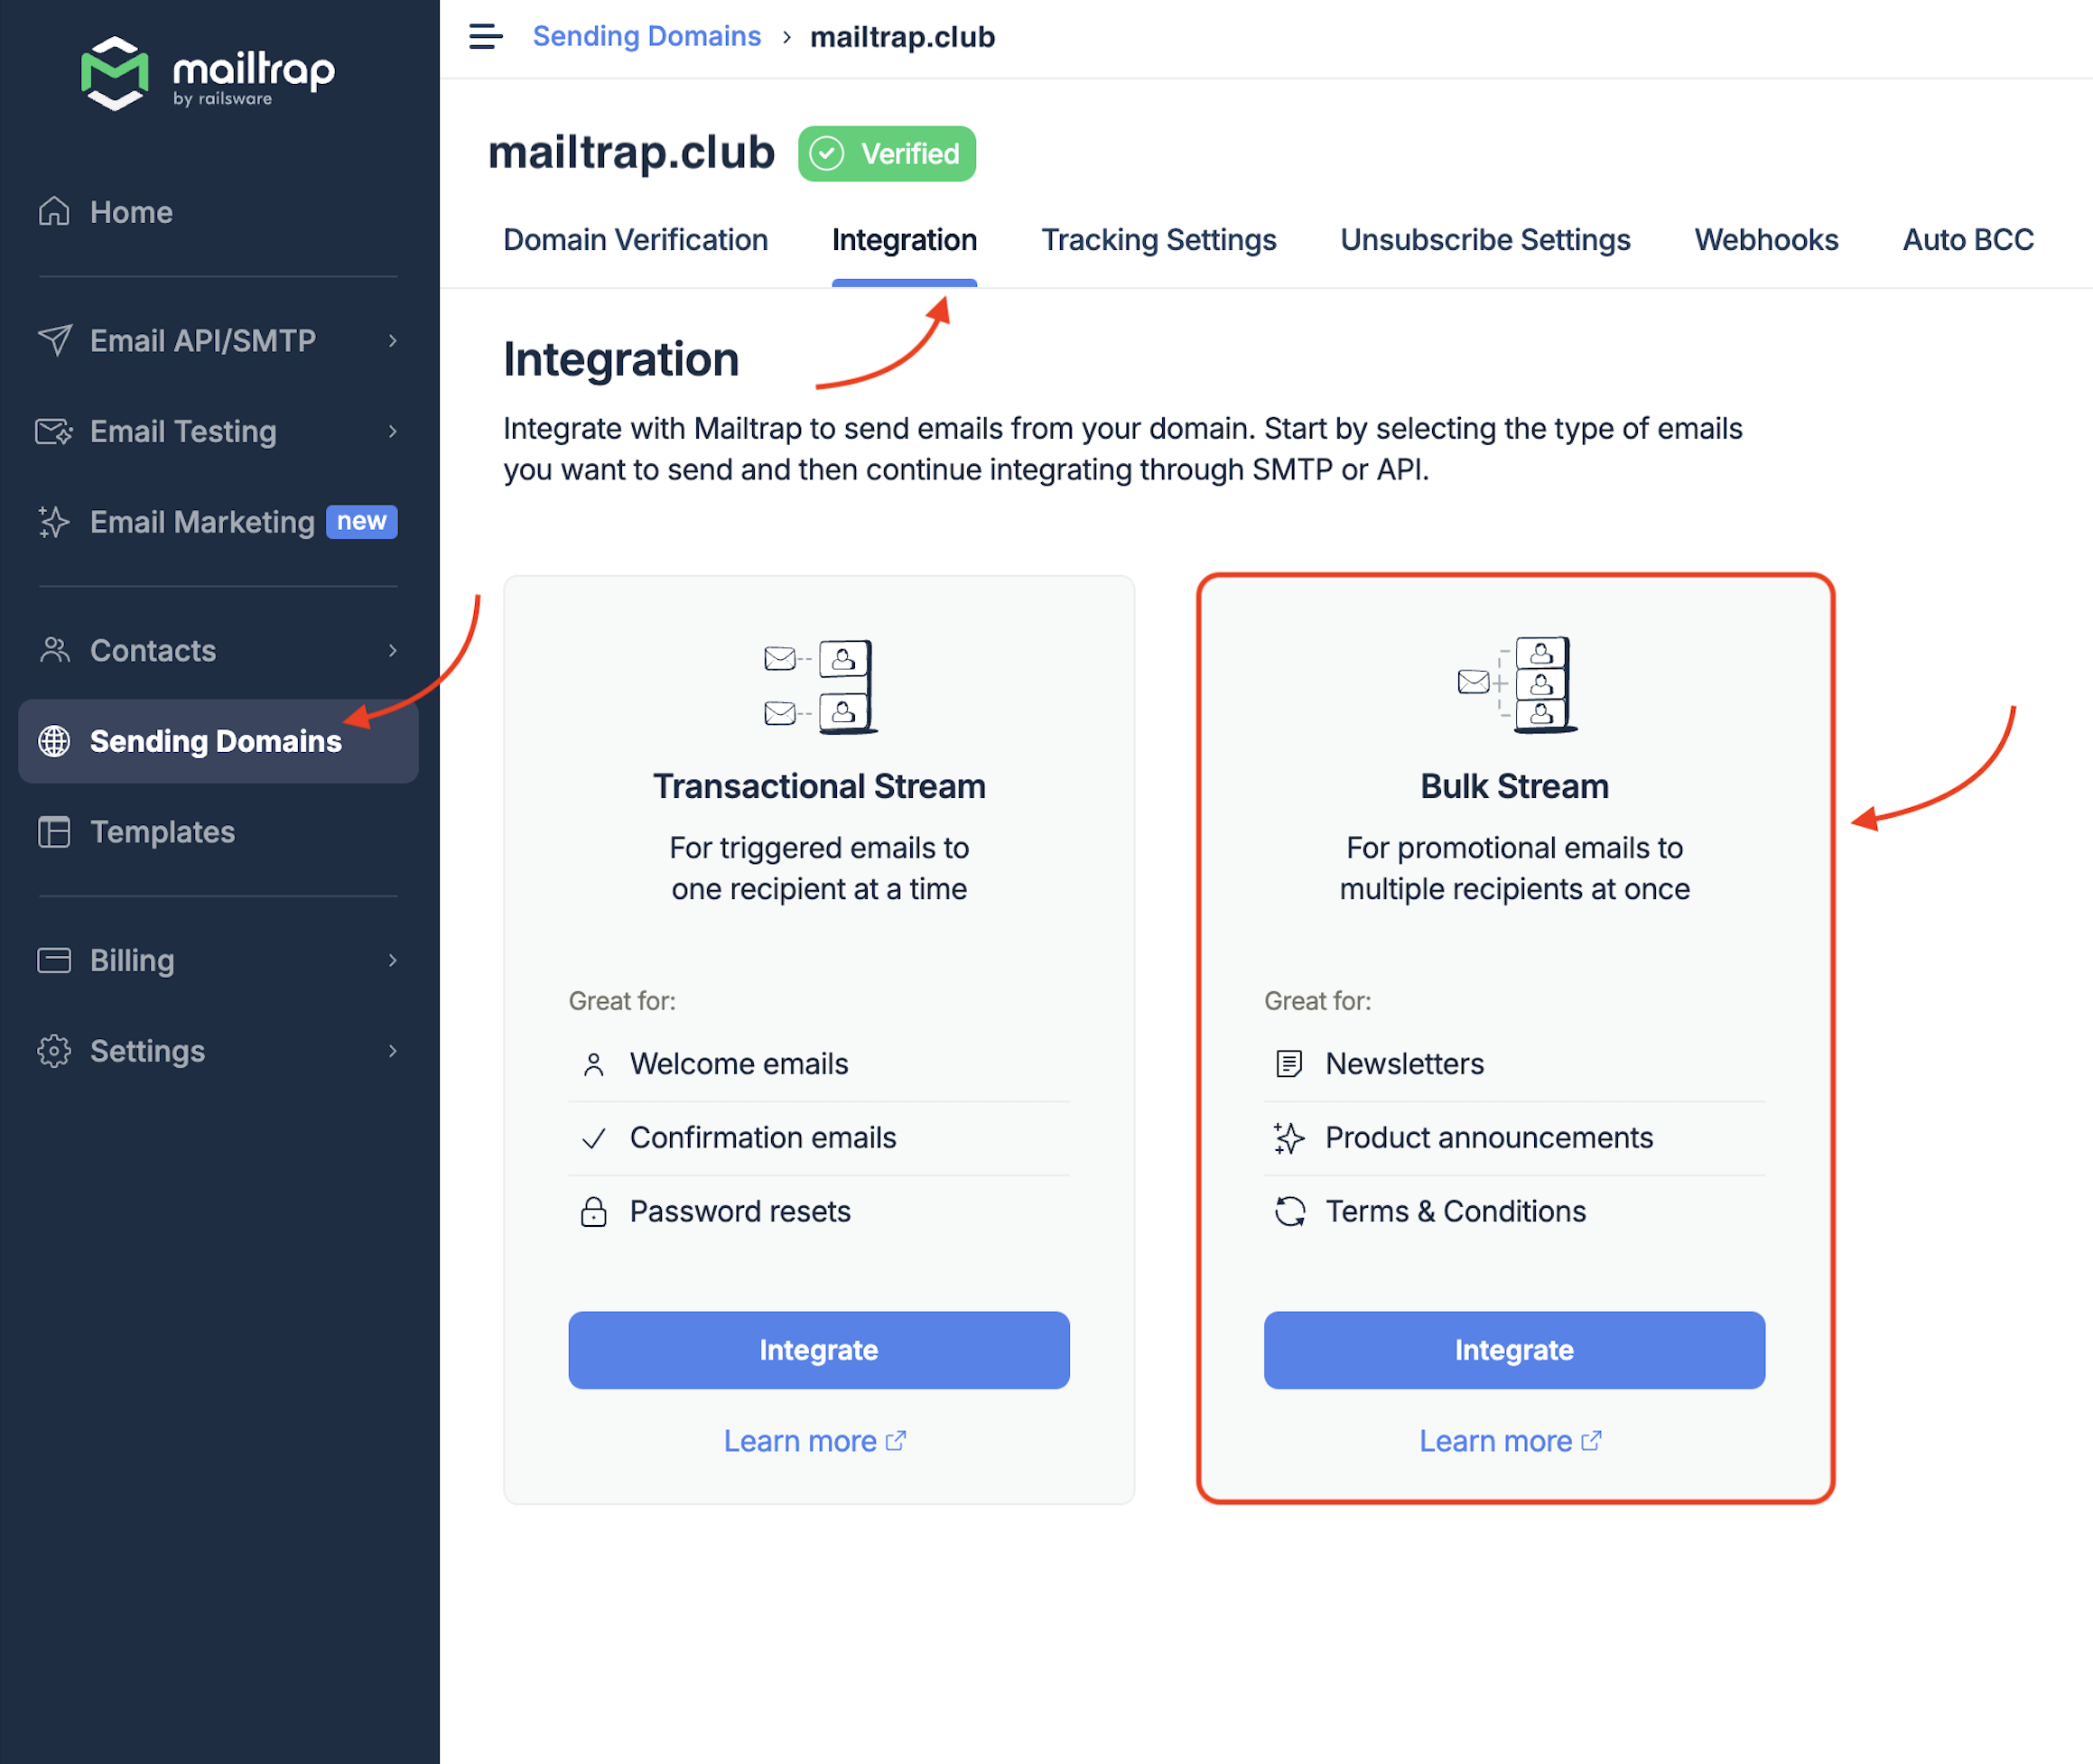
- Navigate to the Sending Domains → Integration and choose the Transactional Stream for now.
- Click on API and select Java underneath Code Samples.
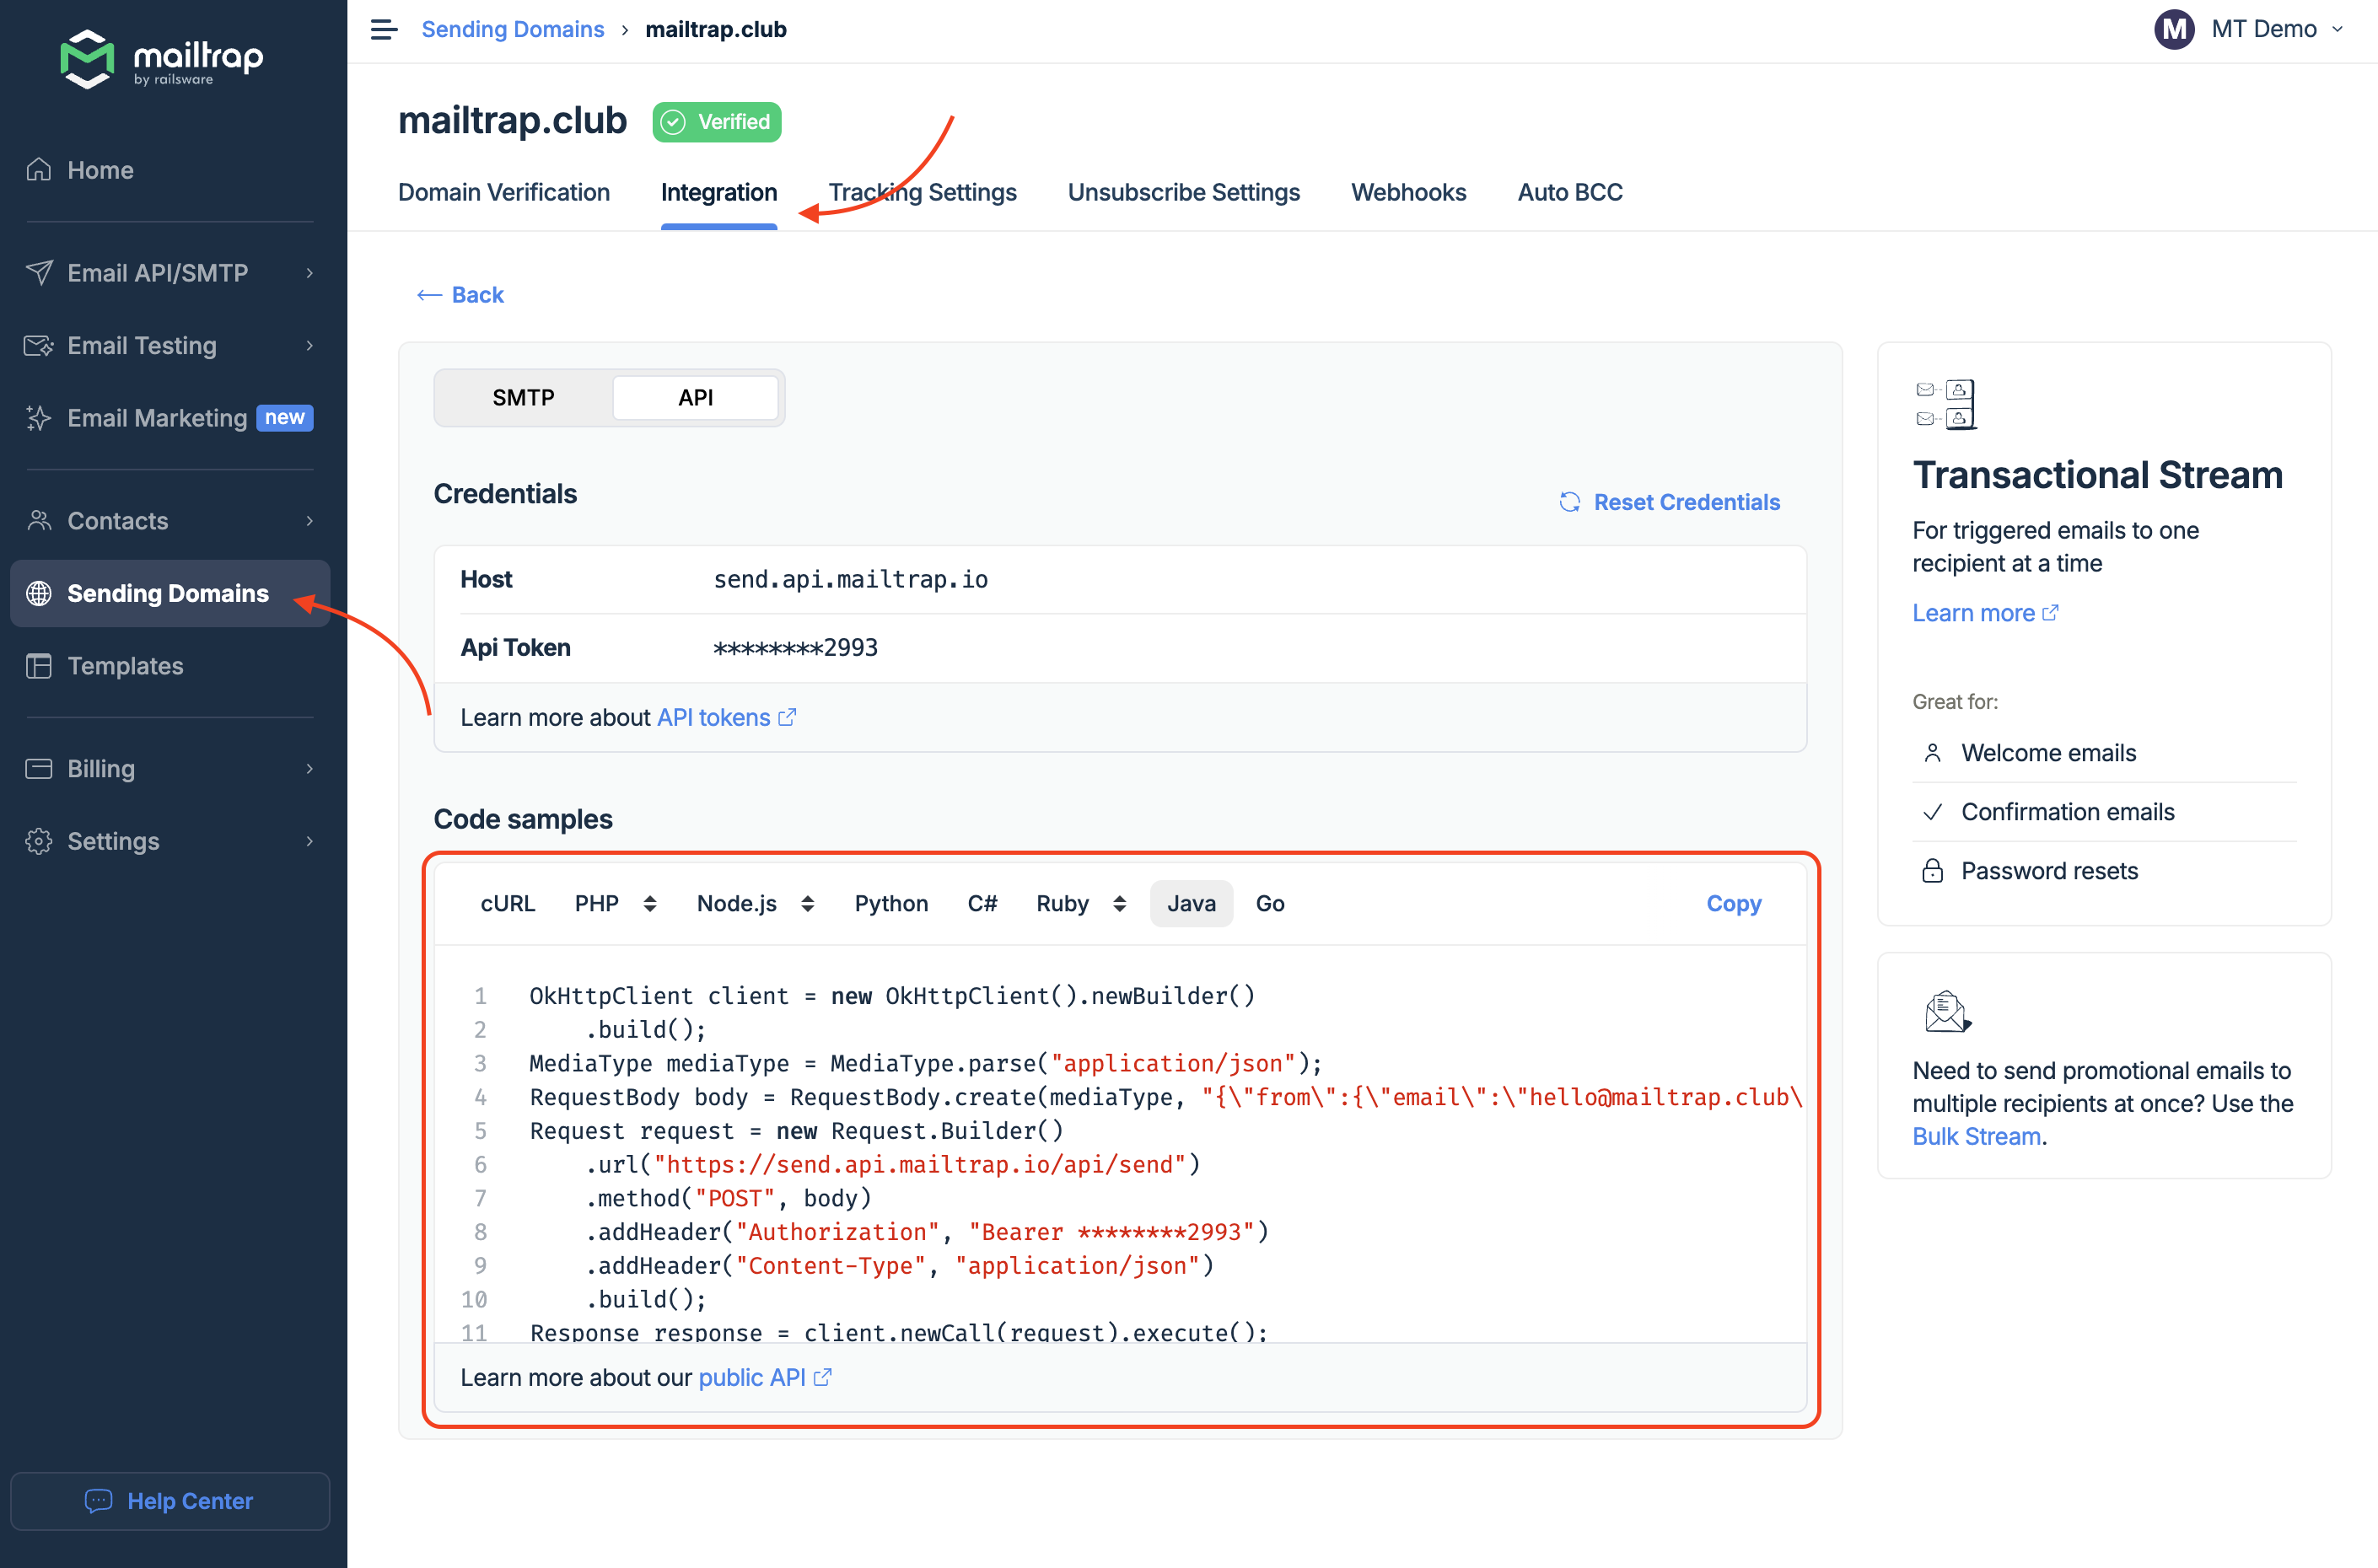
- Copy the code provided into your main configuration file (e.g., Main.java)
- Add the following Mailtrap Java SDK dependency to your project:
<dependencies>
   <dependency>
       <groupId>io.mailtrap</groupId>
       <artifactId>mailtrap-java</artifactId>
       <version>1.0.0</version>
   </dependency>
</dependencies>
And here’s a code snippet you can paste into your Main.java file:
package org.mailtrap;

import io.mailtrap.client.MailtrapClient;
import io.mailtrap.config.MailtrapConfig;
import io.mailtrap.factory.MailtrapClientFactory;
import io.mailtrap.model.request.emails.Address;
import io.mailtrap.model.request.emails.MailtrapMail;

import java.util.List;

public class SendEmail {
   private static final String TOKEN = "YOUR_MAILTRAP_API_TOKEN";
   private static final String EMAIL = "RECEIVER_EMAIL";

   public static void main(String[] args) {
       final MailtrapConfig config = new MailtrapConfig.Builder()
               .token(TOKEN)
               .build();

       final MailtrapClient client = MailtrapClientFactory.createMailtrapClient(config);

       final MailtrapMail mail = MailtrapMail.builder()
               .from(new Address("hello@demomailtrap.com", "Mailtrap Test"))
               .to(List.of(new Address(EMAIL)))
               .subject("You are awesome!")
               .text("Congrats for sending test email with Mailtrap!")
               .category("Integration Test")
               .build();

       try {
           System.out.println(client.send(mail));
       } catch (Exception e) {
           System.out.println("Caught exception : " + e);
       }
   }
}
To run the code, execute the following command:
mvn exec:java -Dexec.mainClass="org.mailtrap.SendEmail"Important:
- For the sending functionality to work, don’t forget to replace the
"YOUR_MAILTRAP_API_TOKEN"with your actual Mailtrap API token. Also, you need to replace"RECEIVER_EMAIL"with real email. - Don’t forget that in Demo setup, when you use demomailtrap.com domain, you could send emails only to yourself.
Send HTML email
To send HTML emails, simply use the new html() method from the SDK, just like so:
"html\":\"<p>Congrats for sending test email with <strong>Mailtrap</strong>!</p>\"And here’s the full code snippet you an copy/paste:
package org.mailtrap;

import io.mailtrap.client.MailtrapClient;
import io.mailtrap.config.MailtrapConfig;
import io.mailtrap.factory.MailtrapClientFactory;
import io.mailtrap.model.request.emails.Address;
import io.mailtrap.model.request.emails.MailtrapMail;

import java.util.List;

public class SendEmailHtml {
   private static final String TOKEN = "YOUR_MAILTRAP_API_TOKEN";
   private static final String EMAIL = "RECEIVER_EMAIL";

    public static void main(String[] args) {
        final MailtrapConfig config = new MailtrapConfig.Builder()
                .token(TOKEN)
                .build();

        final MailtrapClient client = MailtrapClientFactory.createMailtrapClient(config);

        final MailtrapMail mail = MailtrapMail.builder()
                .from(new Address("hello@demomailtrap.com", "Mailtrap Test"))
                .to(List.of(new Address(EMAIL)))
                .subject("You are awesome!")
                .html("<p>Congrats for sending test email with <strong>Mailtrap</strong>!</p>")
                .category("Integration Test")
                .build();

        try {
            System.out.println(client.send(mail));
        } catch (Exception e) {
            System.out.println("Caught exception : " + e);
        }
    }
}
Send email to multiple recipients
Similarly, you can modify the input parameter of to() function to send to multiple recipients.
Here’s an example:
package org.mailtrap;

import io.mailtrap.client.MailtrapClient;
import io.mailtrap.config.MailtrapConfig;
import io.mailtrap.factory.MailtrapClientFactory;
import io.mailtrap.model.request.emails.Address;
import io.mailtrap.model.request.emails.MailtrapMail;

import java.util.List;

public class SendEmailHtml {
   private static final String TOKEN = "YOUR_MAILTRAP_API_TOKEN";
   private static final String EMAIL = "RECEIVER_EMAIL";

   public static void main(String[] args) {
        final MailtrapConfig config = new MailtrapConfig.Builder()
                .token(TOKEN)
                .build();

        final MailtrapClient client = MailtrapClientFactory.createMailtrapClient(config);

        final MailtrapMail mail = MailtrapMail.builder()
                .from(new Address("hello@demomailtrap.com", "Mailtrap Test"))
                .to(List.of(new Address(EMAIL), new Address("demo@mailtrap.io"), new Address("example@mailtrap.io")))
                .subject("You are awesome!")
                .html("<p>Congrats for sending test email with <strong>Mailtrap</strong>!</p>")
                .category("Integration Test")
                .build();

        try {
            System.out.println(client.send(mail));
        } catch (Exception e) {
            System.out.println("Caught exception : " + e);
        }
    }
}
The list above contains two recipients, but feel free to add as many as you need.
Send email with attachments
To add attachments to your emails, you’ll need to encode the file into Base64 format, which is done by the readAndEncodeAttachment() method. Everything else is handled by the SDK.
Check it out:
package org.mailtrap;

import io.mailtrap.client.MailtrapClient;
import io.mailtrap.config.MailtrapConfig;
import io.mailtrap.factory.MailtrapClientFactory;
import io.mailtrap.model.request.emails.Address;
import io.mailtrap.model.request.emails.EmailAttachment;
import io.mailtrap.model.request.emails.MailtrapMail;

import java.io.InputStream;
import java.util.Base64;
import java.util.List;

public class SendEmailWithAttachments {
   private static final String TOKEN = "YOUR_MAILTRAP_API_TOKEN";
   private static final String EMAIL = "RECEIVER_EMAIL";

   public static void main(String[] args) {
       final MailtrapConfig config = new MailtrapConfig.Builder()
               .token(TOKEN)
               .build();

       final MailtrapClient client = MailtrapClientFactory.createMailtrapClient(config);

       final String filename = "file.pdf";
       final String attachment = readAndEncodeAttachment(filename);

       final MailtrapMail mail = MailtrapMail.builder()
               .category("Integration Test")
               .from(new Address("hello@demomailtrap.com", "Mailtrap Test"))
               .to(List.of(new Address(EMAIL)))
               .subject("You are awesome!")
               .text("Congrats for sending test email with Mailtrap!")
               .attachments(List.of(EmailAttachment.builder()
                       .filename(filename)
                       .content(attachment)
                       .build()))
               .build();

       try {
           System.out.println(client.send(mail));
       } catch (Exception e) {
           System.out.println("Caught exception : " + e);
       }
   }

   private static String readAndEncodeAttachment(String filename) {
       try (InputStream inputStream = SendEmailWithAttachments.class.getClassLoader().getResourceAsStream(filename)) {
           if (inputStream == null) {
               System.out.println("Failed to read attachment");
               return "";
           }
           return Base64.getEncoder().encodeToString(inputStream.readAllBytes());
       } catch (Exception e) {
           System.out.println("Failed to read attachment : " + e.getMessage());
           return "";
       }
   }
}
P.S. P.S. Don’t forget to replace filename file.pdf with the actual name of your file.
Send email with embedded image
To add some zest to your emails with an embedded image, all you need to do is:
- Read the image file and encode it to Base64
- Include a
Content-IDto the image part - Reference the image using
cid- For example:
<img src='cid:image_cid'>
- For example:
And here’s how it all looks when put together:
package org.mailtrap;

import io.mailtrap.client.MailtrapClient;
import io.mailtrap.config.MailtrapConfig;
import io.mailtrap.factory.MailtrapClientFactory;
import io.mailtrap.model.request.emails.Address;
import io.mailtrap.model.request.emails.EmailAttachment;
import io.mailtrap.model.request.emails.MailtrapMail;

import java.io.InputStream;
import java.util.Base64;
import java.util.List;

public class SendEmailWithEmbeddedImage {
   private static final String TOKEN = "YOUR_MAILTRAP_API_TOKEN";
   private static final String EMAIL = "RECEIVER_EMAIL";

   public static void main(String[] args) {
       final MailtrapConfig config = new MailtrapConfig.Builder()
               .token(TOKEN)
               .build();

       final MailtrapClient client = MailtrapClientFactory.createMailtrapClient(config);

       final String filename = "path/to/your/image.jpg";
       final String attachment = readAndEncodeAttachment(filename);

       final MailtrapMail mail = MailtrapMail.builder()
               .category("Integration Test")
               .from(new Address("hello@demomailtrap.com", "Mailtrap Test"))
               .to(List.of(new Address(EMAIL)))
               .subject("You are awesome!")
               .html("""
                       <!doctype html>
                       <html>
                         <head>
                           <meta http-equiv="Content-Type" content="text/html; charset=UTF-8">
                         </head>
                         <body style="font-family: sans-serif;">
                           <div style="display: block; margin: auto; max-width: 600px;" class="main">
                             <h1 style="font-size: 18px; font-weight: bold; margin-top: 20px">Congrats for sending test email with Mailtrap!</h1>
                             <img alt="Inspect with Tabs" src="cid:path/to/your/image.jpg" style="width: 100%;">
                             <p>Good luck! Hope it works.</p>
                           </div>
                           <!-- Example of invalid for email html/css, will be detected by Mailtrap: -->
                           <style>
                             .main { background-color: white; }
                             a:hover { border-left-width: 1em; min-height: 2em; }
                           </style>
                         </body>
                       </html>
                       """)
               .attachments(List.of(EmailAttachment.builder()
                       .filename(filename)
                       .content(attachment)
                       .contentId(filename)
                       .disposition("inline")
                       .build()))
               .build();

       try {
           System.out.println(client.sendingApi().emails().send(mail));
       } catch (Exception e) {
           System.out.println("Caught exception : " + e);
       }
   }

   private static String readAndEncodeAttachment(String filename) {
       try (InputStream inputStream = SendEmailWithEmbeddedImage.class.getClassLoader().getResourceAsStream(filename)) {
           if (inputStream == null) {
               System.out.println("Failed to read attachment");
               return "";
           }
           return Base64.getEncoder().encodeToString(inputStream.readAllBytes());
       } catch (Exception e) {
           System.out.println("Failed to read attachment : " + e.getMessage());
           return "";
       }
   }
}
As with attachments, make sure to insert the actual path to your image instead of "path/to/your/image.jpg".
Asynchronous email sending
For asynchronous email sending, we’ll use CompletableFuture, which allows us to run email-sending operations on a separate thread.
Here’s a code block you can use:
package org.mailtrap;

import io.mailtrap.client.MailtrapClient;
import io.mailtrap.config.MailtrapConfig;
import io.mailtrap.factory.MailtrapClientFactory;
import io.mailtrap.model.request.emails.Address;
import io.mailtrap.model.request.emails.MailtrapMail;

import java.io.IOException;
import java.util.List;
import java.util.concurrent.CompletableFuture;

public class SendEmailAsync {
   private static final String TOKEN = "YOUR_MAILTRAP_API_TOKEN";
   private static final String EMAIL = "RECEIVER_EMAIL";

   public static void main(String[] args) {
       // Asynchronously send email
       CompletableFuture<Void> future = CompletableFuture.runAsync(() -> {
                   try {
                       // Attempt to send the email
                       sendEmail();
                   } catch (IOException e) {
                       // Error handling: If an exception occurs during email sending, log the error
                       System.err.println("Error sending email: " + e.getMessage());
                       e.printStackTrace();
                   }
               })
               // Completion Notification: When the async task completes, run this notification code
               .thenRun(() -> System.out.println("Email task completed!"))

               // Exception Handling: If the async task fails, handle the exception here
               .exceptionally(ex -> {
                   System.err.println("Failed to send email: " + ex.getMessage());
                   return null; // Return null to complete the CompletableFuture exceptionally
               });

       // Indicate that the task to send email has been submitted asynchronously
       System.out.println("Email send task submitted!");

       future.join();
   }

   public static void sendEmail() throws IOException {
       final MailtrapConfig config = new MailtrapConfig.Builder()
               .token(TOKEN)
               .build();

       final MailtrapClient client = MailtrapClientFactory.createMailtrapClient(config);

       final MailtrapMail mail = MailtrapMail.builder()
               .from(new Address("hello@demomailtrap.com", "Mailtrap Test"))
               .to(List.of(new Address(EMAIL)))
               .subject("You are awesome!")
               .text("Congrats for sending test email with Mailtrap!")
               .category("Integration Test")
               .build();

       try {
           System.out.println(client.send(mail));
       } catch (Exception e) {
           System.out.println("Caught exception : " + e);
       }
   }
}
To make the code more complete, I’ve also added:
CompletableFuture.runAsync()– Exception handling.thenRun()– Completion notificationsSystem.err– Error logging
You can check these out from the comments in the snippet.
Send bulk email
If you plan on sending the same email to a large group of recipients, for example newsletters, announcements, promotions, invitations, and updates – bulk email is the way to go. Fortunately, Mailtrap provides a reliable bulk email stream to keep your deliverability high.

In the Java SDK it is a separate bulkSendingApi(). This small change will make a huge difference in performance of your emails. Check it out:
package org.mailtrap;

import io.mailtrap.client.MailtrapClient;
import io.mailtrap.config.MailtrapConfig;
import io.mailtrap.factory.MailtrapClientFactory;
import io.mailtrap.model.request.emails.Address;
import io.mailtrap.model.request.emails.MailtrapMail;

import java.util.List;

public class SendEmailBulk {
   private static final String TOKEN = "YOUR_MAILTRAP_API_TOKEN";
   private static final String EMAIL = "RECEIVER_EMAIL";

   public static void main(String[] args) {
       final MailtrapConfig config = new MailtrapConfig.Builder()
               .token(TOKEN)
               .build();

       final MailtrapClient client = MailtrapClientFactory.createMailtrapClient(config);

       final MailtrapMail mail = MailtrapMail.builder()
               .from(new Address("hello@demomailtrap.com", "Mailtrap Test"))
               // here as many recipients as needed may be added
               .to(List.of(new Address(EMAIL)))
               .subject("You are awesome!")
               .text("Congrats for sending bulk emails with Mailtrap!")
               .build();

       try {
           System.out.println(client.bulkSendingApi().emails().send(mail));
       } catch (Exception e) {
           System.out.println("Caught exception : " + e);
       }
   }
}
P.S. Mailtrap’s email API is bulk-ware, which means you can send marketing emails on top of transactional with high deliverability. Without any additional costs, of course.
Wrapping up
And with that, dear reader, we come to the close of our Java article!
I’ve provided you with an arsenal of email-sending options and showed you how to boost your sending firepower even further with Mailtrap SMTP/API.
And here’s a fun fact: did you know that according to StackOverflow, Java won’t be going out of fashion any time soon? So why not expand your knowledge by reading our other Java-related articles, such as:
