 Skip to Navigation


As you can’t really send emails using JavaScript code alone due to the lack of support for server sockets, you can either use a client-side solution or leverage a server-side language that talks to the SMTP server.
In this tutorial, I’ll guide you along both pathways. So: how to send emails in JavaScript with and without a backend, that is, I’ll explain both client-side and server-side methods.
| Client-side | Server-side |
| Mailto SMTP.js EmailJS | Node.js and Nodemailer Email API |
Also, as there’s a lot of code in this article, to make sure everything works correctly I’ll show you how to test your emails and sending functionality by the end of the article, so be sure to stick around. 😉
Send email using mailto:
Mailto is a protocol used to produce hyperlinks on websites through which the users can send an email to a specific address directly from HTML without having to copy it and enter in their email client manually.
Technically, the mailto: method does not send email directly from the browser, which is why I don’t recommend it, but it can do the job.
So, for example, let’s say that you want your website visitors to leave you feedback. You could either insert mailto: as a hyperlink or place it in a simple contact form code.
- Hyperlink
Here’s a basic example of mailto: syntax, which creates a hyperlink that, when clicked, opens the user’s email client with pre-filled fields:
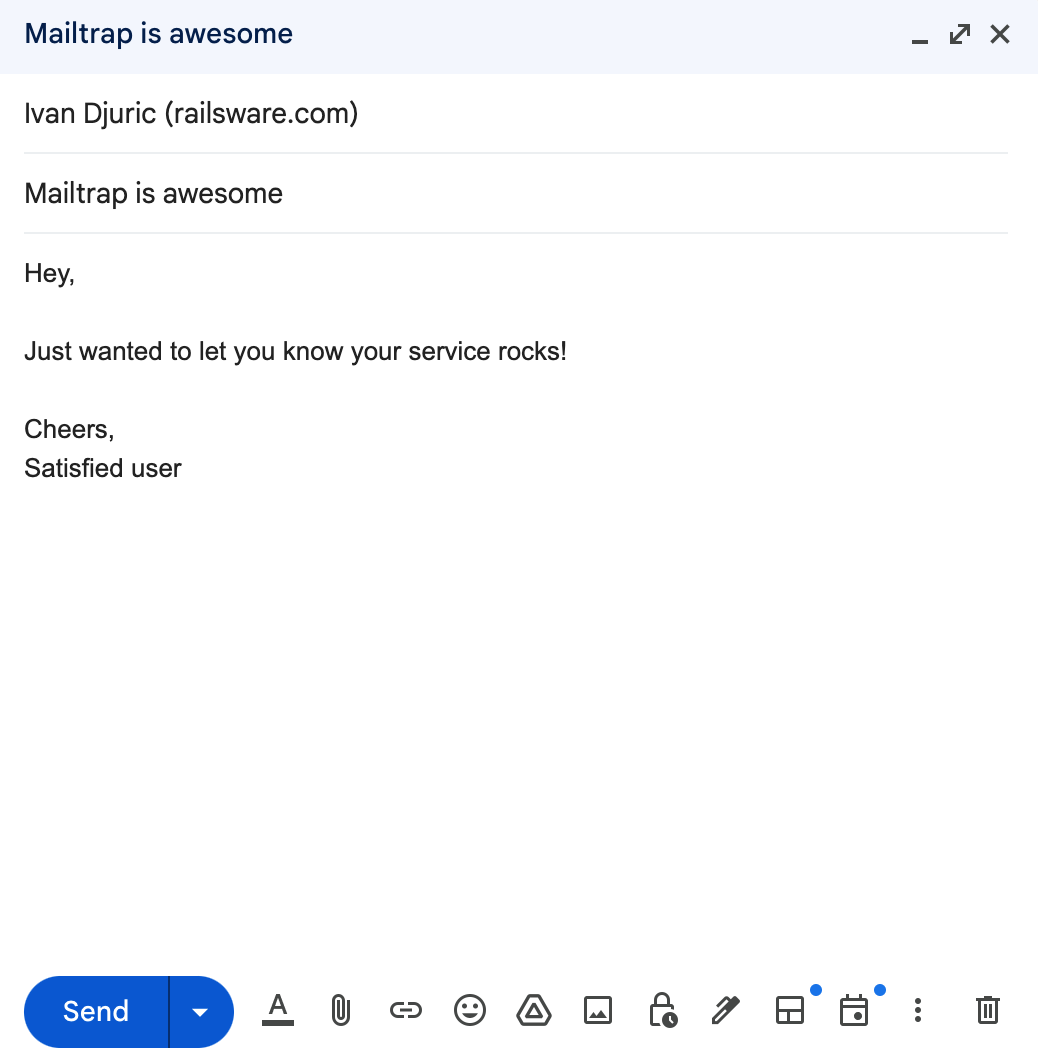
<a href=”mailto:ivan.djuric@railsware.com”>Mailtrap is awesome/a>Now, to improve user experience a bit, you can pre-populate the email body, leveraging mailto: further to its potential. Here’s another, a bit more complex example:
<a href="mailto:ivan.djuric@railsware.com?subject=Mailtrap%20is%20awesome&body=Hey%0D%0A%0D%0AJust%20wanted%20to%20let%20you%20know%20your%20service%20rocks!%0D%0A%0D%0ACheers,%0D%0ASatisfied%20user%20%3A%29">Send Email</a>And here’s what the end-user will be greeted with once they click:
- Simple contact form
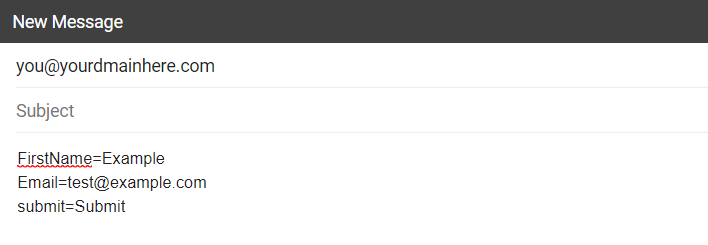
You can also place mailto: in a basic contact form code and allow your visitors to send you messages without backend processing. However, I recommend you go with this option only if you expect low traffic. Check it out:
<form action="mailto:you@yourdmainhere.com" method="post" enctype="text/plain">
  FirstName: <input type="text" name="FirstName">
  Email: <input type="text" name="Email">
  <input type="submit" name="submit" value="Submit">
</form>
In the browser, it would look something like this:

And when the user fills in their first name and email and hits ‘Submit,’ their browser will open the default email client with the following input:
As you can see, mailto: really is a super straightforward solution. However, I must note some of its downsides here, namely:
- Lack of control – Since the data is submitted in the form sent by the browser, you can’t really control the layout of the data. The best you can do is pre-populate the email and create a sort of a template, something like in the example above. ⬆️
- If you want to create a contact form in Java with more control, I suggest you read our dedicated article, where you can learn everything from creating it to adding email validation and verification logic to it.
- No protection against spambots –
mailto:doesn’t protect your email addresses from being easily harvested by bots. However, if you’re set on usingmailto:I can recommend services like Cloudflare as a workaround. - Issues with email clients – There’s always a chance that the email client won’t correspond with the user’s default client they use to send emails. For example, if the user’s default client is Gmail but Outlook opens for them upon clicking on your link, they might not be logged in or even have an account, which could be frustrating.
Send email using SMTP.js
SMTP.js is a super lightweight JavaScript library that removes backend dependencies and allows front-end focused web apps to send client-side mail using SMTP (Simple Mail Transfer Protocol).
This library is best suited for small-scale or test projects because of its lack of encryption (I’ll explain this in a minute). For production use and projects where security concerns are not minimal, I recommend using a dedicated email service with proper encryption.
Regardless, for explanatory purposes, here’s how you can use SMTP.js:
Include a script tag to SMTP.js in your project:
<script src="https://smtpjs.com/v3/smtp.js">
</script>
Here’s an actual example of an HTML file with SMTP.js you can use to send emails with:
<!DOCTYPE html>
<html lang="en">
<head>
    <meta charset="UTF-8">
    <meta name="viewport" content="width=device-width, initial-scale=1.0">
    <title>Send Email with SMTP.js</title>
    <script src="https://smtpjs.com/v3/smtp.js"></script>
</head>
<body>
    <!-- Header section added to the body to provide introductory content -->
    <header>
        <h1>Email Sender App</h1> <!-- Main heading of the web page -->
        <p>Click the button below to send an email using SMTP.js</p> <!-- Description of the page functionality -->
    </header>
    <button onclick="sendEmail()">Send Email</button> <!-- Button to trigger email sending -->

    <script>
        function sendEmail() {
            Email.send({
                Host: "smtp.yourisp.com",
                Username: "username",
                Password: "password",
                To: 'recipient@example.com',
                From: "sender@example.com",
                Subject: "Test Email",
                Body: "This is a test email sent using SMTP.js"
            })
            .then(function (message) {
                alert("Mail sent successfully") // Alert message on successful email delivery
            });
        }
    </script>
</body>
</html>
Code breakdown:
- I’ve added headers to the code, but feel free to remove them and tweak the code as you wish.
- The
sendEmail()JavaScript function usesEmail.send()to send an email. alert("Mail sent successfully")displays a success message after the email is sent.- You need to replace the
Host,Username, andPasswordwith your SMTP server details. Some time ago, this could have been any provider (e.g., Gmail, Outlook, Mailtrap, etc.), but unfortunately, the service is limited to Elastic Email.- I’ve talked to the creator of SMTP.js, and he says that as their service is free, they had to get a sponsor for financial support, and Elastic Email was the one.
And a couple of words more about its key issue: lack of encryption. Namely, when sending an email using SMTP.js, your credentials will be visible to any cyber criminal who wants to intercept. Consider it like shouting your pin across the street.
And yes, SMTP.js does offer an encrypted token, but only if you use Elastic Email. However, although your credentials stay somewhat safe with the token, you still leave your account and your IP reputation open to abuse. As if managing your email sender reputation without a consistent IP address (read: using SMTP.js) wasn’t a daunting task on its own already.
You can read more about this issue in this Reddit thread, where people broke it down and explained it further.
Send email using EmailJS
Last in the line of client-side email-sending solutions for JavaScript is EmailJS, a service which we have featured in our blog post on sending emails in React. What this service offers is the ability to connect your preferred email service, build an email template, and send it from JavaScript without the need for any server code.
Note: Using EmailJS is an option for frontend-only applications that are not supported by a backend server. In case your application does have a backend server, you can use a solution such as Mailtrap Email Sending. I’ll show you how to do this in a minute.
Here’s how it works:
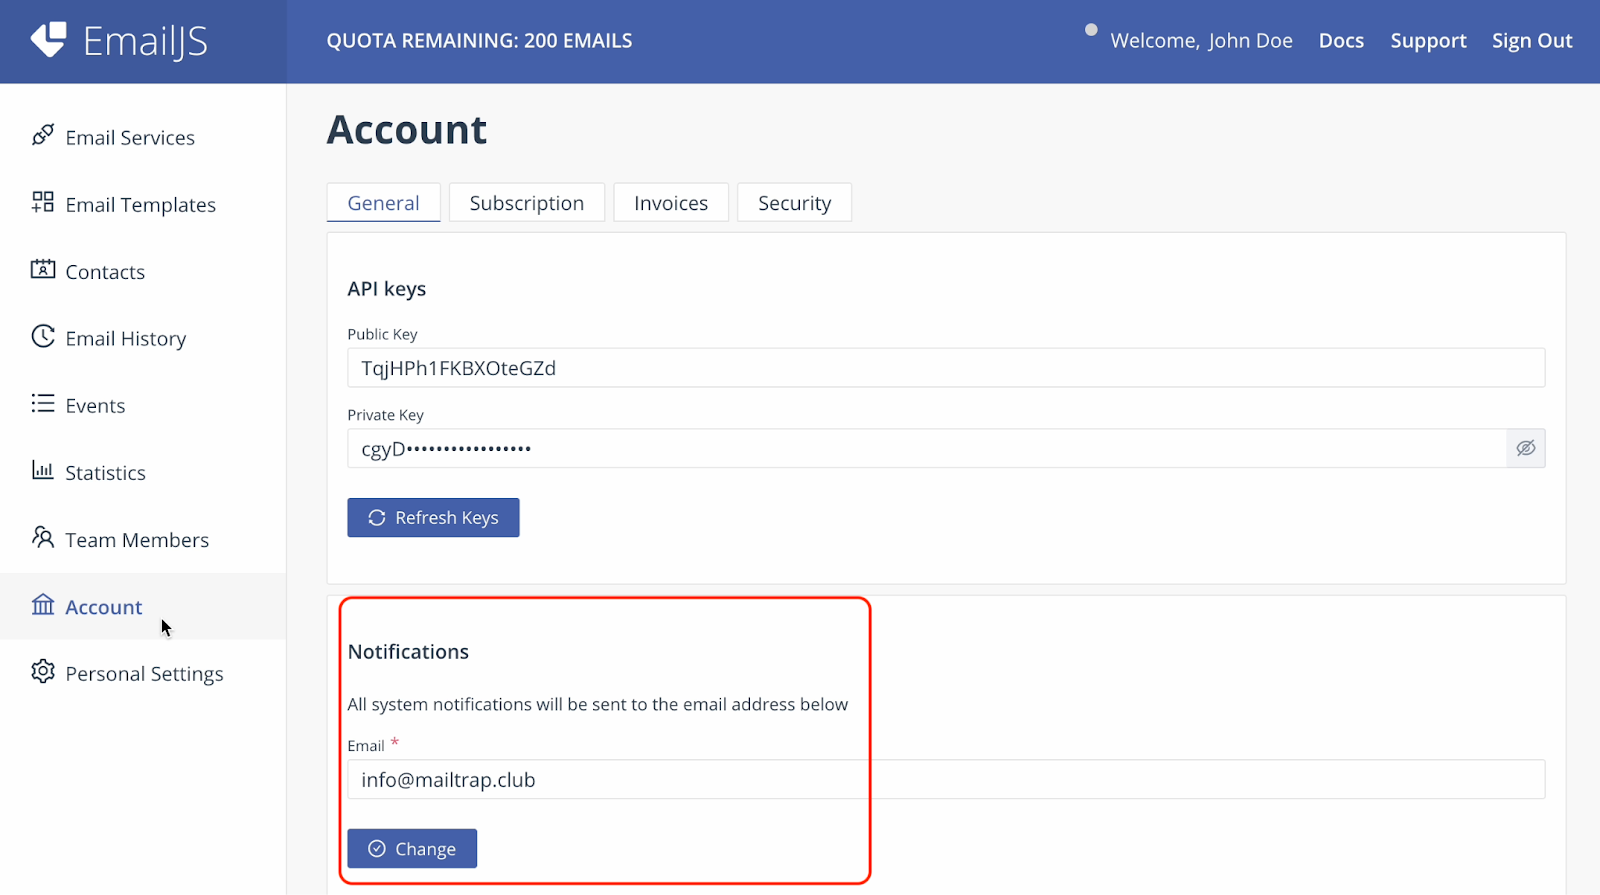
1. Create and setup your EmailJS account
First, start by creating an EmailJS account, logging in, and then navigating to the ‘Account’ page on the sidebar menu on your left. Once there, insert the desired domain you intend to use for email sending, like so:
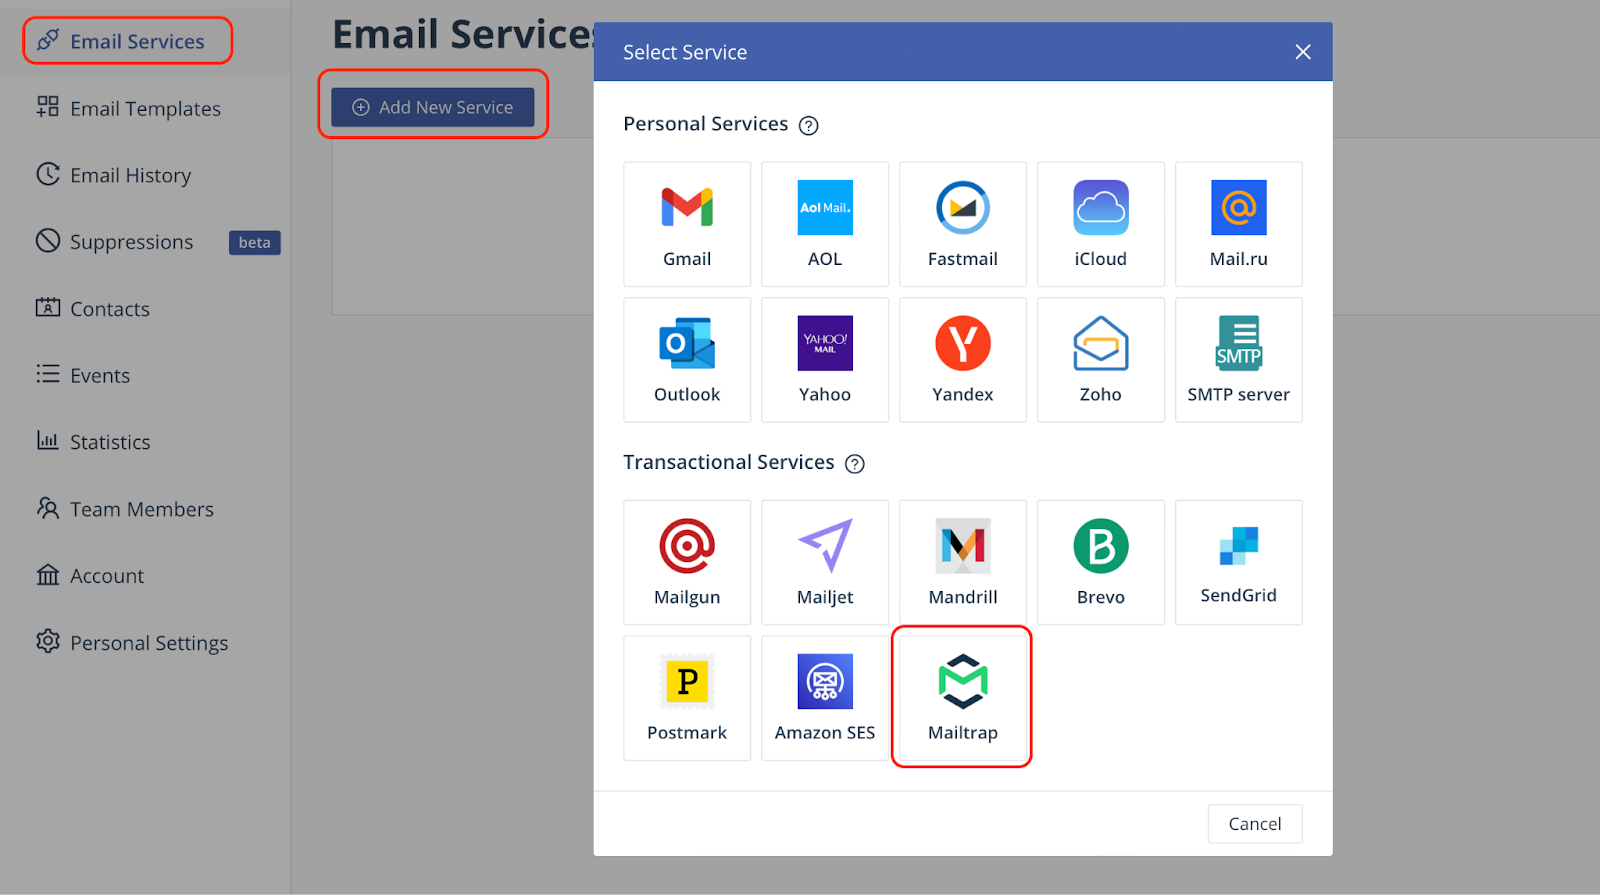
2. Connect your email-sending service
Next, we need to connect an email-sending service, as EmailJS doesn’t have an SMTP of its own. For this example, as in the rest of the article, I’ll go with Mailtrap due to its robust sending capabilities.
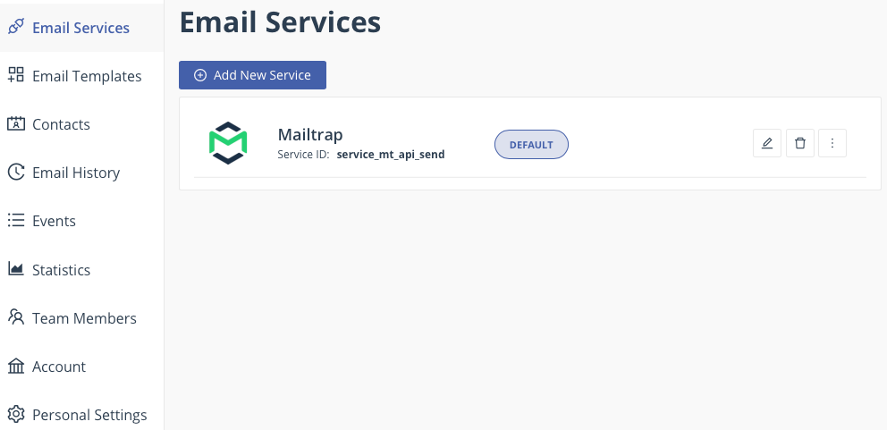
Simply navigate to ‘Email Services’ on your left, and click on ‘Add New Service.’ A window should appear with a list of the available options:
Then, you’ll be asked to configure your service by providing the following necessary details:
- Service ID – This is a unique ID assigned to the service, which you can come up with your own.
- Username and Password – These are the credentials you can copy from the ‘Integrations’ page from your Mailtrap account. If you need help retrieving them, please refer to the Mailtrap knowledgebase.
- Email Feature – From the dropdown menu, select ‘Sending.’ I’ll cover the testing feature in-depth later in the article.
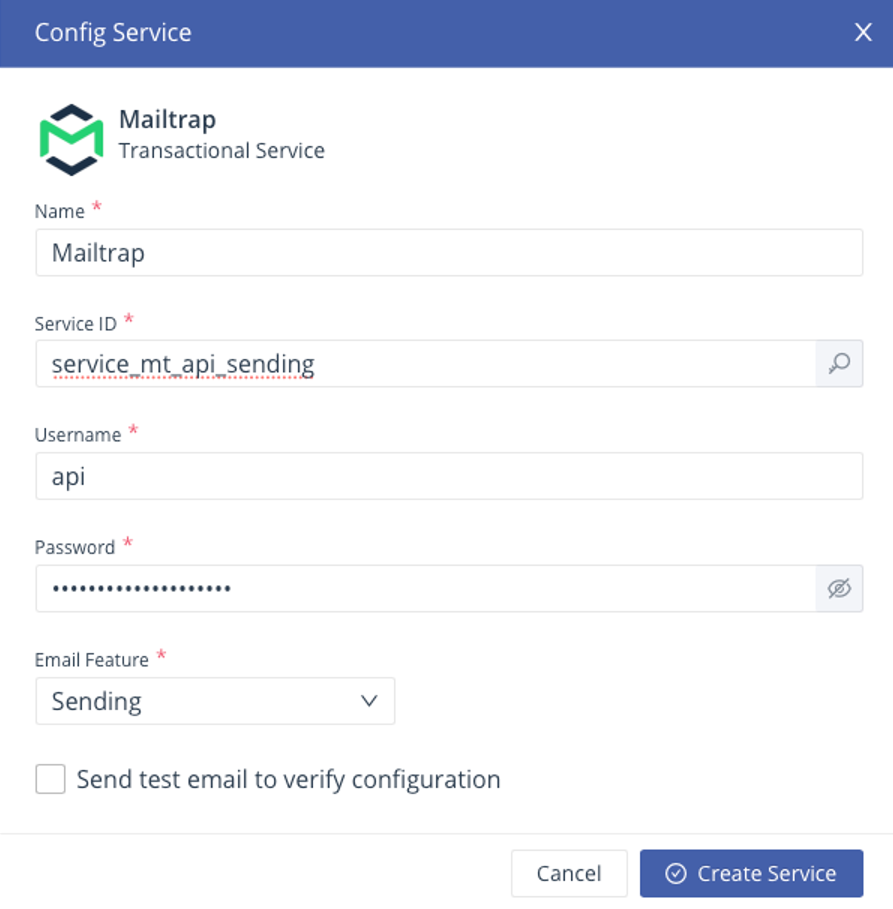
Important: Don’t mark the ‘Send test email to verify configuration’ checkbox since then the whole setup and configuration won’t work.
With all the details provided, click ‘Create Service’ to finalize this step and have the service listed in your EmailJS dashboard.
3. Create an email template
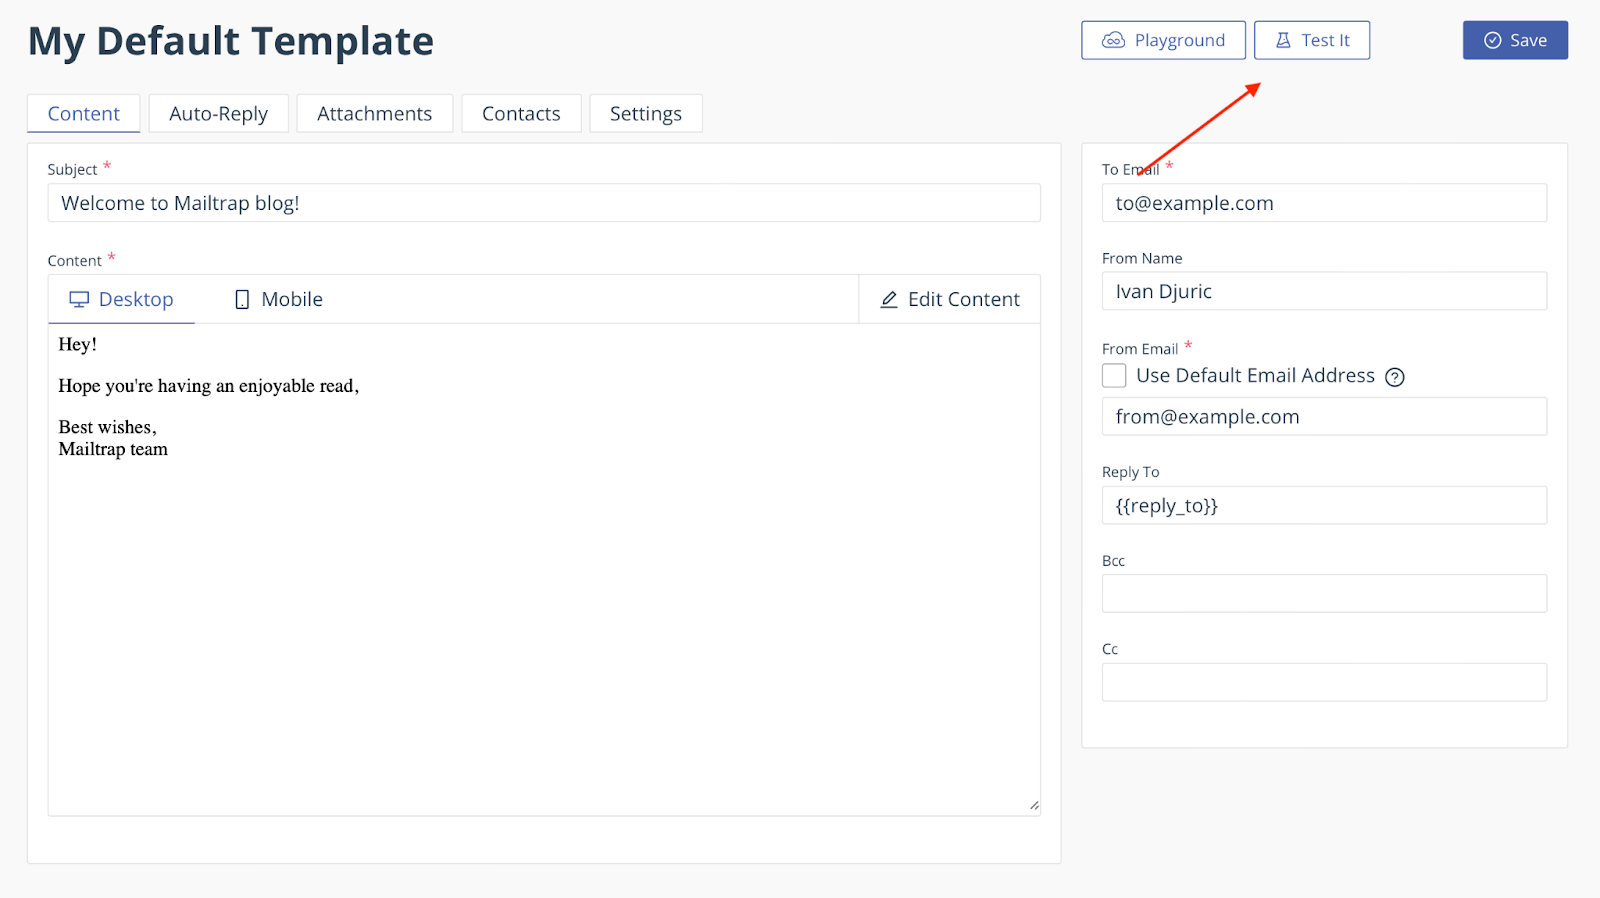
Now, let’s create an email template using the built-in editor, which has a plethora of content-building features, such as auto-reply, reCAPTCHA verification, etc.
You can locate the editor by clicking on ‘Create New Template’ under ‘Email Templates.’ Oce there, you’ll be able to define everything from the basics like the subject, content, and recipient to adding attachments and such.
Important:
- Do not tick the “Use Default Email Address” box since there is currently an issue, which makes the whole integration obsolete since EmailJS account won’t match the sending domain. Instead, use your enter your actual email-sending address.
- If you choose Mailtrap as your service, make sure that your sender email has to be from the same domain you added and verified when setting up your Mailtrap account.
You can also check out how your template looks by clicking on the ‘Test it’ button, which will open a new popup window where you need to provide some details such as the service used and the values for template parameters. ⬇️
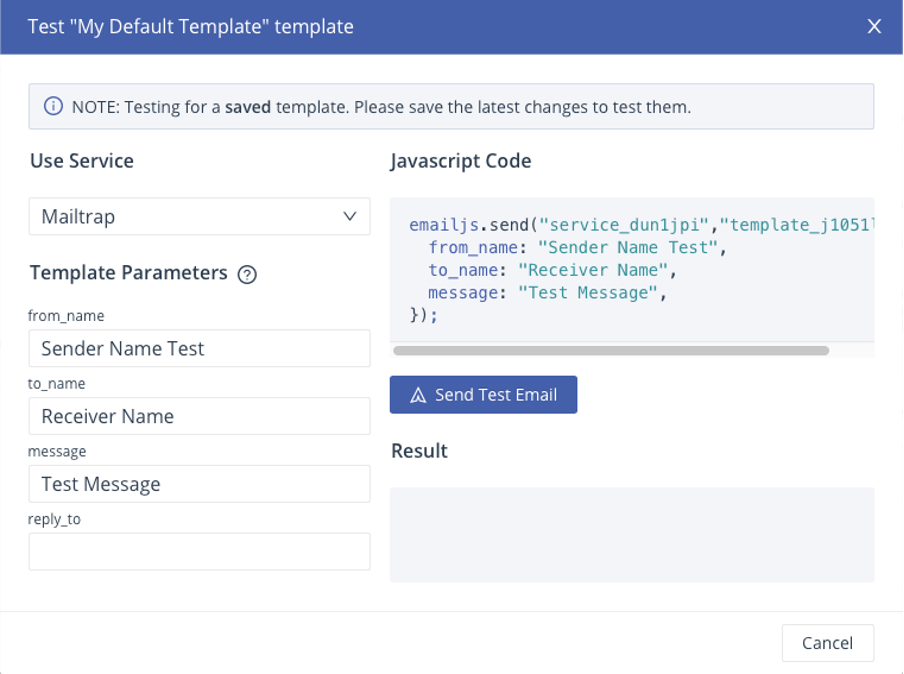
If everything goes as expected, you will get “200 OK” as a result, meaning the email was sent successfully.
4. Install and integrate EmailJS into your project
And finally, let’s get down to coding and install the EmailJS SDK, for which you can either use the npm package manager:
$ npm install --save @emailjs/browserOr Yarn package manager:
$ yarn add @emailjs/browserAfter installing it, paste the following code snippet before closing tag with the correct public key, which will allow you to start using EmailJS on your website:
<script type="text/javascript"
        src="https://cdn.jsdelivr.net/npm/@emailjs/browser@4/dist/email.min.js">
</script>
<script type="text/javascript">
   (function(){
      emailjs.init({
        publicKey: "YOUR_PUBLIC_KEY",
      });
   })();
</script>
To obtain your public key, simply visit the ‘Account’ page in the EmailJS dashboard.
5. Add email-sending logic
Email sending via EmailJS can be carried out via two methods:
emailjs.send
This is the basic method, which you should use if you’re looking to add a simple email-sending functionality with minimal interaction to your website (e.g., password resets, confirmations, etc.).
var templateParams = {
  name: 'James',
  notes: 'Check this out!',
};

emailjs.send('YOUR_SERVICE_ID', 'YOUR_TEMPLATE_ID', templateParams).then(
  (response) => {
    console.log('SUCCESS!', response.status, response.text);
  },
  (error) => {
    console.log('FAILED...', error);
  },
);
emailjs.sendForm
Use this method if you’re using EmailJS to send form details, as it will automatically collect the values of the form and pass them to the specified template.
emailjs.sendForm('YOUR_SERVICE_ID', 'YOUR_TEMPLATE_ID', '#myForm').then(
  (response) => {
    console.log('SUCCESS!', response.status, response.text);
  },
  (error) => {
    console.log('FAILED...', error);
  },
);
If you’re looking for a full code for sending an email straight from the browser using EmailJS and a template you created, you can use the one from the example below:
<script type="text/javascript"
       src="https://cdn.jsdelivr.net/npm/@emailjs/browser@3/dist/email.min.js">
</script>
<script type="text/javascript">
  (function () {
     emailjs.init("YOUR_PUBLIC_KEY");
  })();
</script>
<script>
  var templateParams = {
    from_name: 'Sender',
    message: 'Test Message'
  };

  emailjs.send('email-service-ID', 'email-template-ID', templateParams)
    .then(function (response) {
      console.log('SUCCESS!', response.status, response.text);
    }, function (error) {
      console.log('FAILED...', error);
    });
</script>
Lastly, I also think it’s worth mentioning EmailJS pricing:
- Free plan – Send up to 200 emails per month using only two templates with a limited list of contacts and email size of up to 50Kb.
- Paid plans – Starting at $9m the paid plans upgrade your email sending quotas and provide you with additional features (e.g., suppression lists, multi-user access, etc.).
Send email using Node.js and Nodemailer
Sending an email in JavaScript is super easy if you use a server-side programming language that talks to the SMTP server. Nodemailer, the popular module with zero dependencies for Node.js is one of the most efficient solutions.
One of the best parts regarding Nodemailer is that it allows you to use any SMTP service provider, unlike SMTP.js as I’ve discussed previously in the article. So, you can either go with Gmail or Outlook SMTP, however, I’ll use my trustworthy Mailtrap SMTP.
And here’s how to leverage Nodemailer with SMTP to start sending emails:
1. Install Nodemailer
To install this module, you can either use npm or yarn package managers by running one of the following commands:
npm install nodemailer

or

yarn add nodemailer
2. Configure Nodemailer and send emails
Next, you need to create a transporter object, configure the mailOptions object, and send a message with sendMail().
I’ve done this in your stead, so you can simply copy the following code snippet in your main application .js file:
// Import the Nodemailer library
const nodemailer = require('nodemailer');

// Create a transporter object
const transporter = nodemailer.createTransport({
  host: 'live.smtp.mailtrap.io',
  port: 587,
  secure: false, // use SSL
  auth: {
    user: '1a2b3c4d5e6f7g',
    pass: '1a2b3c4d5e6f7g',
  }
});

// Configure the mailoptions object
const mailOptions = {
  from: 'yourusername@email.com',
  to: 'yourfriend@email.com',
  subject: 'Sending Email using Node.js',
  text: 'That was easy!'
};

// Send the email
transporter.sendMail(mailOptions, function(error, info){
  if (error) {
    console.log('Error:', error);
  } else {
    console.log('Email sent:', info.response);
  }
});
To save and run the script, you can use the node command combined with the name of your main application file. For example: node index.js.
Tip: With this code snippet, you can only send plain text and HTML emails. To find out how to send emails to multiple recipients, add attachments, etc., read our Nodemailer article. 👀
Send email using email API
If you’d rather automate your email-sending process in JavaScript, the most efficient and easiest way to do so would be to use Mailtrap’s Node.js sending package. The SDK is regularly maintained and updated by a team of developers, allowing you to code stress-free.
Moreover, it offers quick integration with the robust Mailtrap API and allows you to seamlessly add email-sending functionality. It only takes a few steps, check it out:
- Create a free Mailtrap account.
- Verify your domain and update DNS records.
- You can find more information about this in our Knowledge Base or watch the video we prepared for you:
- Install the Mailtrap Node.js package with npm or Yarn:
npm install mailtrap

# or, if you are using yarn:

yarn add mailtrap- Copy the following code in your main .js application file:
import { MailtrapClient } from "mailtrap"

/**
 * For this example to work, you need to set up a sending domain,
 * and obtain a token that is authorized to send from the domain.
 */

const TOKEN = "<YOUR-TOKEN-HERE>";
const SENDER_EMAIL = "<SENDER ADDRESS@YOURDOMAIN.COM>";
const RECIPIENT_EMAIL = "<RECIPIENT@EMAIL.COM>";

const client = new MailtrapClient({ token: TOKEN });

const sender = { name: "Mailtrap Test", email: SENDER_EMAIL };

client
  .send({
    from: sender,
    to: [{ email: RECIPIENT_EMAIL }],
    subject: "Hello from Mailtrap!",
    text: "Welcome to Mailtrap Sending!",
  })
  .then(console.log)
.catch(console.error);- Start the server and make requests by simply running
node+ the name of your main application file, e.g.,node server.js
If you haven’t already, you should add “type:” “module”, in your package.json file because Node.js is an ES module.
Also, keep in mind that you need to replace placeholders like TOKEN or SENDER_EMAIL with the actual API key and credentials provided by Mailtrap. You can find these details by navigating to the Integration section under Sending Domains. ⬇️
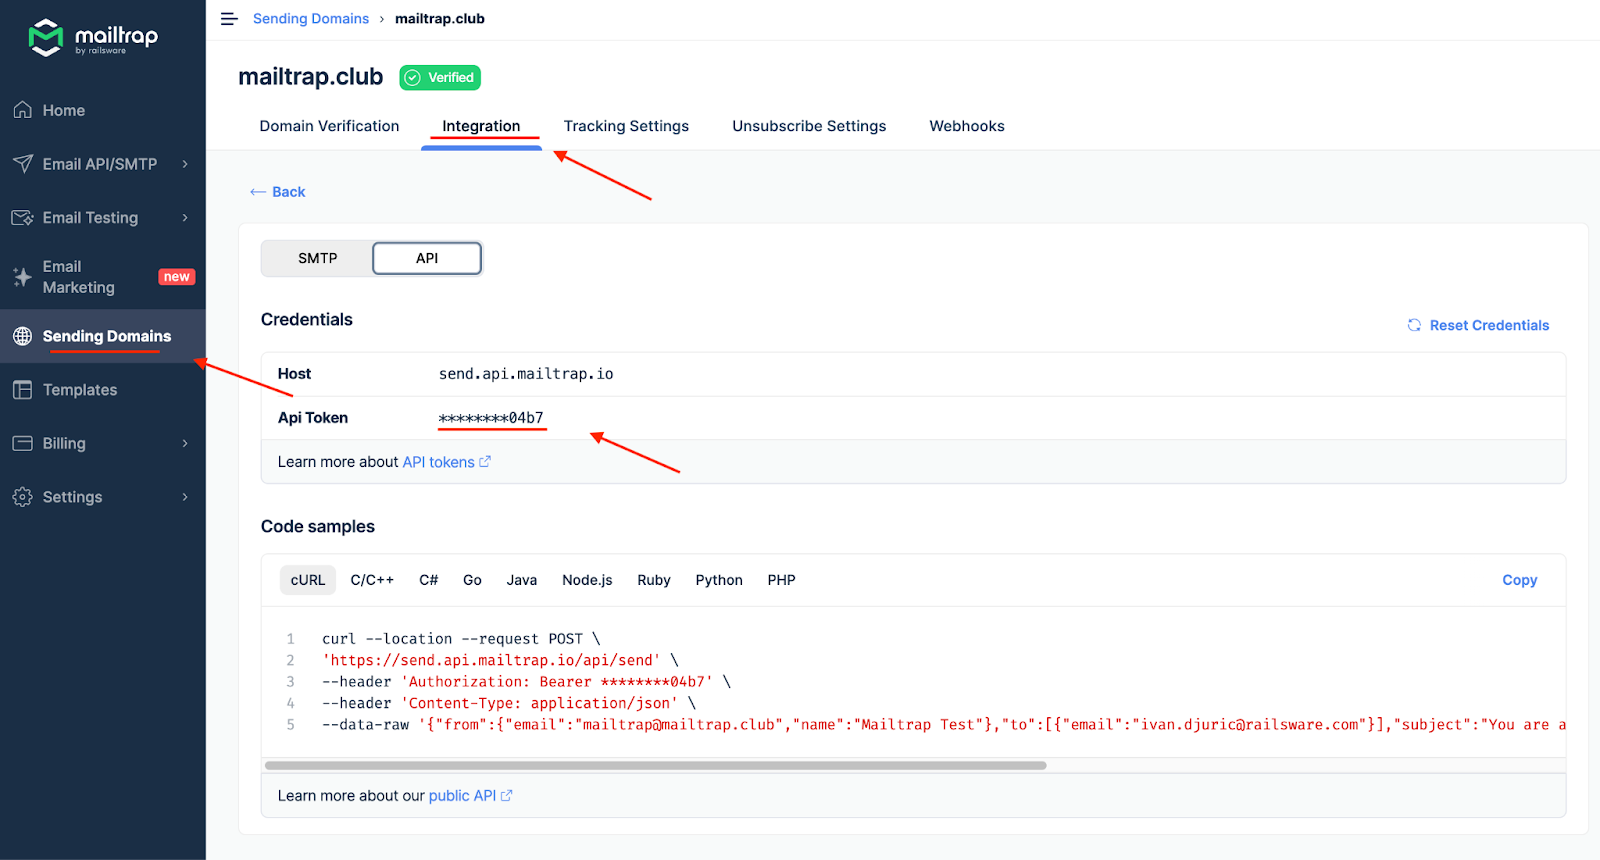
For more complex email-sending functionalities, be sure to check out the examples folder in the official GitHub repository or read our extensive Node.js article.
Send HTML email
To send stylish HTML email, all you need to do is use the following code:
import { MailtrapClient } from "mailtrap"

/**
 * For this example to work, you need to set up a sending domain,
 * and obtain a token that is authorized to send from the domain.
 * @see https://help.mailtrap.io/article/69-sending-domain-setup
 */

const TOKEN = "<YOUR-TOKEN-HERE>";
const SENDER_EMAIL = "<SENDER@YOURDOMAIN.COM>";
const RECIPIENT_EMAIL = "<RECIPIENT@EMAIL.COM>";

const client = new MailtrapClient({ token: TOKEN });

client
  .send({
    category: "test",
    custom_variables: {
      hello: "world",
      year: 2022,
      anticipated: true,
    },
    from: { name: "Mailtrap Test", email: SENDER_EMAIL },
    to: [{ email: RECIPIENT_EMAIL }],
    subject: "Hello from Mailtrap!",
    html: `
    <!doctype html>
    <html>
      <head>
        <meta http-equiv="Content-Type" content="text/html; charset=UTF-8">
      </head>
      <body style="font-family: sans-serif;">
        <div style="display: block; margin: auto; max-width: 600px;" class="main">
          <h1 style="font-size: 18px; font-weight: bold; margin-top: 20px">Congrats for sending test email with Mailtrap!</h1>
          <p>Inspect it using the tabs you see above and learn how this email can be improved.</p>
          <p>Now send your email using our fake SMTP server and integration of your choice!</p>
          <p>Good luck! Hope it works.</p>
        </div>
        <!-- Example of invalid for email html/css, will be detected by Mailtrap: -->
        <style>
          .main { background-color: white; }
          a:hover { border-left-width: 1em; min-height: 2em; }
        </style>
      </body>
    </html>
  `,
  })
  .then(console.log)
.catch(console.error);Test emails and email sending on staging
With a great amount of email-sending code, comes great responsibility: you need to make sure everything works as intended so your recipients actually receive your messages the way you intend them to.
Besides the code, you need to check whether your HTML/CSS elements are supported by the popular mailbox providers, that they don’t trigger spam filters, that your domain doesn’t end up in blacklists, and more.
This does seem like a lot of work on paper, but not when you use the right testing tools. Namely, Mailtrap Email Testing provides you with a sandbox environment to test all of the above and more!
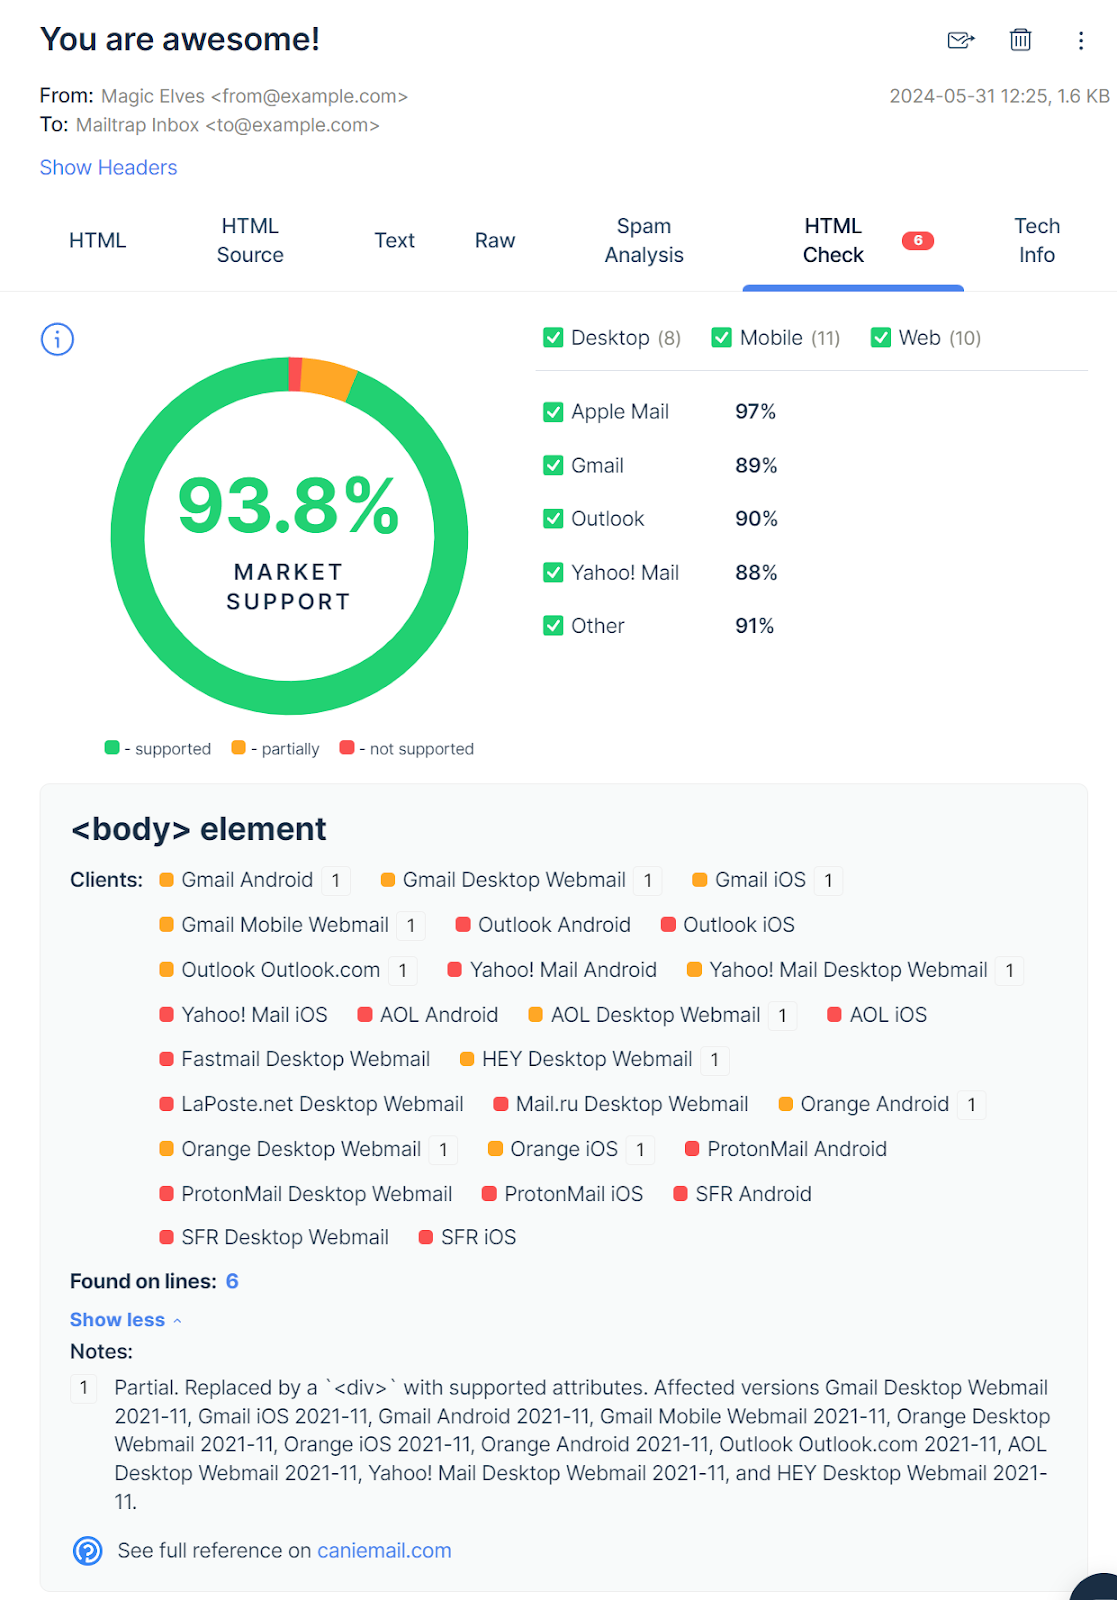
For example, you can use the HTML Check feature to inspect the HTML/CSS of your emails and easily spot any faulty lines of code and easily spot and then fix or remove them. This ensures your emails based on HTML/CSS designs are compatible with different browsers and clients.
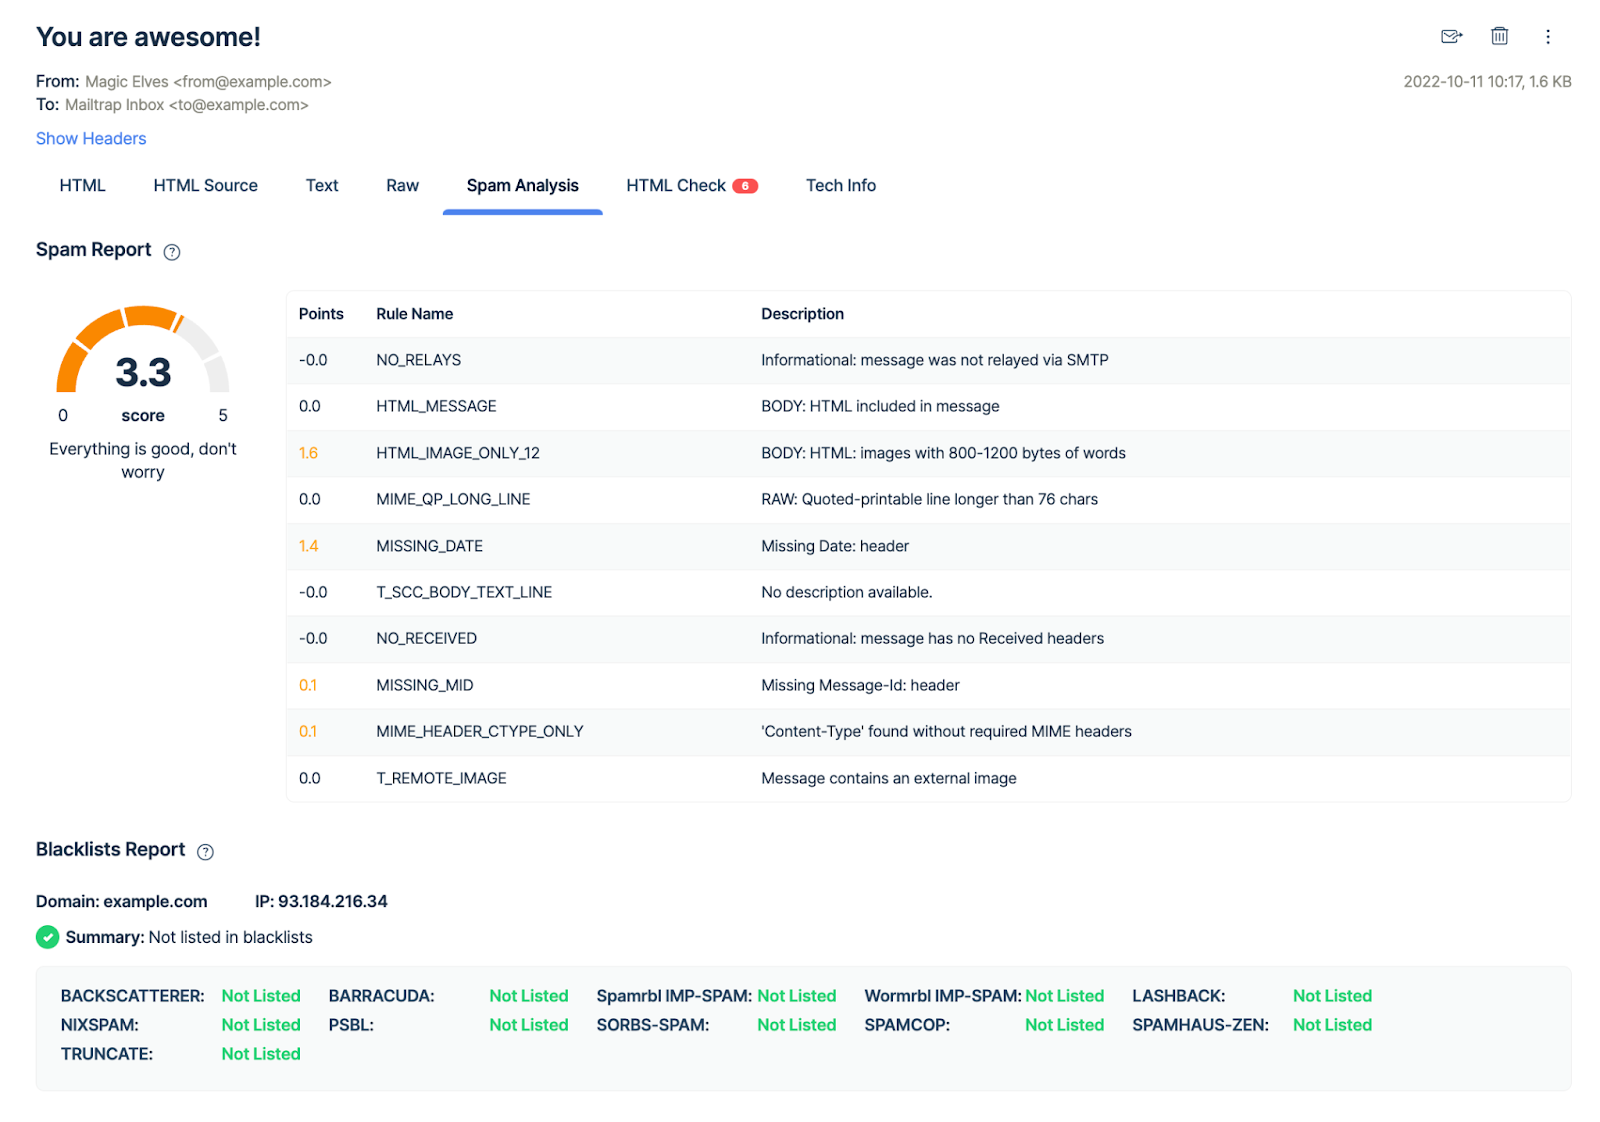
Moreover, you can steer clear away from spam filters and a bunch of other email deliverability thanks to the Spam Report feature. You get a score, try to keep it under 5, and you proactively solve any spam issues; simple as that!
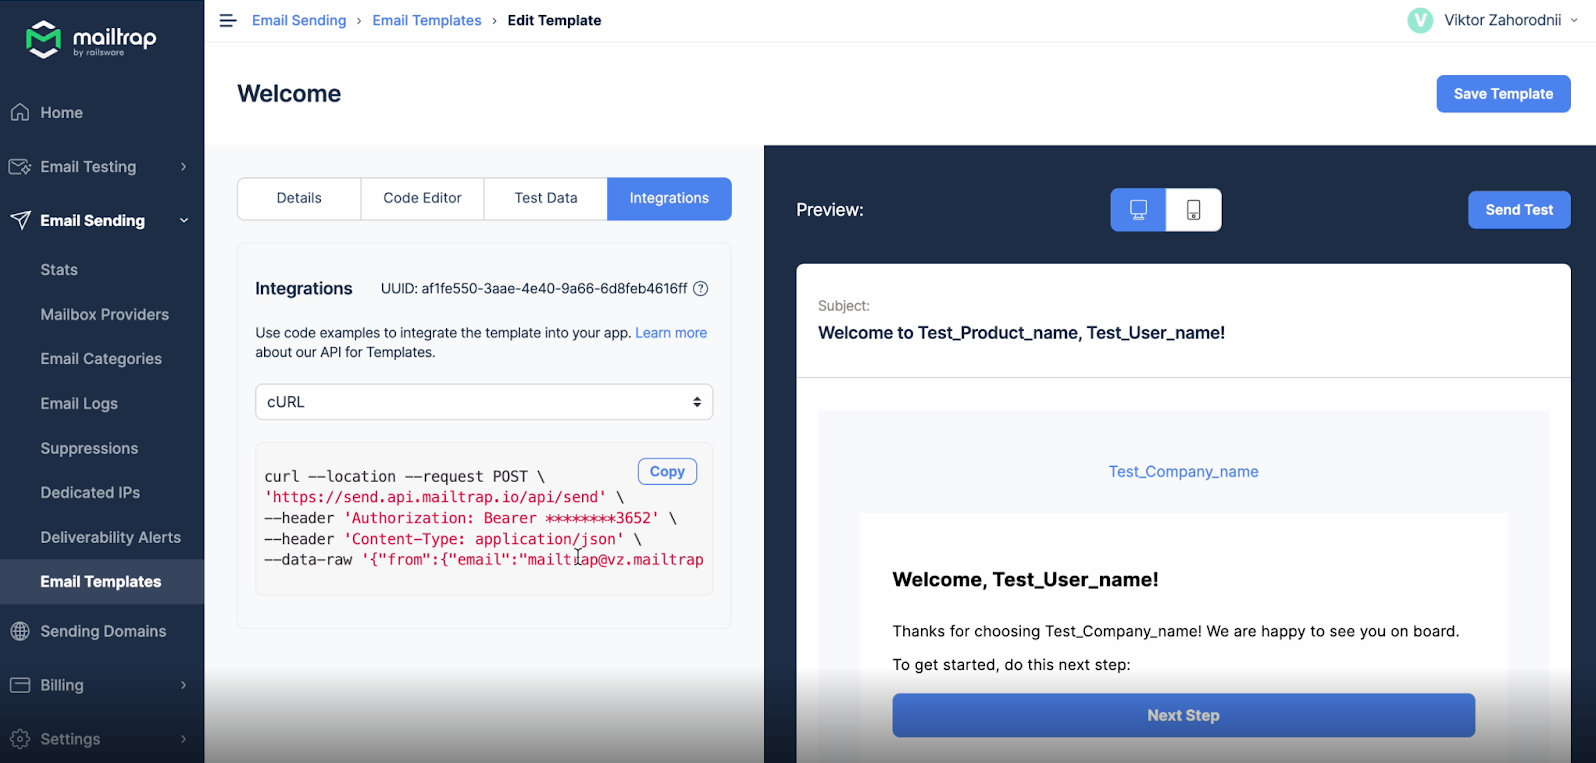
One of the latest features allows you to design, edit, and host HTML email templates on the Mailtrap Email Delivery Platform. You can then test them with our API and easily switch from staging to production once you’re ready to start sending.
On top of these, and other features that make your life easier, Mailtrap Email Testing also has a straightforward setup, check it out!
SMTP
Start by creating a free Mailtrap account and then:
- Navigate to Email Testing → Inboxes → Integration
- Select ‘Node.js’ on the list of integrations.
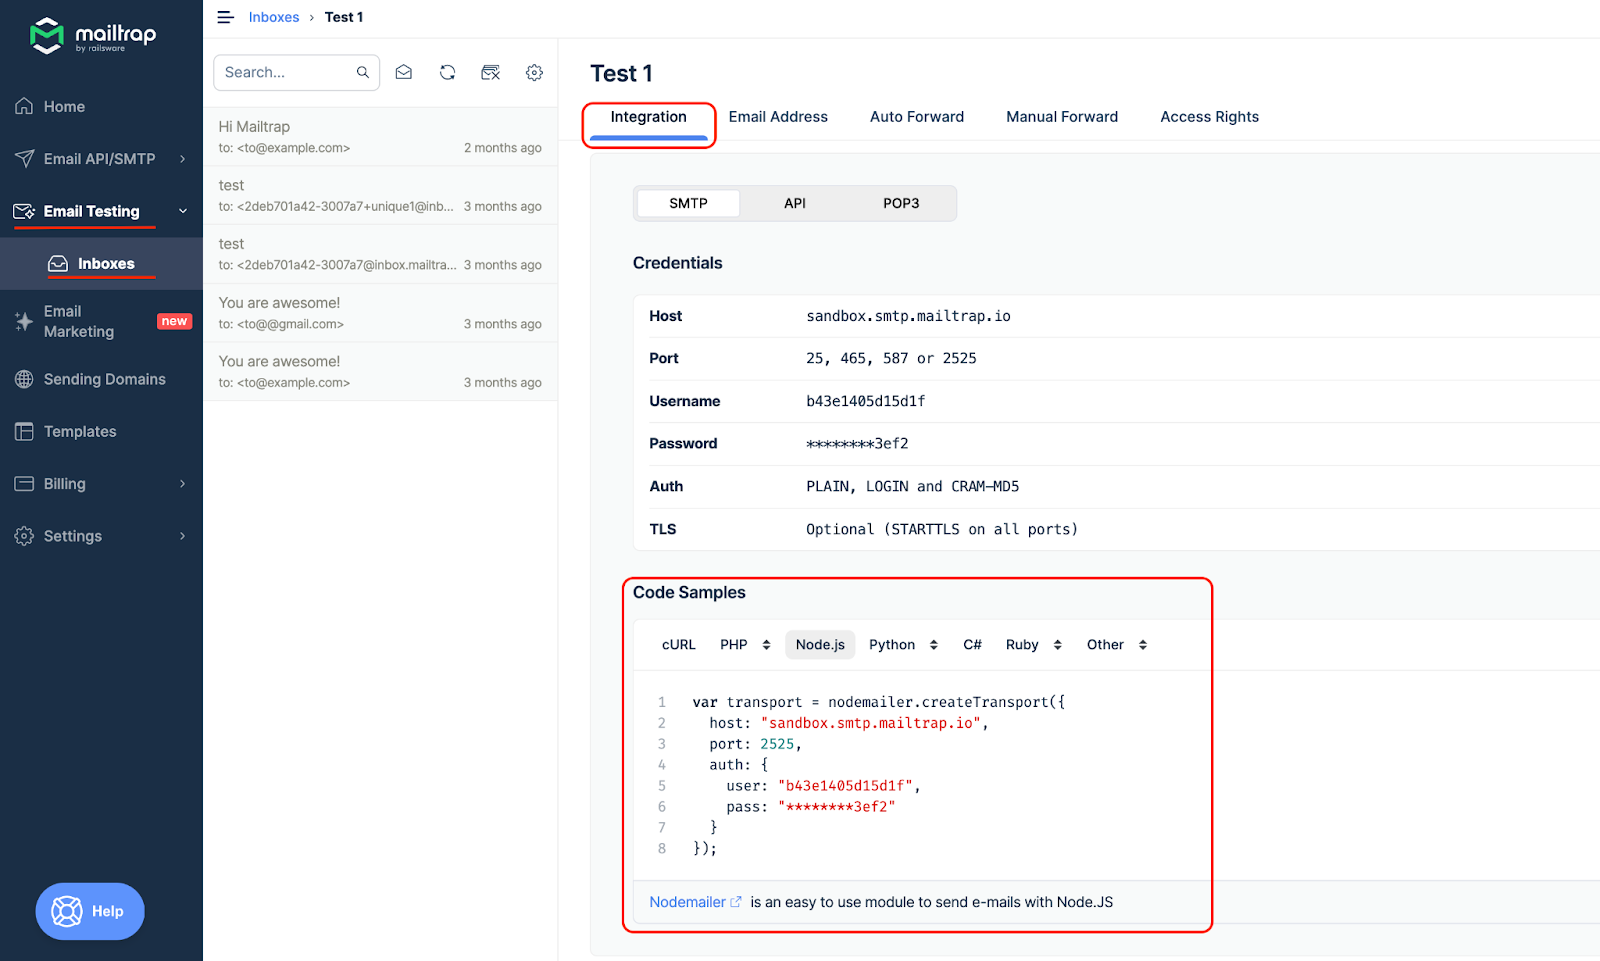
- Paste the provided fake SMTP credentials into your Nodemailer configuration or simply copy the whole transporter object code snippet, which should look something like this:
const transport = nodemailer.createTransport({
  host: "sandbox.smtp.mailtrap.io",
  port: 2525,
  auth: {
    user: "1a2b3c4d5e6f7g",
    pass: "1a2b3c4d5e6f7g"
  }
});API
If you want to integrate Mailtrap API for testing, automation, and testing automated sequences, here’s the code snippet you can use:
import { MailtrapClient } from "mailtrap"

const TOKEN = "<YOUR-TOKEN-HERE>";
const TEST_INBOX_ID = "<YOUR-TEST-INBOX-ID-HERE>"
const ACCOUNT_ID = "<YOUR-ACCOUNT-ID-HERE>"

const client = new MailtrapClient({ token: TOKEN, testInboxId: TEST_INBOX_ID, accountId: ACCOUNT_ID });

const inboxesClient = client.testing.inboxes
const messagesClient = client.testing.messages

inboxesClient.getList()
  .then(async (inboxes) => {
    if (inboxes && inboxes.length > 0) {
      const firstInboxId = inboxes[0].id

      const messages = await messagesClient.get(firstInboxId)

      if (messages && messages.length > 0) {
        const firstMessageId = messages[0].id

        await messagesClient.get(firstInboxId)
        await messagesClient.getHtmlAnalysis(firstInboxId, firstMessageId)
        await messagesClient.getHtmlMessage(firstInboxId, firstMessageId)
        await messagesClient.getTextMessage(firstInboxId, firstMessageId)
        await messagesClient.getMailHeaders(firstInboxId, firstMessageId)
        await messagesClient.getMessageAsEml(firstInboxId, firstMessageId)
        await messagesClient.getMessageHtmlSource(firstInboxId, firstMessageId)
        await messagesClient.getRawMessage(firstInboxId, firstMessageId)
        await messagesClient.getSpamScore(firstInboxId, firstMessageId)
        await messagesClient.showEmailMessage(firstInboxId, firstMessageId)
        await messagesClient.updateMessage(firstInboxId, firstMessageId, {
          isRead: false
        })
        await messagesClient.forward(firstInboxId, firstMessageId, 'mock@mail.com')
        const response = await messagesClient.deleteMessage(firstInboxId, firstMessageId)

        console.log(response)
      }
    }
  })
The code above fetches all inboxes, selects the first one, retrieves messages, and then performs multiple operations on it, which you can see under the await methods.
For more use cases and details, give the official Mailtrap API GitHub repository a look. 👀
Wrapping up
As we come to the close of our ‘JavaScript send email’ article, you can now choose between multiple methods of adding email-sending functionality to your app. Choices, choices…
If you’re stuck on deciding, I advise you to consider what stage your application is in, how much security you need, and what sort of emails you want to send.
If it’s basic testing and some light sending for a personal project, you can go for a client-side solution. However, if you plan to do some serious sending or you’re nearing production, then one of the server-side methods is a 100% no-brainer choice for you.
And with that, I’ll leave it to you to make the decision. Happy sending!


Comments
4 replies