


Let’s get straight to the point: you want to send emails with Nodemailer and Gmail, and I’m here to show you how to do exactly that, step-by-step.
I’ll throw in some additional information you might find useful, such as Gmail’s limitations and some alternatives you can use instead.
How to send email using Nodemailer and Gmail SMTP
Here’s what you’ll need to send emails with your Gmail account and Nodemailer:
- Node.js and npm (Node Package Manager) – I assume you already have these two installed if you’re reading this article, but if you don’t, here’s a helpful guide from npm that can help.
- An app password – In the past, you could enable the Less secure apps access to use your Gmail credentials for 3rd party apps. However, as this feature won’t be supported starting from September 2024, we’ll have to use an app password, which allows you to leverage Gmail SMTP for mail sending.
1. Creating an app password
To create an app password, follow these steps:
- Log in to your Google account.
- Click on ‘Security’ and scroll down to the ‘How you sign in to Google’ section
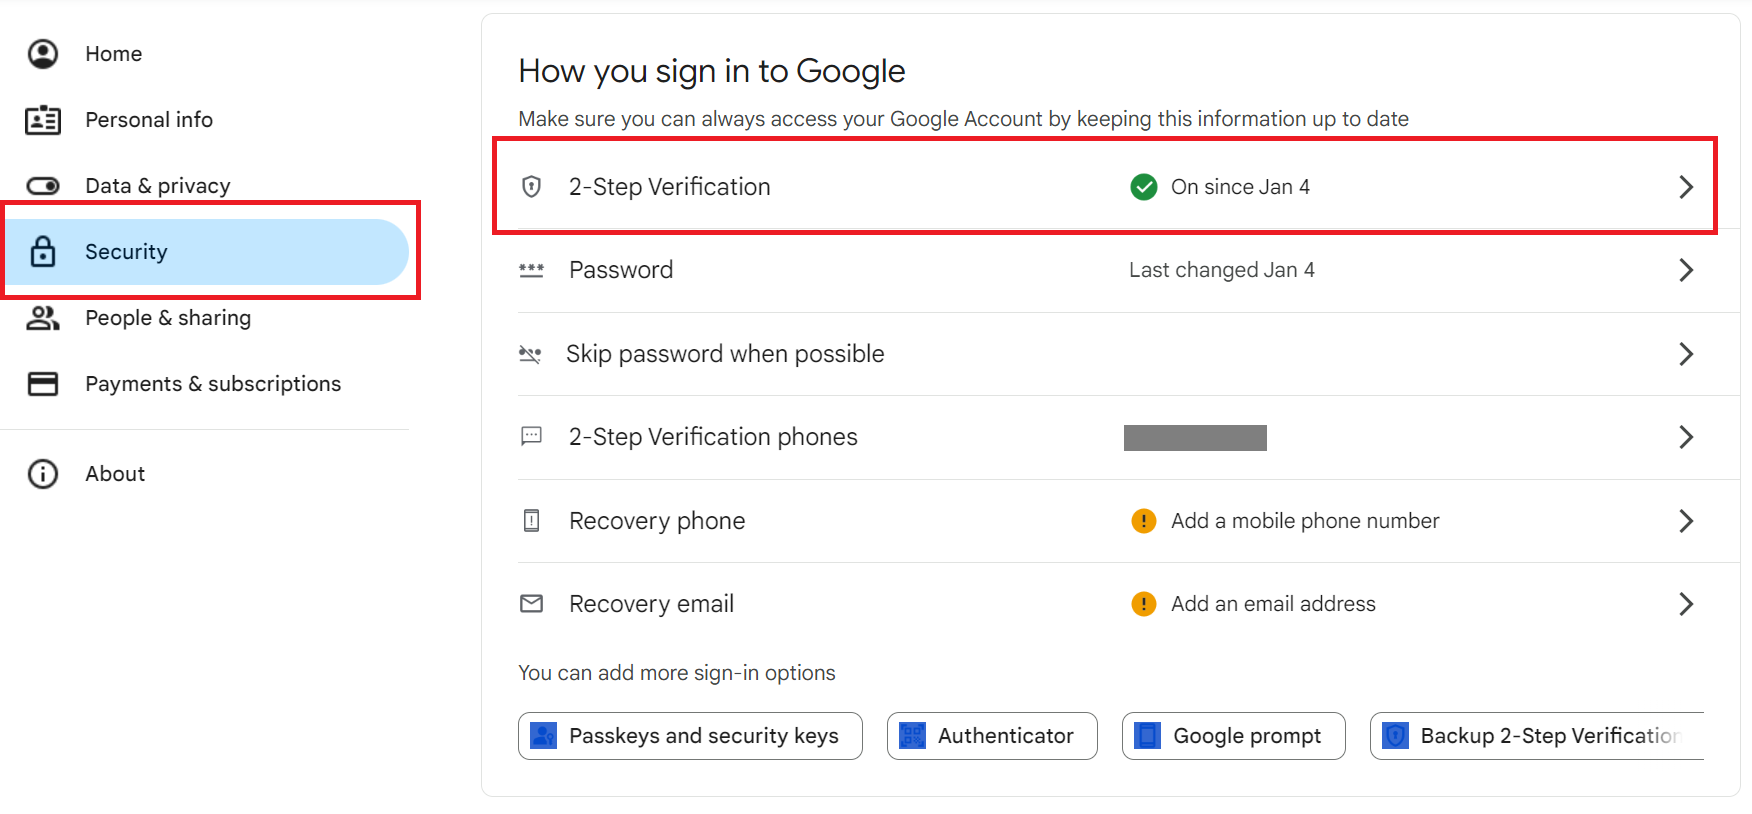
- Select ‘2-Step Verification’ and enter your password when prompted
- In case it’s off, make sure to turn it on.
- Scroll down to the bottom of the page and select ‘App passwords.’
- Choose a name for your app password.
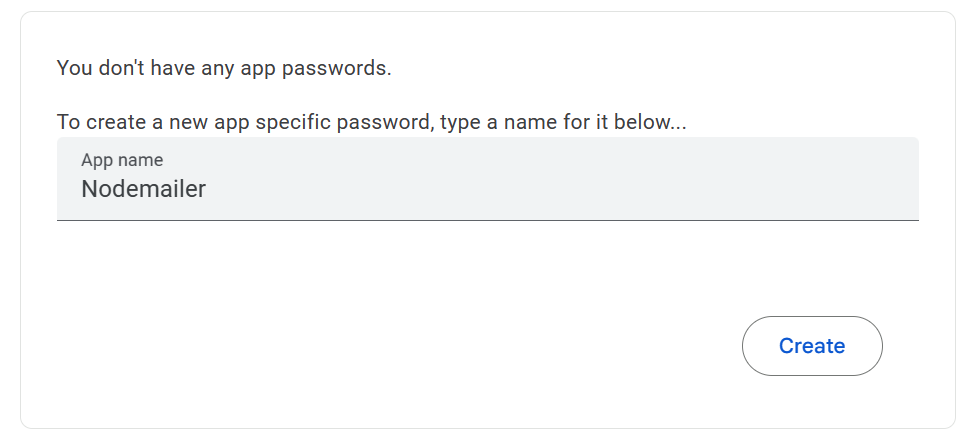
- Click on ‘Generate’ and securely store your new app password.
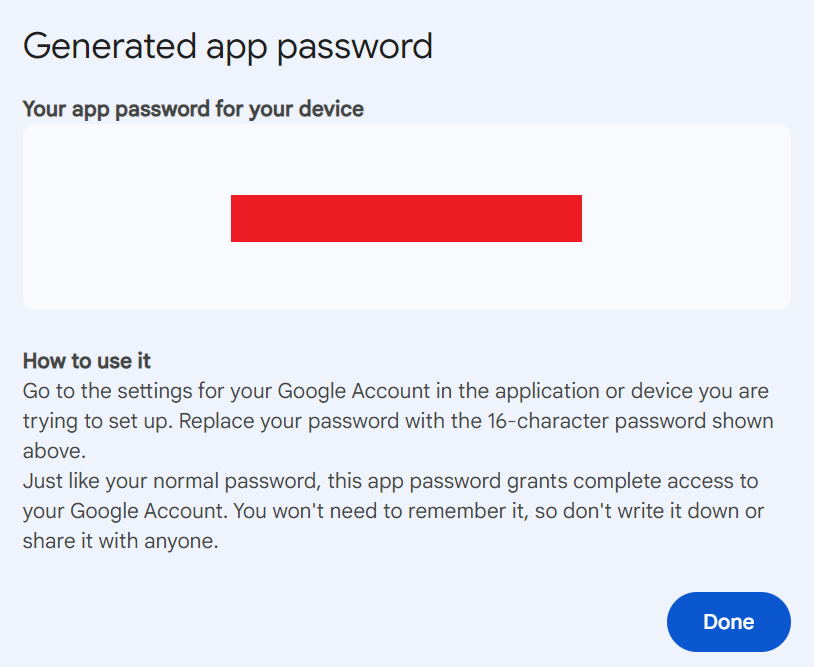
Important: Don’t forget to securely store your app password once you generate it, as it won’t be shown again.
2. Setting up your project
Next, let’s lay the foundation for our sending backend by initializing Node.js and creating our package.json file that contains important metadata about the project.
For this, use the following command:
npm init -y Then, let’s install Nodemailer with either the npm command or Yarn:
npm install nodemailer
# or
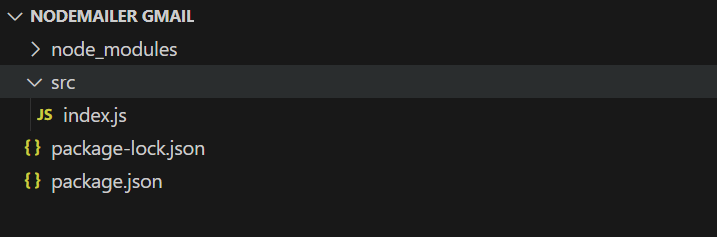
yarn add nodemailerAnd finally, in your project directory, create a src directory with an index.js file in it, which will hold our Nodemailer configuration.
Your project directory should then look something like this:
3. Configuring Nodemailer for Gmail
And now, all there’s left to do is enter your Gmail credentials and app password into your Nodemailer config.
To do this, paste the following code snippet in the index.js file and replace the placeholders with your Gmail credentials and app password:
// Import the Nodemailer library
const nodemailer = require('nodemailer');

// Create a transporter object
const transporter = nodemailer.createTransport({
  host: 'smtp.gmail.com',
  port: 587,
  secure: false, // use false for STARTTLS; true for SSL on port 465
  auth: {
    user: 'YOUR_GMAIL_ADDRESS',
    pass: 'YOUR_APP_PASSWORD',
  }
});

// Configure the mailoptions object
const mailOptions = {
  from: 'yourusername@email.com',
  to: 'yourfriend@email.com',
  subject: 'Sending Email using Node.js',
  text: 'That was easy!'
};

// Send the email
transporter.sendMail(mailOptions, function(error, info){
  if (error) {
    console.log('Error:', error);
  } else {
    console.log('Email sent: ', info.response);
  }
});
To save and run the script, use the following command:
node src/index.jsNote that you can configure different types of callbacks in the last sections of the code. Instead of just getting notified when a message fails to deliver, you could, for example, receive an array including the recipient’s address along with the server response. See all the available options here.
4. Create environment variables (optional)
Although this step is optional, it’s one of the security practices I always recommend. Namely, storing your credentials in environment variables is much safer than saving them directly in your code.
Think of it as using a safe deposit box at the bank instead of stashing your cash under your mattress. If someone breaks into your home (God forbid), you’ll want your money in the bank instead of a place obvious to any amateur burglar. 🏦
All you have to do is create an .env file in the root directory file, which will hold your environment variables.
Then, add your Gmail credentials (or any other sensitive information on that note) to your newly created .env file. For instance:
GMAIL_USER=your-email@gmail.com
GMAIL_PASS=your-app-password
Proceed by installing the dotenv package that will be responsible for loading the environment variables from your .env file into process.env. For this, you can use the trusty npm:
npm install dotenvNote: Starting from v20.6.0, Node.js has built-in support for .env files for configuring environment variables. So it is not necessary to use the dotenv package, but a lot of projects still depend on dotenv, so it’s still the de facto standard.
Lastly, in your index.js file (or wherever you decide to configure Nodemailer), load the environment variables at the beginning of the file by requiring dotenv. The beginning of your Nodemailer configuration should then look something like this:
require('dotenv').config();                              // Load environment variables from the .env file
const nodemailer = require('nodemailer');

const transporter = nodemailer.createTransport({
  service: 'gmail',
  auth: {
    user: process.env.GMAIL_USER,             // Your Gmail address from the .env file
    pass: process.env.GMAIL_PASS,             // Your Gmail app password from the .env file
  }
});

// Configure the mailoptions object
const mailOptions = {
  from: process.env.GMAIL_USER,               // Sender address from the .env file
  to: 'yourfriend@email.com',
  subject: 'Sending Email using Node.js',
  text: 'That was easy!'
};

// Send the email
transporter.sendMail(mailOptions, function(error, info){
  if (error) {
    console.log('Error:', error);
  } else {
    console.log('Email sent: ', info.response);
  }
});
Send HTML email
Previously, I’ve shown you how to send a plain-text email. However, sending HTML email in Nodemailer is quite straightforward, as you can simply add the html field to your message options and use appropriate tags (e.g., <h1>, <p>, etc.).
Check it out:
const mailOptions = {
  from: 'youremail@email.com',
  to: 'yourfriend@yahoo.com',
  subject: 'Sending HTML email using Node.js is a piece of cake',
  text: 'That was easy!',
  html: '<h1>Welcome</h1><p>That was easy!</p>'
}
Besides text and HTML, you can also add any type of data as content of the main body (e.g., Markdown).
For example:
let message = {
    ...
    html: '<b>Hello world!</b>',
    alternatives: [
        {
            contentType: 'text/x-web-markdown',
            content: '**Hello world!**'
        }
    ]
}Tip: With the alternatives field, you can add as many alternatives as you want.
Send email to multiple recipients
With Nodemailer, sending emails to multiple recipients is quite simple as you can add as many recipient addresses as you wish in the same to field, like so:
const mailOptions = {
  from: 'youremail@email.com',
  to: 'yourfriend@example.com, yourotherfriend@example.com, yourfriendsfriend@example.com’
  subject: 'Sending Email using Node.js',
  text: 'That was easy!'
}
Send email with attachments
For sending attachments, you can use the attachments option in the message object.
Here’s how:
let message = {
    ...
    attachments: [
        {   // utf-8 string as an attachment
            filename: 'text1.txt',
            content: 'hello world!'
        },
        {   // binary buffer as an attachment
            filename: 'text2.txt',
            content: Buffer.from('hello world!','utf-8')
        },
        {   // file on disk as an attachment
            filename: 'text3.txt',
            path: '/path/to/file.txt' // stream this file
        },
        {   // filename and content type is derived from path
            path: '/path/to/file.txt'
        },
        {   // stream as an attachment
            filename: 'text4.txt',
            content: fs.createReadStream('file.txt')
        },
        {   // define custom content type for the attachment
            filename: 'text.bin',
            content: 'hello world!',
            contentType: 'text/plain'
        },
        {   // use URL as an attachment
            filename: 'license.txt',
            path: 'https://raw.github.com/nodemailer/nodemailer/master/LICENSE'
        },
        {   // encoded string as an attachment
            filename: 'text1.txt',
            content: 'aGVsbG8gd29ybGQh',
            encoding: 'base64'
        },
        {   // data uri as an attachment
            path: 'data:text/plain;base64,aGVsbG8gd29ybGQ='
        },
        {
            // use pregenerated MIME node
            raw: 'Content-Type: text/plain\r\n' +
                 'Content-Disposition: attachment;\r\n' +
                 '\r\n' +
                 'Hello world!'
        }
    ]
}
Send bulk email
To send bulk email with Nodemailer and Gmail, you can use the following code I prepared for you:
const nodemailer = require('nodemailer');


// Configure Nodemailer to use Gmail for SMTP with pooled connection
const transporter = nodemailer.createTransport({
   host: 'smtp.gmail.com',
   port: 587,
   pool: true, // Use SMTP pooling to keep the connection open for multiple emails
   auth: {
       user: 'your-gmail-username', // Replace with your Gmail username
       pass: 'your-app-password'  // Replace with your app password
   },
   maxMessages: Infinity, // Allow an unlimited number of messages per connection
   maxConnections: 5 // Limit the number of simultaneous connections
});


// Example list of recipients for bulk emailing
const recipients = [
   {email: 'recipient1@example.com', name: 'Recipient One'},
   {email: 'recipient2@example.com', name: 'Recipient Two'},
   {email: 'recipient3@example.com', name: 'Recipient Three'},
   // Add more recipients as needed
];


// Prepare email promises for sending in bulk
const emailPromises = recipients.map(recipient =>
   transporter.sendMail({
       from: '"Sender Name" <sender@example.com>',
       to: `${recipient.name} <${recipient.email}>`, // Personalized to each recipient
       subject: 'Bulk Email Test',
       text: 'This is a test email sent in bulk using Nodemailer and Gmail.',
       html: `<b>Hello ${recipient.name},</b><p>This is a test email sent in bulk using Nodemailer and Gmail.</p>`
   })
);


// Send all emails in parallel and handle the results
Promise.all(emailPromises)
   .then(results => {
       console.log('All emails sent successfully');
       results.forEach(result => {
           console.log(`Message to ${result.envelope.to} sent: ${result.messageId}`);
       });
   })
   .catch(errors => {
       console.error('Failed to send one or more emails:', errors);
   });
Code breakdown:
- This code snippet sets up Nodemailer with Gmail to send bulk emails efficiently using SMTP pooling. By configuring maxMessages to Infinity and limiting simultaneous connections to five, it optimizes connection usage and improves performance.
- The pool: true setting maintains SMTP connections open for multiple sends, reducing overhead and enhancing the email sending process.
Important: As Gmail has quite a bit of sending limits, which I’ll cover in the following section, you should consider using a dedicated email service provider for bulk sending (e.g., Mailtrap).
Gmail SMTP limitations and possible issues
Like I mentioned, Google has official limitations in place to ensure fair usage and protect their infrastructure.
Some of the limitations include:
- Daily sending limits
Regular Gmail accounts can typically send around 100-150 emails per day. If you were to include three recipients, as we did above, this would count as three emails sent already. If you were to send three separate emails to the same recipients, it’s still three emails.
On the other hand, Google Workspace accounts might have higher limits (up to 2,000 emails per day). Now, this would be perfectly fine for sending occasional system updates or transactional emails.
However, if you have mass marketing campaigns in mind or thousands of users to send emails to, you probably want to look into more sophisticated solutions that are designed for bulk email sending. Our list of the best transactional email providers might be of use.
- Attachments size limit
Sending attachments with Nodemailer is easy, but sending a single email that’s over 25 MB via Gmail SMTP server is not that easy I’m afraid. To send larger files, you’ll have to use Google drive and insert the link to it in the email
- Authentication issues
One of the issues you might experience is with authentication. “Impossible”, you might be thinking after all the steps I’ve shown you to set up your account. Unfortunately, Google will do its best to make the spammers’ lives miserable, and honest users like me and you often get caught in the crossfire.
To counter the potential issues, use OAuth2 with Gmail and Nodemailer. Follow these instructions.
- Server location issues
If this wasn’t enough, you might also get into trouble if your servers are in a different geographic location. Google is easily able to detect such behavior and might flag your activity as suspicious, making it difficult to send out any emails.
Finally, you might hit the deliverability issues as you will be sending messages from publicly-available servers. There’s a fair number of spammers and fraudsters utilizing Gmail and even Google Apps accounts, and this all affects the reputation of the sending domains.
- Lack of human support
Even with all the potential issues at bay, basic Gmail accounts and Workspace plans don’t offer dedicated customer support, which is available only for higher-tier plans. So, unfortunately, your best bet for solving any Gmail-related issues are community forums like Stack Overflow.
Note that these limitations are subject to change and are regularly updated by Google.
Is there an alternative to Gmail SMTP?
Now, how do you overcome the Gmail SMTP limitations? Don’t worry — I’ve got the perfect solution for developers with which you keep Nodemailer’s seamless functionality and with which you get an infrastructure that has high deliverability rates by design.
Of course, I’m talking about Mailtrap Email Delivery Platform!
Mailtrap has an official Node.js client you can use to quickly add email-sending functionality to your Node.js application, leveraging either SMTP or the official email API. For a quick walkthrough, check out our dedicated guide.
To ensure your emails reach the desired inboxes just in time, Mailtrap also offers a plethora of features aimed at improving deliverability.
Benefit highlights of using Mailtrap:
- Reliable deliverability – Mailtrap’s infrastructure is optimized for high deliverability, allowing you to send 10,000 emails per second.
- Scalability – With Mailtrap, you aren’t restricted with daily sending limits as you can send between a few emails a day to millions, it’s all up to you. You can easily grow your operation needs and send a high volume of emails without compromising the quality of your service or facing performance issues.
- Enhanced security – Mailtrap abides with the industry’s most secure email-sending practices like using SSL/TLS encryption.
- Managed email infrastructure – Mailtrap will handle analytics, scaling, and the stability of your infrastructure for you. Its infrastructure is suitable for businesses of all sizes, especially those using emails as the communication channel.
- In-depth analytics – Unlike Gmail’s infrastructure, Mailtrap provides you with detailed analytics and helicopter-view dashboards, allowing you to easily check your open rates, bounce rates, click-through rates, and more.
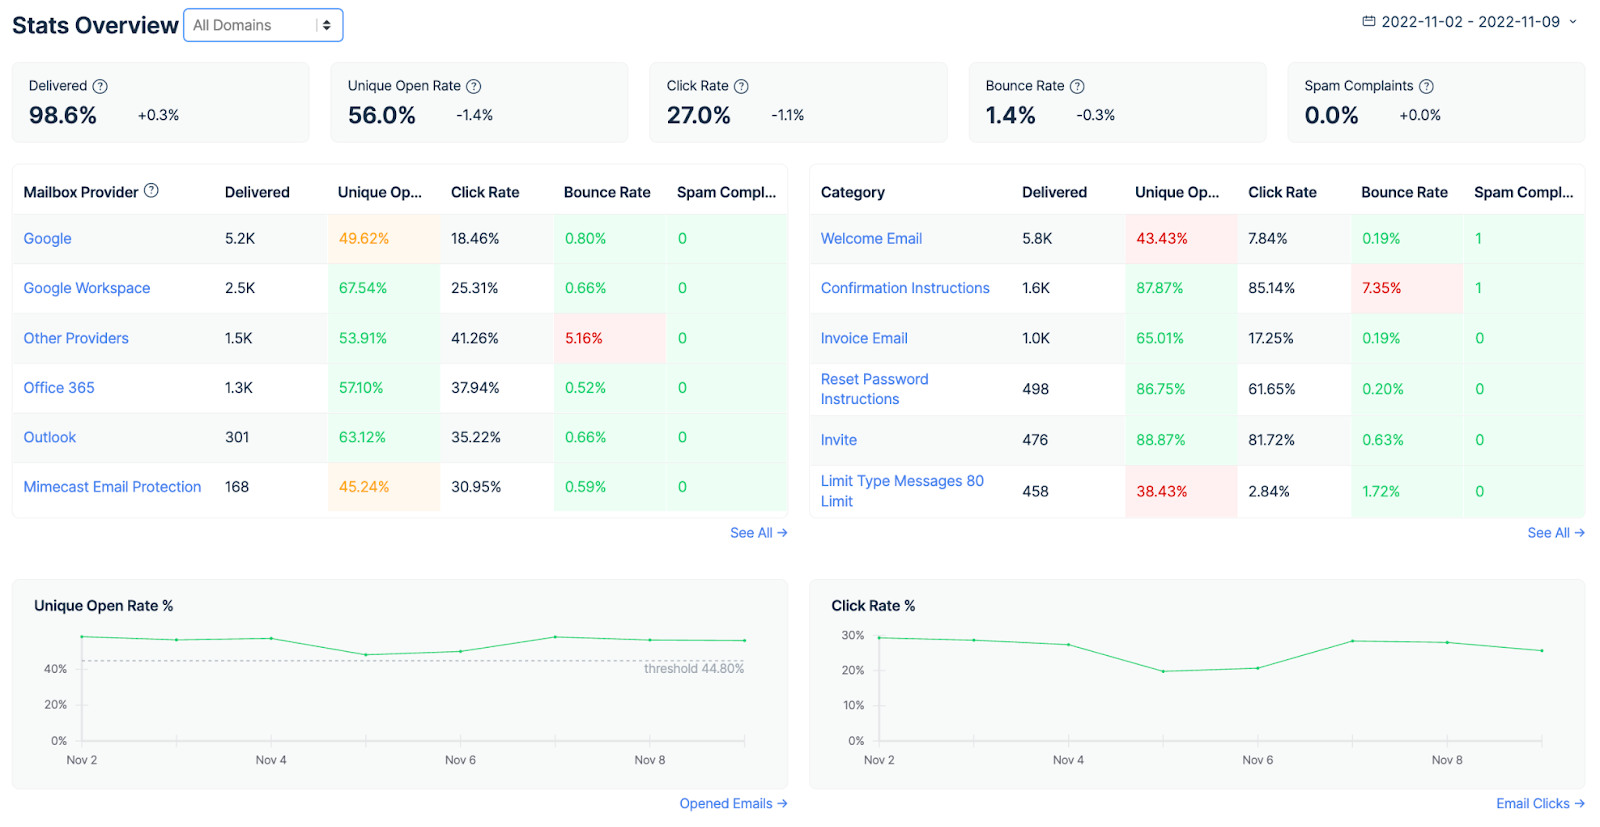
- Detailed email logs – With Mailtrap, you can see up to 30 days of email logs, making your debugging and tracking tasks way easier on your back.
- Transactional and Bulk streams – Unlike with Gmail’s SMTP, with Mailtrap you can send transactional emails (e.g., password resets and signups) with the Transactional Stream or use the Bulk Stream to send marketing emails on top of transactional without compromising your deliverability without additional cost.
- Dedicated customer support team – With Mailtrap, you don’t have to rely on community forums for support, as we have a team of experts who work around the clock to help you with any issue you encounter or answer any question you might have.
Most importantly, setting up Mailtrap SMTP is super straightforward and takes only five minutes thanks to its seamless configuration process!
Nodemailer setup guide for Mailtrap’s SMTP service:
- Create a free Mailtrap account.
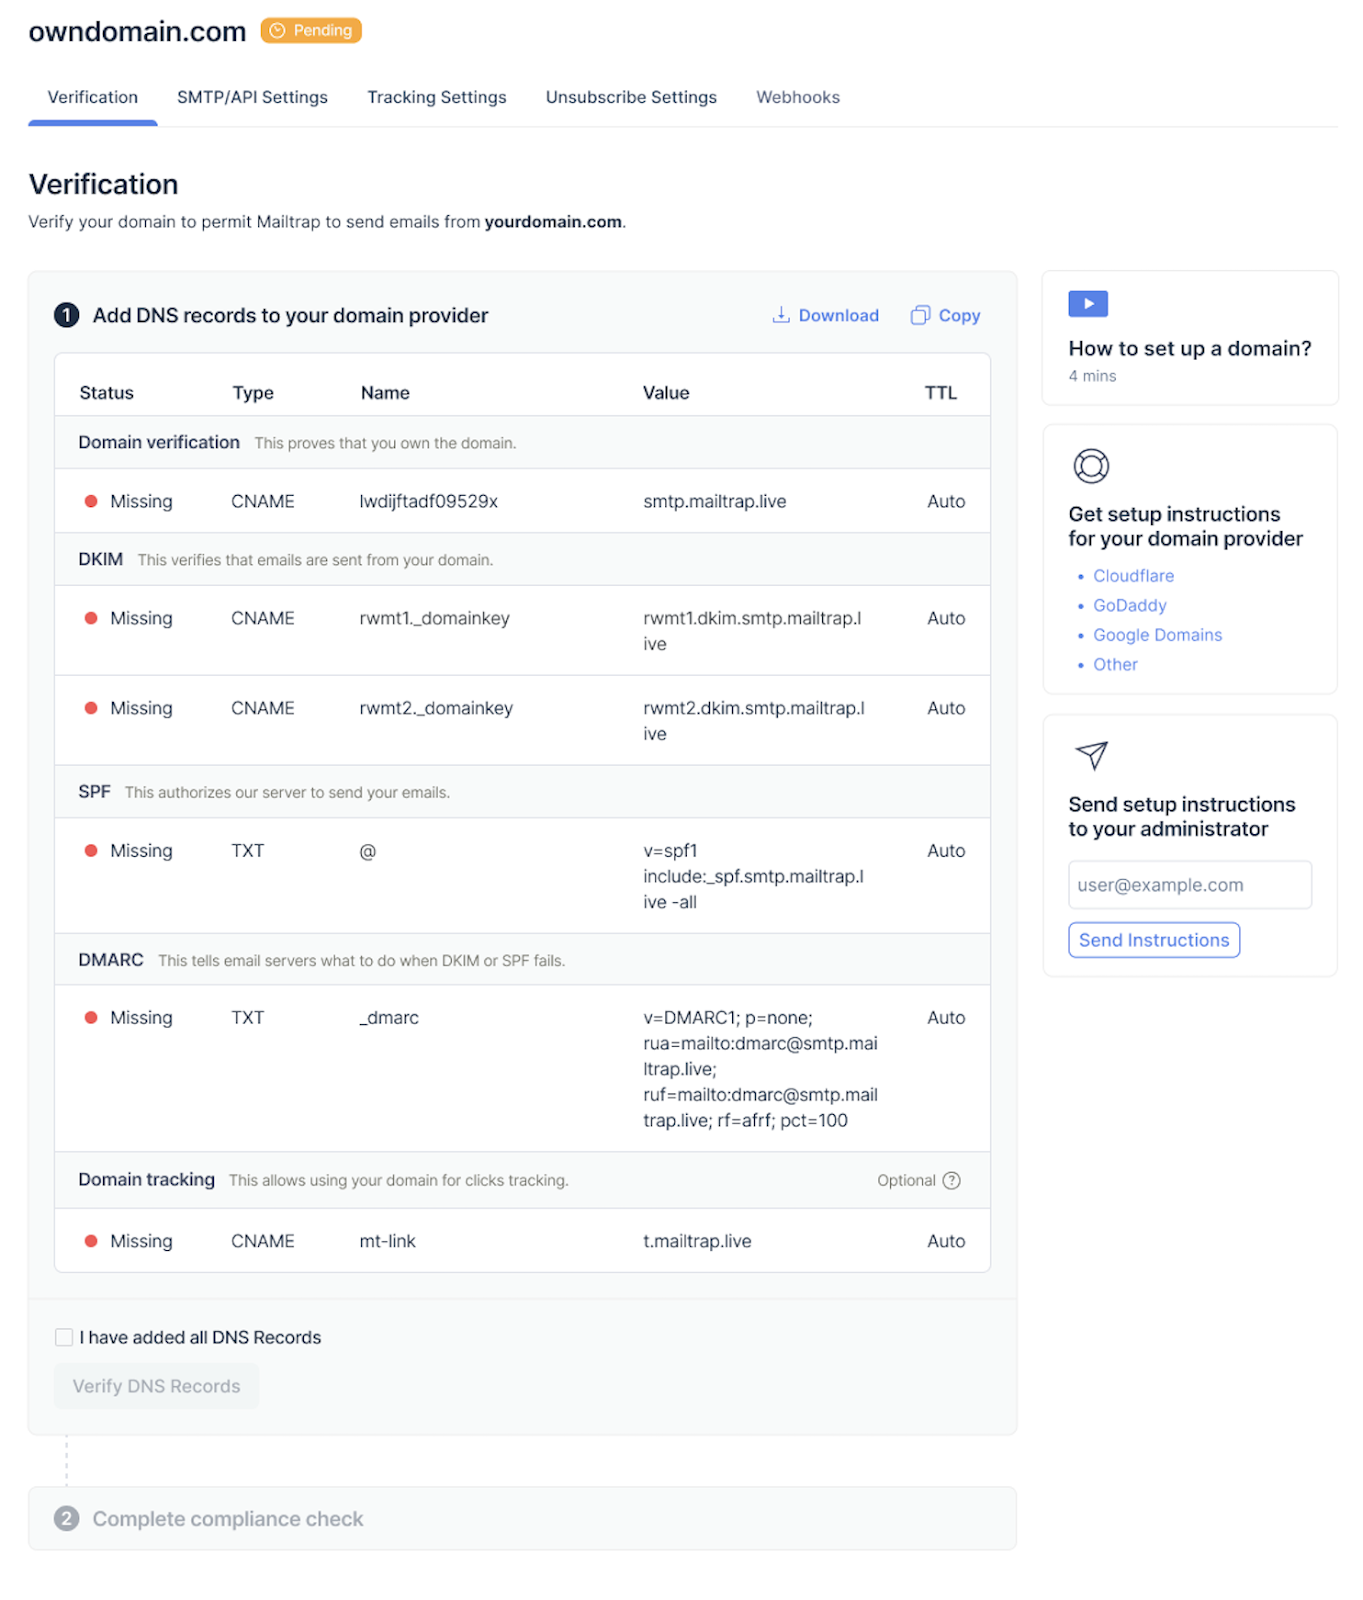
- Navigate to the Sending Domains menu and add your domain.
- Add the DNS records provided by Mailtrap to your domain provider’s DNS to verify domain ownership.
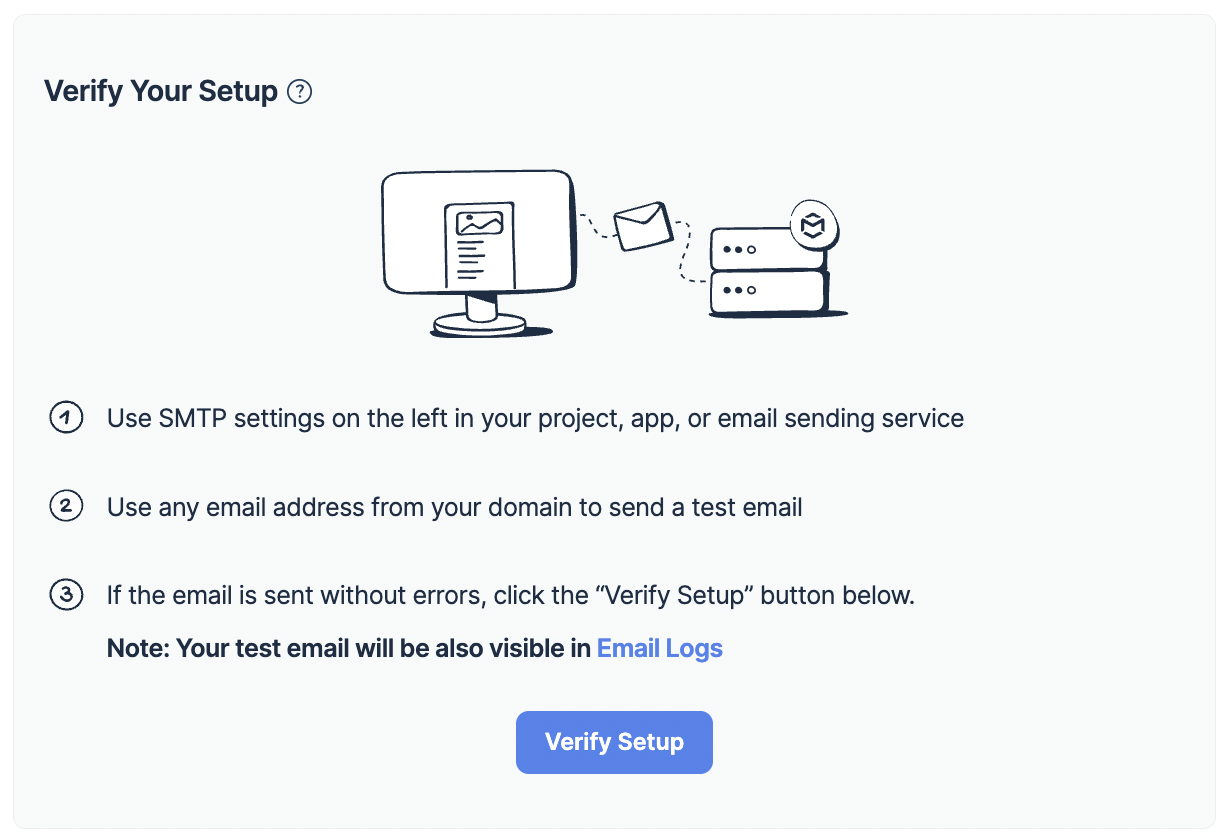
- Once you’ve verified your domain, go to the Integration tab and choose the SMTP stream configuration based on your needs.
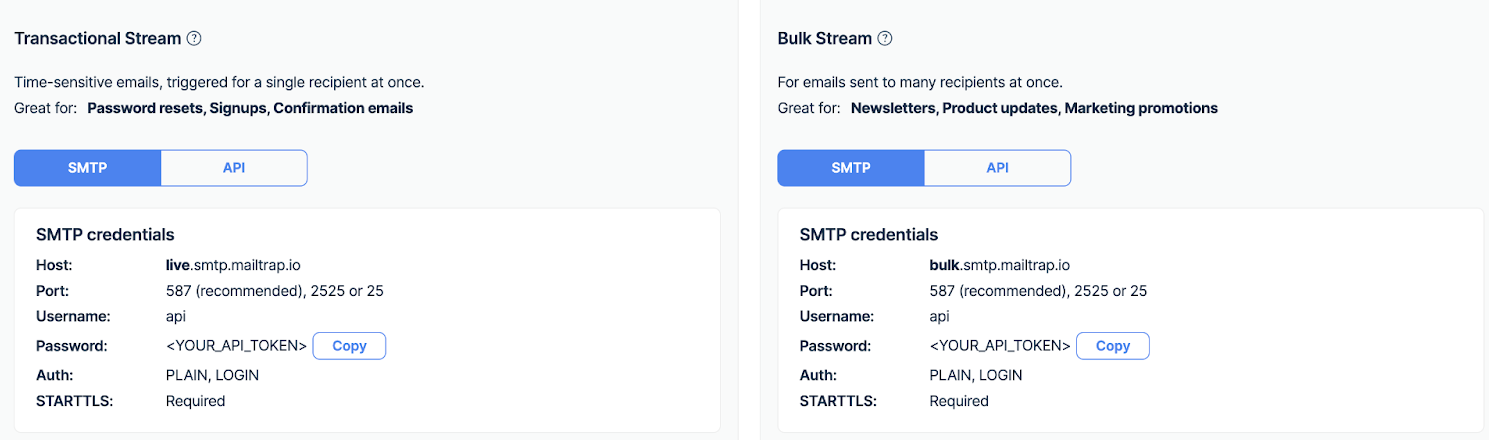
- Copy the credentials provided by Mailtrap (Host, Port, Username, etc.) into your Nodemailer configuration file, more specifically, the transporter object.
And that’s pretty much it!
Wrapping up
That’s all folks! (Queue the Looney Tunes theme song)
As promised, I’ve shown you how to send emails with Nodemailer and Gmail SMTP, which really is, as you can see for yourself, no rocket science. 🚀
However, you can always take the easier (and more efficient) route by opting for Mailtrap, avoiding Gmail’s limitations and ensuring your emails get delivered where they’re supposed to and when they’re supposed to.
Additionally, if you want to spice up your coding journey and learn more things Javascript related, check out our blog where you can find articles such as:


Comments
2 replies