
Swift Mailer can be used with any PHP framework, and then easily integrated with an external SMTP. In this post, we will go step-by-step and review Swift Mailer’s functionality, build an HTML email, embed images, attach files, and send the message with Mailtrap SMTP server as well as email API.
What is Swift Mailer?
Swift Mailer is a component-based mailing library, which is compatible with PHP web apps. It was created by SensioLabs, a French company famous for its open-source software community commitment and in particular, for the creation of the Symfony framework.
Before June 2019, Swift Mailer was used as the main mailing module in Symfony and was mostly associated with it. What did happen in June 2019? The Mailer component was announced (along with the Mime component) as a standalone mailing module for Symfony (available for version 4.3 and higher).
You might find worrying posts over the internet asking “What is going to happen with Swift Mailer then?”. We believe that it will be further supported and maintained. Swift Mailer is used as the main mail option in frameworks like Yii2 and CMS like Drupal, Laravael’s email API is built on top of the Swift Mailer library as well.
Update 2021: it looks like we were wrong – Swift Mailer is not supported since November 2021. But the demand for its is there, so keep reading if you use it. Otherwise, read more about sending emails with Symfony Mailer, the next evolution of Swift Mailer.
First email configurations
Let’s start with the installation. It’s recommended to make it via Composer:
$ composer require "swiftmailer/swiftmailer:^6.0"Then let’s specify transport and mailer, for which we’ll need the:
- Hostname
- Port
- Username
- Password
You will find these credentials by navigating to your Mailtrap dashboard and going to Sending Domains. Once there, choose your preferred sending stream (Transactional or Bulk), select SMTP, and copy your details.
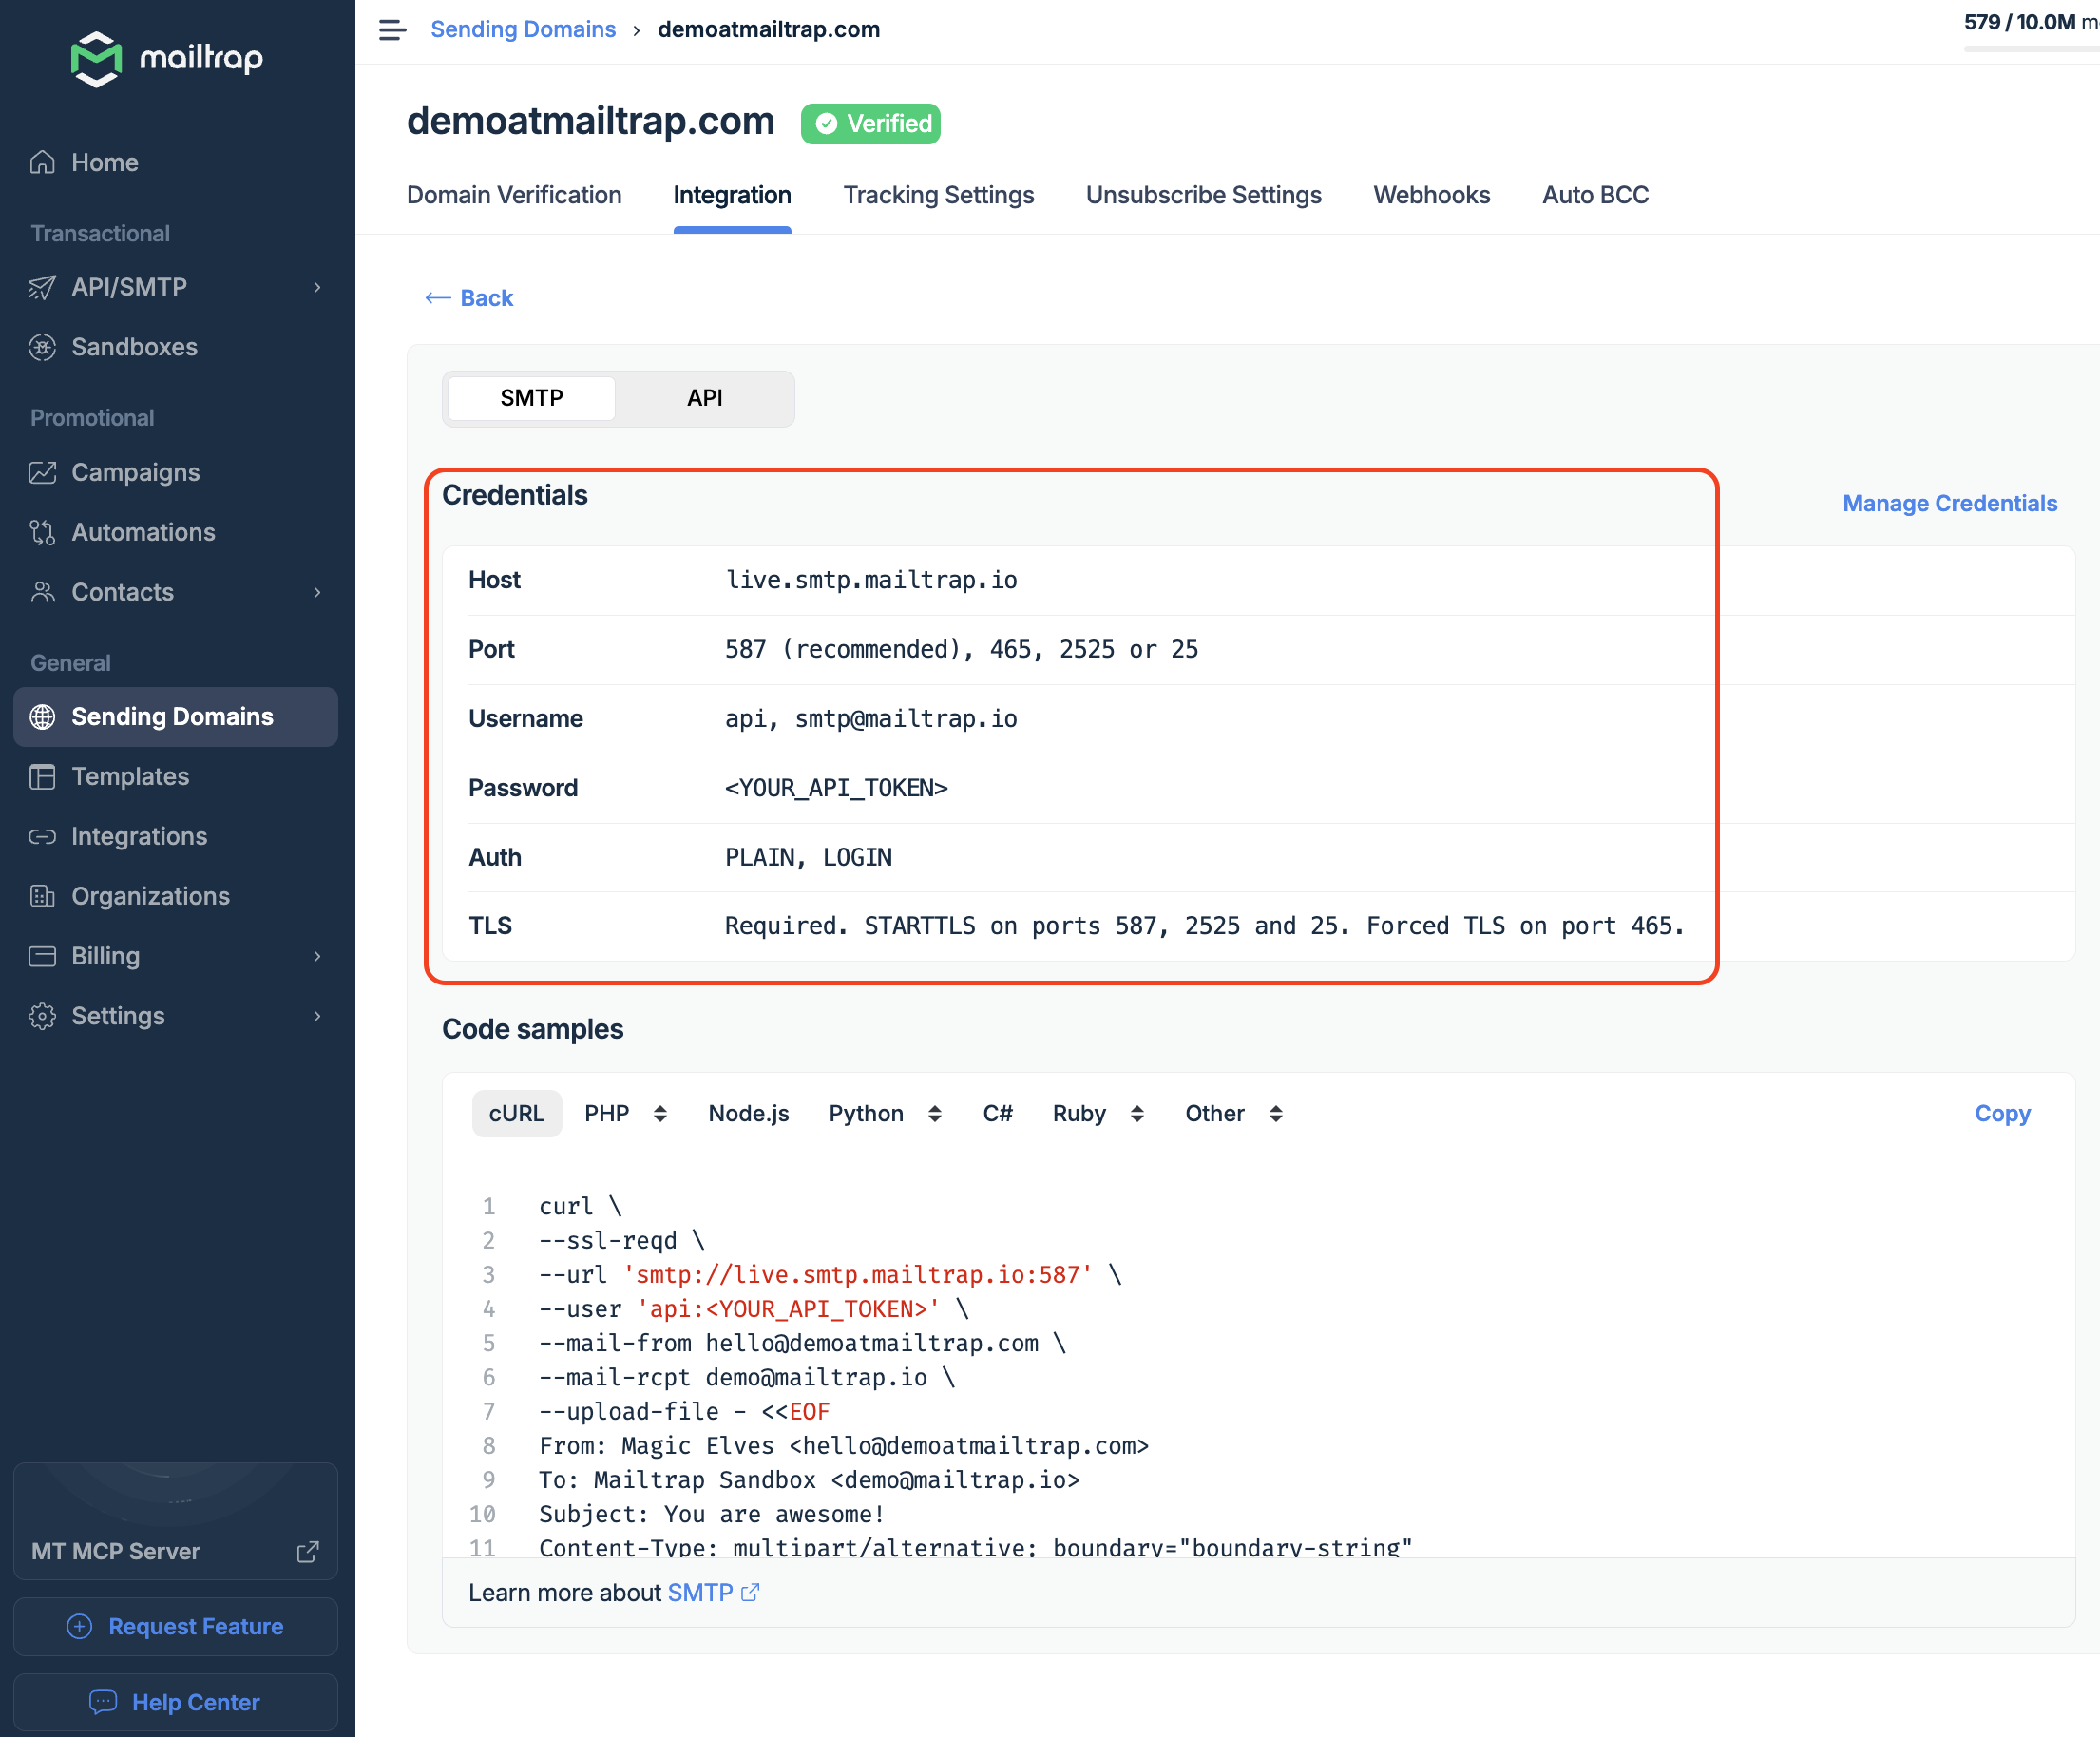
Ultimately, here’s what your code should look like with the credentials:
$transport = (new Swift_SmtpTransport('live.smtp.mailtrap.io', 2525))
  ->setUsername('1a2b3c4d5e6f7g') // generated by Mailtrap
  ->setPassword('1a2b3c4d5e6f7g') // generated by Mailtrap
;
$mailer = new Swift_Mailer($transport);
How to create an email in Swift Mailer
In Swift Mailer, messages are composed with the help of Swift_Message class. Its instances have a lot of methods to manage HTML, attachments, media – all the additional attributes to compose a good looking and informative email.
Let’s start by creating a message from top to bottom, likely to an email client: set recipient, sender, and a subject. Usually, we will make it with setSubject(), setTo(), and setFrom() methods. To include several recipients, use an array and to add recipients in copy, use setCc() or setBcc(). Also, you can set name headers with associative arrays:
// Create the message
$message = (new Swift_Message())
  // Add subject
  ->setSubject('Here should be a subject')
  //Put the From address
->setFrom(['support@example.com'])
  // Include several To addresses
 ->setTo(['newuser@example.com' => 'New Mailtrap user'])
->setCc([
'support@example.com',
‘product@example.com’ => ‘Product manager’
]);
For more details and alternatives, refer to the corresponding section in the Swift Mailer documentation.
Adding HTML content
In Swift Mailer, you need to define which type of content you are going to add to your message body. It can be text/html, text/plain, or both.
Tip: wherever possible, include a plain text version for the HTML content. If for some reason the HTML part won’t be rendered, your recipient will still be able to understand the content of your message.
For this purpose, use setBody() method and addPart() for the alternative. For example:
$message->setBody(<p>'Welcome to Maitrap!</p>
Now your test emails will be <i>safe</i>', 'text/html');
$message->addPart('Welcome to Mailtrap!', 'text/plain');How to embed images
Even if you are sending transactional emails, most probably you will need to include at least your company’s logo. Swift Mailer lets you embed your image directly, without any additional manipulations. Use Swift_EmbeddedFile::fromPath(). method for this purpose. It is very similar to inserting an image to the body of your message in many email clients. So, you should have an image file saved locally on your computer or you can even add an image hosted on some website. For the latter, allow_url_fopen should be enabled in your PHP installation (read more about it in the PHP manual).
// Create the message, you can add the subject right here if you like
$message = new Swift_Message('The subject should be here');
// Set the body
$message->setBody(
'<html>' .
' <body>' .
'Here is our new logo <img src="’ .
     $message->embed(Swift_Image::fromPath('newlogo.png')) .
   ‘" alt="new logo" />' .
' Let us know how you like it'.
' </body>' .
'</html>',
  'text/html' // don’t forget to mark the content type
);
Embedding an image from a URL looks similar:
$message->setBody(
'<html>' .
' <body>' .
'  Here is our new logo <img src="' .
     $message->embed(Swift_Image::fromPath('/blog/newlogo.png')) .
   '" alt="Image" />' .
'  Let us know how you like it' .
' </body>' .
'</html>',
  'text/html'
);
Alternatively, you can embed the image as a CID attachment:
$cid = $message->embed(Swift_Image::fromPath('newlogo.png'));
$message->setBody(
'<html>' .
' <body>' .
'  Here is our new logo <img src="' . $cid . '" alt="Image" />' .
'  Let us know how you like it' .
' </body>' .
'</html>',
  'text/html'
);
Here is another nice option – Swift_Image class. As per Swift Mailer documentation, “Swift_Image and Swift_EmbeddedFile are just aliases of one another. Swift_Image exists for semantic purposes.”
Anyway, it allows embedding dynamic content, for instance, images created via PHP GD.
// Create your file contents
$img_data = create_my_image_data();
// Create the message
$message = new Swift_Message('Dynamic Picture');
// Set the body
$message->setBody(
'<html>' .
' <body>' .
'  Here is a new picture <img src="' . // Embed the file
     $message->embed(new Swift_Image($img_data, 'image.jpg', 'image/jpeg')) .
   '" alt="Image" />' .
'  Anything else?' .
' </body>' .
'</html>',
  'text/html'
);
How to include attachments
Attaching files works almost the same as embedding images. You also can attach files saved locally, from URLs, or add dynamic content. The difference is that you use Swift_Attachment class here and Swift_Message's attach() method.
Tip: The recipient will download the file with the same name you’ve specified. Double-check it when adding an attachment! To rename the file right in the script, use ->setFilename() method.
// For the regular file types like docs, spreadsheets, or images, you can go without the content type
$message->attach(Swift_Attachment::fromPath('/path/to/image.jpg'));
// attach a file from a URL
$message->attach(Swift_Attachment::fromPath('/blog/newlogo.jpg'));
// Create the attachment and rename it
$message->attach(
  Swift_Attachment::fromPath('/path/to/newlogo.jpg')->setFilename('logofinal.jpg')
);
// now let’s add a pdf file created via GD and set its content type
$data = create_confirmation_pdf_data();
$attachment = new Swift_Attachment($data, 'confirmation.pdf', 'application/pdf');
$message->attach($attachment);
Sending a message with Swift Mailer
Above we have defined the subject of our message, its recipients, and the content. Looks like the email is ready to be sent. We have already created the transport and specified Mailtrap credentials, so we simply use the Mailer class to send the message:
$mailer->send($message);Let’s compose the whole message and send it. In this example we use both HTML and plain text parts, embed an image, and attach a PDF file:
<?php
require_once '/path/to/vendor/autoload.php';
 try {
$transport = (new Swift_SmtpTransport('live.smtp.mailtrap.io', 2525))
        ->setUsername('1a2b3c4d5e6f7g')
        ->setPassword('1a2b3c4d5e6f7g');
    $mailer = new Swift_Mailer($transport);
public function index($name, \Swift_Mailer $mailer)
{
 $message = (new Swift_Message())
 ->setSubject('Here should be a subject')
->setFrom(['support@example.com'])
 ->setTo(['newuser@example.com' => 'New Mailtrap user'])
->setCc([
'product@example.com' => 'Product manager'
]);
$message->setBody(
'<html>' .
' <body>' .
'  <img src="' .
     $message->embed(Swift_Image::fromPath('image.png')) .
   '" alt="Image" />' .
'  <p>Welcome to Mailtrap!</p>’.
‘Now your test emails will be <i>safe</i>’ .
' </body>' .
'</html>',
  'text/html'
);
$message->addPart('Welcome to Mailtrap!', 'text/plain');
$message->attach(Swift_Attachment::fromPath('/path/to/confirmation.pdf'));
$mailer->send($message);Sending a message via email API
Besides an SMTP service, Mailtrap also offers an email API that lets you add email-sending functionality to your application and have more control over your email deliverability.
If you want to use Mailtrap Email API for your PHP app, after verifying your domain name, go to the Sending Domains section, select API and SMTP tab. From the drop-down menu, select PHP and copy paste the below code with your credentials in it.
<?php

$curl = curl_init();

curl_setopt_array($curl, array(
    CURLOPT_URL => 'https://send.api.mailtrap.io/api/send',
    CURLOPT_RETURNTRANSFER => true,
    CURLOPT_ENCODING => '',
    CURLOPT_MAXREDIRS => 10,
    CURLOPT_TIMEOUT => 0,
    CURLOPT_FOLLOWLOCATION => true,
    CURLOPT_HTTP_VERSION => CURL_HTTP_VERSION_1_1,
    CURLOPT_CUSTOMREQUEST => 'POST',
    CURLOPT_POSTFIELDS =>'{"from":{"email":"mailtrap@mailtrap.club","name":"Mailtrap Test"},"to":[{"email":"viktoriia.ivanenko@railsware.com"}],"subject":"You are awesome!","text":"Congrats for sending test email with Mailtrap!","category":"Integration Test"}',
    CURLOPT_HTTPHEADER => array(
        'Authorization: Bearer <your api token>,
        'Content-Type: application/json'
    ),
));

$response = curl_exec($curl);

curl_close($curl);
echo $response;