If you want to send emails in Cursor, you won’t be able to do it since it doesn’t have built-in sending functionality. But don’t worry — I’ve got you covered!
In this article, I’ll show you how to integrate Cursor with Mailtrap MCP and start sending emails with simple prompts — whether you’re on Windows or macOS.
Alternatively, feel free to check our knowledge base tutorial on how to send emails with Cursor and Mailtrap email MCP server.
Before we start: Since Mailtrap MCP server is implemented as a Node.js command line utility, make sure that besides the Cursor editor, you have the latest Node.js version installed.
Setup Mailtrap MCP Server
First, let’s set up and configure an MCP Server in Cursor. So, open your Cursor editor and navigate to Settings → Cursor Settings.
Once in the Cursor Settings window, go to the MCP tab and click on Add new global MCP server.
This will open a new mcp.json file, which is used by Cursor to store all the MCP servers you can make requests to. Initially, the file is empty, so copy/paste the following configuration inside it:
{
  "mcpServers": {
    "mailtrap": {
      "command": "npx",
      "args": ["-y", "mcp-mailtrap"],
      "env": {
        "MAILTRAP_API_TOKEN": "your_mailtrap_api_token",
        "DEFAULT_FROM_EMAIL": "your_sender@example.com"
      }
    }
  }
}
This setup allows us to use Mailtrap Email API to send emails by prompting the AI within Cursor. However, now you need to replace MAILTRAP_API_TOKEN and DEFAULT_FROM_EMAIL values with your own Mailtrap API credentials.
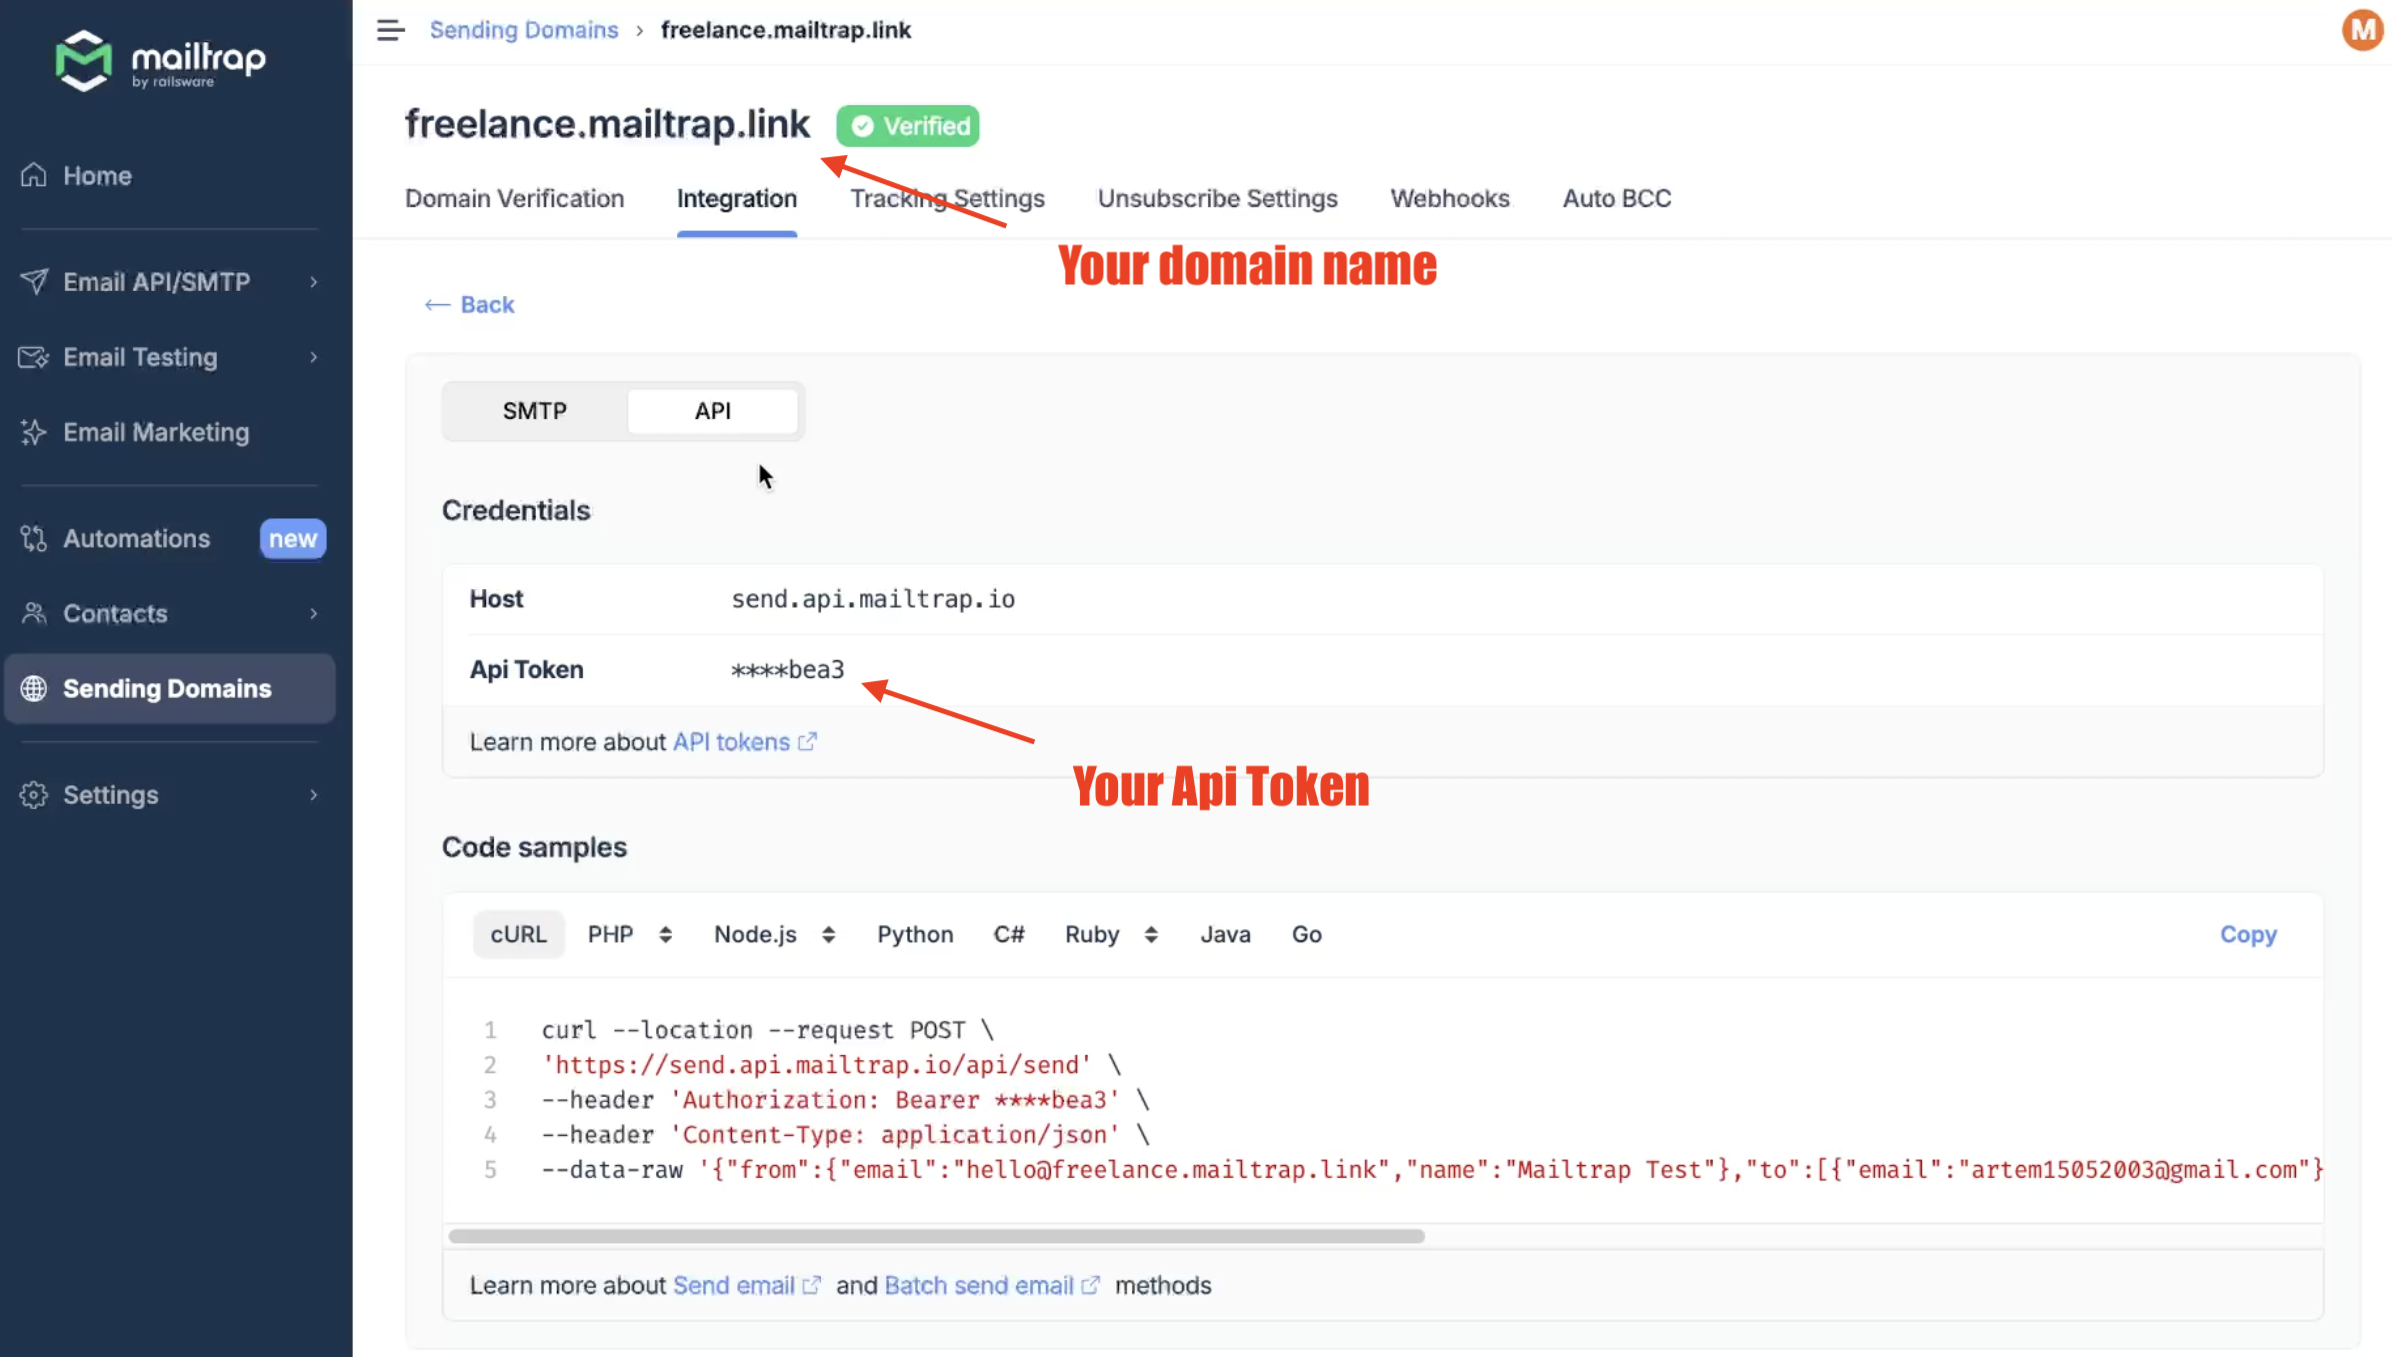
To do this, open your Mailtrap account and navigate to Sending Domains → Integration → API. There, you’ll see:
- Your domain name, which is different for every user. For example, with the domain used for this article, I can use something like ‘no-reply@freelance.mailtrap.link’.
- The API token, used to authenticate API requests, which you can copy/paste.

After inserting the credentials in your mcp.json file and saving it, Mailtrap MCP should be successfully displayed as connected in the MCP tab of Cursor Settings.
Note: Although you shouldn’t have issues, we recommend reloading Cursor to make sure everything is set up correctly.
Send emails with Mailtrap Email MCP Server
Now, let’s use the configured Mailtrap MCP to send some emails.
First, toggle the AI Pane, located in the upper-right corner of the Cursor editor.
In the opened pane, make sure that the Agent mode is configured since it allows Cursor to perform actions for us.
To send a plain-text email, you can use a prompt like this one (although I encourage you to use your own prompts and experiment with them since the possibilities are pretty much endless):
| Send an email to john.doe@example.com with the subject ‘Hi John!’ and a message that wishes John a great day. |
Cursor will then identify the Mailtrap MCP server for your request, suggest running the right tool, in this case, send_email, and generate the email with all the parameters and values for you. As soon as you’re ready to send, click Run tool.
Lastly, Cursor AI will notify you when it successfully delivers the email.
You can verify it by checking the Email Logs tab of your Mailtrap dashboard.
Send HTML email
To send an HTML email in Cursor using Mailtrap MCP, all you need to do is tell the AI that you want your message to be formatted accordingly. For example:
| Send an email to john.doe@example.com with the subject ‘Hi John!’ and a message that wishes John a great day. Make sure the message is nicely formatted by using HTML. |
Cursor AI will then do the job for you, and you can verify that the email data meets your expectations. In this case, we can see a new html field with the HTML content of our email:
As soon as you’re ready, click on Run tool, and Cursor will send the new HTML email.
To verify whether the email has been formatted correctly, you can go to the Preview tab in Mailtrap Email Logs.
Send email to multiple recipients
Sending emails to multiple recipients is just as simple. Feel free to use an example prompt below to send an email to multiple recipients or modify your own prompt(s).
| Send an email to Jackie and Michael with a simple greeting. Jackie’s email is jackie@example.com, and Michael’s email is mike@example.com. |
Again, you can verify that the email data meets your expectations. In this case, we can see a new cc field being specified, which includes a list of additional recipients provided via carbon copy. If everything looks good, hit Run tool, and off it goes.
As usual, Cursor AI will tell you that the email was sent successfully, providing you with a few extra details.
Now, if you go to Mailtrap Email Logs, you should see that the email has been sent to multiple recipients. Simple as that!
Further reading:


