In 2024, WooCommerce had a market share of 36.68%, making it the leading e-commerce platform worldwide. Online stores use transactional emails to send notifications to their customers, such as receipts or order confirmations. So, WooCommerce also needs a working email-sending functionality.
As a WordPress plugin, WooCommerce uses the native wp_mail()function to send emails, which is far from ideal. This means that emails addressed to your customers might not get sent or delivered to the inbox. They might even get discarded by the receiving mail servers.
In this tutorial, we’ll explain how to send emails in WooCommerce and land them in recipients’ inboxes. We’ll also talk about different types of transactional emails. Let’s dive right into it!
Transactional emails in WooCommerce: definition, importance, examples
Transactional emails are emails that are triggered when a user takes a specific action.
For example, when you forget your super difficult password (mydogmax111) for the 100th time and request a reset, you’ll receive an email with a password reset link. That would be a transactional email.
Such emails are important as they provide users with necessary information about further steps, confirm their action, or let them know if something was unsuccessful. Refer to this article to learn more about WordPress transactional emails.
By default, WooCommerce includes certain types of transactional emails that can be modified to match your needs. These are usually WooCommerce order emails:
- New order – sent to site administrators
- Canceled order – sent to site administrators
- Failed order – sent to site administrators
- Order on hold – sent to customers
- Processing order – sent to customers
- Completed order – sent to customers
- Refunded order – sent to customers
- Customer invoice / Order details – sent to customers
- Customer note – sent to customers
- Reset password – sent to customers
- New account – sent to customers
These templates are available in plain text, HTML, or multipart formats. You can use them as they are or change their color or banner image. For that, you’d need to access WooCommerce email settings and scroll down to the ‘Email template’ section.
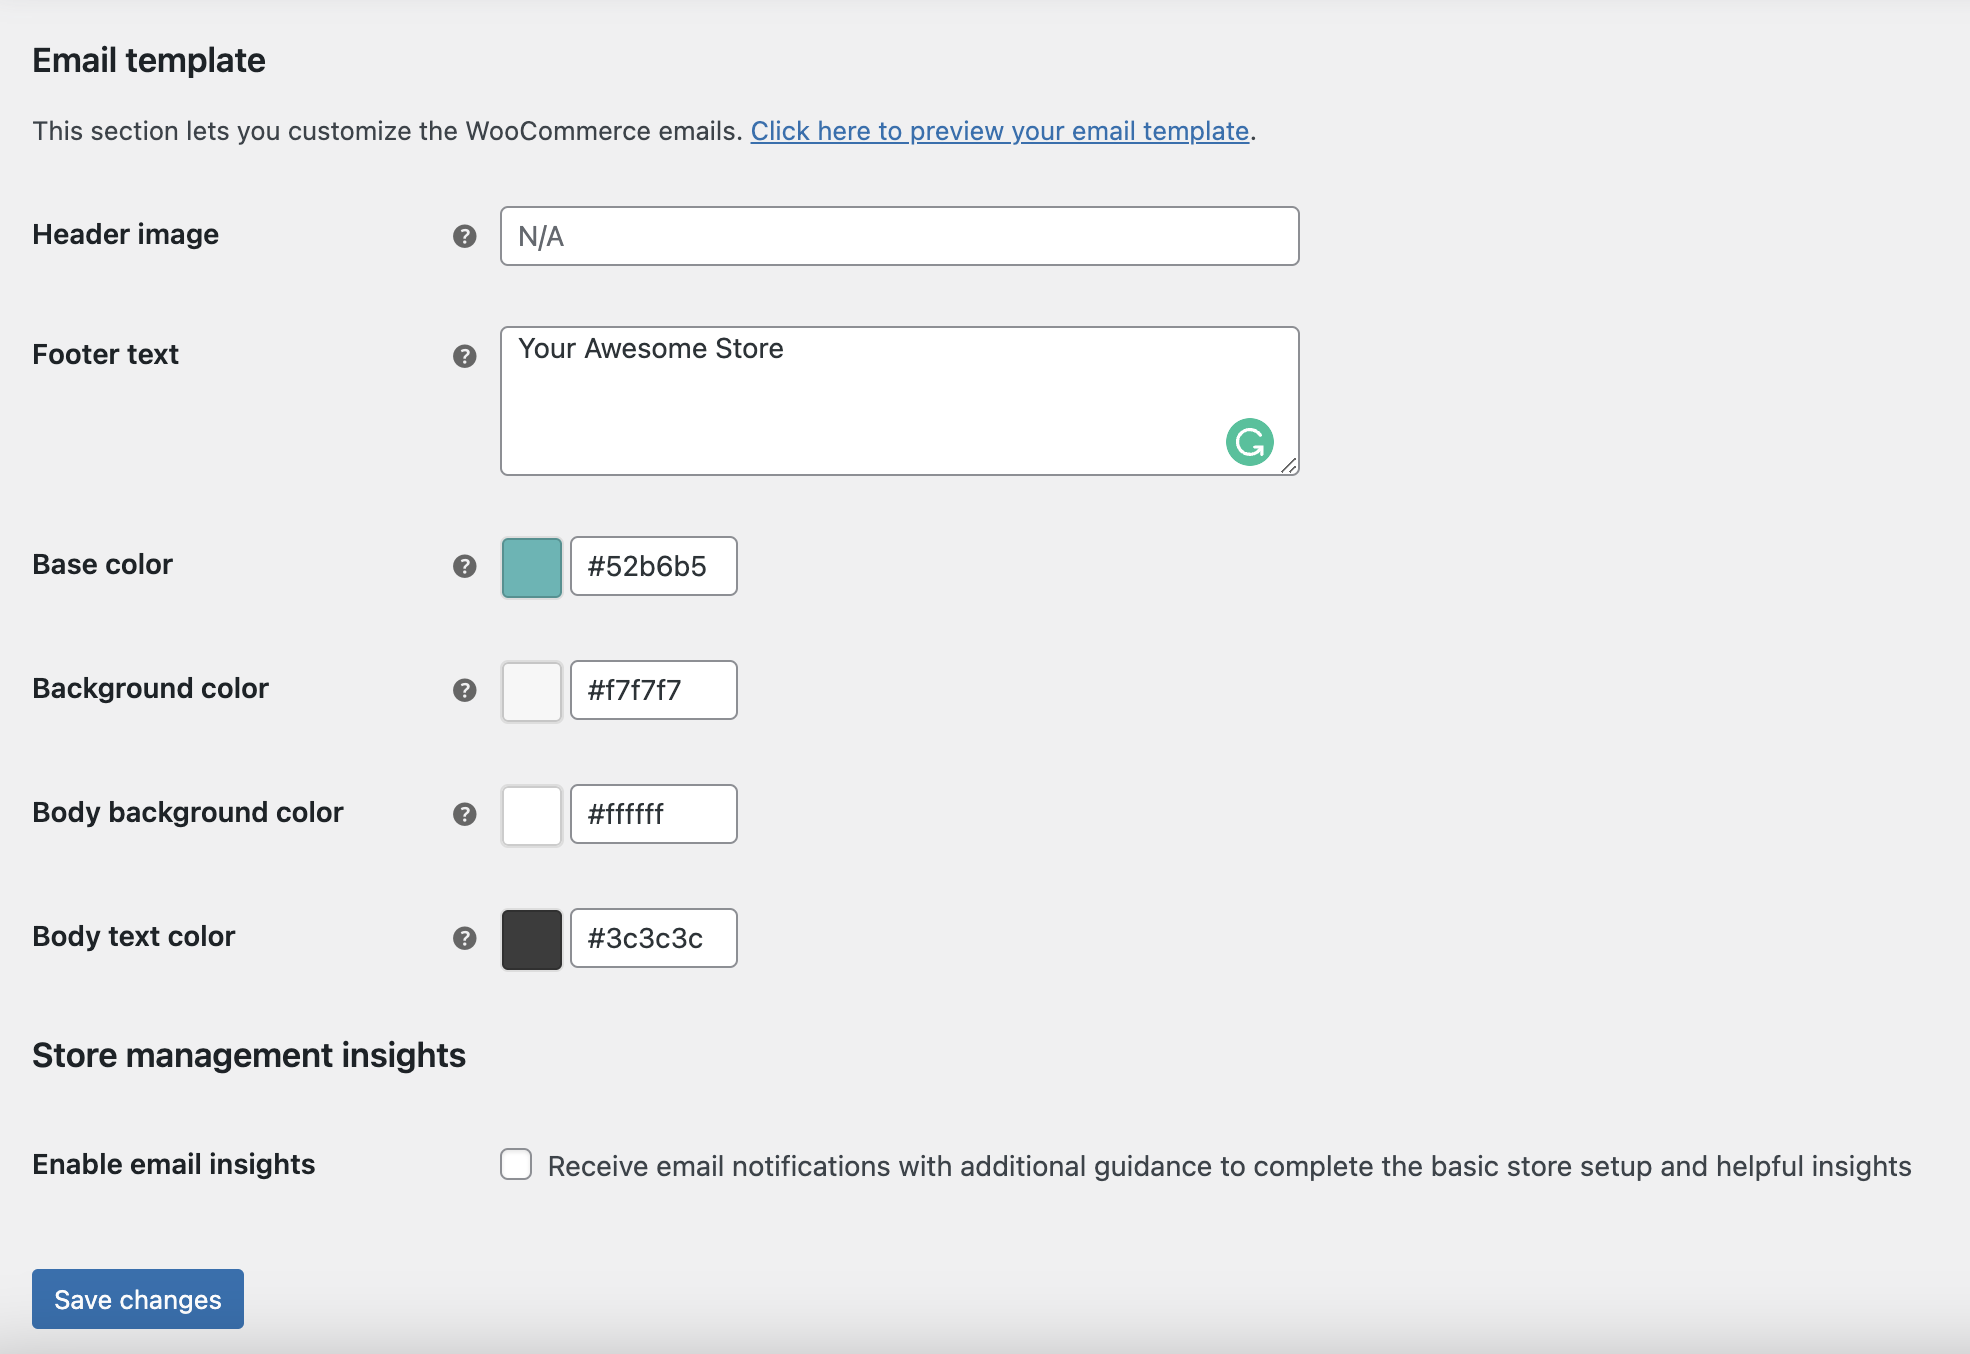
It’s also possible to change a particular template, for example, processing order. Simply press the ‘Manage’ button across the template. Fill in the empty fields, such as email subject, heading, additional content, and choose the email type (text, HTML, or multipart). Finally, hit ‘Save changes’.
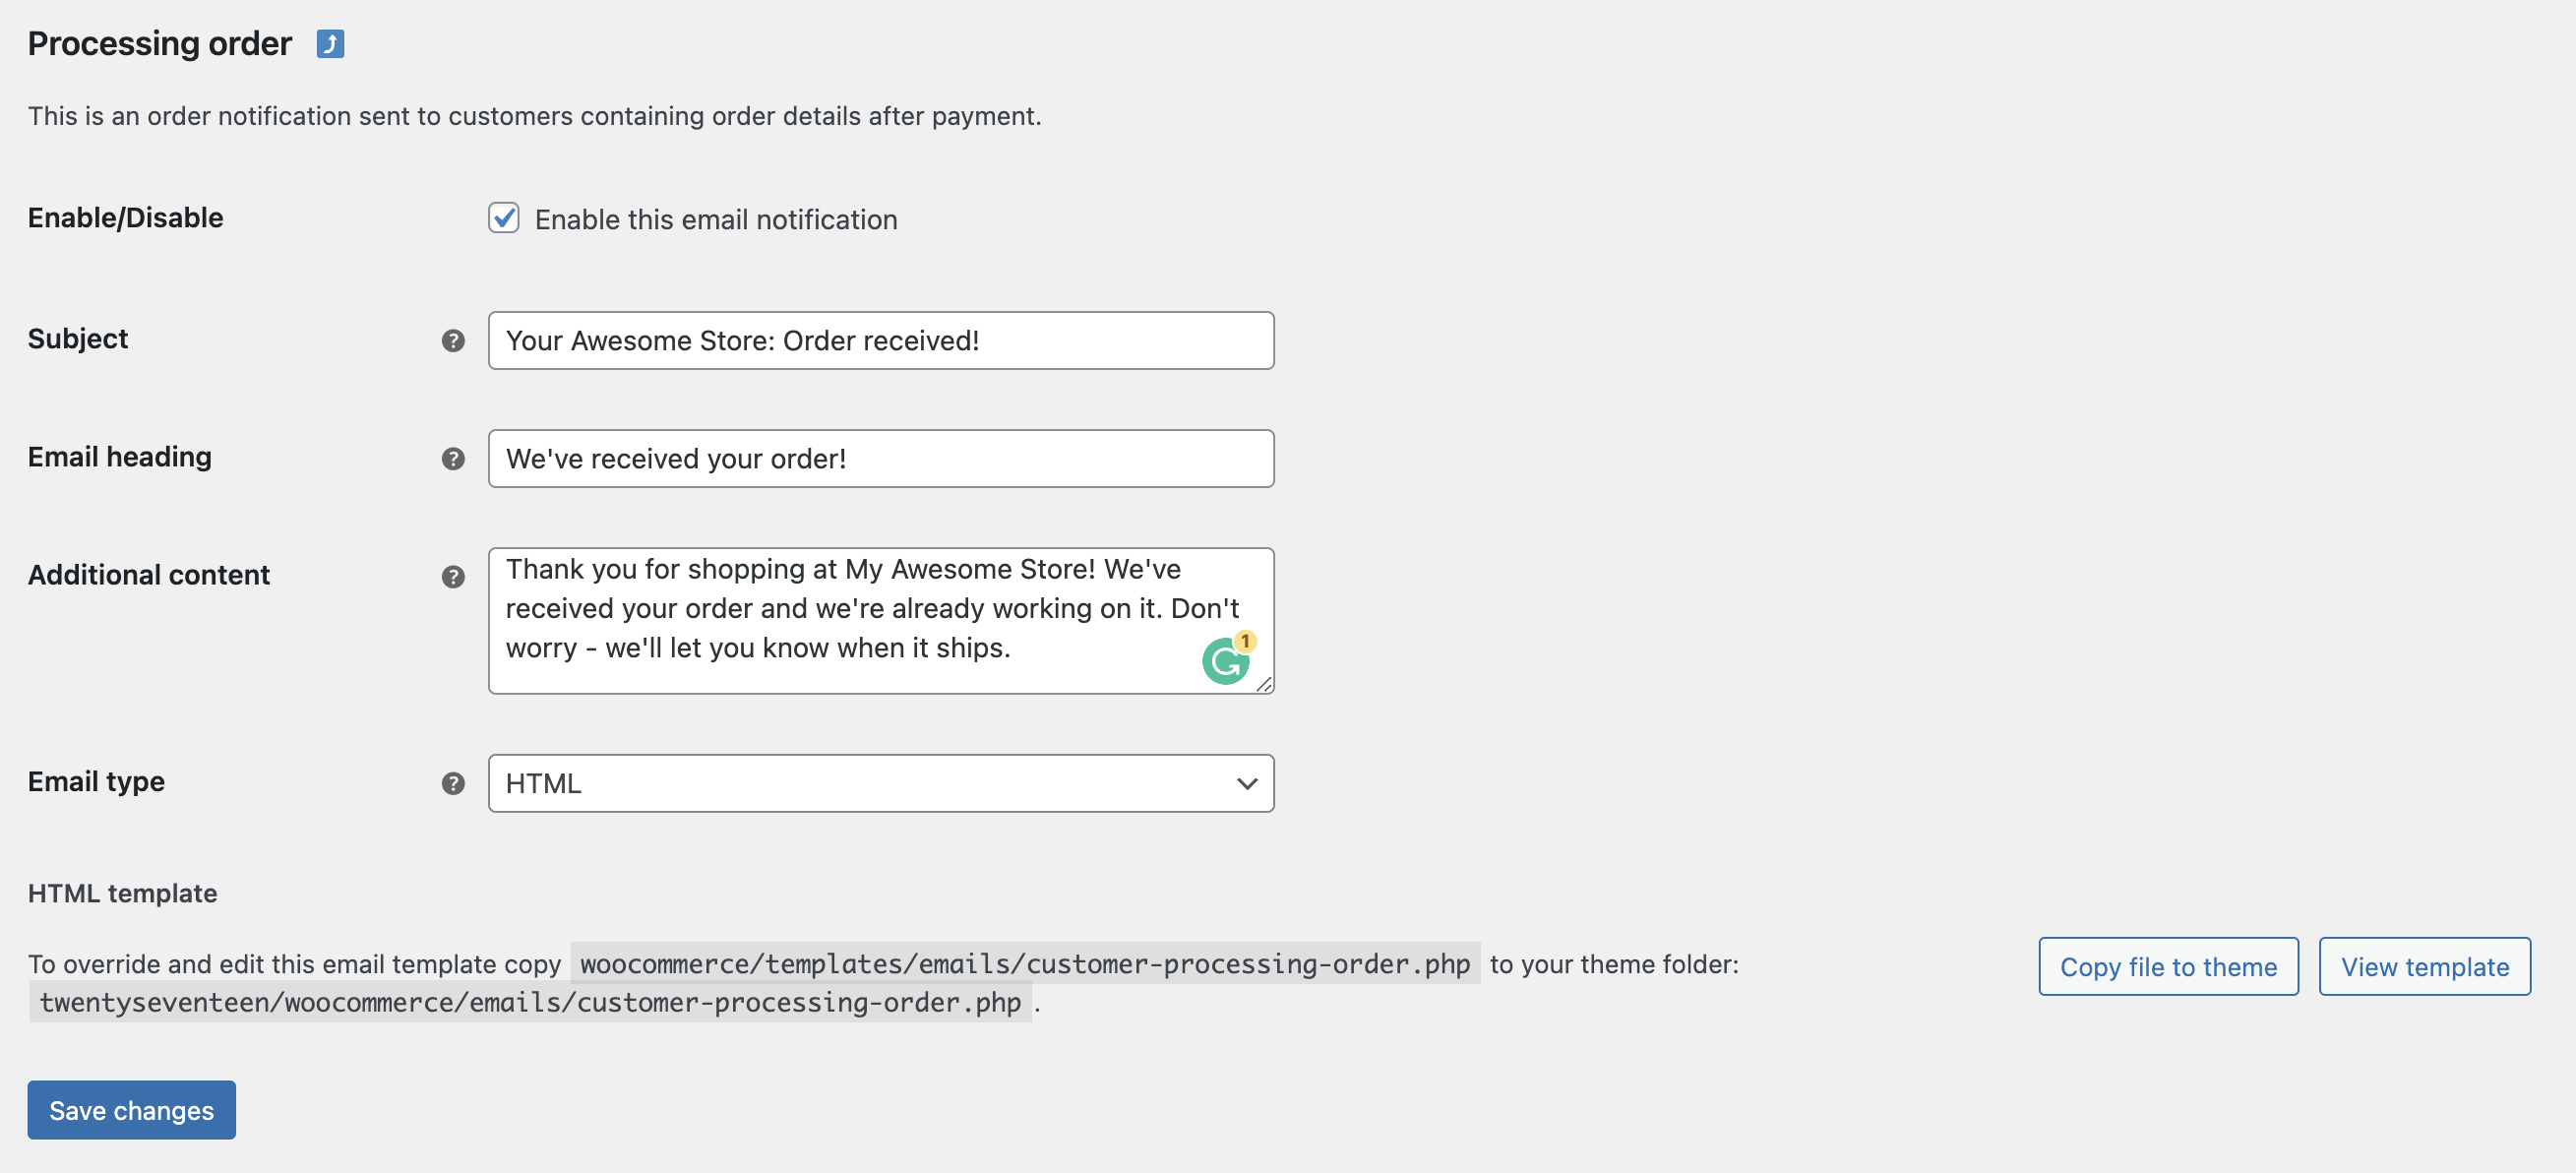
If that’s not enough and you need more tweaks, just copy the template file below those fields by pressing ‘Copy file to theme’.
Navigate to the ‘Appearance’ tab in the WordPress dashboard and choose ‘Theme file editor’. You’ll see the ‘Theme files’ tab on the right portion of the screen. Scroll down to find ‘WooCommerce’. Expand it and press ‘emails’ which will open the menu with the list of templates you copied.
Choose the template you want to tweak and start coding.
Note: it’s recommended to create a child theme and make changes there to avoid losing all the customizations in the parent theme.
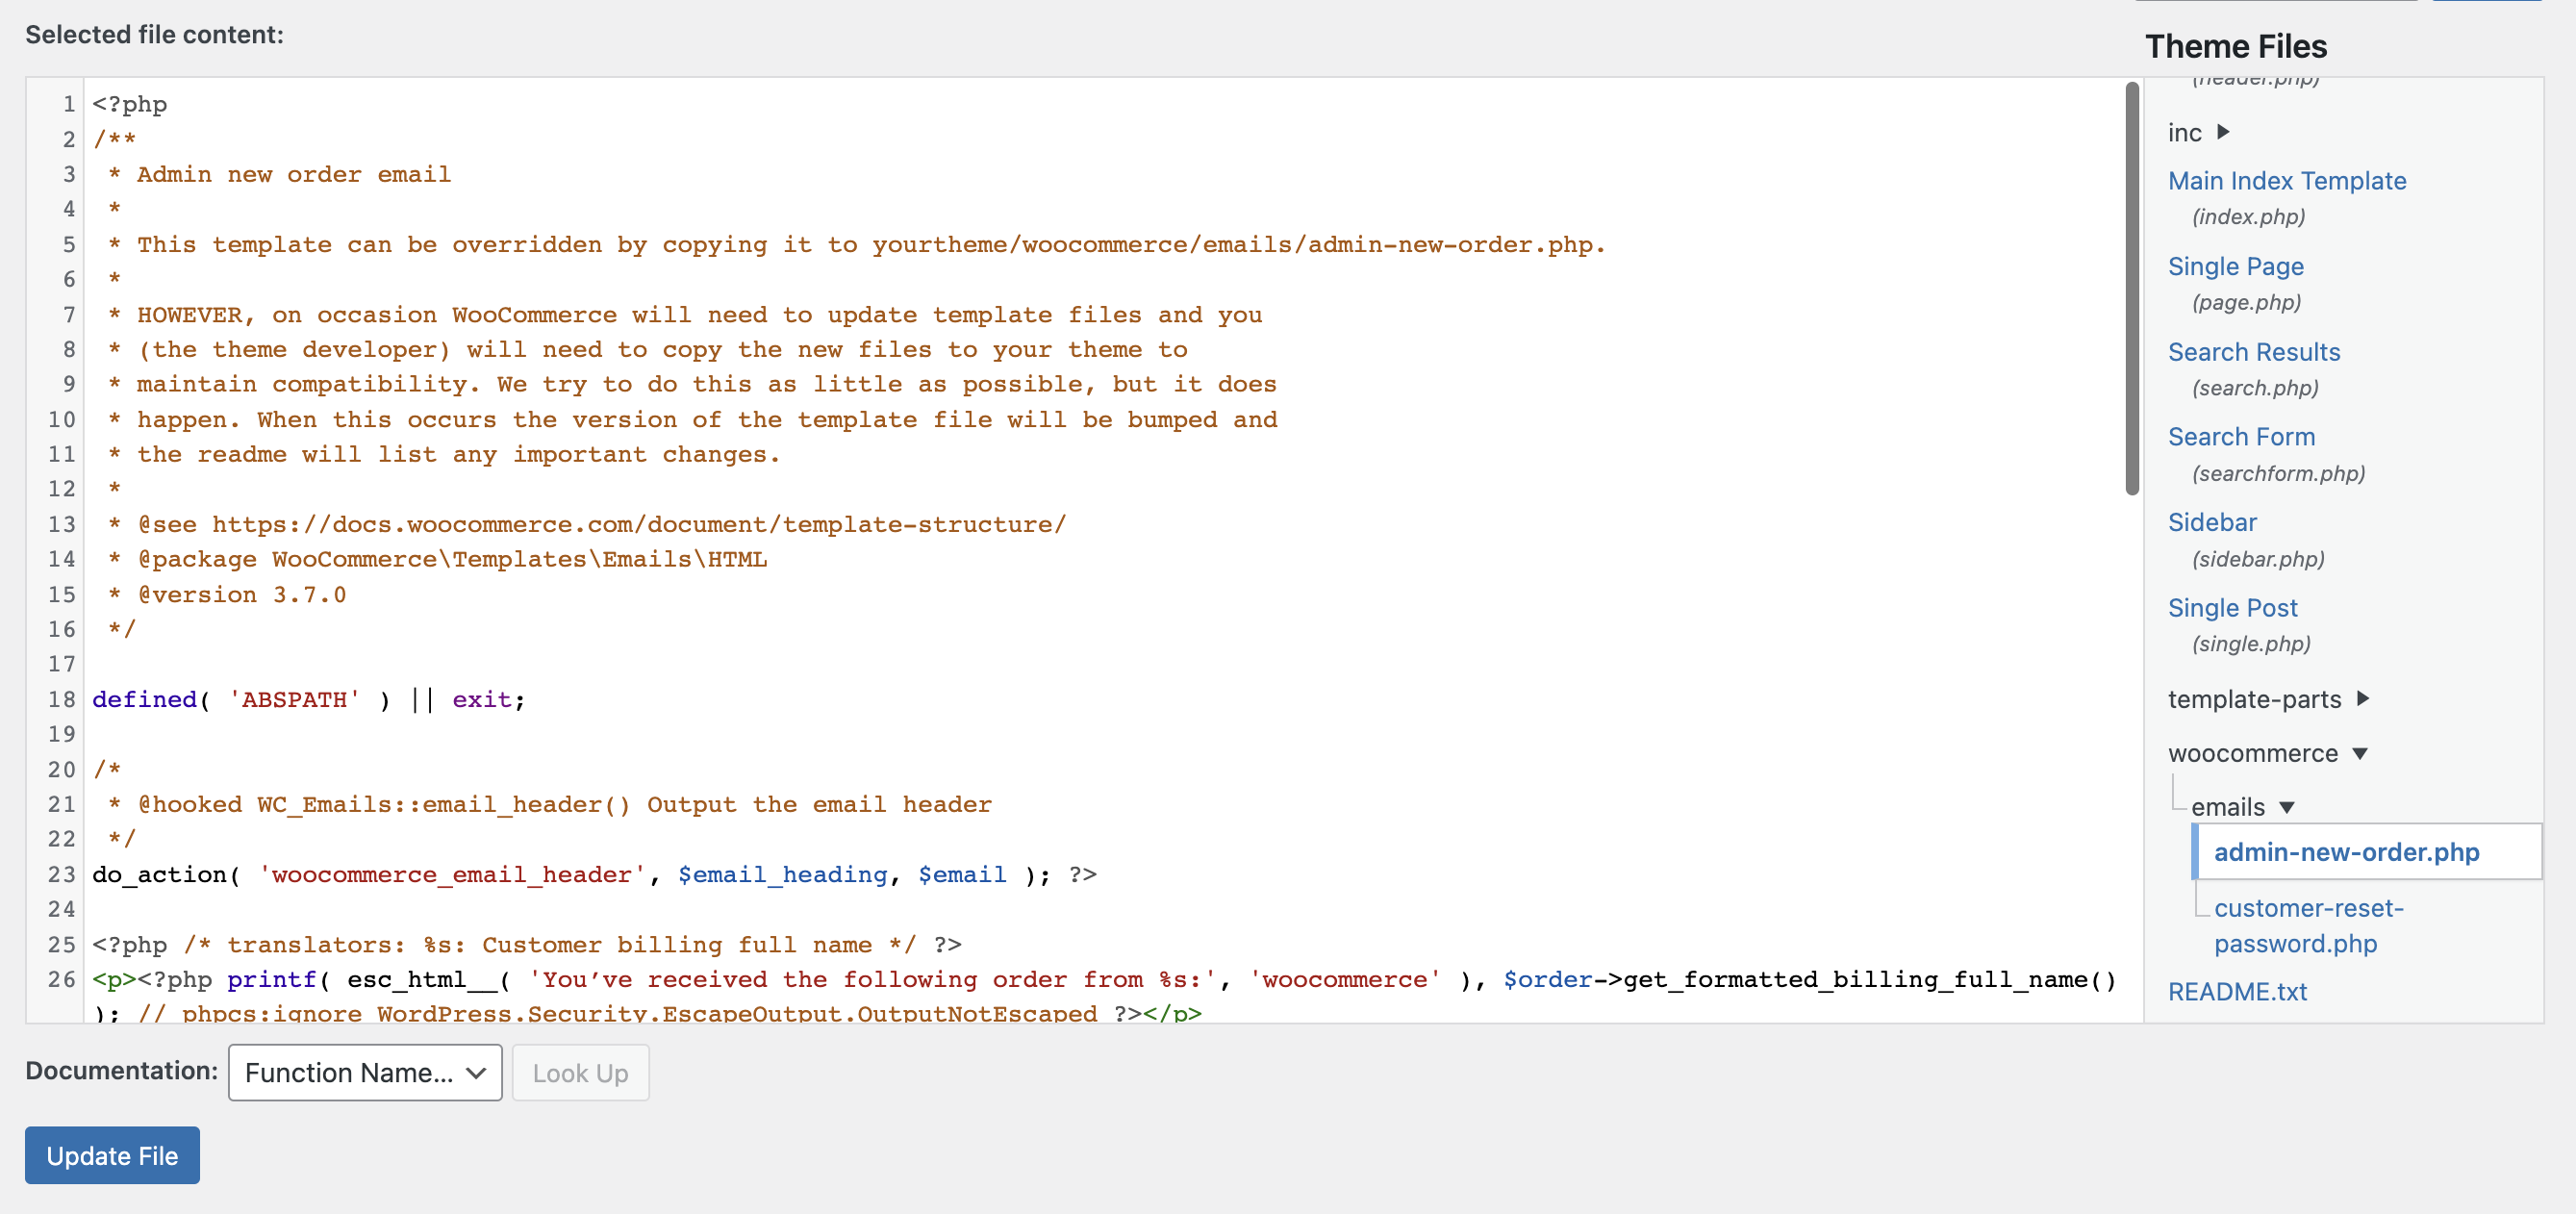
WooCommerce’s default customization options are limited, but there are multiple plugins that can help with that (more on that below). You can also extend WooCommerce capabilities by using powerful form builders like JetFormBuilder for creating custom form and automating processes like email notifications.
Though plugins enable you to customize the design, you still have to come up with the content yourself or use templates. Here’s an order confirmation template from Mailtrap:
Subject: Your [SERVICE] order confirmation
Your order is confirmed!
[NAME], thanks for shopping with us. Here are your order details:
[orderID]
[product + picture]
[quantity/other customizations]
[price_paid + payment method] // if payment by card, the last four digits should be used
[shipping + billing address]
We estimate that your order will arrive in 2-3 business days. Click the button below to track it.
TRACK YOUR ORDER
Forgot to add something? Here are the items our clients frequently buy together with [PRODUCT]. Get them within the next 24 hours, and we’ll ship everything together.
[FAQs]
Need any support? Send a reply to this message or contact us right away [link].
Thanks for your order and we hope you enjoy!
Attention: Mailtrap’s transactional email templates are almost ready and will be available to our users soon.
How to send emails in WooCommerce with the WP Mail SMTP plugin
As mentioned above, it’s possible to send emails programmatically from WooCommerce with the WordPress wp_mail() function. It calls PHP’s mail() function, which in turn connects with the local host to send emails. Check out this blog post to find more information about sending emails in WordPress.
Without header authentication, PHP’s mail() function is often blocked by WordPress hosting providers. Email servers don’t tolerate this function either, putting incoming emails in the spam folder.
But that’s not the only issue. WooCommerce emails might not be sent or delivered for other reasons as well (refer to the troubleshooting section below for more details).
WP Mail SMTP plugin (or any other SMTP plugin, for that matter) solves those problems by overriding the mail() function and allowing users to configure WordPress SMTP settings.
This plugin connects Gmail SMTP or third-party SMTP service. By doing so, it enables you to send multiple emails from your WooCommerce store regardless of your web host.
More information on setting up WordPress Gmail SMTP is available in another tutorial.
Sending emails with Mailtrap
Today, we’ll teach you how to set up WP Mail SMTP with Mailtrap Email API – an email infrastructure with high deliverability rates by design. While Gmail integration is suitable for small e-commerce stores, you’ll need an SMTP service such as Email API to send bulk emails.
With Email API, developers take complete control over email deliverability and infrastructure. Actionable analytics lets users monitor overall email infrastructure performance and unexpected sending issues if they appear. It includes a helicopter view dashboard, drill-down reports, 60 days of email logs, and deliverability alerts. With these features, you can closely track which emails were sent, delivered, and failed.
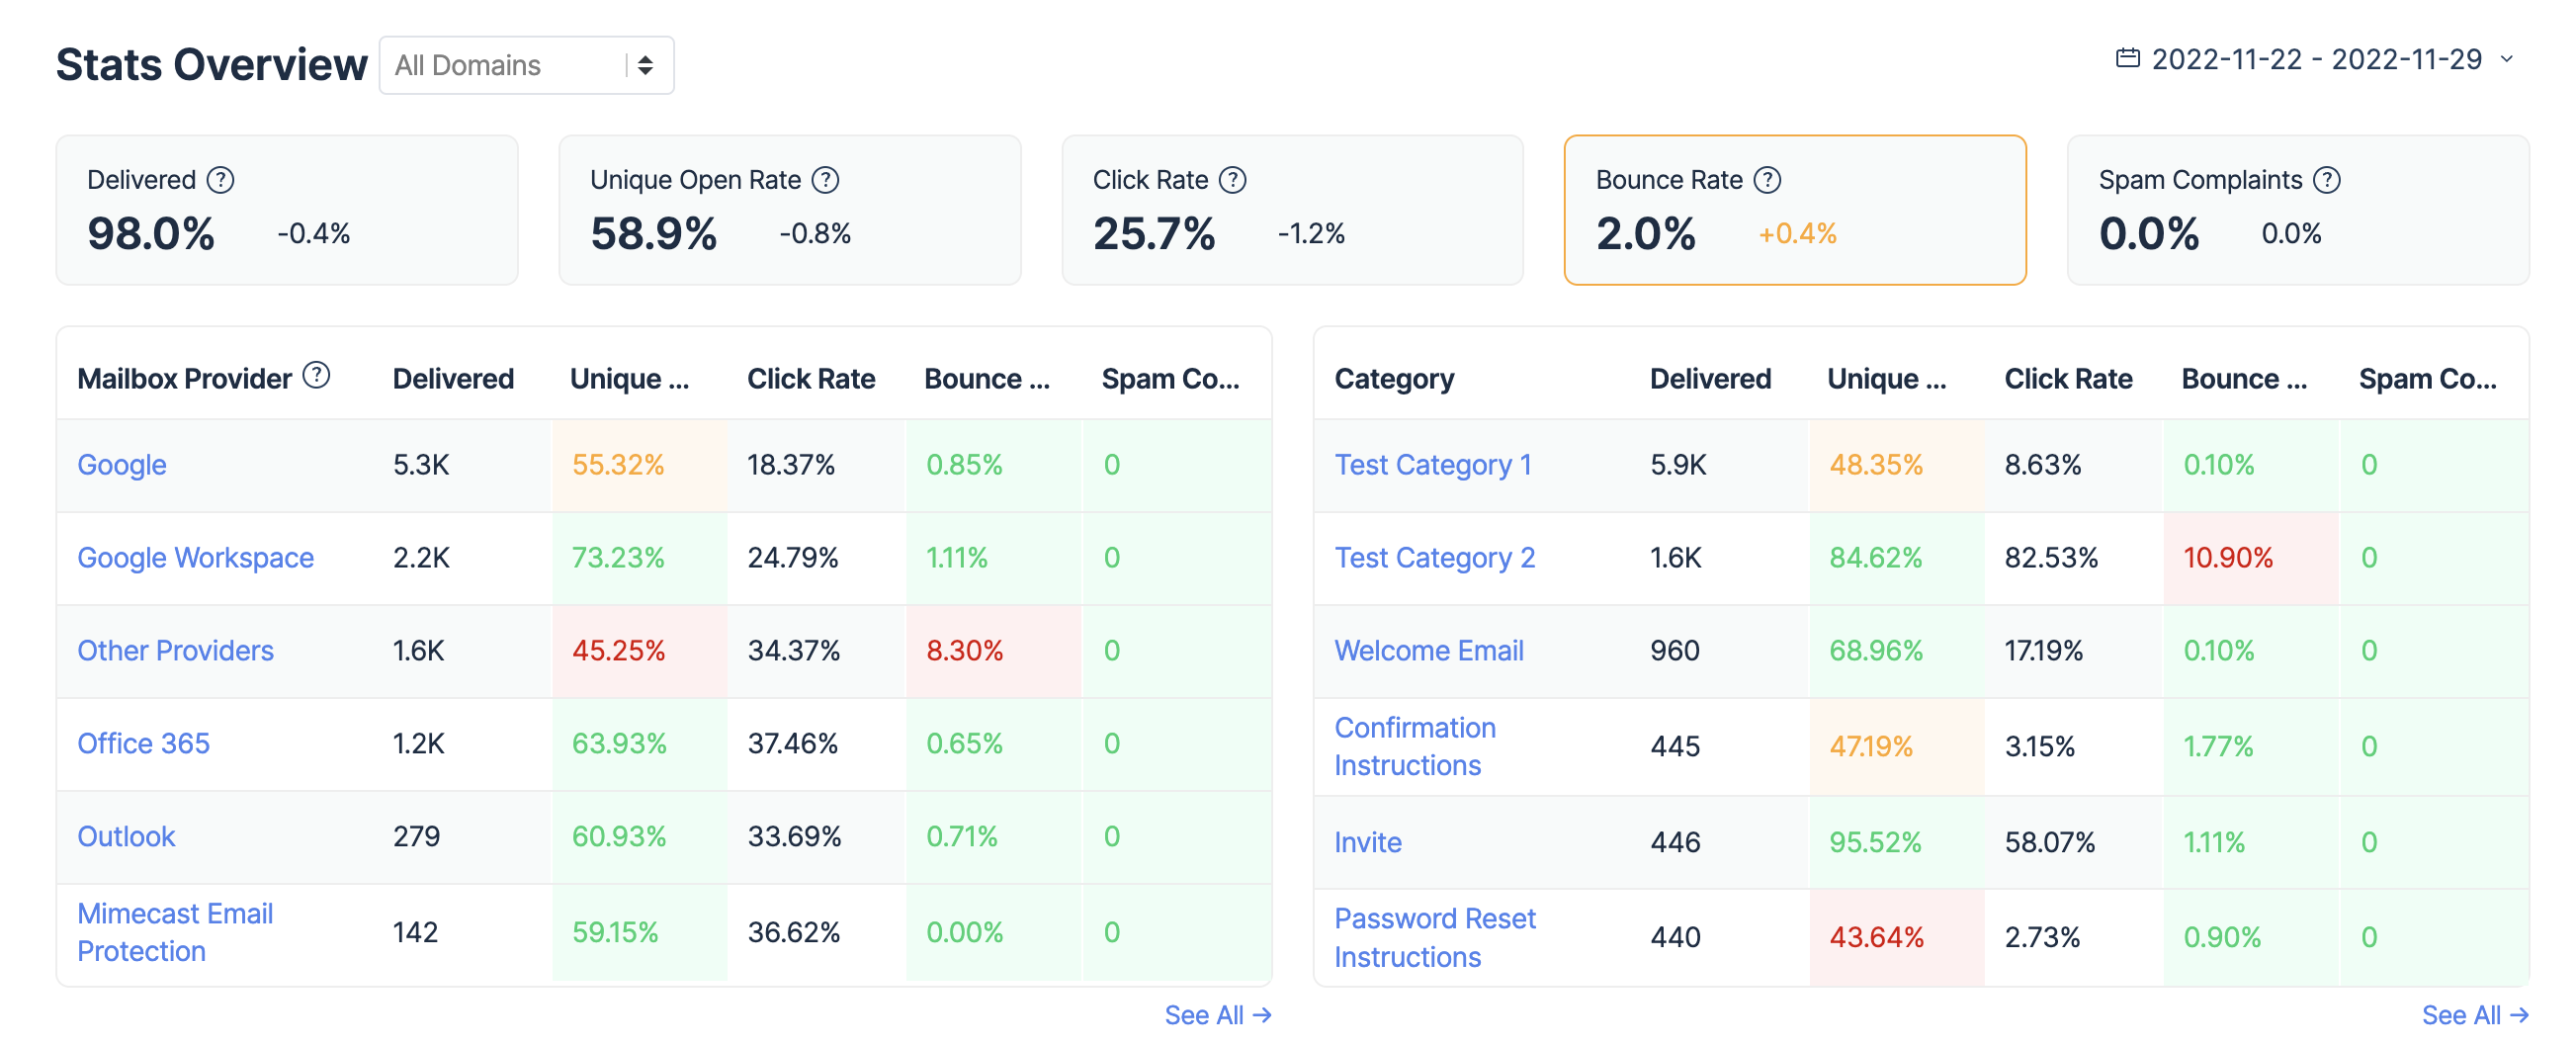
Let’s start the integration by creating the Mailtrap account. Simply go to Mailtrap.io and sign up. Once the account is created and verified, add your domain and verify it using authentication protocols.
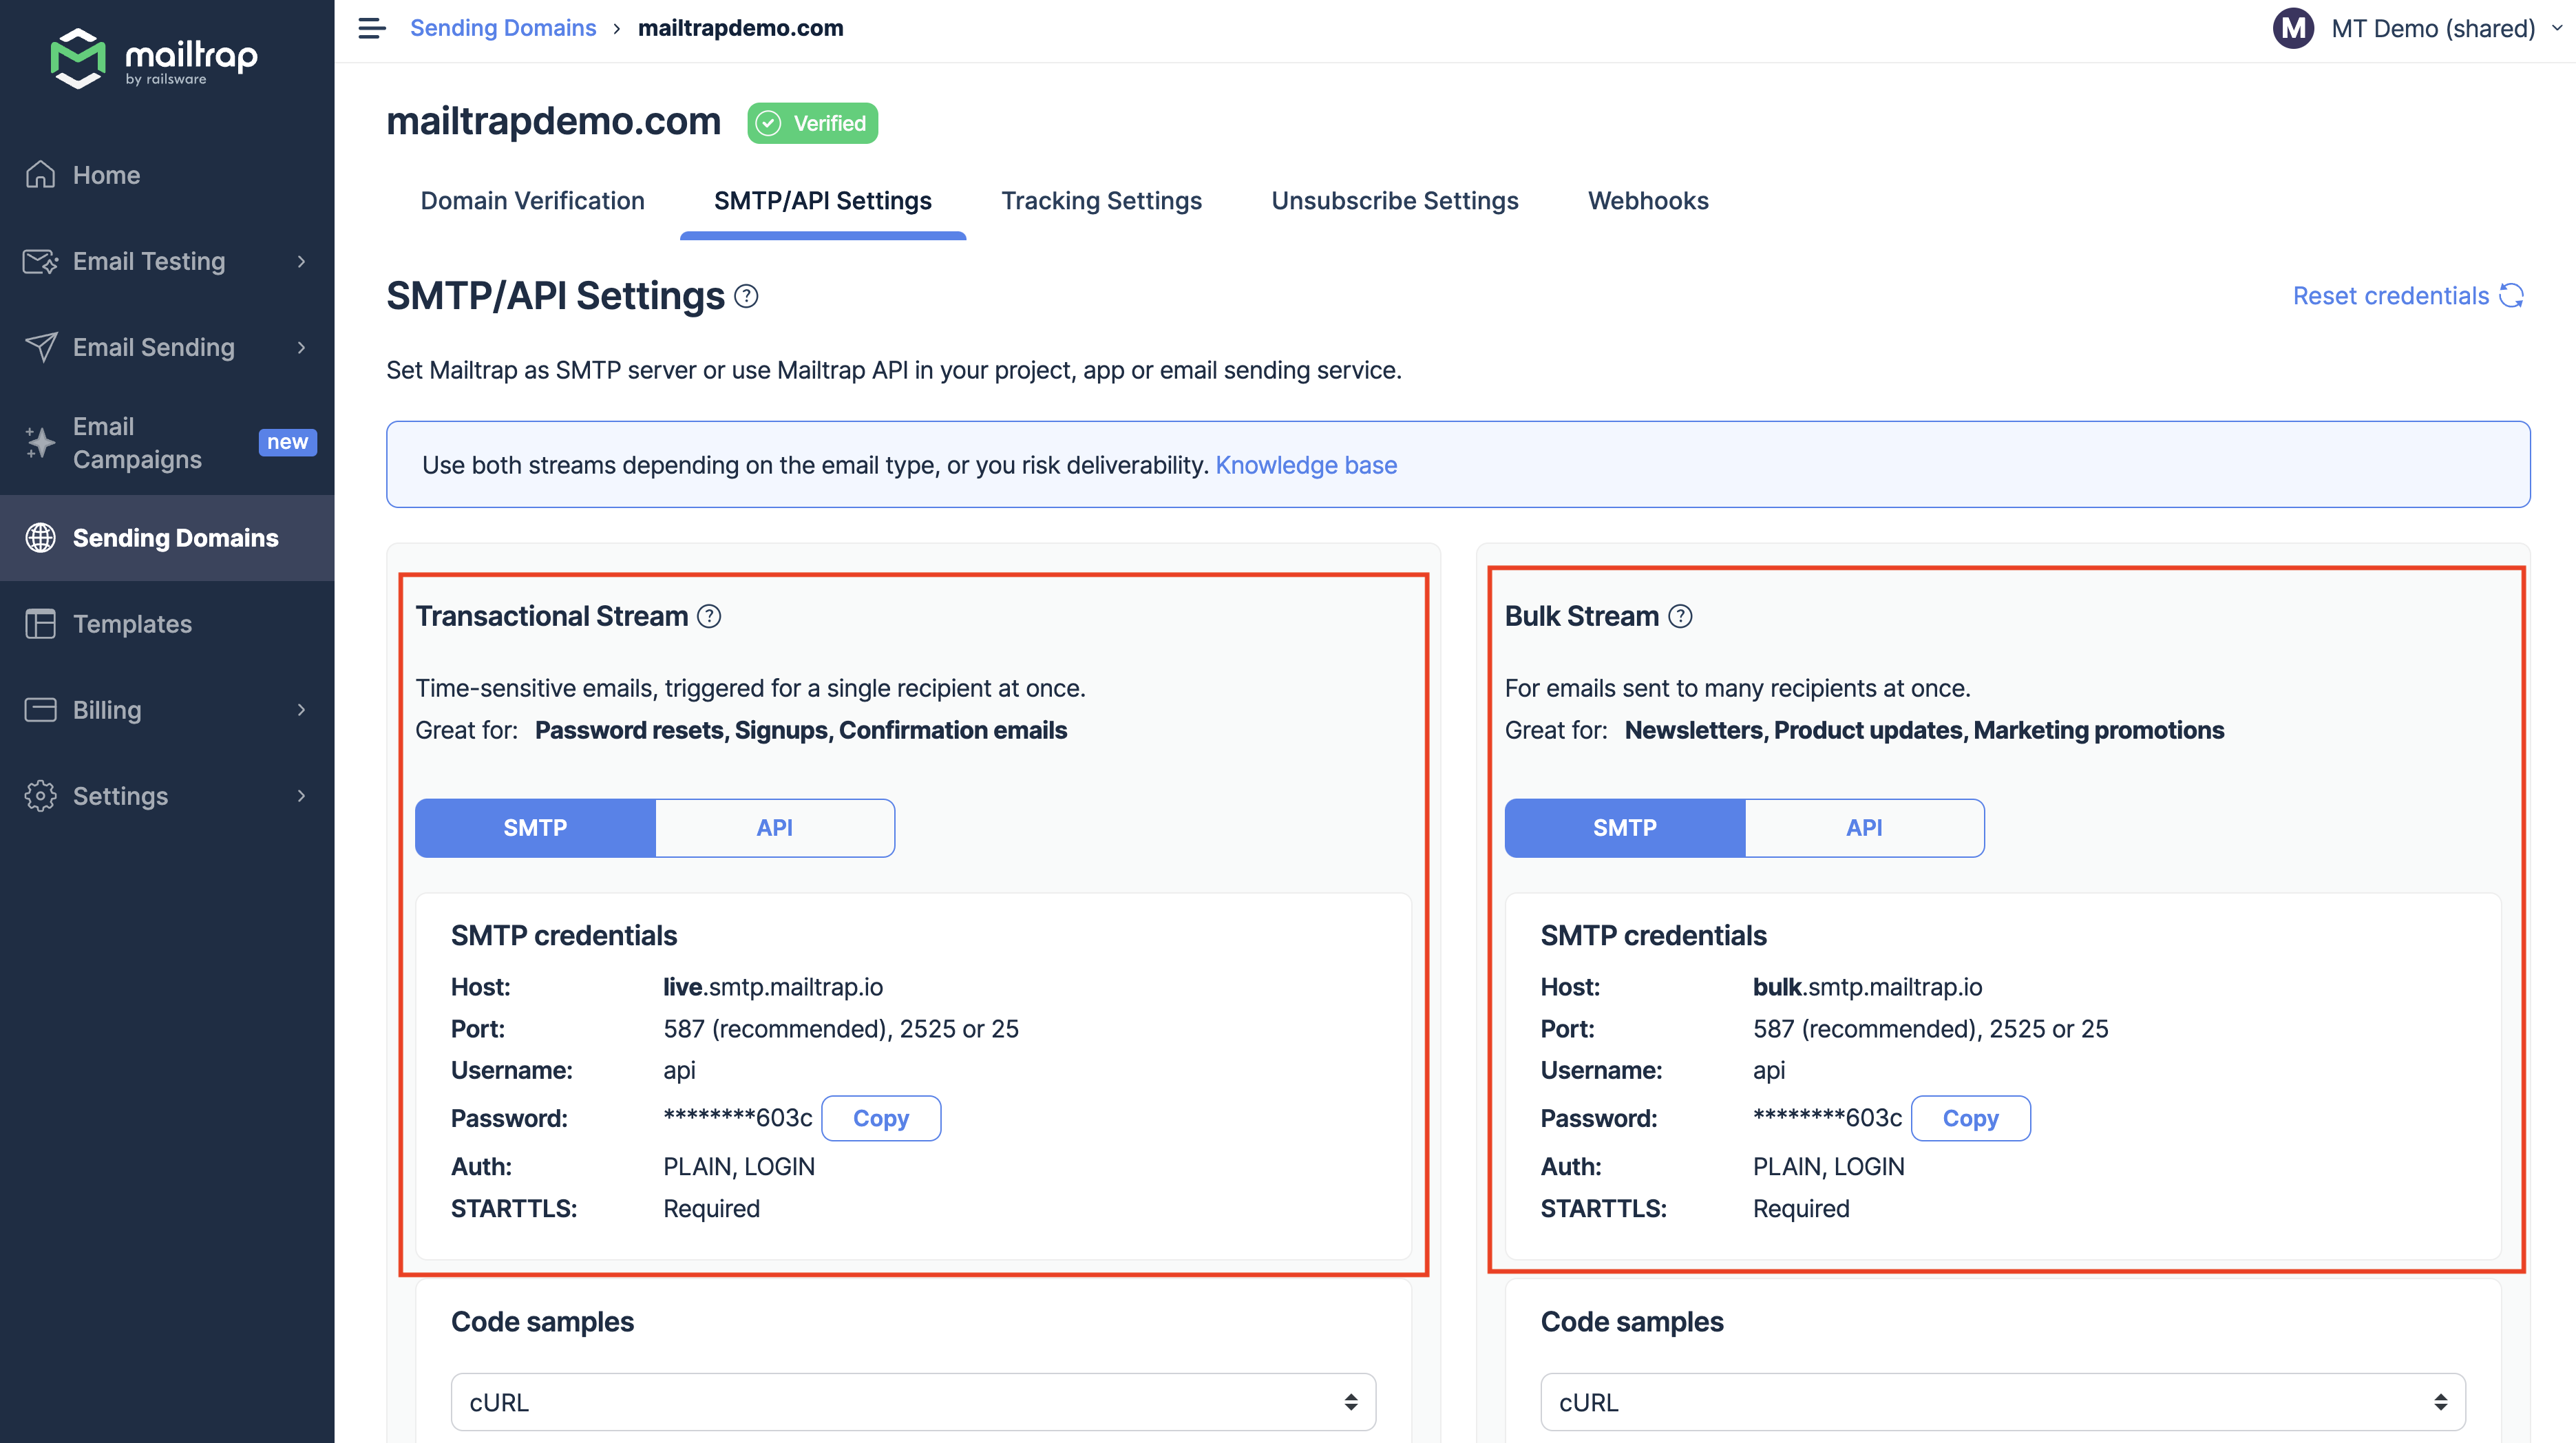
Afterward, go to the ‘SMTP/API Settings’ tab, choose Transactional or Bulk stream, depending on your preferences, and copy the associated credentials. In this article, I’ll be using the Transactional stream.
Now go back to the dashboard of your WooCommerce store to install the WP Mail SMTP plugin.
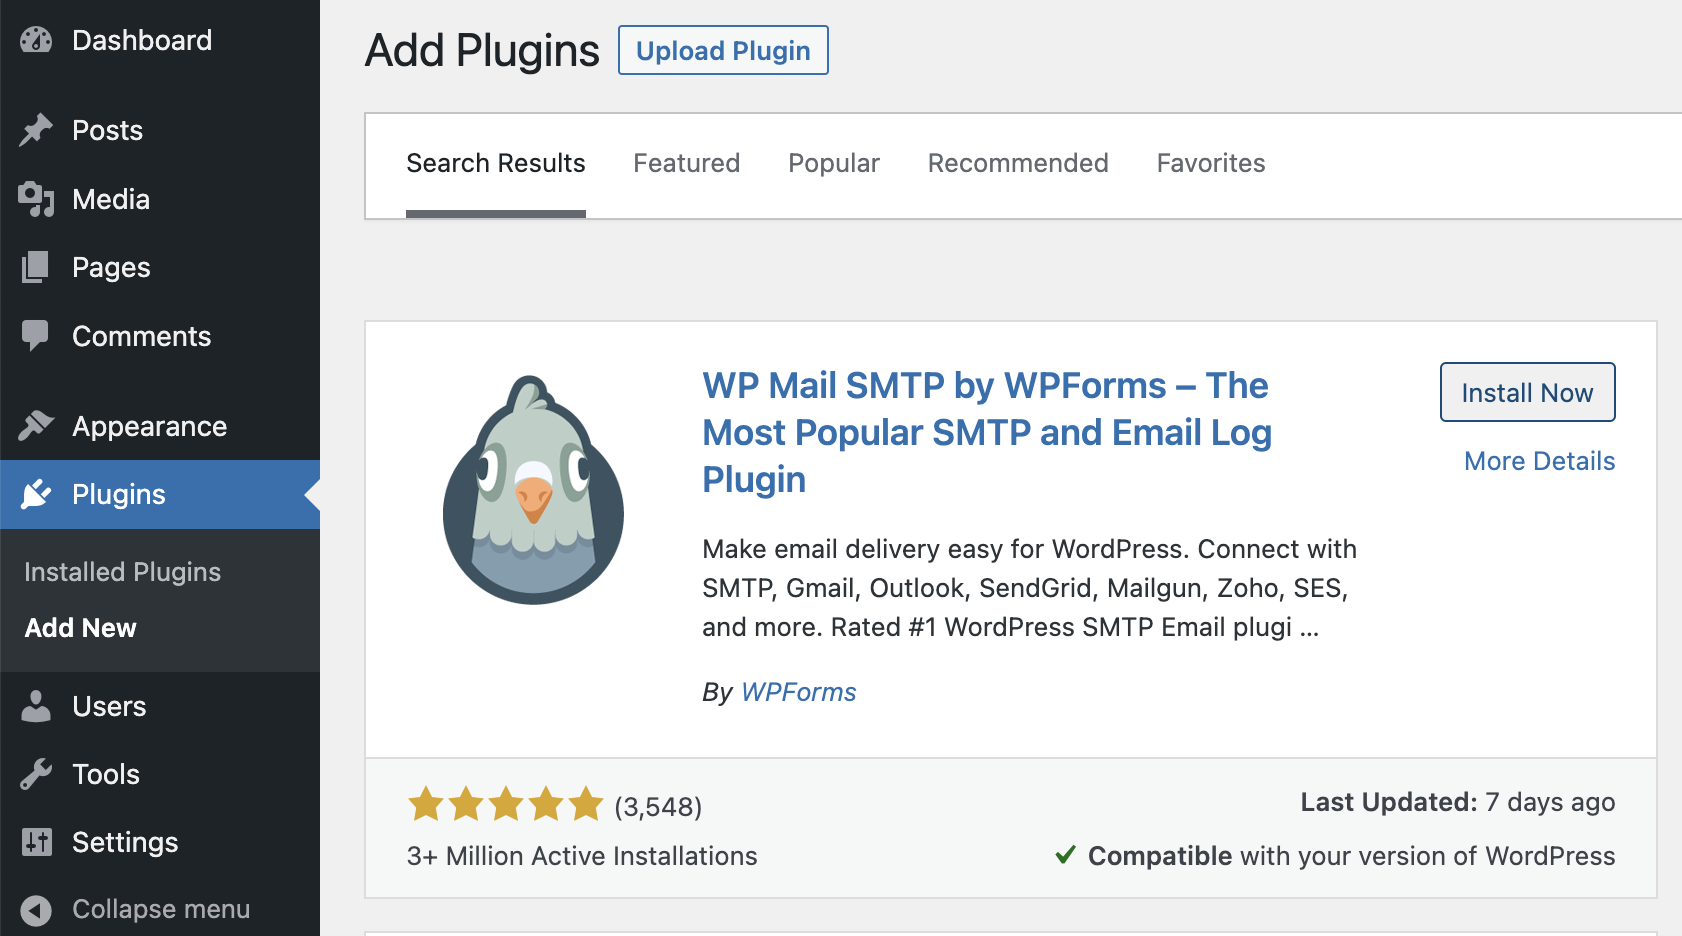
Navigate to the ‘Plugins’ section, and press ‘Add New’. Search for ‘WP Mail SMTP’, install it, and then press ‘Activate’.
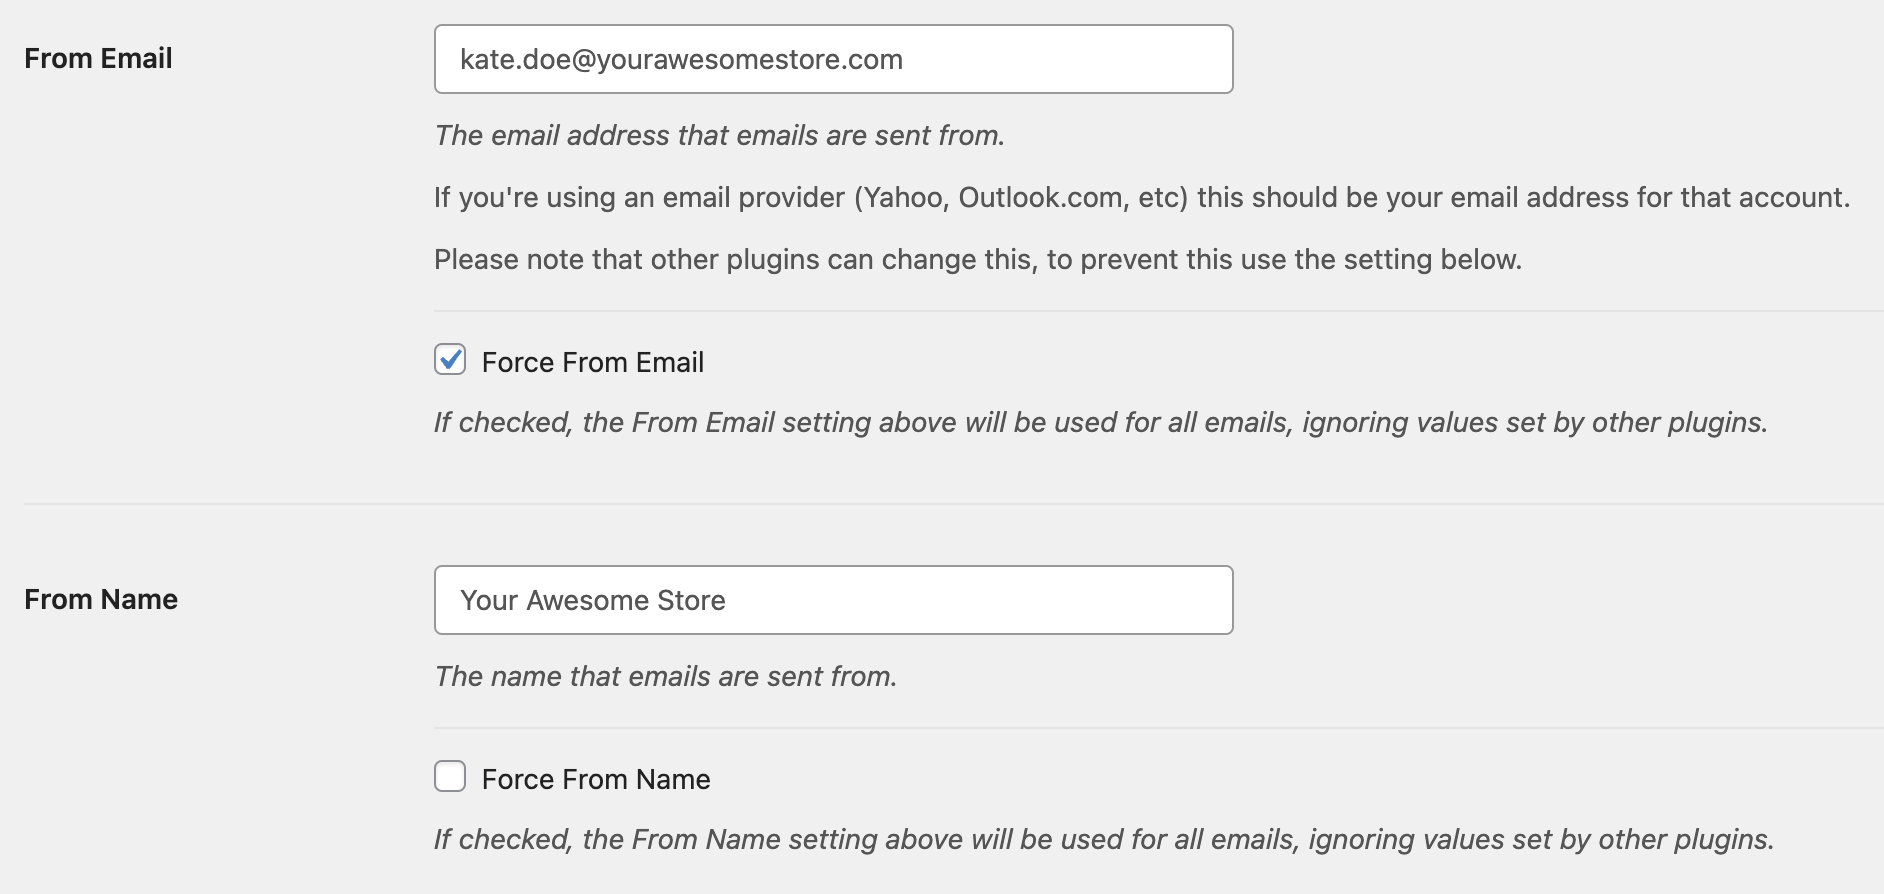
When the plugin is activated, navigate to its settings. Find the fields for ‘From Email’ and ‘From Name’ in the ‘General’ settings and fill them out.
To ensure your WooCommerce emails don’t go to the spam folder, it’s recommended to turn on the ‘Force From Email’ option. That way, all emails will be sent from the email address that represents your store.
However, if you want to have different addresses for confirmation emails and password resets, for example, keep this option off (you’ll learn how to do that here).
Remember: if you can’t configure From Email and From Name at this stage, make sure to come back to this step after connecting the mailer.
After that, it’s time to choose your mailer. Select ‘Other SMTP’. Here, you’ll need the credentials we copied from Mailtrap Email Sending earlier:
- SMTP Host: live.smtp.mailtrap.io
- Encryption: SSL or TLS
- SMTP Port: 25, 465, or 587 (will be filled out automatically once you choose encryption)
- Authentication: toggle On
- SMTP Username: api
- SMTP Password: your SMTP password
Click ‘Save Settings’ and Mailtrap Email API will be connected to your WooCommerce store.
At this point, you’re technically ready to send email to all customers, but we’d advise you to send test email first (more on that below).
Sending emails with attachments
Store owners don’t really need attachments on a day-to-day basis. Order confirmation or welcome emails to new customers don’t necessarily contain any images or files.
Yet there are times when you might need attachments. For example, if you have a corporate client, they might request a custom invoice. You can’t include that in the default ‘customer invoice/order details’ email.
It’s possible to add attachments with slight modifications to the PHP code.
Go to the WordPress dashboard and press ‘Media’ > ‘Add New’ to select the necessary files. Navigate to the functions.php file of your child theme and insert the following snippet at the bottom:
add_filter( 'woocommerce_email_attachments', 'attach_to_woo_emails', 10, 3);
function attach_to_woo_emails ( $attachments , $email_id, $order ) {

	// Avoiding errors and problems
    if ( ! is_a( $order, 'WC_Order' ) || ! isset( $email_id ) ) {
        return $attachments;
    }

	$file_path = get_template_directory() . '/invoice1.pdf'; // directory of the current theme

 	// if you are using a child theme, use this line instead to get the directory
 	// $file_path = get_stylesheet_directory() . '/invoice1.pdf';

	$attachments[] = $file_path;
	return $attachments;
}
Alternatively, you could use WooCommerce plugins such as WooCommerce PDF Invoices & Packing Slips or Email Attachments.
Sending custom emails
You’ll have to send custom emails if you want to send after-purchase emails from WooCommerce.
Surprisingly enough, you can’t send email after order to your customers by default. The new order, canceled order, and failed order are all addressed to site administrators.
The native way of sending custom emails is a bit complicated. You’ll need to create an email manager class, extend WC_Email classes, and then build a custom template in plain text and HTML formats. That way, you’ll be able to send HTML email when it’s supported. If not, the email will be displayed in plain text format.
When the custom order emails are created, they will appear in Woocommerce settings.
So, if you want to create a custom email, we recommend checking out this guide.
You can also use ready-made WooCommerce templates and modify them.
If you prefer to use a plugin, you’ll need a premium Follow-Ups plugin. It will help you notify your customers when you’re updating orders (or any other event) or send emails to vendors directly from WooCommerce.
You’ll find information on installing and using this plugin here.
What other plugins can you use to customize and send emails in WooCommerce?
Post SMTP can be used as an alternative to WP Mail SMTP, while YayMail Email Customizer is one of the many plugins that can help with email customization. WooLentor customizer plugin also allows designing your own email template.
Post SMTP Mailer/Email Log
Post SMTP is a WordPress plugin that has the same concept as WP Mail SMTP: it overrides the PHP mail function and sends emails with an SMTP server.
This email plugin includes various features, including support for multiple SMTP servers, email logging and debugging, and the ability to customize the From address and subject line of outgoing emails. It also comes with a built-in SMTP test tool to help you troubleshoot any issues you may encounter.
YayMail – WooCommerce Email Customizer
YayMail WooCommerce Email Customizer is a WordPress plugin that allows you to customize email content and design.
With this plugin, you can easily edit the layout of default WooCommerce templates by customizing the colors, fonts, and images, and adding custom fields. These could be the customer’s first name or the order total. The plugin comes with shortcodes that can be used to create dynamic content such as customers’ order history, a list of related products, or coupon codes.
YayMail has a drag-and-drop menu for easy editing.
How to test email sending in WooCommerce
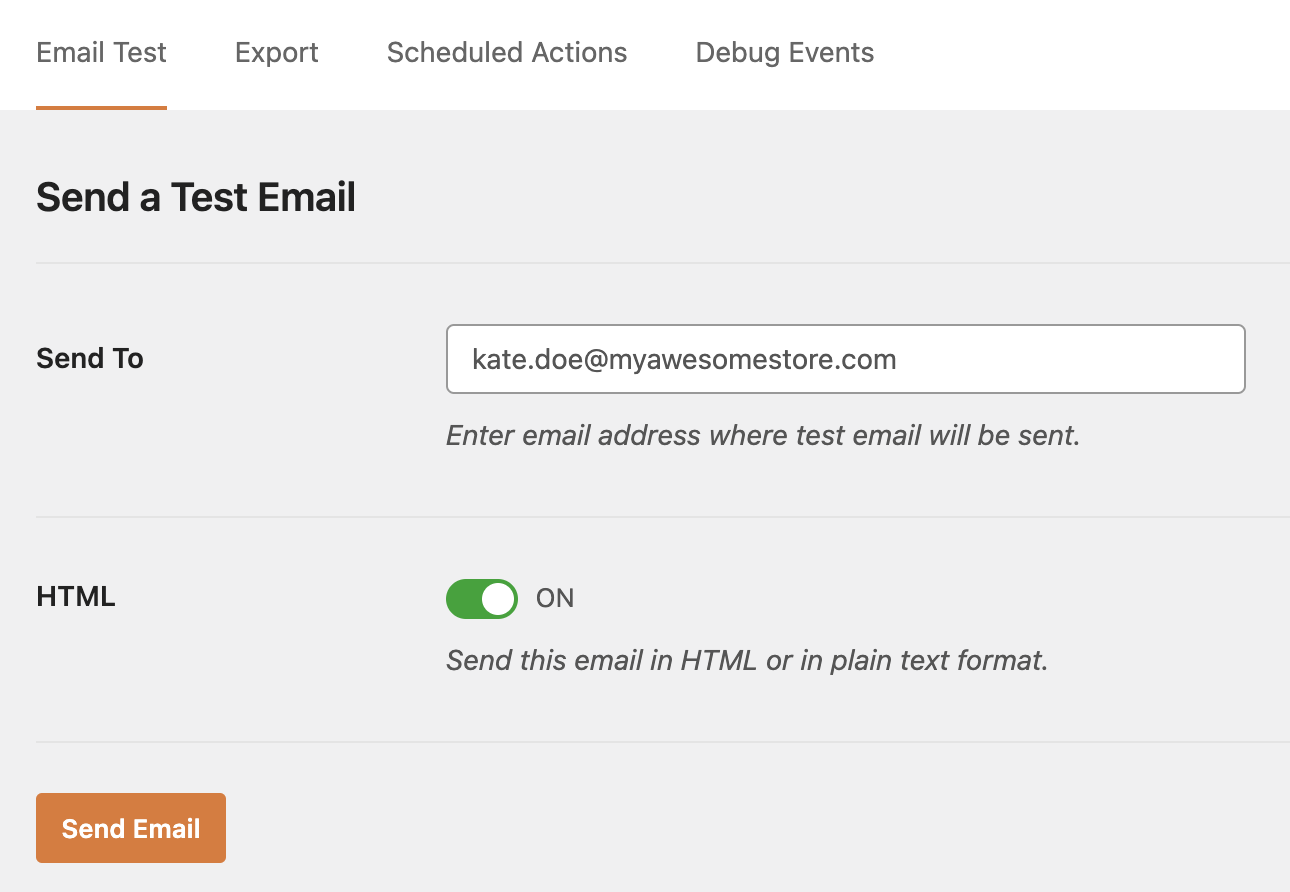
The easiest way to test email sending in WooCommerce is to send a test email with WP Mail SMTP. Once the SMTP connection is established, you should navigate to the ‘Email Test’ tab, enter your email address, and toggle the HTML switch on or off. Press ‘Send’ and you’ll find the email in your mailbox within minutes.
If the authentication was unsuccessful or some other error occurred, you’ll see the notification immediately.
Another option is to create a sample order in your WooCommerce store. Don’t worry, you won’t send email to customer and scare them off.
What you have to do here is go to WooCommerce > Settings > Emails tab. Choose either ‘New order’, ‘Canceled order’, or ‘Failed order’ templates. These three templates can be addressed to you.
Click ‘Manage’ and enter your email address. Make sure ‘Enable this email notification’ is toggled on. Now go to the ‘Orders’ section and hit ‘New Order’. You don’t have to fill in anything here. Just pay attention to the ‘Customer’ field – it should indicate ‘Guest’.
Find the ‘Order Actions’ tab and choose ‘Resend new order notification’ from the dropdown menu. Press ‘Create’ and you’ll receive an order notification. While you’re at it, you could also check your template visually.

While these methods can easily check email sending and HTML for specific email providers, they aren’t particularly suitable for large-scale and automatic testing. Creating a dummy inbox for every existing email client is time-consuming. Plus, one typo can direct your test email to a real inbox.
To avoid spamming users, it’s recommended to use a dedicated testing tool, one like Mailtrap Email Sandbox. It uses a fake SMTP server to trap the email traffic from staging and testing environments.
The Email Sandbox automatically checks HTML/CSS against the most common email providers, such as Gmail, Outlook, Apple Mail, Yahoo, and others. It displays elements that won’t be supported by specific providers. With this feature, you can inspect WooCommerce HTML templates to make sure they are displayed correctly to all of your customers.
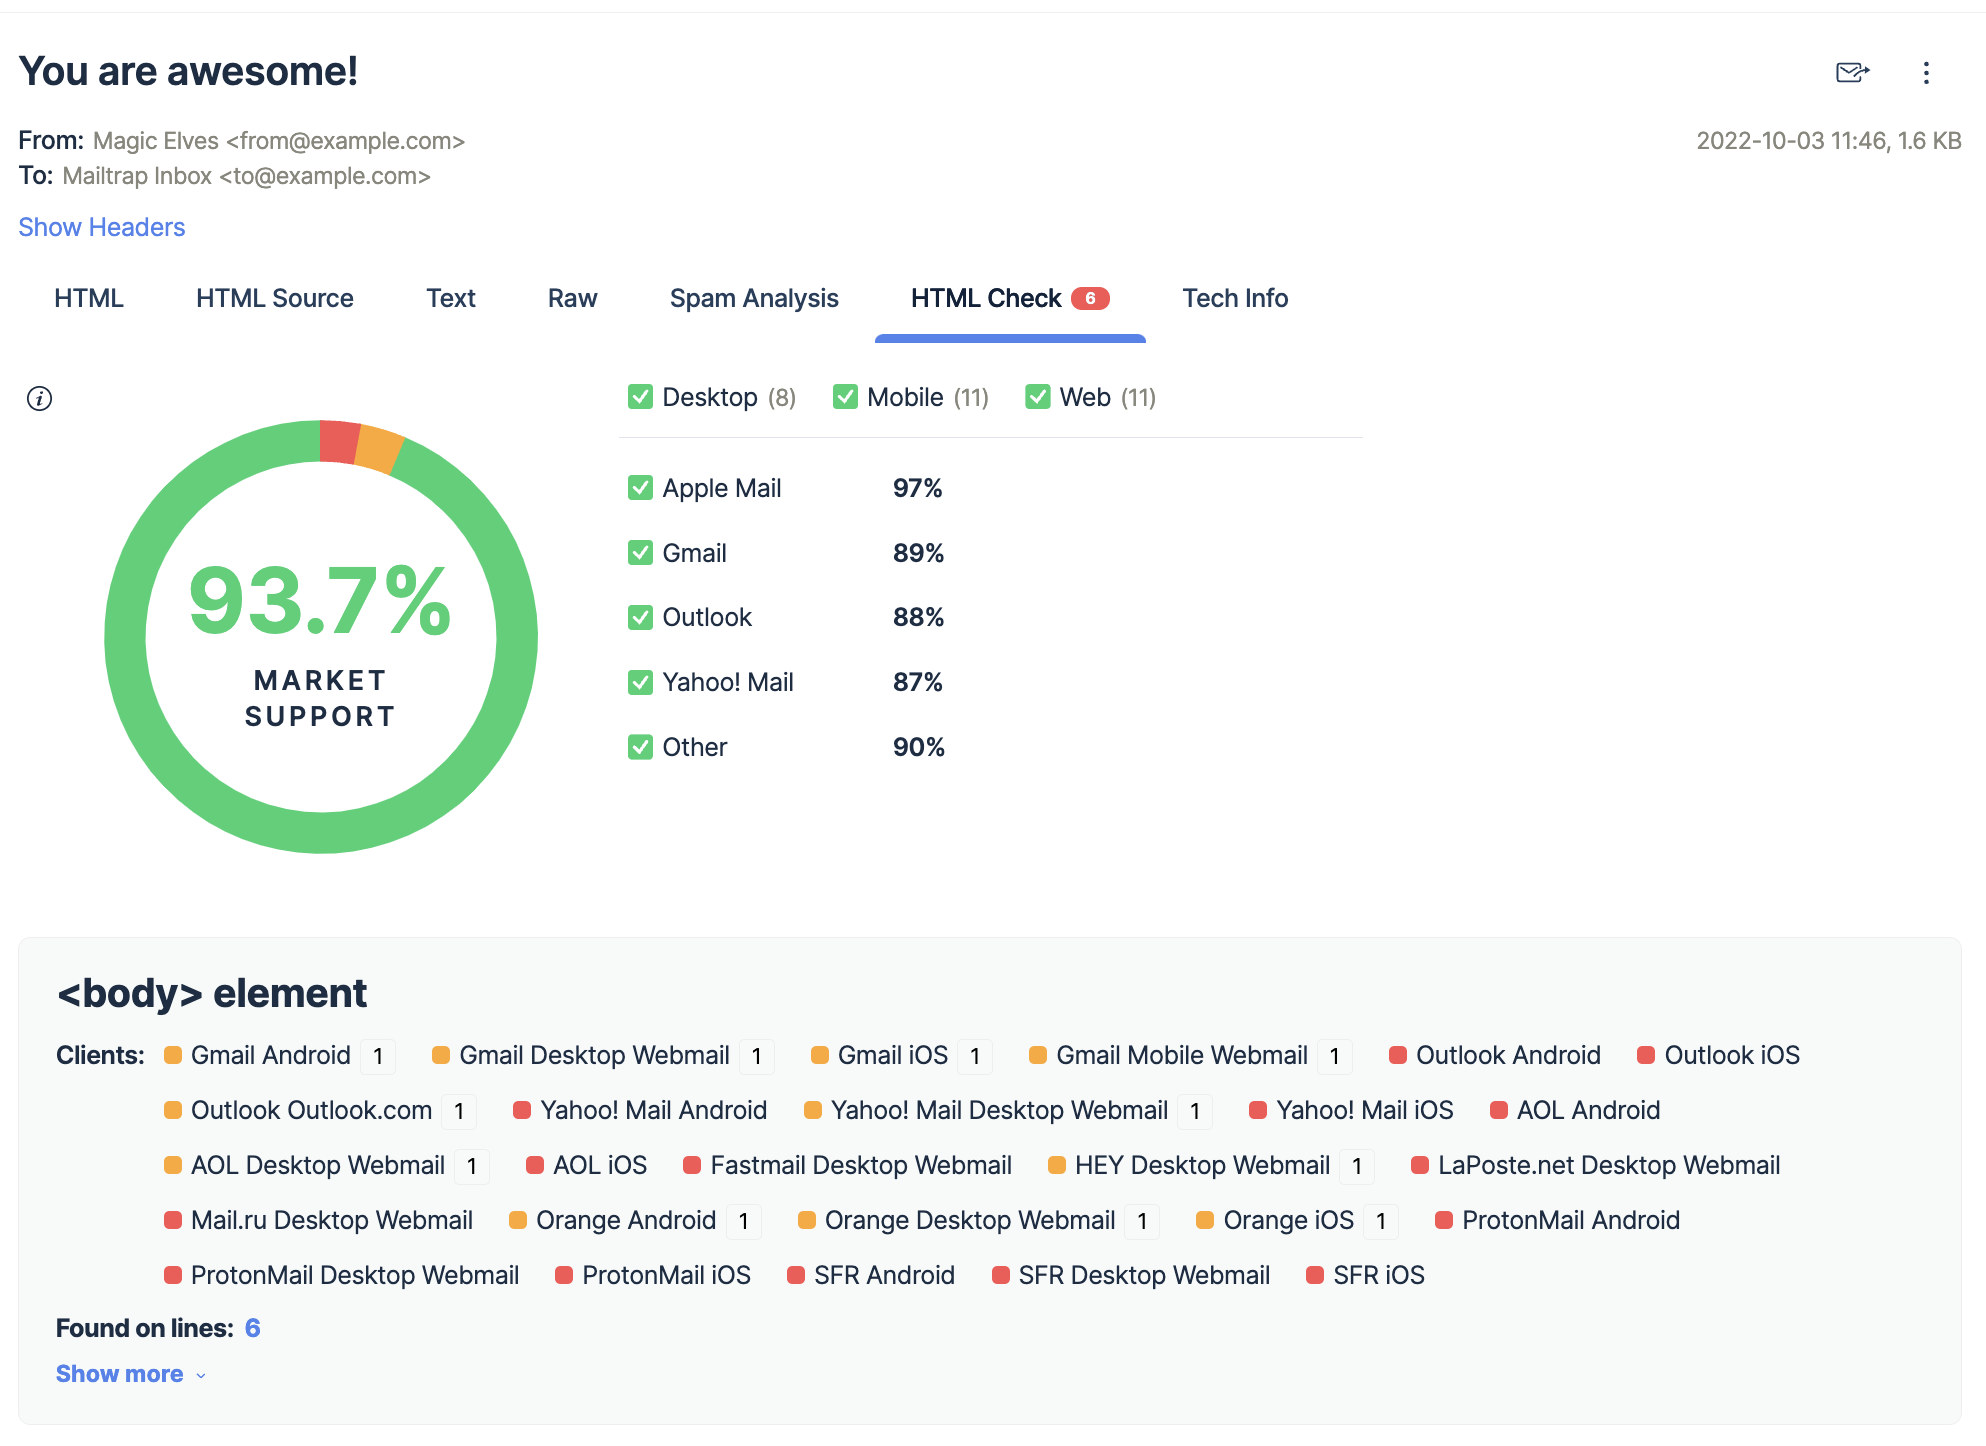
You have three options when it comes to integrating Mailtrap Email Sandbox with your WooCommerce store:
- Use its SMTP credentials with the WP Mail SMTP plugin;
- Integrate Email Sandbox with SMTP/API;
- Send emails to Mailtrap’s inbox address.
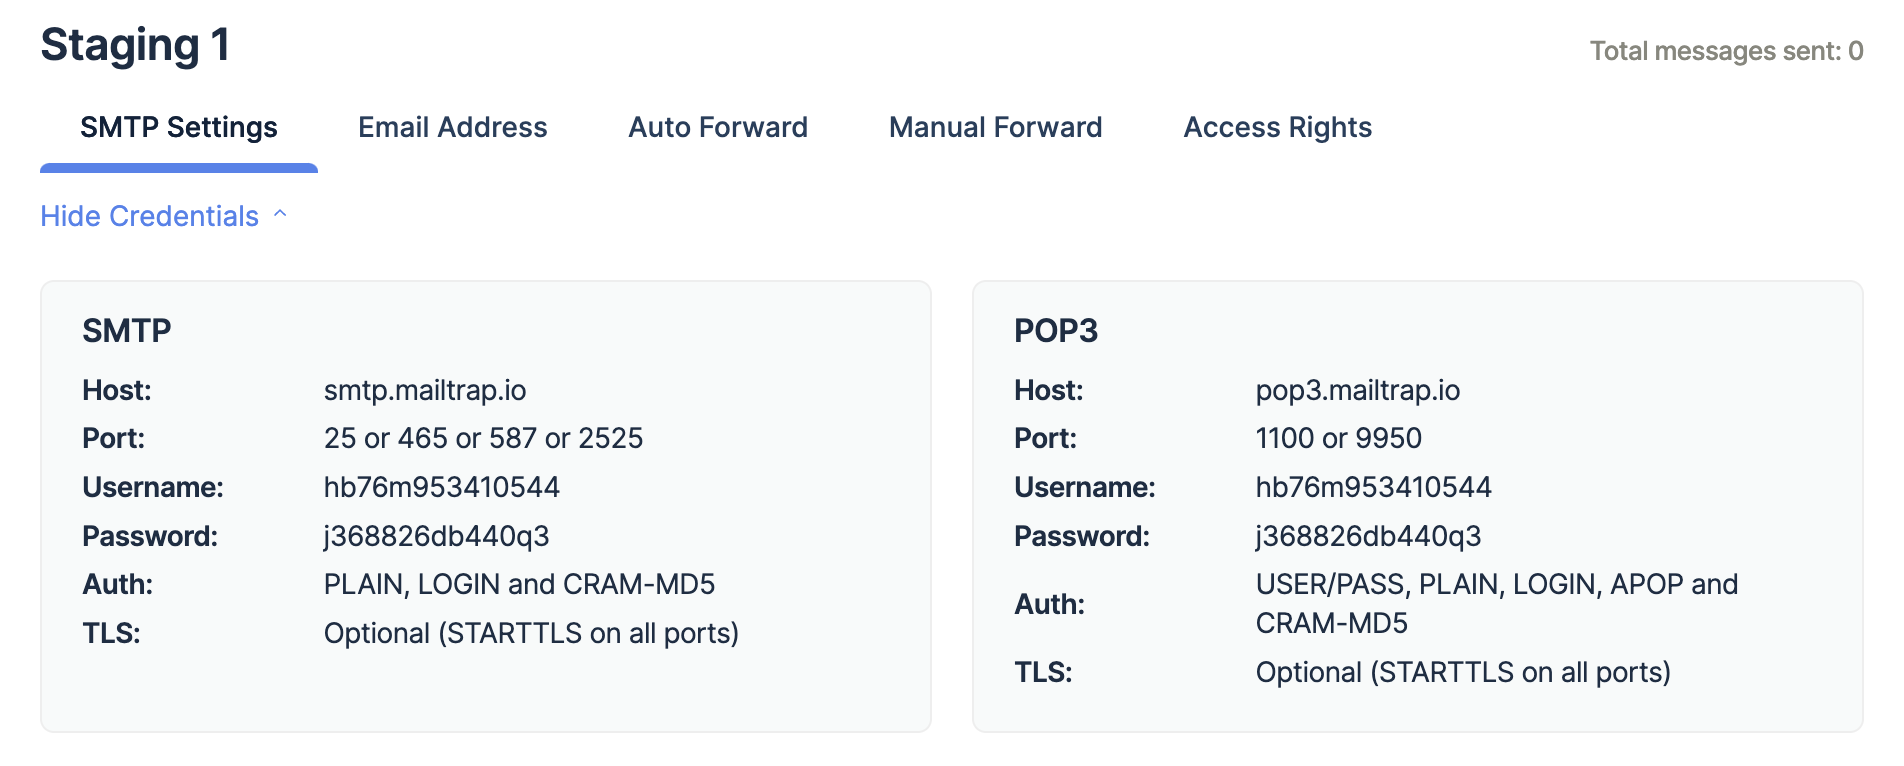
The SMTP integration for the Email Sandbox will be similar to Email API integration. Instead of the credentials we used in the example above, you need to use Email Sandbox SMTP credentials. To access them, open ‘My Inbox’ created by default and find the tab ‘SMTP Settings’.
Press ‘Show Credentials’, copy the parameters you’ll see, and paste them into the relevant fields of the WP Mail SMTP settings page. Click ‘Save Settings’ and now all your emails will be sent to Mailtrap’s inbox instead of your recipients.
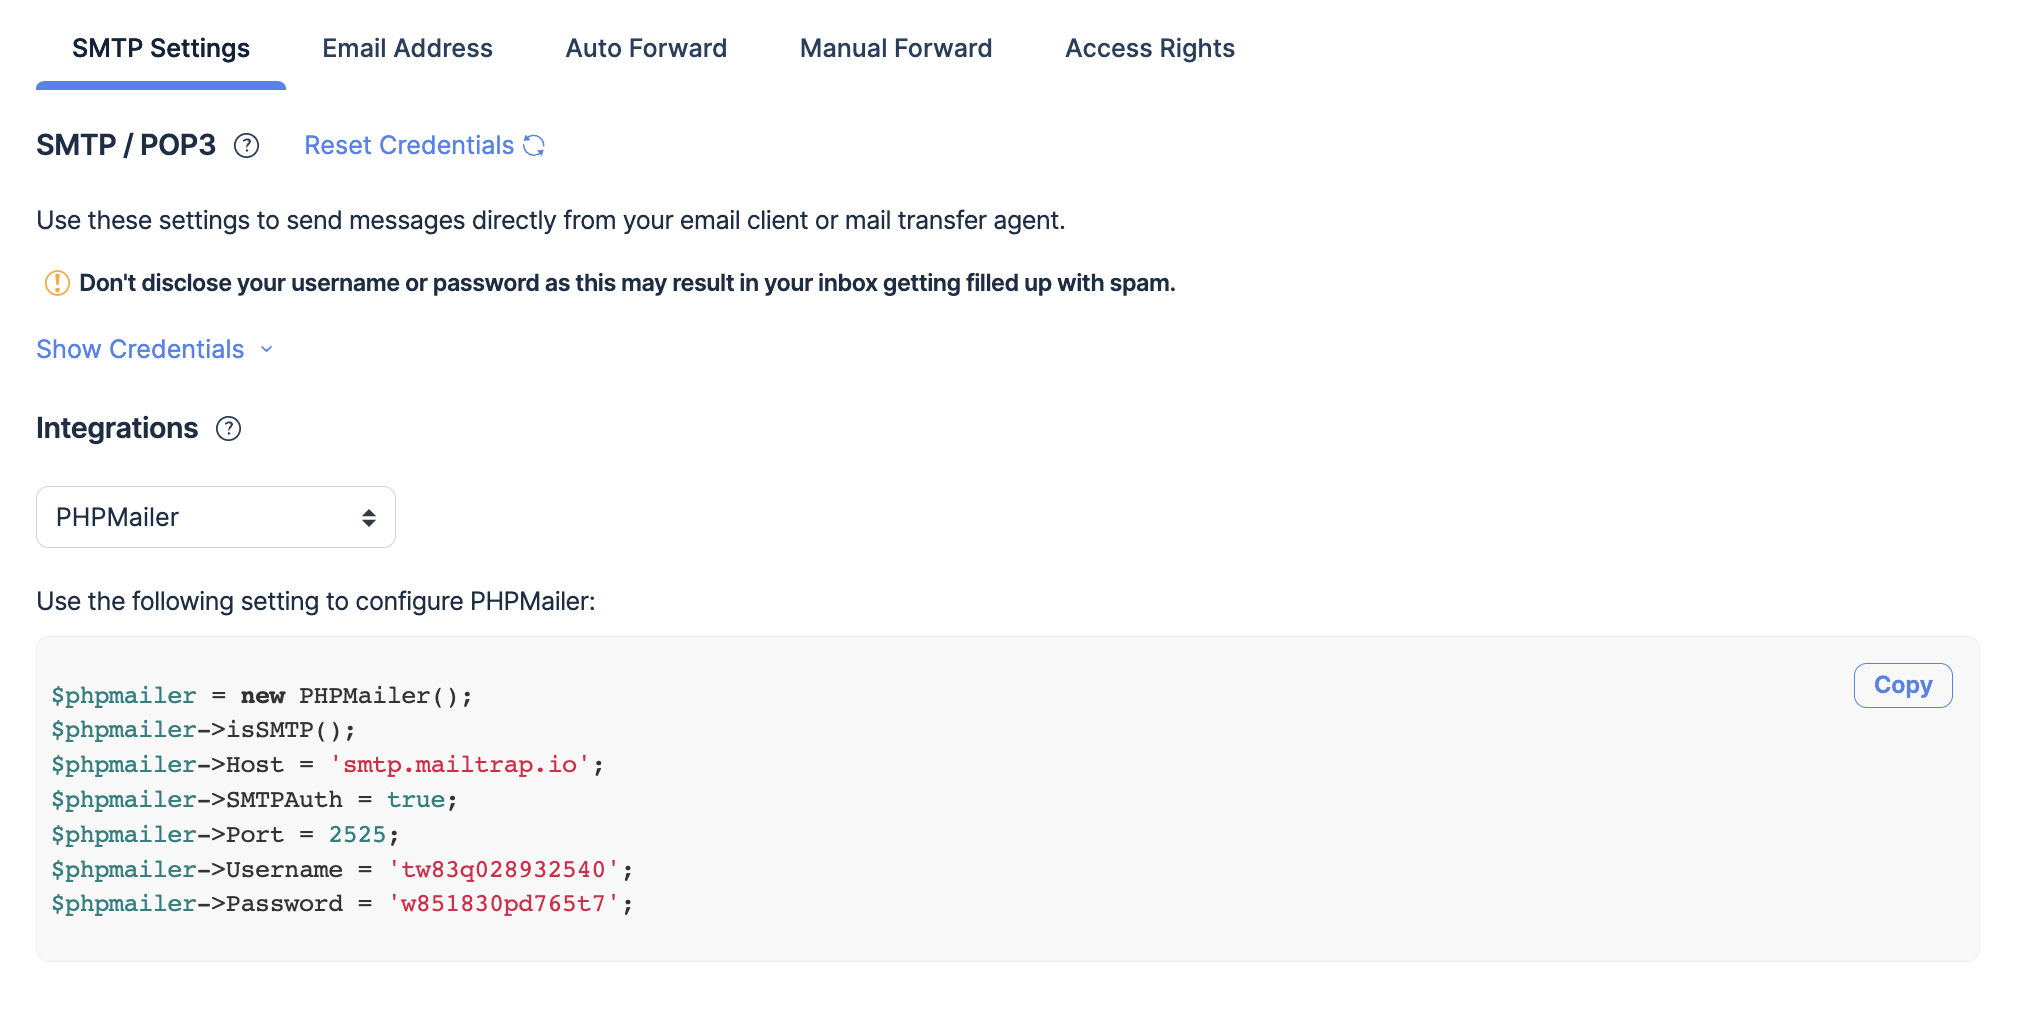
For API integration, you should scroll down to the ‘Integrations’ tab and copy the code sample to configure PHPMailer.
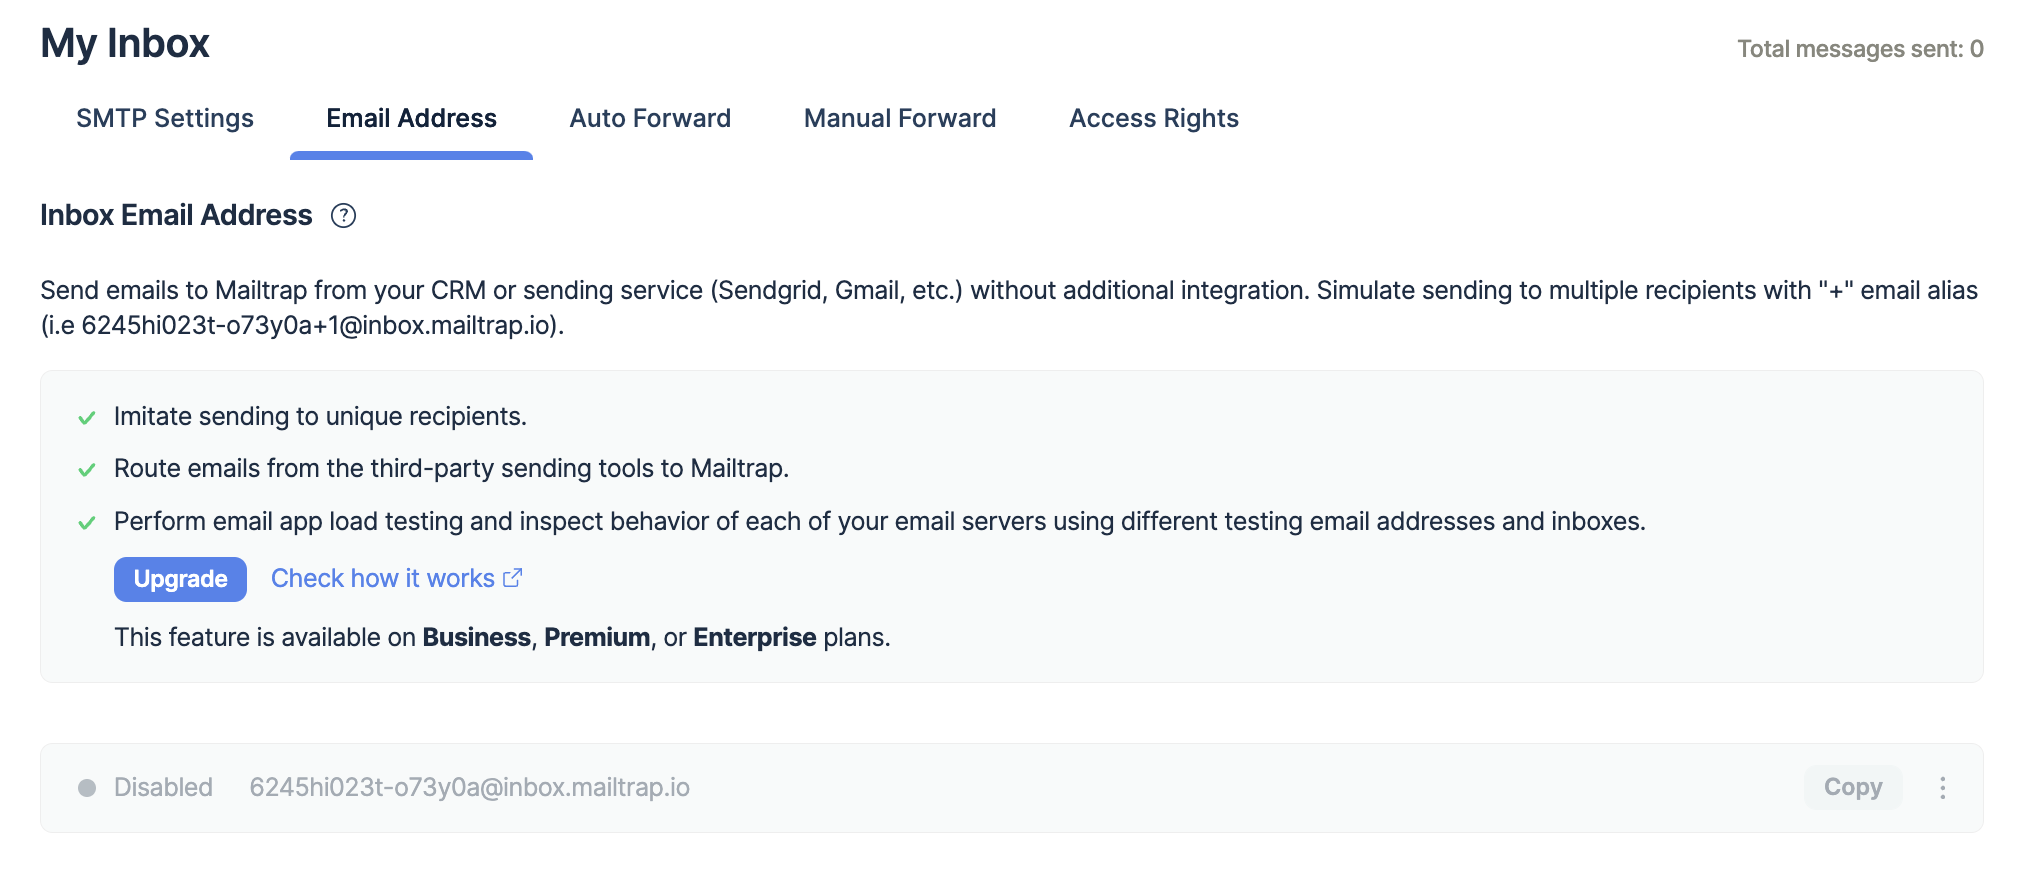
If you wish to test a couple of emails after the store is published without disabling sending to real recipients, you can direct New order, Canceled order, and Processing Order emails to Mailtrap’s email address. You’ll find it in the ‘Email Address’ tab.
Once the emails appear in your virtual inbox, you’ll be able to analyze them for HTML, Spam Score, and blacklists.
WooCommerce not sending emails: troubleshooting the most common issues
Even though the WP Mail SMTP plugin solves most of the sending problems, it’s not almighty. WooCommerce might still not send emails because of its quirks. Below we’ll list down common ways to fix WooCommerce sending issues.
Checking the order status
Pending orders are a common cause of not receiving emails. These are abandoned cart orders, i.e. users didn’t proceed with payment and left the checkout page. Pending orders are considered to be incomplete orders, which is why they don’t trigger emails.
If you receive payment via Paypal and the status of the payment is ‘Pending Payment’, it could indicate a problem with your payment gateway setup. In that case, you should contact WooCommerce support.
If you don’t have pending orders and all the order statuses are in check, you might be facing plugin incompatibility. The solution is to disable all the plugins except for WooCommerce and see if the issue gets resolved.
Checking the email notification settings
Normally, when orders update from pending to processing, you should receive an email along with your customers. If you’re not receiving emails, it could be because the ‘Enable this email notification’ is toggled off.
Go to the ‘Emails’ tab in your WooCommerce settings and make sure this checkbox is marked for every template.
Checking whether the emails were sent and not received
If all the above steps check out but the emails are still not getting sent, the issue might be with From address and name. If you’re not using an SMTP plugin, go to the email settings of your WooCommerce store, scroll down to the ‘Email Sender options’ tab, and make sure you’re using an email address with your domain in it (example@your.domain).
Your emails might still end up in the spam folder even with the correct from name. The culprit will be the PHP mail() function.

If you’re using an SMTP plugin, go to its settings and make sure From Email is configured properly. Now you should be able to send emails from WooCommerce successfully.
Good luck!


