 Skip to Navigation


If you want to learn what iCloud SMTP is all about, what it’s used for, and, of course, how to use it, you’ve come to the right place!
To skip the formalities and jump straight ahead to iCloud SMTP configuration, [click here].
What is iCloud SMTP?
SMTP, or Simple Mail Transfer Protocol, is an internet standard protocol that, via a series of commands, defines how the messages get from the sender to the email server. Additionally, it can relay emails between servers and clients.
iCloud SMTP is the protocol Apple uses for its iCloud service to send emails from its devices (e.g., iPhones, iPads, etc.) and iCloud Mail client.
The server address iCloud SMTP uses is smtp.mail.me.com, whereas for the port number, it uses 587 by default. This SMTP port number is the industry standard because of its support for STARTTLS encryption, which ensures your emails can’t be intercepted during transmissions.
What iCloud SMTP is used for
Besides being primarily used by Apple’s devices and iCloud Mail, iCloud SMTP can also be used for sending:
- Emails from different clients/services – You can send emails from Gmail, Thunderbird, Yahoo Mail, and other popular clients and services with an iCloud SMTP address.
- User-triggered emails from web apps – These include password resets, purchase confirmations, shipping notifications, etc.
- Notifications from Internet of Things (IoT) devices – For instance, you can set up your smart alarm system to use iCloud SMTP to notify you when there’s an anomaly.
- Emails from custom applications – You can configure your application to leverage iCloud SMTP to send messages to users, thus adding email-sending functionality to it.
It’s important to keep in mind that iCloud has its limitations, which I’ll go over [later in the article], as well as, of course, provide you with an [alternative].
Why should you use iCloud as an SMTP server?
Yes, it has its limitations (don’t we all?), but using iCloud as an SMTP also has its own advantages, such as:
- Stability and reliability – Backed by Apple’s email infrastructure, iCloud SMTP ensures timely delivery of your messages.
- Strong security measures – With iCloud SMTP, your data remains encrypted, and your encryption keys are stored in Apple data centers. Moreover, there’s an additional, advanced layer of security, which you can read about in detail on the official page.
- Cost-effectiveness – iCloud is free for all users with an Apple ID, making it one of the more affordable options for personal use.
- Apple’s Privacy Policy – Apple emphasizes user privacy and limits the collection and use of personal data. If you’re interested in details, be sure to check out the official Privacy Policy page.
- Backup and archiving – iCloud’s servers usually store copies of emails, ensuring synchronization across all devices. Most importantly, this allows you to easily store and backup your emails.
- Straightforward configuration – As you’ll see shortly, setting up iCloud as an SMTP server is super easy, espeiiicially if you’re in Apple’s ecosystem already.
Note: I’ve compiled these advantages of using iCloud SMTP with our email deliverability expert, Yaroslav. So, you can rest assured you’re not reading a biased review.
How to configure iCloud SMTP server settings?
Now, as promised, let’s configure iCloud SMTP server settings.
Step 1. Enable two-factor authentication
First, you have to enable two-factor authentication, which, as Apple terms it, is designed to make sure that you’re the only one who can access your account.
Now, you’ve probably enabled it already while setting up your device, but nonetheless, you can check that by logging in to your Apple ID account.
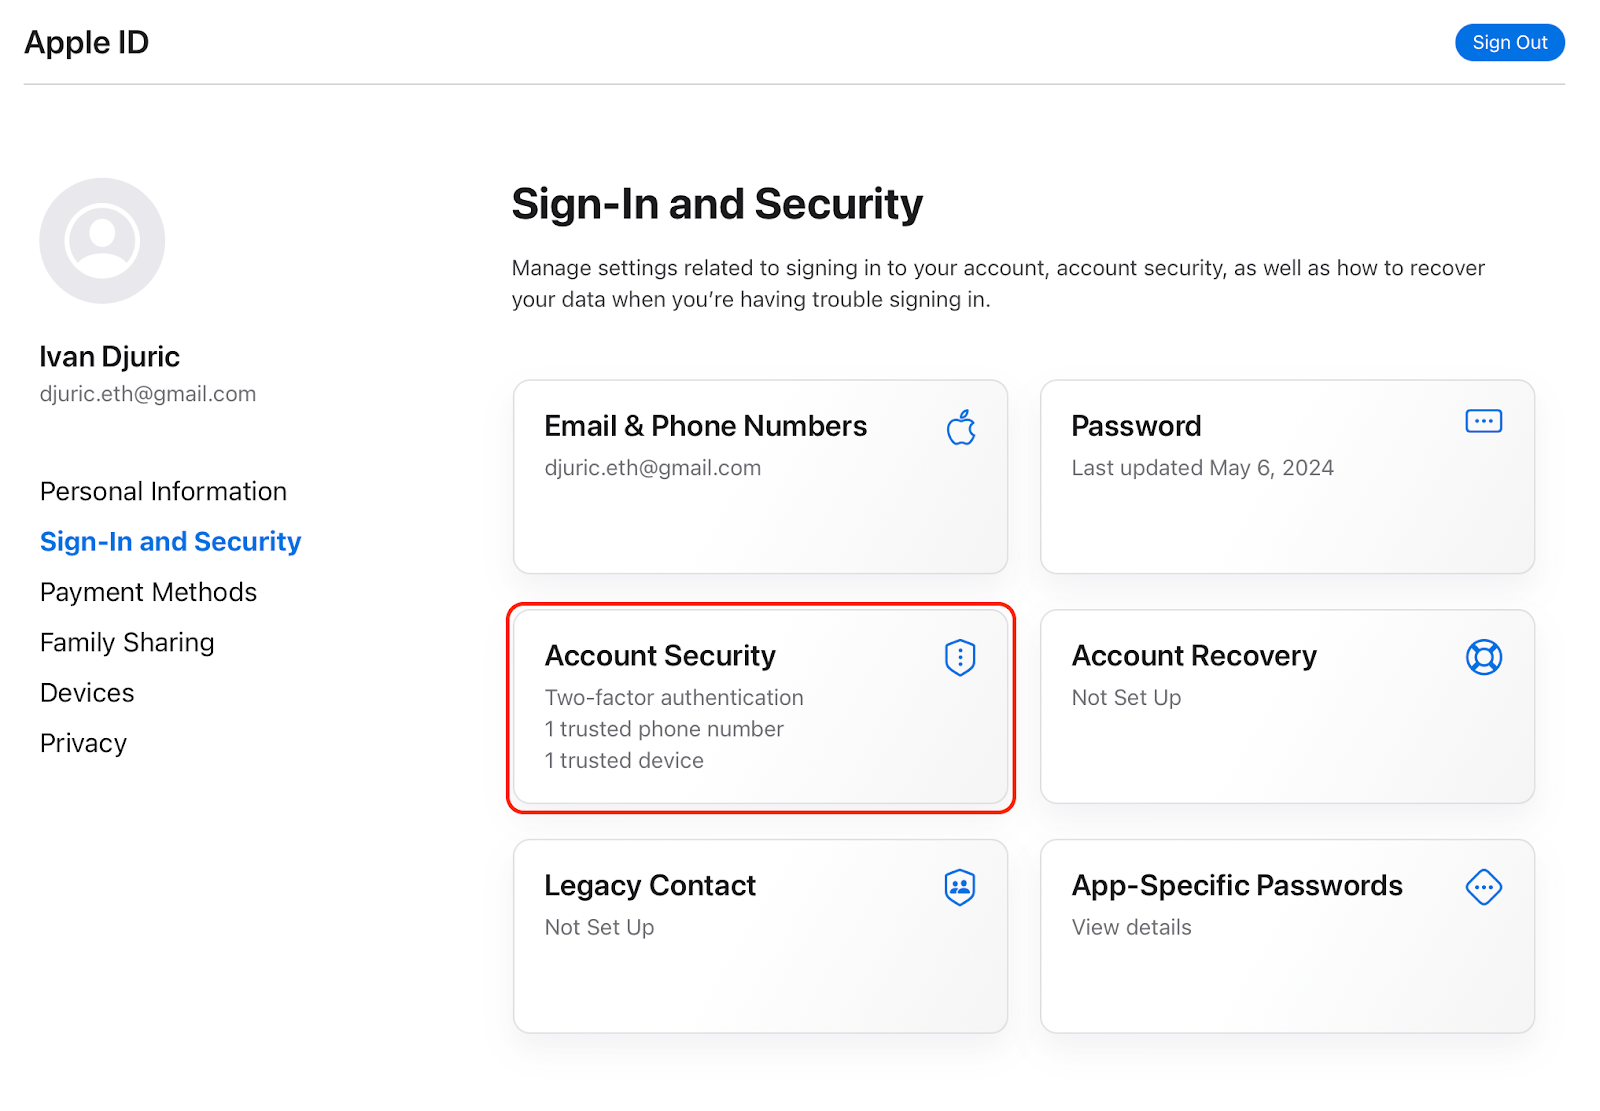
You can find the two-factor authentication setting under Account Security, and if you have it enabled, great, proceed to Step 2. If you don’t, simply follow the prompts and either add a trusted phone number, device, or a security key, which will act as two-factor authentication.
Step 2. Obtain an app-specific password
Once you’ve enabled 2FA, you’ll need to obtain an app-specific password to use iCloud SMTP. App-specific passwords were designed by Apple as an additional security measure when you’re using iCloud mail server for other clients or apps.
And here’s how you can obtain one:
- Log in to your Apple ID account.
- Note that to generate an app password, you need to log in using your password (so no Touch or Face ID) and two-factor authentication.
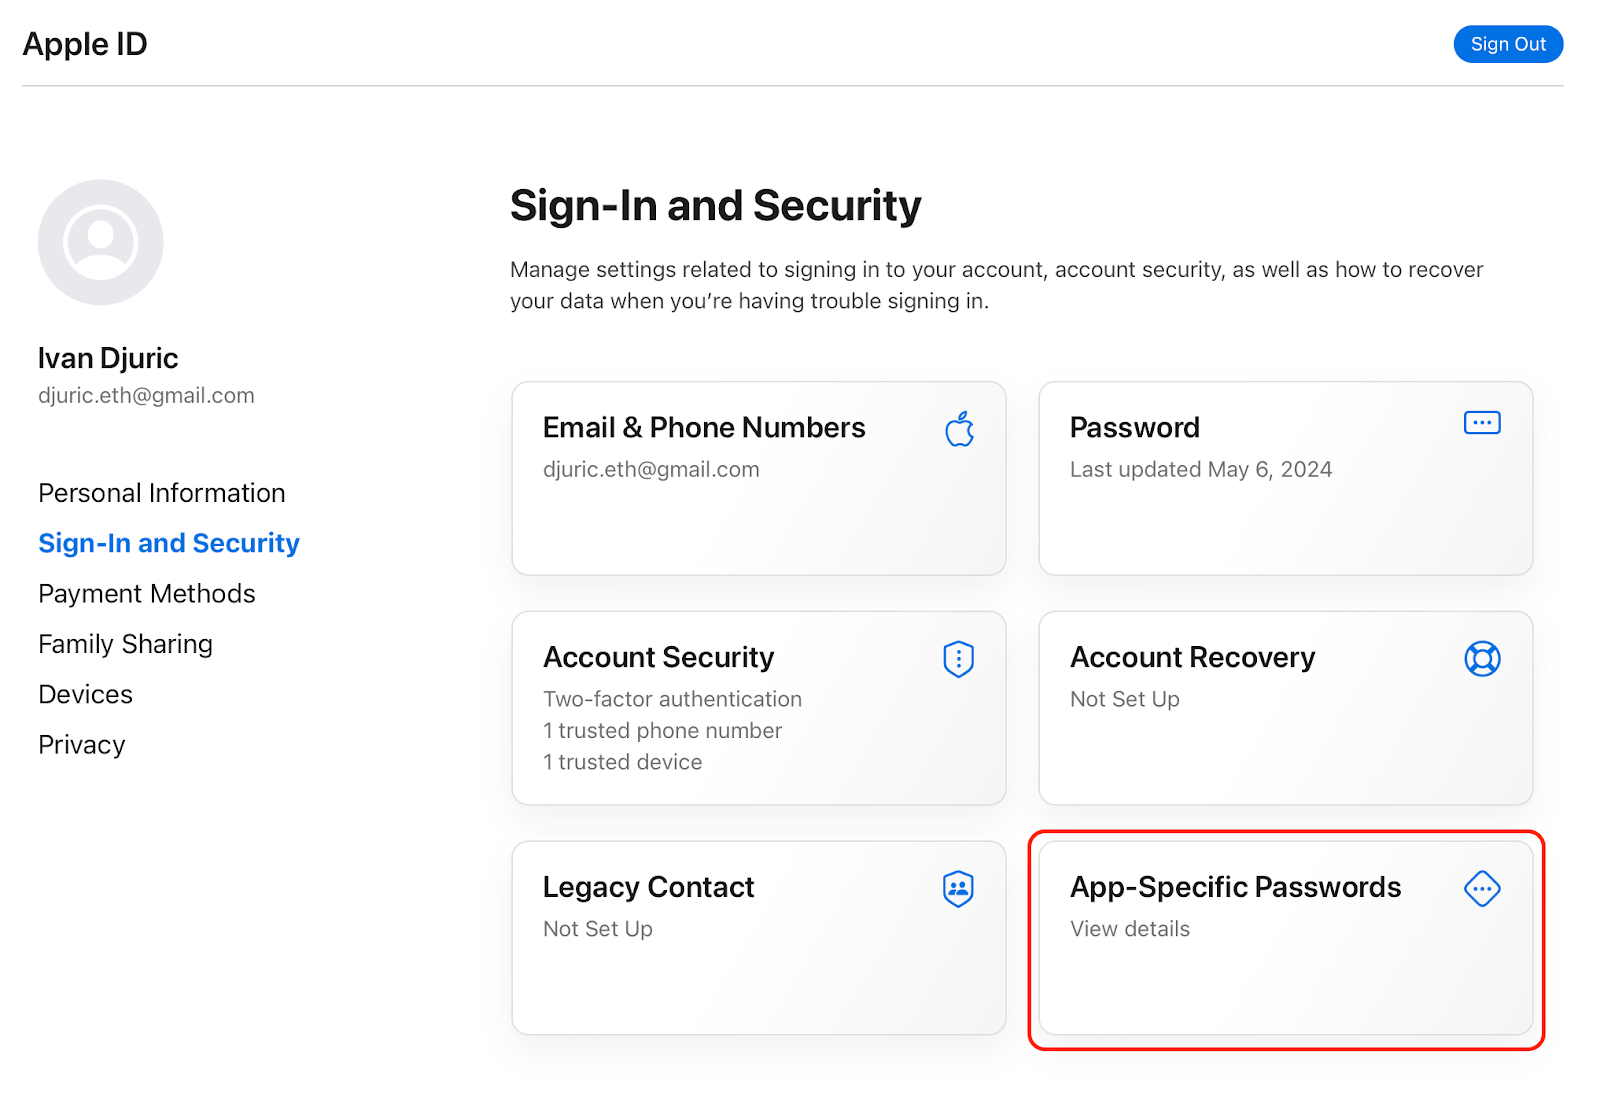
- Select App-Specific Passwords under Sign-In and Security.
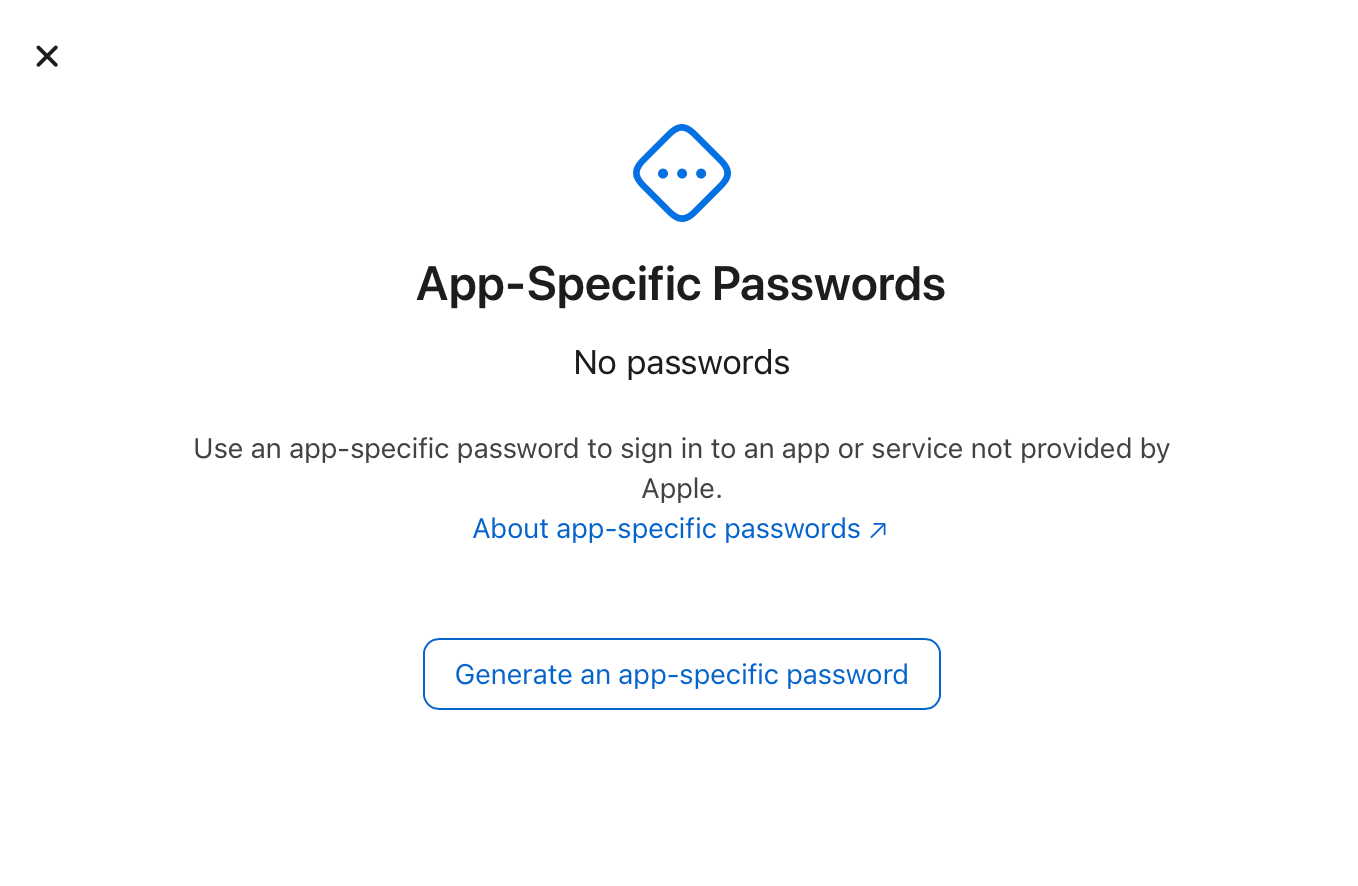
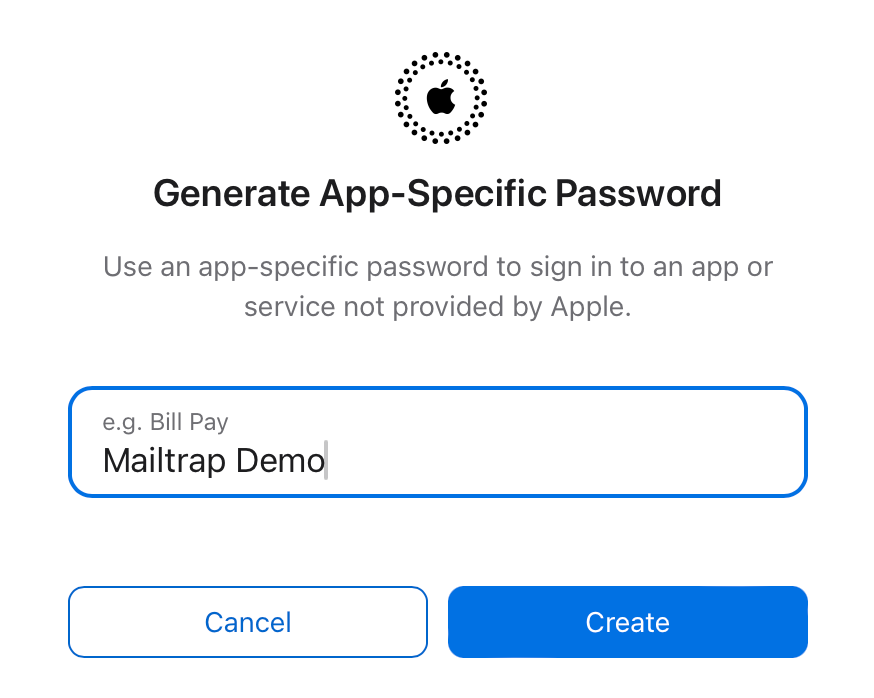
- Click on Generate an app-specific password.
- Choose a name for your app password (the name is up to you, as it can be anything you wish, e.g., ‘My App 1’ or anything along those lines).
- Enter your Apple ID password one more time and finalize the process.
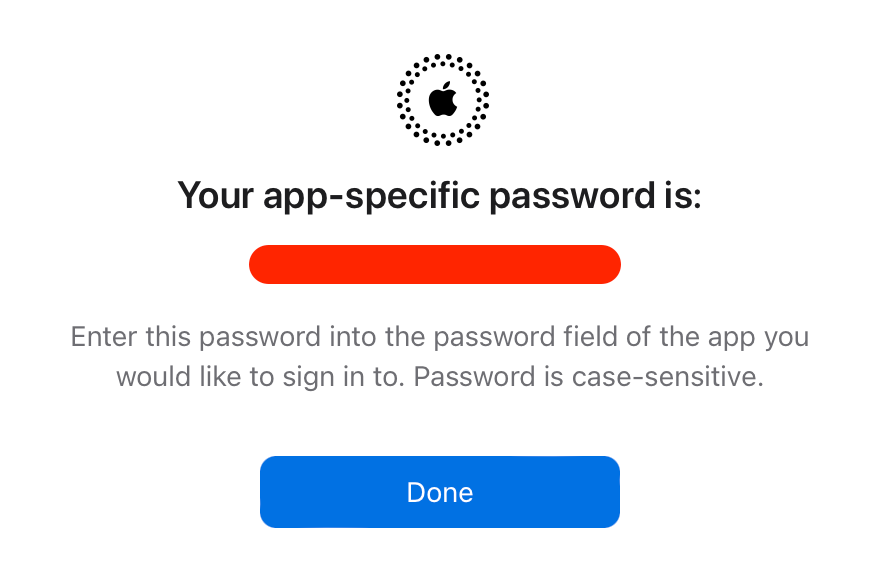
Important: Once you generate your app-specific password, you won’t be able to access it again. So, make sure to store it securely. For this, I personally use and recommend 1Password.
Step 3. Insert the required iCloud SMTP settings
Lastly, insert the following information into your app or email client:
| Setting | Details |
| SMTP server name | smtp.mail.me.com |
| SMTP port | 587 |
| SMTP encryption | SSL / TLS / STARTTLS |
| Username | Your full iCloud Mail email address: → johndoe@icloud.com ✅ → johndoe ❌ |
| Password | App-specific password |
iCloud SMTP configuration examples
Okay, now that I’ve shown you how to configure iCloud SMTP step-by-step, let me show you some practical examples.
Gmail
To send emails via Gmail with your iCloud address, all you have to do is:
- Log in to your Gmail account.
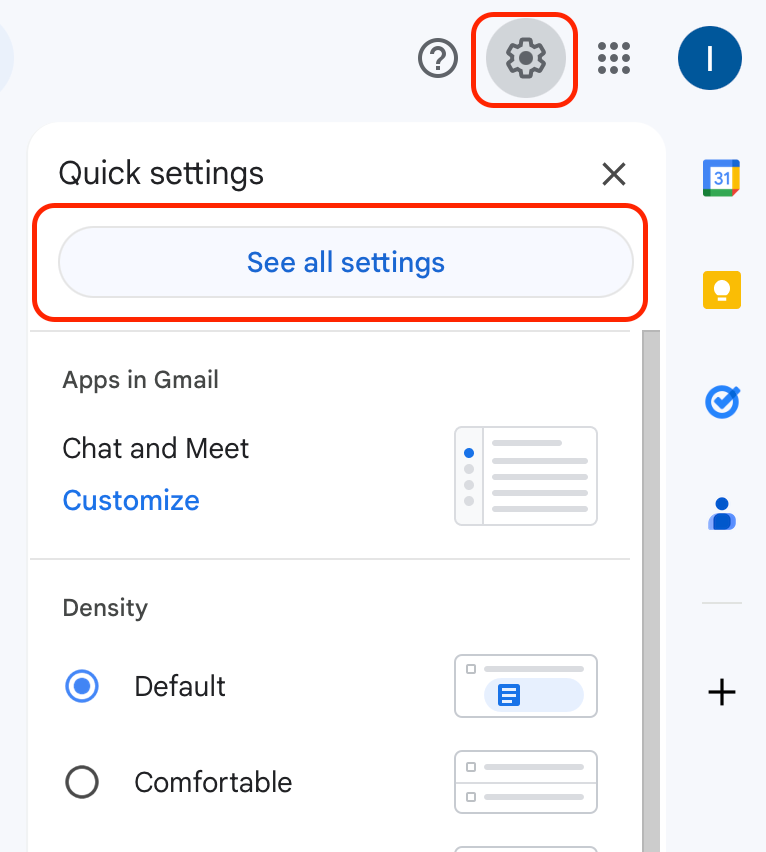
- Click on the cogwheel icon in the right corner and then hit the See all settings button.
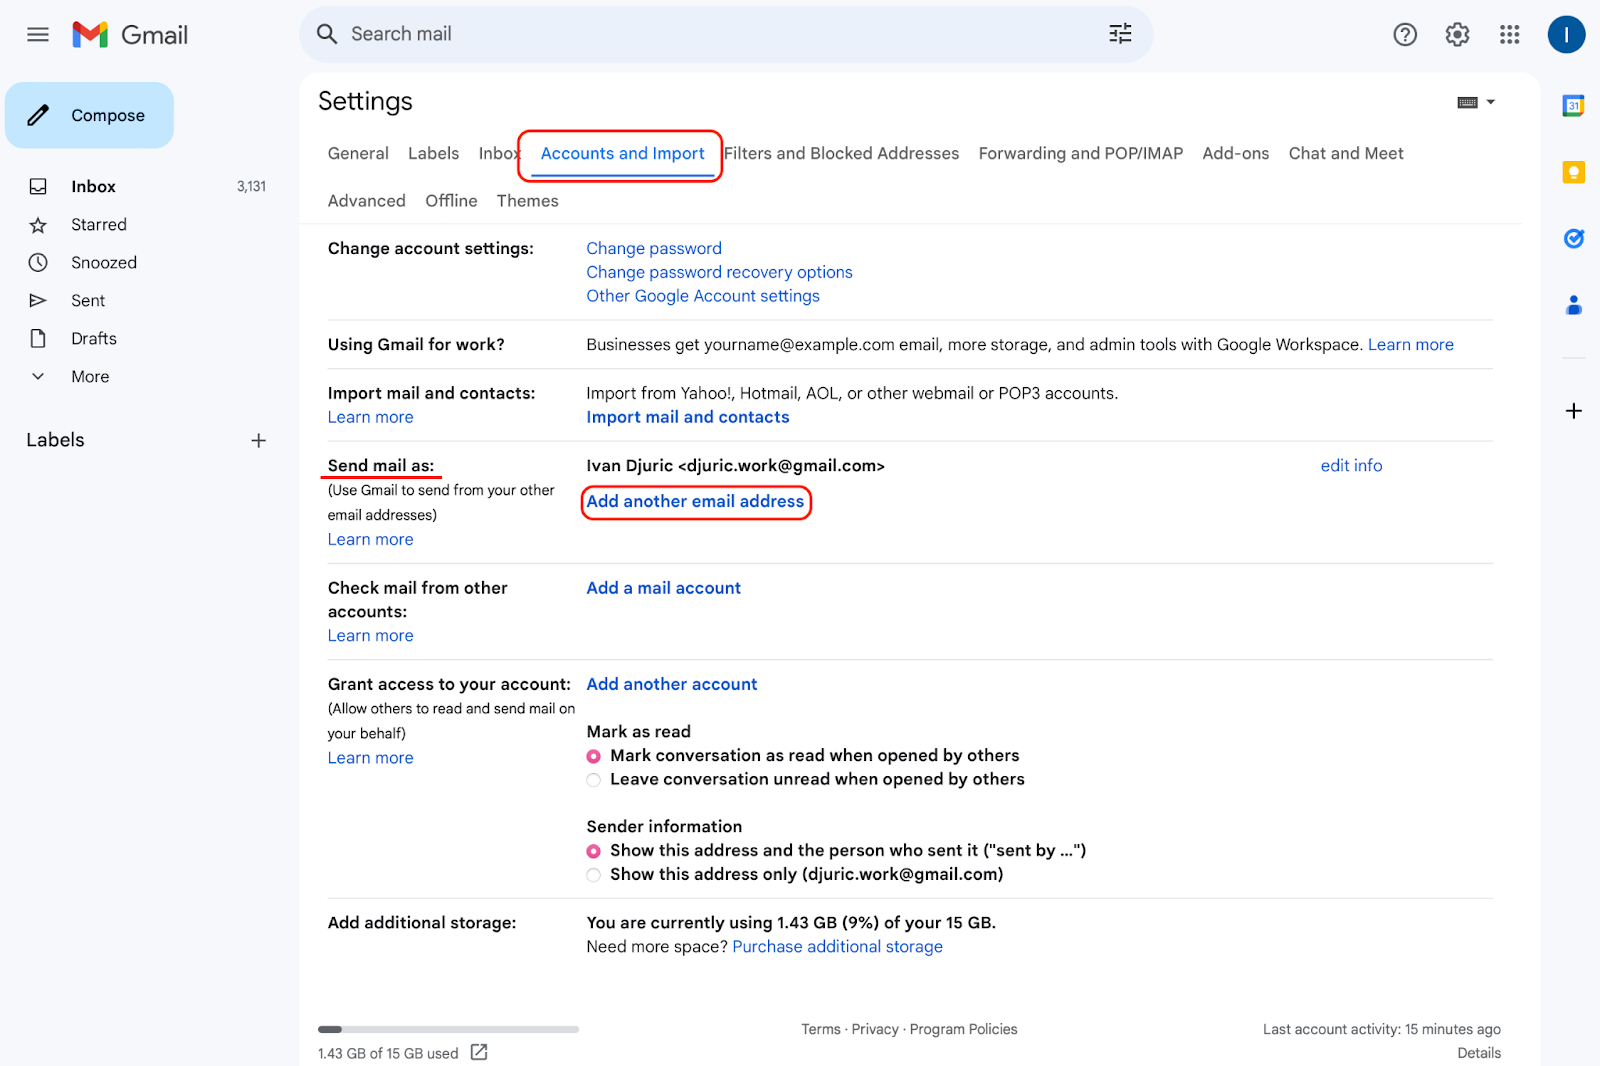
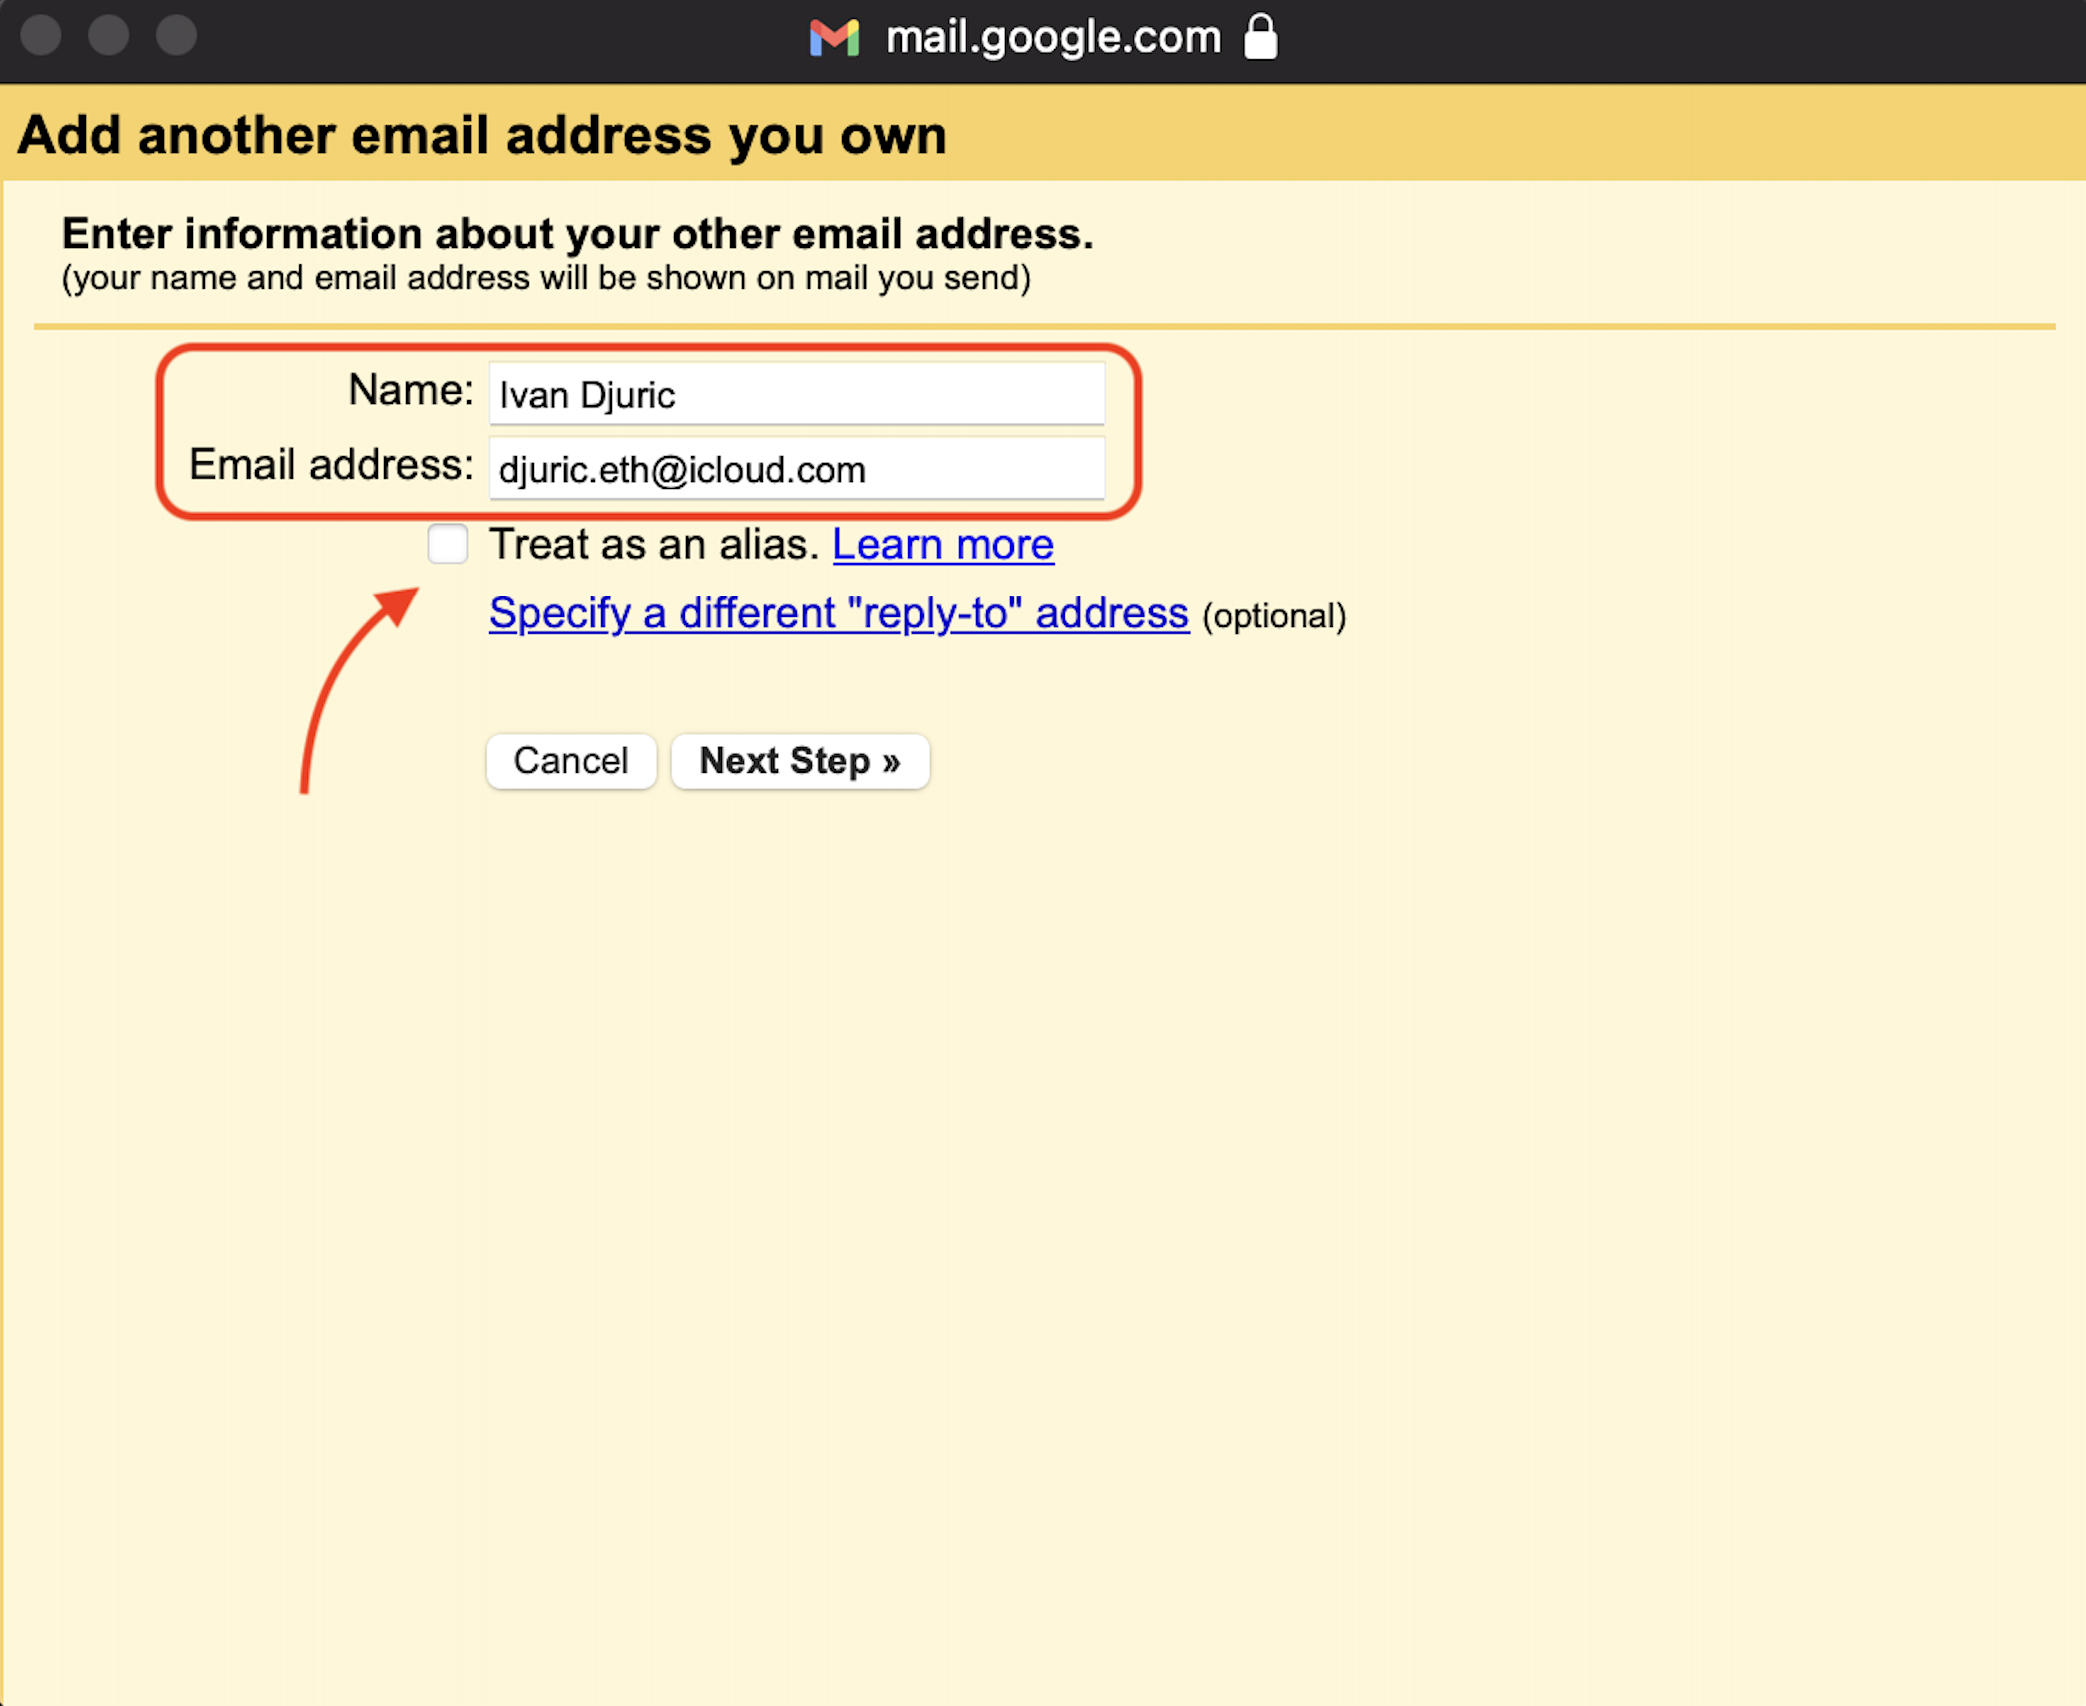
- Go to the Accounts and Import tab and click on Add another email address (located under ‘Send mail as’). This should open a new window.
- Enter your name and iCloud email address in the empty fields. Also, make sure to uncheck Treat an alias for Gmail to send messages on behalf of your iCloud account.
- To learn more about Treat as an alias, click here.
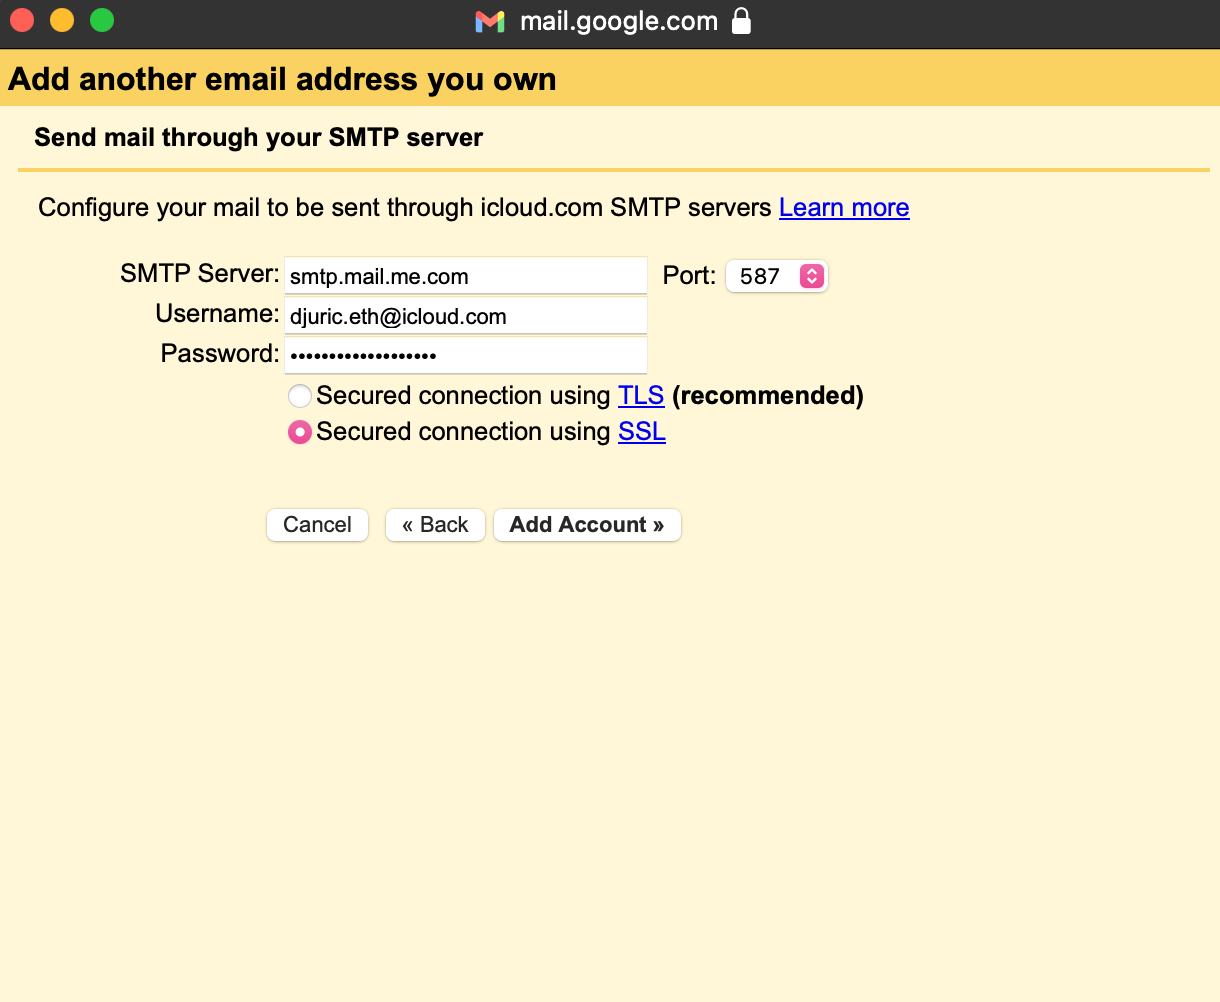
- Next, insert the iCloud SMTP configuration settings and click Add Account.
- P.S. Don’t forget to use your app-specific password.
Once you’re done, Gmail will send you a verification code to your iCloud email address. And once you complete the verification process, you’ll be able to send emails from your Gmail account using your iCloud email address!
Thunderbird
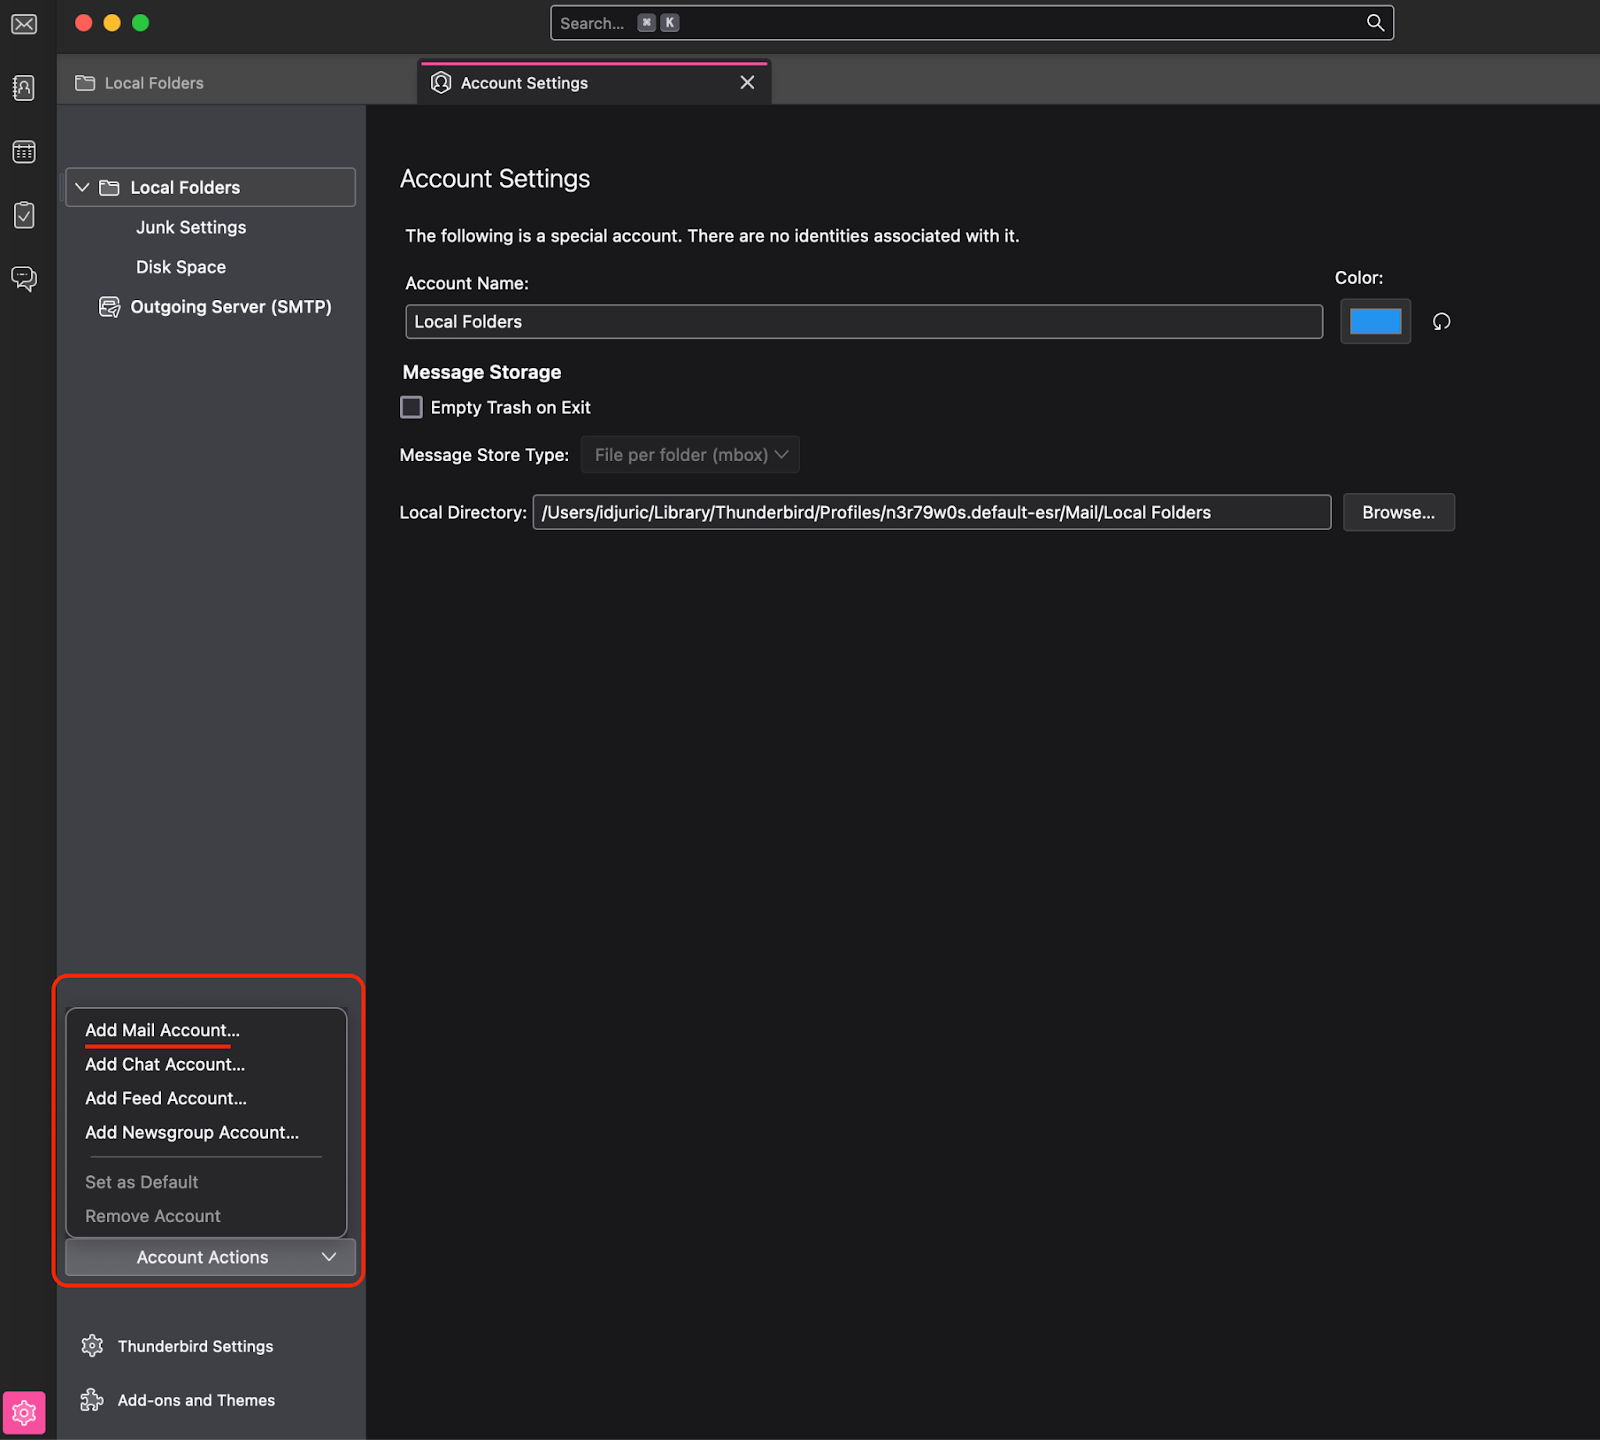
As for Thunderbird, the process is a bit easier. All you have to do is:
- Open Thunderbird.
- Click on Add Mail account under Account Actions.
- Enter your iCloud email address and the app-specific password.
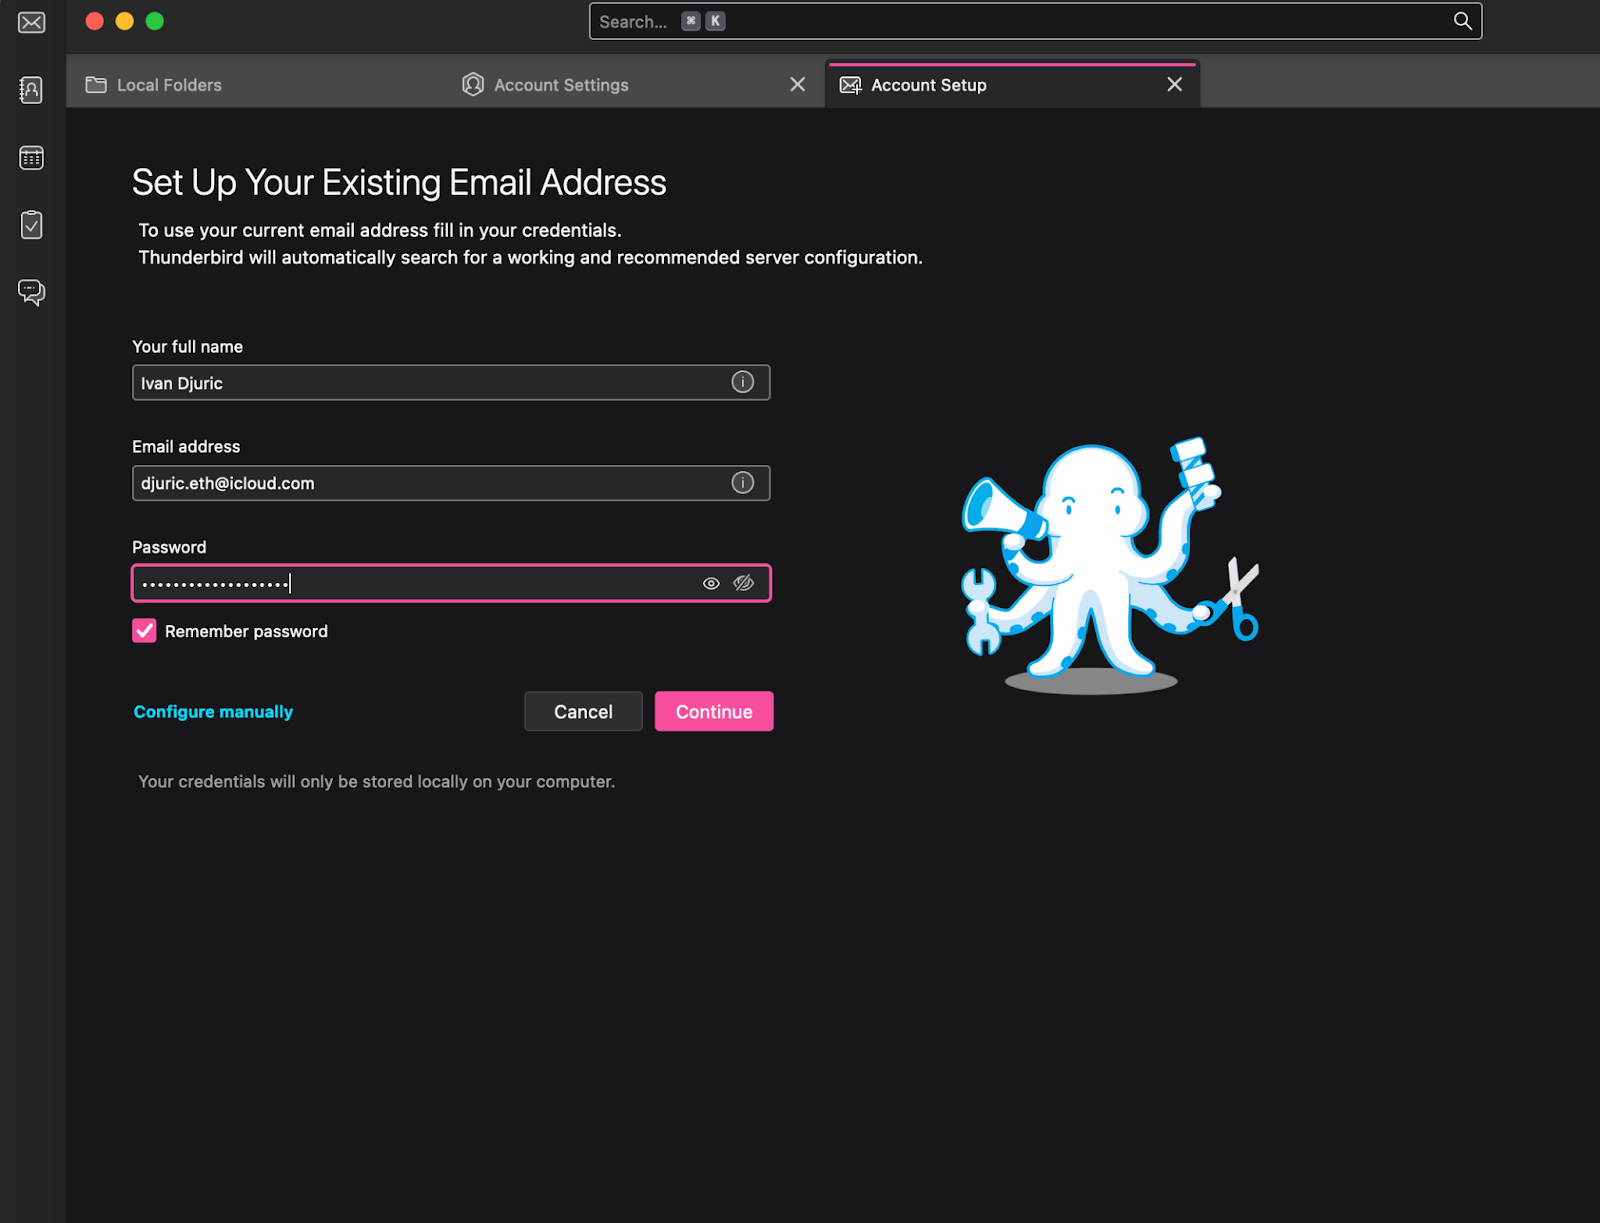
And voila, you can now use Thunderbird to send messages from your iCloud email account!
Nodemailer
For demonstrative purposes, let’s imagine you want to send emails via Nodemailer. In such a case, you would need to insert iCloud SMTP settings in the transporter object, like so:
const nodemailer = require('nodemailer');


const transporter = nodemailer.createTransport({
    host: 'smtp.mail.me.com',
    port: 587,
    secure: false,
    auth: {
        user: "example@icloud.com",
        pass: "my-app-specific-password"
    }
});


const mailOptions = {
    from: 'info@mailtrap.club',
    sender: 'custom@customdomain.com', // Custom sender address
    to: 'mailinator.email.test@mailinator.com',
    subject: 'Sending a test email by leveraging iCloud SMTP',
    text: 'Testing Mailinator for the Mailtrap blog. :)!'
};


transporter.sendMail(mailOptions, (error, info) => {
    if (error) {
        console.error('Error, error');
    } else {
        console.log('Email sent: ', info.response);
    }
});
Pro tip: If you want to use a custom email domain with iCloud SMTP, you can specify it in the sender: field that I’ve added to the code. However, you need an iCloud+ subscription for this.
How to configure iCloud POP3 settings?
POP3, or Post Office Protocol 3, is a protocol that downloads emails from the server and saves them on local storage, deleting them from the server afterward.
Having this in mind, it should come to no surprise that iCloud doesn’t support POP3, as Apple is all about synchronization and an accessible ecosystem.
How to configure iCloud IMAP settings?
Apple’s retrieval protocol of choice for iCloud is IMAP, or Internet Message Access Protocol, which is a standard among email programs nowadays. It works similarly to cloud email because, unlike POP, it stores the messages you receive on the mail server.
If you want to set your email client or app to use IMAP, you can use the following settings:
| Setting | Details |
| IMAP server name | imap.mail.me.com |
| IMAP port | 993 |
| IMAP encryption | SSL / TLS / STARTTLS |
| Username | Your full iCloud Mail email address: → johndoe@icloud.com ✅ → johndoe ❌ |
| Password | App-specific password |
Up for more reads? I suggest checking out our article on the differences between POP and IMAP. Or, better yet, watch our awesome video!
Troubleshooting iCloud SMTP server configuration
To save you the trouble, I’ve combed through Apple’s community forums and Stack Overflow for the most common iCloud SMTP server errors. Here are the most common issues:
- Apple system status – Firstly, visit Apple’s official System Status page to check if iCloud Mail services are up and running.
- Up-to-date software – If all services are operating normally, make sure your email client is up to date (e.g., Thunderbird, iCloud Mail, etc.) or that you have the latest version of the programming language you’re using installed.
- Encryption settings – In case the default SSL is causing issues, try switching to TLS or STARTTLS instead.
- Here’s an example of a message you might get if you’re encountering issues with encryption:
Error: unable to verify the first certificate
    at TLSSocket.onConnectSecure (_tls_wrap.js:1474:34)
    at TLSSocket.emit (events.js:315:20)
    at TLSSocket._finishInit (_tls_wrap.js:917:8)
    at TLSWrap.ssl.onhandshakedone (_tls_wrap.js:687:12) {
  code: 'UNABLE_TO_VERIFY_LEAF_SIGNATURE'
}- Correct SMTP ports – The default port for iCloud SMTP is port 587, but if it’s not working for you, use 25 as an alternative. However, I recommend doing this only if you’re in a staging environment due to security reasons.
- Firewall and antivirus – If you’re using firewall or antivirus software, it might be blocking traffic from your SMTP, labeling it as suspicious by mistake. So, either create an exception or turn it off completely.
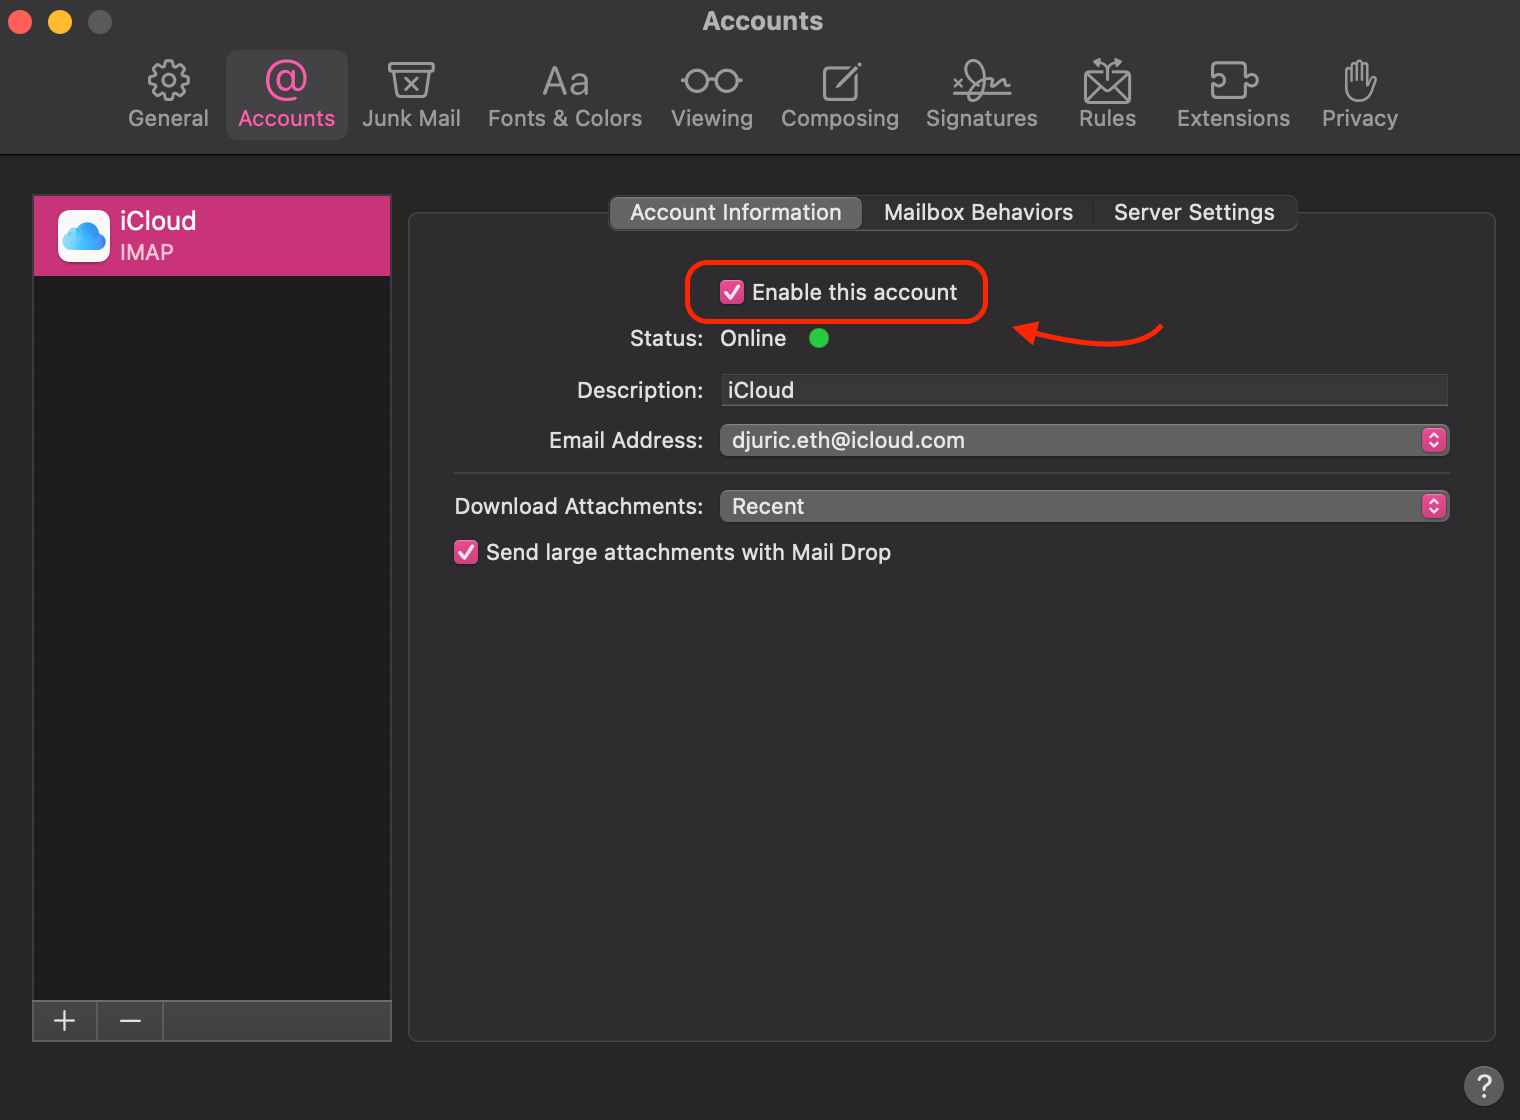
- Enable your account [if using iCloud Mail] – Whether you’re on your Mac, iPhone, iPad, etc., navigate to the settings of your iCloud Mail app and enable your account.
- Here’s what it looks like for Mac:
- App-specific password – Lastly, I know I sound like your typical internet provider’s customer support representative who tells you to restart the router, but please, make sure you’re using the app-specific password.
- I know I’m a bore, but don’t make the same mistake as me and waste 2 hours of your life trying to log in with your regular password. 🥲
iCloud SMTP limitations: when not to use iCloud as a SMTP server
As iCloud SMTP is designed for personal use, and Apple is not an email service provider, it’s only logical it has some limitations, such as:
- Sending limits – Apple has strict limits in place, making it not the most optimal for high volume email sending. Additionally, you can’t even upgrade the plan for a higher limit.
- Here’s a little table summarizing the sending limits for you:
| Safeguard | Limit |
| The total # of messages you can send daily | 1000 messages |
| The number of recipients you can message daily | 1000 recipients |
| The maximum number of recipients per message | 500 recipients |
| The size of incoming and outgoing messages | 20MB, up to 5GB with Mail Drop turned on |
Looking to send large amounts of email? Check out the top 10 list of mass email service providers we’ve prepared for you!
- Lack of advanced features – Unlike most competitive SMTP service providers nowadays, iCloud SMTP doesn’t come with in-depth analytics, dedicated IPs, and other features that enhance your deliverability.
- Lack of dedicated support – Apple community forums are the closest thing you’ll get to a customer support team for iCloud SMTP.
- HIPAA compliance and legal issues – If your business needs to comply with specific regulations like HIPAA, iCloud SMTP might not be your best bet. Primarily, this is because Apple doesn’t provide BAAs for iCloud, which are necessary for a service to be considered HIPAA-compliant.
- Custom domain name – As I’ve previously mentioned, the only way to have a custom domain name with iCloud SMTP is to subscribe to iCloud+. This is a big minus in my book, as this feature is included in the majority of basic plans SMTP providers offer nowadays.
A reliable alternative to iCloud SMTP—Mailtrap Email API/SMTP
Remember how iCloud SMTP allows you to send 1,000 messages daily? Well, let me introduce you to Mailtrap Email Delivery Platform, which offers an Email API/SMTP service with an impressive throughput of 10,000 emails per second (yes, you’ve read that right 🙂).
Email API/SMTP is designed to deliver your emails just in time, allowing you to choose how many emails you want to send based on your pricing plan.
And to help you deliver emails in time Mailtrap offers a robust infrastructure with many advanced features, such as:
- In-depth analytics – Drill-down reports and helicopter-view dashboards that include bounce rates, open rates, click-through rates, and all the other important stats you need to keep your infrastructure in check.
- Drag-and-drop HTML email builder – Use our AI to create eye-catching emails that will make your campaigns stand out.
- Dedicated IPs – You can have a dedicated IP address for sending emails, which gives you full control over your sender reputation.
- Automatic authentication – Mailtrap provides you with and automatically validates all necessary DNS records (SPF, DKIM, DMARC).
- 24/7 human support – We’ve a dedicated team of experts who work around the clock to solve any potential issues you might encounter, or simply answer any questions if you’re feeling stuck.
Most importantly, Mailtrap’s SMTP is super easy to use, check it out!
Still not convinced? In that case, I’ll just let this table convince you:
| Feature | Mailtrap SMTP | iCloud SMTP |
| In-depth analytics | ✅ | ❌ |
| Drag-and-drop HTML email builder | ✅ | ❌ |
| Dedicated IPs | ✅ | ❌ |
| 24/7 human support | ✅ | ❌ |
| Email logs [up to 30 days] | ✅ | ❌ |
| Email templates | ✅ | ❌ |
| Automatic authentication | ✅ | ❌ |
| Scalable pricing | ✅ | ❌ |
As you can see for yourself, the difference between a dedicated email service such as Mailtrap and an SMTP designed for personal use like iCloud is not small.
If you’re curious to explore this significant gap between the two yourself or simply try out a robust SMTP service, Mailtrap offers a free plan. So, go ahead and check it out!
Wrapping up
Does sending a limited amount of messages without any analytics or additional features in place sound okay to you? If so, iCloud SMTP is the way to go for you.
On the other hand, if you feel like your app needs a robust email sending service with all the industry-standard features, Mailtrap is the obvious choice. Personally, I never go fishing without my fully-packed toolkit.
Whichever path you choose, godspeed to your emails! 📧

