Skip to Navigation


I’ve been with Mailtrap since 2021, and I have tested a gazillion emails (using Mailtrap) and talked to god-knows how many SMEs to wrap my mind around all the intricacies.
This piece is an honest account of my ‘how to test email’ journey. It covers every aspect you can test, their importance, and the examples of best practices.
Sure, I used Mailtrap almost exclusively, so the following sections feature a bunch of references and pointers to our platform. But, you’ll also encounter other tools and tips on how to incorporate them into your workflow.
What aspects of an email can you test?
You can test ALL aspects of your email and here’s a quick list:
- Email deliverability
- SPAM score
- Headers
- Technical tests (DNS authentication, inbox placement, etc)
- Email components and interaction elements
Also when testing, a structured approach is crucial, or you’ll get lost in all the data. Worse yet, you’ll waste a lot of time testing the wrong things.
Deliverability testing
Deliverability testing is the first thing to do because it’s about making sure your emails hit the inbox, not the spam folder. And my dear colleague Piotr wrote a great guide on “Email deliverability: Everything you need to know”.
We even got an entire cheatsheet playlist about it. Hit ▶️below.
Anyway, moving onto the nitty gritty of deliverability testing.
HTML check
The HTML check is crucial in email content testing. Since this is not only about different content elements working but also about rendering. If the rendering is bad, the customer will think you are a spammer – spam complaint = sending reputation drop.
Note that I’ll be covering sandbox tests with Mailtrap to check emails before sending them. And that’s without spamming real recipients.
If you want to give Mailtrap Email Testing a try, hit the button above ⬆️to sign up, then follow this setup guide. You be testing your first email in minutes and there’s a free email testing plan.
Later, I’ll talk about production email tests (with Mailtrap and otherwise). You can safely run these with a preselected cohort of your subscribers. For example, production email tests are A/B tests and specific aspects of trigger point tests like email heat maps.
Finally, it’s time to move to WHATS and HOWS.
The HTML check takes a deep dive into various elements (HTML and CSS) of your email template and assesses overall market support across different email clients, and different devices; covering web, mobile, and desktop.
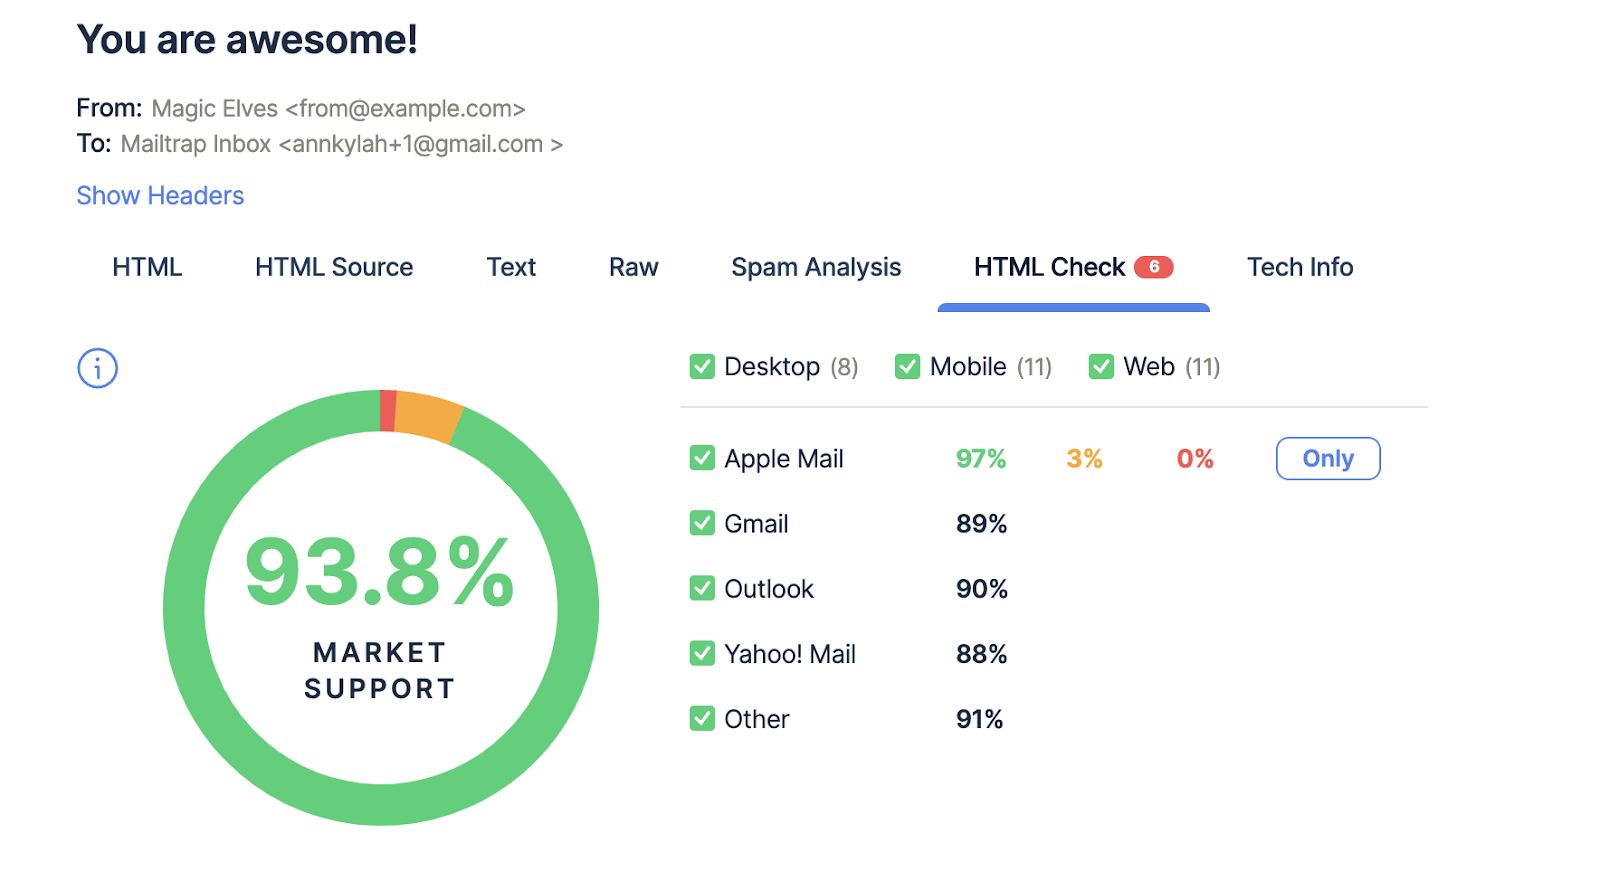
There’s a neat “Only” button, which pops up when you hover left of each provider. Hitting it allows you to see the support for only the client you select. And if you’re dreading deliverability to Apple Mail, for example, it’s a cool trick to see how to fix your template so that Apple loves it.
On that note, I’ll move on to show the other email template elements you can test under HTML Check.
Email body
The <body> element section shows you the support for the body of your email template. Note that this isn’t body copy of an email. It’s the HTML body of your email and how deliverable it is across different clients.
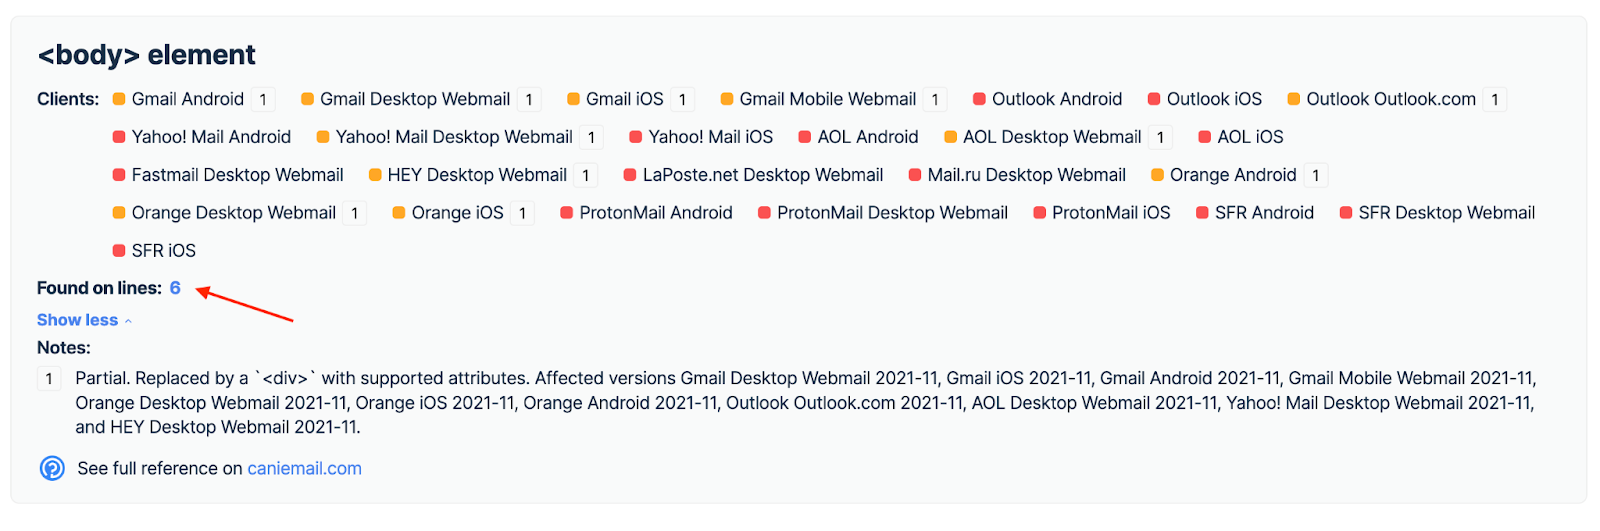
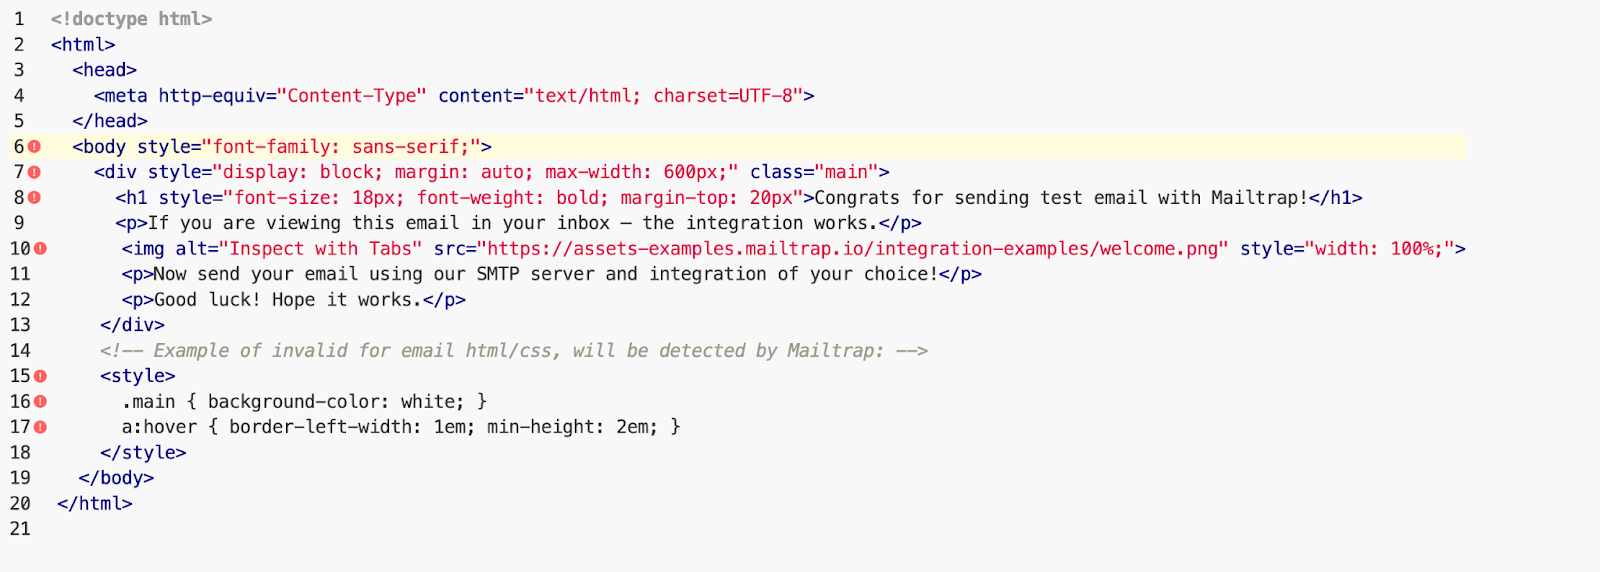
In this example, you can see that there’s partial support for the <body> element and the problematic area is on line 6. When I click 6, next to “Found on lines:”, I’m taken to the HTML Source tab, and I can immediately see the problematic line, so it’s straightforward to fix it.
Yeah, it seems the <style> and the <body> elements are in some conflict. So, I’m moving on to check that.
Styling and fonts
The <style> element section checks the support for template’s styling. I’m still using the same example, and as you can see below, some clients partially support the element, it appears buggy, and it’s not supported across all the email client versions.
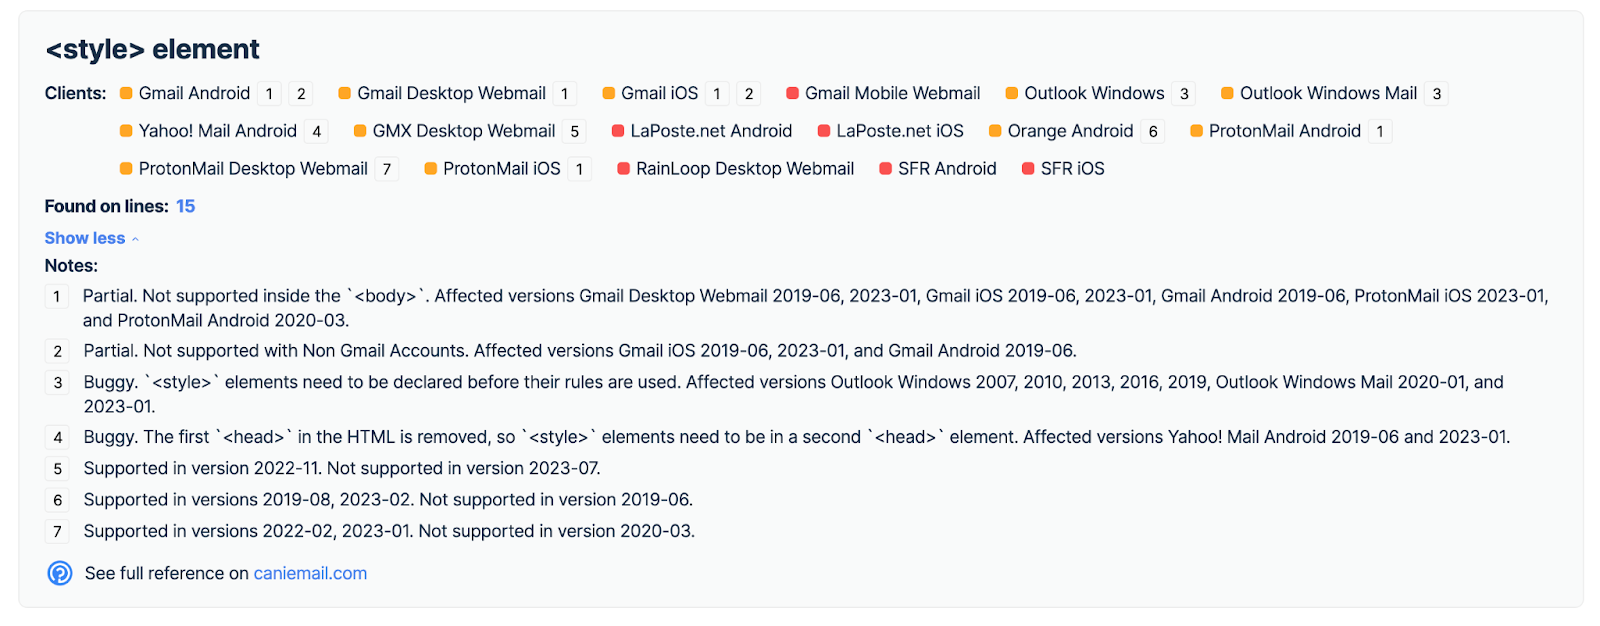
Again, clicking on the number next to “Found on lines” takes me to the template and clearly shows what’s wrong. The best thing is that if a line gets declared as “Buggy”, there’s a quick explanation why it’s buggy and how to fix it, which may cut template debugging in half.
As for the fonts, one of the key parameters Mailtrap checks is the font-weight. Of course, this is assuming you’re using a standard font family.
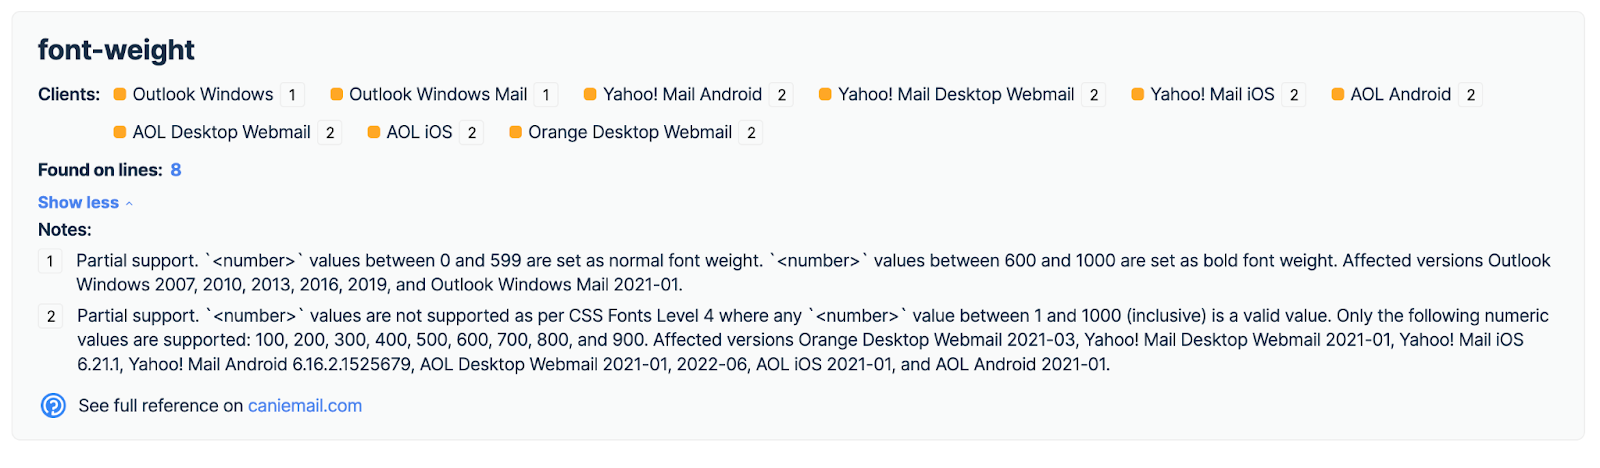
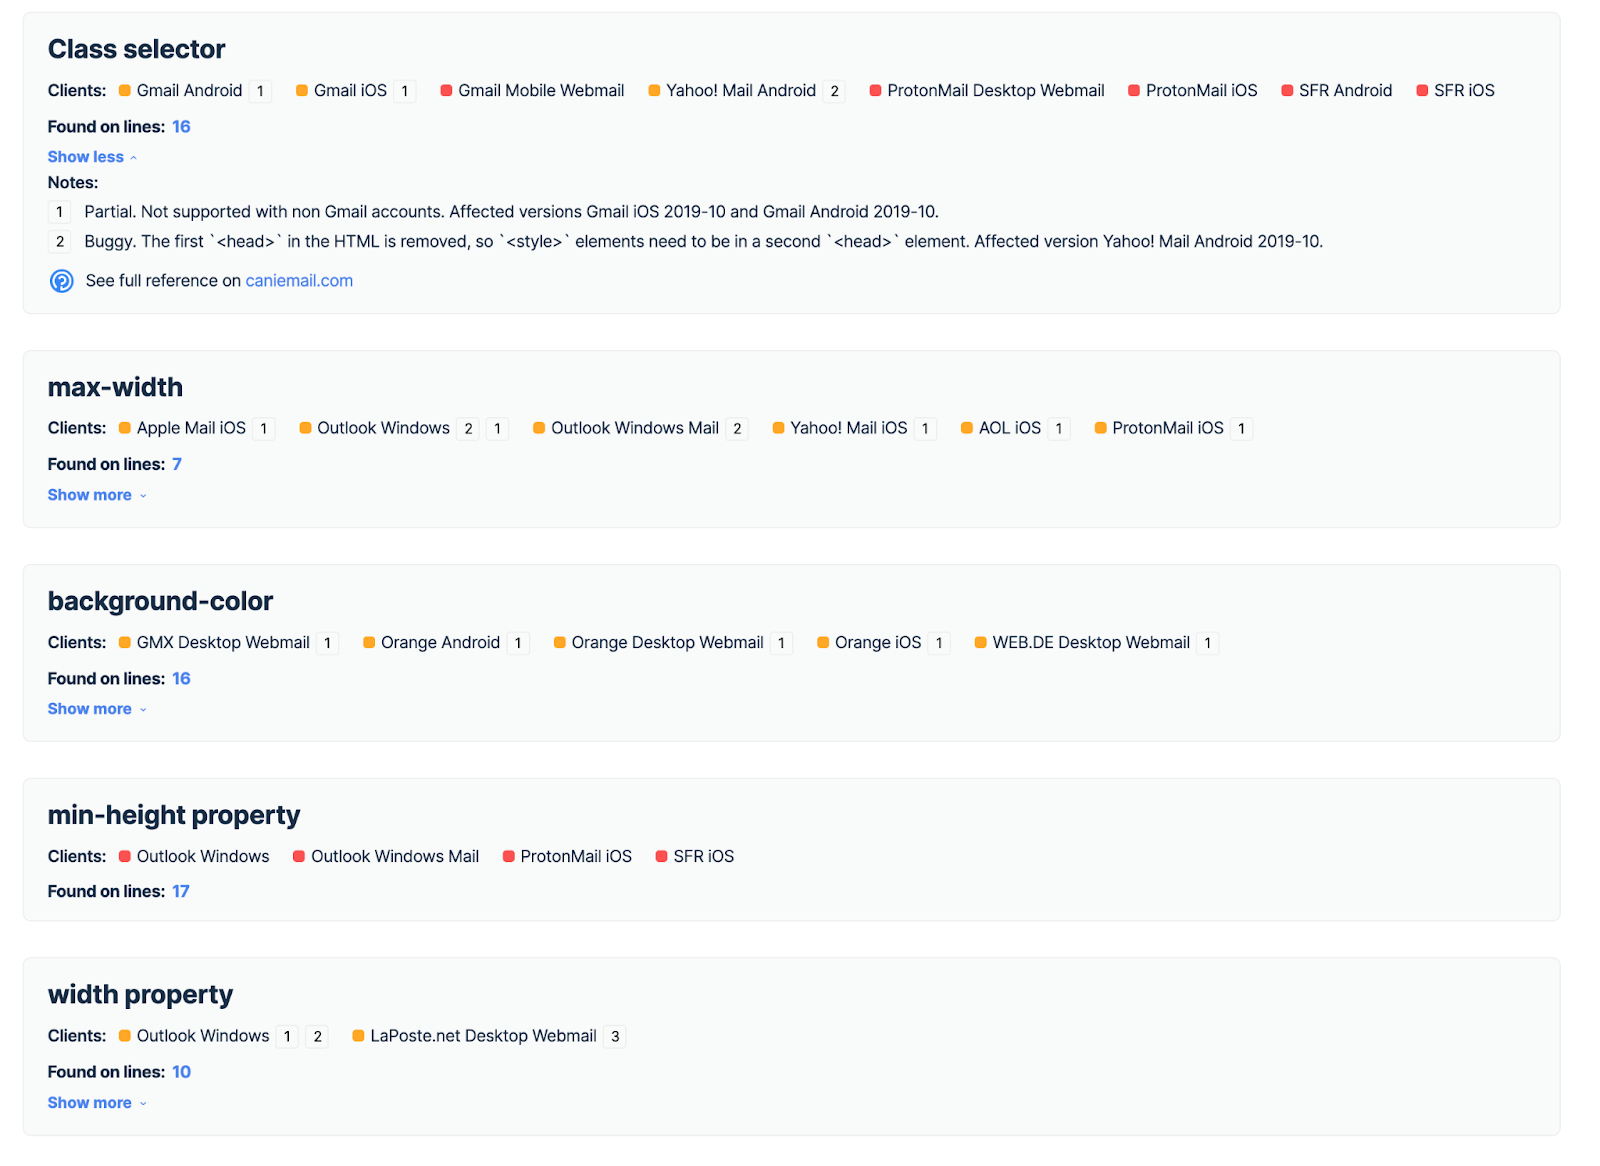
Like before, the notes show you that the font-weight is partially supported, plus there’s a quick explanation of why it’s like that. But the check doesn’t stop there, you can also inspect the class selector, max-width, background-color, width property, max-width, and any other CSS or HTML element that might appear in the email.
I know, it may seem that there’s something seriously wrong with the template in the example, but it’s not. As you can see from the first screenshot, it has 93.8% support across different email clients. So it’s a good template, but there are options to make it even better.
When you’re done checking the template, it’s time to see whether it has a chance to trigger spam bots.
SPAM score
The spam testing results are under the Spam Analysis and they give you the overall score for an email. In the background, we’re running an up-to-date SpamAssassin filter to determine the score. And you can see which elements of your template drive the score up.
At the same time, under Blacklists Report, you’ll see if your domain and IP address appear in any of the most common blacklists. Check our Free IP Blocklist Checker or Free Domain Blocklist Checker pages for more detailed info on how these reports work and how to act.
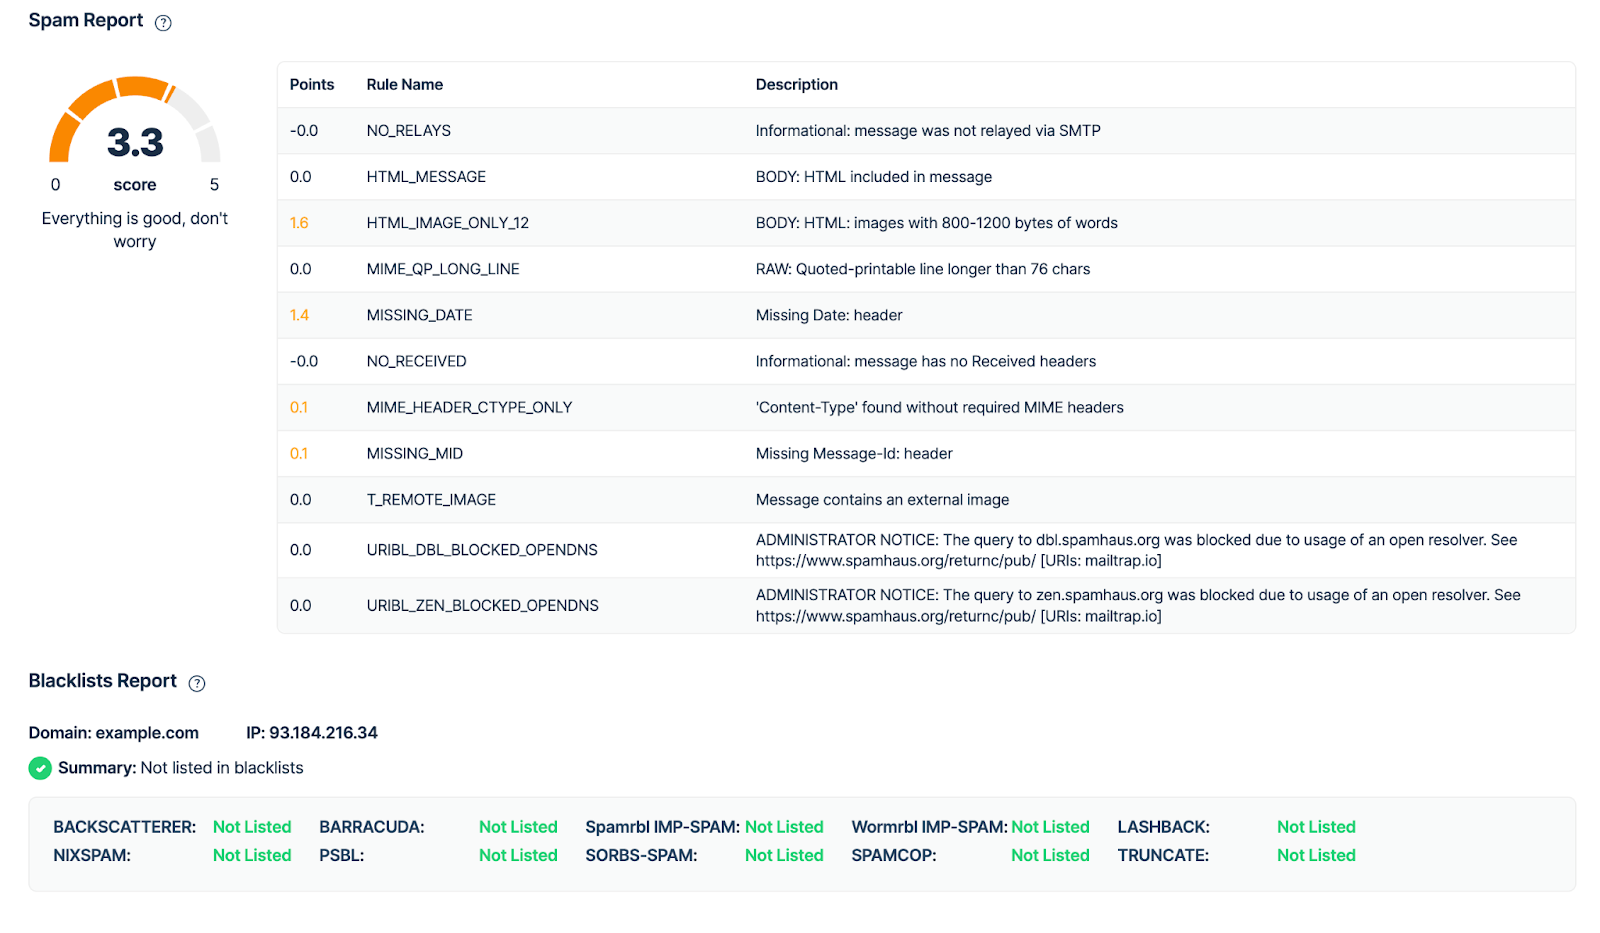
The template I’m using scored 3.3 which is okay. Generally, the recommendation is to keep the spam score under 5. But if you wanna get the score even higher, feel free to fix the rules as described in the table.
If you need more info on how to steer clear of the spam folder, check our blog post on “How to Avoid Emails Going to Spam?”.
That out of the way, you can proceed to check the headers.
Email headers
The Tech Info tab is the header information checker. You should know that it displays the original header values, which might be altered by an MTA or email service provider when sending the emails. However, the data we display are more than enough for debugging purposes.
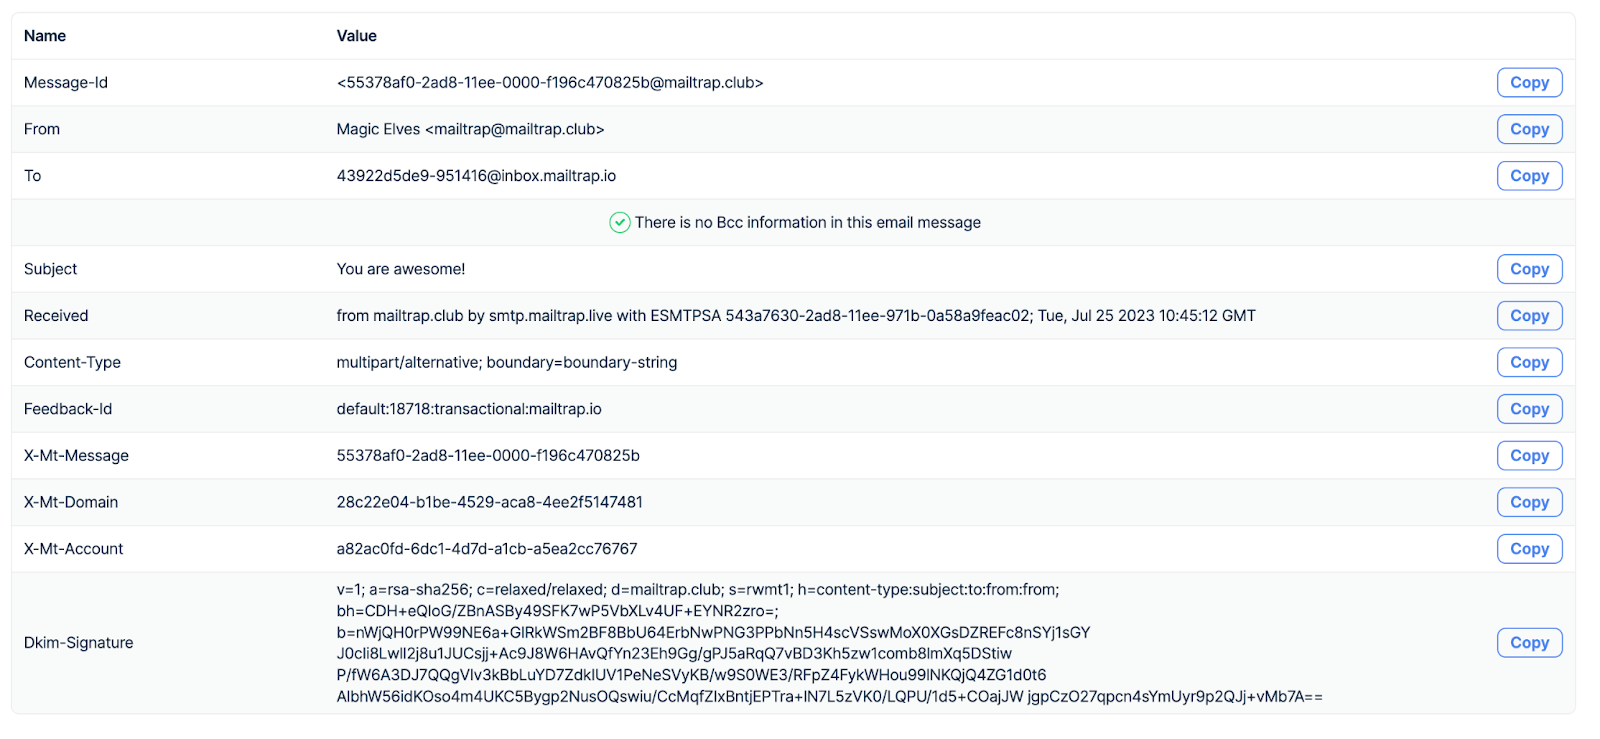
Also, pointers to header information or buggy headers may also appear under the HTML Check tab, and the Spam Analysis tabs. For example, the Spam Analysis flags ‘Content-Type’ without the proper MIME header (check the screenshot below).

Templates
To check whether your pre-made templates look the way you intend them to before you send them out, you can use the Email Templates feature.
With it, you can test your templates with our API and then switch from staging to production once you’re ready to dispatch them.
Simply enable sandbox, specify the inbox ID to receive template test, and send it through the API in the production environment.

Automation in Email Testing (via Mailtrap API)
Yes, you can automate email testing and if you’re sending a lot of emails, you should consider doing it. Mailtrap allows you to automate via our RESTful API (available on the free pricing plan).
Sure, it requires some coding but you can let the API run the dull tasks and notify you if there’s a problem.
Since I mentioned Mailtrap HTML Check a few times, here’s an exemplary request script for the HTML analysis using PHP/cURL.
<?php

$curl = curl_init();

curl_setopt_array($curl, [
  CURLOPT_URL => "https://mailtrap.io/api/accounts/account_id/inboxes/inbox_id/messages/message_id/analyze",
  CURLOPT_RETURNTRANSFER => true,
  CURLOPT_ENCODING => "",
  CURLOPT_MAXREDIRS => 10,
  CURLOPT_TIMEOUT => 30,
  CURLOPT_HTTP_VERSION => CURL_HTTP_VERSION_1_1,
  CURLOPT_CUSTOMREQUEST => "GET",
  CURLOPT_HTTPHEADER => [
    "Accept: application/json",
    "Api-Token: 123"
  ],
]);

$response = curl_exec($curl);
$err = curl_error($curl);

curl_close($curl);

if ($err) {
  echo "cURL Error #:" . $err;
} else {
  echo $response;
}
And here’s an exemplary response to the request.
{
  "report": {
    "status": "success",
    "errors": [
      {
        "error_line": 15,
        "rule_name": "style",
        "email_clients": {
          "desktop": [
            "Notes 6 / 7"
          ],
          "mobile": [
            "Gmail"
          ]
        }
      },
      {
        "error_line": 7,
        "rule_name": "display",
        "email_clients": {
          "desktop": [
            "AOL Desktop",
            "IBM Notes 9",
            "Outlook 2000-03",
            "Outlook 2007-16",
            "Outlook Express",
            "Postbox",
            "Windows 10 Mail",
            "Windows Live Mail"
          ],
          "mobile": [
            "Android 4.2.2 Mail",
            "Android 4.4.4 Mail",
            "BlackBerry",
            "Gmail Android app IMAP",
            "Google Inbox Android app",
            "Windows Phone 8 Mail",
            "Yahoo! Mail Android app",
            "Yahoo! Mail iOS app"
          ],
          "web": [
            "Yahoo! Mail"
          ]
        }
      }
    ]
  }
}
The response you’re looking for is 200. If there are any issues, the system will return 401, 404, or 404 error messages.
Technical testing (outside the sandbox environment)
We’re now moving out of the realm of sandbox tests and I’ll cover some production tests or pre-production tests. These should be done either before sending an email campaign or after sending a batch of emails to a test cohort of recipients.
Authentication
Authentication tests involve verifying that your emails are correctly authenticated using DNS records – SPF, DKIM, and DMARC. Actually, this authenticates your sending server, which can, in turn, significantly boost your deliverability.
On production, if you don’t have proper DNS, mailbox providers (Google, Yahoo, Outlook, etc.) are likely to relay your emails to the wrong inbox, not receive them at all, or even block your domain.
If you want to know more – check this guide on DNS.
Anyway, all Mailtrap Email Sending users are required to add the given DNS records to their domain provider’s records. And authenticate the records before they start sending emails.
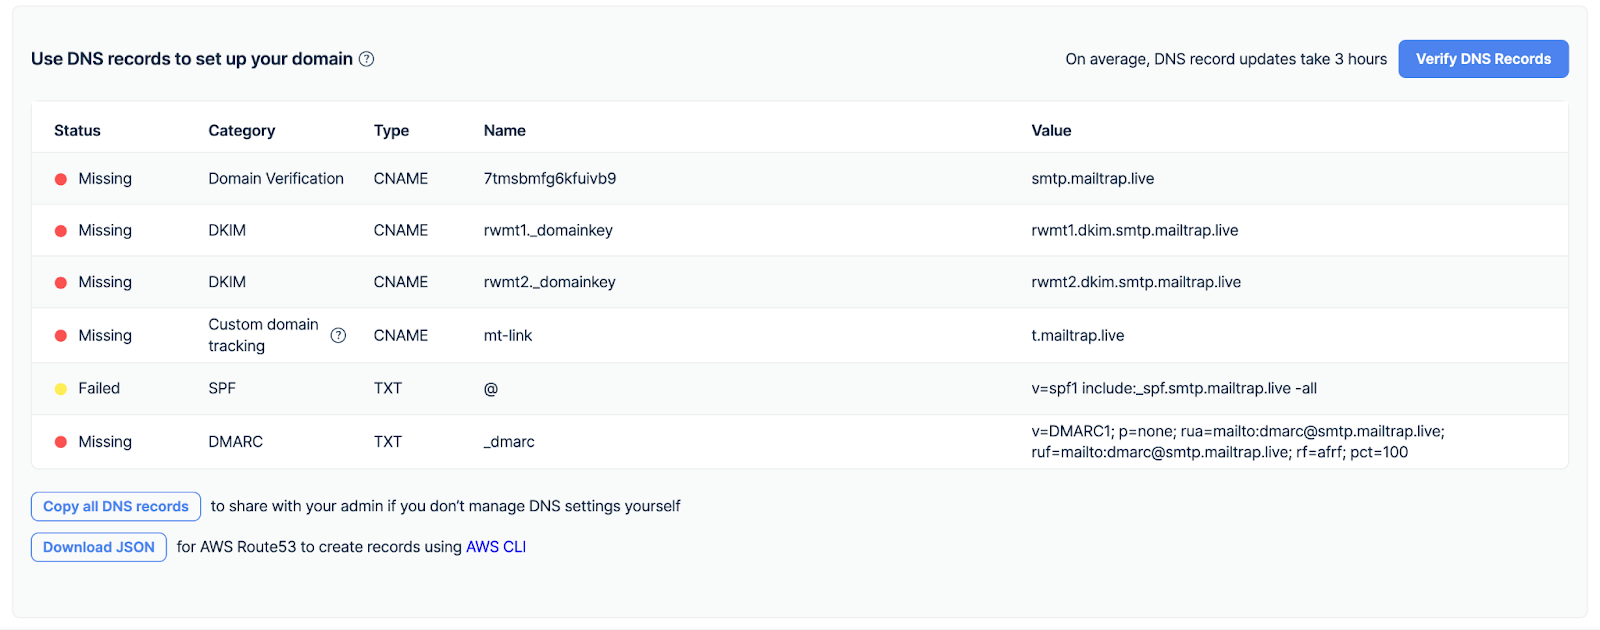
Yeah, I know that the DNS setup can be a pain and may take some time to complete. But let me be completely honest. If you don’t take the time to set up DNS before sending, you’ll be spending much more time trying to unblock or unban your domain afterward. Plus, your deliverability metrics will be all over the place.
Outside domain verification with Mailtrap, MxToolbox is a lightweight tool you can use to check the status of your DNS records. This is assuming you’re not a Mailtrap user or haven’t set up DNS with your email-sending service. Here are the links to test each record:
Note that if something’s wrong with the DNS, or one of the records is missing, you’ll still need to check with your sending service and domain provider and fix the issue.
Inbox placement
Inbox placement tests tell you which inbox your email is likely to land into (Primary, Promotions, Spam, etc). Typically, you’ll use a separate tool to check inbox placement, and one of the simplest to use, in my experience, is Kickbox.

To gauge inbox placement, Kickbox, and a lot of its competitors, use a seed list that’s easy to integrate with most ESPs. It’s a list of dummy test addresses across different mailbox providers that receive your emails and then relay back the info where the emails landed.
However, it’s not all sunshine and roses since the seed approach isn’t as accurate as you might expect. Here’s why:
- Deliverability is tied to your domain and sender reputation, email content, and in some cases timing. So to get accurate results, you need your domain data.
- Seed testing isn’t granular enough so it may return misleading results.
- If you have a good domain reputation and send simple emails, the seed test won’t show any spam, whereas in reality some messages could be labeled as spam.
So, my wholehearted recommendation is to focus on delivery time (time-to-inbox) instead of placement tests.
Delivery time
Delivery time (time-to-inbox) tests how fast your emails get into the recipient’s inbox, and the faster the better. The challenge is that you can’t accurately do this test outside production, but you don’t want to spam your recipients.
I know, you’re now thinking: “I got a bunch of dummy addresses, I’m gonna send the emails there and just check the times”. But we, at Mailtrap, of course, tried that, and it doesn’t work. If you want to know why check “Why Using Dummy Email for Testing Just Doesn’t Work”.
Okay, so how do you check the delivery time (time-to-inbox)?
I’d recommend choosing a small batch of recipients (about 100), sending a campaign to them, and then checking the delivery times.
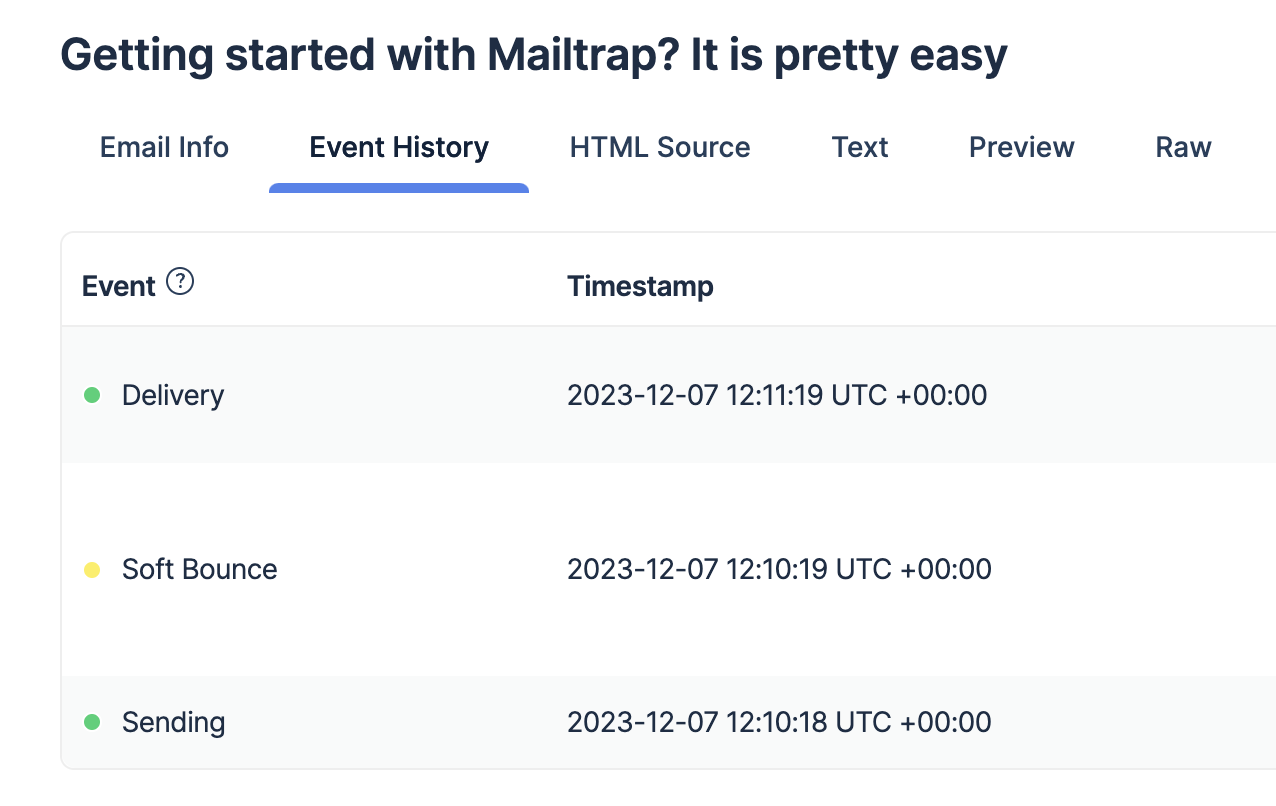
Using Mailtrap Email Sending, I sent a transactional email to a batch of 100 recipients, then I checked the emails that were delivered. I clicked Email Logs in our menu, selected an email, then clicked the Event History tab, and it showed that it took a minute for the email to land in the inbox (see image above).
Sure, it could have been much faster, but there was an intermediary Soft Bounce event that slowed down the email. That info is also important because it hints at the following possibilities:
- The recipient’s inbox is full, or there’s some limitation on their side (e.g. message is too large).
- The recipient could have an autoresponder which is sometimes treated as a soft bounce.
- There was a DNS failure on the receiving side (the email account of the recipient, not your infrastructure).
Bounce rate
The bounce rate I’m talking about here is a hard bounce – which is a permanent failure to deliver an email to a particular recipient. There are a few reasons that may happen:
- The address is no longer in use (deleted or suspended).
- The address is invalid.
- The IPS rejects the email for various reasons.
Note that a bunch of hard bounces usually occur when you buy an email list, so please don’t do it. And if you want to learn more about Hard vs Soft Bounces, click the link.
Moving on to bounce rate tests…
It’s hard to accurately test for hard bounces without sending the emails. Yeah, some deliverability tools and inbox placement tools may offer estimations, but I wouldn’t rely on that.
So, what can you do?
You can take preemptive measures and actively work to minimize hard bounces. Here’s a quick list:
- Run recipient email verification upon collection – be it within an email form, a sign-up flow, or wherever. For example, Verifalia has a great JavaScript SDK for that. And there are a bunch of other options for different frameworks.
- Regularly review your email list and purge it from hard bounces. Tools like ZeroBounce, NeverBounce, and MyEmailVerifier are good at that.
- After sending a campaign, immediately remove all hard-bounce addresses from the list.
Yeah, there’s some manual work and programming involved, but you have to do it, particularly if you’re sending a lot of emails. If not, your email domain reputation is at risk, learn more about it at Email Domain Reputation: All You Need to Know.
Rate limiting
The rate limiting tests aren’t for the fainthearted as they often require programming and extensive knowledge of email infrastructure. Even so, they’re important for large campaigns to determine how many emails you can send without triggering spam filters or violating ISP policies.
Also, these are quantitative tests aimed at the email server, not your emails. You can do load and stress testing and simulate different scenarios. For instance, you may want to run SOAP/REST, TCP, FTP tests, or mimic a huge load on multiple servers at a specific email throughput (e.g. 1000 emails per hour).
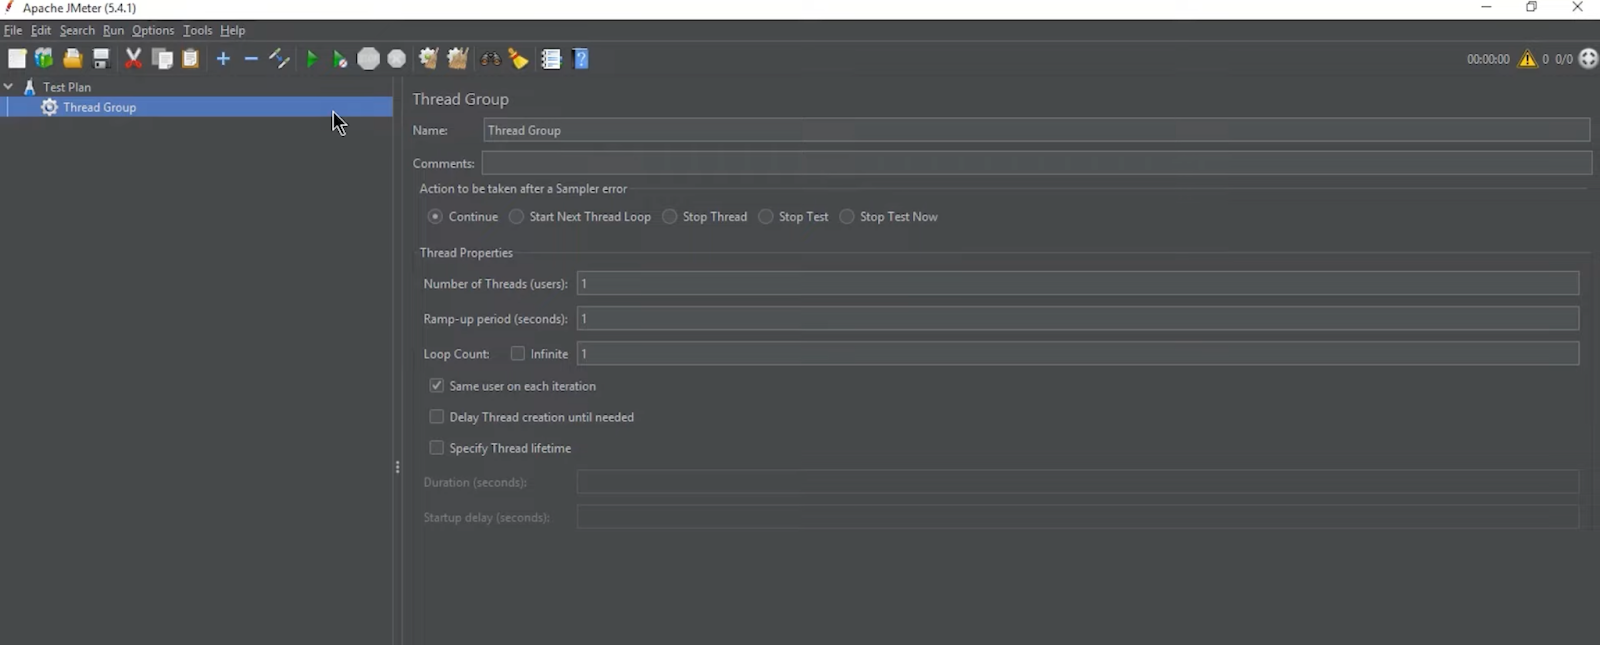
For me, the top two tools for this are GMass (designed to help you with Gmail rate limits) and ApacheJMeter which is a full-blown testing app for server performance and functional behavior.
Finally, you should keep in mind that most email providers limit your throughput anyway depending on different factors. And it’s best to spread out large campaigns into smaller chunks and send them iteratively. Plus, consider a dedicated IP address if you send more than 200K emails a month.
Pro Tip:
Mailtrap offers an ActionMailer Balancer that allows you to balance (limit the sending rate) between two providers. For example, you can use Mailtrap Sending and Mailgun or Mailchimp and split the traffic 50-50.
This is particularly useful if you’re migrating from one service to another. Plus, the balancer safeguards your email infrastructure since when one service fails, the load is automatically taken over by the other.
If you want to learn the details, check out our ActionMailer Balancer article.
Component and interaction elements testing
This is about testing the elements your recipients can and should interact with. Some of the tests below can be done in a sandbox, and I explicitly pointed that out.
Subject line
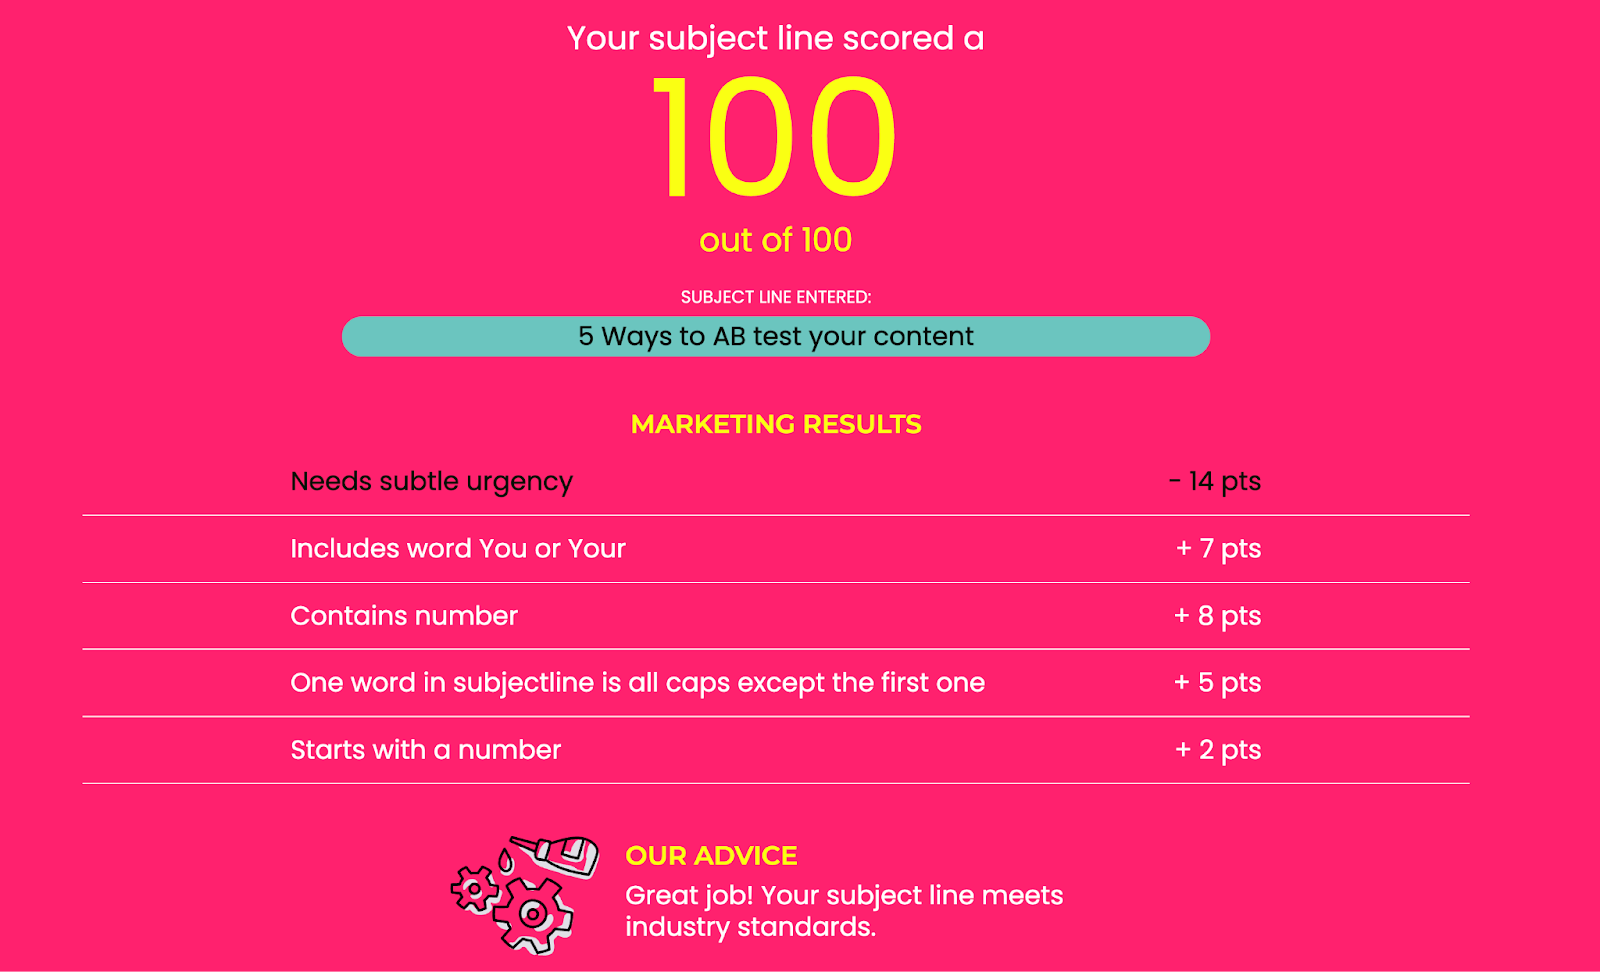
Email marketing tools like ActiveCampaign allow you to test subject lines as part of their A/B testing functionality. But if you want a standalone solution, I find the Subject Line tool the easiest to use, it’s free, plus you get a clear explanation of the subject’s score.
However, I need to stress the functional difference between an A/B test and testing a subject line with a standalone tool.
With a standalone tool, you can only see if the subject line meets the industry standards and guestimate if it’s enticing enough to attract opens. Whereas, a proper A/B test of a subject line tells you accurately which of the two subject lines is more attractive for your audience.
So, it’s much better to use the A/B test, where the subject with a higher open rate is the winner. Just be careful not to change too many parameters for the A/B so you can clearly understand what made the difference.
Attachments
Just to be clear, I wouldn’t recommend sending marketing emails with attachments at all. These often undergo much more scrutiny and may drive your sender’s reputation down.
The same applies even if you offer a downloadable e-book or an exclusive industry report. It’s much safer to ask users to go to a link and then download the doc from the cloud then send it in an email.
However, it’s a different story with transactional emails like invoice reminders or order confirmations. These usually have a doc attached to them. You can test them via Mailtrap Email Testing to make sure the critical email is deliverable in the correct format along with the attachment.
Also, if you’re using Mailtrap Email Sending, we have a separate transactional stream and endpoint dedicated exclusively to transactional emails. Mailbox providers understand that, so your emails and attachments are gonna always land where they’re supposed to.
Signatures
There are tools designed to help you manage email signatures and test them. But I don’t want to complicate things since Mailtrap Email Testing shows your signature and how it’s displayed on desktop or mobile devices.
You just select the testing email, click the HTML tab, and scroll down to your signature. There you can check the social links, details, and whatnot.

Nevertheless, I want you give you some tips and tricks on best practices to ensure your signature doesn’t trigger spam filters and that it’s always displayed properly.
- Include essential brand and sender info – company/sender name, contact information/address, logo, and social media links.
- Create both plain text and HTML versions of the signature. Having the plain text version helps when the email client doesn’t support HTML.
- If you’re using an image with the signature make sure it’s hosted on a reliable server.
- Check formatting and layout for consistency in size and styles and make sure all links are clickable and working.
Trigger points
The trigger points are the email elements that drive conversions. It’s where recipients click on a link, take your offer, buy something, or sign up. These are, of course, links, buttons, and CTAs (call to action).
The first thing to do is to clearly understand the triggers for each email marketing campaign. For instance, the trigger point for a beta product proposal is usually different than the one you might have in a Black Friday campaign.
Also, note that if you’re primarily sending transactional emails, these have specific trigger points that always need to work. Let’s say you run an email verification sequence and ask recipients to log in via email; the associated button has to take users directly to your app without intermediary steps. Meaning, that you need to be sure the link and the buttons do exactly that.
On that note, I’m moving to email testing tools (Mailtrap again 😀).
For Mailtrap users, it’s easy to check if the trigger points work. That is – check if there are broken links, if the buttons are clickable, and if the links lead to the desired destination.
The above is a basic example, but you can click everything in the tested email, under the Mailtrap HTML email preview, and be sure it’s working.
If you want to take things up a notch, you may want to a service that offers email heat mapping. For example, tools like Email on Acid, and Brevo (formerly Sendingblue) offer email heat maps.
This approach is useful for large campaigns where your email design may affect the conversions. For instance, you may find that the primary CTA is very low so few people even scroll to it. Or you could realize recipients just open your email without spending any time on it.
To the above, the key to heat maps is understanding which part of the email message attracts the most attention and adapting the trigger points to that.
Logging and reporting
As I mentioned a few times earlier in the article Mailtrap Email Testing provides you with all the error logs for an email and these can be found under the HTML Check tab. Plus, there’s the Tech Info tab to inspect the SMTP transaction and headers.
To remind you, the key benefit is that the logs feature a succinct explanation of where and why the error occurred. As a result, it’ll be much quicker to ensure your email follows the best practices and adheres to IPS’s policies.
Also, if you’re using Mailtrap Email Sending, you get email delivery percentages.
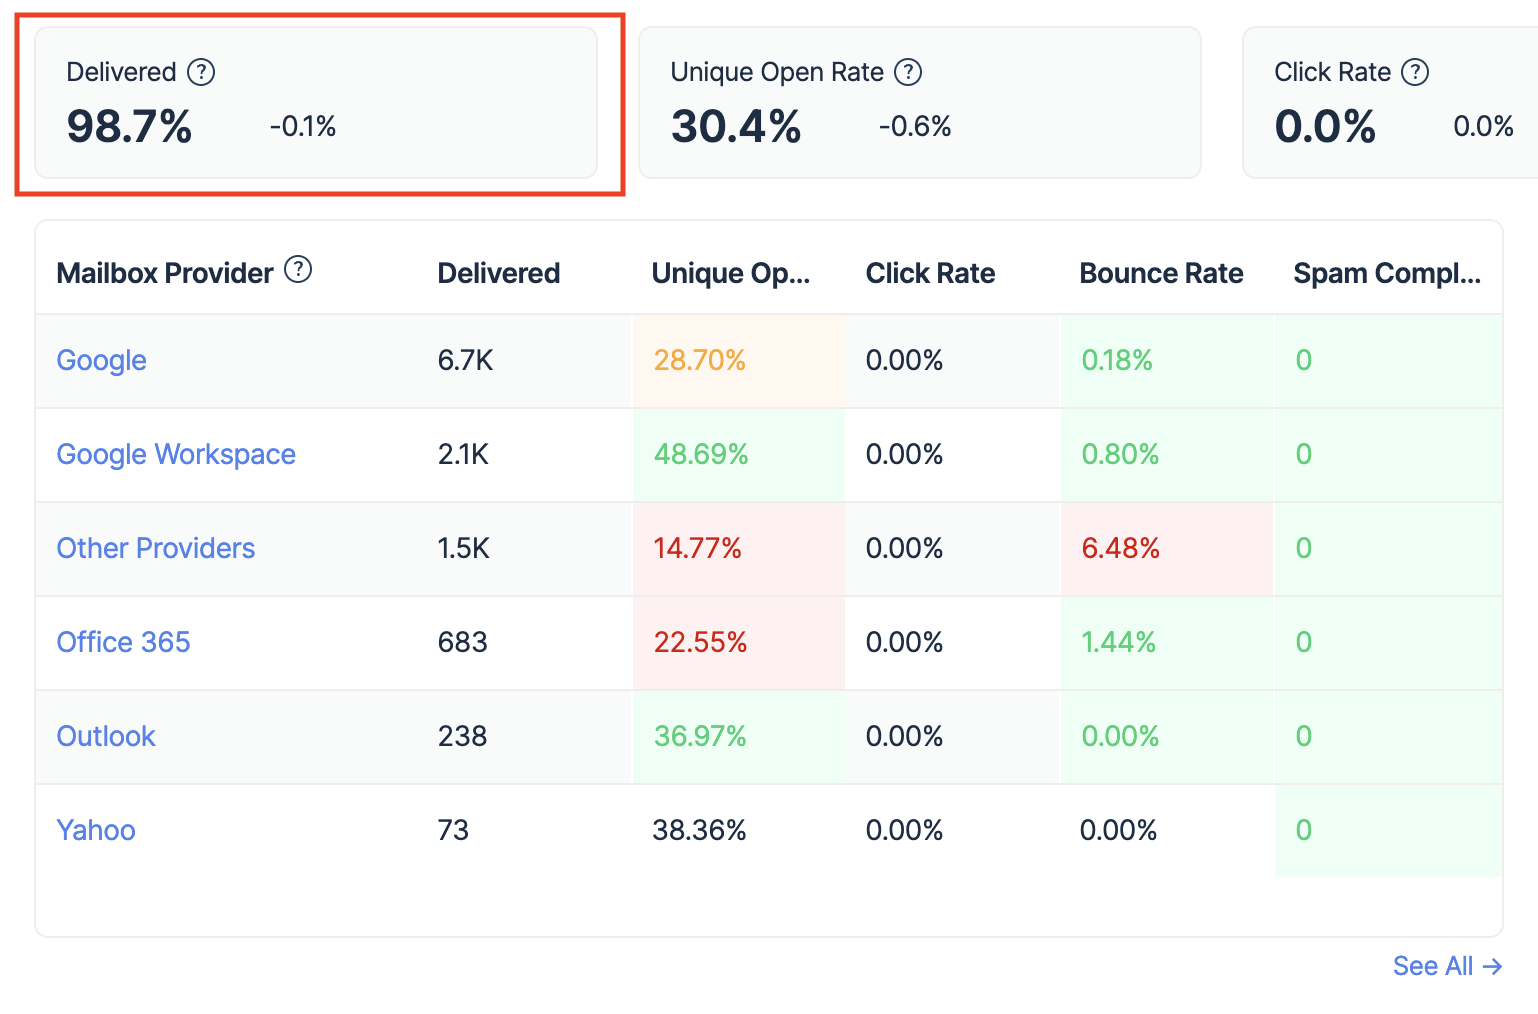
Speaking of delivery, you should aim for percentages higher than 90%. Anything below that signals that there are too many hard bounces and you need to inspect your email list and infrastructure.
To give you a personal example, a few years back I was working on an outreach campaign with a different tool. And I was consistently getting 12+% of bounces and spam complaints combined. This was alarming.
After a thorough inspection, it turned out the DNS records were messy, and a faulty SPF was causing the trouble. Of course, this could have been prevented with a proper authentication and DNS check.
Be that as it may, I’ll continue discussing the metrics to help you manage expectations and set some benchmarks for your campaigns.
Success/failure metrics
Determining optimal success and failure metrics varies depending on your industry, targeted avatar, and campaign approaches.
However, I’ve done a bunch of research and want to give you some median numbers so you have a better understanding if the email testing you’re doing is effective or not.
- Market Support (sandbox testing) – the score of 90%+ is good, if it’s below 85%, you need to work on your template.
- Spam Score (sandbox testing) – the score below 5 is good, consider making it under 3, particularly for marketing emails.
- Open rate (production sending) – 37% on average across all industries (at the low end, tech services and SaaS companies may consistently average at 21%).
- Click rate (production sending) – 1.4% on average across all industries (at the low end, food and dining services may average at 0.6%).
- Hard bounce rate (production sending) – 10.4% on average across all industries (at the low end (which is favorable for the given metric) is the maintenance and repairs services with 5%).
- Unsubscribe rate (production sending) – 0.30% on average across all industries (note: anything below 2% is considered acceptable).
I want to stress that some of the low numbers shouldn’t discourage you. As said, these are just median numbers to give you a helicopter view of general email performance. And, of course, there are ways to improve the numbers, which we wrote extensively about.
Here’s some bedtime reading to help you improve the stats.
- What Is Email Feedback Loop and Why Is It Important?
- How to Test Emails in Different Clients | Mailtrap Blog
- How to Check and Improve Email Sender Reputation [2023]
- List Unsubscribe Header: Why and How to Use | Mailtrap Blog
- Email Marketing A/B Testing: A Step-By-Step Guide [2023]
Ready, steady, test!
By now, you have all the tools, tips, and knowledge on how to test email. Now, you truly have the power to own the deliverability of the email campaign. Just use it wisely.