Love it or hate it, email is a staple in business communication. This importance in the business realm is one thing email has in common with Excel, the powerful spreadsheet software.
What’s more, when combined, the two can serve as a very efficient tool for enabling and automating the sending of emails/email alerts/email notifications to one or to multiple addresses in just a few clicks.
If you are curious to learn how to send emails from Excel, we provide step-by-step instructions in the text below, as well as our dedicated YouTube tutorial!
Why send emails from Excel?
Before diving into the details, it’s important to go through the benefits of sending email messages from Excel, as some of you who stumbled across this article might be puzzled by the idea.
These benefits include:
- Streamlining your workflow.
- Reducing the time spent on the email creation and delivery process.
- Minimizing the chances of errors occurring in the email creation and delivery process.
- Automation can be incorporated into everything (for instance, if you have employees or teammates changing spreadsheets or entire documents often; Excel can send you automated emails each time when cell value changes, when Excel document is updated, or when a condition is met).
- Customer information from Excel spreadsheets can be included in your emails, thus making the emails customized and more engaging.
How to send emails from Excel: step-by-step explanation
The most common way of sending emails from Excel is using Visual Basic for Applications (VBA) – an event-driven programming language created by Microsoft.
With Excel VBA macros, you can automate tasks, generate custom forms/graphs/reports, integrate other systems/applications, and customize the applications within the Microsoft Office suite such as Word, PowerPoint, Outlook, and of course, Excel by extending their functionalities.
What’s so great about VBA is that it’s based on English-like statements which makes it easy to learn. So, if you are not tech-savvy, using VBA should not come as a big challenge. Great, right?
That said, let’s see what email sending with VBA looks like in action.
Preparation step – Enable the developer tab in Excel
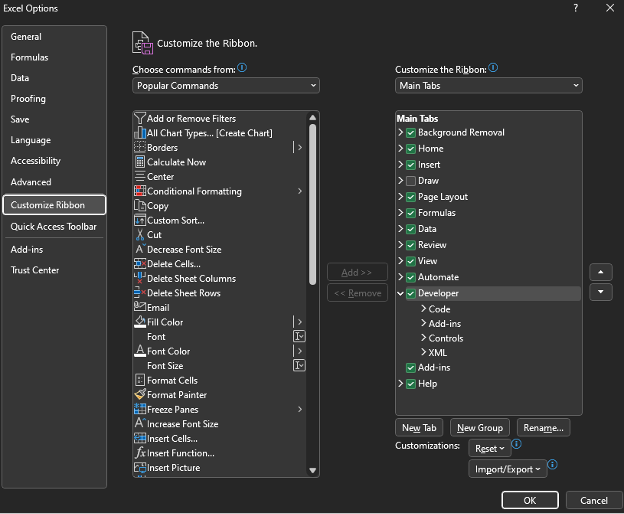
The Excel features for sending emails are located in the Developer tab, which for some of you, might not be visible by default in the toolbar.
To change this, go to File -> Options -> Customize Ribbon.
This should open a new dialog box where you can enable or disable certain tabs, including the Developer tab.
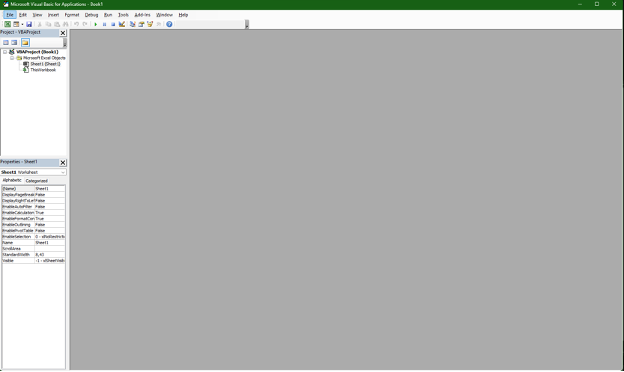
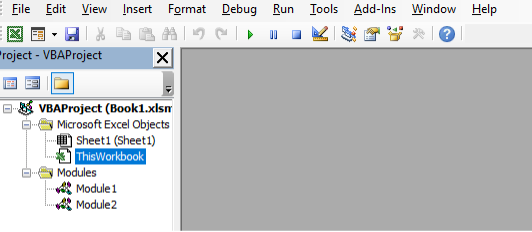
Step #1 – Open the VBA code editor
To start writing your VBA code, you need to open the VBA code editor. This is done by going into the Developer tab and clicking on “Visual Basic”.

Once opened, the editor should look like this:
Step #2 – Add a reference to EASendMailObj ActiveX Object 1.0 Type Library
For Excel to communicate with an email server, you need to add a reference to EASendMailObj ActiveX Object 1.0 Type Library.
This reference is added by navigating to Tools -> References in the VBA editor and selecting “EASendMailObj ActiveX Object 1.0 Type Library” from the list of available references.

Note: Before adding the reference, you need to install EmailArchitect upon downloading it from https://www.emailarchitect.net/webapp/download/easendmail.exe.
Step #3 – Create a new module
The VBA code needed to send an email has to be written in a module.
To create one, in the editor, go to Insert and then click on “Module”.
This should open up a window where you can write your own code or copy and paste the one below after making any necessary changes to SMTP server settings, email properties, etc.
Public Sub SendMailTo()

Dim sender As String
Dim name As String
Dim address As String
Dim subject As String
Dim body As String
Dim bodyFormat As Integer

sender = "john@company.com"
name = "John"
address = "jane@company.com"
subject = "Test subject"
body = "Test body"
bodyFormat = 0

    Set oSmtp = New EASendMailObjLib.Mail
    oSmtp.LicenseCode = "TryIt" ' Here goes your license code for the software; for now, we are using the trial version

    ' Please change the server address, username, and password to the ones you will be using
    oSmtp.ServerAddr = "smtp.example.com"
    oSmtp.UserName = "******"
    oSmtp.Password = "****************"

    oSmtp.ServerPort = 587

    ' Using TryTLS,
    ' If the SMTP server supports TLS, then a TLS connection is used; otherwise, a normal TCP connection is used.
    ' https://www.emailarchitect.net/easendmail/sdk/?ct=connecttype
    oSmtp.ConnectType = 4

    oSmtp.FromAddr = sender
    oSmtp.AddRecipient name, address, 0

    oSmtp.subject = subject
    oSmtp.bodyFormat = bodyFormat
    oSmtp.BodyText = body

    oSmtp.Asynchronous = 1
    oSmtp.SendMail
    Set oSmtp = Nothing
End Sub
Step #4 – Run the code
To see if your VBA code is working, you now need to run it by using the “▶️” button in the editor or pressing F5.
If any errors are present, a popup window with an error message will notify you. Otherwise, Excel should show a different popup window confirming the email delivery.
Once you are satisfied with the code and how it’s running, save the Excel worksheet and close the VBA editor.
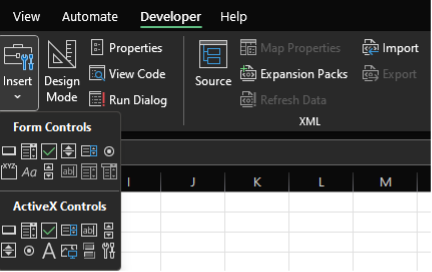
To run the VBA macro you just created without opening the VBA editor every time, you need to create a command send button and connect it to the macro.
You start off by going into the worksheet and then into the Developer tab, where you click the “Insert” option. This should open a dropdown sectioned off into “Form Controls” and “ActiveX Controls”.
Under “Form Controls”, pick “Command Button” and drag it onto the worksheet.
Once on the worksheet, right-click on the button and select the “Assign Macro” option.
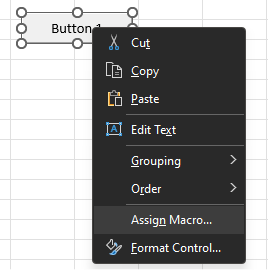
In the “Assign Macro” dialog box, find your VBA macro and select it.
Finally, close the dialog box, save the worksheet, and then test the functionality of the button.
How to automate sending email from Excel
Your code and command button are working? Great!
But what if you wanted the code to run on its own and trigger email sending automatically without you needing to press a single button? That is possible in Excel as well, and here is how.
First, copy all the code you wrote in your macro to send email from Excel.
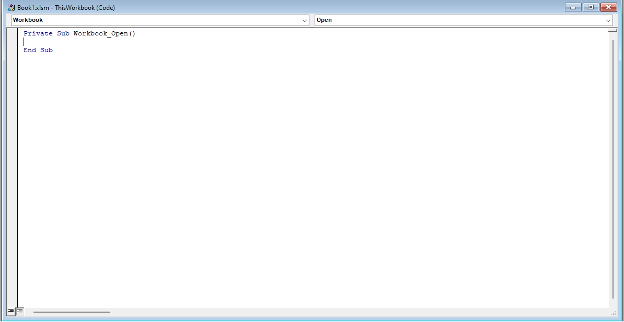
Then, in the VBA editor, on the left-hand side of the screen, double-click on “ThisWorkbook”.
A new code window will open, and on top of it, there will be two dropdown menus, using which you should select “Workbook” and “Open”.


In the same window, paste your code in between the two existing code lines. This will cause your code to run every time this Excel file is opened.
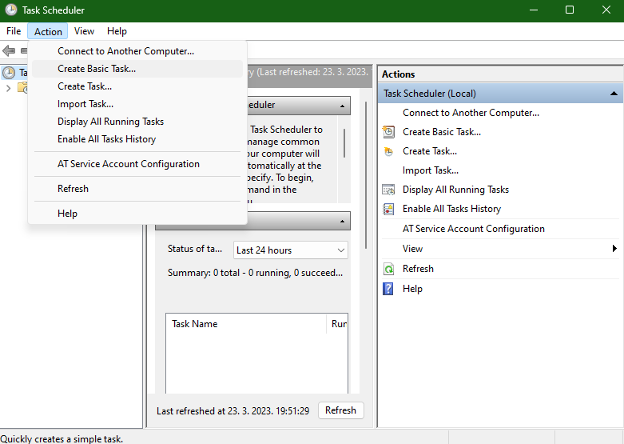
Lastly, to have your operating system open the Excel document and thus run the code automatically at regular intervals, launch Task Scheduler on your PC, navigate to Action, and create a basic task.
This will open up a wizard with which you can define all the details related to the task scheduling.
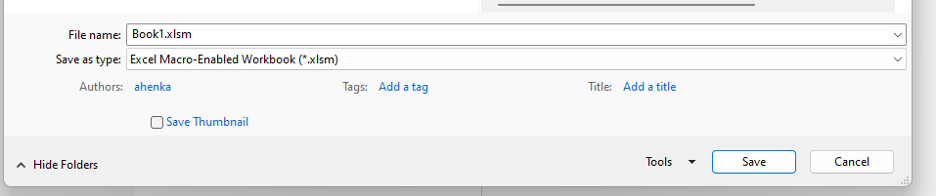
Note: To run the macro each time the workbook opens, the Excel file should be saved as Excel Macro-Enabled Workbook (*.xlsm).
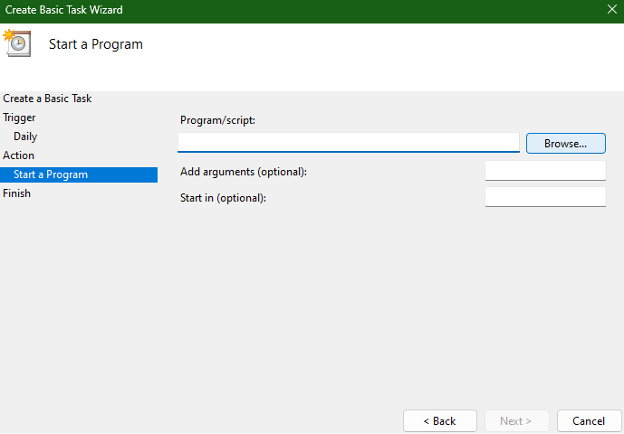
Note: Use the “Browse” button to find Excel on your PC, or enter the program path into the Program/script field. The Add arguments filed will be used to enter the document path.
And that’s it! You have now automated the sending of emails from Excel each time when file is opened.
How to send emails from Excel without macros
Regardless of how useful macros can be, we know that some of you reading this might not like using them. Lucky for you, there is a way to send emails from Excel without any macros.
The process is pretty simple.
As the initial step, get your email details ready in an Excel spreadsheet, just like in the screenshot below:

Then, for the first entry in the column named “Formula”, add a hyperlink formula by first selecting the cell and then clicking on the “ƒ𝑥” button in the top left corner.

Once the formula builder is open, fill out the necessary information.
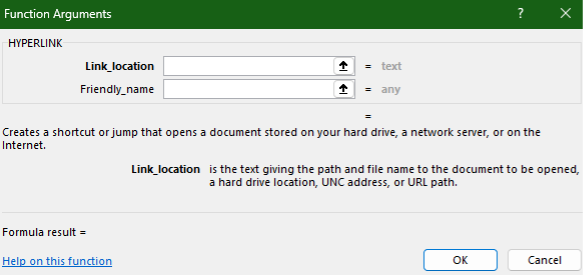
- Link_location – this will be your formula
- Friendly_name – this will be the hyperlink text
In full, the formula should look something like this, with the parameters being based on cell value:
=HYPERLINK("mailto:"&A2&"&cc="&B2&"?subject="&C2&"&body="&D2,"Send mail")Formula parameters explanation:
- mailto – Recipient
- cc – CC’d recipient
- subject – Email subject line
- body – Email body
Note: The formula will use your default email program to generate email and send it. So, if you want to use Microsoft Outlook, for example, make sure it’s set as the default email program in your operating system.
Unfortunately, attachments have to be added manually when using this method. So keep that in mind if you decide to go for it.
Otherwise, with all the steps above completed correctly, you should be good to send out emails from Excel based on cell content without any macros.
So easy, right?
How to send bulk emails from Excel
With the basics out of the way, it’s time to cover some changes to the VBA script code you might want to implement to complete other email-sending tasks, starting off with sending emails to multiple recipients/email ids.
This particular task will require making just a few tweaks to our previously-used code so that it can retrieve recipients from a specified range and loop through them:
Public Sub SendMailTo()

Dim sender As String
Dim name As String
Dim address As String
Dim subject As String
Dim body As String
Dim bodyFormat As Integer

sender = "john@company.com"
name = "John"
address = "jane@company.com"
subject = "Test subject"
body = "Test body"
bodyFormat = 0

    Set oSmtp = New EASendMailObjLib.Mail
    oSmtp.LicenseCode = "TryIt" ' Here goes your license code for the software; for now, we are using the trial version

    ' Please change server address, username, password to yours
    oSmtp.ServerAddr = "smtp.example.com"
    oSmtp.UserName = "******"
    oSmtp.Password = "****************"

    oSmtp.ServerPort = 587

    ' Using TryTLS,
    ' If the SMTP server supports TLS, then a TLS connection is used; otherwise, a normal TCP connection is used.
    ' https://www.emailarchitect.net/easendmail/sdk/?ct=connecttype
    oSmtp.ConnectType = 4
    oSmtp.FromAddr = sender
    oSmtp.subject = subject
    oSmtp.bodyFormat = bodyFormat
    oSmtp.BodyText = body
    oSmtp.Asynchronous = 1

    Set RecipientsList = Range("A1:A3") 'Change this range to be the range that holds your recipient list
    For Each Recipient In RecipientsList
        With oSmtp
            .AddRecipient "", Recipient.Value, 0
        End With
        oSmtp.SendMail
    Next Recipient

    Set oSmtp = Nothing
    'Show confirmation message
    MsgBox "Emails sent successfully!", vbInformation
End Sub
How to send emails from Excel with attachments
Whether it’s a funny image or an important document, chances are, some of your emails will come with attachments. Adding the same in VBA code is quite simple and can be done by adding these lines to your code:
With oSmtp
   .AddRecipient "", Recipient.Value, 0
   .AddAttachment "C:\avatar.jpg"
End With
How to send HTML emails from Excel
Lastly, we’ll touch upon sending HTML emails from Excel, as thus far, we have focused only on plain text ones.
For the latter, when setting the email body, we used bodyFormat = 0, which now needs to be changed to bodyFormat = 1.
What also needs to be changed is the value assigned to the body property so it holds HTML code like so:
body = "<H3><B>Hi Bob!</B></H3>" & _
    "You can find my new course at this link.<BR>" & _
    "<A HREF=""http://www.course-link.com/"">Excel for dummies course</A>"
Sending emails from Microsoft Excel: is there an alternative, and should you consider it?
Although quite simple, sending emails from Excel is not super common. On the one hand, many Excel users aren’t even aware that it’s a possibility; on the other, sending from Excel doesn’t seem very advanced.
And while we can’t do much to spread the word about Excel’s email-sending capabilities, we can teach you how to connect it to a sending solution that will allow you to achieve quick delivery, monitor deliverability, troubleshoot sending issues, and do much more.
The sending solution in question is Mailtrap Email Delivery Platform which provides a stable email infrastructure with high deliverability rates by design.
Maitrap comes with two sending options – Email API and SMTP Service. And when it comes to sending from Excel, all you need to do is complete a quick and easy integration to start using the SMTP service. No lengthy forms to fill out or a bunch of validation credentials to provide!
In terms of monitoring and troubleshooting, this sending solution comes with unique capabilities, which include helicopter-view dashboards, in-depth analytics, alerts, and more.
What about the delivery time? That stands at about 1 second, meaning your emails will reach recipient inboxes just in time.
So how do you start using Mailtrap’s SMTP service in Excel? First, you sign up for a Mailtrap account.
Then, you add and verify your domain as described on this Mailtrap knowledgebase page.
Finally, with your account created and your domain verified, copy the SMTP credentials Mailtrap provides you with on the API and SMTP Integration page and include them in your VBA code following the example below:
' Please change username and password to yours
oSmtp.ServerAddr = "live.smtp.mailtrap.io"
oSmtp.UserName = "api"
oSmtp.Password = "****************"
oSmtp.ServerPort = 587

' Using TryTLS,
' If the SMTP server supports TLS, then a TLS connection is used; otherwise, a normal TCP connection is used.
' https://www.emailarchitect.net/easendmail/sdk/?ct=connecttype
oSmtp.ConnectType = 4