 Skip to Navigation


So, what’s the catch with webhooks?
Not using them nowadays would be like commuting to work on a horse. Charming? Yes, definitely, but not very efficient I’m afraid.
In this article, I explain webhooks and provide you with all the technical tidbits you need to know in order to be webhook-fluent.
What are webhooks?
Webhooks are user-defined HTTP callback functions that allow two applications to communicate with each other. They operate via the web, and refer to hooks in software that trigger actions based on specific events. Hence, the name webhooks. 🪝
Put simply, webhooks are automated messages sent from apps when something happens.
You can think of them as hotel receptionists who, when a new guest arrives (specific event), update the hotel’s records (your app) and check the guests in. Similarly, if a new user registers on your website, a webhook will tell your app, which processes the registration and updates the database.

While user registrations are a common trigger, webhooks can be triggered for other events and have more complex use cases, which I delve into a bit later in the article.
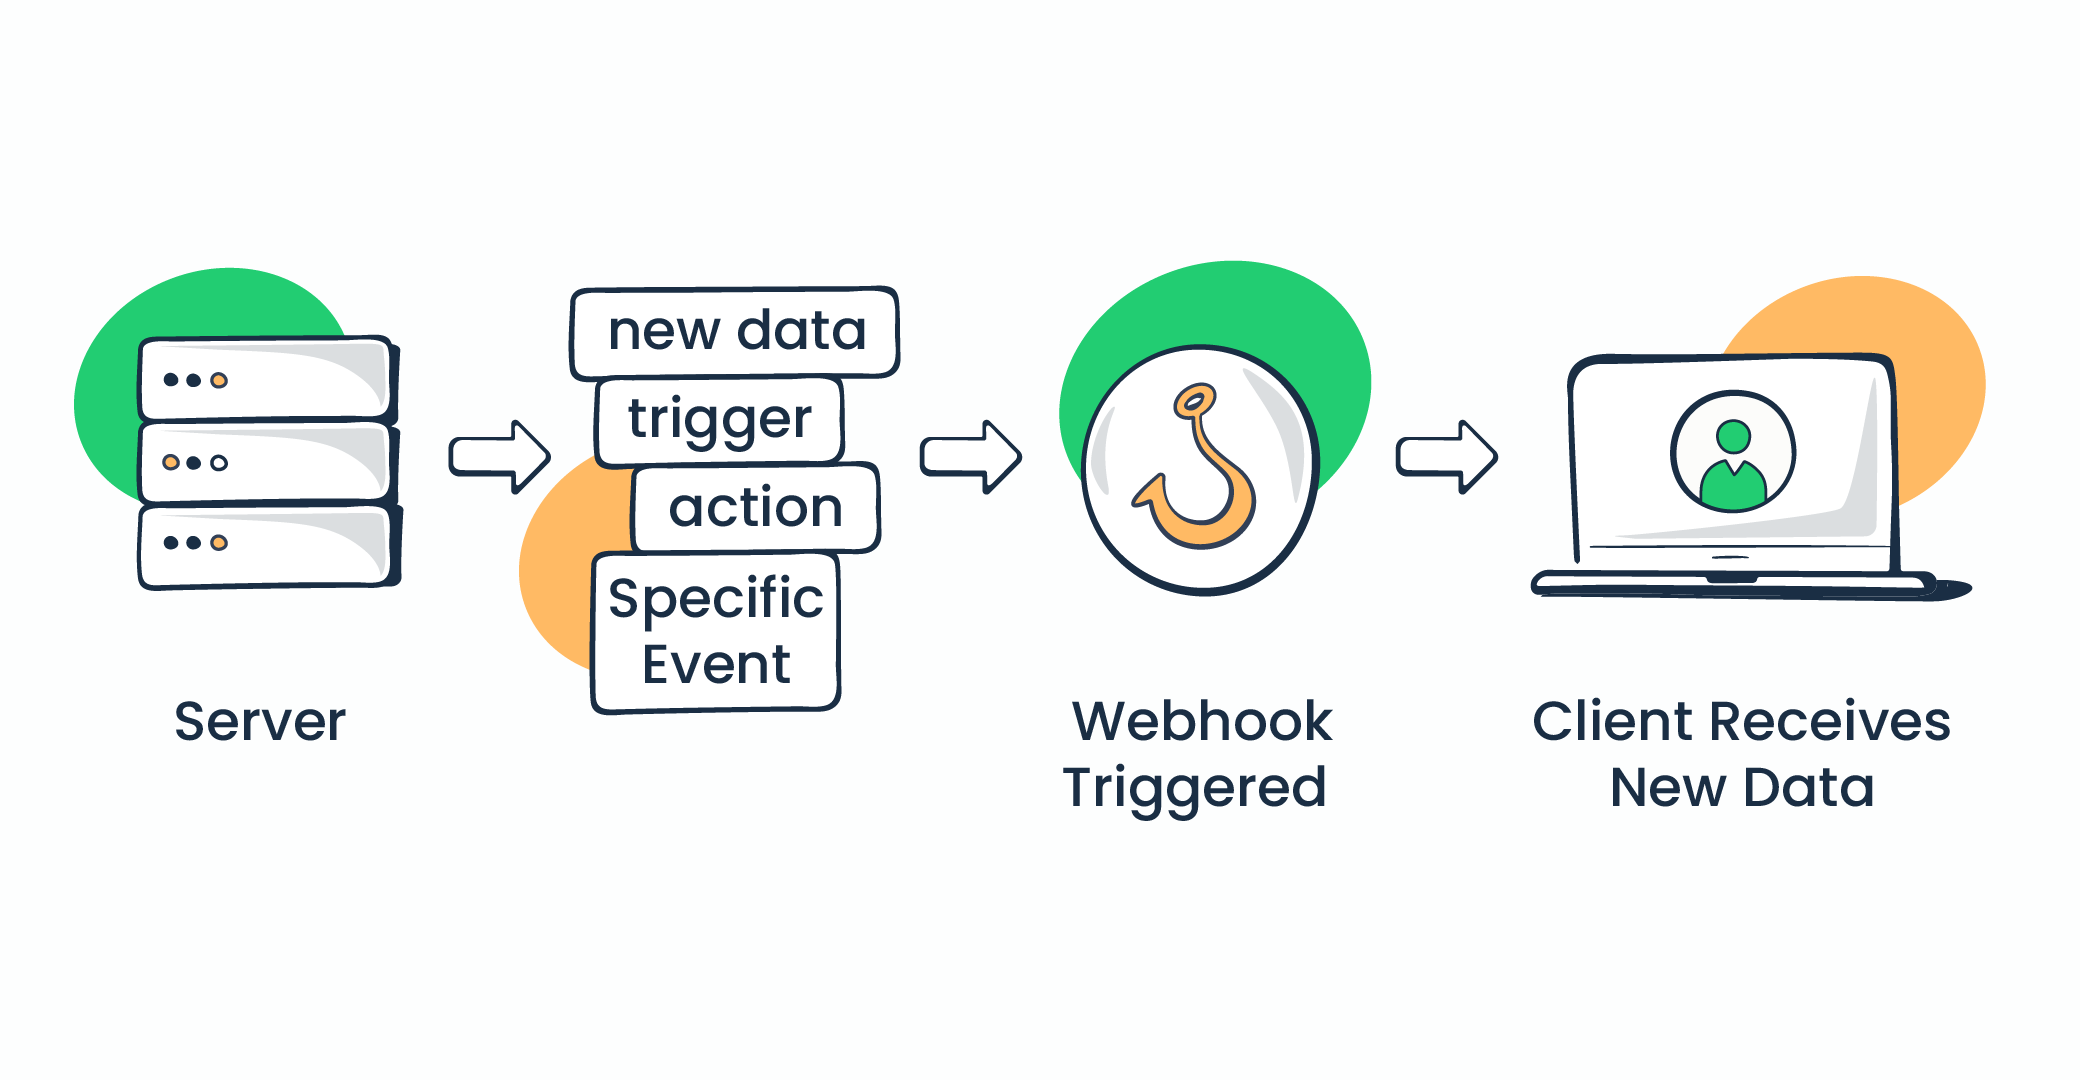
How do webhooks work?
When a specified event triggers your app (e.g., a user registers), the webhook sends an HTTP request, which consists of:
- Webhook URL – Indicates where you want to send the request.
- Body (payload) – Contains the information you want to send to another app.
- Header – Specifies how the information in the header is formatted (e.g., XML, JSON)
- Request method – The request can either be GET, POST, PUT, or DELETE
Once the app receives the HTTP request from a webhook, it sends a response that lets your trigger app know if the request is completed successfully. Once processed and added to the database, every component of the request will be available on all client connections that may need the data it contains.
And don’t worry, I’ll also show you how webhooks work in detail via practical examples in a minute.
Webhooks vs API
Both webhooks and APIs (application programming interface) are equally important for communication between software. However, although they are similar in their essence, they work in vastly different ways.
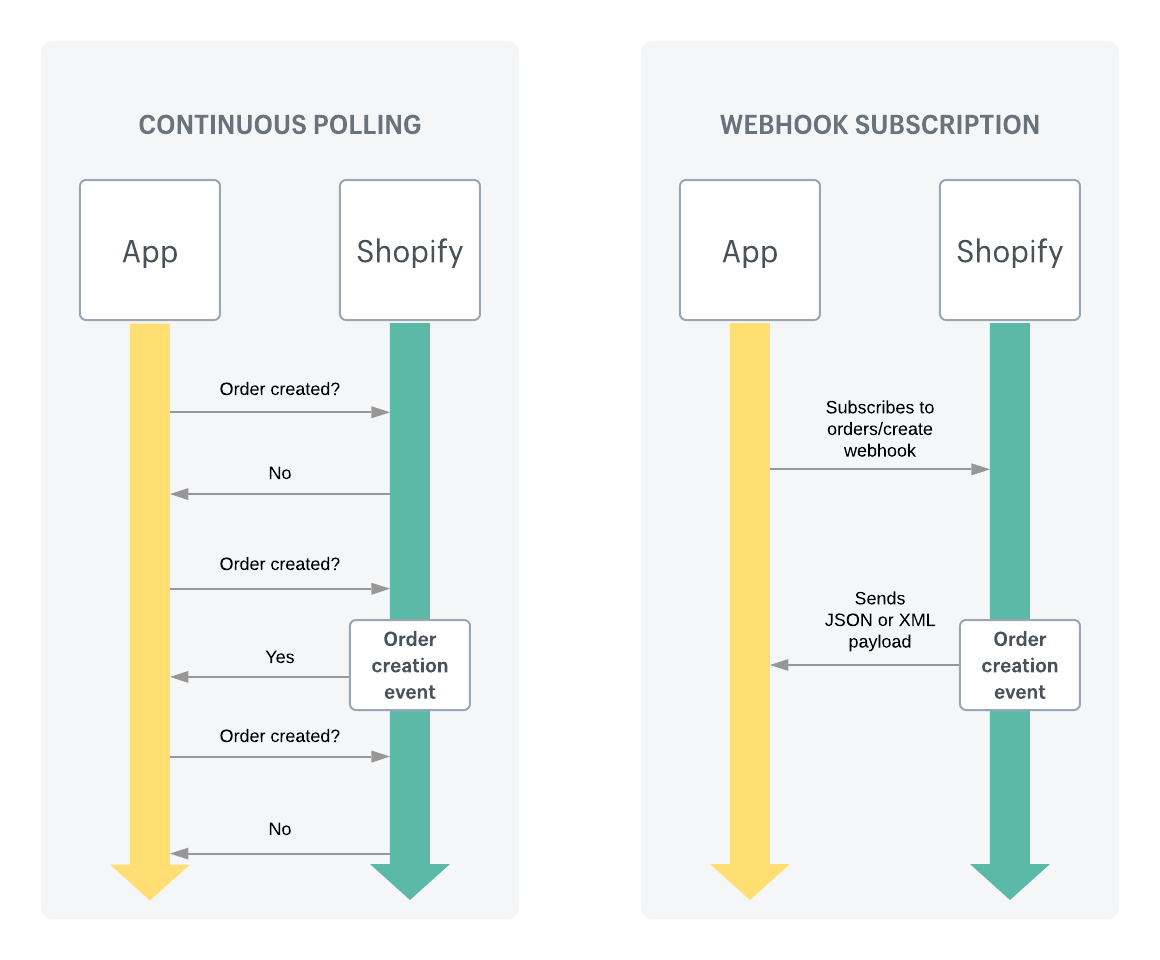
Consider APIs and webhooks as siblings, and let’s say those siblings are on a road trip, sitting comfortably in the backseat. APIs will constantly ask: “Are we there yet? Are we there yet?.” In tech terms, this is called polling, a process that asks another system, or even another API, for an update to see if something has changed.
A webhook, on the other hand, is the silent type, the kid who tells you: hey, just let me know when we arrive!” and will elegantly leave when the car stops. Again, in tech terms, this is called pushing, a process that sends, or ‘pushes’ data to a client or server when a specific event occurs. Hence why webhooks are also known as ‘push APIs’ or ‘reverse APIs’.

In a nutshell:
- APIs are a set of definitions and protocols that request information through polling, are more complex than webhooks, and are used for purposes such as retrieving data on demand.
- Webhooks are a type of event-driven APIs that send information or perform specific functions in response to triggers (e.g., button clicks, user registrations, etc.).
If you’re interested in the more technical side of this comparison, check out the table below:
| Feature | Webhooks | APIs |
| Data transfer | Event-based (push data/pushing) | Request-based (pull data/polling) |
| Initiation | Initiated by the server | Initiated by client |
| Efficiency | More efficient as it sends data only when there’s an update | Less efficient due to constant polling |
| Complexity | Simpler for the client as it only listens for incoming data | Requires constant checking by the server |
| Use case | Best for receiving real-time updates | Best for retrieving data on demand |
| Implementation | Typically more simple and scalable in real-time applications | Can be complex, depending on the frequency of data needed |
| Control | Less control and dependent on the event triggers set up on the server | High control over when and what data to fetch |
Webhooks vs WebSockets
As a user from a Stack Overflow thread would put it, webhooks and WebSockets solve different aspects of one problem in very different ways.
The main difference between the two is that webhooks are event-driven, acting only after a specific trigger. On the other hand, WebSockets keep the connection between two apps (or APIs) open, waiting for something to happen. This allows for real-time communication, updates, and synchronization between both sides of the ‘conversation.’
For a clearer picture, here’s how WebSockets work:
- Initiation – The client starts a WebSocket connection to the server.
- Open connection – Once open, the connection stays open.
- Two-way communication – Both the client and the server have the ability to continuously send messages to each other.
Okay, now it’s time for, you guessed it, another allegory! If webhooks are hotel receptionists who only wait for someone to arrive, we can think of WebSockets as some kind of special (quite inefficient) receptionists who keep the doors open all the time, scouting for guests in front of the hotel, even if it’s a very, very slow night.

In a nutshell:
- WebSockets provide a long-lived connection that allows a client and a server to send each other messages at any time. They are ideal for applications that require continuous data flow, such as financial trading platforms, live chats, etc.
- Webhooks don’t keep an open connection and only perform specific functions in response to triggers.
And of course, a tech-table for all you lovers of geeky info out there:
| Feature | Webhooks | WebSockets |
| Communication | One-way (server to client) | Two-way (bidirectional) |
| Connection type | Stateless, triggered by events | Stateful, continuous connection |
| Data transfer | Data is pushed only when specific events occurs | Continuous data flow without specific requests |
| Efficiency | Efficient for sporadic, event-driven updates | More efficient for frequent and real-time updates |
| Use case | Ideal for notifications, automated workflows, etc. | Best suited for interactive applications requiring real-time communications (e.g., chat apps) |
| Complexity | Simpler to implement for specific tasks triggered by events | More complex due to managing open, persistent connections |
| Resource usage | Lower, since connections are made only when events occur | Higher due to maintaining open connections |
| Control | Server controlled, client responds to received data | Both client and server can initiate communication anytime |
| Scalability | Scalable with less overhead per message but can face bottlenecks with very high event volumes | Scalable in terms of concurrent communications but requires more resources to manage connections |
What are webhooks used for?
Okay, now that you’re familiar with webhooks, it’s time to go over what they’re typically used for, which includes:
- Real-time notifications – If you’re running an e-commerce platform, you can use webhooks to notify your inventory management system whenever a new order is placed.
- Data synchronization – Have two or more systems in place? No problem, because webhooks can push notifications from one system to the other whenever a change happens (e.g., a user updates their profile).
- Workflow automation – You can make a webhook trigger to send a notification in Slack whenever a new issue is created in a project management tool (e.g., Jira).
- Monitoring and alerts – If you have a monitoring system in place, you can trigger your webhook to send an alert (via email, sms, etc.) to the responsible person/team whenever a server goes down.
- API communication – Besides helping apps communicate, webhooks can also be middlemen in API communication. For instance, when a transaction is completed, a payment gateway can use webhooks to notify your application so your system can respond accordingly in time.
- Third-party webhook integration – As you’ll shortly see, you can integrate webhooks with various third-party software, such as CRM systems, project management tools, e-commerce platforms, etc.
Examples of webhooks
Now, as promised, let me show you some real-world uses and examples of webhooks.
Slack
Slack allows you to modify the platform to send a notification to a channel whenever a critical error occurs in your web application. For example, when the error occurs, the webhook will send a detailed message to a specific Slack channel, with the payload containing all the details and a link to the logs.
Here’s an example of a JSON payload:
{
  "channel": "#alerts",
  "username": "ErrorBot",
  "text": "A critical error occurred in the web application:\n*Error Message:* Unexpected token in JSON\n*Timestamp:* 2024-07-25T14:30:00Z\n*Logs:* <http://example.com/logs/error-1234>",
  "icon_emoji": ":warning:"
}
And here’s a code breakdown with principles you can apply to other examples as well:
"channel":– Specifies the Slack channel where the message should be sent."username":– Sets the username that appears next to the message in the Slack channel."text":– The main content of the message that provides the information about the error."icon_emoji":– Sets the emoji that appears next to the message.
Also, did you know that you can combine Slack, Zapier, and ESPs? My colleague Piotr talks about it in his Slack email integration article.
GitHub
With GitHub webhooks, you can make a webhook send a notification to a CI/CD service to trigger a build when a new push is made to a repository.
Here’s what you’d have to do:
- Go to your repository on GitHub
- Navigate to Settings → Webhooks → Add webhook
- Enter the Payload URL of your CI/CD service (e.g., Jenkins)
- Select application/json as the Content type
- Choose Just the push event for the event to trigger the webhook
- Click Add webhook
Then, you need to set up a new job to handle builds in your CI/CD service and configure it to listen for incoming webhooks from GitHub. And finally, parse the incoming JSON payload to extract relevant information.
JSON example:
{
  "ref": "refs/heads/main",
  "before": "9c54a35c4d76d567bb5e4b2387bd2c5b4bc1c8d2",
  "after": "de8251ff97a4b5b2e8ad488ebcbd4b12c8d8b987",
  "repository": {
    "id": 123456,
    "name": "example-repo",
    "full_name": "user/example-repo"
  },
  "pusher": {
    "name": "user",
    "email": "user@example.com"
  },
  "commits": [
    {
      "id": "de8251ff97a4b5b2e8ad488ebcbd4b12c8d8b987",
      "message": "Fixed bug in API",
      "timestamp": "2024-07-25T14:30:00Z",
      "url": "https://github.com/user/example-repo/commit/de8251ff97a4b5b2e8ad488ebcbd4b12c8d8b987"
    }
  ]
}
Stripe
Now, let’s say you want to update the order status when a payment is successful. Who do you call? Stripe and webhooks, of course!
Here’s how the process would look like:
- Log in to Stripe and navigate to Developers → Webhooks
- Click Add endpoint
- Enter the Endpoint URL of your server
- Select the events you want to listen to (e.g., charge.succeeded)
- Click Add endpoint
Then, you’d set up a route in your server to listen to incoming HTTP POST requests from Stripe, verify the Stripe signature, and parse the incoming JSON payload to extract new data.
JSON example:
{
  "id": "evt_1HUz9LFbuFVVSY1hKwJMcHmy",
  "object": "event",
  "api_version": "2020-08-27",
  "created": 1599677774,
  "data": {
    "object": {
      "id": "ch_1HUz8zFbuFVVSY1hkWfyJMWP",
      "object": "charge",
      "amount": 2000,
      "currency": "usd",
      "description": "Payment for order #1234",
      "status": "succeeded"
    }
  },
  "livemode": false,
  "type": "charge.succeeded"
}
With this setup, your server would process the payload and event type and elegantly update the order status in your database.
Moreover, you can even send a confirmation message with the payment details to the customer.
Shopify
Okay, so you’ve successfully set up webhooks to update orders, but how do you notify your packaging/delivery service that a new order has been created? It’s simple—set up a webhook in Shopify.
And here’s how you can set them up:
- Log in to your Shopify admin panel
- Navigate to Settings → Notifications
- Scroll down to Webhooks and click Create webhook
- Select Event as Order creation
- Enter the URL where you want to receive data
- Choose JSON as the format and click Save webhook
The next few steps will sound familiar: set up a route in your server to handle POST requests from Shopify and (you know it by now) parse the incoming JSON payload to extract data:
{
  "id": 820982911946154508,
  "email": "user@example.com",
  "closed_at": null,
  "created_at": "2024-07-25T14:30:00-04:00",
  "updated_at": "2024-07-25T14:30:00-04:00",
  "number": 234,
  "note": null,
  "token": "1234567890abcdef",
  "gateway": "credit_card",
  "test": false,
  "total_price": "298.50",
  "subtotal_price": "298.50",
  "total_weight": 0,
  "total_tax": "0.00",
  "currency": "USD",
  "financial_status": "paid",
  "confirmed": true,
  "total_discounts": "0.00",
  "total_line_items_price": "298.50",
  "cart_token": null,
  "buyer_accepts_marketing": true,
  "name": "#1001",
  "total_price_usd": "298.50",
  "line_items": [
    {
      "id": 466157049,
      "variant_id": 39072856,
      "title": "Awesome Product",
      "quantity": 1,
      "price": "199.00",
      "sku": "12345",
      "variant_title": null,
      "vendor": "Awesome Vendor",
      "fulfillment_service": "manual",
      "product_id": 12345678,
      "requires_shipping": true,
      "taxable": true,
      "gift_card": false,
      "name": "Awesome Product",
      "variant_inventory_management": null,
      "properties": [],
      "product_exists": true,
      "fulfillable_quantity": 1,
      "grams": 0,
      "total_discount": "0.00",
      "fulfillment_status": null
    }
  ]
}
Mailtrap
I know, I know, this chapter seems like your typical CTA section where I ask you to buy something from us but trust me, I won’t. Providing a Mailtrap webhook example seemed only logical as I’m well acquainted with the platform.
Anyhow, let’s imagine you want to make your Laravel app send emails and keep an eye out on key deliverability metrics. In such a case, you could use Mailtrap webhooks, which will provide you with information on:
- Deliveries
- Bounces
- Unsubscribes
- Spam complaints
- Rejections
- Soft bounces
- Suspensions
- Opens
- Clicks

And here’s a JSON example from our webhook documentation:
{
  "events": [
    {
      "event": "delivery",
      "timestamp": 1728669700,
      "sending_stream": "transactional",
      "category": "Password reset",
      "custom_variables": {
        "variable_a": "value",
        "variable_b": "value2"
      },
      "message_id": "1df37d17-0286-4d8b-8edf-bc4ec5be86e6",
      "email": "receiver@example.com",
      "event_id": "bede7236-2284-43d6-a953-1fdcafd0fdbc"
    },
    {
      "event": "delivery",
      "timestamp": 1728669700,
      "sending_stream": "transactional",
      "category": "Email confirmation",
      "custom_variables": {
        "foo": "bar",
        "baz": 123
      },
      "message_id": "ca7974af-7212-42aa-99fb-cc4742d0658b",
      "email": "another@example.com",
      "event_id": "657b8544-6a95-4c47-997f-6e47922a5052"
    }
  ]
}
To learn how to set them up, you can simply follow our in-depth knowledge base article.
Also, don’t forget to check out our dedicated video:
When shouldn’t you use webhooks?
As with everything in life, even webhooks have their downsides. So, here are some cases when you shouldn’t use them:
- High-frequency event triggers – Webhooks can become overwhelmed if your app generates a large number of events in a short period, which can lead to performance issues or, even worse, data loss.
- Solution: Batch processing, message queues
- Unreliable internet connection – Like hotel receptionists needing coffee to stay awake during long night shifts, webhooks need a stable internet connection to be reliable middlemen between the sender and the receiver. Without a stable connection, you risk facing data loss or delayed processing.
- Solution: Regular polling, message queueing system
- Handling sensitive data – If you’re handling sensitive data, you should be aware that webhooks can pose a security risk without any encryption or authentication system in place.
- Solution: HMAC verification, IP whitelisting, SSL/TLS, authentication tokens, etc.
Lastly, I’d also suggest you pass webhooks if you think you don’t need to act on the data immediately. In such a case, you’d be better off using batch processing or simply regular polling.
Moreover, webhooks don’t support bi-directional syncs or HTTP action methods such as PATCH or DELETE. For these purposes, APIs would be your best bet.
Wrapping up
And there you have it; now you know what the catch is with webhooks!
If you want to cement your knowledge, why not try out webhooks yourself and learn in practice by trial and error? For this, I recommend following our step-by-step tutorial on using webhooks.
Bonus tip: you can test webhooks on the conveniently named Webhooks.site.
Up for more reads? I found the original article about webhooks from 2007, written by their creator, John Lindsay, super interesting. You can also visit the Mailtrap blog and read all things email, as well as the Mailtrap YouTube channel to check out videos on related concepts.

