
Many email marketing campaigns have an element of mass emailing to them. Be it a campaign to boost conversions and sales, generate leads, follow up with email list subscribers, or simply do cold email outreach, mass emails (also known as bulk emails) are what will be used to spread the campaign’s main message.
But how do you send mass email in Gmail, the widely available email service? Are there limitations and alternatives? These and other questions will be covered in detail in this article.
So keep on reading if you want to learn more!
How to send mass email in Gmail
A large majority, if not all, of you reading this article have sent individual emails through Gmail before. And as you know, this isn’t a very complex process or one that consists of many steps. The same applies to mass email sending.
Step 1 – Create multiple Gmail accounts (optional)
Sending emails through Gmail comes with certain limitations, which we’ll discuss more later in the article. One of those limitations is the daily sending quota. If you anticipate that you’ll exceed this quota but still don’t want to pay to upgrade your Gmail account, one way to go about things is to create multiple Gmail accounts.
Do keep in mind that the creation of multiple accounts is not a foolproof method and that you might get suspended by Google if it comes to light that the sending tactics you are using are against their rules.
Note: Regardless of whether you are using one or multiple accounts to deliver your emails, as a sender, you have to comply with certain requirements. Check out the latest ones issued by Google and Yahoo.
Step 2 – Add your contacts
If you plan on mass emailing the same contacts frequently and you want to make things a bit more manageable for yourself, it’s recommended that you add your contacts into Gmail either manually or through importing.
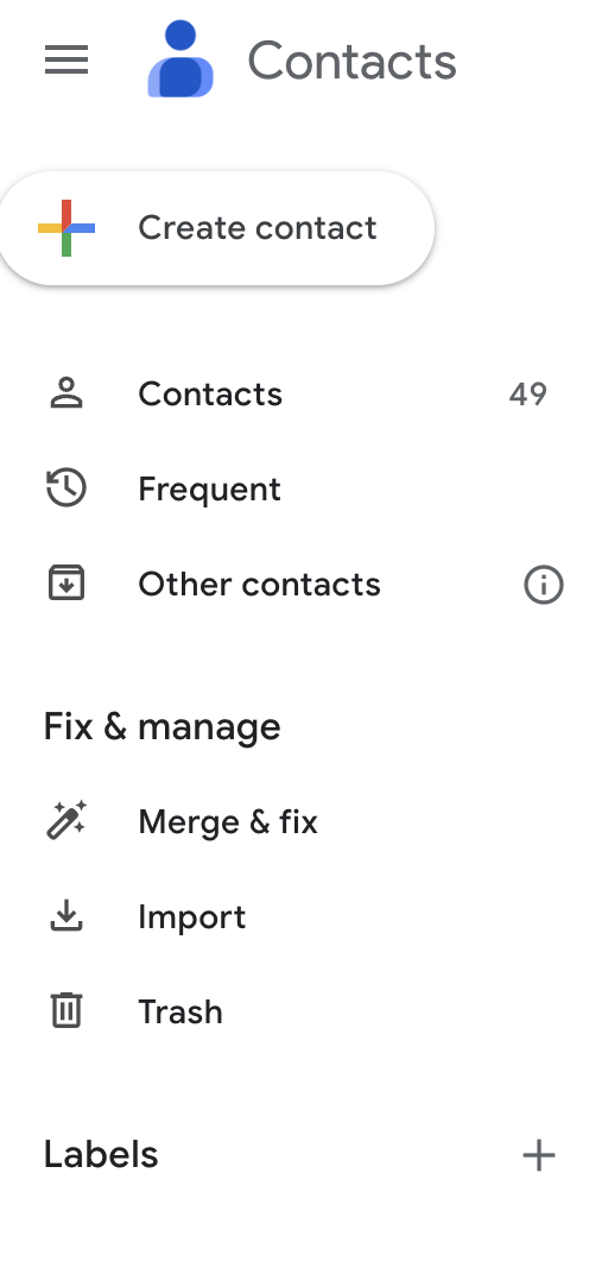
For those that choose to go the manual route, you’ll first need to click on the Google Apps icon in the top right corner of the Gmail dashboard and then on Google Contacts.
There, click on Create contact and enter as much information as necessary for each contact, such as their name, company, birthday, etc.

When importing, you’ll be able to add more than one contact at a time, but they will have to be stored in a CSV file or vCard file beforehand.
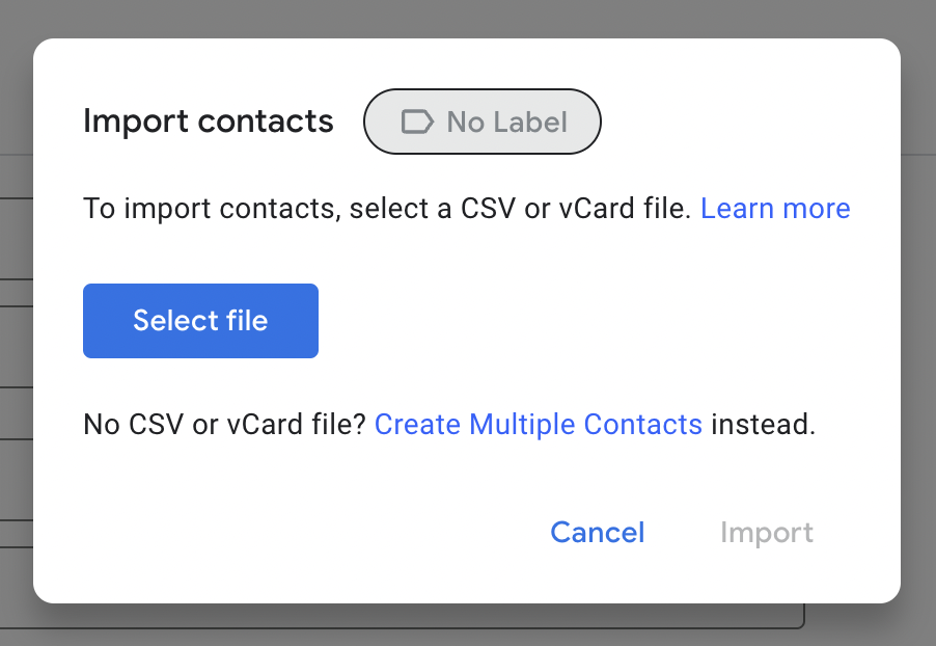
Once the data has been imported, you’ll be asked to review any duplicates found and then finalize the process.
Step 3 – Group your contacts using labels
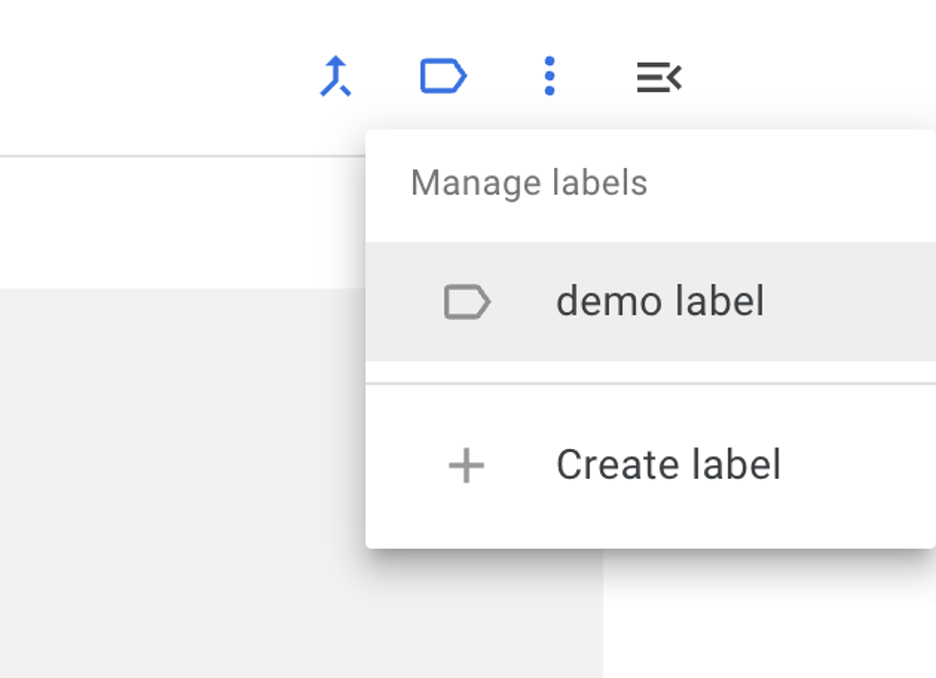
To group specific contacts together in Gmail, using labels is the way to go. The option to create them should be on the left-hand side of the Contacts page.
Once clicked, it will ask you to name your label. And after you’ve completed that step, you can head over to your list of contacts and, using the three dots icon assign the label to the contacts of your choice.
To assign a label to multiple contacts at once, select the contacts and use the Manage labels icon located in the top-right corner.
Step 4 – Compose the email
Email composing will be a different process for each one of you reading this. For that reason, we won’t go into too much detail in this step, only the basics.
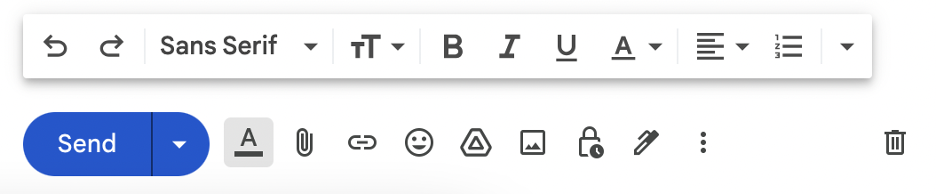
To start composing, in the Gmail dashboard, click on Compose. Then, in the small compose window that opens, draft the subject line and email message body.
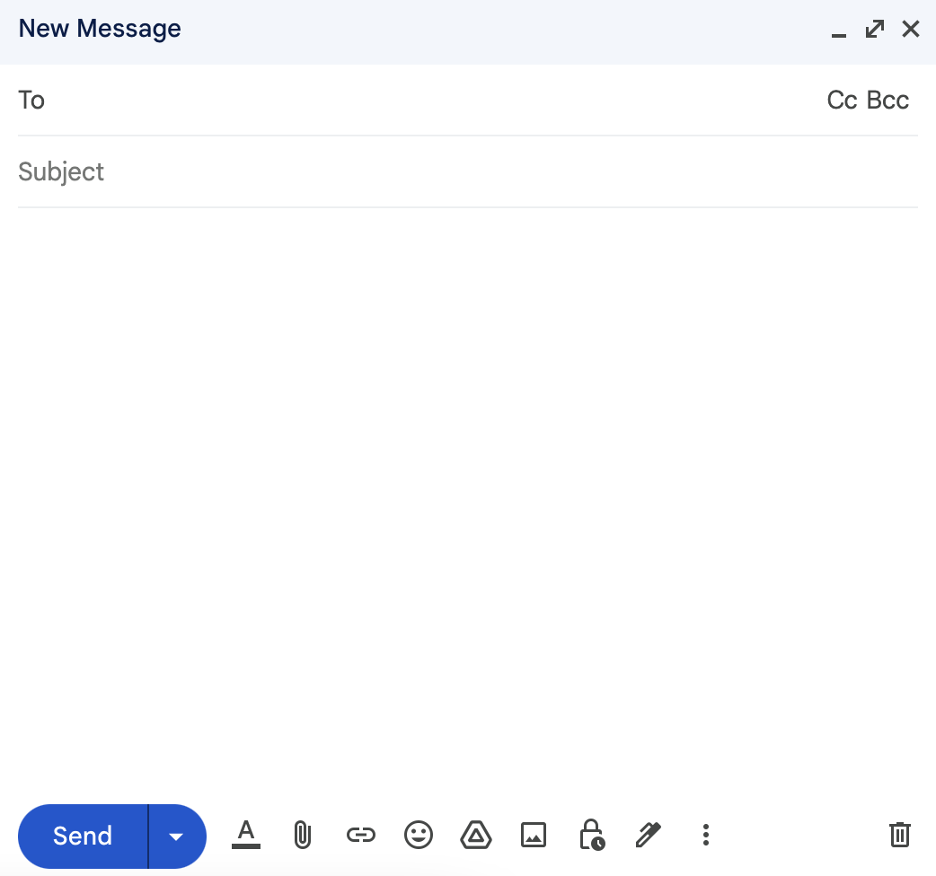
Also, if necessary, use the formatting options available in the horizontal menu next to the Send button. Through this menu, you can also add images, attachments, emojis, and more.
Another way you can start composing emails is through the Send email button on the Contacts page, available to you once you select all your contacts or at least five.

Step 5 – Select the email recipients and send your email
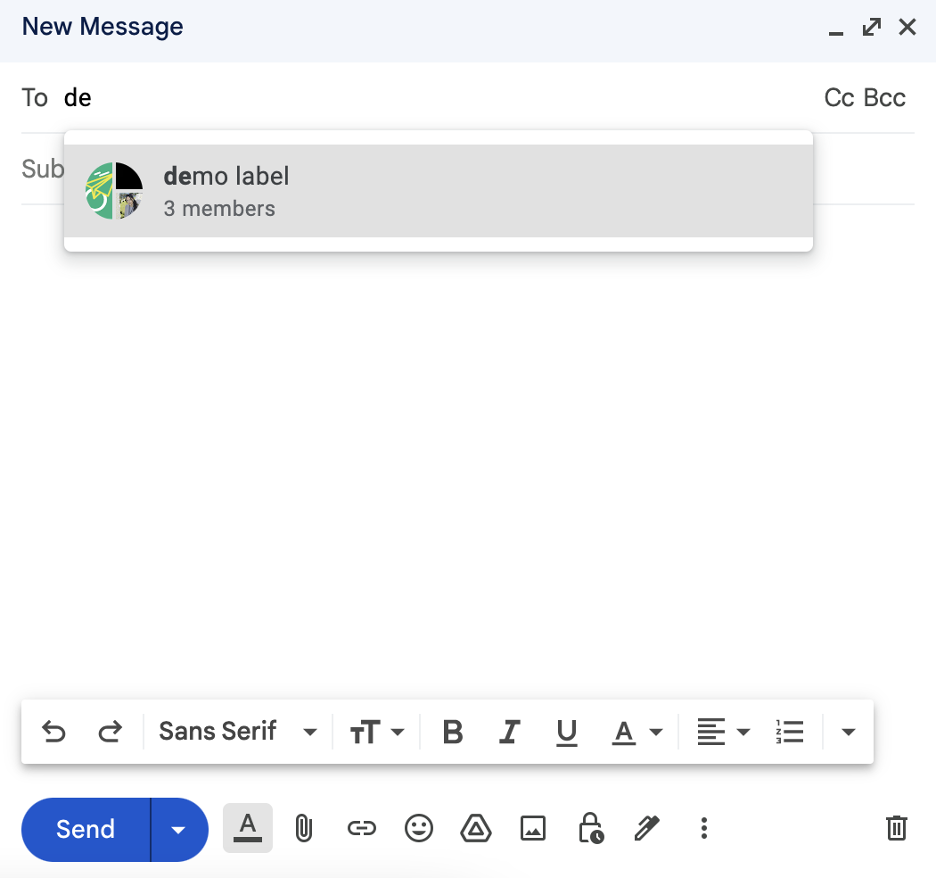
The last step you need to complete before sending off the mass email campaign is entering the recipients. You can do this by pasting a list of addresses one by one into the TO field or entering the name of the label your recipients have been assigned.
If you want to send a test email, simply put yourself as the only recipient and then view the message in your Gmail inbox.
With that out of the way, simply click Send for instant sending or click the arrow next to the Send button for scheduled sending.

How to send mass email in Gmail without showing addresses
To protect the privacy of the recipients and prevent the exposure of their information to others, hiding addresses when sending mass emails is a must. In Gmail, this can be done with the help of the BCC filed, and here is how:
First, you begin to compose the new email with the, you guessed it, Compose button.
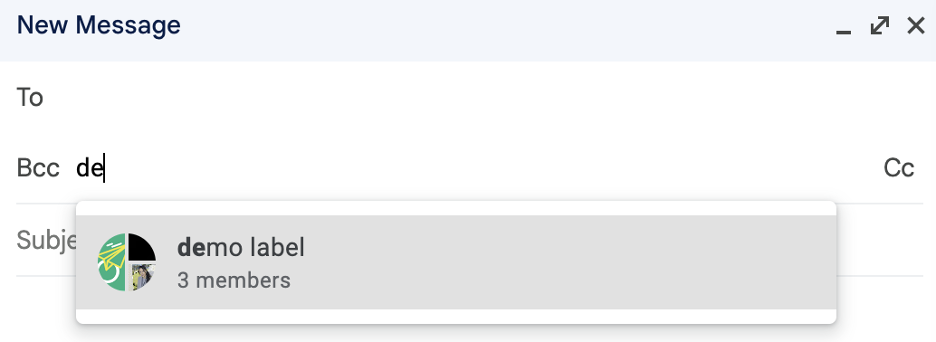
Then, instead of the TO field, use the BCC one to paste the list of recipient addresses.

Once you’ve done that, give everything a review and make sure no addresses accidentally end in the TO or CC field. If everything looks good, you can then send mass email and hide recipients.
How to send mass email in Gmail using the BCC field and labels
If you want to send mass emails without showing email addresses, but you don’t feel like entering them individually, you can use the help of Gmail labels.
The process will essentially stay the same as in the “How to send mass email in Gmail without showing addresses” section, with the only difference being in the step where you add the recipients.
Here, instead of adding recipients manually in the BCC field, you will just enter the label name.
How to send mass email in Gmail using spreadsheets
When sending mass emails from Gmail and other platforms, people often wonder if they can do so using a spreadsheet.
Google Sheets, as well as Excel spreadsheets, are the place where huge lists of recipients can be conveniently stored along with their information. Adding to the usefulness of spreadsheets in the email-sending process is the fact that by using them, you can create personalized emails. Cool, right?
Let’s see what it all looks like in practice!
To begin, you’ll need to create a copy of a sample Gmail/Sheets Mail Merge spreadsheet. This spreadsheet, as well as the script attached to it, is what will enable us to run a mail merge with Gmail and Google Sheets.

Once copied, the spreadsheet containing sample data should open.
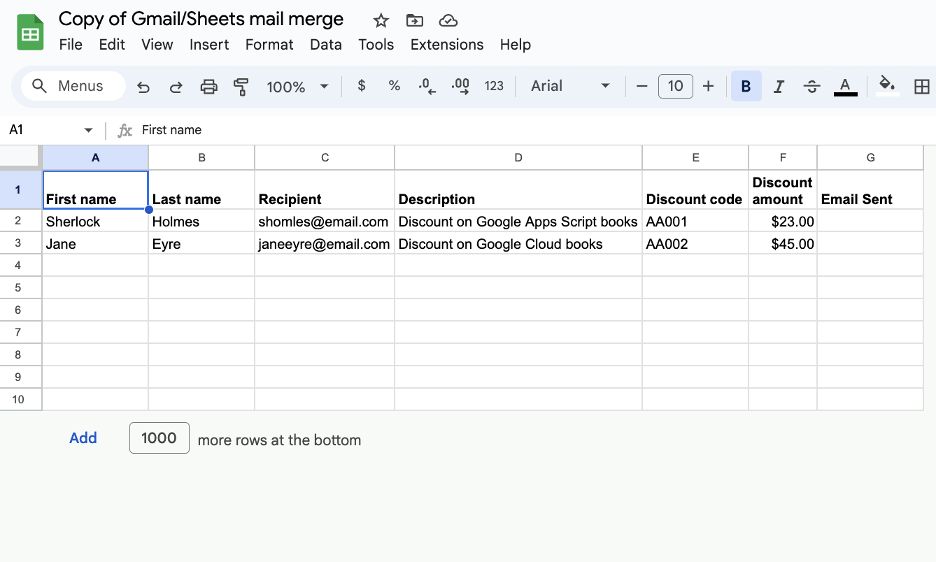
Now, to set up the spreadsheet for mass email sending, delete the sample data and modify the names of the columns, and/or add or remove any unnecessary columns. Do keep in mind, though, that the columns Recipient and Email Sent should stay as they are, as the Mail Merge script specifically looks for them.
The Recipient column is where you’ll insert the recipient addresses, and the Email Sent column is what will be populated by the script upon successful email sending.
With the columns modified, added, or deleted as necessary, fill out the sheet with recipient information, row by row.
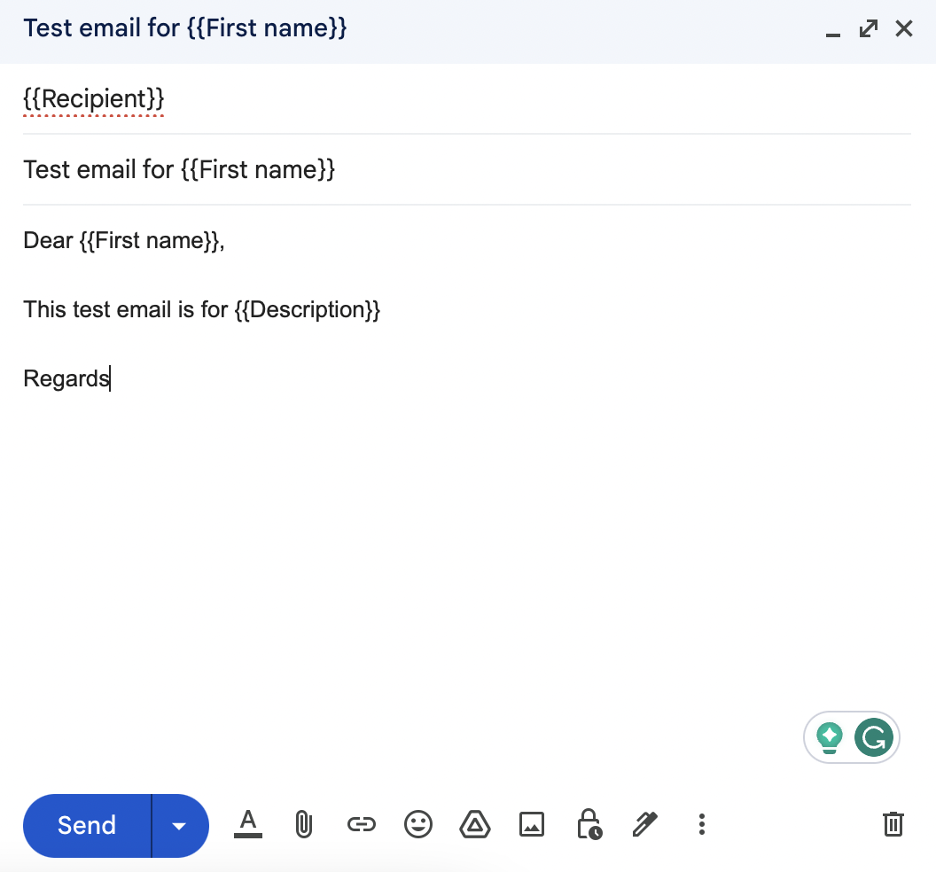
To pull the data from the spreadsheet into Gmail, compose the email, and for each piece of recipient information you want to include, use double curly brackets with the name of the column in between.
Examples:
- {{First Name}}
- {{Price}}
For the TO field, don’t forget to use {{Recipient}}. And for the subject line, the use of the double curly brackets and column name combination is also allowed.
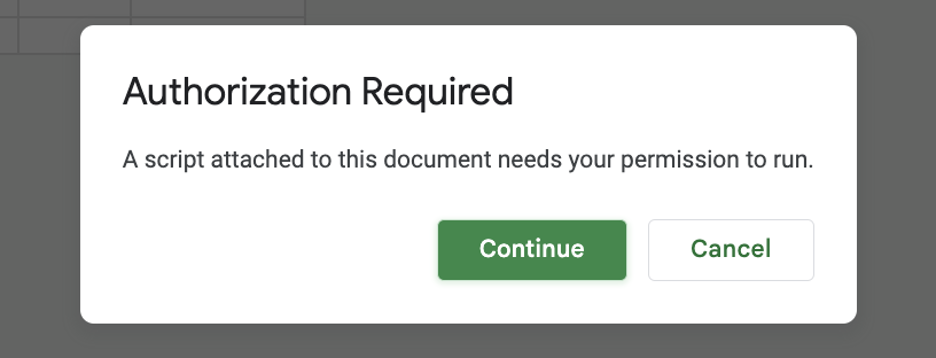
After your email is ready, don’t send it; instead, just copy its subject line and go back to the spreadsheet. At the top of the spreadsheet there will be an option called Mail Merge, which, once clicked on, will show another option labeled Send Emails.

Click on it and give the Mail Merge script the authorization it needs.
This is just a precautionary measure and shouldn’t alarm you, as the spreadsheet and script are provided by Google.
With authorization given, click on Send Emails again, paste the email subject line, and click OK. This will cause the script to run and send the mass email, which you can double-check by looking at the Email Sent column of the spreadsheet.

If you want to use the advanced features of the Mail Merge script, head to Extensions and then Apps Script. There you will see the entire script code and can change things such as the BCC or CC recipient, sender name or alias, and reply-to address, as well as enable sending from a no-reply email address or using attachments.
How to send mass email in Gmail with different attachments
Personalized mass emails can go further than just the email content. For instance, in your mass emails, you can send a personalized attachment to each recipient.
To do so, you’ll again need a spreadsheet populated with recipient information. Only this time, you don’t need to copy a Google-created one but can instead use a spreadsheet of your own containing the columns you need.
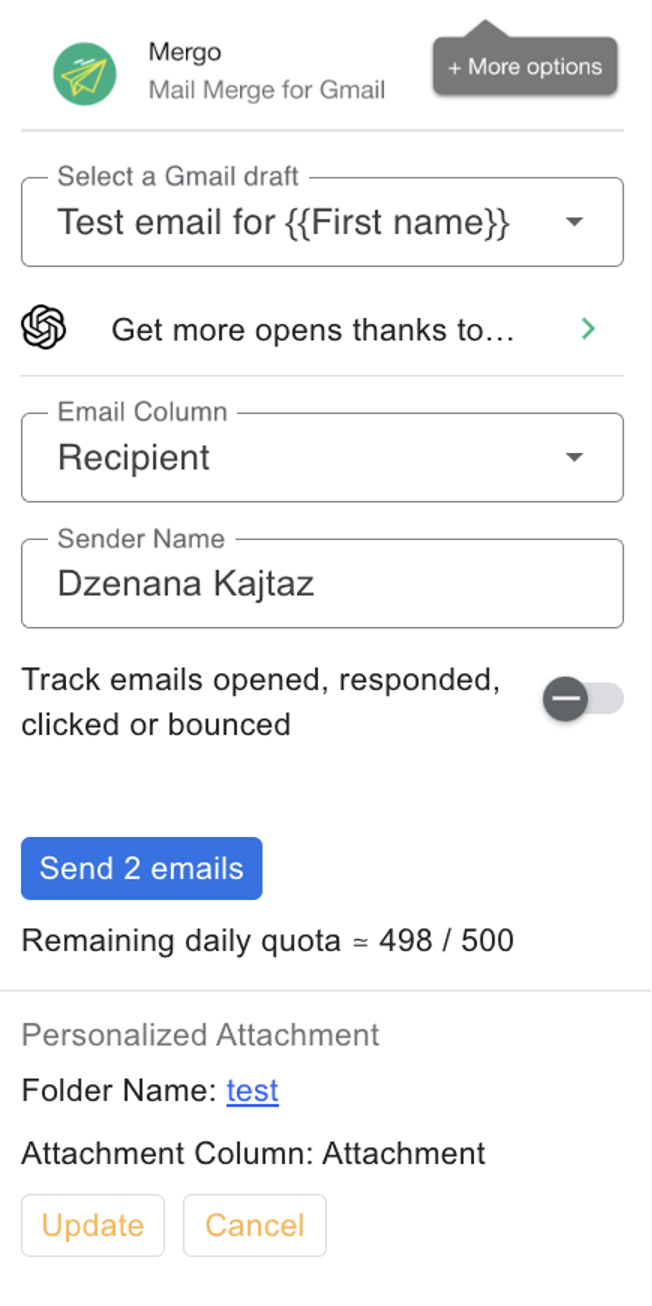
Along with the spreadsheet, you’ll also need Mail Merge features provided by an add-on called “Mergo mail merge”. This add-on can be installed by going to Extensions, Add-ons, and Get add-ons.

Post add-on installation, refresh the spreadsheet, and you should see the Mergo Mail Merge icon on the right-hand side.
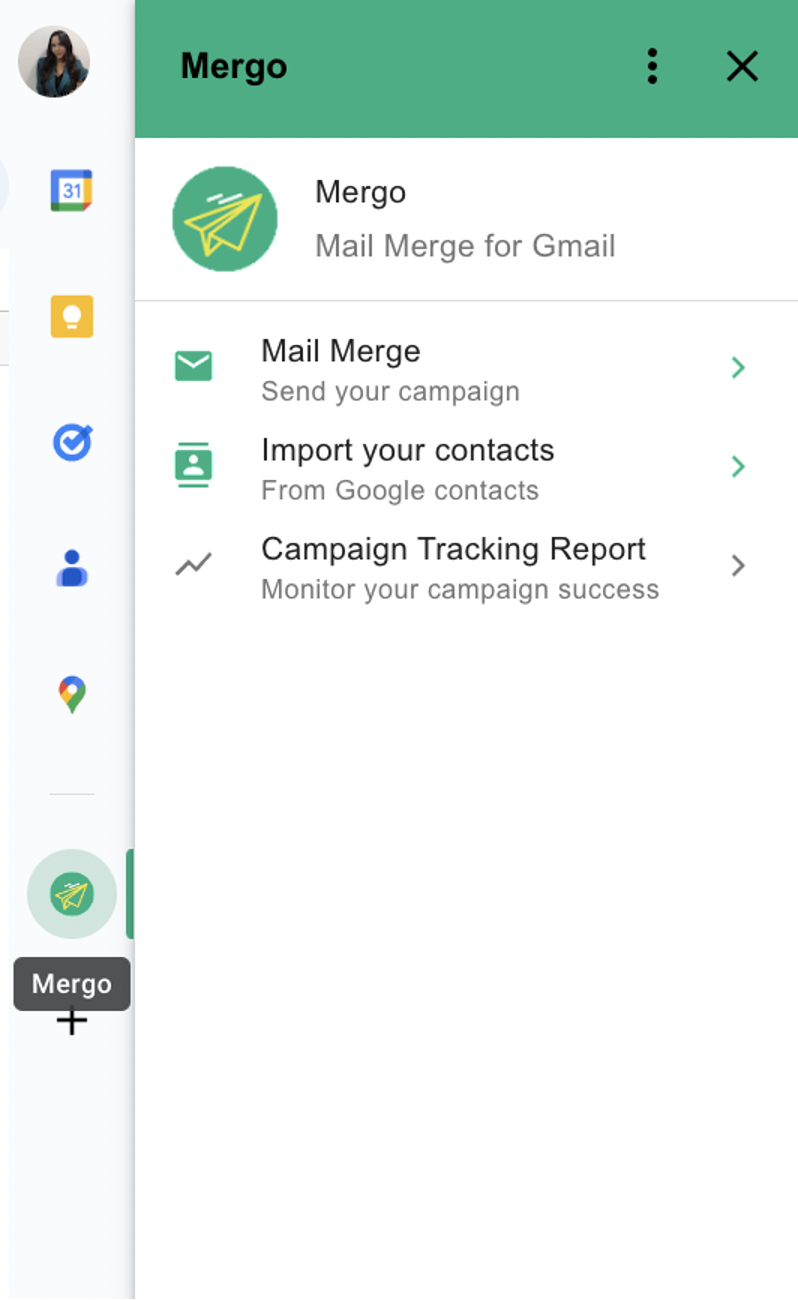
Click on the icon and then on Mail Merge. And in the new window that opens, select the email draft you composed (email copy containing double curly brackets and column names) and then click on the three dots icon -> Add personalized attachments.
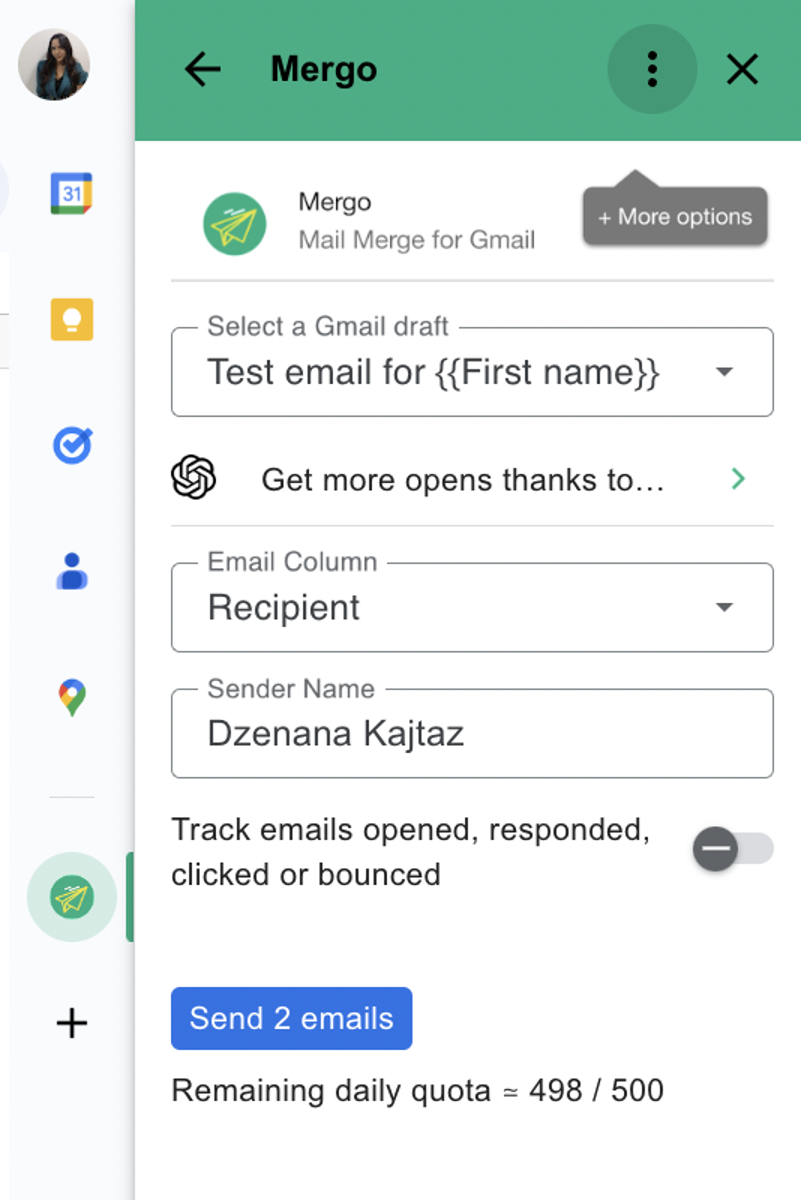
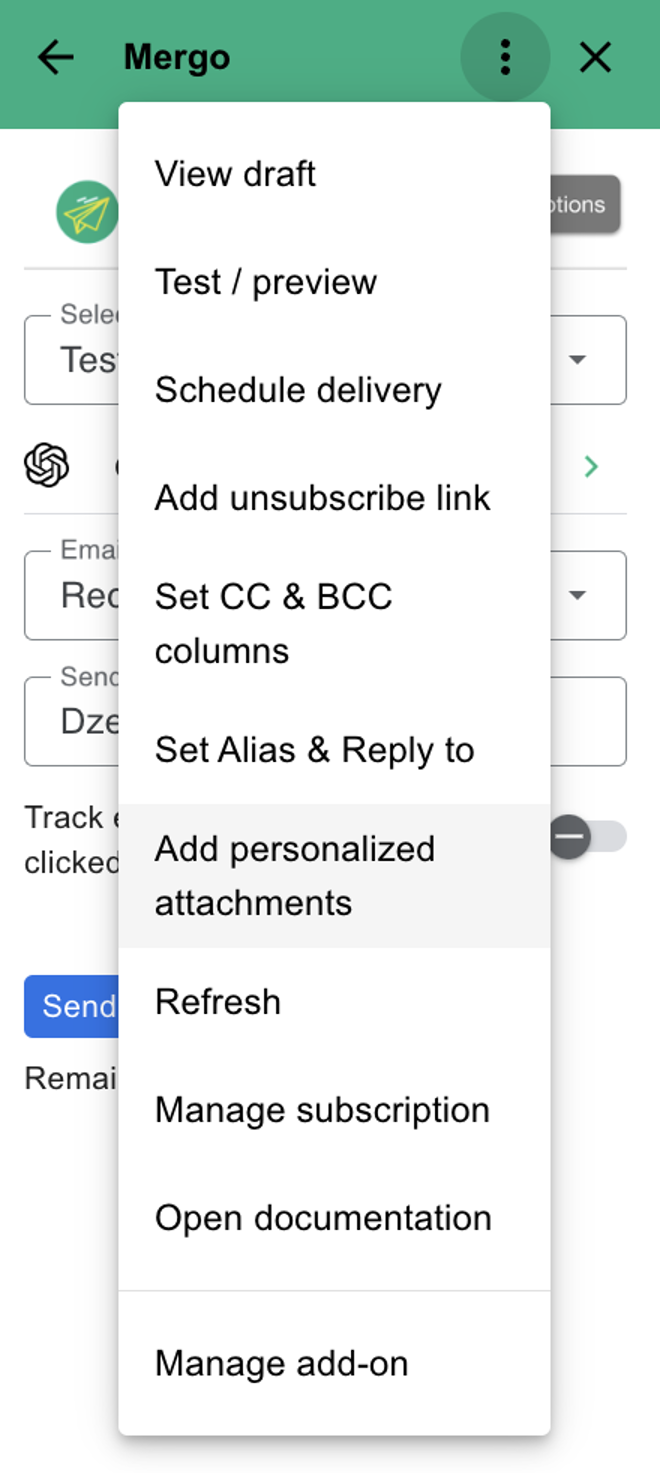
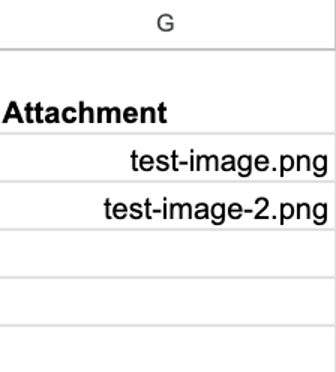
This should allow you to connect the Google Drive folder containing your attachments and define the name of the attachment column in your spreadsheet.
Now, to actually get the attachments from the Google Drive folder, copy and paste the full names (file extension included) of the different attachments you want to send.
Lastly, simply send off the emails using the button in the Mergo Mail Merge window.
Do keep in mind that the add-on might ask you to give authorization to access your data. This, again, is just a precautionary measure.
Possible limitations when sending mass emails in Gmail
Earlier in the article, we mentioned that Gmail users who want to do mass email sending face certain limitations. To get you prepared for the hiccups, these limitations can cause, we’ll now go over each one.
A daily maximum of 500 emails sent
If you decide to stick with a standard Gmail account, you’ll be faced with a limit of 500 email/day and the same limit on the number of recipients. And although the limit is quite low and won’t be enough for most businesses, using a standard Gmail account is free of charge.
For those willing to spend a bit on having a higher recipient and daily sending limit, using Google Workspace (formerly known as G Suite) is an option. A Workspace account will come with a price as well as a limit of 2000 recipients and 2000 emails/day.
Poor deliverability
One of the biggest drawbacks of sending a mass email using Gmail is the likelihood of your account being disabled or flagged and, thus, your emails ending up in the spam folder.
This could happen for a number of reasons, including not following sender guidelines, hitting the sending limit with a very young Gmail account, etc.
Worried about landing in spam? This video explains how to get bulk emails back out of spam and what to do to avoid spam filters when sending at scale.
Lack of personalization
Even though some level of personalization is possible when sending mass emails from Gmail, thanks to things such as Mail Merge, this personalization is nothing compared to what can be done using dedicated mass email tools.
Poor scheduling and automation
Again, in comparison to dedicated mass email-sending tools, Gmail has trouble keeping up in terms of email scheduling and automation. Only very basic options are available, as seen in the email-sending steps we covered earlier in the article.
Lack of email tracking and analytics
Once you send off your mass emails with Gmail, tracking their performance metrics is not really available through the Gmail dashboard as this email service doesn’t come with the necessary tracking or reporting features.
Without this readily available to you, knowing if your emails are getting delivered, opened, and engaged with or if your contacts are hitting the unsubscribe link at an alarming rate will not be possible, and thus you won’t be able to make the necessary improvements.
Minimal design options
Gmail is great for sending and receiving emails, but designing the same is not its biggest strength. Yes, some basic HTML email templates with a call-to-action here and there can be created using it, but anything more visually engaging than that will not be doable.
But, it should be noted that there is a range of third-party tools that integrate with Gmail.com, using which you can create complex designs and then import them.
Is there an alternative to sending mass emails with Gmail?
After listing all those limitations, it’s only fair we tell you what alternatives you can use if you want a smoother mass email-sending experience than what Gmail can offer you.
In essence, you have two options. The first is using a dedicated email service provider, and the second is using email marketing services/platforms.
For both, you have plenty to choose from on the market. And all options are designed to handle large-scale email campaigns, as well as provide lots of features such as an email builder, email contact list management, email deliverability management, reporting, personalization, and more.
Let’s explore some examples!
Bulk email stream feature:
Mailtrap’s Bulk Email Stream is a feature using which you can send bulk emails at the price of transactional. What’s more, as the Mailtrap Email Delivery Platform supports marketing and transactional emails, you’ll be able to cover all your sending needs with one platform. And no, your deliverability won’t suffer as you will have separate sending streams.
Are there other benefits to Mailtrap’s Bulk Email Stream? Yes, plenty, including:
- Smooth and secure setup
- The option to choose between an email API and an SMTP service
- Actionable in-depth analytics,
- 30-day email logs
You can try out this feature today by signing up for a free Mailtrap account!
Email service providers:
- Brevo (previously Sendinblue)
- Amazon SES
- Mailchimp
- Mailjet
- Mailgun
- Postmark
- SMTP2GO
- Elastic Email
- SendPulse
- Mailmodo
Email marketing platforms:
- Mailchimp
- Constant Contact
- AWeber
- ConvertKit
- GetResponse
- ActiveCampaign
- HubSpot
- Brevo (previously Sendinblue)
Depending on the option you go for, you can expect to enjoy even very advanced features like those helping you ensure compliance with mass email sending rules and regulations, tracking performance (open rate, bounce rate, click-through rate, etc.), and so on. But do keep in mind that any Gmail alternative you go for should also have a short learning curve in order for you to get to sending as soon as possible and a price that won’t break your budget while still giving you every functionality that you need.
Still looking for a Gmail alternative? We cover some popular ones in detail in this video:
Wrapping up
Mass email sending, whether it’s done with Gmail or another tool, can be daunting at first. Let’s face it; nobody wants to be the one making an error when the email campaign being worked on is sent to hundreds or even thousands of recipients.
Luckily, thanks to step-by-step guides like this one, you can easily learn how to send mass email in Gmail and send all of those mass/bulk email campaigns you included in your email marketing strategy in no time!