 Skip to Navigation


In this step-by-step article, I’ll show you how to send HTML emails in Go using both an SMTP server and an email API.
As the sending solution, I’ve used Mailtrap SMTP/API for its reliability and ease-of-use.
The code snippets I provide are compatible with Go 1.13 and above.
Send HTML email in Go using SMTP
To start sending HTML emails from your Go project via SMTP, follow these steps:
1. Install Gomail
As Go can’t leverage an SMTP server on its own, I suggest using Gomail, a community-driven package that’s super simple to use.
To install it, run the following command in your preferred code editor:
go get gopkg.in/mail.v22. Integrate Mailtrap SMTP with your app
Next, let’s obtain our SMTP server credentials and integrate them with our app.
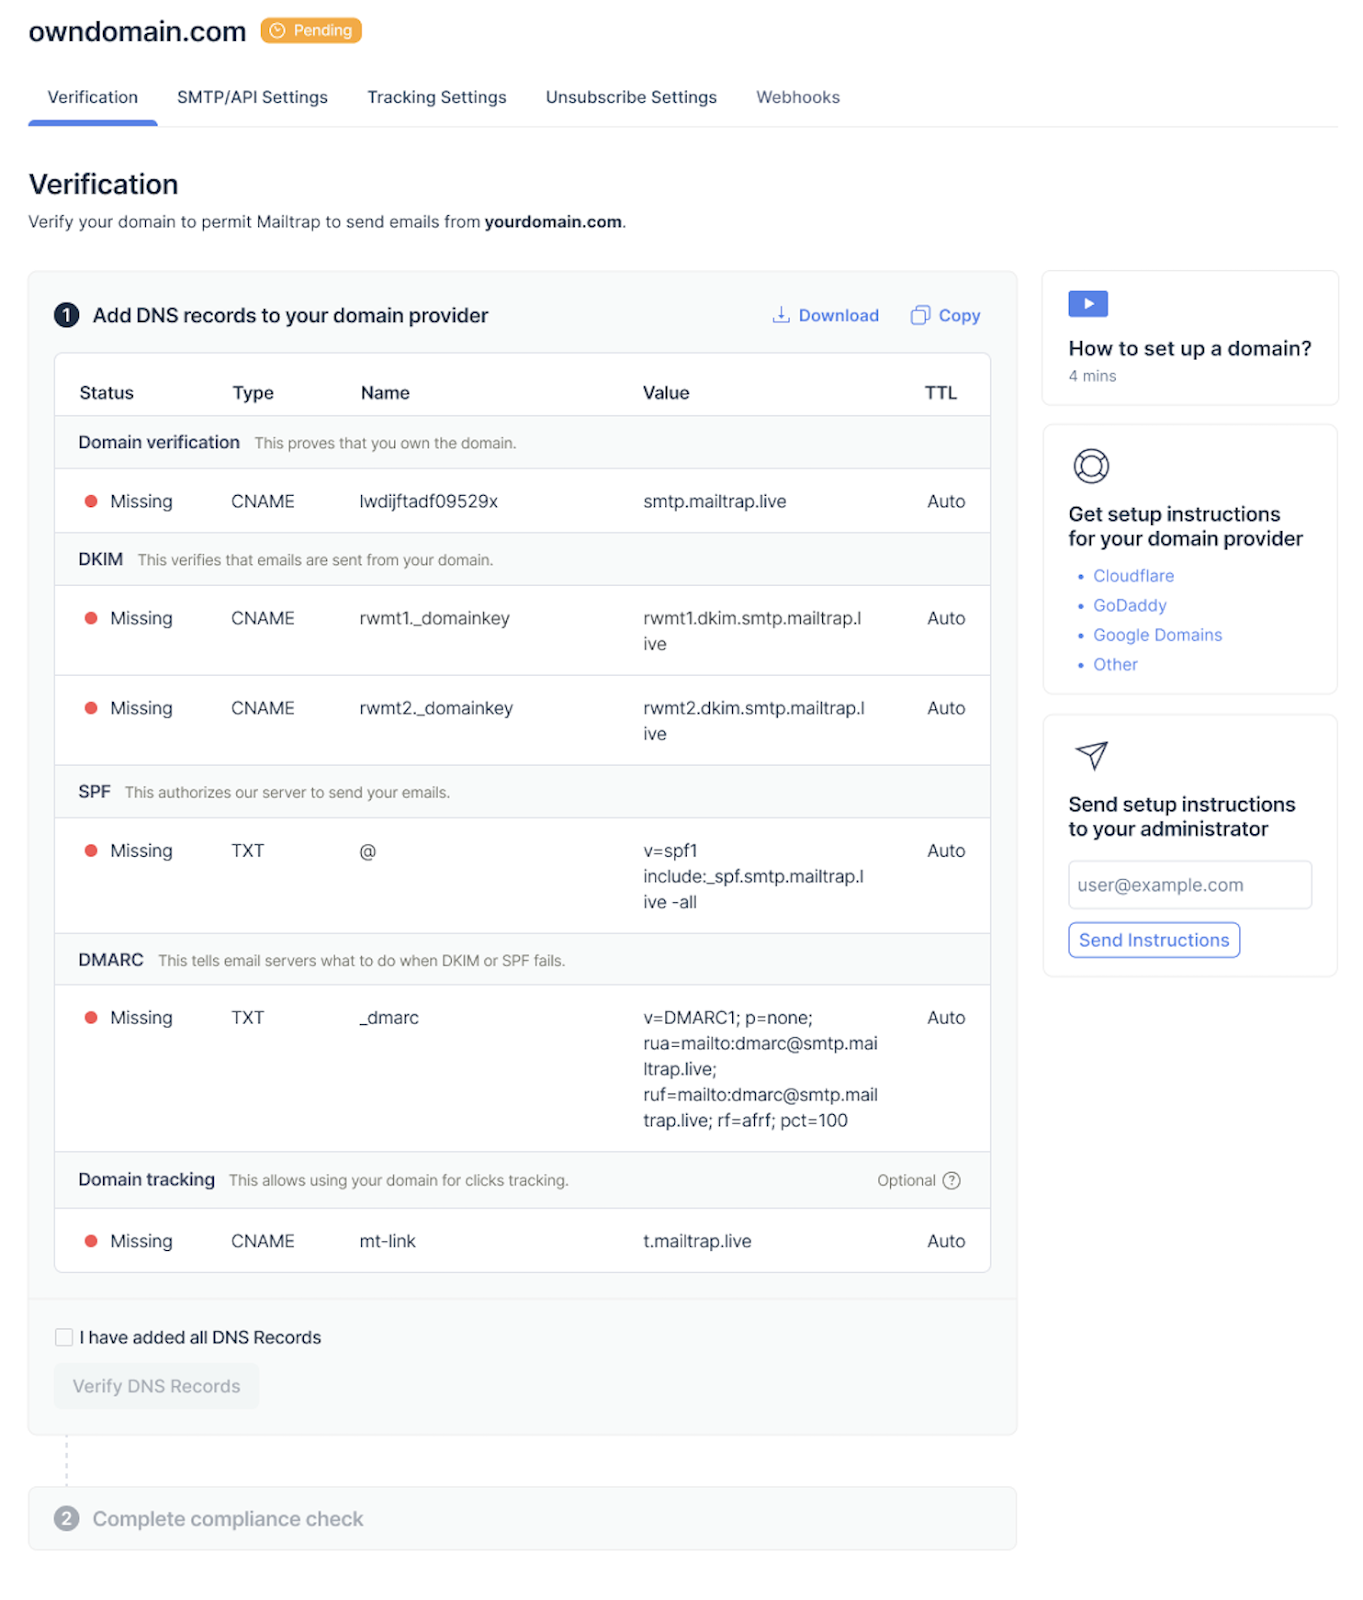
Start by creating a free Mailtrap account, logging in, and navigating to Sending Domains, where you’ll need to add and verify your domain. This takes only ~5 minutes, and you can use our detailed Knowledge Base article as your step-by-step guide.
Then, add the DNS records provided by Mailtrap to your domain provider’s DNS. By doing this, you verify the domain ownership.
3. Configure Gomail
With your domain verified, all there’s left to do is copy/paste the following code into your main configuration file (e.g., main.go):
package main

import (
    "fmt"
    gomail "gopkg.in/mail.v2"
)

func main() {
    // Create a new message
    message := gomail.NewMessage()

    // Set email headers
    message.SetHeader("From", "youremail@email.com")
    message.SetHeader("To", "recipient1@email.com")
    message.SetHeader("Subject", "Hello from the Mailtrap team")

    // Set email body to HTML format
    message.SetBody("text/html", `
        <html>
            <body>
                <h1>This is a Test Email</h1>
                <p><b>Hello!</b> This is a test email with HTML formatting.</p>
                <p>Thanks,<br>Mailtrap</p>
            </body>
        </html>
    `)

    // Set up the SMTP dialer
    dialer := gomail.NewDialer("live.smtp.mailtrap.io", 587, "api", "1a2b3c4d5e6f7g")

    // Send the email
    if err := dialer.DialAndSend(message); err != nil {
        fmt.Println("Error:", err)
        panic(err)
    } else {
        fmt.Println("HTML Email sent successfully!")
    }
}
To run the script, execute the following command: go run.main.go.
Code explanation:
- The script is designed to send basic HTML emails. However, I’ll also cover dynamic content and email templates a bit later in the article.
- The key function is
SetBody, which is set to “text/html” in this case, so it defines the content of the email body as HTML.- Make sure to write your HTML code within the string passed to
SetBodyand enclose it in backticks (`) for better readability.
- Make sure to write your HTML code within the string passed to
- If you want to send plain text along with your HTML emails in case some of your recipients’ clients don’t support HTML, use the
AddAlternativefunction like so:
m.SetBody( "text/html", "<p>Hello!</p>")

m.AddAlternative("text/plain", "Hello!")
Send HTML email with attachment
To add attachments, all you have to do is move the desired image/document to your project folder and specify its name under the Attach method.
For example, if you want to add an invoice to your email, simply copy the invoice#1.pdf and specify it in the code, just like this:
package main

import (
    "fmt"
    gomail "gopkg.in/mail.v2"
)

func main() {
    // Create a new message
    message := gomail.NewMessage()

    // Set email headers
    message.SetHeader("From", "youremail@email.com")
    message.SetHeader("To", "abc@gmail.com")
    message.SetHeader("Subject", "Test Email with Attachment")

    // Set email body
    message.SetBody("text/html", `
        <html>
            <body>
                <h1>This is a Test Email</h1>
                <p><b>Hello!</b> Please find the attachment below.</p>
                <p>Thanks,<br>Mailtrap</p>
            </body>
        </html>
    `)

    // Add attachments
    message.Attach("/invoice#1.pdf")

    // Set up the SMTP dialer
    dialer := gomail.NewDialer("live.smtp.mailtrap.io", 587, "api", "1a2b3c4d5e6f7g")

    // Send the email
    if err := dialer.DialAndSend(message); err != nil {
        fmt.Println("Error:", err)
        panic(err)
    } else {
        fmt.Println("Email sent successfully with attachments!")
    }
}
Send HTML email with embedded image
To add an embedded image to your HTML emails and display it inline rather than as an attachment, use the conveniently named Embed() method.
Here’s how it works in action:
package main

import (
    "fmt"
    gomail "gopkg.in/mail.v2"
)

func main() {
    // Create a new message
    message := gomail.NewMessage()

    // Set email headers
    message.SetHeader("From", "youremail@email.com")
    message.SetHeader("To", "abc@gmail.com")
    message.SetHeader("Subject", "Test Email with Embedded Image")

    // Embed image and set email body to reference the embedded image
    message.Embed("/path/to/image.jpg")

    message.SetBody("text/html", `
        <html>
            <body>
                <h1>Test Email with Embedded Image</h1>
                <p><b>Hello!</b> This email contains an embedded image:</p>
                <img src="cid:image.jpg" alt="Embedded Image">
                <p>Thanks,<br>Mailtrap</p>
            </body>
        </html>
    `)

    // Set up the SMTP dialer
    dialer := gomail.NewDialer("live.smtp.mailtrap.io", 587, "api", "1a2b3c4d5e6f7g")

    // Send the email
    if err := dialer.DialAndSend(message); err != nil {
        fmt.Println("Error:", err)
        panic(err)
    } else {
        fmt.Println("Email sent successfully with an embedded image!")
    }
}
Sending HTML email with dynamic content
To send emails with dynamic content, you can use Go’s html/template package, which allows you to insert variables into your HTML.
Now, for example, let’s say you have a recipient called Alice, and you want to send her a dynamic email with the link to her invoice. Here’s the code you could use:
package main

import (
    "html/template"
    "os"
)

type User struct {
    Name string
    Link string
}

func main() {
    tmpl := `<html>
                <body>
                    <h1>Hello, {{.Name}}!</h1>
                    <p>Your shopping invoice is available <a href="{{.Link}}">here</a>.</p>
                </body>
             </html>`

    t, err := template.New("webpage").Parse(tmpl)
    if err != nil {
        panic(err)
    }

    user := User{Name: "Alice", Link: "https://example.com/invoice/alice"}
    t.Execute(os.Stdout, user)
}
Code breakdown:
func main()now includestmplvariable with the dynamic HTML template as a string wrapped in tags.- The
Userstruct holds data such as recipient’s name and the link. t.Executerenders the template and substitutes{{.Name}}and{{.Link}}with Alice’s name and her invoice URL, then outputs the HTML toos.Stdout.
How to style HTML email template
To spice it up a bit, you can use inline CSS directly within your HTML template in Go. Besides being easy to use, inline styles come with the benefit of working well with most email clients.
Here’s how it works:
1. Create an email template
In your project directory, create a new file and call it email.template. Then, paste the following code into the same file:
const emailTemplate = `
<html>
    <body style="font-family: Arial, sans-serif; color: #333; background-color: #f9f9f9; padding: 20px;">
        <div style="max-width: 600px; margin: auto; background-color: #fff; padding: 20px; border-radius: 8px; box-shadow: 0 4px 8px rgba(0, 0, 0, 0.1);">
            <h1 style="color: #4CAF50;">Hello, {{.Name}}!</h1>
            <p style="font-size: 16px; line-height: 1.5;">This is a test email with styled HTML content.</p>
            <p style="font-size: 14px; color: #666;">Thank you for using our service. We hope you enjoy this email layout!</p>
            <a href="{{.Link}}" style="display: inline-block; margin-top: 20px; padding: 10px 15px; color: #fff; background-color: #4CAF50; text-decoration: none; border-radius: 5px;">Learn More</a>
        </div>
    </body>
</html>
`
2. Render the template
To execute the template, we’ll use html/template, and again, we’ll dynamically fill in the values for Name and Link. For example:
import (
    "bytes"
    "html/template"
    "fmt"
    gomail "gopkg.in/mail.v2"
)

func sendStyledEmail(name, link string) {
    // Parse the template
    tmpl, err := template.New("email").Parse(emailTemplate)
    if err != nil {
        fmt.Println("Error parsing template:", err)
        return
    }

    // Execute the template with dynamic data
    var body bytes.Buffer
    err = tmpl.Execute(&body, struct {
        Name string
        Link string
    }{Name: name, Link: link})

    if err != nil {
        fmt.Println(“error executing template:”, err)
        return
    }

    // Create a new message
    message := gomail.NewMessage()
    message.SetHeader("From", "youremail@gmail.com")
    message.SetHeader("To", "recipient@example.com")
    message.SetHeader("Subject", "Styled HTML Email")
    message.SetBody("text/html", body.String())

    // Send email (setup dialer as shown before)
    // ...
}

func main() {
    sendStyledEmail(“Your name”, “https://example.com”)
}
Keep in mind that you can replace the Name and Link variables and add new ones if you want, such as OrderNumber, ProductName, Email, EventDate, EventLocation, etc.
You can also use Mailtrap’s drag-and-drop email builder, a part of the Email Templates feature, which allows you to design, edit, and host HTML email templates on the platform.
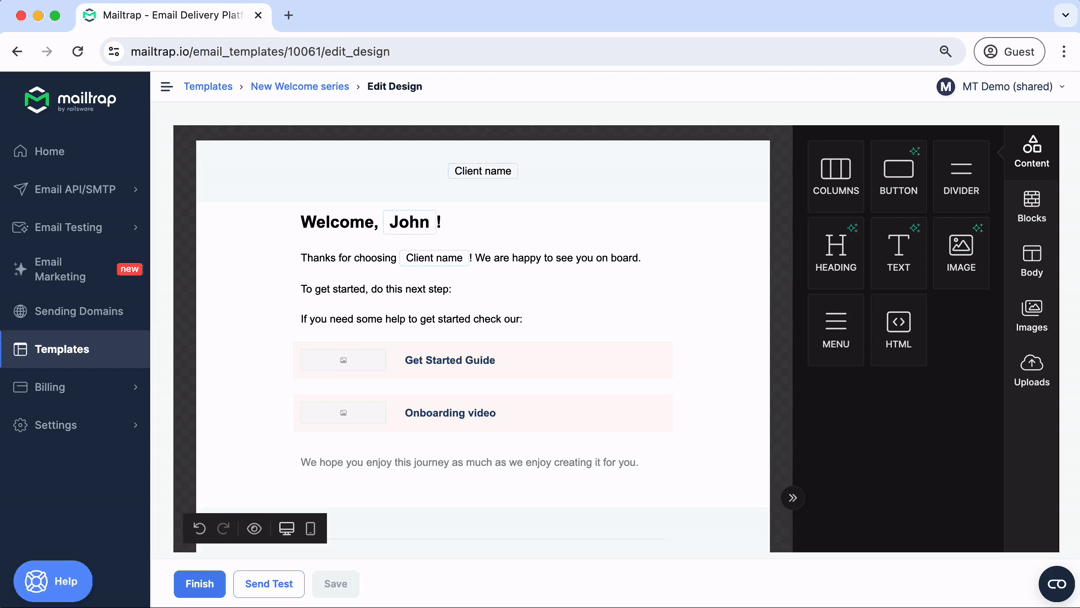
I must also note that the drag-and-drop email builder comes free with any of the plans you choose, no additional costs included!
Send HTML email in Go using email API
Did you know that you can automate the HTML sending process in Go with Mailtrap’s very own email API? The API offers reliable email infrastructure with high deliverability rates by design and is super smooth to integrate into your project.
Here’s everything you need to do:
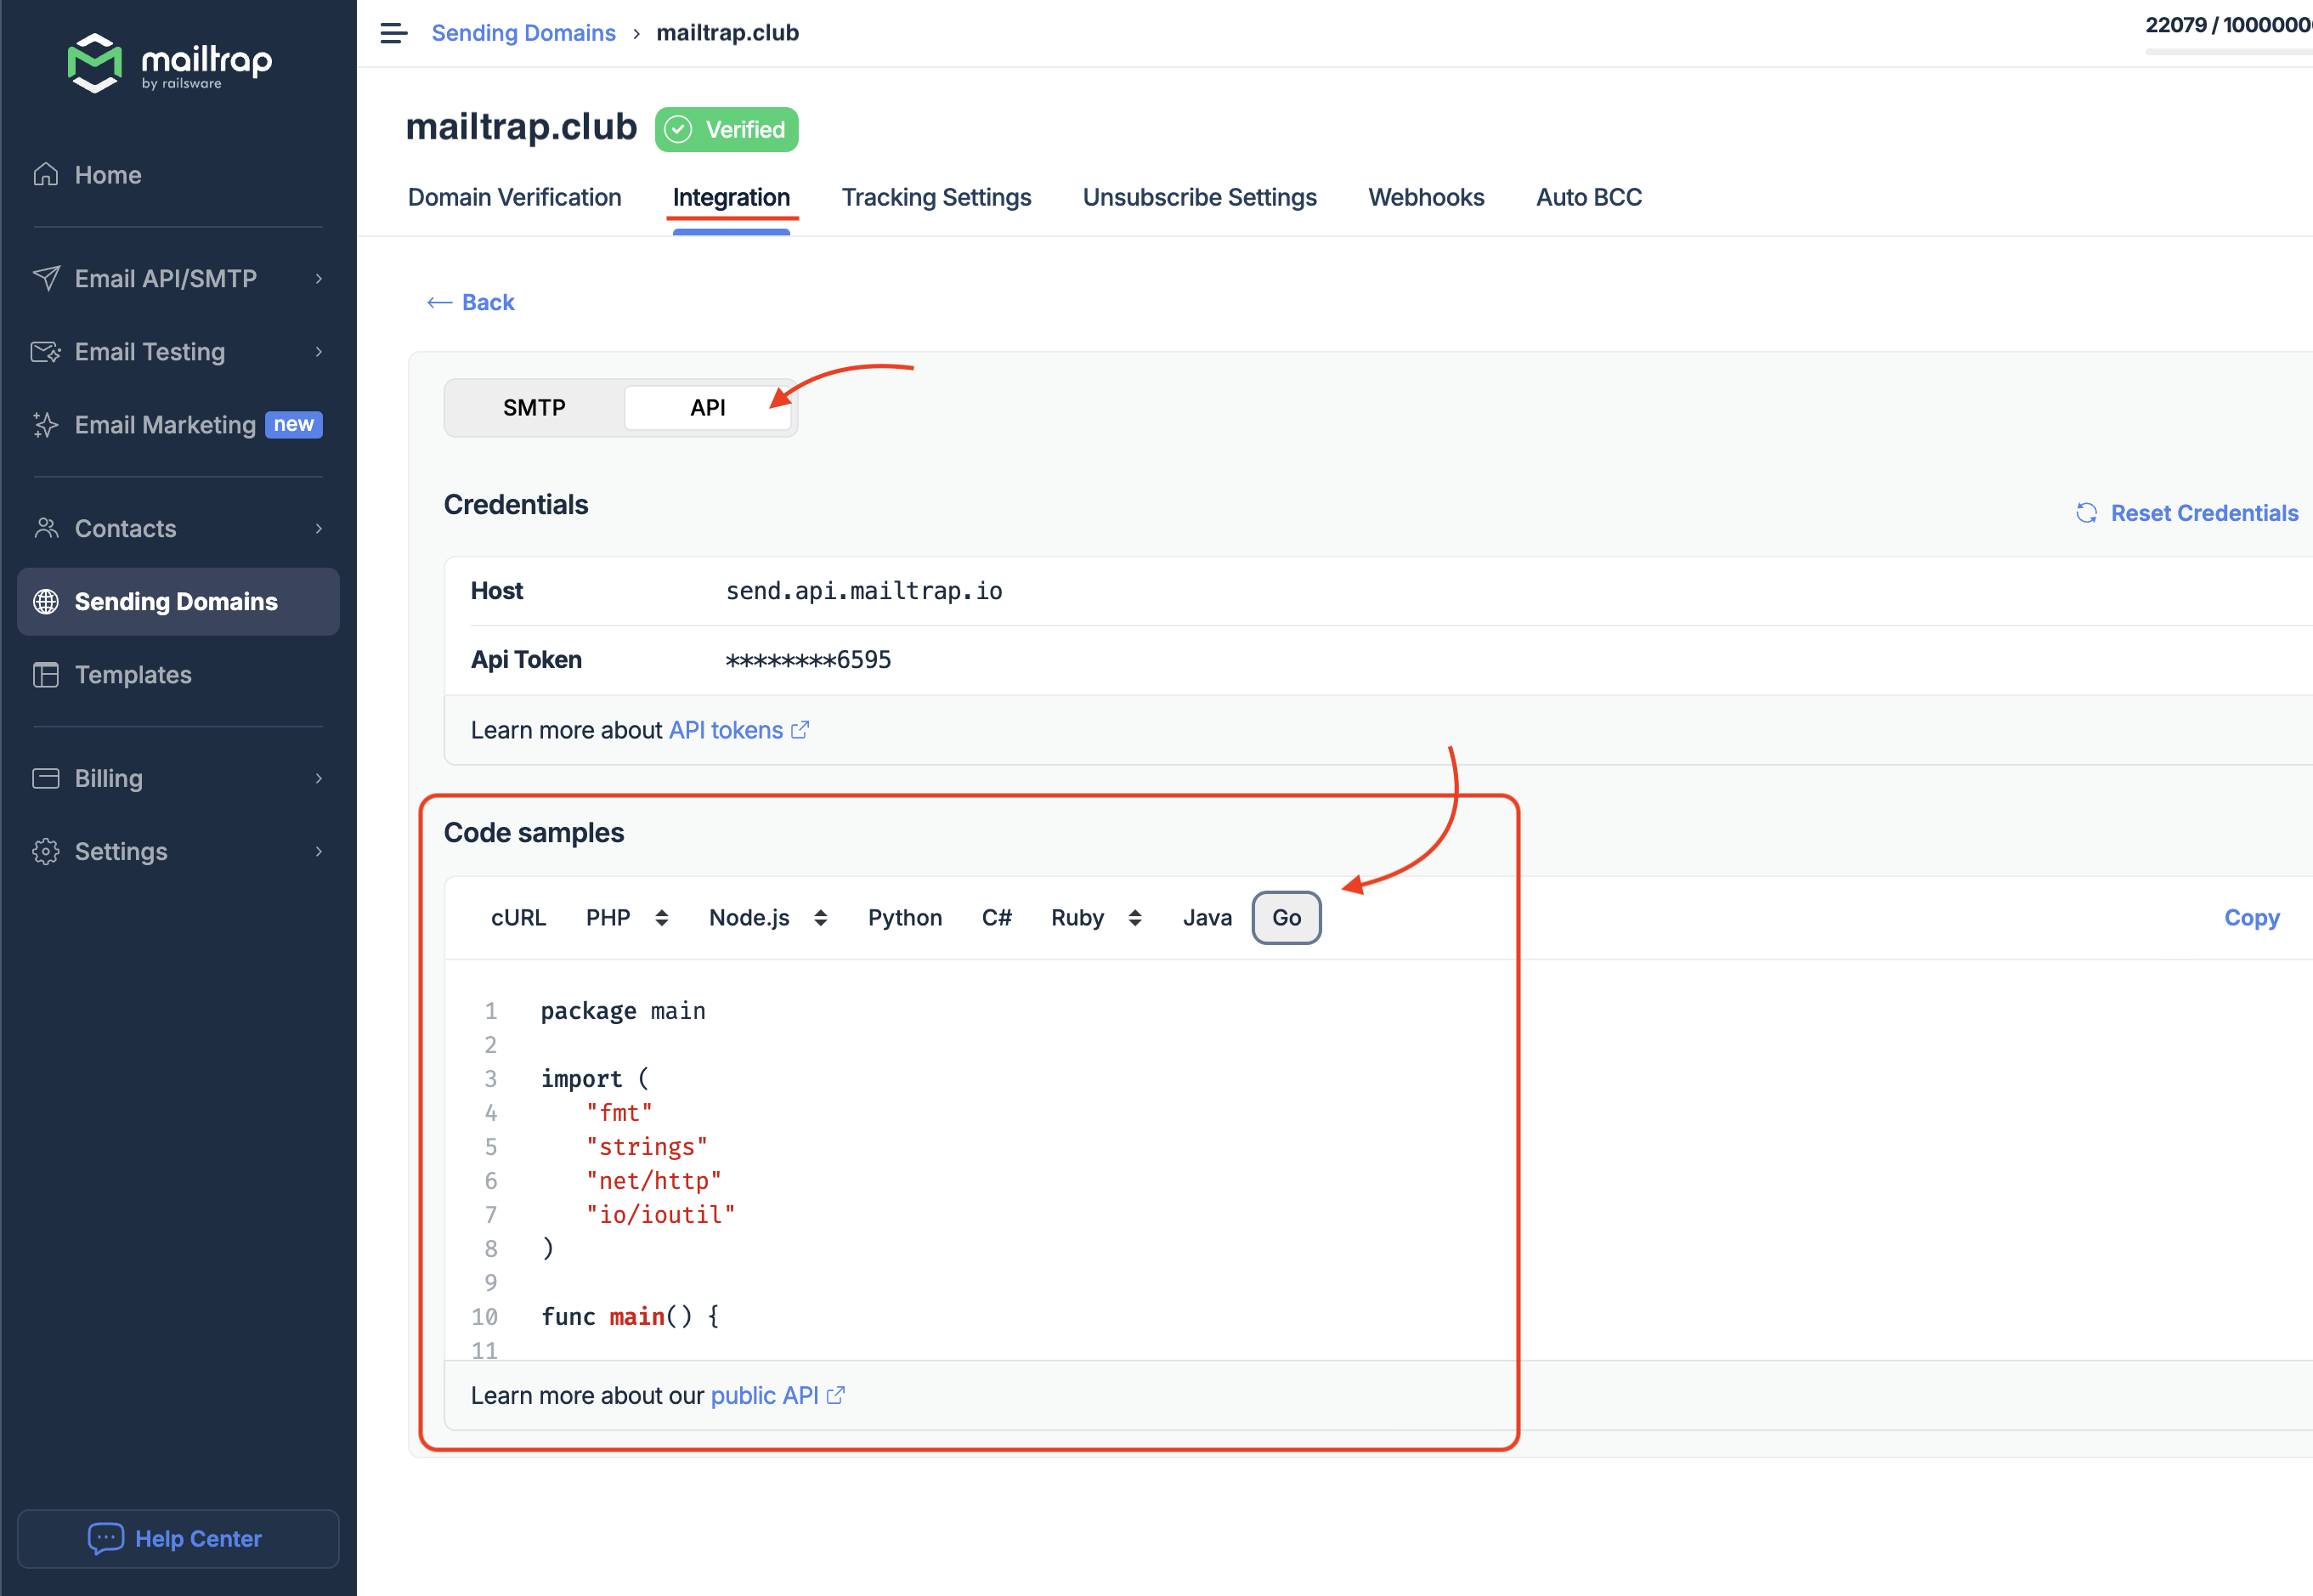
- Create a free Mailtrap account.
- Verify your domain and update DNS records.
- Navigate to the Sending Domains → Integration and choose your preferred stream.
- Click on API and select Go underneath Code Samples.
Then, simply copy the code snippet below into your main.go file to start sending basic HTML messages:
package main

import (
	"bytes"
	"fmt"
	"io"
	"log"
	"net/http"
	"time"
)

func main() {
	// Mailtrap account config
	token := "<secret_token>"
	httpHost := "https://send.api.mailtrap.io/api/send"

	// Message body with HTML content
	message := []byte(`{
		"from":{"email":"john.doe@your.domain"},
		"to":[{"email":"kate.doe@example.com"}],
		"subject":"Why aren't you using Mailtrap yet?",
		"text":"Here's the space for your great sales pitch",
		"html":"<strong>Here's the space for your great sales pitch</strong>"
	}`)

	// Set up request
	request, err := http.NewRequest(http.MethodPost, httpHost, bytes.NewBuffer(message))
	if err != nil {
		log.Fatal(err)
	}

	// Set required headers
	request.Header.Set("Content-Type", "application/json")
	request.Header.Set("Authorization", "Bearer "+token)

	// Send request
	client := http.Client{Timeout: 5 * time.Second}
	res, err := client.Do(request)
	if err != nil {
		log.Fatal(err)
	}
	defer res.Body.Close()

	body, err := io.ReadAll(res.Body)
	if err != nil {
		log.Fatal(err)
	}

	fmt.Println(string(body))
}
Last but not least, replace the placeholders such as token and from:email with your actual Mailtrap credentials, then start the server and make requests by running main.go.
Also, as you can notice, I’ve kept the "text" field as an industry-standard practice, acting as a fallback in case some of your recipients’ email clients do not support HTML.
Send HTML email with attachment
For sending HTML emails with attachments, I’ve added the attachments field under html.
Check out the code snippet below:
import (
	"bytes"
	"encoding/base64"
	"fmt"
	"io"
	"log"
	"net/http"
	"os"
	"time"
)

// within main function
	// Open the file
	file, err := os.Open("attachment.txt")
	if err != nil {
		log.Fatalf("Failed to open file: %v", err)
	}
	defer file.Close()

	// Read all contents of the file
	fileData, err := io.ReadAll(file)
	if err != nil {
		log.Fatalf("Failed to read file: %v", err)
	}

	// Encode the file data to base64
	encodedFileData := base64.StdEncoding.EncodeToString(fileData)

message := []byte(`{
    "from": { "email": "john.doe@your.domain" },
    "to": [
        { "email": "kate.doe@example.com" }
    ],
    "subject": "Here's your attached file!",
    "text": "Check out the attached file.",
    "html": "<p>Check out the attached <strong>file</strong>.</p>",
    "attachments": [
        {
          "filename": "example.pdf",
          "content": "` + encodedFileData + `",
          "type": "application/pdf",
          "disposition": "attachment"
        }
    ]
}`)
Send HTML email with embedded image
To embed an image to our HTML email and display it inline, we’ll specify the desired image’s file path, set disposition to “inline”, include an <img> tag, and use the select file type.
Sounds complicated? Don’t worry—here’s a code snippet you can use:
import (
	"bytes"
	"encoding/base64"
	"fmt"
	"io"
	"log"
	"net/http"
	"os"
)

// within main function
	// Open the file (image instead of a generic attachment)
	file, err := os.Open("image.jpg") // Replace with your image file path
	if err != nil {
		log.Fatalf("Failed to open file: %v", err)
	}
	defer file.Close()

	// Read all contents of the file
	fileData, err := io.ReadAll(file)
	if err != nil {
		log.Fatalf("Failed to read file: %v", err)
	}

	// Encode the file data to base64
	encodedFileData := base64.StdEncoding.EncodeToString(fileData)

message := []byte(`{
    "from": { "email": "john.doe@your.domain" },
    "to": [
        { "email": "kate.doe@example.com" }
    ],
    "subject": "Here's an embedded image!",
    "text": "Check out the embedded image.",
    "html": "<p>Here's an embedded image:</p><img src='cid:embedded-image' alt='Embedded Image' />",
    "attachments": [
        {
          "filename": "image.jpg", // Use the actual image filename
          "content": "` + encodedFileData + `",
          "type": "image/jpeg", // Adjust type if using a different image format
          "disposition": "inline",
          "content_id": "embedded-image"
        }
    ]
}`)
Code breakdown:
- File path – Added path to the image file (image.jpg).
- Inline display – Set
"disposition": "inline"to display the image inline. - Content ID – Added
"content_id": "embedded-image"as a unique identifier for our image in the email body. - HTML body – Included an
<img>tag referencingcontent_idwithsrc='cid:embedded-image' - Attachment type – Set the
"type"to"image/jpeg"for the image MIME type.- You can adjust this accordingly if you’re using another image format (e.g., PNG).
For more sending cases like asynchronous or bulk email, be sure to check out our dedicated article. 👀
Sending HTML email with dynamic content
To send HTML email with dynamic content, I’ve added variables such as recipientEmail and recipientName and fmt.Sprintf, which will substitute these variables into the JSON payload.
Check it out in action:
package main

import (
	"bytes"
	"fmt"
	"io"
	"log"
	"net/http"
)

func main() {
	// Mailtrap account config
	token := "<secret_token>"
	httpHost := "https://send.api.mailtrap.io/api/send"

	// Dynamic variables
	recipientEmail := "kate.doe@example.com"
	recipientName := "Kate"

	// Message body with dynamic content
	message := []byte(fmt.Sprintf(`{
		"from":{"email":"john.doe@your.domain"},
		"to":[{"email":"%s"}],
		"subject":"Why aren't you using Mailtrap yet?",
		"text":"Hi %s, here's the space for your great sales pitch.",
		"html":"<p>Hi <strong>%s</strong>,</p><p>Here's the space for your great sales pitch.</p>"
	}`, recipientEmail, recipientName, recipientName))

	// Set up request
	request, err := http.NewRequest(http.MethodPost, httpHost, bytes.NewBuffer(message))
	if err != nil {
		log.Fatal(err)
	}

	// Set required headers
	request.Header.Set("Content-Type", "application/json")
	request.Header.Set("Authorization", "Bearer "+token)

	// Send request
	client := http.Client{}
	res, err := client.Do(request)
	if err != nil {
		log.Fatal(err)
	}
	defer res.Body.Close()

	body, err := io.ReadAll(res.Body)
	if err != nil {
		log.Fatal(err)
	}

	fmt.Println(string(body))
}
Wrapping up
And with that, we’ve covered everything you need to know to send HTML emails in Go!
Now, you can add sending functionality both via SMTP and API, and you know how to use dynamic content, email templates, and more!
Also, be sure to visit our blog, where you can find other HTML-related articles such as:
And if you’re looking for some eye bleach, our YouTube channel might be just the thing you need! 👀
