
In this ‘Flask send email Gmail’ tutorial, I’ll show you how to send mail in Flask with Gmail’s SMTP and API.
But, as Gmail has some limitations, I also made sure to go over them and explain how to overcome them.
Send email in Flask using Gmail SMTP
Note that I assume you have Flask Mail already set up, but, if you don’t, feel free to consult our dedicated Flask article.
All set? Let’s jump right in!
1. Create an app password
Previously, you could enable the Less secure apps access to use your Gmail credentials for 3rd party apps, but as this feature won’t be supported starting from September 2024, we have to rely on app-specific passwords.
An app password essentially allows us to leverage Gmail SMTP for email sending.
Here’s what you need to do to get one:
- Log in to your Google account.
- Click on ‘Security’ and scroll down to the ‘How you sign in to Google’ section.

- Select ‘2-Step Verification’
- In case it’s off, make sure to turn it on.
- Scroll down to the bottom of the page and select ‘App passwords.’
- Choose a name for your app password.
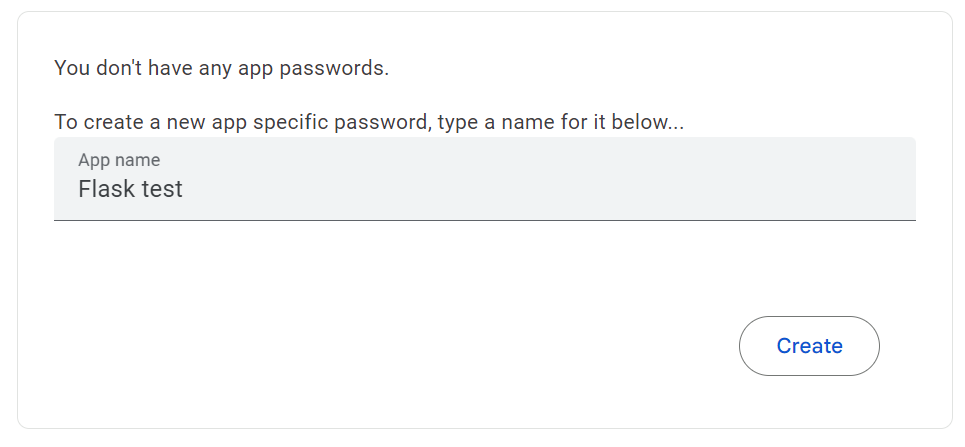
- Click on ‘Generate’ and securely store your new app password.
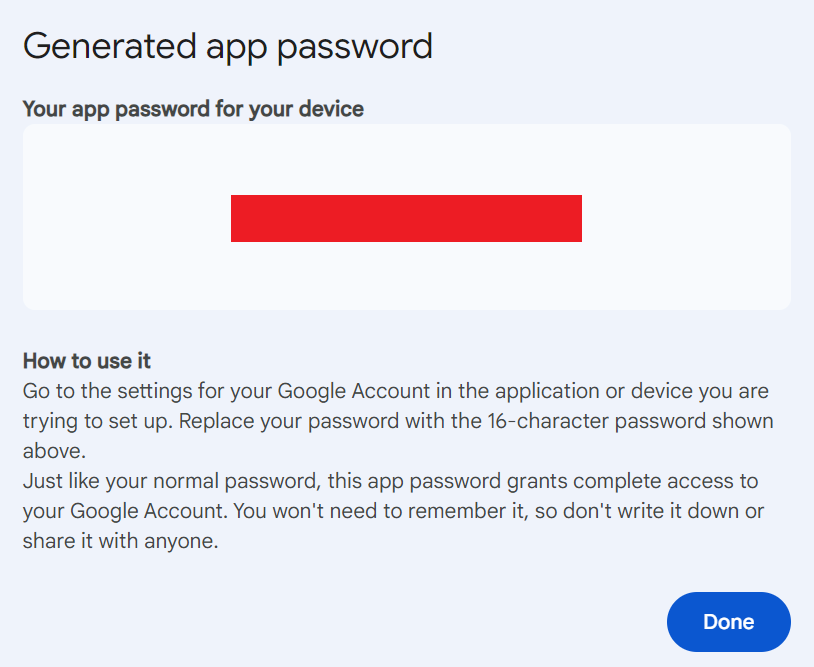
Important: Make sure to securely store your app password when you generate it, as it won’t be shown again.
2. Configure your Flask application for Gmail
Now, all you need to do is enter your Gmail credentials and app password into your Flask configuration.
Here’s a code snippet that uses the Flask-Mail extension and Message object:
from flask import Flask
from flask_mail import Mail, Message

app = Flask(__name__)

app.config['MAIL_SERVER'] = 'smtp.gmail.com'
app.config['MAIL_PORT'] = 587
app.config['MAIL_USERNAME'] = 'your_email@gmail.com'  # Use your actual Gmail address
app.config['MAIL_PASSWORD'] = 'your_app_password'     # Use your generated App Password
app.config['MAIL_USE_TLS'] = True
app.config['MAIL_USE_SSL'] = False
mail = Mail(app)

@app.route("/")
def index():
    msg = Message(
        subject='Hello from the other side!',
        sender='your_email@gmail.com',  # Ensure this matches MAIL_USERNAME
        recipients=['recipient@example.com']  # Replace with actual recipient's email
    )
    msg.body = "Hey, sending you this email from my Flask app, let me know if it works."
    mail.send(msg)
    return "Message sent!"

if __name__ == '__main__':
app.run(debug=True)Notes:
- You can also use port 465, which was originally intended for SMTPS (SMTP over SSL). If you do decide to use it, you’ll have to change the
MAIL_USE_SSLvariable to =true andMAIL_USE_TLSto= false.
- Although
debug=Truecan come in handy during development, I recommend turning it off in production to avoid security risks. - To test this code snippet, you run it in Python Shell, then open http://localhost:5000/, and finally check your inbox.
- If you’ve followed all of the steps correctly, this will trigger the email-sending functionality defined in the / route.
3. Create environment variables (optional)
If you don’t want to save your credentials directly in your code or configuration files by hard-coding them, you can use environment variables. This way, you can later make changes to your configuration without having to modify the code itself.
Here’s what you have to do:
- Create a new .env file in the root directory of your project.
- Add
MAIL_USERNAMEandMAIL_PASSWORDvariables
MAIL_USERNAME='your_email@gmail.com'  # Use your actual Gmail address
MAIL_PASSWORD='your_app_password' # Use your generated Ap- Replace the placeholder values with your Gmail credentials.
- Load environment variables from your .env file by importing
load_dotenvfromdotenvand calling it at the beginning of your code:
from dotenv import load_dotenv
import os

# Load environment variables from .env file
load_dotenv()

# Now you can safely access the environment variables
mail_username = os.environ.get('MAIL_USERNAME')
mail_password = os.environ.get('MAIL_PASSWORD')- Access the environment variables with the os module through the os.environ dictionary:
# Access the value of an environment variable
mail_username = os.environ.get('MAIL_USERNAME')
mail_password = os.environ.get('MAIL_PASSWORD')
You can also integrate the variables into your Flask configuration directly, like so:
app.config['MAIL_USERNAME'] = os.environ.get('MAIL_USERNAME')
app.config['MAIL_PASSWORD'] = os.environ.get('MAIL_PASSWORD')
Additionally, you can import sensitive credentials from Operating System Environment variables, not only importing .env file.
In this case, the importing code is the same as .env file.
# Access the value of an environment variable
mail_username = os.environ.get('MAIL_USERNAME')
mail_password = os.environ.get('MAIL_PASSWORD')
Send email to multiple recipients
Sending email messages to multiple recipients in Flask is as easy as including any email addresses you want to send messages to in the recipients list of the Message object.
Note that each recipient’s email address should be a string within the list:
from flask import Flask
from flask_mail import Mail, Message

app = Flask(__name__)

# Configure Flask-Mail with your email settings
app.config['MAIL_SERVER'] = 'smtp.example.com'  # Use your SMTP email server details
app.config['MAIL_PORT'] = 587
app.config['MAIL_USERNAME'] = 'your_email@example.com'
app.config['MAIL_PASSWORD'] = 'your_email_password'
app.config['MAIL_USE_TLS'] = True
app.config['MAIL_USE_SSL'] = False
mail = Mail(app)

@app.route("/send_email")
def send_email():
    # Define the list of recipients
    recipients = ['recipient1@example.com', 'recipient2@example.com', 'recipient3@example.com']

    # Create a Message object with subject, sender, and recipient list
    msg = Message(subject='Hello from Flask!',
                  sender='your_email@example.com',
                  recipients=recipients)  # Pass the list of recipients here

    # Email body
    msg.body = 'This is a test email sent from a Flask application to multiple recipients.'

    # Send the email
    mail.send(msg)

    return "Email sent to multiple recipients!"

if __name__ == '__main__':
    app.run(debug=True)
Send email with attachments
To add attachments to your emails, all you have to do is load your configuration with the open_resource() and attach methods and the with statement.
Check it out:
with app.open_resource("invoice.pdf") as fp:
    msg.attach("invoice.pdf", "application/pdf", fp.read())
As an example, let’s imagine you’re sending an invoice via email in your Flask app. Here’s what the code would look like in such a case:
from flask import Flask
from flask_mail import Mail, Message

app = Flask(__name__)

# Configure Flask-Mail
app.config['MAIL_SERVER'] = 'smtp.example.com'
app.config['MAIL_PORT'] = 587
app.config['MAIL_USERNAME'] = 'your_email@example.com'
app.config['MAIL_PASSWORD'] = 'your_email_password'
app.config['MAIL_USE_TLS'] = True
app.config['MAIL_USE_SSL'] = False
mail = Mail(app)

@app.route("/send_email_with_attachment")
def send_email_with_attachment():
    msg = Message(subject='Email with Attachment',
                  sender='your_email@example.com',
                  recipients=['recipient@example.com'])

    msg.body = 'Please find the attached invoice.'

    # Attach a file
    with app.open_resource("invoice.pdf") as fp:
        msg.attach("invoice.pdf", "application/pdf", fp.read())

    mail.send(msg)

    return "Email sent with attachment!"

if __name__ == '__main__':
app.run(debug=True)Tip:
- If you’re encountering an error, make sure that you’ve inserted your Gmail account and your password and that the file you want to send is in the correct root directory of your Flask application.
Send HTML email
Sending HTML is also easy, as all you have to do is use the html attribute of the Message object. This way, you can specify the content of the email in HTML format, which lets you customize it, add links, images, etc., to the email body.
Here’s an example:
from flask import Flask
from flask_mail import Mail, Message

app = Flask(__name__)

# Configure Flask-Mail
app.config['MAIL_SERVER'] = 'smtp.example.com'
app.config['MAIL_PORT'] = 587
app.config['MAIL_USERNAME'] = 'your_email@example.com'
app.config['MAIL_PASSWORD'] = 'your_email_password'
app.config['MAIL_USE_TLS'] = True
app.config['MAIL_USE_SSL'] = False
mail = Mail(app)

@app.route("/send_html_email")
def send_html_email():
    msg = Message(subject='HTML Email from Flask',
                  sender='your_email@example.com',
                  recipients=['recipient@example.com'])

    # HTML body content
    msg.html = """
    <html>
        <body>
            <h1>Hello from Flask-Mail!</h1>
            <p>This is an example of an <strong>HTML</strong> email sent from a Flask application using Flask-Mail.</p>
            <a href="https://example.com">Visit our Website</a>
        </body>
    </html>
    """

    mail.send(msg)

    return "HTML email sent!"

if __name__ == '__main__':
    app.run(debug=True)
Send email in Flask using Gmail API
Now, let’s see how you can automate your sending process in Flask with Gmail’s email API.
Step 1: Create a project
First, let’s visit the Google Developers Console, which will give our app access to Gmail.
If you’re visiting this page for the first time, agree to the Terms of Service, pick your Country of residence, and then:
- Click on ‘Select a project’ or ‘Create project’
- Name your project
- Press ‘Create’

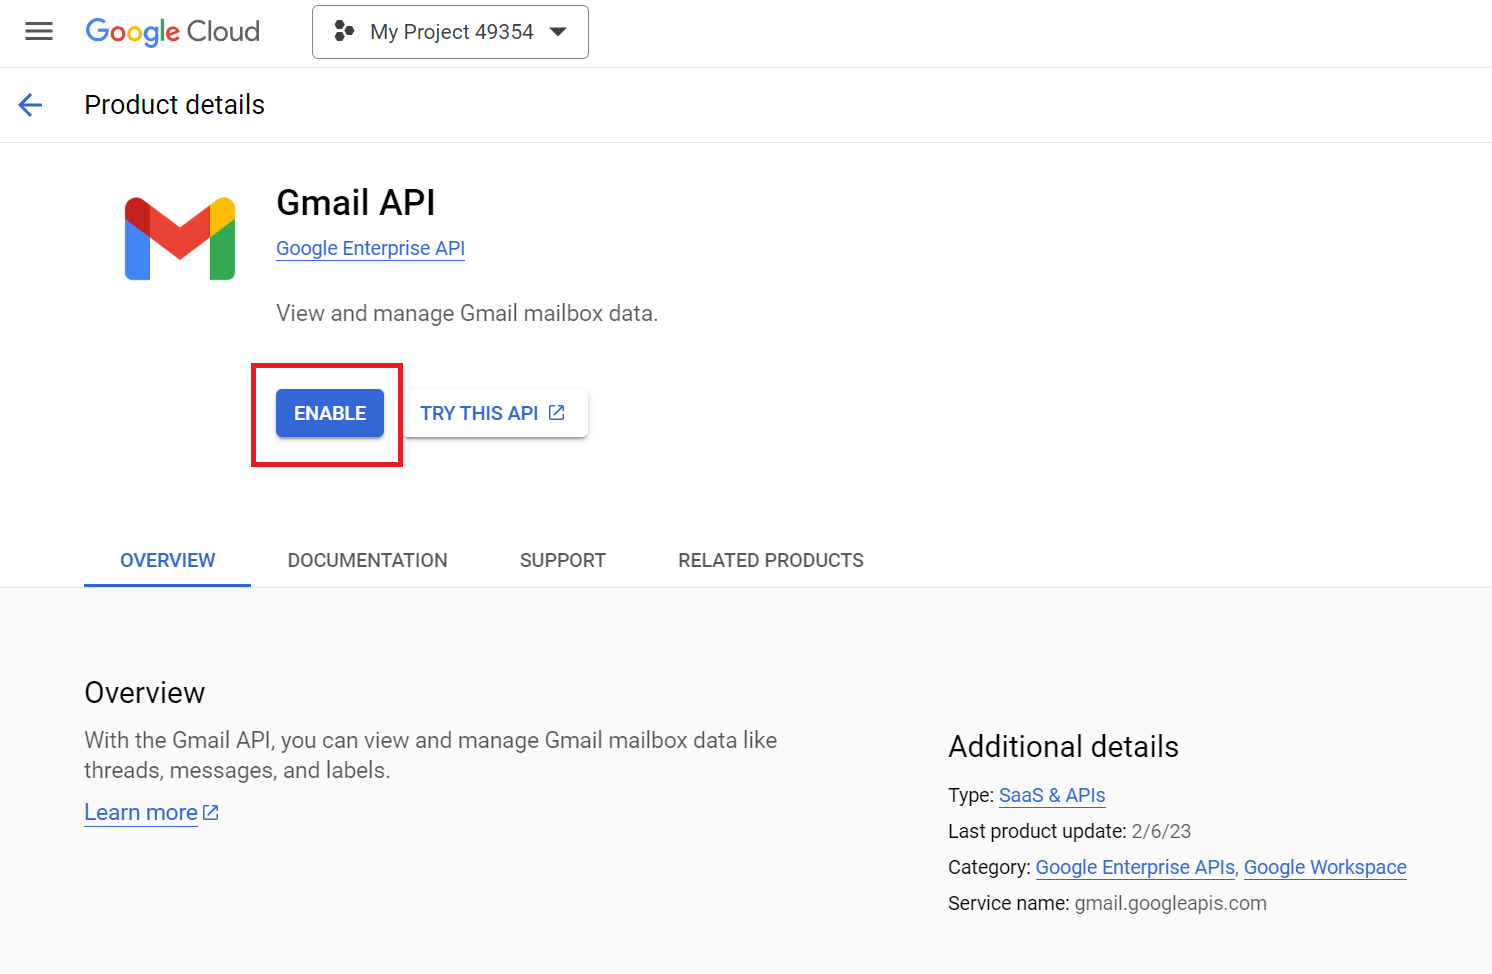
Step 2: Enable Gmail API
To enable the Gmail API, visit the API Library page by clicking on the Library tab on the left.
Once you’re in the library, find the ‘Gmail API’ (you can also use the search bar for this), click on it, and press Enable.
Step 3: Create credentials and set up the OAuth 2.0 Authorization
Once you’ve enabled the Gmail API, you will be taken to a dashboard where you’ll need to enter your credentials.
Here, we need OAuth client ID, which is the unique identifier assigned to an application that allows it to request OAuth 2.0 authorization to access protected resources on the user’s behalf.
So, choose OAuth client ID from the drop-down list of the Create Credentials button in the Credentials tab.
Then, you’ll have to submit the consent questionnaire with the basic information regarding your app.
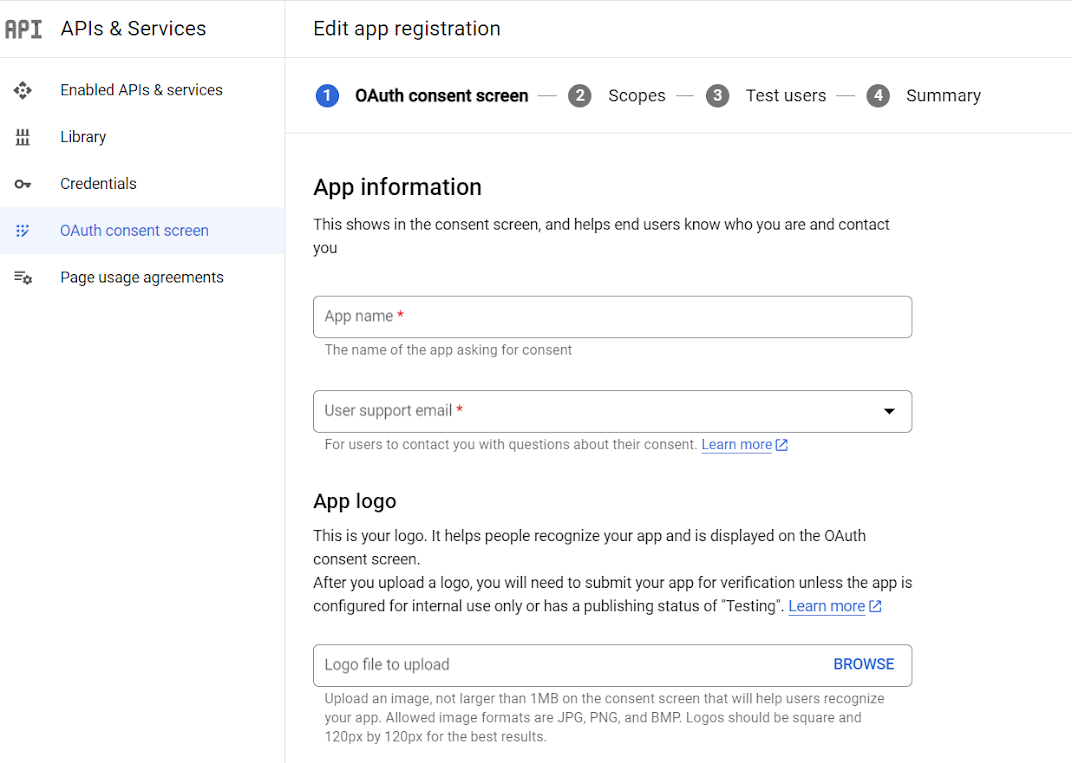
After finishing the questionnaire, you’ll be able to fill out credentials, pick the type of your app (e.g., web app, Android, etc.) and name your OAuth Client ID.
And to finalize the credentials creation, simply click on Create and let’s move on.
Step 4: Install Google Client Library
Now, we need to install the Google Client Library in your Python environment, which will interact with the Gmail API. For this, you can use the following command:
pip install --upgrade google-api-python-client google-auth-httplib2 google-auth-oauthlibStep 5: Implement OAuth 2.0 authorization
By implementing OAuth 2.0 authorization, you authorize your application to access your Gmail account.
Here’s an example:
from flask import Flask, redirect, url_for, session
from google_auth_oauthlib.flow import Flow
from googleapiclient.discovery import build
import os

app = Flask(__name__)
app.secret_key = 'your_secret_key'  # Define a secret key for session management

# Replace 'your_credentials.json' with the path to your downloaded credentials file
os.environ['OAUTHLIB_INSECURE_TRANSPORT'] = '1'  # Required for testing only, remove for production
flow = Flow.from_client_secrets_file(
    'your_credentials.json',
    scopes=['https://www.googleapis.com/auth/gmail.send'],
    redirect_uri='http://localhost:5000/callback'
)

@app.route('/')
def index():
    authorization_url, state = flow.authorization_url(prompt='consent')
    session['state'] = state
    return redirect(authorization_url)

@app.route('/callback')
def callback():
    flow.fetch_token(authorization_response=request.url)

    if not session['state'] == request.args['state']:
        abort(500)  # State does not match!

    credentials = flow.credentials
    session['credentials'] = {
        'token': credentials.token,
        'refresh_token': credentials.refresh_token,
        'token_uri': credentials.token_uri,
        'client_id': credentials.client_id,
        'client_secret': credentials.client_secret,
        'scopes': credentials.scopes
    }

    return 'Authentication successful, you can now send emails.'

if __name__ == '__main__':
    app.run(debug=True)
Pro tip:
os.environ['OAUTHLIB_INSECURE_TRANSPORT'] = '1'enables the use of HTTP for OAuth transactions, which is not secure for production environments. So, to disable it and enforce HTTPS in production, either remove the whole line of code or set it to 0.
Step 6: Send an email
And finally, use the send_email method to send an email via the Gmail API and the create_message method to prepare the email content, like so:
from email.mime.text import MIMEText
import base64
from googleapiclient.discovery import build

def send_email(service, user_id, message):
    try:
        message = (service.users().messages().send(userId=user_id, body=message)
                   .execute())
        print('Message Id: %s' % message['id'])
        return message
    except Exception as error:
        print('An error occurred: %s' % error)

def create_message(sender, to, subject, message_text):
    message = MIMEText(message_text)
    message['to'] = to
    message['from'] = sender
    message['subject'] = subject
    return {'raw': base64.urlsafe_b64encode(message.as_string().encode()).decode()}

# Example usage:
# credentials = ... # Obtain credentials as shown earlier
# service = build('gmail', 'v1', credentials=credentials)
# message = create_message('me', 'recipient@example.com', 'Test Subject', 'Test email body')
# send_email(service, 'me', message)
Gmail email infrastructure limitations
To ensure fair usage and protect their infrastructure, Google has official limitations in place, some of which include:
- Quota limits – Quota units represent Gmail resource usage. The exact number of quota units available depends on the project, but there are specific limits. For instance, sending an email consumes 100 quota units, while every user has 250 quotas per second.
- If your application exceeds these limits, you’ll receive a ‘429 Too Many Requests Error’.
- Bandwidth limits – Gmail imposes separate bandwidth limits based on the number of requests your app can make per day, per user rate limits, and the number of quota units those requests consume.
- Attachment size limit – With all attachments included, the maximum size of a single email Gmail allows users to send is 25 MB. If you plan to send larger files, you’ll have to use Google drive and insert the link to it in the email.
- Concurrent requests – To prevent abuse, Gmail API limits the number of concurrent connections from single user accounts or OAuth clients.
- User-specific limits – To prevent spam, Gmail limits consumer accounts to 500 emails per day, whereas for Workspace accounts it can be anywhere from 100 to 5,000 emails per day, depending on the plan (e.g., Business Starter, Enterprise, etc.)
- Lack of human support – Unfortunately, basic Gmail accounts and Workspace plans don’t offer dedicated customer support, which is only available for higher-tier plans. So you’ll have to either rely on Gmail API documentation or community forums like Stack Overflow for any potential issues you might face.
Note that these limitations are subject to change and are regularly updated by Google.
Is there an alternative to Gmail email infrastructure?
Whether you can’t live with Gmail’s quota limits or sending limits, don’t worry — I have a reliable alternative for you designed to make sure your emails reach your recipients’ inboxes just in time.
Although there are many SMTP and email API providers out there, Mailtrap Email Sending, a part of Mailtrap Email Delivery Platform, is one of the best solutions for developers I’ve found.
Mailtrap Email Sending offers both SMTP and email API services with an impressive throughput of 10,000 emails per second and a plethora of advanced features, such as:
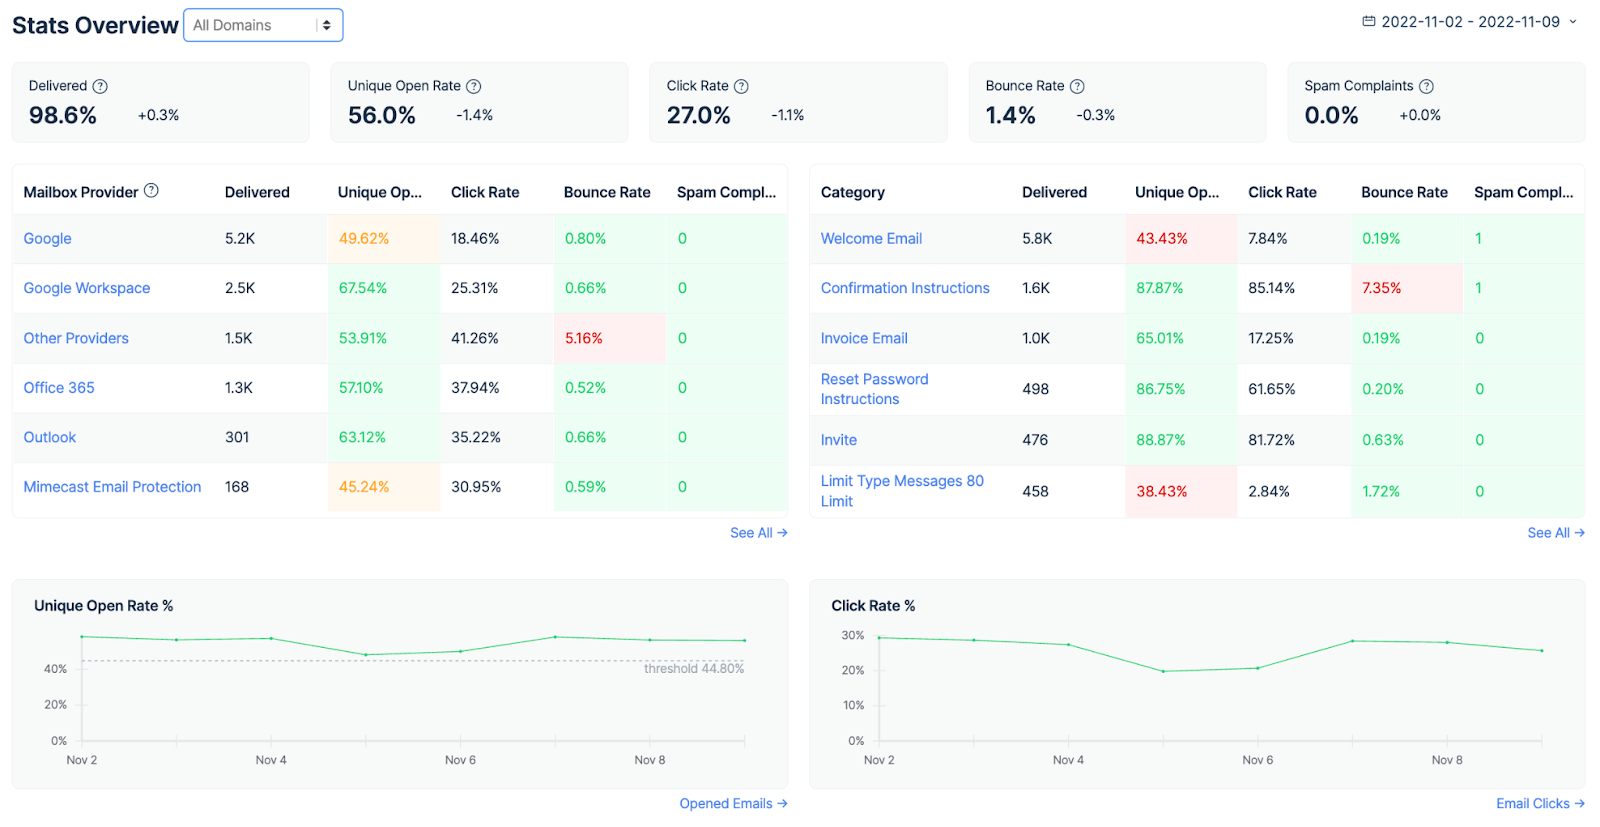
- In-depth analytics – Drill-down reports, helicopter-view dashboards, and stats for every separate email service provider.
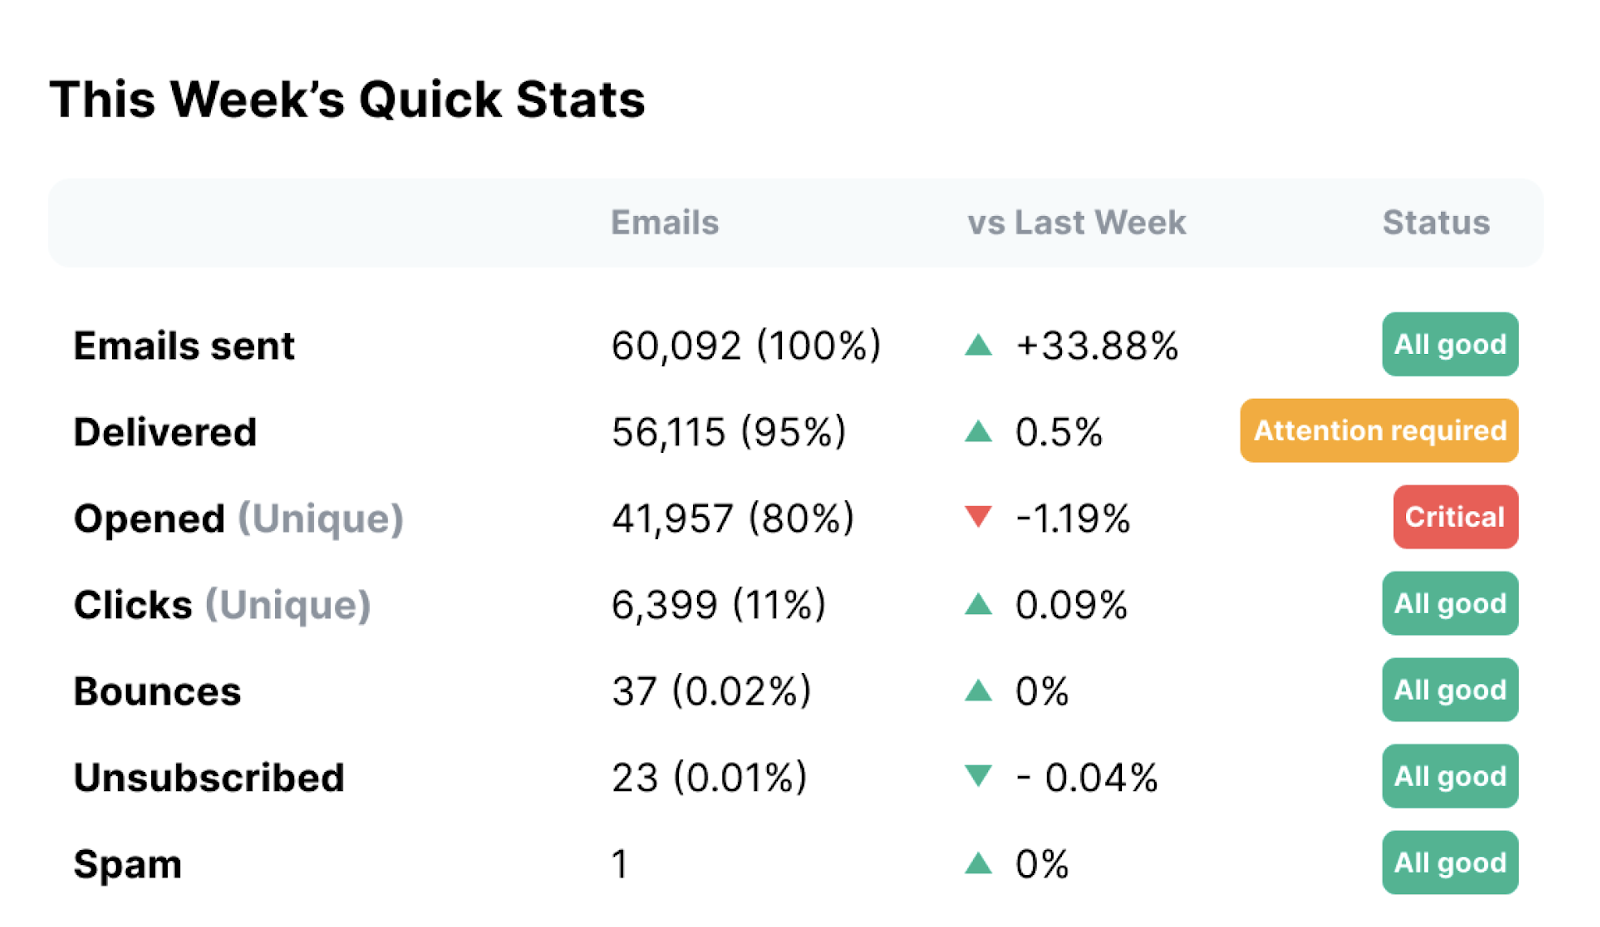
- Detailed email logs – Mailtrap lets you see up to 60 days of email logs, which can be key for any debugging and tracking purposes.
- Deliverability alerts – You receive weekly reports every Monday or hourly alerts if one of the critical metrics goes below the predetermined threshold.
- Email authentication – Mailtrap provides you with DNS records (SPF, DKIM, DMARC) and automatically validates them, and your DKIM keys are rotated quarterly.
- Dedicated customer support team – Unlike Google, Mailtrap has a team of dedicated experts who work around the clock to answer any of your questions or help you solve any potential blockers.
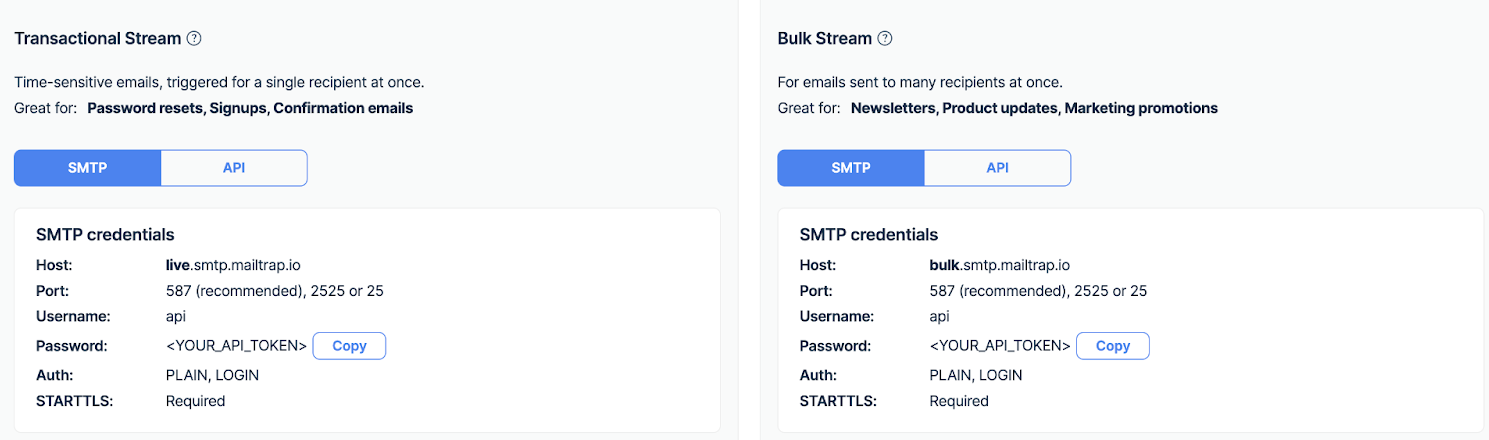
- Transactional and Bulk streams – With Mailtrap, you can either send transactional emails (e.g., password resets and signups) with the Transactional Stream or use the Bulk Stream to send promotional emails to a large number of recipients at once.
Last but not least, Mailtrap Email Sending takes only 5 minutes to set up thanks to its seamless configuration process, check it out!
Wrapping up
And with that, we conclude our Flask send email Gmail guide! 📧
If you can live with its limitations and the lack of some features, then choosing Gmail’s SMTP or API for adding email functionality to your app is a no-brainer.
But, if you’re a developer or product manager looking for a more reliable and advanced solution with high deliverability, Mailtrap would be your best bet.
Interested in expanding your knowledge even further? Be sure to check out our blog, where you can find a plethora of articles related to Python and its frameworks, such as:
- Sending Emails in Python [2024 Guide with Code Examples]
- Send HTML Emails in Python: Guide with Code Examples [2024]
- Python Test Email: A Step-by-Step Guide [2024]
- Send, Receive, and Test Emails in Django
- YagMail Tutorial – How to Send an Email with YagMail | Mailtrap Blog
As well as our YouTube channel with all sorts of tutorials, including ones on Flask: