
Whether you’re a system administrator, a developer, or simply someone looking to automate repetitive email tasks, harnessing the power of Bash scripting can save you time and effort.
In this article, we’ll explore how to leverage different Linux commands in Bash to send emails efficiently. We’ll guide you in using the potential of Bash scripting in Debian distributions to level up your email workflows.
Without much further ado, we’ll dive right into the details.
Before We Start
In Linux, there are numerous commands that allow for sending emails with a bash script. However, for a mail command to work, you need to set up an SMTP server on your machine.
You can use your own SMTP, though the setup and configuration would take a long time, and we won’t cover that in this article. Free external SMTP server providers like Yahoo, or Gmail are also an option.
But here, we’ll focus on using Mailtrap SMTP as a proper MTA, and the configuration would be geared to that. To set up Mailtrap SMTP, you’ll need to do the following.
- Go to our sign-up page to create an account unless you already have one.
- Select Sending Domains and add your domain.
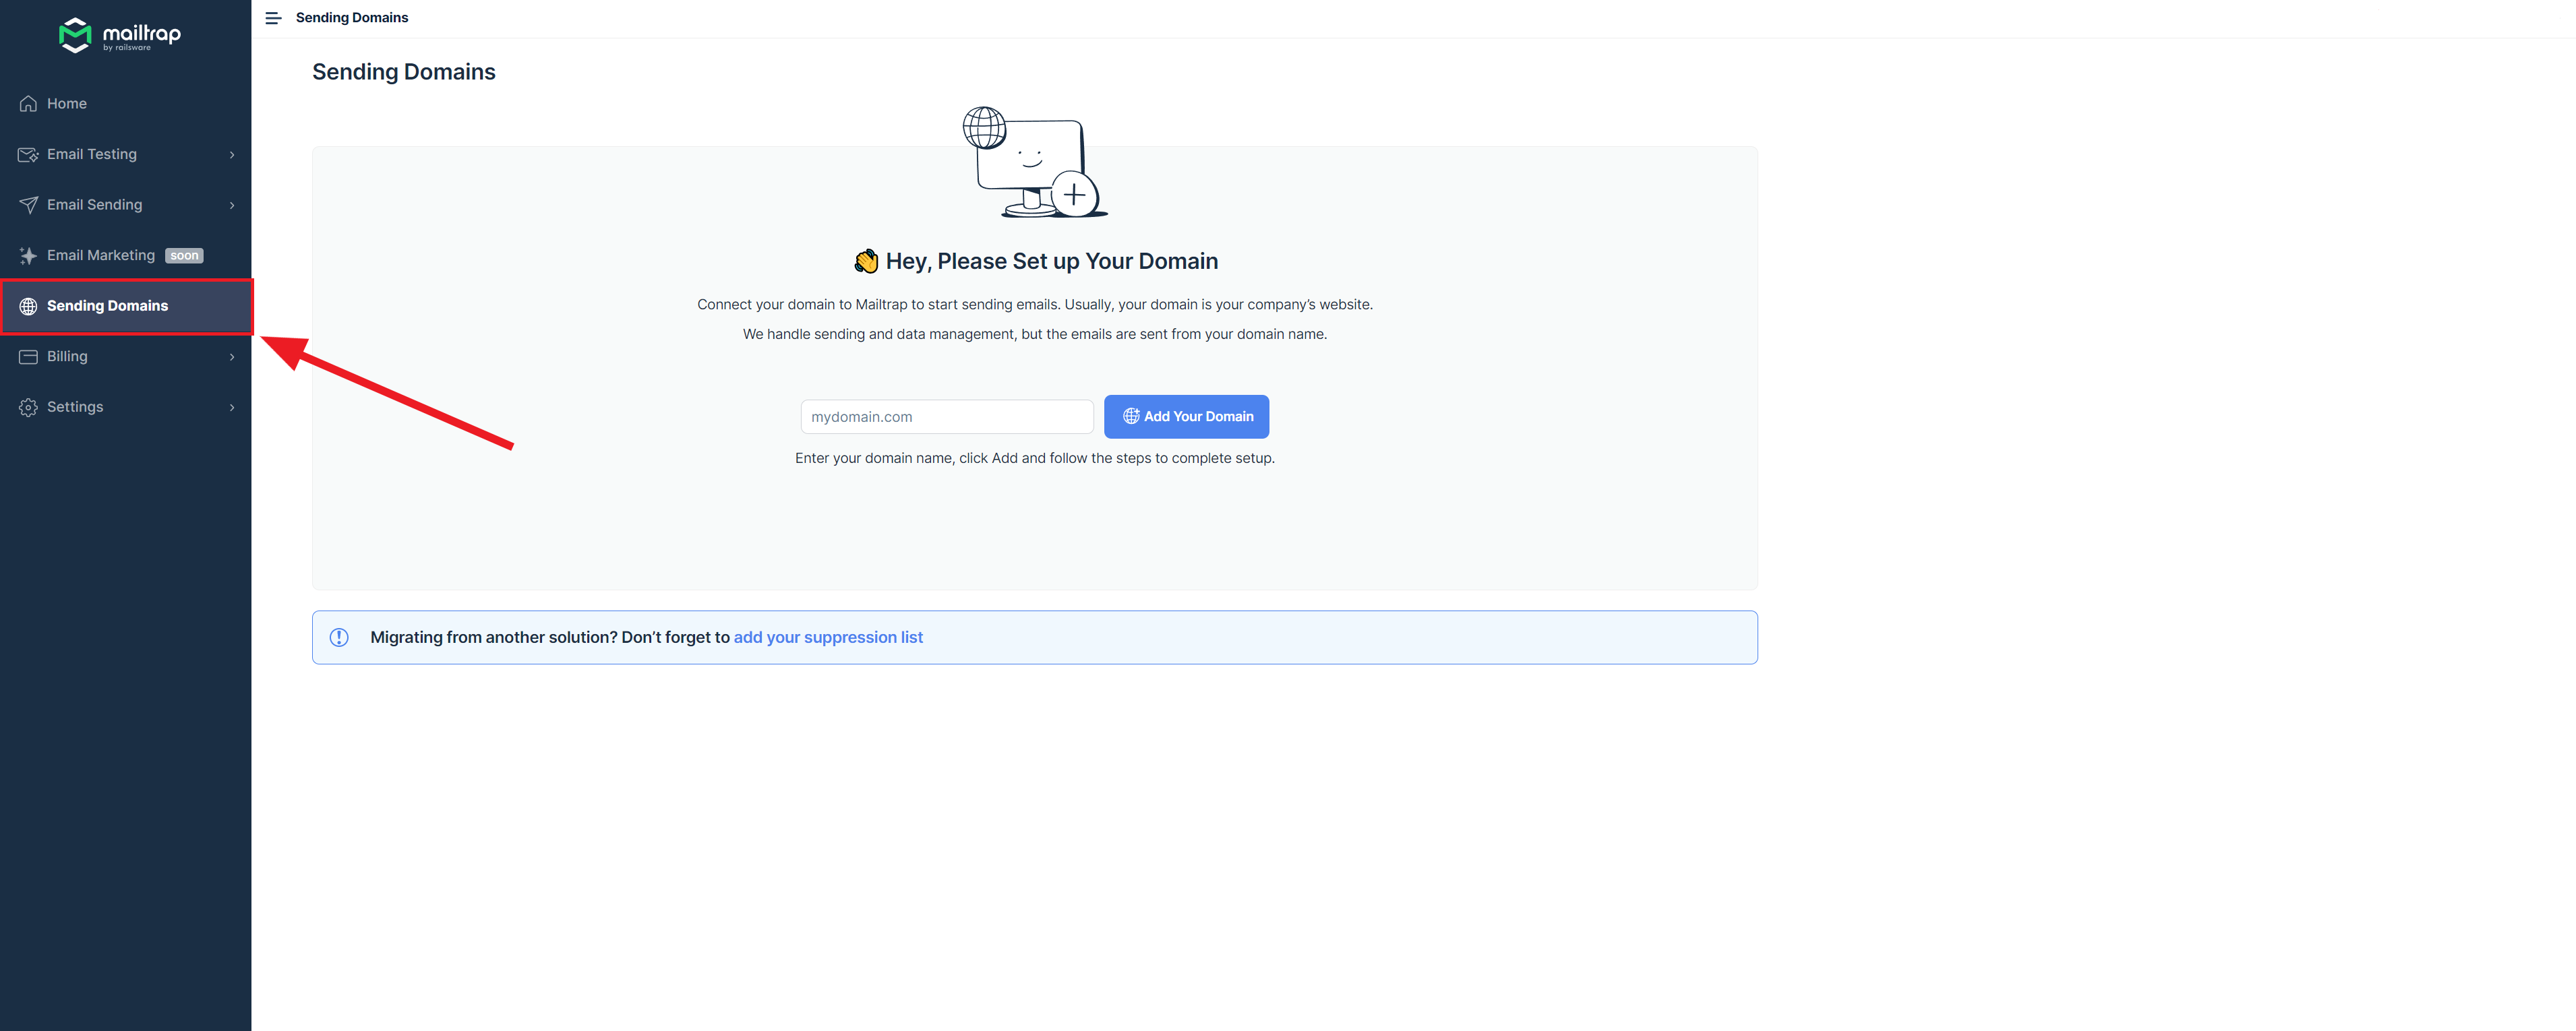
- Verify your domain with provided DNS records, and proceed to the next step.
- Under Sending Domains, navigate to SMTP/API Settings to see your credentials.
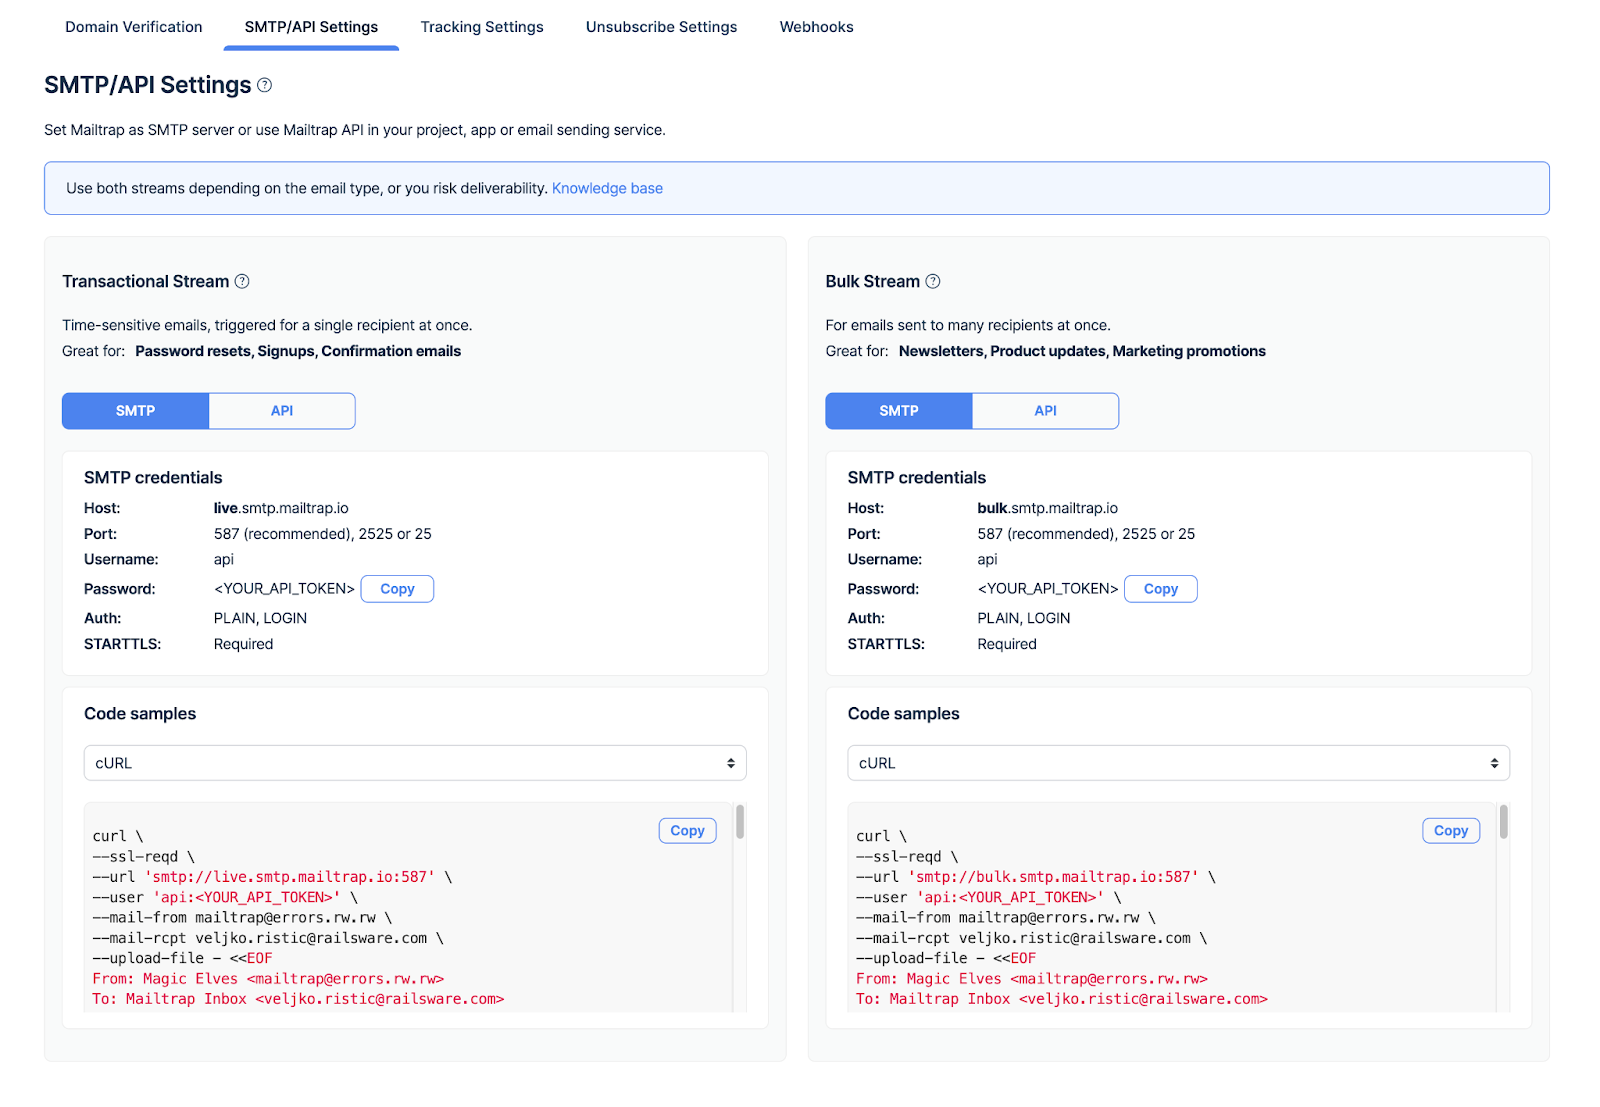
- On your machine, navigate to the
/etc/ssmtp/ssmtp.conffile from command line, and open it using therootprivileges. This facilitates authentication and the connection to our mail server. - At the end of the file, add the lines below to finish up the setup.
UseSTARTTLS=YES
FromLineOverride=YES
root=admin@example.com
mailhub=live.smtp.mailtrap.io:587
AuthUser=api
AuthPass=yourMailtrappassword
hostname=freelance.mailtrap.link
Tips:
- Your domain needs to be verified to be able to send emails. Verification may take up to 72 hours, but you can do it faster by contacting support@mailtrap.io.
- Should you choose to use your Gmail account, and the
smtp.gmail.comSMTP server, note that Google will stop supporting less secure apps in mid-2024. To offset that, you’ll have to generate and use app passwords as well as two-step verification. - We assume that you have the listed commands installed and configured on your machine.
Important notes on the ‘send’ command
The ‘send’ (-s) command isn’t a standalone command for sending emails in Unix/Linux. Instead, it’s often a part of various mail user agents like mutt, mailx, etc.
Here, we’ll use the mutt command to send a simple email message, as it’s among the most popular options. Check a basic Bash script for mutt:
#!/bin/bash
recipient="example1@example.com,example2@example.com"
subject="Greetings!"
body="Hello, World! This is a test email sent using 'mutt'."

echo "$body" | mutt -s "$subject" -- $recipient
In this script, mutt -s "$subject" -- $recipient sends an a plain txt. email with a subject and recipient(s). The message body is provided by the echo command "$body".
Send an email in HTML format:
Unfortunately, mutt does not natively support inline HTML content. You need to use a separate HTML file as the body. Here’s how you could do it:
#!/bin/bash
recipient="example1@example.com,example2@example.com"
subject="Greetings!"
body="/path/to/body.html"

mutt -e "my_hdr Content-Type: text/html" -s "$subject" -i "$body" -- $recipient
In the script, -e "my_hdr Content-Type: text/html" sets the Content-Type header to text/html, and -i "$body" inserts the content of the file specified by the $body.
But you’ll first need to create and save the HTML email body in a separate file and save it, then replace "/path/to/body.html" with the actual path to your file.
Send an email with attachments:
#!/bin/bash
recipient="example1@example.com,example2@example.com"
subject="Greetings!"
body="Hello, World! This is a test email sent using 'mutt'."
attachment="/path/to/file"

echo "$body" | mutt -s "$subject" -a "$attachment" -- $recipient
Here, -a "$attachment" attaches the file specified by the $attachment. And again, you’ll need to replace the "/path/to/file" with the actual location of the file you’d like to send.
Send an email to multiple recipients:
You can send an email to multiple recipients by separating the email addresses with a comma.
#!/bin/bash
recipient="example1@example.com,example2@example.com"
subject="Greetings!"
body="Hello, World! This is a test email sent using 'mutt'."

echo "$body" | mutt -s "$subject" -- $recipient
Keep in mind that this method applies to most of the functions and scripts covered in this article. Basically, if you want to send to multiple recipients, just separate all the addresses with commas to put them in CC. If you want to Bcc someone, that’s slightly different and we won’t cover it in this article.
Also, if you want to learn more about mutt and how to configure and install it, check our “Send Emails with Linux” article.
Sendmail Command
Useful Git. on installing ‘sendmail’. Mind the following:
- Assuming you’re on a clean server, you might also need to install
php-mail. - You might need to add
[.zone]to email addresses. - Useful link to resolve a potential SSL blocker with TLS. Or proceed to create the certificate as
sendmailmay require a more complexAuth.
#!/bin/bash
recipient="example1@example.com,example2@example.com"
subject="Test Email"
body="This is a test email sent using sendmail."

# For HTML emails, add the following line
MIME="MIME-Version: 1.0\nContent-Type: text/html\n"

echo -e "To: $recipient\nSubject: $subject\n$MIME\n\n$body" | sendmail -t
Note: sendmail does not natively support attachments. You would typically need to use mutt or mailx (with some configurations) to handle single or multiple attachments.
Mailx Command
#!/bin/bash
recipient="example1@example.com,example2@example.com"
subject="Test Email"
body="This is a test email sent using mailx."
attachment="/path/to/file"

# For HTML emails, you add the following line
MIME="MIME-Version: 1.0\nContent-Type: text/html\n"

echo "$body" | mailx -s "$subject" -a "$attachment" $recipient
Note: The -a option used for attachments might not work with some versions of mailx. The heirloom mailx version (12.5) does support it, but not all versions do. And again, you need to replace the “/path/to/file" with the actual location, assuming you’re using version 12.5 of mailx.
Msmtp Command
‘msmtp’ is a bit more complicated SMTP client, so let’s put it in a proper context.
In our “Send Emails with Linux” article, we covered the ‘ssmtp’ command, the predecessor to ‘msmtp’. As shown in the article, the command still works on Debian-based distributions, and you can indeed send emails with it.
However, ‘ssmtp’ has been unsupported since March 2019, and the ‘msmtp’ is its supported alternative. The main highlights of the ‘msmtp’ include:
- Email sending via MUA, typically Emacs or Mutt. Just make sure to instruct the MUA on your machine not to call
/usr/sbin/sendmail, but call themsmtp. - Email forwarding to an SMTP (the server facilitates the delivery)
- Profiles – you can configure ‘msmtp’ with different SMTPs and configurations, making it great for mobile clients.
- Command pipelining
- Support for SOCKS proxy and IDN (Internationalized Domain Names)
Now, we’ll give you a more comprehensive tutorial on using and configuring ‘msmtp’ to ensure you get everything right from the start.
Step 1: Installation
Run the following snippet to install ‘msmtp’ and the associated package.
sudo apt-get install msmtp msmtp-mtaStep 2: Configurations
Proceed to create the configuration file by running the command below.
sudo nano /etc/msmtprcThen configure the ‘msmtprc’, your file should look like the below, and note that the snippet is geared towards Mailtrap users.
defaults
auth           on
tls            on
tls_trust_file /etc/ssl/certs/ca-certificates.crt
logfile        ~/.msmtp.log
account        mailtrap
host           live.smtp.mailtrap.io
port           587
from           username@example.com
user           api
password       YourMailtrapPassword //API token actually//
account default : mailtrap
That out of the way, you can run a simple command to see if you configured everything properly.
echo "Message" | mail -s "Title" youremailaddress@gmail.comStep 3: Bash Script
Keep in mind that, the function doesn’t directly accept message input from the command line. Instead, it requires a formatted email file. In our case, we created a file called ‘message.sh’, saved it, and we’ll be referencing that in the bash scripting.
#!/bin/bash
recipient="example1@example.com, example2@example.com"
subject="Test Email"
body="This is a test email sent using msmtp."
attachment="/path/to/file"

# For HTML emails, you add the following line
MIME="MIME-Version: 1.0\nContent-Type: text/html\n"

echo -e "To: $recipient\nFrom: your-email@example.com\nSubject: $subject\n$MIME\n\n$body" > message.txt
msmtp -t < message.txt
./message.sh
msmtp -t < message.txtAnd, as mentioned with a few other commands, if you want to include an attachment, replace the “/path/to/file” with the actual location of your file.
Please remember that these commands will only work if the corresponding tools are correctly installed and configured on your system.
Mailtrap Email API
This section shows you how to send emails with Mailtrap Email API via a Bash script that uses the curl command.
We assume that you already created an account and verified your sending domain, so we won’t repeat those steps.
Step 1: Copy your Mailtrap API token
Your API tokens are under Settings → API Tokens.
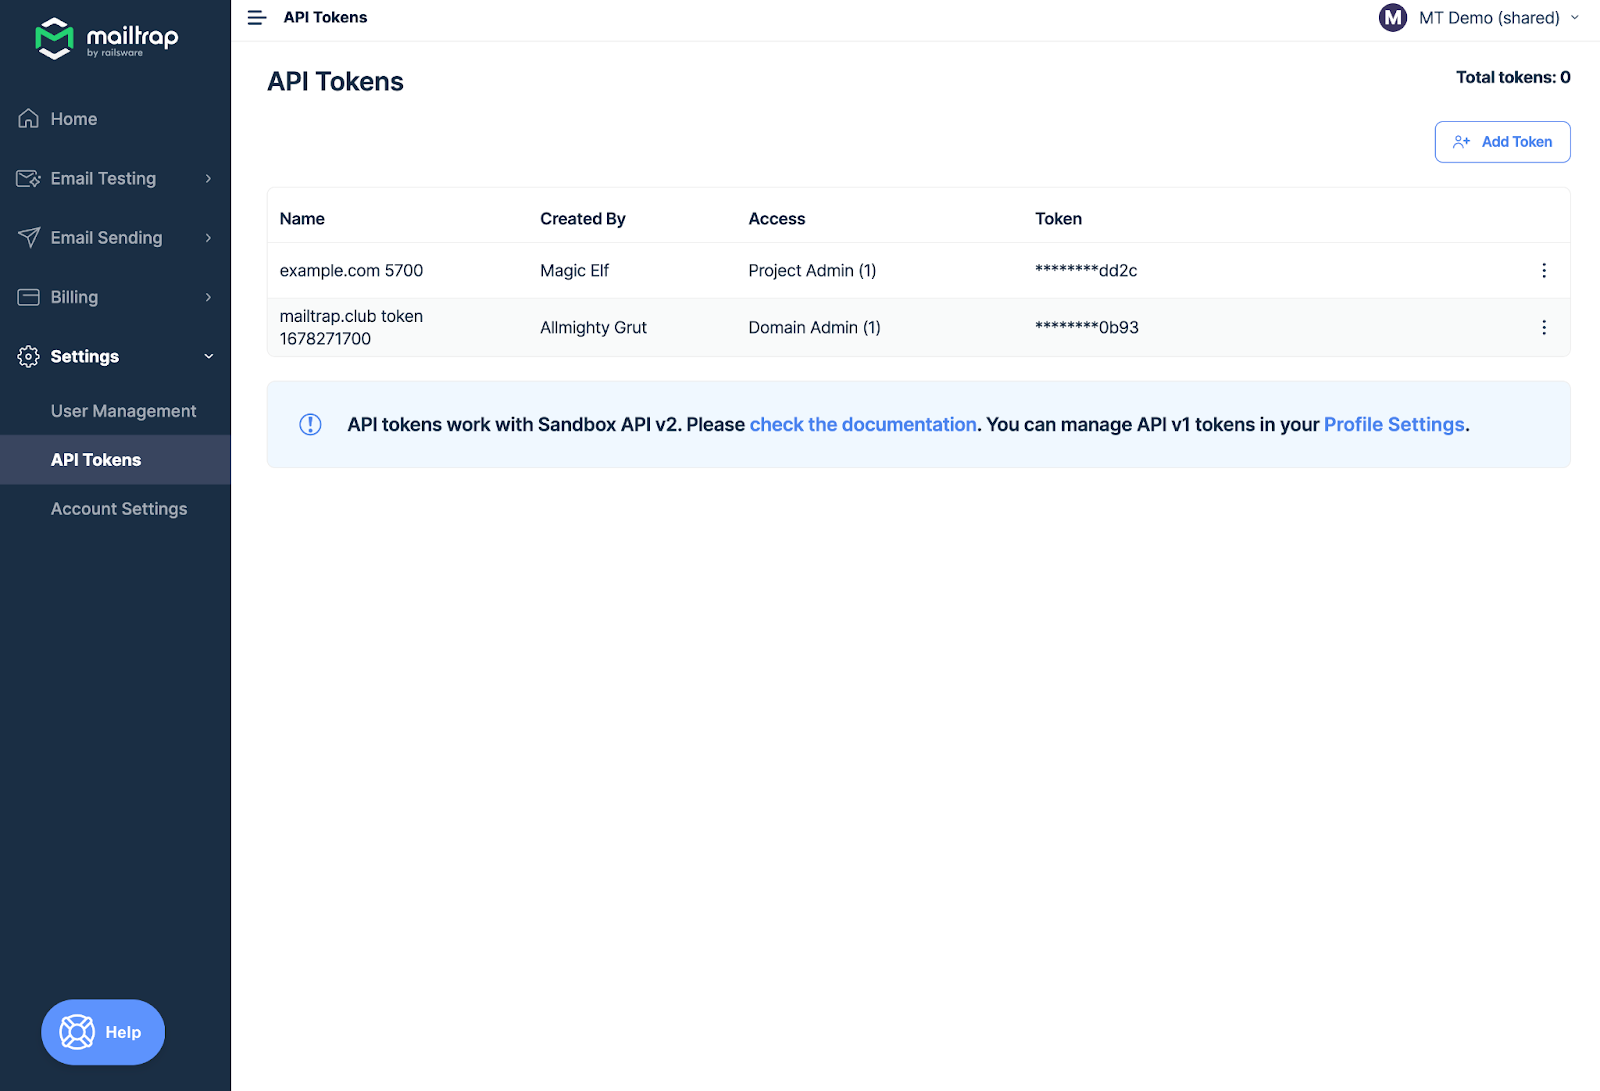
Click the copy button, to the right of the token, then move to the next step.
Note: You need to have domain or account admin privileges to use and manage API tokens.
Step 2: The Bash script
Make a POST request to the Mailtrap API. Here’s an exemplary Bash script that does exactly that.
#!/bin/bash
api_key="your_Mailtrap_api_token"
curl -X POST "https://send.api.mailtrap.io/api/send" \--header "Authorization: Bearer $api_key" \--header 'Content-Type: application/json' \--data-raw '{"from":{"email":"youremail@example.com","name":"Mailtrap Test"},"to":[{"email":"fix"}],"subject":"You are awesome!","text":"Congrats for sending a test email with Mailtrap!","category":"Integration Test"}'
The curl command makes a POST request to our API. And the following are passed as data in the request.
- API key
- Sender and recipient addresses
- Subject
- Email body
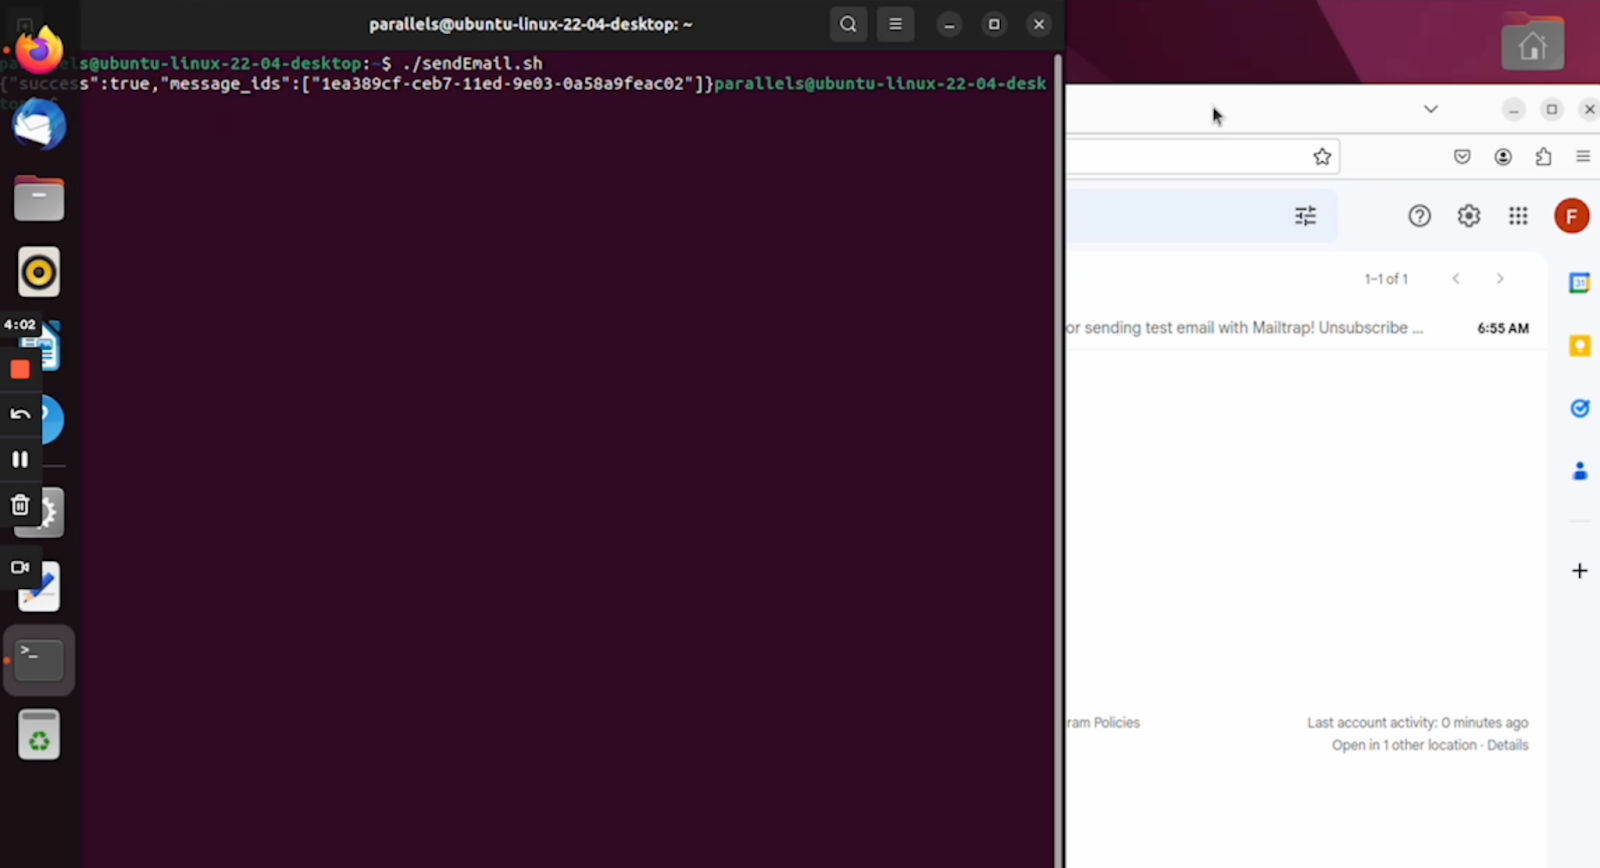
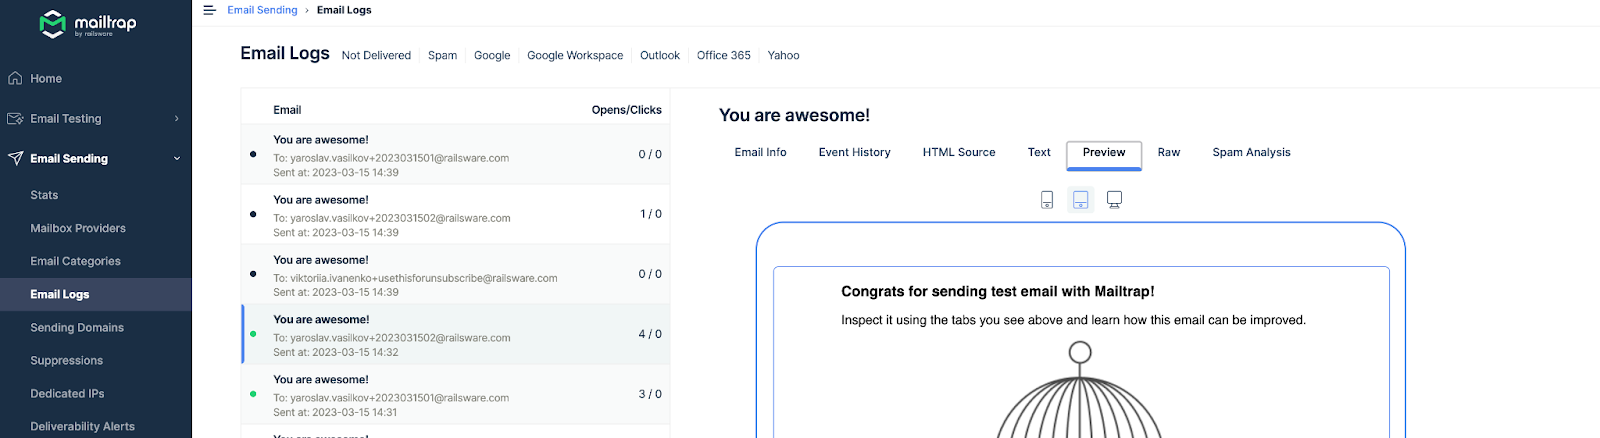
Step 3: Go to Email Logs
Navigate to Mailtrap Email Logs to see if sending was successful. Your email should appear under the logs upon executing the script above.
Before sending: test emails
Mailtrap also provides you with a testing environment with a fake SMTP server. This micro tutorial shows you how to leverage that with a Bash script and test each aspect of your email template.
Notes:
- We assume that you already have a Mailtrap account.
- The script uses the
curlcommand out of convenience – you can configure everything within the command itself. Mailtrap also provides you with 20+ other code examples if you prefer a different syntax. - A slightly different method was covered in our “Send Emails with Linux” article.
Step 1: Get your Testing API token
Navigate to Settings > API Tokens. And now, you want to ensure that your API token has Admin rights to a Mailtrap Testing Project or an Inbox.
So, click the More menu (three vertical dots) to the far right of your API token and select Edit Permissions.
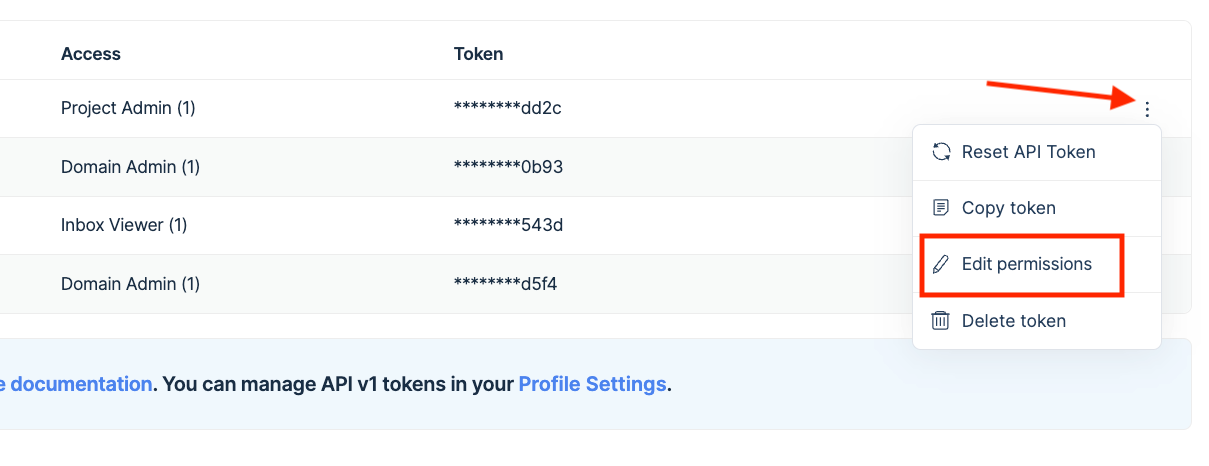
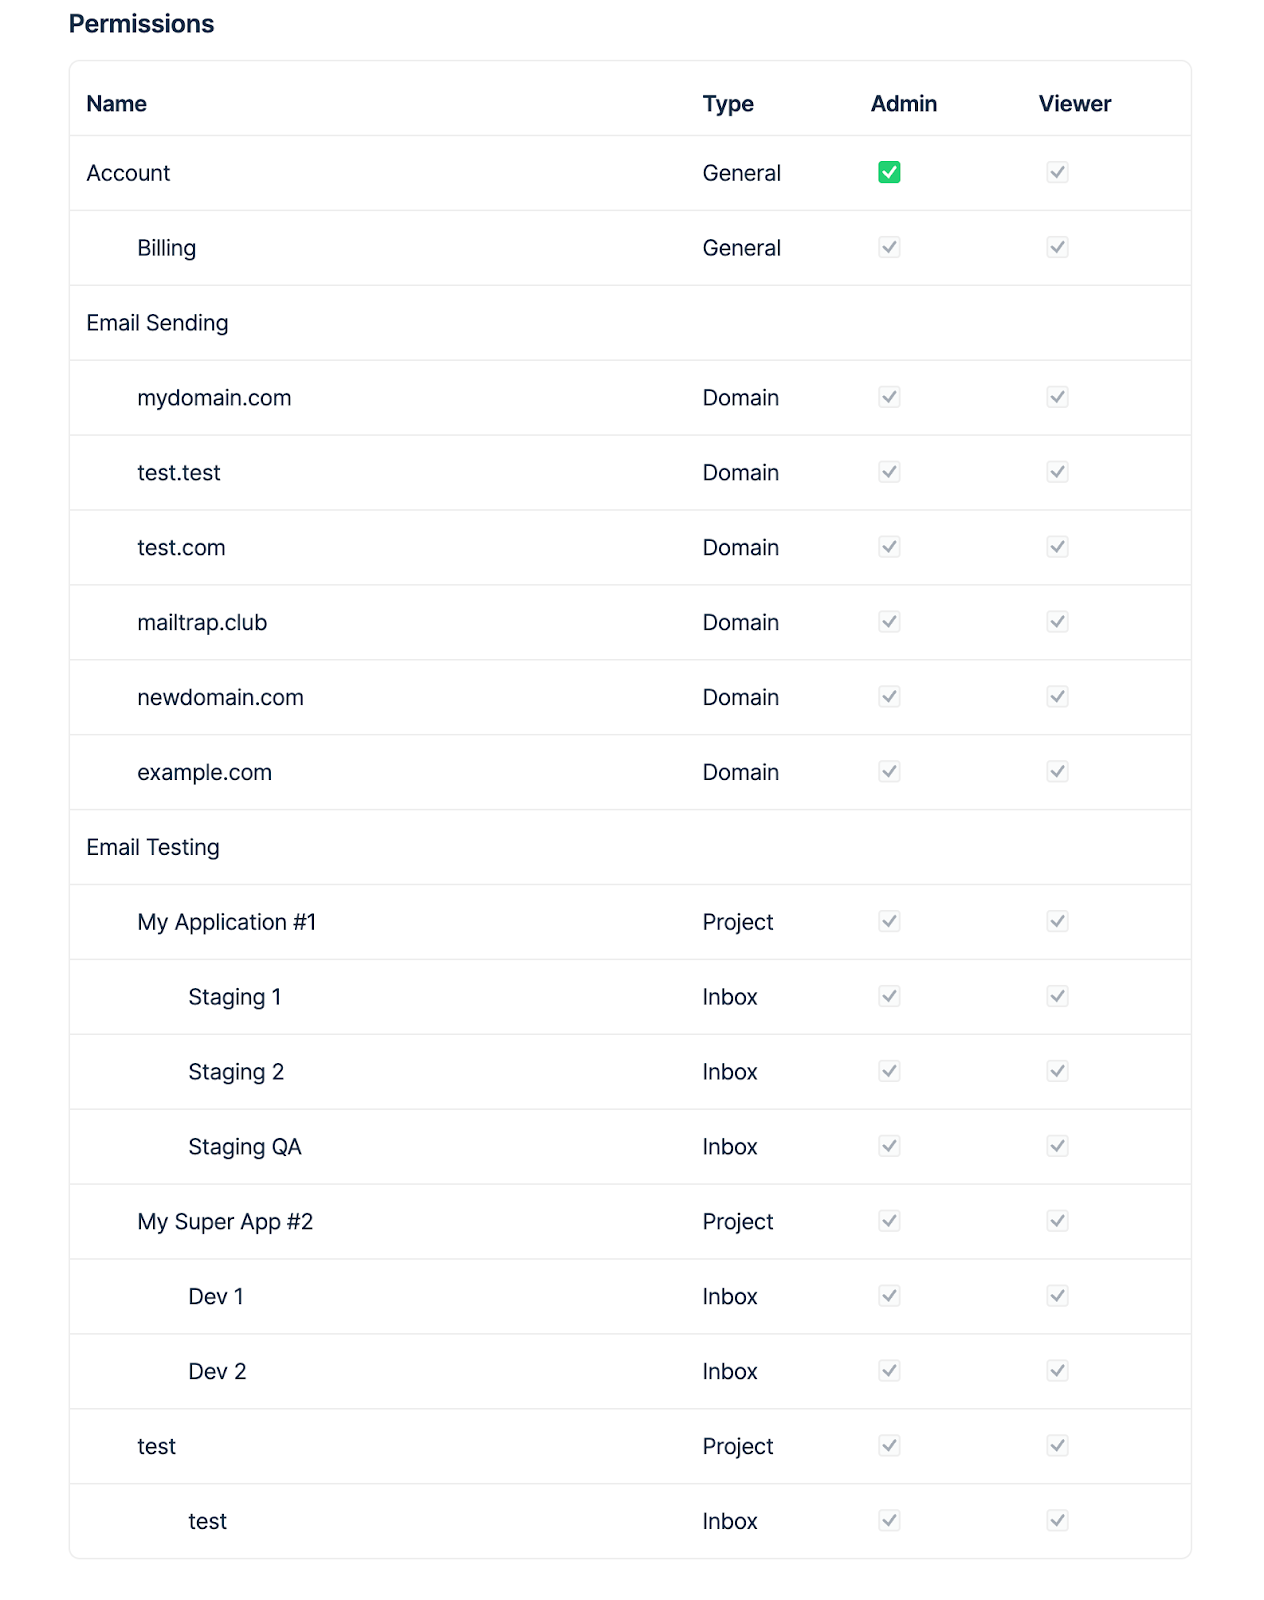
Under Email Testing → Inboxes → Access Rights, check if you have admin rights to test emails within a particular Project or Inbox.
Step 2: Send a Test Email
To send a test email using the Mailtrap API, you will need to make a POST request to the Mailtrap Testing API. Of course, you do it from Linux command line, and here’s an example with curl:
curl  \
--ssl-reqd \
--url 'smtp://sandbox.smtp.mailtrap.io:2525' \
--user 'yourMailtrapTestingAPItoken' \
--mail-from from@example.com \
--mail-rcpt to@example.com \
--upload-file - <<EOF
From: Magic Elves <from@example.com>
To: Mailtrap Inbox <to@example.com>
Subject: You are awesome!
Content-Type: multipart/alternative; boundary="boundary-string"

--boundary-string
Content-Type: text/plain; charset="utf-8"
Content-Transfer-Encoding: quoted-printable
Content-Disposition: inline

Congrats for sending test email with Mailtrap!

Inspect it using the tabs above and learn how this email can be improved.
Now send your email using our fake SMTP server and integration of your choice!

Good luck! Hope it works.

--boundary-string
Content-Type: text/html; charset="utf-8"
Content-Transfer-Encoding: quoted-printable
Content-Disposition: inline

<!doctype html>
<html>
  <head>
    <meta http-equiv="Content-Type" content="text/html; charset=UTF-8">
  </head>
  <body style="font-family: sans-serif;">
    <div style="display: block; margin: auto; max-width: 600px;" class="main">
      <h1 style="font-size: 18px; font-weight: bold; margin-top: 20px">Congrats for sending test email with Mailtrap!</h1>
      <p>Inspect it using the tabs you see above and learn how this email can be improved.</p>
      <img alt="Inspect with Tabs" src="https://assets-examples.mailtrap.io/integration-examples/welcome.png" style="width: 100%;">
      <p>Now send your email using our fake SMTP server and integration of your choice!</p>
      <p>Good luck! Hope it works.</p>
    </div>
    <!-- Example of invalid for email html/css, will be detected by Mailtrap: -->
    <style>
      .main { background-color: white; }
      a:hover { border-left-width: 1em; min-height: 2em; }
    </style>
  </body>
</html>

--boundary-string--
EOF
In the script, the curl command makes a POST request to the Mailtrap API. The API key, inbox ID, sender and recipient email addresses, and the subject and message body are all passed as data in the request.
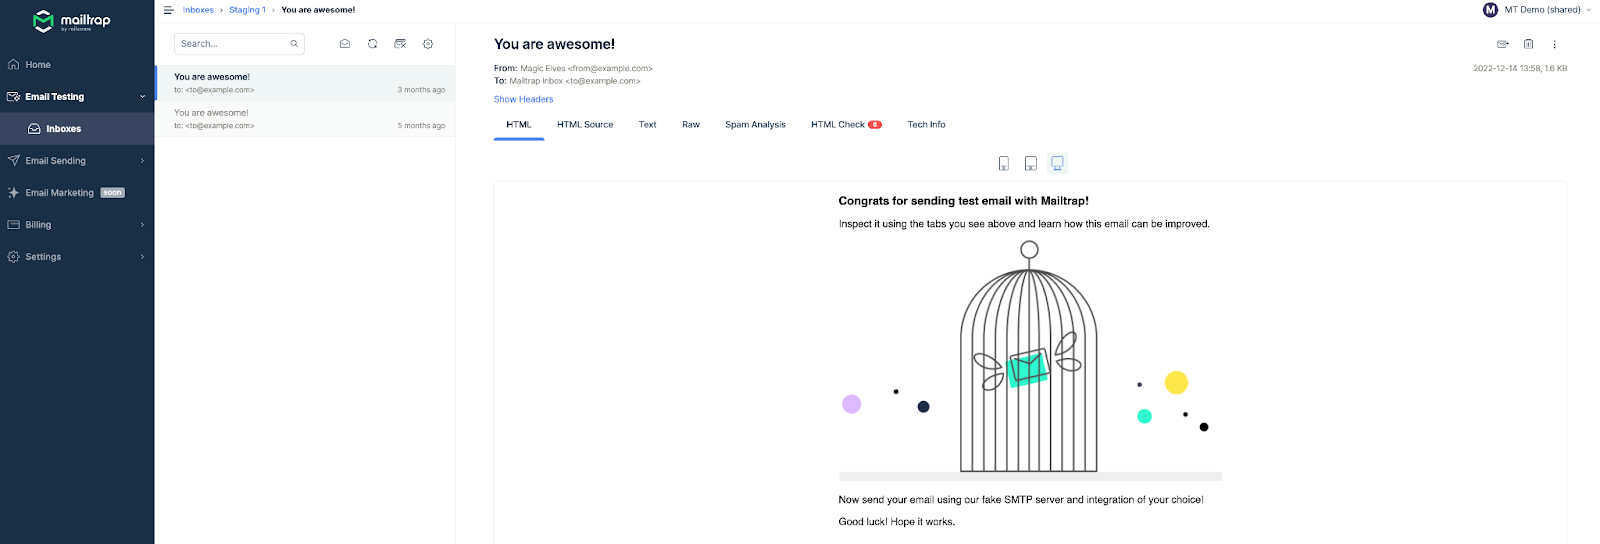
Step 3: Check Your Mailtrap Inbox
Run the script, then go to Mailtrap Inbox to see if it was successful. The test email should appear in your Mailtrap Inbox.
Here Bash, there Bash, everywhere a Bash script
Mastering the art of email automation with Bash scripting opens up a world of possibilities. By leveraging the different commands and techniques we’ve explored in this article, you can streamline your email workflow, save time, and reduce repetitive tasks.
Feel free to experiment with the examples provided and adapt them to suit your email message. With the power of Bash scripting at your fingertips, you’re well-equipped to tcfake full control of your email communication. Embrace the automation revolution and watch your productivity soar!