Skip to Navigation


Mailtrap Email Sending templates support the Handlebars templating language. It combines an input object (JSON) and a template to create text formats, HTML, or an email subject.
You can use Handlebars syntax to personalize your email templates and insert specific information for each of your recipients.
For instance, you may have a client business name called “business name” under a JSON object property. Then, using {{business name}} Handlebars expression somewhere in the template, you can insert the property value to an email template.
The main benefit of using this syntax is that you don’t have to update your code base. The dynamic templating happens fast and outside the code base.
Using Handlebars with Mailtrap
Note that Handlebars supports a bunch of features, not just the variable replacement. Mailtrap templates support the standard set of Helpers, and here’s the shortlist:
- Basic Replacement
- Conditional statements:
{{#if}},{{#unless}},{{#each}}, and{{#with}}
The following sections give you examples for each of the helpers including code blocks, mock JSON data, and HTML output. With these, you shouldn’t find it hard to customize Mailtrap templates to your needs.
Basic Replacement
The basic usage is just to render the values you pass. You can use objects and refer to variables like {{object_name.variable}}.
If the variable is present in the data you pass – it won’t be rendered.
If you want to do a replacement with HTML, use triple brackets {{{value_with_html}}}.
Template
<p>Hello {{firstName}} {{lastName}}!</p>
<p>Click this <a href="{{url}}">link</a></p>
<p>{{company.name}}, {{company.adress}}</p>
<p>{{{signature}}}</p>
JSON Object
{
  "firstName": "John",
  "lastName": "Smith",
  "url": "http://example.com",
  "company": {
    "name": "Best Company",
    "adress": "Its Address"
  },
  "signature": "<strong>thanks!<strong>"
}
HTML output
<p>Hello John Smith!</p>
<p>Click this <a href="http://example.com">link</a></p>
<p>Best Company, Its Address</p>
<p><strong>thanks!<strong></p>
Conditional Statements
if
else
if else
Use the if helper for conditional block rendering.
Note: Should the argument return "", 0, nil, false, empty_map, empty_slice, or an empty_array, then the block won’t be rendered.
if block helper in an email template:
{{#if user.isSubscribed}}
  <p>Hello {{user.name}},</p>
  <p>Thank you for subscribing to our newsletter!</p>
{{else}}
  <p>Hello {{user.name}},</p>
  <p>We noticed that you have not yet subscribed to our newsletter. Click <a href='#'>here</a> to subscribe.</p>
{{/if}}
The JSON test data for the example above may look like this:
{
  "user": {
    "name": "Jane Doe",
    "isSubscribed": true
  }
}
HTML email output would be:
  <p>Hello Jane Doe,</p>
  <p>Thank you for subscribing to our newsletter!</p>
If you change the isSubscribed variable to false in JSON data, the HTML output is:
  <p>Hello Jane Doe,</p>
<p>We noticed that you have not yet subscribed to our newsletter. Click <a href='#'>here</a> to subscribe.</p>Note: the examples above include both if and else expressions. Of course, you can use only if, but it’s recommendable to include else as well to cover the scenario where a conditional statement is false.
unless
The unless block helper works like an inverse if. Simply put, it renders when the expression returns a false value.
unless block helper in an email template:
{{#unless user.isSubscribed}}
  <p>Hello {{user.name}},</p>
  <p>We noticed that you have not yet subscribed to our newsletter. Click <a href='#'>here</a> to subscribe.</p>
{{else}}
  <p>Hello {{user.name}},</p>
  <p>Thank you for subscribing to our newsletter!</p>
{{/unless}}
The JSON test data for the example above may look like this:
{
  "user": {
    "name": "Jane Doe",
    "isSubscribed": false
  }
}
HTML email output would be:
<p>Hello Jane Doe,</p>
<p>We noticed that you have not yet subscribed to our newsletter. Click <a href='#'>here</a> to subscribe.</p>
The block helper example also contains {{else}} and should the isSubscribed variable be true, here’s the HTML output:
  <p>Hello Jane Doe,</p>
  <p>Thank you for subscribing to our newsletter!</p>
each
The {{#each}} helper is used to iterate over an object or array, then execute a block of code for each item.
In the example below, {{#each user.items}} iterate over the user.items array, then execute the code inside the block.
Note: {{this}} helper is used as a reference to the current item in the iteration.
each block helper in an email template:
{{#each user.items}}
  <p>Item: {{this}}</p>
{{/each}}
The JSON test data for the example above may look like this:
{
  "user": {
    "name": "Jane Doe",
    "items": ["Item 1", "Item 2", "Item 3"]
  }
}
HTML email output would be:
  <p>Item: Item 1</p>
  <p>Item: Item 2</p>
  <p>Item: Item 3</p>
each block helper including an {{else}} block:
{{#each user.items}}
  <p>Item: {{this}}</p>
{{else}}
  <p>No items found</p>
{{/each}}
The JSON test data for the example above may look like the below. Keep in mind that we deliberately kept the "items" variable empty to generate “No items found” output.
{
  "user": {
    "name": "Jane Doe",
    "items": []
  }
}
HTML email output would be:
<p>No items found</p>with
You can use the with helper to change the context in which the code block gets executed.
In the example below, the {{with user}} block sets the context for the user object. Consequently, the {{name}} and {{email}} can be accessed directly. This is useful when you want to avoid writing long chains of nested property accessors.
{{#with user}}
  <p>Name: {{name}}</p>
  <p>Email: {{email}}</p>
{{/with}}
The JSON test data for the example above may look like this:
{
  "user": {
    "name": "Jane Doe",
    "email": "jane.doe@example.com"
  }
}
HTML email output would be:
<p>Name: Jane Doe</p>
<p>Email: jane.doe@example.com</p>
with block helper including {{else}}
In the example below, the {{else}} clause only gets executed if there’s no value within the {{with}} block.
{{#with user}}
  <p>Name: {{name}}</p>
  <p>Email: {{email}}</p>
{{else}}
  <p>No user found</p>
{{/with}}
The JSON test data for the example above may look like this:
{
  "user": null
}
HTML email output would be:
<p>No user found</p>Example of an Order Confirmation Template
The following example contains the majority of Handlebars helpers explained above as well as mock JSON data, and HTML output.
Email template in HTML:
<html>
  <body>
    <h1>Order Confirmation</h1>
    <p>Hello {{customer.name}},</p>
    <p>Thank you for your order! Your order number is {{order.number}}.</p>
    <p>Your order details are:</p>
    <table>
      <thead>
        <tr>
          <th>Product</th>
          <th>Quantity</th>
          <th>Price</th>
        </tr>
      </thead>
      <tbody>
        {{#each order.items}}
        <tr>
          <td>{{name}}</td>
          <td>{{quantity}}</td>
          <td>${{price}}</td>
        </tr>
        {{/each}}
      </tbody>
    </table>
    <p>Shipping to:</p>
    <address>
      {{#with customer.address}}
        {{#if company}}
          {{company}}<br>
        {{/if}}
        {{firstName}} {{lastName}}<br>
        {{street}}<br>
        {{city}}, {{state}} {{zip}}<br>
        {{country}}
      {{/with}}
    </address>
    <p>Your order will be shipped {{#unless order.isRush}}within 3-5 business days{{else}}within 24 hours{{/unless}}.</p>
    <p>Total: ${{order.total}}</p>
    <p>Thank you for shopping with us!</p>
  </body>
</html>
Mock JSON data:
{
  "customer": {
    "name": "John Smith",
    "address": {
      "company": "My company",
      "firstName": "John",
      "lastName": "Smith",
      "street": "123 Main St",
      "city": "Anytown",
      "state": "State",
      "zip": "ZIP",
      "country": "USA"
    }
  },
  "order": {
    "number": "123456",
    "items": [
      {
        "name": "Product 1",
        "quantity": "1",
        "price": "10"
      },
      {
        "name": "Product 2",
        "quantity": "2",
        "price": "20"
      }
    ],
    "isRush": true,
    "total": 50
  }
}
HTML email output would be:
<html>
  <body>
    <h1>Order Confirmation</h1>
    <p>Hello John Smith,</p>
    <p>Thank you for your order! Your order number is 123456.</p>
    <p>Your order details are:</p>
    <table>
      <thead>
        <tr>
          <th>Product</th>
          <th>Quantity</th>
          <th>Price</th>
        </tr>
      </thead>
      <tbody>
        <tr>
          <td>Product 1</td>
          <td>1</td>
          <td>$10</td>
        </tr>
        <tr>
          <td>Product 2</td>
          <td>2</td>
          <td>$20</td>
        </tr>
      </tbody>
    </table>
    <p>Shipping to:</p>
    <address>
      My company<br>
      John Smith<br>
      123 Main St<br>
      Anytown, State ZIP<br>
      USA
    </address>
    <p>Your order will be shipped within 24 hours.</p>
    <p>Total: $50</p>
    <p>Thank you for shopping with us!</p>
  </body>
</html>
Testing your email template with Mailtrap API
In the quick tutorial below, I’m assuming you’ve activated both Mailtrap Email Testing and Email Sending.
- Navigate to Email Sending > Email Templates in the menu on the left.
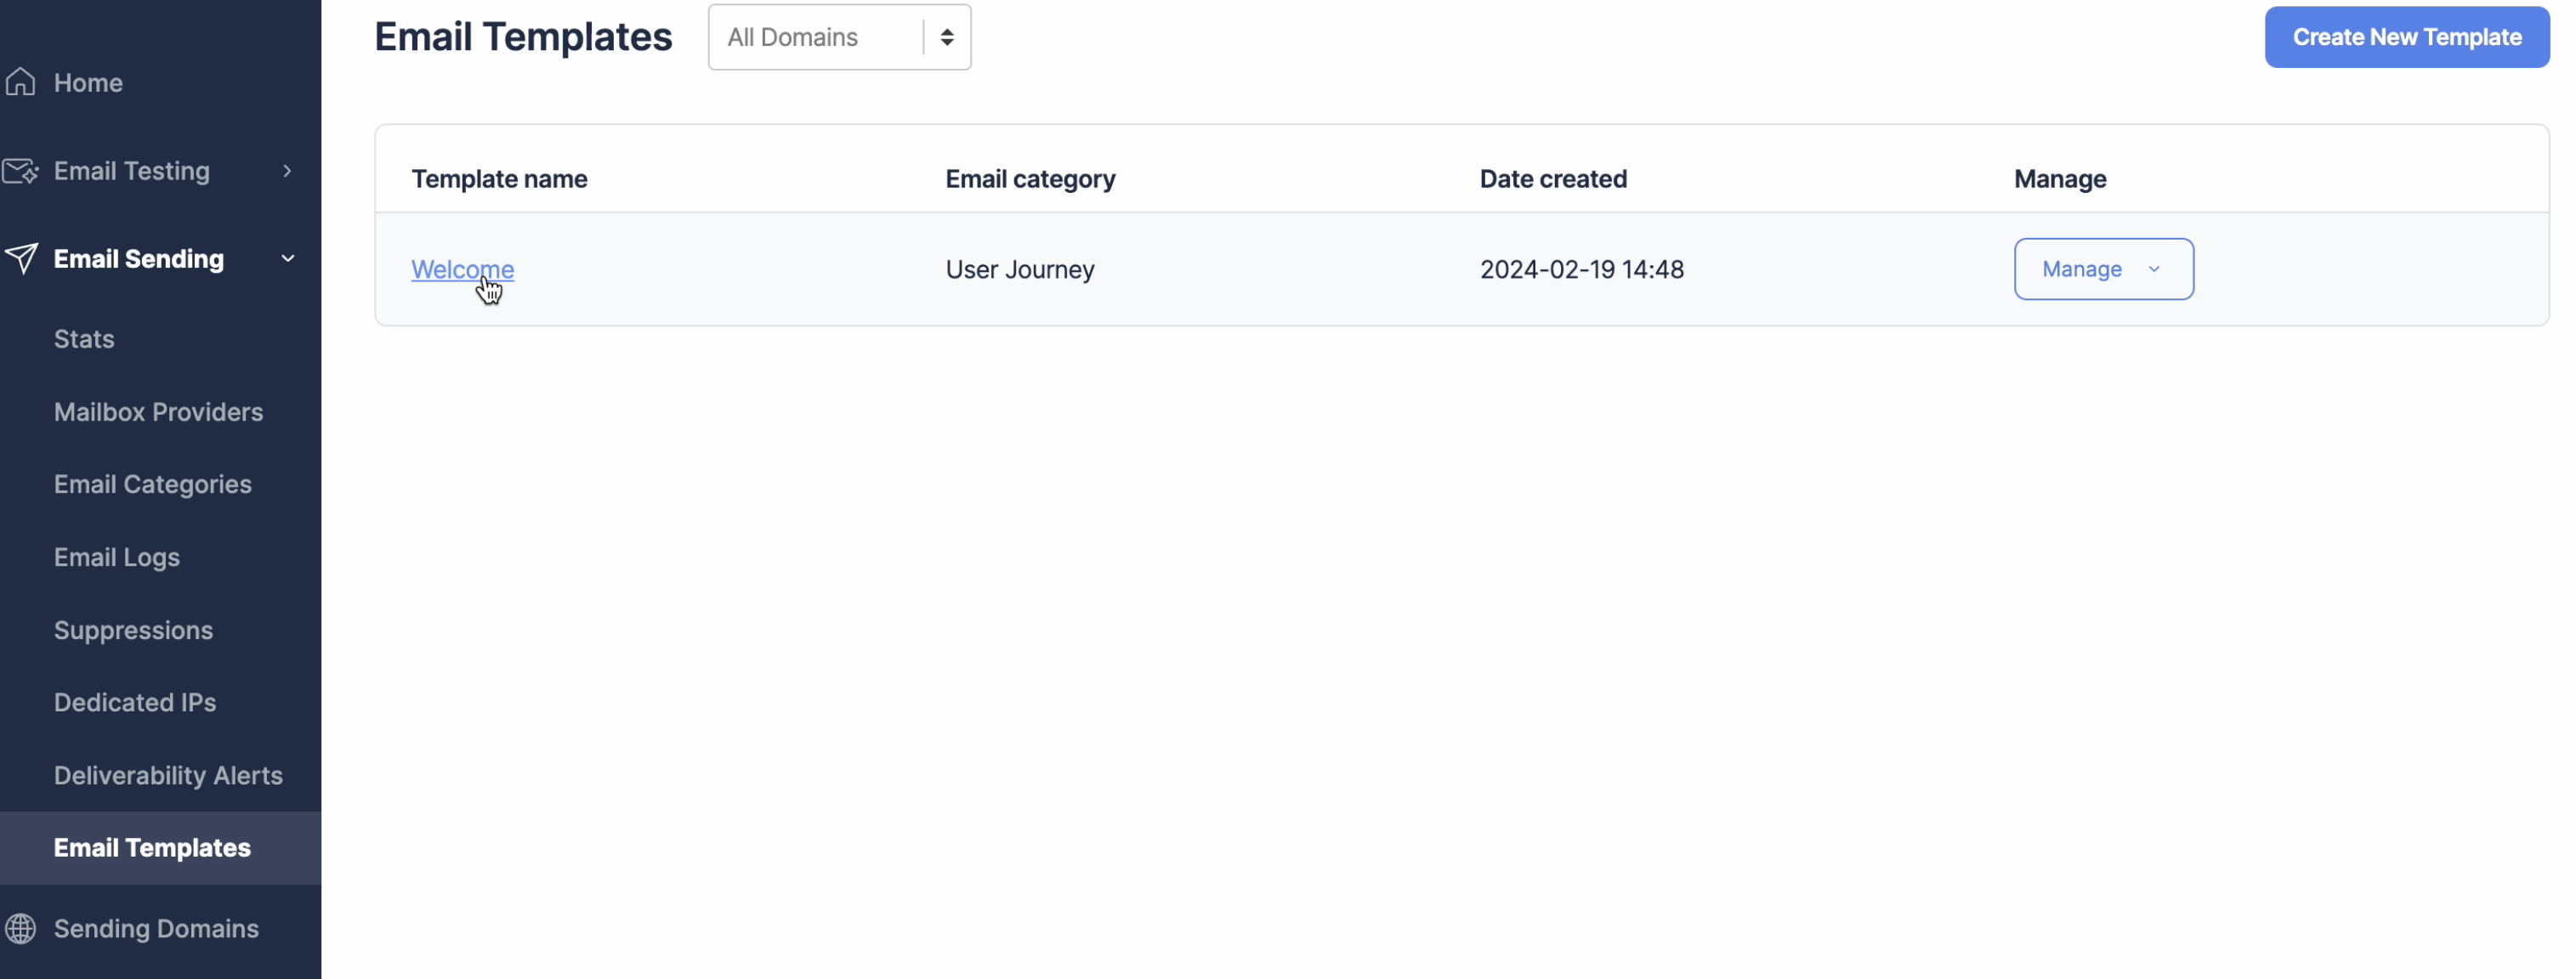
- Select your email template and click the Integrations tab.
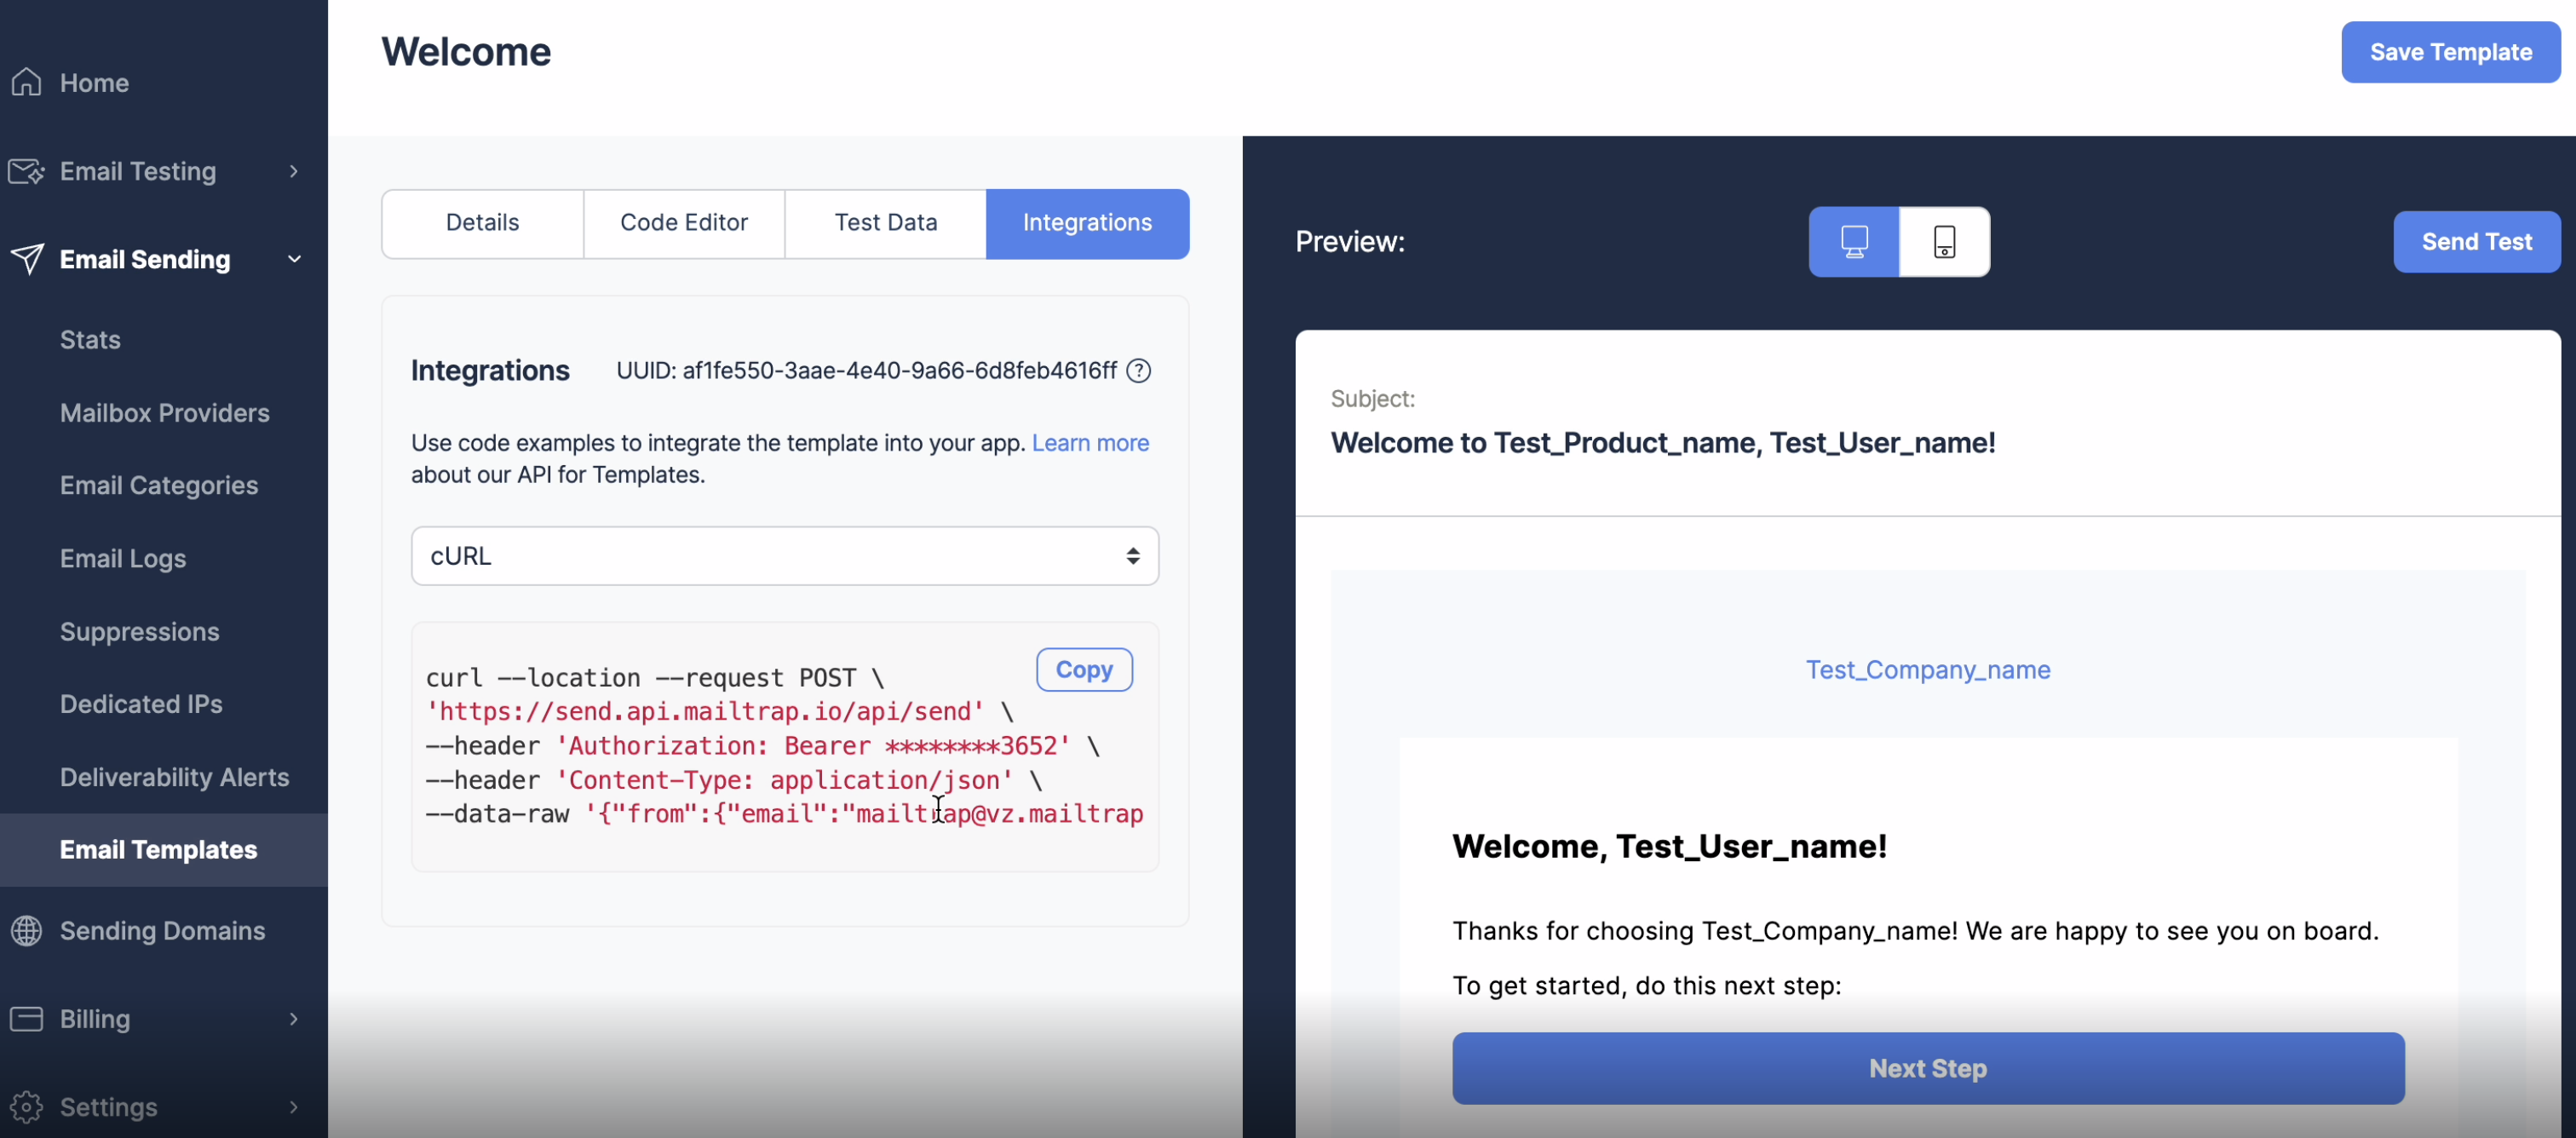
- Copy the code under the Integrations tab (cURL, or any other based on your preference)
- To test the template, you only need to change the Sending API endpoint (send.api.mailtrap.io) to Testing API (sandbox.api.mailtrap.io) and add the
inbox_idto the end of the endpoint URL.
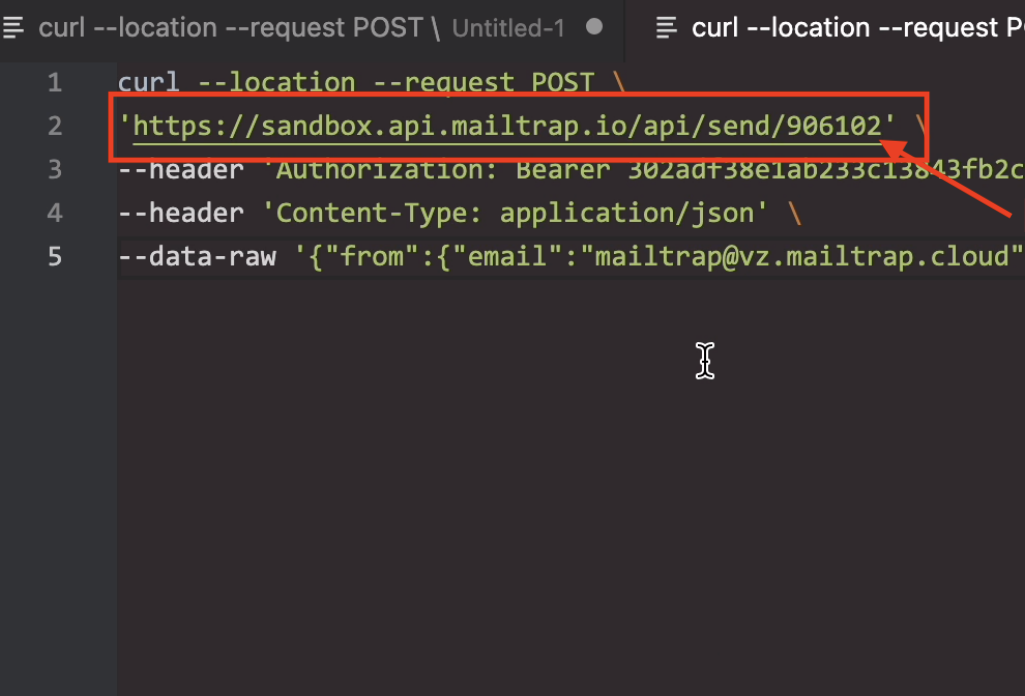
- Finally, run the template test and check the associated inbox to preview the template under sandbox.
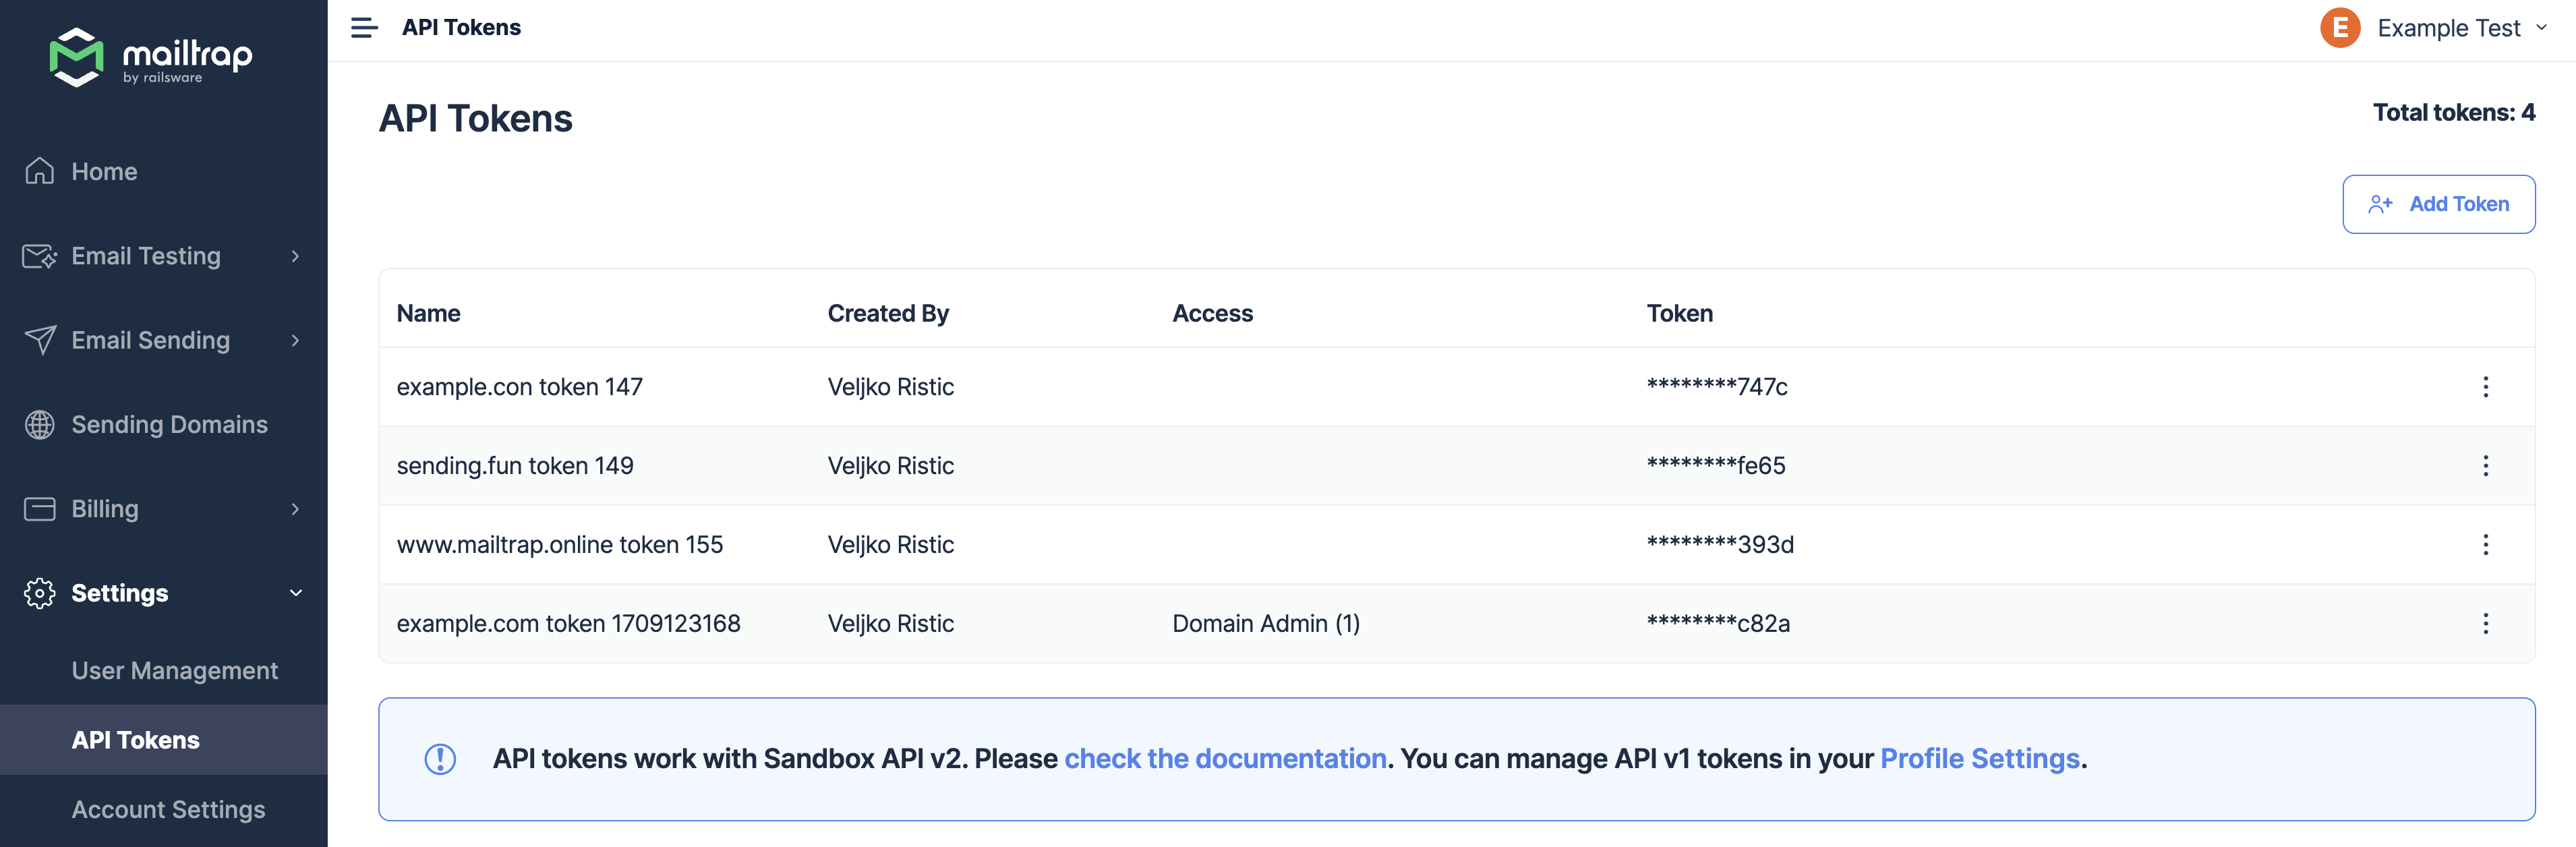
Important Notes:
- Pay attention that the
Authorization: Bearer(API token) token is related to the Inbox you’re targeting. You can check (and copy-paste) the token under Settings > API Tokens.
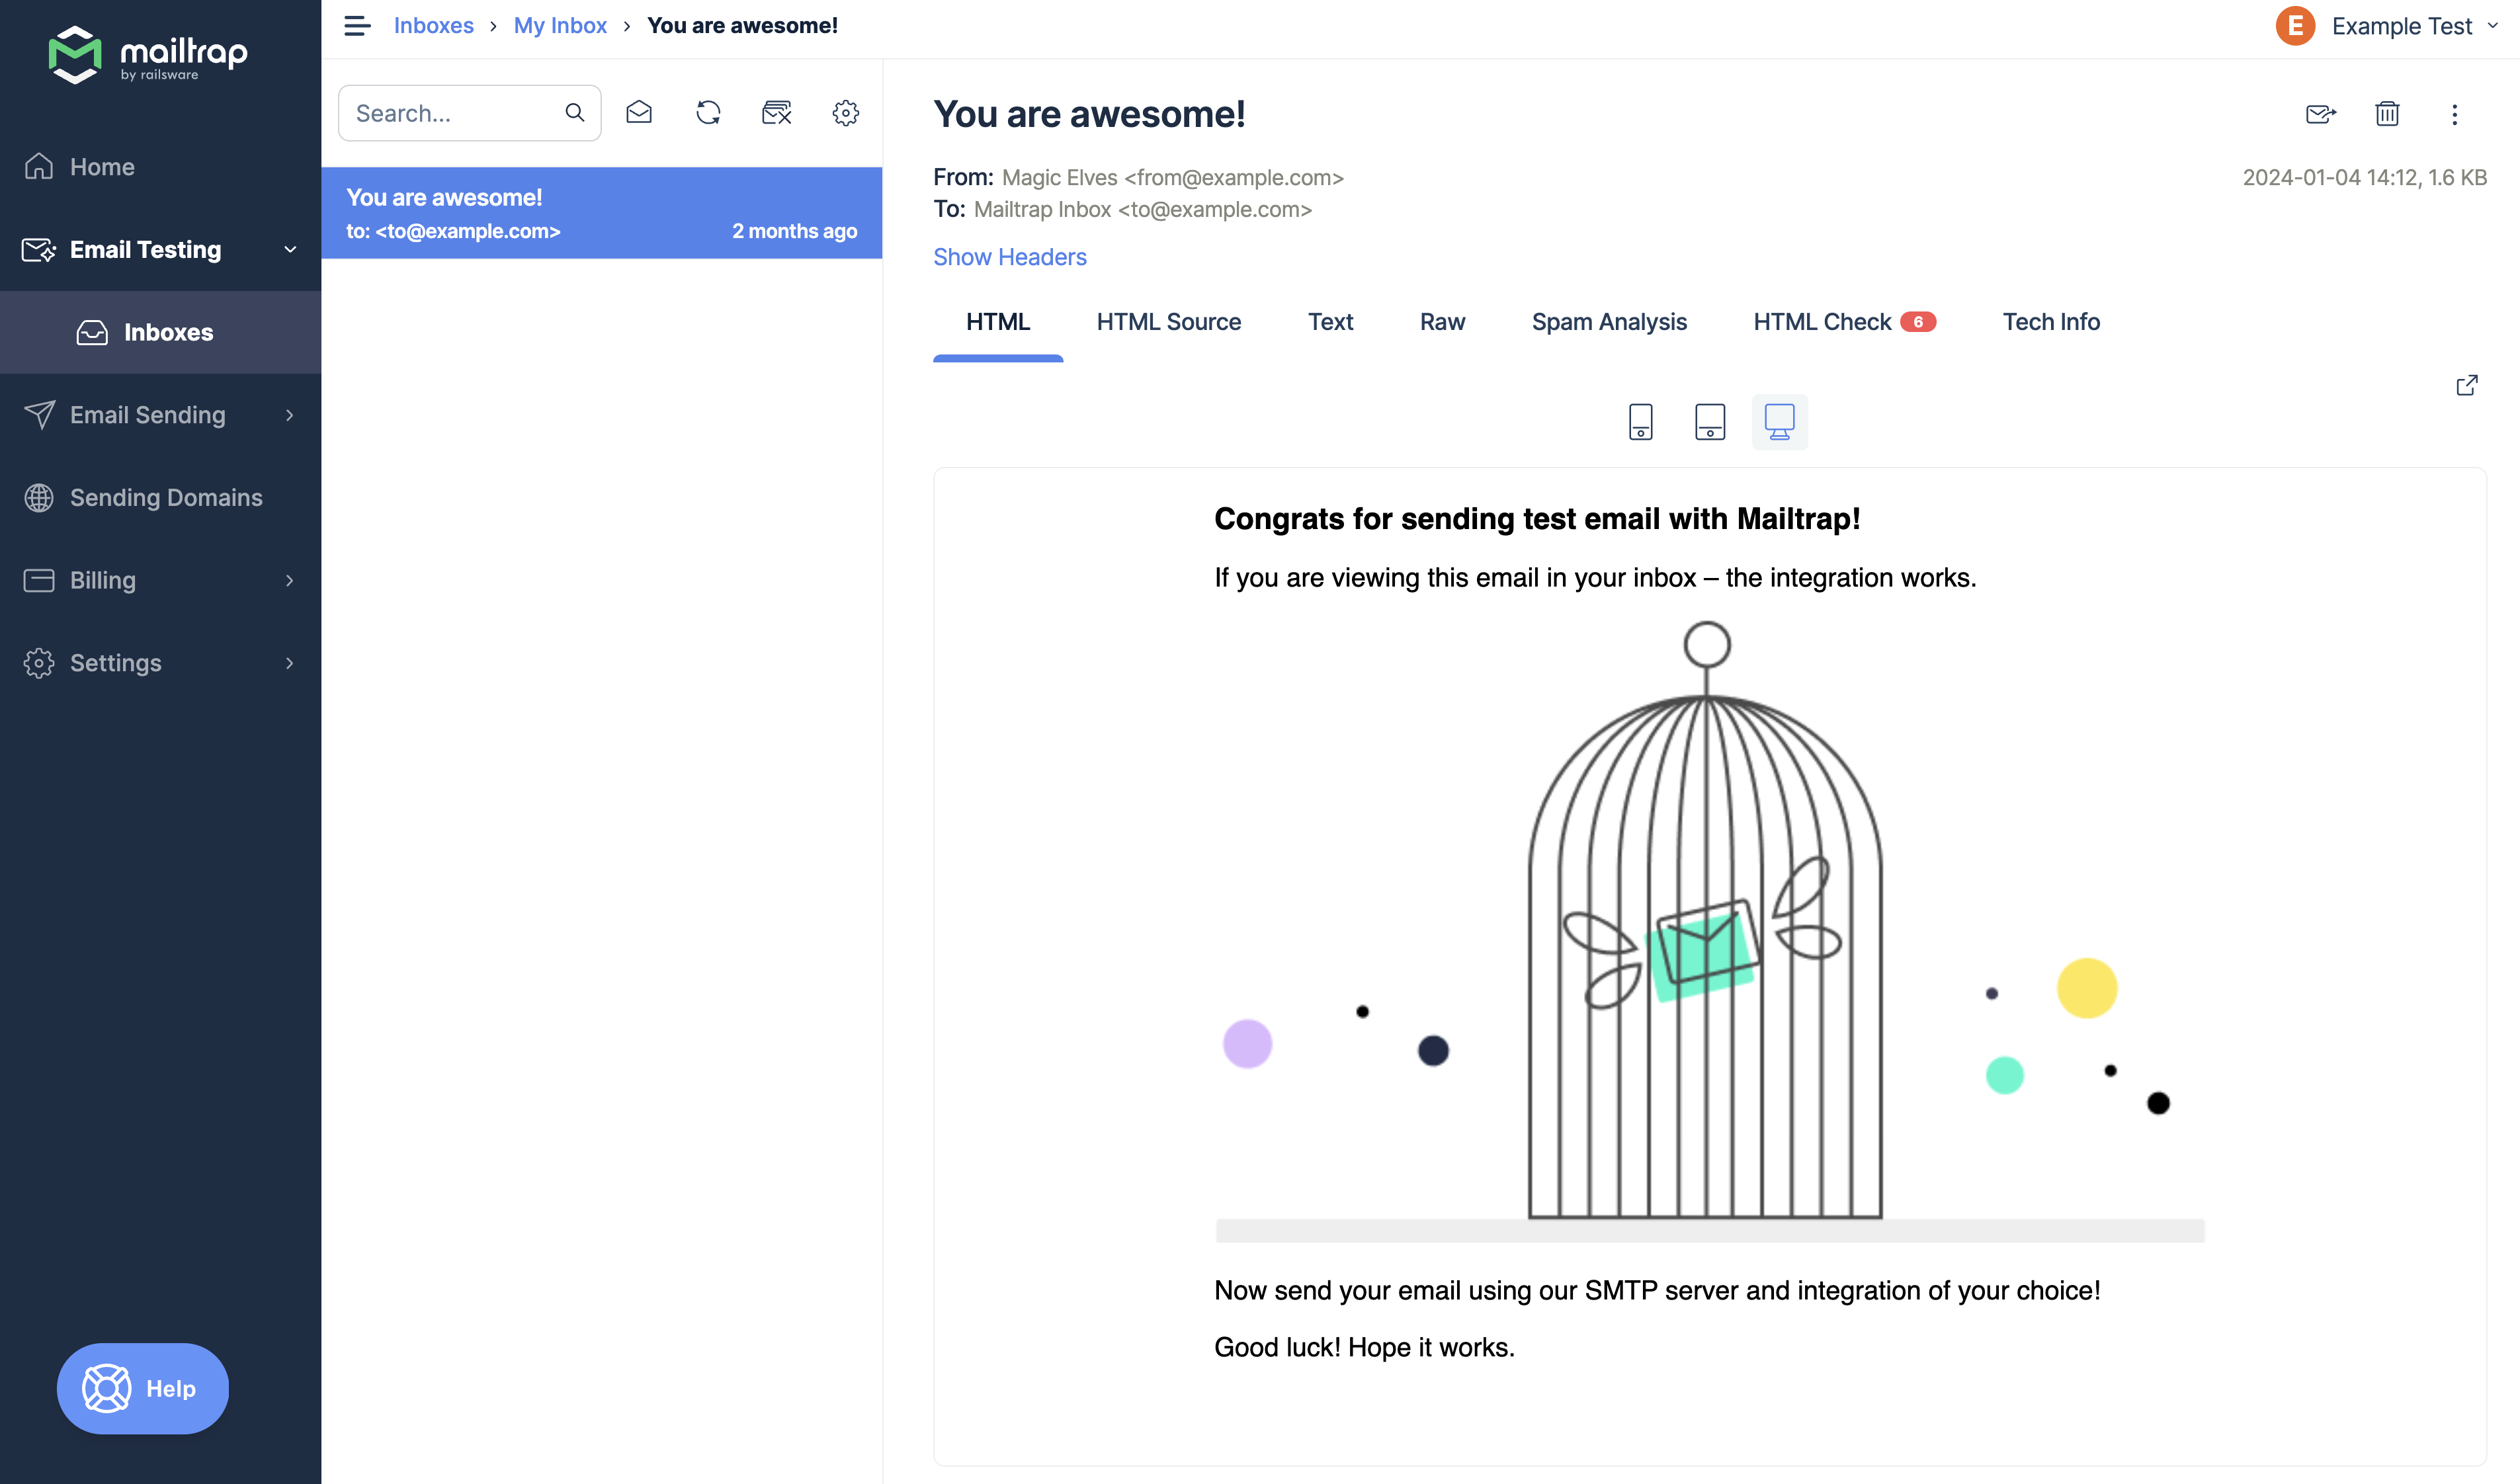
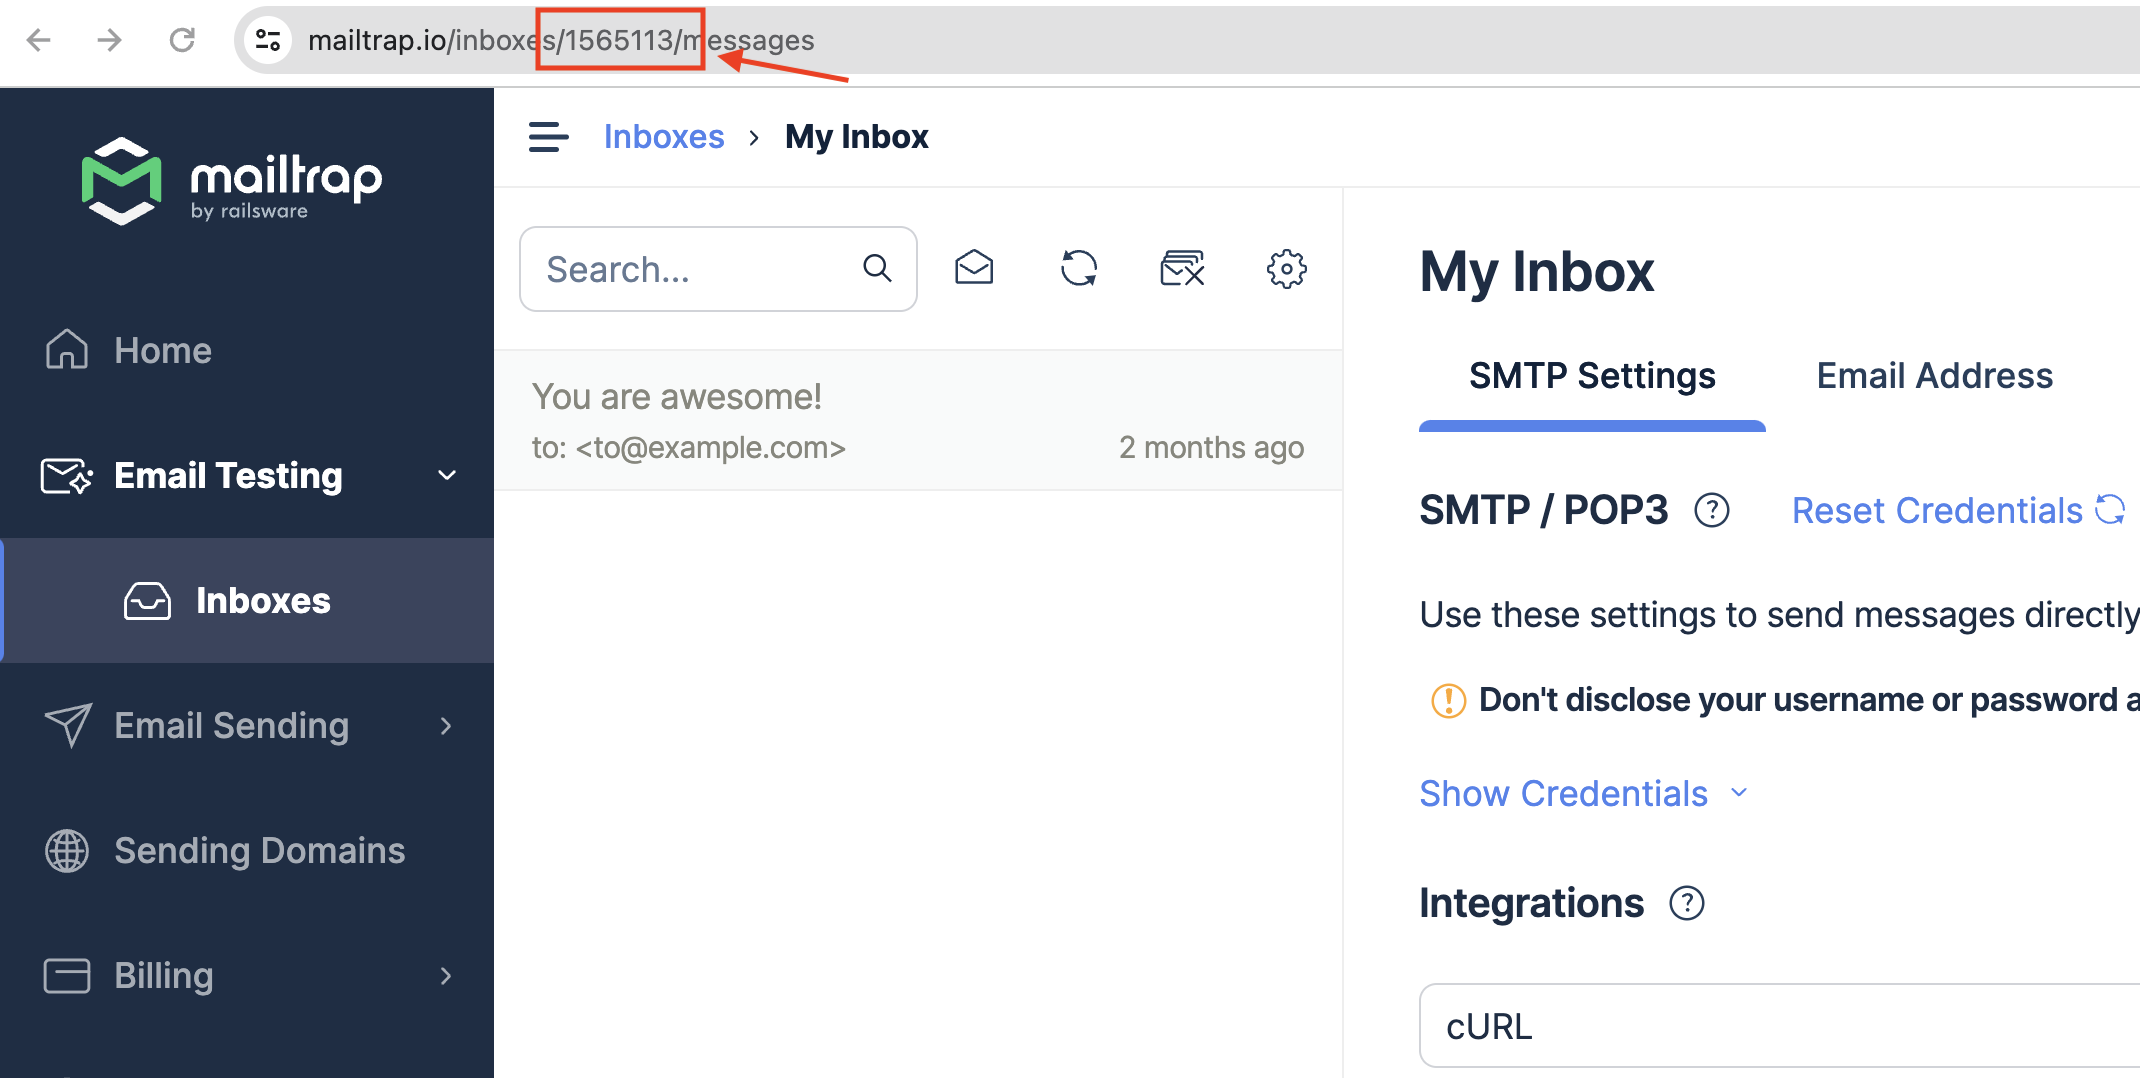
- Your
inbox_idis in the Inbox URL, see image below.
For an in-depth demo of Mailtrap email templates, make sure to check out the video below:
Grooming your Handlebars
Now, you can test out any of the given Handlebars helpers yourself. Of course, feel free to customize the expressions to your needs. And if you have any questions, reach out to us at support@mailtrap.io.