
For Shopify store owners, a contact form is more than a mere feature; it’s a bridge to customer engagement and service excellence. Quick and easy for visitors to use, it’s an essential tool in the digital marketplace.
This tutorial will walk you through setting up both standard and custom contact us forms on your Shopify site, explore Shopify’s email-sending limitations, and introduce the integration of third-party SMTP services like Mailtrap to elevate your contact form’s functionality and reliability.
How to add a contact form to a Shopify store?
Adding a contact form to your Shopify website is a user-friendly and straightforward process. The platform offers drag-and-drop functionality, ready-to-use templates, and third-party apps from the Shopify App Store that can help you with this. If you’ve seen a website with a contact form that you like, you can use an app detector for Shopify to identify which specific apps the site is using.
Here’s a quick step-by-step guide:
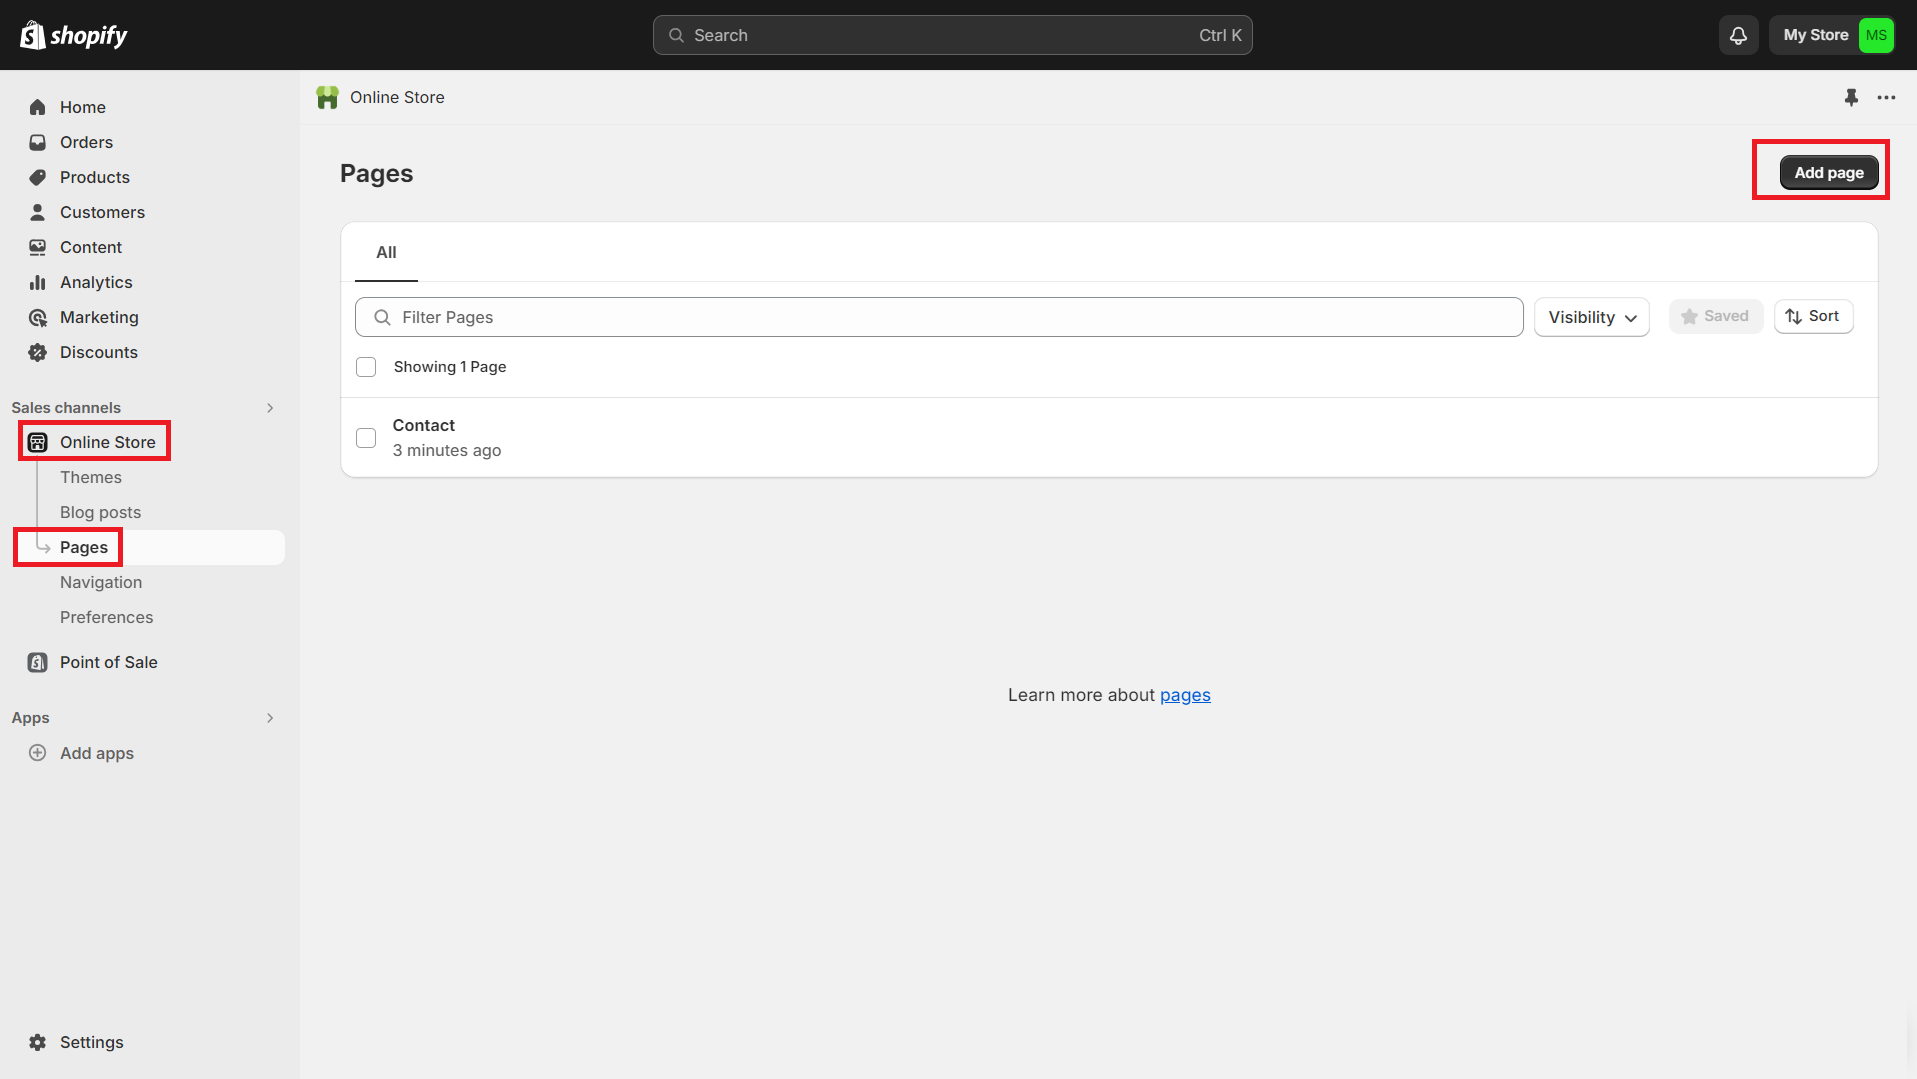
- Navigate to ‘Online Store‘ > ‘Pages‘ from your Shopify admin dashboard.
- Select ‘Add page‘ to create a new contact us page.
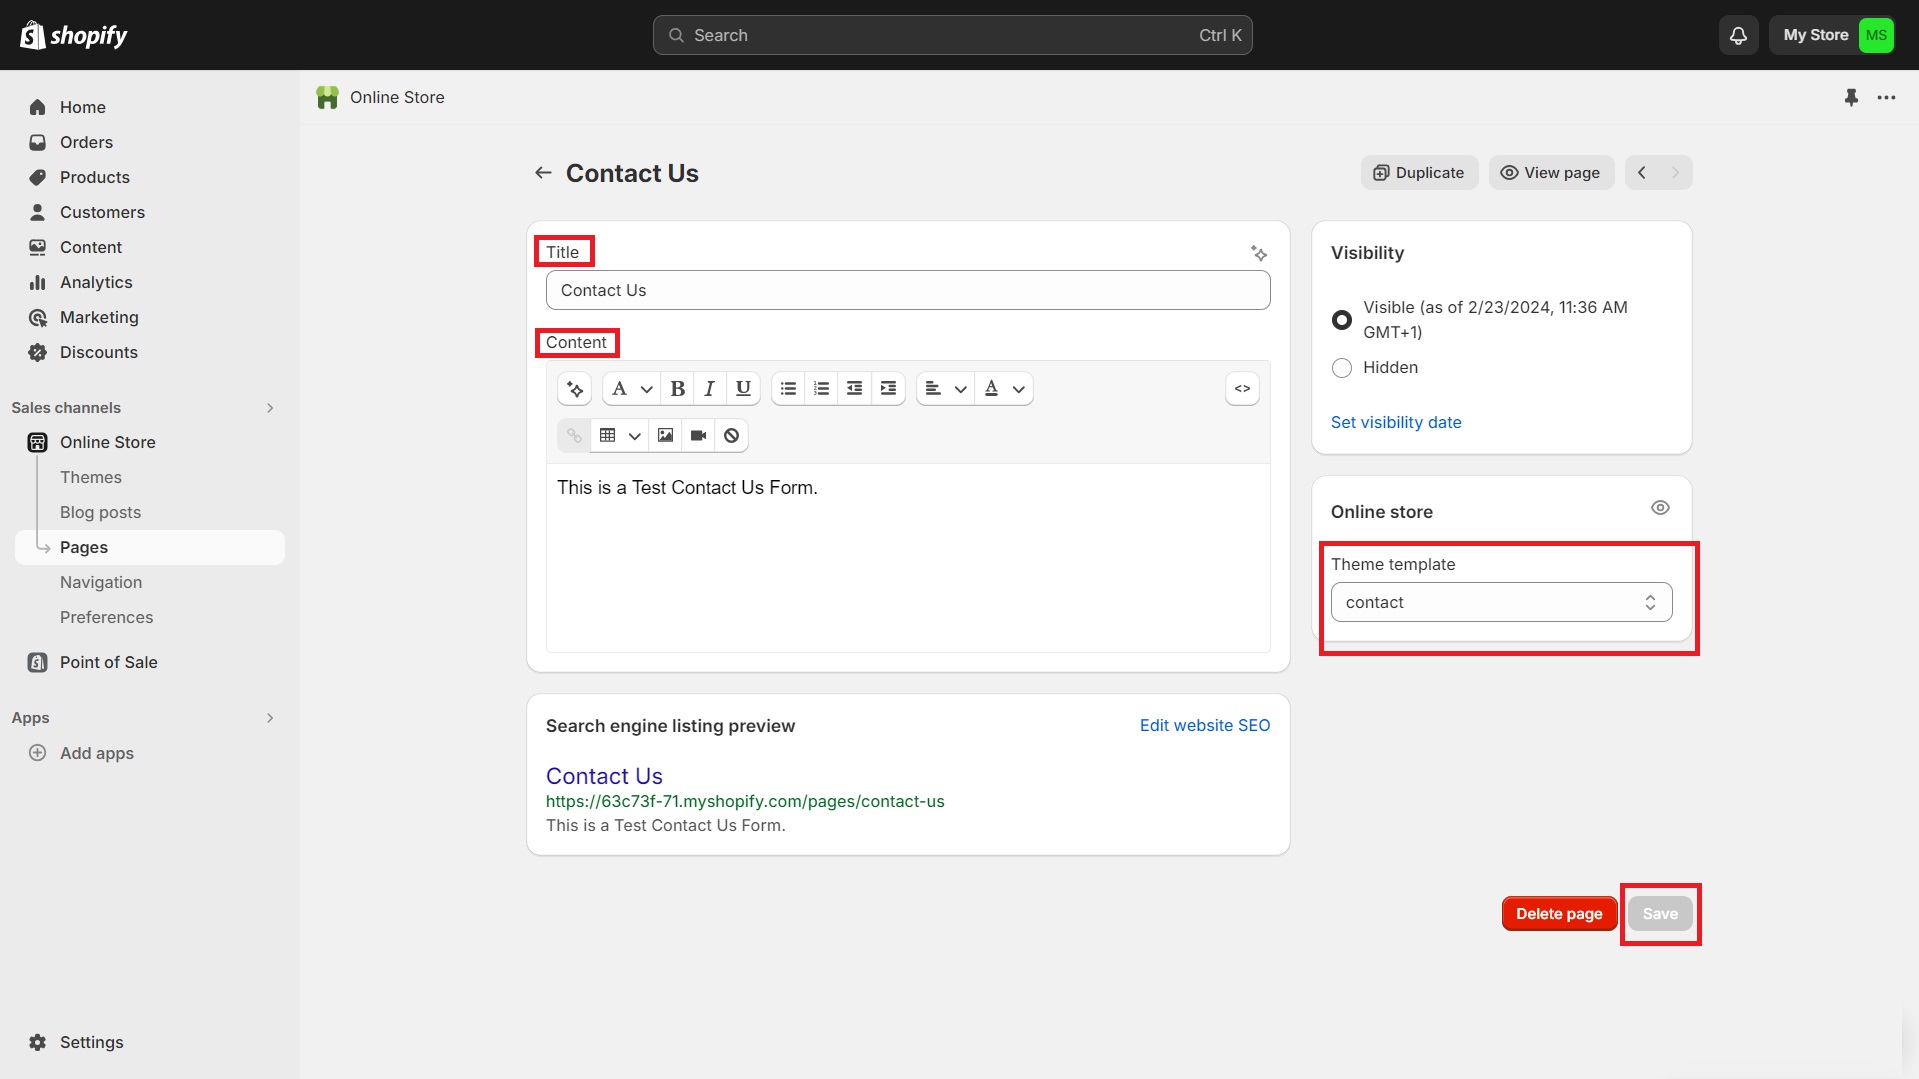
- Enter a title for your contact page in the ‘Title‘ field.
- Use the ‘Content’ box to add any text you want displayed above your contact form.
- Select ‘contact’ from the dropdown menu in the ‘Theme template‘ section of the ‘Online store‘.
- Click ‘Save’ to finalize your contact page.
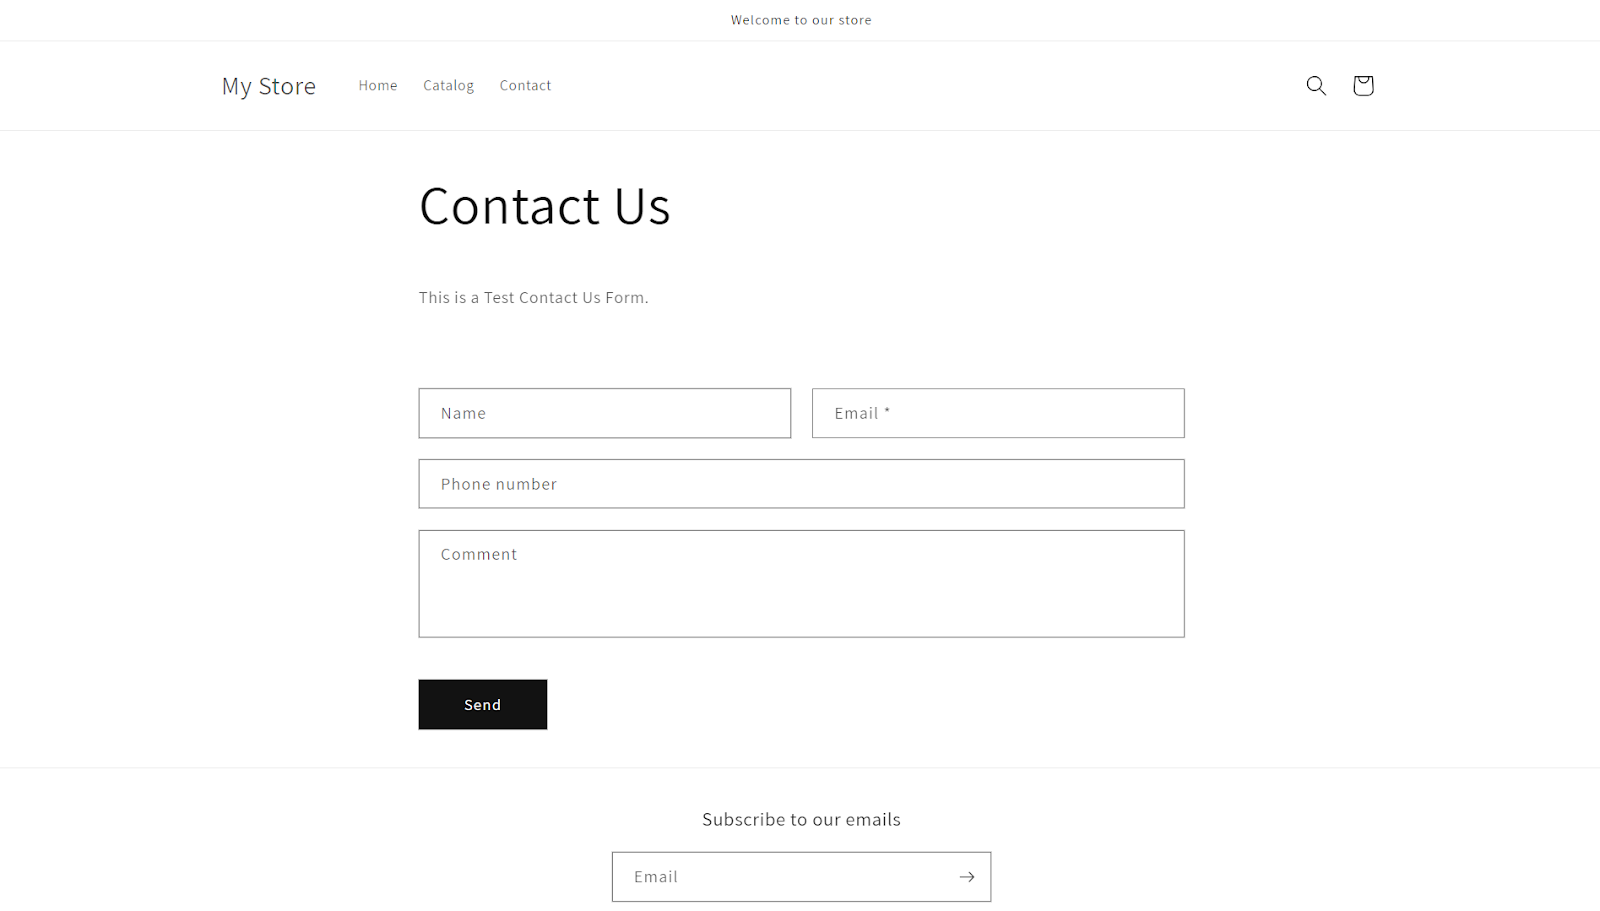
Once the basic form is saved, it is automatically published. Customers can then submit their name, phone number, email, and a message to you, which will be sent to the email address associated with your Shopify account. This ensures all submissions are seamlessly integrated into your Shopify accounting or bookkeeping records.
If your store uses a Shopify theme and you want to customize your contact form, you can tailor the contact page further through the theme’s customization options.
How to add a custom contact form to a Shopify store?
For those comfortable with code, Shopify themes also offer the ability to dive into the HTML, CSS, and Liquid code to make more detailed customizations. This could include adding custom fields to your contact form, changing how form submissions are handled, or integrating additional features unavailable through the theme editor alone.
Liquid, Shopify’s server-side templating language, allows for deeper contact form customization. It is particularly useful for iterating over arrays of data, such as product images or collections, using Liquid loops.
If your Shopify store uses an existing theme, here are some guidelines to help you through the process:
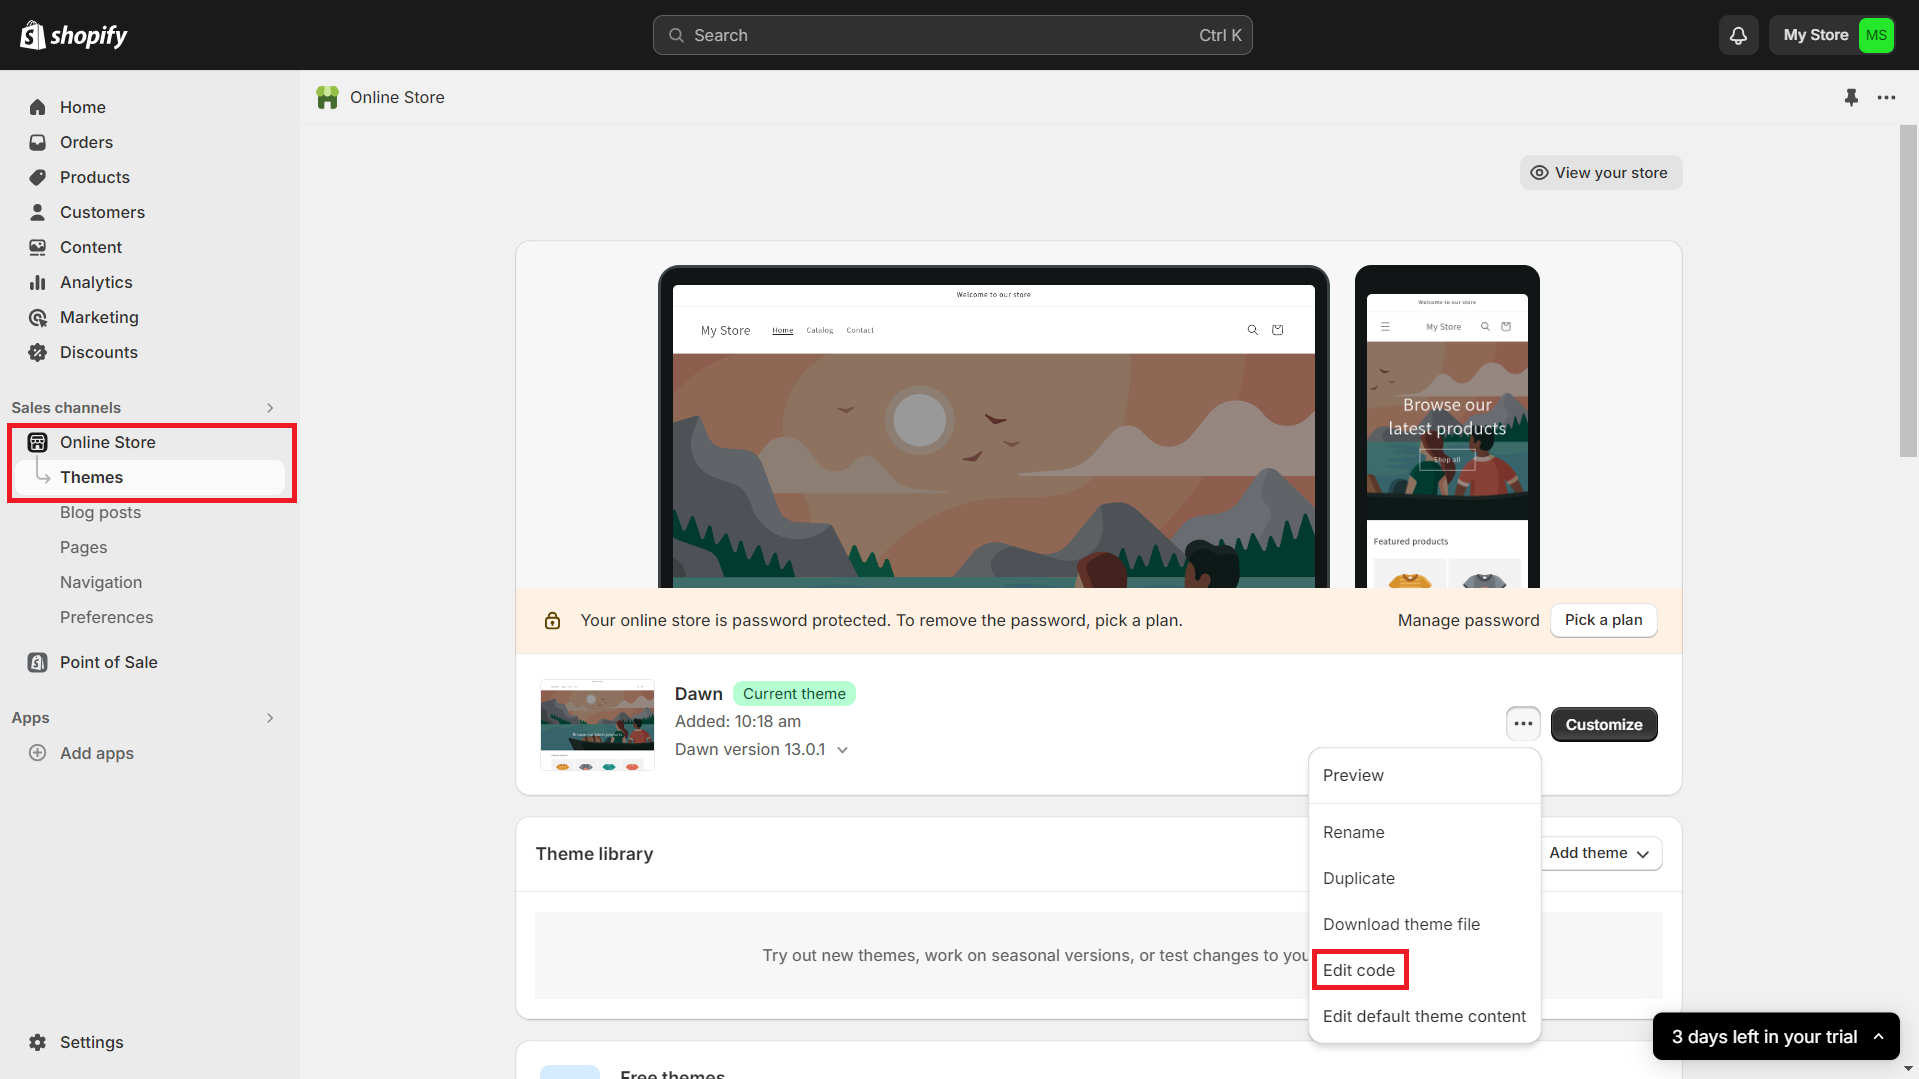
- Go to your Shopify admin, and navigate to ‘Online Store‘ > ‘Themes’. Then select ‘Actions’ > ‘Edit code‘ for your active theme.
- If you want to add a custom contact form or edit an existing one, locate the contact-form.liquid file in the directory. This file contains the default structure for a contact form in Shopify. (Note: The file name can differ depending on the theme.)

For Shopify developers aiming to enhance custom contact forms, focusing on JavaScript integration offers significant advantages. JavaScript allows the creation of dynamic, user-friendly forms with real-time validation, improving the user experience by providing immediate feedback. Additionally, implementing AJAX for form submissions can streamline the process, eliminating page reloads and presenting users with instant success or error messages.
For those less comfortable with coding, Shopify’s App Store has numerous form builder apps like ‘Form Builder with File Upload’ and ‘POWr Form Builder’. Most of these apps offer drag-and-drop interfaces, allowing you to create customized forms that can be easily embedded into your Shopify site without touching a line of code.
Shopify email sending limits
Shopify limits the number of emails that can be sent from its platform to prevent abuse and ensure service reliability. These limits might affect store owners who rely heavily on email communication for customer service and marketing.
Knowing these limitations is crucial for planning your communication strategies accordingly and avoiding service disruptions. For detailed insights on industry standards and performance metrics, consider consulting a Shopify benchmark report to compare your store’s email engagement rates with similar businesses.
- Monthly Free Emails: 10,000 emails at the beginning of each month for all plan levels.
- Additional Email Pricing Structure:
- Up to 300,000 emails: $1 USD per additional 1,000 emails.
- 300,001 to 750,000 emails: $0.65 USD per additional 1,000 emails.
- Over 750,000 emails: $0.55 USD per additional 1,000 emails.
- Rollover: Unused free emails do not carry over to the next month.
Additionally, Shopify restricts direct access to SMTP settings to maintain the platform’s user-friendly and secure environment. This restriction ensures that users who need to customize their email-sending capabilities, such as integrating with third-party email services for enhanced deliverability and features, can do so through apps from the Shopify App Store. These apps facilitate the configuration of custom SMTP settings indirectly, allowing users to meet their specific needs while preserving the platform’s performance and security.
How to configure third-party SMTP on your Shopify store?
Given the limitations and potential costs associated with Shopify’s email-sending capabilities, especially for businesses experiencing growth, the importance of reliable email delivery cannot be understated.
As your eCommerce business expands, the volume of customer interactions and transactions increases, raising the importance of every email sent. This is where a robust email delivery platform becomes an important tool that can solve this challenge. In this scenario, integrating a third-party sending solution like Mailtrap will provide a more advanced and reliable email delivery experience that can accurately meet these growing demands.
Mailtrap is an email delivery platform that combines Email Sending and Email Testing into one seamless workflow. Designed with developers in mind, it ensures your emails reach their destination and look and perform as intended. This unified approach simplifies email management, making it easier for you to develop, test, and send emails effectively. The key Email Sending features include:
- Helicopter-view dashboards
- Deliverability alerts
- Email logs
- Deliverability stats for all Mailbox Providers (Office 365, Outlook, Gmail, Google Workspace, and more)
- Email categories
- Webhooks
- Email templates
Mailtrap Email Testing acts as an email sandbox, capturing SMTP traffic from your environment and routing emails to a virtual inbox. This setup prevents email delivery to recipients, allowing thorough examination and debugging of your emails.
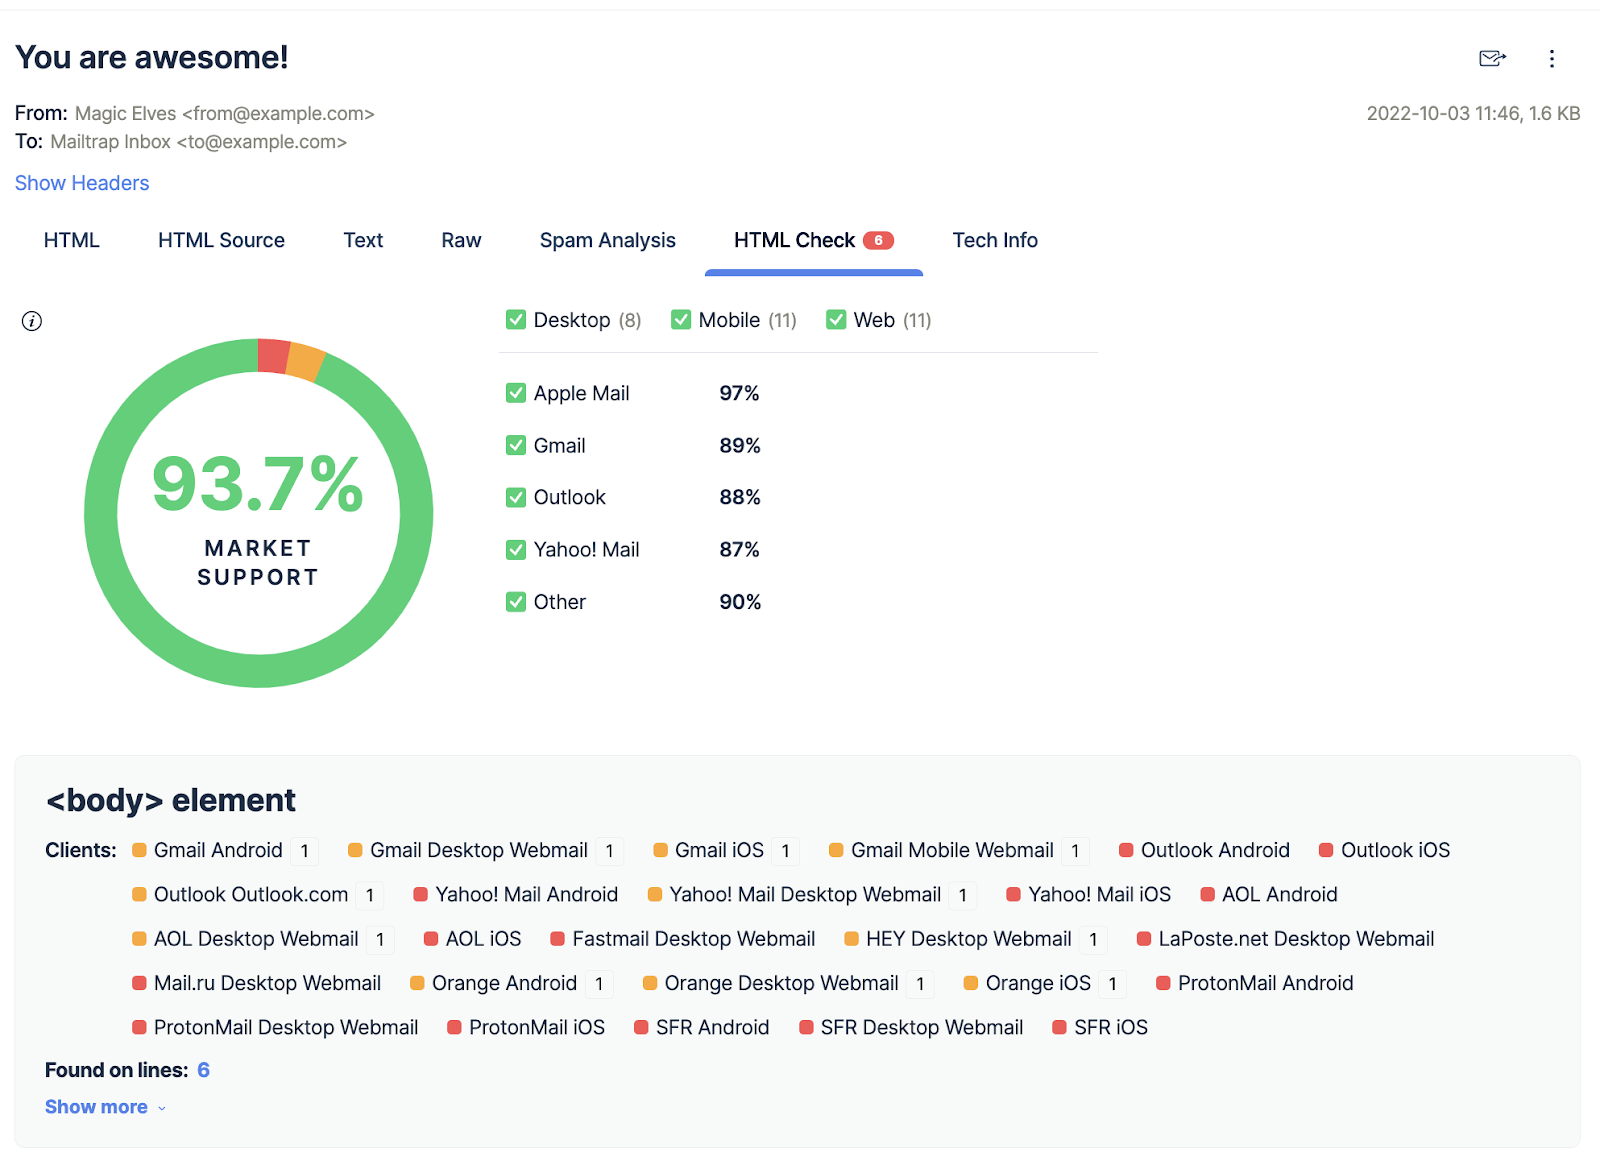
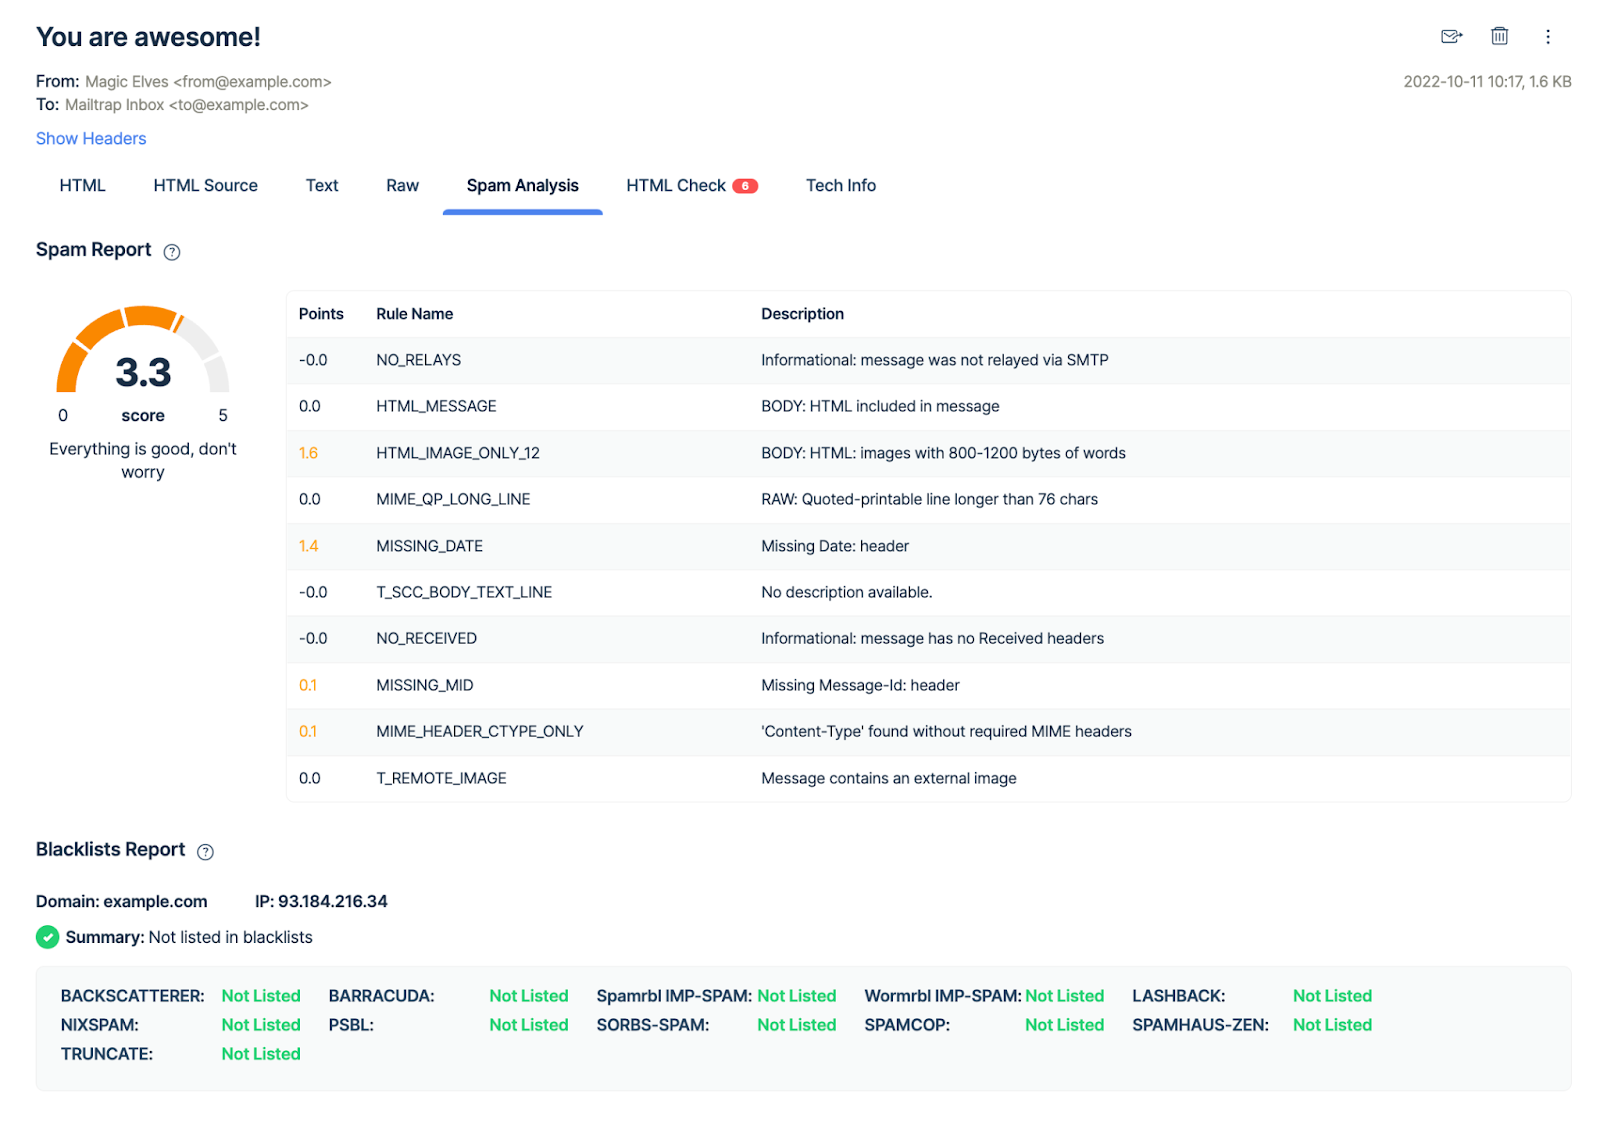
Mailtrap Email Testing offers a range of features, such as HTML/CSS validation, spam score analysis, and an API for QA automation. It’s designed to work seamlessly with over 20 programming languages, such as Ruby, Python, PHP, .Net, and Node.js (works with Nodemailer). This makes Mailtrap a versatile tool for email preview, multiple inbox management for different projects, user management, and Single Sign-On (SSO) capabilities.
Setting Up Mailtrap on Shopify
Integrating Mailtrap into your Shopify store streamlines and enhances email communication, ensuring reliable delivery from contact forms to transactional messages. Here’s how you can set it up:
- Step 1: Sign up by creating a free account, or sign in if you already have one.
- Step 2: Next, add and verify your domain. This step is crucial for ensuring your emails are delivered successfully and not marked as spam. Then, create a new inbox (e.g., “Shopify Contact Form”).
- Step 3: Install a third-party contact form app with a custom SMTP configuration feature via the Shopify App Store. Use an app like “Contact Form Ultimate”.
- Step 4: In the app’s settings, configure your SMTP details that can be found in Mailtrap’s “SMTP/API Settings” tab of the “Domain Name” page.
- Step 5: Submit a test message through your contact form and verify that it appears in your Mailtrap inbox, ensuring the integration works correctly.
Conclusion
Setting up a contact form on your Shopify site is crucial for enhancing customer interaction. Shopify’s user-friendly setup caters to a broad spectrum of users, from novices to experts, enabling you to quickly implement a standard form or dive into more complex customizations. Considering Shopify’s email limitations, integrating a third-party SMTP service like Mailtrap can be a strategic move to ensure reliable email delivery and domain reputation as your business expands. This approach improves your store’s efficiency and solidifies your commitment to providing exceptional customer service.
Now that your contact form is up and running, get ready for your online store’s inbox to become a lot more interesting! 📩
