 Skip to Navigation


When it comes to adding email functionality to your PHP app, the PHPMailer class is the winning option.
In this article, I’ll describe the process of installing PHPMailer, configuring SMTP settings, and adding email-sending functionality to your app step-by-step.
To jump straight into the action, click here.
The code snippets I provide in this article are for PHPMailer 6.9, which is compatible with PHP 5.5 and above.
What is PHPMailer?
PHPMailer is the classic email-sending, open-source library for PHP. It’s compatible with most PHP frameworks, such as Laravel and Symfony and is used by many open-source projects like WordPress. It also supports multiple ways of sending email messages, including the most reliable one, direct dispatch to SMTP servers, and PHP mail() function, Sendmail, and qmail.
Some of the most important PHPMailer features include:
- SMTP Authentication
- Automatic email address validation
- Protection against header injection attacks
- TLS and SSL protocol support
- DKIM and S/MIME signing support
- Support for embedded images
- Support for adding attachments, including inline
- Multiple formats, string, and binary attachments
- Multipart/alternative emails for clients that do not read HTML email
- Support for sending emails with multiple To, CC, BCC, and Reply-to addresses
How to install PHPMailer
To install PHPMailer, you’ll need Composer, a dependency manager for PHP, recommended by PHPMailer creators on GitHub.
Once installed, add this line to your composer.json file:
"phpmailer/phpmailer": "^6.9"Or run the following command:
composer require phpmailer/phpmailerNote:
- The vendor folder and the vendor/autoload.php script are not part of PHPMailer. Instead, they are generated by Composer.
If you’re not a fan of Composer, you can download PHPMailer files with source code manually and copy the contents of the folder into an include_path directory specified in your PHP configuration and load each class file manually, like so:
<?php
use PHPMailer\PHPMailer\PHPMailer;
use PHPMailer\PHPMailer\Exception;

require 'path/to/PHPMailer/src/Exception.php';
require 'path/to/PHPMailer/src/PHPMailer.php';
require 'path/to/PHPMailer/src/SMTP.php';
Adding an Exception class will help you handle errors and debug them. In PHP it works similarly to other programming languages. So, without it, if there is an error in your email sending code, you will just see a message saying that the Exception class is not found, but you won’t be provided with any details on how to debug it.
You can also install PHPMailer with vital files only. The key PHP files to include are src/PHPmailer.php and src/SMTP.php if you are using SMTP. You will also need src/OAuth.php if you’re using XOAUTH2 and the dependencies for the services you wish to authenticate with. And you can skip the language folder if you’re okay with errors in English only.
For more information on installing PHPMailer, you can check the official installation manual.
PHPMailer SMTP settings
Sending emails with PHPMailer is most optimal when paired with an external SMTP server. This makes it reliable and secure as it can be encrypted (TLS/SSL), making it an ideal choice for your PHP application.
Check out the basic SMTP configuration in the example below:
<?php
use PHPMailer\PHPMailer\PHPMailer;
use PHPMailer\PHPMailer\SMTP;
use PHPMailer\PHPMailer\Exception;

require 'vendor/autoload.php'; // Adjust the path as needed if you're not using Composer

$mail = new PHPMailer(true);

try {
    //Server settings
    $mail->isSMTP();                                            // Send using SMTP
    $mail->Host       = 'smtp.example.com';                     // Set the SMTP server to send through
    $mail->SMTPAuth   = true;                                   // Enable SMTP authentication
    $mail->Username   = 'your_email@example.com';               // SMTP username
    $mail->Password   = 'your_password';                        // SMTP password
    $mail->SMTPSecure = 'tls'; // Enable TLS encryption
    $mail->Port       = 587;                                    // TCP port to connect to
Once you have your SMTP details and credentials, all you have to do is replace the placeholders in this code with them, which I’ll show you how to do in the following chapter.
How to send emails using PHPMailer and SMTP
For sending emails using PHPMailer, I went with Mailtrap Email Sending SMTP as it offers high deliverability rates by design. Moreover, Mailtrap lets me test my emails before I send them (I’ll describe this later in the article) and it’s super easy to configure.
Here’s how it works:
- Create a Mailtrap account
- Verify your email-sending domain as described in the video below. ⬇️
- Navigate to the SMTP/API Settings window under Sending Domains, where you’ll find the SMTP credentials. Please note, sending using API isn’t working with PHPMailer.
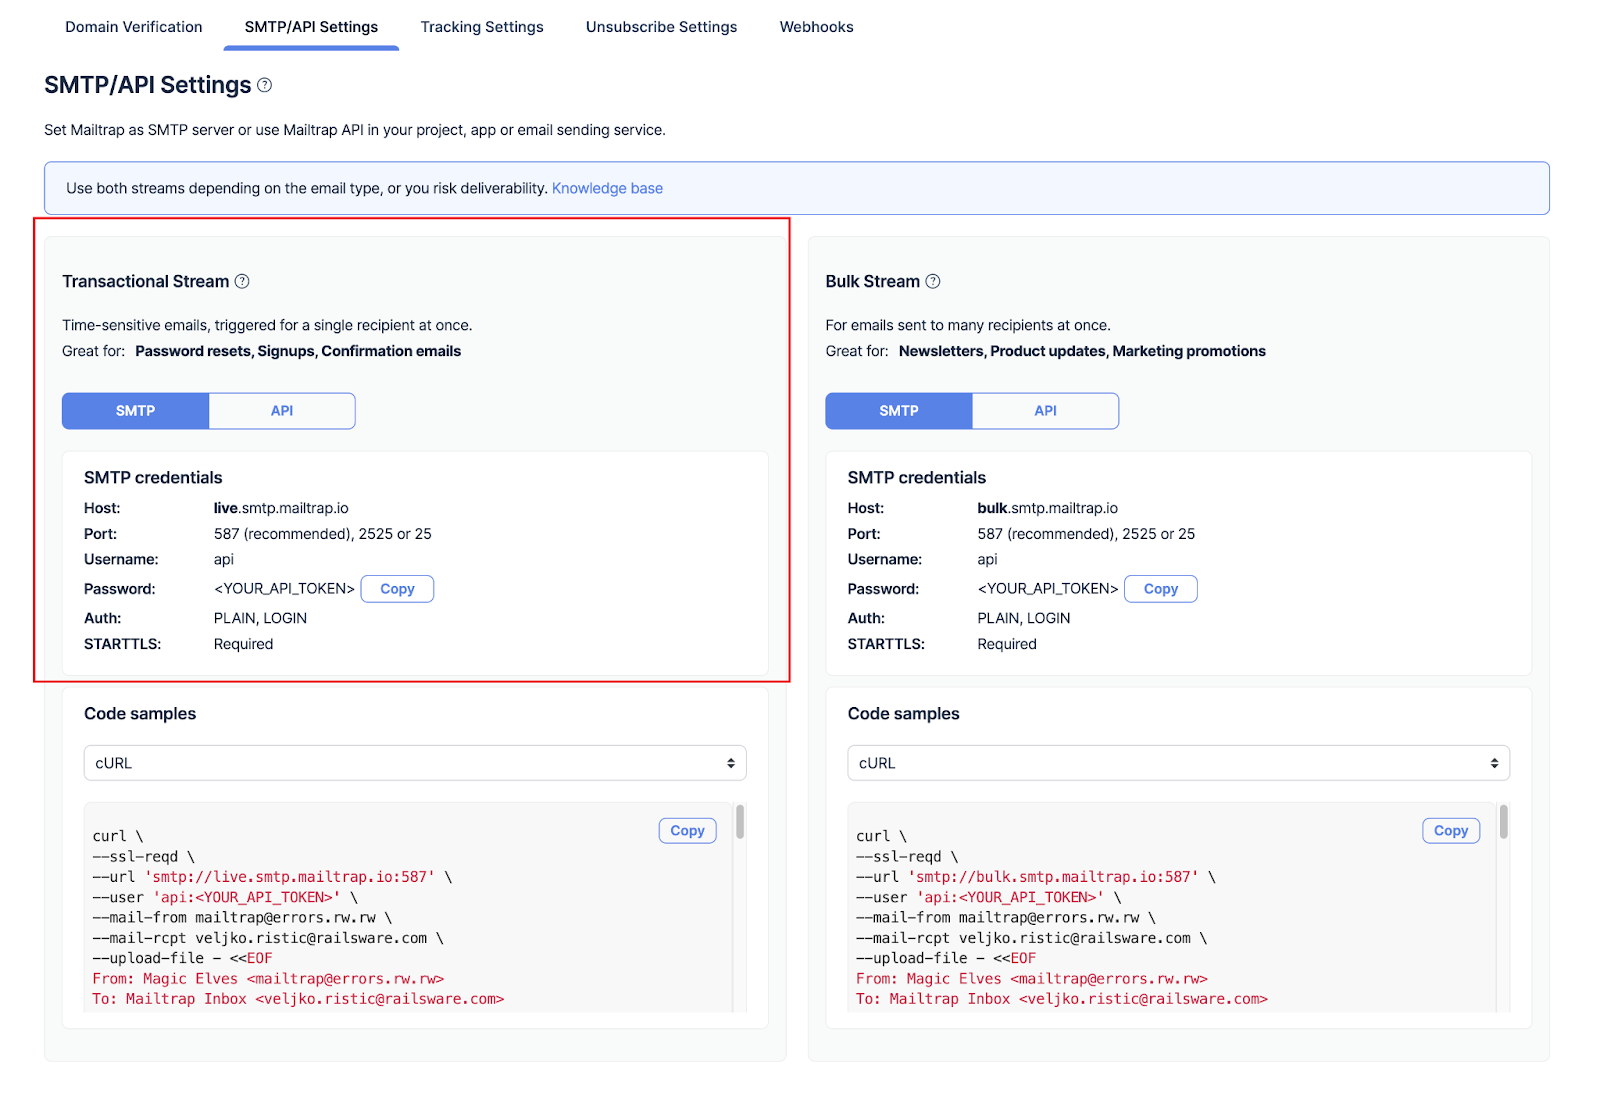
- Copy and paste the Transactional Stream credentials into your PHP script.
And finally, here’s how you can send plain-text email with your Mailtrap SMTP credentials in place:
<?php
use PHPMailer\PHPMailer\PHPMailer;
use PHPMailer\PHPMailer\Exception;

require 'vendor/autoload.php'; // Adjust based on your installation method

$mail = new PHPMailer(true); // Enable exceptions

// SMTP Configuration
$mail->isSMTP();
$mail->Host = 'live.smtp.mailtrap.io'; // Your SMTP server
$mail->SMTPAuth = true;
$mail->Username = 'your_username'; // Your Mailtrap username
$mail->Password = 'your_password'; // Your Mailtrap password
$mail->SMTPSecure = 'tls';
$mail->Port = 587;

// Sender and recipient settings
$mail->setFrom('from@example.com', 'From Name');
$mail->addAddress('recipient@example.com', 'Recipient Name');

// Sending plain text email
$mail->isHTML(false); // Set email format to plain text
$mail->Subject = 'Your Subject Here';
$mail->Body    = 'This is the plain text message body';

// Send the email
if(!$mail->send()){
    echo 'Message could not be sent. Mailer Error: ' . $mail->ErrorInfo;
} else {
    echo 'Message has been sent';
}
Make sure that your isHTML method is set to false for sending plain text emails.
Send HTML emails
Dive into HTML email customization in PHP by checking out our dedicated article.
To send an HTML email, just set the isHTML property to (true), like in the example below:
<?php
use PHPMailer\PHPMailer\PHPMailer;
use PHPMailer\PHPMailer\Exception;
require 'path/to/composer/vendor/autoload.php'; // Ensure the path is correct
$mail = new PHPMailer(true); // Passing `true` enables exceptions
try {
$mail->isSMTP();
$mail->Host = 'live.smtp.mailtrap.io'; // Your SMTP server
$mail->SMTPAuth = true;
$mail->Username = 'paste one generated by Mailtrap'; // Your Mailtrap username
$mail->Password = 'paste one generated by Mailtrap'; // Your Mailtrap password
$mail->SMTPSecure = 'tls';
$mail->Port = 587;
// Sender and recipient settings
$mail->setFrom('info@mailtrap.io', 'Mailtrap');
$mail->addReplyTo('info@mailtrap.io', 'Mailtrap');
$mail->addAddress('recipient1@mailtrap.io', 'Tim'); // Primary recipient
// CC and BCC
$mail->addCC('cc1@example.com', 'Elena');
$mail->addBCC('bcc1@example.com', 'Alex');
// Adding more BCC recipients
$mail->addBCC('bcc2@example.com', 'Anna');
$mail->addBCC('bcc3@example.com', 'Mark');
// Email content
$mail->isHTML(true); // Set email format to HTML
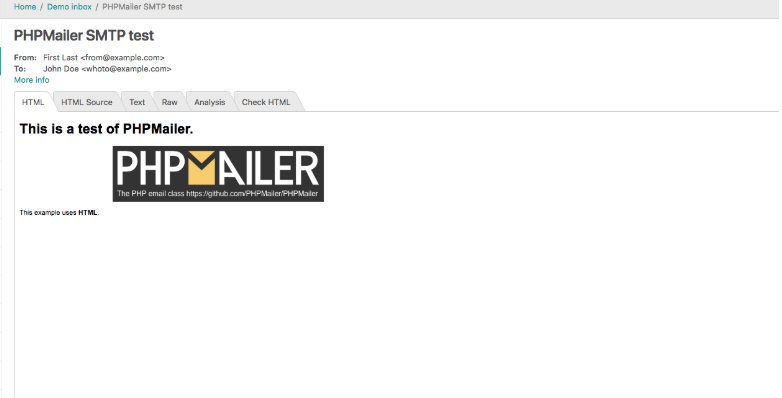
$mail->Subject = "PHPMailer SMTP test";
$mail->Body = '<h1>Send HTML Email using SMTP in PHP</h1><p>This is a test email I\'m sending using SMTP mail server with PHPMailer.</p>'; // Example HTML body
$mail->AltBody = 'This is the plain text version of the email content';
if(!$mail->send()) {
echo 'Message could not be sent.';
echo 'Mailer Error: ' . $mail->ErrorInfo;
} else {
echo 'Message has been sent';
}
} catch (Exception $e) {
echo "Message could not be sent. Mailer Error: {$mail->ErrorInfo}";
}
?>How to send emails to multiple recipients
To send emails to multiple recipients, you can use the following code snippet:
<?php
use PHPMailer\PHPMailer\PHPMailer;
require 'path/to/composer/vendor/autoload.php';
$mail = new PHPMailer;
$mail->isSMTP();
$mail->Host = 'live.smtp.mailtrap.io';
$mail->SMTPAuth = true;
$mail->Username = '1a2b3c4d5e6f7g'; //generated by Mailtrap
$mail->Password = '1a2b3c4d5e6f7g'; //generated by Mailtrap
$mail->SMTPSecure = 'tls';
$mail->Port = 587;
$mail->SMTPKeepAlive = true; // add it to keep the SMTP connection open after each email sent
$mail->setFrom('list@example.com', 'List manager');
$mail->Subject = "New Mailtrap mailing list";
$users = [
  ['email' => 'max@gmail.com', 'name' => 'Max'],
  ['email' => 'box@example.com', 'name' => 'Bob']
];
foreach ($users as $user) {
  $mail->addAddress($user['email'], $user['name']);
  $mail->Body = "<h2>Hello, {$user['name']}!</h2> <p>How are you?</p>";
  $mail->AltBody = "Hello, {$user['name']}! \n How are you?";
  try {
      $mail->send();
      echo "Message sent to: ({$user['email']}) {$mail->ErrorInfo}\n";
  } catch (Exception $e) {
      echo "Mailer Error ({$user['email']}) {$mail->ErrorInfo}\n";
  }
  $mail->clearAddresses();
}
$mail->smtpClose();
Send emails with attachments
For sending emails with attachments, you can:
- Attach a file from your filesystem
If you go with this option, be sure to save your files in the same directory as the script.
To attach a file, just specify its file path. You can also add a filename, but that’s up to you as the script will use the actual name of your file:
$mail->addAttachment('path/to/invoice1.pdf', 'invoice1.pdf');When you call this script, PHPMailer attaches the file located at path/to/invoice1.pdf to the email. The second parameter, invoice1.pdf, is optional and specifies the filename. For this example, I used .pdf, but keep in mind that you can also add other types of files as well, such as pictures (.jpg or .png) for instance.
To add another file, simply repeat the command:
$mail->addAttachment('path/to/calculation1.xlsx', 'calculation1.xlsx');- Add a string attachment
By adding a string attachment, you attach data without first having to save it as a physical file on your system. In translation, the data you attach is stored in a variable. For example, this allows you to extract a file from a database, such as BLOB (Binary Large Object), without needing to save it as a file.
For this, you can use the following command:
$mysql_data = $mysql_row['blob_data'];
$mail->addStringAttachment($mysql_data, 'db_data.db');
This example adds data stored as a BLOB from a MySQL database.
You can also use a remote URL, like so:
$mail->addStringAttachment(file_get_contents($url), 'myfile.pdf');Sending emails with embedded images
To send emails with embedded images, you can use CID attachments:
$mail->addEmbeddedImage('path/to/image_file.jpg', 'image_cid');
$mail->isHTML(true);
$mail->Body = '<img src="cid:image_cid">';
And here’s how it looks in a full code snippet:
<?php
use PHPMailer\PHPMailer\PHPMailer;
require 'path/to/composer/vendor/autoload.php';

$mail = new PHPMailer(true); // Enables exceptions

$mail->isSMTP();
$mail->Host = 'live.smtp.mailtrap.io';
$mail->SMTPAuth = true;
$mail->Username = 'paste one generated by Mailtrap';
$mail->Password = 'paste one generated by Mailtrap';
$mail->SMTPSecure = 'tls';
$mail->Port = 587;

$mail->setFrom('from@example.com', 'First Last');
$mail->addReplyTo('towho@example.com', 'John Doe');
$mail->addAddress('recipient@example.com', 'Recipient Name'); // Specify the recipient

$mail->isHTML(true);
$mail->Subject = "PHPMailer SMTP test";
$mail->addEmbeddedImage('path/to/image_file.jpg', 'image_cid'); // Specify the path to your image and a CID
$mail->Body = '<img src="cid:image_cid"> Mail body in HTML'; // Use the CID as the src attribute in your img tag
$mail->AltBody = 'This is the plain text version of the email content';

if(!$mail->send()){
    echo 'Message could not be sent.';
    echo 'Mailer Error: ' . $mail->ErrorInfo;
}else{
    echo 'Message has been sent';
}
The result “Message has been sent” informs you that your code is executing correctly. To check the delivery result and details, go to your Mailtrap inbox: your messages will get there in seconds.
Asynchronous email sending
Unlike Node.js, which supports asynchronous operations, PHPMailer is synchronous by design. Nonetheless, you can use the exec() function to call a PHP script for sending email in the background.
First, install the PHP CLI (Command Line Interface) and then use the following sendEmail.php script:
<?php
use PHPMailer\PHPMailer\PHPMailer;
use PHPMailer\PHPMailer\Exception;

require 'path/to/vendor/autoload.php'; // Adjust the path as needed

$mail = new PHPMailer(true);

// SMTP Configuration
$mail->isSMTP();
$mail->Host = 'smtp.example.com'; // Specify main and backup SMTP servers
$mail->SMTPAuth = true; // Enable SMTP authentication
$mail->Username = 'user@example.com'; // SMTP username
$mail->Password = 'secret'; // SMTP password
$mail->SMTPSecure = 'tls'; // Enable TLS encryption, `ssl` also accepted
$mail->Port = 587; // TCP port to connect to

// Email Settings
$mail->setFrom('from@example.com', 'Mailer');
$mail->addAddress('recipient@example.com', 'Recipient Name'); // Add a recipient
$mail->isHTML(true); // Set email format to HTML
$mail->Subject = 'Here is the subject';
$mail->Body    = 'This is the HTML message body <b>in bold!</b>';
$mail->AltBody = 'This is the body in plain text for non-HTML mail clients';

try {
    $mail->send();
    echo 'Message has been sent';
} catch (Exception $e) {
    echo "Message could not be sent. Mailer Error: {$mail->ErrorInfo}";
}
To run the script, use the following command:
exec("php /path/to/sendEmail.php > /dev/null &");Notes:
- Make sure that the path to the PHP CLI executable (php) is correctly specified.
- In some cases and environments, you might have to use the full path to the CLI binary (e.g., /usr/bin/php).
- Check your server’s PHP config to ensure functions like
exec()are not disabled, as they often are in shared hosting environments for security reasons.- The directive that controls this is the
disable_functionsdirective in php.ini.
- The directive that controls this is the
How to send bulk emails
To send emails to many recipients simultaneously in PHPMailer, I use Mailtrap’s Bulk Stream credentials.
You can find them after you log in to your Mailtrap account and navigate to Sending Domains → SMTP/API Settings tab. On the right, you should see the Transactional Stream credentials.
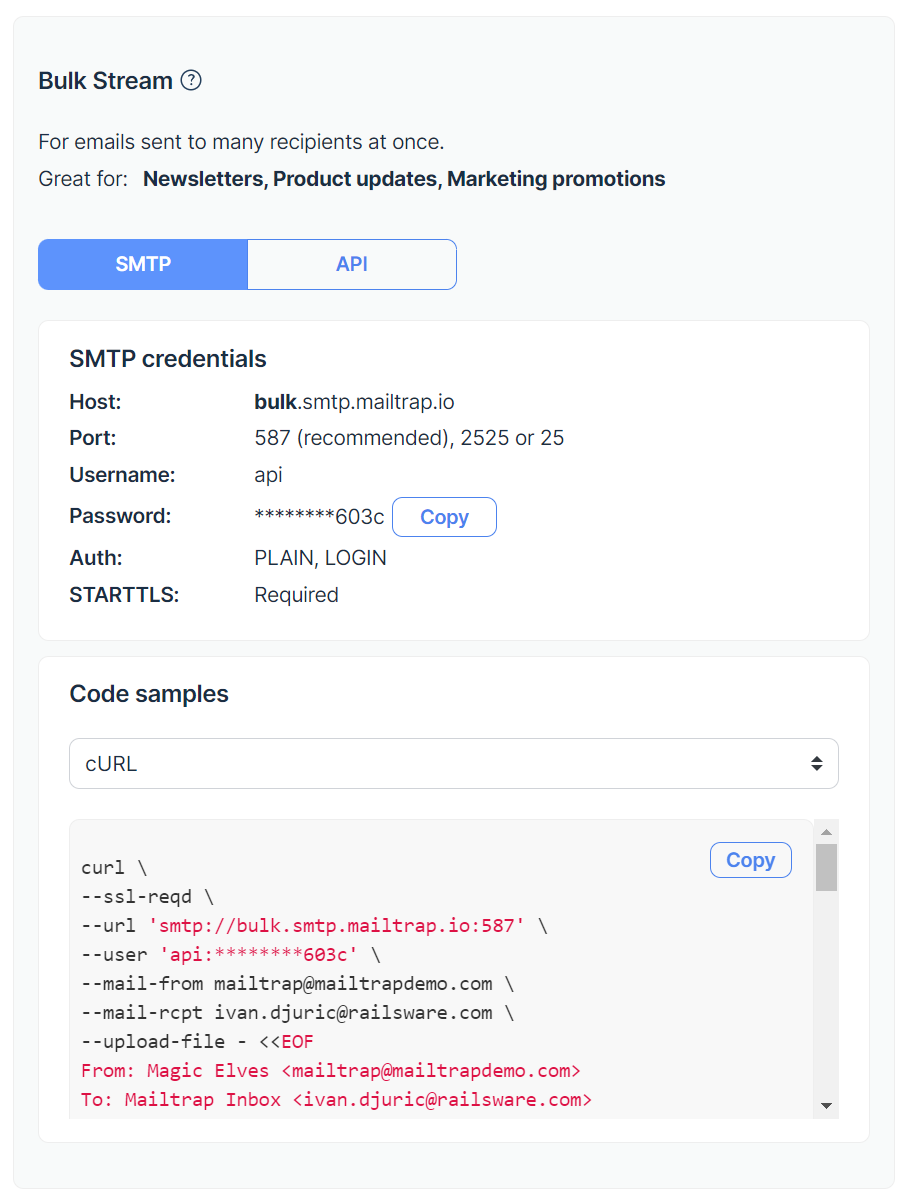
Then, simply insert the credentials into the following script for sending bulk email:
<?php
use PHPMailer\PHPMailer\PHPMailer;
use PHPMailer\PHPMailer\Exception;

require 'vendor/autoload.php'; // Path to the Composer autoload file

$mail = new PHPMailer(true);

try {
    //Server settings
    $mail->isSMTP();
    $mail->Host       = 'bulk.smtp.mailtrap.io'; // Set the SMTP server to send through
    $mail->SMTPAuth   = true;               // Enable SMTP authentication
    $mail->Username   = 'your_smtp_username'; // SMTP username
    $mail->Password   = 'your_smtp_password'; // SMTP password
    $mail->SMTPSecure = PHPMailer::ENCRYPTION_STARTTLS; // Enable TLS encryption;
    $mail->Port       = 587; // TCP port to connect to

    // Sender and reply-to address
    $mail->setFrom('from@example.com', 'Mailer');
    $mail->addReplyTo('replyto@example.com', 'Mailer');

    // Content
    $mail->isHTML(true); // Set email format to HTML

    // Recipients list
    $recipients = [
        ['email' => 'person1@example.com', 'name' => 'Person One'],
        ['email' => 'person2@example.com', 'name' => 'Person Two'],
        // Add more recipients as needed
    ];

    foreach ($recipients as $recipient) {
        $mail->addAddress($recipient['email'], $recipient['name']); // Add a recipient

        // Personalize the message
        $mail->Subject = 'Here is the subject';
        $mail->Body    = 'This is the HTML message body <b>in bold!</b>';
        $mail->AltBody = 'This is the body in plain text for non-HTML mail clients';

        $mail->send();
        $mail->clearAddresses(); // Clear addresses for the next iteration
    }

    echo 'Messages have been sent';
} catch (Exception $e) {
    echo "Message could not be sent. Mailer Error: {$mail->ErrorInfo}";
}
This script lets you send emails to multiple recipients without opening and closing the SMTP connection for every mail, which is way more efficient than creating a new PHPMailer instance for each mail, for example.
However, if you plan to send a large volume of emails, you might want to use a job queue system such as RabbitMQ, Beanstalkd, Redis, or others.
For explanatory purposes, I’ll show you how to do it with RabbitMQ.
But first, let’s install a PHP library for it via Composer:
composer require php-amqplib/php-amqplibThen, the job producer script will publish emails to a RabbitMQ queue:
require 'vendor/autoload.php';

use PhpAmqpLib\Connection\AMQPStreamConnection;
use PhpAmqpLib\Message\AMQPMessage;

$connection = new AMQPStreamConnection('localhost', 5672, 'user', 'password');
$channel = $connection->channel();

$channel->queue_declare('emailQueue', false, true, false, false);

$emailData = [
    'email' => 'recipient@example.com',
    'subject' => 'Test Email',
    'body' => 'This is a test email body.'
];

$msg = new AMQPMessage(json_encode($emailData), ['delivery_mode' => AMQPMessage::DELIVERY_MODE_PERSISTENT]);
$channel->basic_publish($msg, '', 'emailQueue');

echo " [x] Sent 'Email Job'\n";

$channel->close();
$connection->close();
And lastly, the worker script will consume the messages from the queue and send emails:
require 'vendor/autoload.php';

use PhpAmqpLib\Connection\AMQPStreamConnection;
use PhpAmqpLib\Message\AMQPMessage;
use PHPMailer\PHPMailer\PHPMailer;
use PHPMailer\PHPMailer\Exception;
use PHPMailer\PHPMailer\SMTPException;

$connection = new AMQPStreamConnection('localhost', 5672, 'user', 'password');
$channel = $connection->channel();

$channel->queue_declare('emailQueue', false, true, false, false);

echo " [*] Waiting for messages. To exit press CTRL+C\n";

$logFile = 'email_log.txt'; // Path to your log file

$callback = function ($msg) use ($logFile) {
    echo " [x] Received ", $msg->body, "\n";
    $emailData = json_decode($msg->body, true);

    $mail = new PHPMailer(true);
    try {
        // Configure SMTP settings
        $mail->isSMTP();
        // Your SMTP configuration here

        $mail->setFrom('from@example.com', 'Mailer');
        $mail->addAddress($emailData['email']); // Recipient email from the job data

        $mail->isHTML(true); // Email format to HTML
        $mail->Subject = $emailData['subject'];
        $mail->Body    = $emailData['body'];

        $mail->send();
        echo "Email sent to {$emailData['email']}\n";

        // Log successful email sending
        file_put_contents($logFile, "Email successfully sent to {$emailData['email']} at " . date('Y-m-d H:i:s') . "\n", FILE_APPEND);
    } catch (Exception $e) {
        echo "Email could not be sent. Mailer Error: {$mail->ErrorInfo}\n";
        // Log general errors
        file_put_contents($logFile, "Failed to send email to {$emailData['email']} at " . date('Y-m-d H:i:s') . ". Error: {$mail->ErrorInfo}\n", FILE_APPEND);
    } catch (SMTPException $e) {
        echo "SMTP Error: {$mail->ErrorInfo}\n";
        // Log SMTP-specific errors
        file_put_contents($logFile, "SMTP error while sending email to {$emailData['email']} at " . date('Y-m-d H:i:s') . ". Error: {$mail->ErrorInfo}\n", FILE_APPEND);
    }

    $msg->ack();
};

$channel->basic_qos(null, 1, null);
$channel->basic_consume('emailQueue', '', false, false, false, false, $callback);

while ($channel->is_consuming()) {
    $channel->wait();
}

$channel->close();
$connection->close();Tips:
- Replace placeholder values like
localhost,5672,user,password, andemailQueuewith your actual RabbitMQ details and queue name. - Also consider a process manager like, for example, Supervisor to ensure your worker script is always running and restarts automatically when it crashes.
- The worker script needs your specific SMTP configuration details; in this case, it’s your Bulk Stream credentials.
PHPMailer debugging
If you experience some troubles when sending emails through an SMTP server, the SMTPDebug command will help you explore those errors and find out what should be fixed.
Enable SMTP debugging and set the debug level in your script as follows:
$mail->SMTPDebug = 2;- level 1 = client; will show you messages sent by the client
- level 2 = client and server; will add server messages, it’s the recommended setting.
- level 3 = client, server, and connection; will add details about the initial information, which might be useful for discovering STARTTLS failures
- level 4 = low-level information.
Example 1. Invalid SMTP hostname
2018-12-12 14:51:32	Connection: opening to mailtrap.io:587, timeout=10, options=array()
2018-12-12 14:51:42	Connection failed. Error #2: stream_socket_client(): unable to connect to mailtrap.io:587 (Operation timed out) [/Users/xxxx/Downloads/PHPMailer/src/SMTP.php line 326]
2018-12-12 14:51:42	SMTP ERROR: Failed to connect to server: Operation timed out (60)
2018-12-12 14:51:42	SMTP connect() failed.
For this example, I entered an invalid hostname: mailtrap.io instead of live.smtp.mailtrap.io. and instantly received a message that an error had occurred at the very first stage of communication with the server.
Example 2. Invalid credentials
2018-12-12 14:49:26	Connection: opening to live.smtp.mailtrap.io:587, timeout=300, options=array()
2018-12-12 14:49:26	Connection: opened
2018-12-12 14:49:26	SMTP INBOUND: "220 mailtrap.io ESMTP ready"
2018-12-12 14:49:26	SERVER -> CLIENT: 220 mailtrap.io ESMTP ready
...
2018-12-12 14:49:30	SMTP INBOUND: "535 5.7.0 Invalid login or password"
2018-12-12 14:49:30	SERVER -> CLIENT: 535 5.7.0 Invalid login or password
2018-12-12 14:49:30	SMTP ERROR: Username command failed: 535 5.7.0 Invalid login or password
2018-12-12 14:49:30	SMTP Error: Could not authenticate.
2018-12-12 14:49:30	CLIENT -> SERVER: QUIT
2018-12-12 14:49:30	SMTP INBOUND: "221 2.0.0 Bye"
2018-12-12 14:49:30	SERVER -> CLIENT: 221 2.0.0 Bye
2018-12-12 14:49:30	Connection: closed
2018-12-12 14:49:30	SMTP connect() failed.
Mailer Error: SMTP connect() failed.
Here, I demonstrate where the error occurs: now the SMTP, its hostname, and port are valid but a combination of login and password was not found, so you should double-check and modify your credentials.
There are a couple of detailed articles on GitHub about debugging and troubleshooting, refer to them when you need to dive deeper into these topics. And if you’re seeing the infamous SMTP Error: Could not connect to SMTP host, there’s a dedicated section for solving this issue.
Test your emails and email sending in a staging environment
Sending your emails without testing them beforehand would be like going on a trip without checking whether you’ve packed everything. Just imagine finding yourself at the airport terminal only to notice that you forgot your passport at the check-in. 🛂
Something like that can actually happen to your emails if you don’t test them before sending them out. For example, they might be skipping inboxes or being flagged as spam, your HTML might not be rendered correctly by all email clients, your personalization variables may be off, etc.
Luckily, we’ve got you covered with Mailtrap’s holistic Email Testing solution.
Mailtrap Email Testing allows you to catch traffic from staging and dev environments and then preview them and analyze their HTML/CSS before sending them out.

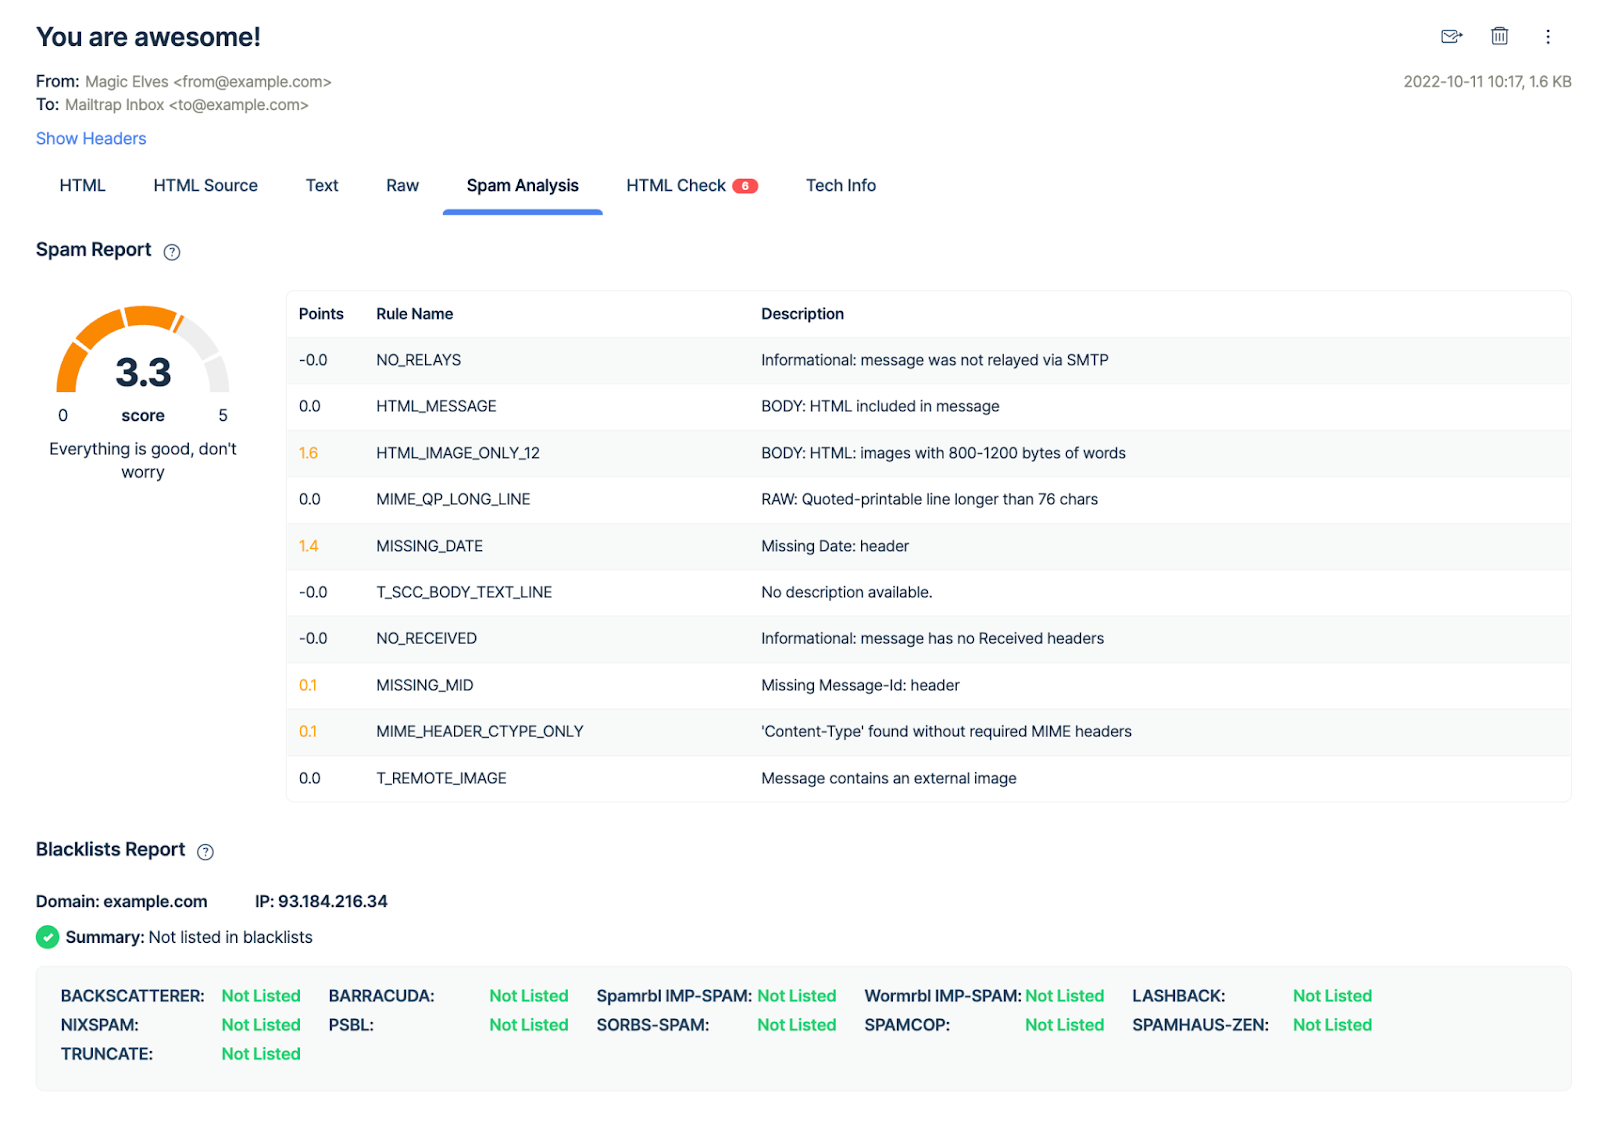
There’s also the Spam Report, which can help you solve potential email deliverability issues if you keep your spam score below 5.
Having said that, let me show you how it works.
To test your emails with a fake SMTP server, go to Email Testing → Inboxes → SMTP Settings and select PHPMailer on the list of Integrations.
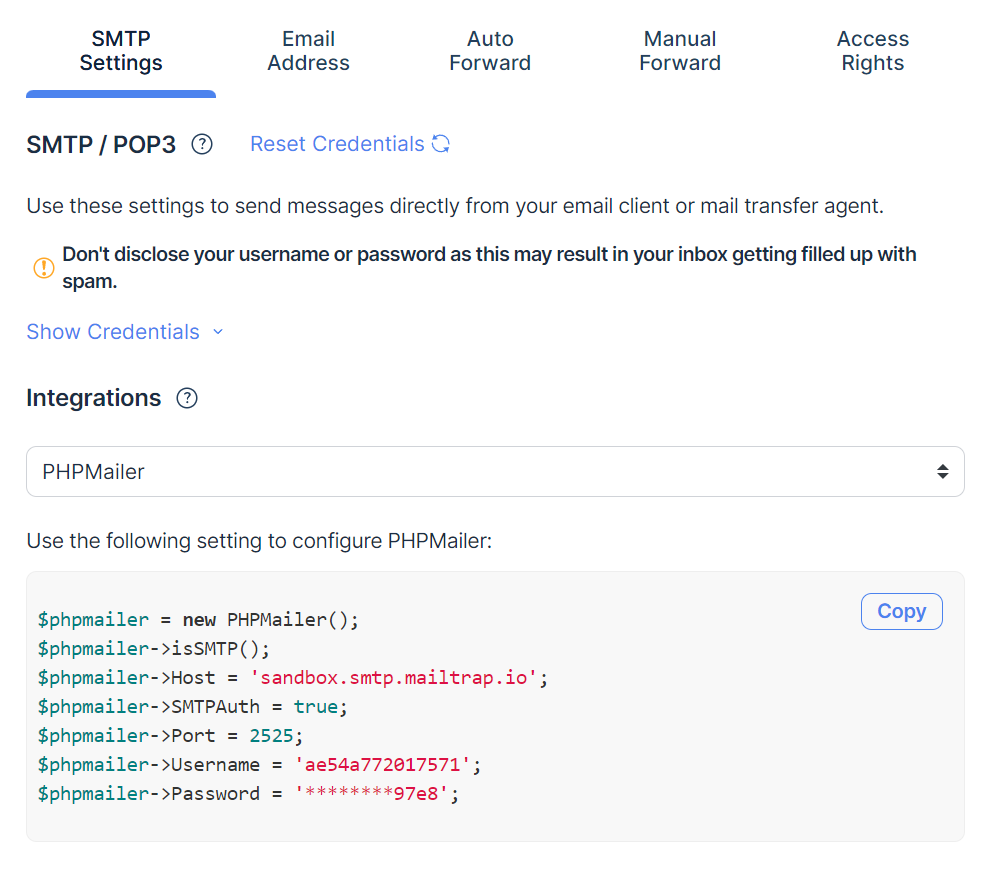
Then, simply paste the settings to your PHPMailer script, which should look something like this:
<?php
use PHPMailer\PHPMailer\PHPMailer;
use PHPMailer\PHPMailer\Exception;

require 'vendor/autoload.php';

$phpmailer = new PHPMailer(true); // Create a new PHPMailer instance

try {
    // SMTP settings for Mailtrap
    $phpmailer->isSMTP(); // Set mailer to use SMTP
    $phpmailer->Host = 'sandbox.smtp.mailtrap.io'; // Specify main and backup SMTP servers
    $phpmailer->SMTPAuth = true; // Enable SMTP authentication
    $phpmailer->Username = '1234567891234'; // SMTP username
    $phpmailer->Password = '1234567891234'; // SMTP password
    $phpmailer->Port = 587; // TCP port to connect to

    // Email content settings
    $phpmailer->setFrom('your_email@example.com', 'Mailer');
    $phpmailer->addAddress('recipient@example.com', 'Joe User'); // Add a recipient
    $phpmailer->isHTML(true); // Set email format to HTML
    $phpmailer->Subject = 'Here is the subject';
    $phpmailer->Body    = 'This is the HTML message body <b>in bold!</b>';
    $phpmailer->AltBody = 'This is the body in plain text for non-HTML mail clients';

    $phpmailer->send(); // Send the email
    echo 'Message has been sent';
} catch (Exception $e) {
    echo "Message could not be sent. Mailer Error: {$phpmailer->ErrorInfo}";
}
?>
Pro tip:
- You can also use Mailtrap SMTP credentials for testing emails with PHPMailer on localhost and get extra functionality.
Wrapping up
In this tutorial, I’ve covered the most common PHPMailer use cases, from creating HTML emails with images and attachments, to sending them with or without SMTP, and more!
Hopefully, you can use this article as your go-to guide for adding email functionality to your app.
However, if you’re looking for other use cases, have a look at the “examples” folder inside PHPMailer documentation on Github, or check out our blog, where you can find articles such as:
- PHPMailer Gmail: A Guide with Code Examples [2024]
- Sending Emails in PHP [2024 Guide with Examples]
- PHP Email Contact Form | Mailtrap
- Simple Ways to Test Emails in Your PHP App
Also, if you’re a visual learner be sure to check out our YouTube channel and see how to send emails using PHP!


Comments
6 replies