 Skip to Navigation


Email contact forms are the bread and butter for any campaign to collect leads, customers, or hook potential users into your funnel.
The cool thing is that they’re relatively easy to embed into your webpage, even for beginners. Yet, email harvesters will struggle to abuse them when set up correctly.
Here, I’ll be showing you how to build an effective contact form in PHP. I’m going to explain the process step by step in this article, covering the following.
- Build a simple HTML contact form (without the optional CSS)
- Write a PHP script that will collect form data (including action attribute)
- Write another script to validate and verify the data
- Show you how to send emails using PHP mailer
And before we begin, I’ll also talk about troubleshooting sending issues. So, let’s roll up our sleeves.
How to build a PHP contact form
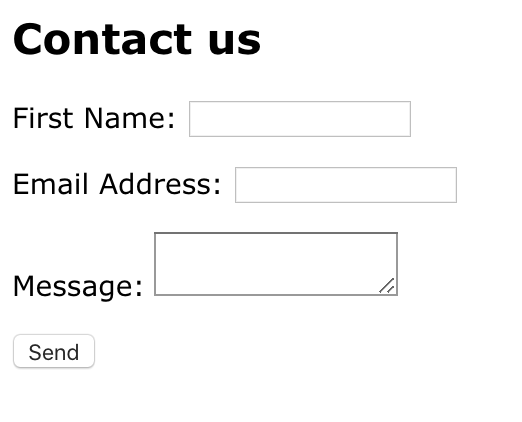
For starters, I’ll build a simple form with just HTML code. If you don’t care much about the visual side of it, it can be as simple as this:
<form>
<h2>Contact us</h2>
<p><label>First Name:</label> <input name="myEmail" type="text" /></p>
<p><label>Email Address:</label> <input style="cursor: pointer;" name="myEmail" type="text" /></p>
<p><label>Message:</label>  <textarea name="message"></textarea> </p>
<p><input type="submit" value="Send" /></p>
</form>
Of course, without any CSS it looks really ugly (no div class or anything). But it will be just fine for demonstration purposes, and I want to focus on performance and security rather than aesthetics.
Pro Tip: If you’re not into writing CSS at the moment, you can use any of the hundreds of available form builders. Some options include Simfatic, 123FormBuilder, and PHP Jabbers. CodeCanyon has hundreds of tools with reviews for each to make the choice easier.
Add the “Accept terms/privacy policy” checkbox
Adding the checkbox ensures users must agree to the terms and privacy policies before submitting the form, enhancing both usability and compliance. Here’s how to do it:
<form>
    <h2>Contact us</h2>
    <p><label>First Name:</label> <input name="firstName" type="text" /></p>
    <p><label>Email Address:</label> <input style="cursor: pointer;" name="email" type="email" /></p>
    <p><label>Message:</label> <textarea name="message"></textarea></p>

    <!-- Checkbox for accepting terms/privacy policy -->
    <p>
        <input type="checkbox" id="terms" name="terms" required>
        <label for="terms">I accept the <a href="terms.html">Terms of Service</a> and <a href="privacy.html">Privacy Policy</a>.</label>
    </p>

    <p><input type="submit" value="Send" /></p>
</form>
Quick breakdown:
- Email input type: I’ve changed the type of the email address input to
type="email"to enforce a valid email format. - Name attributes: I updated the name attributes for the first name and email fields to be distinct (
firstNameandemail) to correctly identify the fields in the PHP backend. - Checkbox for Terms and Conditions: I added a checkbox for accepting the terms and privacy policy, which is required before the form can be submitted.
- Links to documents: I included links to “Terms of Service” and “Privacy Policy” pages within the checkbox label for user accessibility.
Add Google reCaptcha
To add an additional security layer, you may want to add a simple reCaptcha script to your PHP mail form.
First, head to https://www.google.com/recaptcha/admin/create and fill out the form. Next, choose the reCaptcha version that you’d like to use (make sure it’s supported). I’ll opt for v2 for this tutorial.
ReCaptcha v2 is sent with a form, and you can easily handle it in the backend with the rest of the form fields. ReCaptcha v3, on the other hand, needs to be called manually on the frontend. This is doable but would require us to rewrite the entire code. Let’s leave this for another occasion.

Submit the form and you’ll see your individual Site Key and Secret Key. Check out the whole form with the added ReCaptcha:
<?php

$errors = [];
$errorMessage = '';

$secret = 'your secret key';

if (!empty($_POST)) {
    $name = $_POST['name'];
    $email = $_POST['email'];
    $message = $_POST['message'];
    $recaptchaResponse = $_POST['g-recaptcha-response'];

    $recaptchaUrl = "https://www.google.com/recaptcha/api/siteverify?secret={$secret}&response={$recaptchaResponse}";
    $verify = json_decode(file_get_contents($recaptchaUrl));

    if (!$verify->success) {
      $errors[] = 'Recaptcha failed';
    }

    if (empty($name)) {
        $errors[] = 'Name is empty';
    }

    if (empty($email)) {
        $errors[] = 'Email is empty';
    } else if (!filter_var($email, FILTER_VALIDATE_EMAIL)) {
        $errors[] = 'Email is invalid';
    }

    if (empty($message)) {
        $errors[] = 'Message is empty';
    }


    if (!empty($errors)) {
        $allErrors = join('<br/>', $errors);
        $errorMessage = "<p style='color: red;'>{$allErrors}</p>";
    } else {
        $toEmail = 'some.nugget@gmail.com';
        $emailSubject = 'New email from your contant form';
        $headers = ['From' => $email, 'Reply-To' => $email, 'Content-type' => 'text/html; charset=iso-8859-1'];

        $bodyParagraphs = ["Name: {$name}", "Email: {$email}", "Message:", $message];
        $body = join(PHP_EOL, $bodyParagraphs);

        if (mail($toEmail, $emailSubject, $body, $headers)) {
            header('Location: thank-you.html');
        } else {
            $errorMessage = "<p style='color: red;'>Oops, something went wrong. Please try again later</p>";
        }
    }
}

?>

<html>
<body>
  <script src="https://www.google.com/recaptcha/api.js"></script>
  <form action="/form.php" method="post" id="contact-form">
    <h2>Contact us</h2>

    <?php echo((!empty($errorMessage)) ? $errorMessage : '') ?>
    <p>
      <label>First Name:</label>
      <input name="name" type="text"/>
    </p>
    <p>
      <label>Email Address:</label>
      <input style="cursor: pointer;" name="email" type="text"/>
    </p>
    <p>
      <label>Message:</label>
      <textarea name="message"></textarea>
    </p>

    <p>
      <button
        class="g-recaptcha"
        type="submit"
        data-sitekey="your site key"
        data-callback='onRecaptchaSuccess'
      >
        Submit
      </button>
    </p>
  </form>
  <script src="//cdnjs.cloudflare.com/ajax/libs/validate.js/0.13.1/validate.min.js"></script>
  <script>
      const constraints = {
          name: {
              presence: {allowEmpty: false}
          },
          email: {
              presence: {allowEmpty: false},
              email: true
          },
          message: {
              presence: {allowEmpty: false}
          }
      };

      const form = document.getElementById('contact-form');

      form.addEventListener('submit', function (event) {
          const formValues = {
              name: form.elements.name.value,
              email: form.elements.email.value,
              message: form.elements.message.value
          };

          const errors = validate(formValues, constraints);

          if (errors) {
              event.preventDefault();
              const errorMessage = Object
                  .values(errors)
                  .map(function (fieldValues) {
                      return fieldValues.join(', ')
                  })
                  .join("\n");

              alert(errorMessage);
          }
      }, false);

      function onRecaptchaSuccess () {
          document.getElementById('contact-form').submit()
      }
  </script>
</body>
</html>
How to collect data from a PHP contact form
Okay, the contact form is in place, but whatever data users insert goes straight into a black hole. So, I’ll need to add two more elements to the form – ACTION, and METHOD.
- ACTION tells the browser what it should do when a user hits the
Sendbutton. - METHOD tells it how to approach this move.
In this case, I want to load a new PHP page in the background. The form will be processing the data, so you’re legally obliged to protect the user’s details (name and email address), making the POST method the safer option.
To explain, using GET would mean these details get included in the URL of the following page, something I’d rather avoid.
Now, all that needs to be done is to include these two attributes in the code we previously used:
<form method="POST" action="form.php" id="contact-form">
<h2>Contact us</h2>
<p><label>First Name:</label> <input name="name" type="text" /></p>
<p><label>Email Address:</label> <input style="cursor: pointer;" name="email" type="text" /></p>
<p><label>Message:</label>  <textarea name="message"></textarea> </p>
<p><input type="submit" value="Send" /></p>
</form>
How to validate and verify data from a contact form
To get rid of potential spammers and protect your users from accidentally mistyping their contact details, it’s worth adding some validation and verification algorithms to the contact form.
For top-notch security, consider doing this on the client- and the server side.
Client-side validation will quickly return any errors on the frontend, letting a user fix them right away. Server-side validation will also catch those that passed the initial test (by, for example, disabling JavaScript in the browser) but shouldn’t have.
Note that you can write your own script, but it’s often worth using what’s already been built and tested. These scripts also do verification and offer a much better experience than, for example, a regex.
I’ll use a bulletproof solution for schema validation – https://validatejs.org/. For simplicity, just add a library from a CDN.
<script src="//cdnjs.cloudflare.com/ajax/libs/validate.js/0.13.1/validate.min.js"></script>Here’s the script.
<script>
   const constraints = {
       name: {
           presence: { allowEmpty: false }
       },
       email: {
           presence: { allowEmpty: false },
           email: true
       },
       message: {
           presence: { allowEmpty: false }
       }
   };

   const form = document.getElementById('contact-form');

   form.addEventListener('submit', function (event) {
     const formValues = {
         name: form.elements.name.value,
         email: form.elements.email.value,
         message: form.elements.message.value
     };

     const errors = validate(formValues, constraints);

     if (errors) {
       event.preventDefault();
       const errorMessage = Object
           .values(errors)
           .map(function (fieldValues) { return fieldValues.join(', ')})
           .join("\n");

       alert(errorMessage);
     }
   }, false);
</script>
For the server-side validation, you can use the following code:
<?php

$errors = [];

if (!empty($_POST)) {
   $name = $_POST['name'];
   $email = $_POST['email'];
   $message = $_POST['message'];

   if (empty($name)) {
       $errors[] = 'Name is empty';
   }

   if (empty($email)) {
       $errors[] = 'Email is empty';
   } else if (!filter_var($email, FILTER_VALIDATE_EMAIL)) {
       $errors[] = 'Email is invalid';
   }

   if (empty($message)) {
       $errors[] = 'Message is empty';
   }
}
If either verification fails, it would be a good idea to let the user know. You can use the following code to build an error message:
<?php

if (!empty($errors)) {

   $allErrors = join('<br/>', $errors);

   $errorMessage = "<p style='color: red;'>{$allErrors}</p>";

}
You are free to render this message anywhere on your page.
Set up PHPMailer to send emails from a PHP contact form
PHPMailer is a great choice for sending emails from a PHP contact form due to its ease of use, advanced features, and robust error handling.
It offers compatibility across various email servers, has strong community support, and enhances email security through SMTP authentication.
However, keep in mind that PHPMailer doesn’t have any built-in email sending. Therefore, I’ll be covering the initial installation and SMTP setup, then I’ll move to show you how to send emails via SMTP and API.
Installation
To integrate PHPMailer into your project, the first step is to get Composer; it’s a tool for managing dependencies in PHP projects.
After setting up Composer, you should update your composer.json file by adding the following line:
"phpmailer/phpmailer": "^6.9"Alternatively, you can directly execute this command in your terminal:
composer require phpmailer/phpmailerImportant Note: Remember, the vendor directory and the vendor/autoload.php script are created by Composer and are not part of PHPMailer itself.
PHPMailer can also be installed manually. Download the PHPMailer source files and add them in your project’s include path as defined in the PHP configuration. Then, you can manually load the necessary class files:
<?php
use PHPMailer\PHPMailer\PHPMailer;
use PHPMailer\PHPMailer\Exception;

require 'path/to/PHPMailer/src/Exception.php';
require 'path/to/PHPMailer/src/PHPMailer.php';
require 'path/to/PHPMailer/src/SMTP.php';
Pro Tip: Incorporate the Exception class is to handle and debug errors effectively. Without it, you might encounter a generic error message indicating the absence of the Exception class without detailed debugging information.
To minimize the installation footprint, you can install PHPMailer with only the essential files.
- SMTP functionality – include
src/PHPMailer.phpandsrc/SMTP.php - XOAUTH2 – also include
src/OAuth.phpalong with any dependencies required for authentication
SMTP settings
An external SMTP server to send emails via PHPMailer enhances reliability and security. When configured with TLS or SSL encryption, it ensures that your PHP application’s email transmissions are secure.
Check the basic setup for SMTP settings using PHPMailer:
<?php
use PHPMailer\PHPMailer\PHPMailer;
use PHPMailer\PHPMailer\SMTP;
use PHPMailer\PHPMailer\Exception;

require 'vendor/autoload.php'; // Adjust the path as needed if you're not using Composer

$mail = new PHPMailer(true);

try {
    //Server settings
    $mail->isSMTP();                                            // Send using SMTP
    $mail->Host       = 'smtp.example.com';                     // Set the SMTP server to send through
    $mail->SMTPAuth   = true;                                   // Enable SMTP authentication
    $mail->Username   = 'your_email@example.com';               // SMTP username
    $mail->Password   = 'your_password';                        // SMTP password
    $mail->SMTPSecure = 'tls';                                  // Enable TLS encryption
    $mail->Port       = 587;                                    // TCP port to connect to
The code here includes only placeholder values in the script for exemplary purposes. I’ll be changing that to Mailtrap API/SMTP credentials and server details in the following sections. Production SMTP setup for PHP on a VPS involves additional security and server optimization considerations beyond these settings.
Send email from a PHP contact form using SMTP
As mentioned, I’ll be using Mailtrap API/SMTP to send the email. It’s part of Mailtrap Email Delivery Platform, an email-sending solution for developer and product teams, focused on fast delivery and high inboxing rates for transactional and promo emails.
Now, assuming you’ve added and verified your sending domain, it’s time to move onto the SMTP settings. Since I’m sending from an email contact form, I’ll use Mailtrap’s Transactional Stream to send the confirmation to the recipient.
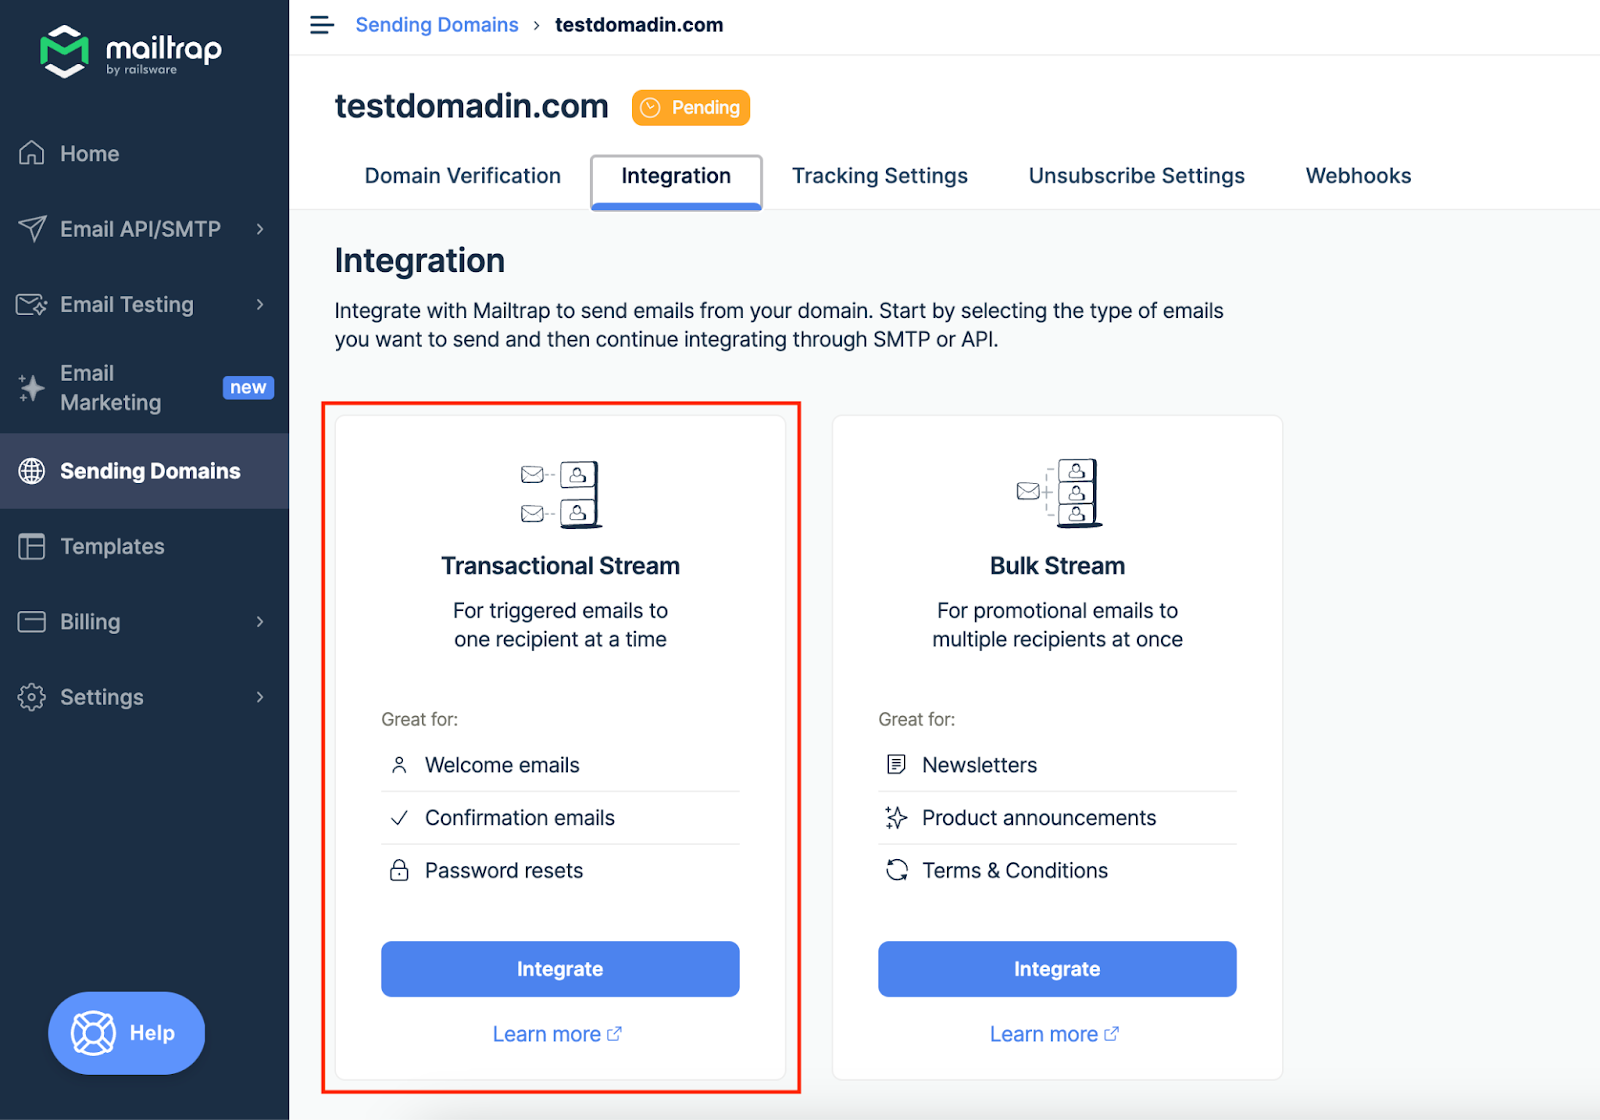
Please make sure to copy-paste the transactional stream credentials into your scrip, and the final result may look something like the below.
<?php
use PHPMailer\PHPMailer\PHPMailer;
use PHPMailer\PHPMailer\Exception;

require 'vendor/autoload.php'; // Adjust based on your installation method

$mail = new PHPMailer(true); // Enable exceptions

// SMTP Configuration
$mail->isSMTP();
$mail->Host = 'live.smtp.mailtrap.io'; // Your SMTP server
$mail->SMTPAuth = true;
$mail->Username = 'your_username'; // Your Mailtrap username
$mail->Password = 'your_password'; // Your Mailtrap password
$mail->SMTPSecure = 'tls';
$mail->Port = 587;

// Sender and recipient settings
$mail->setFrom('from@example.com', 'From Name');
$mail->addAddress('recipient@example.com', 'Recipient Name');

// Sending plain text email
$mail->isHTML(false); // Set email format to plain text
$mail->Subject = 'Your Subject Here';
$mail->Body    = 'This is the plain text message body';

// Send the email
if(!$mail->send()){
    echo 'Message could not be sent. Mailer Error: ' . $mail->ErrorInfo;
} else {
    echo 'Message has been sent';
}
To start using Mailtrap yourself, hit the button below.
Send email with attachment
Depending on the type of contact form you’re using, there are cases where you may consider adding an attachment to an email from the contact form. For instance, this sometimes applies to:
- Confirmation reciepts
- Event tickets and passes
- Contracts and legal agreements
- Educational materials and resources
- Insurance policies
- Etc.
Anyway, there are two ways to include attachments with PHPMailer and I’ll be covering both below. Just for the fun of it, I’ll assume the file is an event ticket.
Attach files directly from a filesystem
To be efficient, store these files in the same directory as your PHP script. Then, simply reference its path in the script. Optionally, you can redefine the filename when attaching it:
$mail->addAttachment('path/to/eventticket1.pdf', 'eventticket1.pdf');In this command, the file at path/to/eventticket1.pdf is attached to your email. The eventticket1.pdf parameter is optional and lets you specify an alternate filename for the recipient. This method isn’t limited to PDFs, you can attach images and other file types similarly.
If you want to attach multiple files, repeat the attachment line with new paths and filenames:
$mail->addAttachment('path/to/eventticket2.pdf', 'eventticket2.pdf');Incorporate string attachments
PHPMailer also allows you to attach data strings directly. This is particularly useful for sending data that doesn’t need to be saved as a file on your server, such as extracting binary data from a database.
For attaching data from a database like a BLOB, you might use:
$mysql_data = $mysql_row['blob_data'];
$mail->addStringAttachment($mysql_data, 'db_data.db');
This command attaches data directly from a MySQL database BLOB field.
Lastly, it’s possible to attach files from external sources by fetching the contents via URL:
$mail->addStringAttachment(file_get_contents($url), 'myfile.pdf');This technique allows you to dynamically include content from external sources directly into your emails without downloading and saving them first.
Send email from a PHP contact form using email API
If you need to process thousands of contact submissions and send equal emails, I’d always recommend using email API. Why? It offers additional flexibility, automations, and could be easier to integrate with your existing systems.
Again, I’ll use Mailtrap API/SMTP – its official PHP SDK. But, before I start, here are some considerations to kept in mind.
- The official package can be installed with Composer.
- This client isn’t hard-coupled with Symfony HTTP, Guzzle, Zend, React or other libraries to send HTTP requests.
- The client uses PSR-18 client abstraction to have the flexibility to choose your own client.
If you want a quick start, run the following commands.
Symfony HTTP client (recommended)
composer require railsware/mailtrap-php symfony/http-client nyholm/psr7Guzzle HTTP client
composer require railsware/mailtrap-php guzzlehttp/guzzle php-http/guzzle7-adapterWith that out of the way, check how to send an email via Mailtrap PHP SDK.
<?php

use Mailtrap\Config;
use Mailtrap\EmailHeader\CategoryHeader;
use Mailtrap\EmailHeader\CustomVariableHeader;
use Mailtrap\Helper\ResponseHelper;
use Mailtrap\MailtrapClient;
use Symfony\Component\Mime\Address;
use Symfony\Component\Mime\Email;
use Symfony\Component\Mime\Header\UnstructuredHeader;

require __DIR__ . '/vendor/autoload.php';

// your API token from here https://mailtrap.io/api-tokens
$apiKey = getenv('MAILTRAP_API_KEY');
$mailtrap = new MailtrapClient(new Config($apiKey));

$email = (new Email())
    ->from(new Address('example@your-domain-here.com', 'Mailtrap Test'))
    ->replyTo(new Address('reply@your-domain-here.com'))
    ->to(new Address('email@example.com', 'Jon'))
    ->priority(Email::PRIORITY_HIGH)
    ->cc('mailtrapqa@example.com')
    ->addCc('staging@example.com')
    ->bcc('mailtrapdev@example.com')
    ->subject('Best practices of building HTML emails')
    ->text('Hey! Learn the best practices of building HTML emails and play with ready-to-go templates. Mailtrap's Guide on How to Build HTML Email is live on our blog')
    ->html(
        '<html>
        <body>
        <p><br>Hey</br>
        Learn the best practices of building HTML emails and play with ready-to-go templates.</p>
        <p><a href="https://mailtrap.io/blog/build-html-email/">Mailtrap's Guide on How to Build HTML Email</a> is live on our blog</p>
        <img src="cid:logo">
        </body>
    </html>'
    )
    ->embed(fopen('https://mailtrap.io/app/uploads/2021/04/mailtrap-new-logo.svg', 'r'), 'logo', 'image/svg+xml')
    ;

    // Headers
    $email->getHeaders()
    ->addTextHeader('X-Message-Source', 'domain.com')
    ->add(new UnstructuredHeader('X-Mailer', 'Mailtrap PHP Client')) // the same as addTextHeader
    ;

    // Custom Variables
    $email->getHeaders()
    ->add(new CustomVariableHeader('user_id', '45982'))
    ->add(new CustomVariableHeader('batch_id', 'PSJ-12'))
    ;

    // Category (should be only one)
    $email->getHeaders()
    ->add(new CategoryHeader('Integration Test'))
    ;

try {
    $response = $mailtrap->sending()->emails()->send($email); // Email sending API (real)

    var_dump(ResponseHelper::toArray($response)); // body (array)
} catch (Exception $e) {
    echo 'Caught exception: ',  $e->getMessage(), "\n";
}

// OR send email to the Mailtrap SANDBOX

try {
    $response = $mailtrap->sandbox()->emails()->send($email, 1000001); // Required second param -> inbox_id

    var_dump(ResponseHelper::toArray($response)); // body (array)
} catch (Exception $e) {
    echo 'Caught exception: ',  $e->getMessage(), "\n";}
Note that this is a full example including CC, Bcc, Custom Variables and more. Of course, you can tone it down for your purposes.
Send email with attachment
Again, I’ll assume that your contact form collets event-goers, and I’ll show you how to send an email via API with an event ticket as an attachment.
I’ll refactor the Mailtrap PHP SDK script to include an email attachment and use the attach method available in the Symfony\Component\Mime\Email class. Also, I’ll assume you have a file named event_ticket.pdf located in the same directory as your script.
<?php

use Mailtrap\Config;
use Mailtrap\EmailHeader\CategoryHeader;
use Mailtrap\EmailHeader\CustomVariableHeader;
use Mailtrap\Helper\ResponseHelper;
use Mailtrap\MailtrapClient;
use Symfony\Component\Mime\Address;
use Symfony\Component\Mime\Email;
use Symfony\Component\Mime\Header\UnstructuredHeader;

require __DIR__ . '/vendor/autoload.php';

// your API token from here https://mailtrap.io/api-tokens
$apiKey = getenv('MAILTRAP_API_KEY');
$mailtrap = new MailtrapClient(new Config($apiKey));

$email = (new Email())
    ->from(new Address('example@your-domain-here.com', 'Mailtrap Test'))
    ->replyTo(new Address('reply@your-domain-here.com'))
    ->to(new Address('email@example.com', 'Jon'))
    ->priority(Email::PRIORITY_HIGH)
    ->cc('mailtrapqa@example.com')
    ->addCc('staging@example.com')
    ->bcc('mailtrapdev@example.com')
    ->subject('Best practices of building HTML emails')
    ->text('Hey! Learn the best practices of building HTML emails and play with ready-to-go templates. Mailtrap's Guide on How to Build HTML Email is live on our blog')
    ->html(
        '<html>
        <body>
        <p><br>Hey</br>
        Learn the best practices of building HTML emails and play with ready-to-go templates.</p>
        <p><a href="https://mailtrap.io/blog/build-html-email/">Mailtrap's Guide on How to Build HTML Email</a> is live on our blog</p>
        <img src="cid:logo">
        </body>
    </html>'
    )
    ->embed(fopen('https://mailtrap.io/app/uploads/2021/04/mailtrap-new-logo.svg', 'r'), 'logo', 'image/svg+xml')
    // Attaching the event ticket
    ->attachFromPath(__DIR__ . '/event_ticket.pdf', 'Event Ticket.pdf', 'application/pdf');

// Headers
$email->getHeaders()
    ->addTextHeader('X-Message-Source', 'domain.com')
    ->add(new UnstructuredHeader('X-Mailer', 'Mailtrap PHP Client'))
    ;

// Custom Variables
$email->getHeaders()
    ->add(new CustomVariableHeader('user_id', '45982'))
    ->add(new CustomVariableHeader('batch_id', 'PSJ-12'))
    ;

// Category (should be only one)
$email->getHeaders()
    ->add(new CategoryHeader('Integration Test'))
    ;

try {
    $response = $mailtrap->sending()->emails()->send($email); // Email sending API (real)

    var_dump(ResponseHelper::toArray($response)); // body (array)
} catch (Exception $e) {
    echo 'Caught exception: ',  $e->getMessage(), "\n";
}

// OR send email to the Mailtrap SANDBOX

try {
    $response = $mailtrap->sandbox()->emails()->send($email, 1000001); // Required second param -> inbox_id

    var_dump(ResponseHelper::toArray($response)); // body (array)
} catch (Exception $e) {
    echo 'Caught exception: ',  $e->getMessage(), "\n";}
How to send emails using PHP mail()
The PHP mail() function is a native PHP method for sending emails. Despite its direct access and ease of use, its notable limitations that have diminished its popularity.
The limitations include:
- Dependency on the server’s mail configuration, meaning it sends emails directly from your server.
- That setup often leads to emails being marked as spam or outright rejected by email providers.
mail()lacks sophisticated features like email tracking and is susceptible to email injection attacks.
Due to these issues, I strongly advise against relying on mail(). However, for educational purposes, here’s how the mail() function is typically used:
<?php
mail($to, $subject, $message, $headers, $parameters);
?>
Parameters explained
$to: The recipient’s email address, which must be a valid email format like user@example.com or formatted with a name (User user@example.com) according to RFC 2822.$subject: The subject line of the email.$message: The main body text of your email, which should use Carriage Return Line Feed (CRLF, \r\n) to separate lines. Keep lines under 70 characters.$headers: Essential for defining theFromaddress. If omitted, PHP throws an error. Additional headers can include CC or BCC, structured as an array or a single string separated by CRLFs.$parameters: Used to specify additional settings that are defined in thesendmail_pathconfiguration.
Here’s an example of how to send a plain text email.
<?php
$to = "somebody@example.com";
$subject = "My subject";
$txt = "Hello world!";
$headers = "From: webmaster@example.com" . "\r\n" .
"CC: somebodyelse@example.com";

mail($to, $subject, $txt, $headers);
?>
And if you want to send an HTML email, here’s the usual setup.
// Message
$message = '
<html>
<head>
  <title>Review Request Reminder</title>
</head>
<body>
  <p>Here are the cases requiring your review in December:</p>
  <table>
    <tr>
      <th>Case title</th><th>Category</th><th>Status</th><th>Due date</th>
    </tr>
    <tr>
      <td>Case 1</td><td>Development</td><td>pending</td><td>Dec-20</td>
    </tr>
    <tr>
      <td>Case 1</td><td>DevOps</td><td>pending</td><td>Dec-21</td>
    </tr>
  </table>
</body>
</html>
';
To ensure correct formatting, there are two methods set the Content-type header appropriately.
#1 Method
$headers = "MIME-Version: 1.0" . "\r\n";
$headers .= "Content-type:text/html;charset=UTF-8" . "\r\n";
#2 Method
$headers['MIME-Version'] = '1.0';
$headers['Content-type'] = 'text/html; charset=iso-8859-1';
Critical considerations:
- Using
mail(), you face potential deliverability challenges. - Emails sent may bypass SPF and DKIM settings, leading to them being flagged as spam by recipient MTAs.
- Tracking delivery failures is problematic, as bounce-back messages are often not returned
PHP contact form doesn’t send emails: how to fix the issue?
Contact forms in PHP either use mail() function or SMTP authentication via PHPMailer to send emails. This means some common issues you may come across are connected to either malfunctioning of the mail() function, or to the incorrect settings of the SMTP. There is a bare minimum checklist of what you can do to troubleshoot:
Code should match the form method
When you set the form method to POST, then make sure you use $_POST to look for your form values. Otherwise, if you set it to GET or didn’t set it at all, then you need to use $_GET to look for your form values. But as mentioned earlier, it’s safer to use POST.
Configure the localhost mail server properly
If your workstation is local and you develop locally using WAMP, MAMP, or XAMPP, an email server might not be installed on your workstation. However, it is obligatory to install since PHP cannot send mail by default.
Use a different mailing package
PHP’s built-in mail() function is simple but it has quite a few disadvantages. Consider the alternatives that offer more flexibility and fewer errors like PHPMailer or Symfony Mailer.
Enable PHP’s custom mail.log
This would not record the complete SMTP interaction, but at least function call parameters and invocation script.
ini_set("mail.log", "/tmp/mail.log");
ini_set("mail.add_x_header", TRUE);
Wrapping up
When all is said and done, now you’re fully equipped to create and set in motion a PHP email form. Not only date, but you’ll be making user data safe.
And if you’re interested in more PHP-related articles, we’ve got a handful of them waiting for you on our blog, such as:
- How to Set Up Email Verification in PHP
- How to Validate Emails in PHP
- PHP Mail Test: Tutorial with Code Snippets
- PHPMailer Office 365: Tutorial


Comments
5 replies
View all comments