PHP has multiple options for sending HTML emails: the PHP mail() function, PHPMailer, or SymfonyMailer. However, the latter two are the more popular and recommended options.
Why? Because the PHP mail() function has multiple limitations, including the inability to add attachments or send emails using the SMTP server. I’ll be diving into more details on the limitations below.
In this tutorial, I’ll show you how to build and send HTML emails in PHP using the mail() function, PHPMailer, and SymfonyMailer. I’ll also show you how to leverage Mailtrap’s SDK to send beautiful HTML emails in PHP. Let’s go!
Send HTML emails using PHP’s mail() function
I’ll start with mail(), as it’s a native function in PHP. With it, you can send plain text and simple HTML emails. First, I’ll list its limitations and then provide code pieces for sending HTML emails.
Limitations of PHP mail() function
PHP mail function might be simple, but there are several things it won’t allow you to do:
- You won’t be able to add attachments without complex configurations;
- You won’t be able to embed images directly within the email as attachments that can be referenced in the HTML content via CID (Content ID);
- You’ll have trouble sending emails to multiple recipients as the mail() function opens and closes the SMTP socket for each sent email. This can be time-consuming and resource-intensive.
- You’ll have trouble connecting to third-party SMTP servers as the mail() function sends emails over the local server. And, for the same reason, you’ll most likely encounter deliverability issues (even if you’ve correctly configured SPF, DKIM, and DMARC and followed deliverability best practices).
Considering the limitations and security concerns, mail() function isn’t a preferable option to send emails from PHP. But, if you still want to use it, I’ll show you how in the next section. Read this blog post or watch this video for a detailed overview of sending emails in PHP.
Send a simple HTML email
The built-in mail() function requires four arguments: the recipient’s email address, the subject of the email, the message, and additional headers. The additional headers allow us to set the Content-type header and specify it as text/html.
Sometimes, extra headers are used to specify the 'X-Mailer: PHP/' . phpversion() header. This can be useful for debugging but could reveal your server configurations. For that reason, I decided to omit it.
<?php

$to = 'contact@example.com';
$subject = 'Hello!';

$headers['From'] = 'sender@example.com';
$headers['MIME-Version'] = 'MIME-Version: 1.0';
$headers['Content-type'] = 'text/html; charset=iso-8859-1'

$message = '
<html>
<head>
    <title>Review Request Reminder</title>
</head>
<body>
    <p>Here are the cases requiring your review in December:</p>
    <table>
        <tr>
            <th>Case title</th><th>Category</th><th>Status</th><th>Due date</th>
        </tr>
        <tr>
            <td>Case 1</td><td>Development</td><td>pending</td><td>Dec-20</td>
        </tr>
        <tr>
            <td>Case 2</td><td>DevOps</td><td>pending</td><td>Dec-21</td>
        </tr>
    </table>
</body>
</html>
';

$result = mail($to, $subject, $message, $headers);

if ($result) {
    echo 'Success!' . PHP_EOL;
} else {
    echo 'Error.' . PHP_EOL;
}
I also added error handling. The if statement checks if the email is sent successfully and provides feedback based on the outcome.
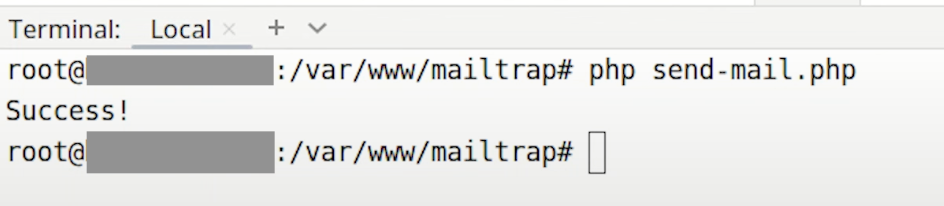
I ran this PHP code with php send-mail.php command and got the Success! message.
Keep in mind that, despite the success message, the email still might not arrive in the indicated inbox. That’s because of the limitations we listed above. Also, the code will work only with specific configurations (with a local server or with a WordPress setup that doesn’t require third-party SMTP connections through TLS).
Send an HTML email with images (hosting images on the server)
An option for embedding images when using the mail() function is to host images on the server. Unlike base64, this method doesn’t increase the email size.
Here’s how to do it:
- Upload the image to your web server. Make sure it’s uploaded to a publicly accessible location.
- Reference the image in your HTML content using the
<img>tag and its absolute URL:
<img src="https://www.yourdomain.com/images/your-image.jpg" alt="Embedded Image">- Send the email with the mail() function as we did with the previous example.
The complete code snippet will look something like this:
<?php

$to = 'recipient@example.com';
$subject = 'Email with Embedded Image';
$message = '
<html>
<head>
  <title>Email with Embedded Image</title>
</head>
<body>
  <p>Here is an image embedded in this email:</p>
  <img src="https://www.yourdomain.com/images/your-image.jpg" alt="Embedded Image">
</body>
</html>
';

$headers = "MIME-Version: 1.0" . "\r\n";
$headers .= "Content-type:text/html;charset=UTF-8" . "\r\n";

$headers .= 'From: <sender@example.com>' . "\r\n";
$headers .= 'Reply-To: <sender@example.com>' . "\r\n";

if(mail($to, $subject, $message, $headers)) {
    echo "Email sent successfully.";
} else {
    echo "Failed to send email.";
}
?>
Send an HTML email with images (embedding with base64)
Another option is to encode the image with base64. This will transform the binary data of the image into a text string, and we’ll be able to embed it into the HTML code using the <img> HTML tag.
But, before moving on to embedding, I’ll add simple error checking to ensure that the file exists and is readable. Then I’ll encode it.
<?php
// Check if the image file exists and is readable
$imagePath = 'path/to/your/image.jpg';
if (file_exists($imagePath) && is_readable($imagePath)) {
    // Convert your image to base64 string
    $imageData = base64_encode(file_get_contents($imagePath));
} else {
    echo "Image file not found or not accessible.";
    exit; // Stop the script execution if the image is not accessible
}
In the script above, the code will be executed only if both conditions are met, i.e., the image file exists and is readable.
The next step is to construct HTML content as in the previous example, but this time, I’ll add the <img> tag.
$message = '
<html>
<head>
<title>Your Email Title</title>
</head>
<body>
<p>Here is the content of your email.</p>
<img src="data:image/jpeg;base64,' . $imageData . '" alt="Description of Image">
</body>
</html>
';
Finally, I’ll set the headers and send an email. The headers should be separated with CRLF (\r\n). The complete code snippet will look like this:
<?php
// Check if the image file exists and is readable
$imagePath = 'path/to/your/image.jpg';
if (file_exists($imagePath) && is_readable($imagePath)) {
    // Convert your image to base64 string
    $imageData = base64_encode(file_get_contents($imagePath));
} else {
    echo "Image file not found or not accessible.";
    exit; // Stop the script execution if the image is not accessible
}

// Construct the HTML email content
$message = '
<html>
<head>
<title>Your Email Title</title>
</head>
<body>
<p>Here is the content of your email.</p>
<img src="data:image/jpeg;base64,' . $imageData . '" alt="Description of Image">
</body>
</html>
';

// Set the headers
$headers = [
    "MIME-Version: 1.0",
    "Content-type: text/html; charset=UTF-8",
    'From: Your Name <sender@example.com>',
    'Cc: Another Name <another-email@example.com>',
];

// Send the email
if (mail('recipient@example.com', 'Subject of Your Email', $message, implode("\r\n", $headers))) {
    echo "Email sent successfully.";
} else {
    echo "Failed to send email.";
}
?>
Keep in mind that this method increases the email size significantly. Larger email size can lead to a couple of problems:
- Slower loading times;
- Email servers rejecting emails due to their larger size;
- Email clients blocking base64 encoded images for security reasons.
Send HTML emails using PHPMailer
A better way to send HTML emails in PHP is by using PHPMailer. This package addresses the limitations of the native mail() function. It has features such as:
- SMTP authentication;
- Support for TLS and SSL protocols;
- Image embedding;
- Adding attachments;
- The ability to connect to external SMTP servers;
- And, most importantly (at least for this blog post), the ability to send text and HTML emails.
First, I’ll install the package by adding the following line to the composer.json file:
"phpmailer/phpmailer": "^6.9.1"Alternatively, you can run the composer require phpmailer/phpmailer command.
To send and deliver HTML emails with PHPMailer, I’ll use a third-party SMTP provider – Mailtrap Email Sending, which is a sending solution with high deliverability rates by design.
Email Sending provides separate streams for bulk and transactional emails to maintain high and stable deliverability. While it has an official PHP SDK, I’ll focus on its SMTP server for now.
Send a basic HTML message
Sending a basic HTML message using PHPMailer is pretty straightforward. First, start your new PHP project with the following code:
<?php
use PHPMailer\PHPMailer\PHPMailer;
And include the Composer-generated autoload.php file.
require 'path/to/composer/vendor/autoload.php';Create a new instance of the PHPMailer class and configure the SMTP settings.
$mail = new PHPMailer();
$mail->isSMTP();
$mail->Host = 'live.smtp.mailtrap.io';
$mail->SMTPAuth = true;
$mail->Username = '1a2b3c4d5e6f7g';
$mail->Password = '1a2b3c4d5e6f7g';
$mail->SMTPSecure = 'tls';
$mail->Port = 587;
For this step, I had to go to my Mailtrap account and grab the necessary credentials. I’ve already added and verified the sending domain, but if you haven’t done so yet, check out the sending domain setup article for detailed instructions.
Once the domain is verified, go to Sending Domains, click on the verified domain, and open the SMTP/API Settings tab. There, you’ll see Transactional Stream and Bulk Stream. In this case, I’ll opt for a Transactional Stream and copy the credentials underneath.
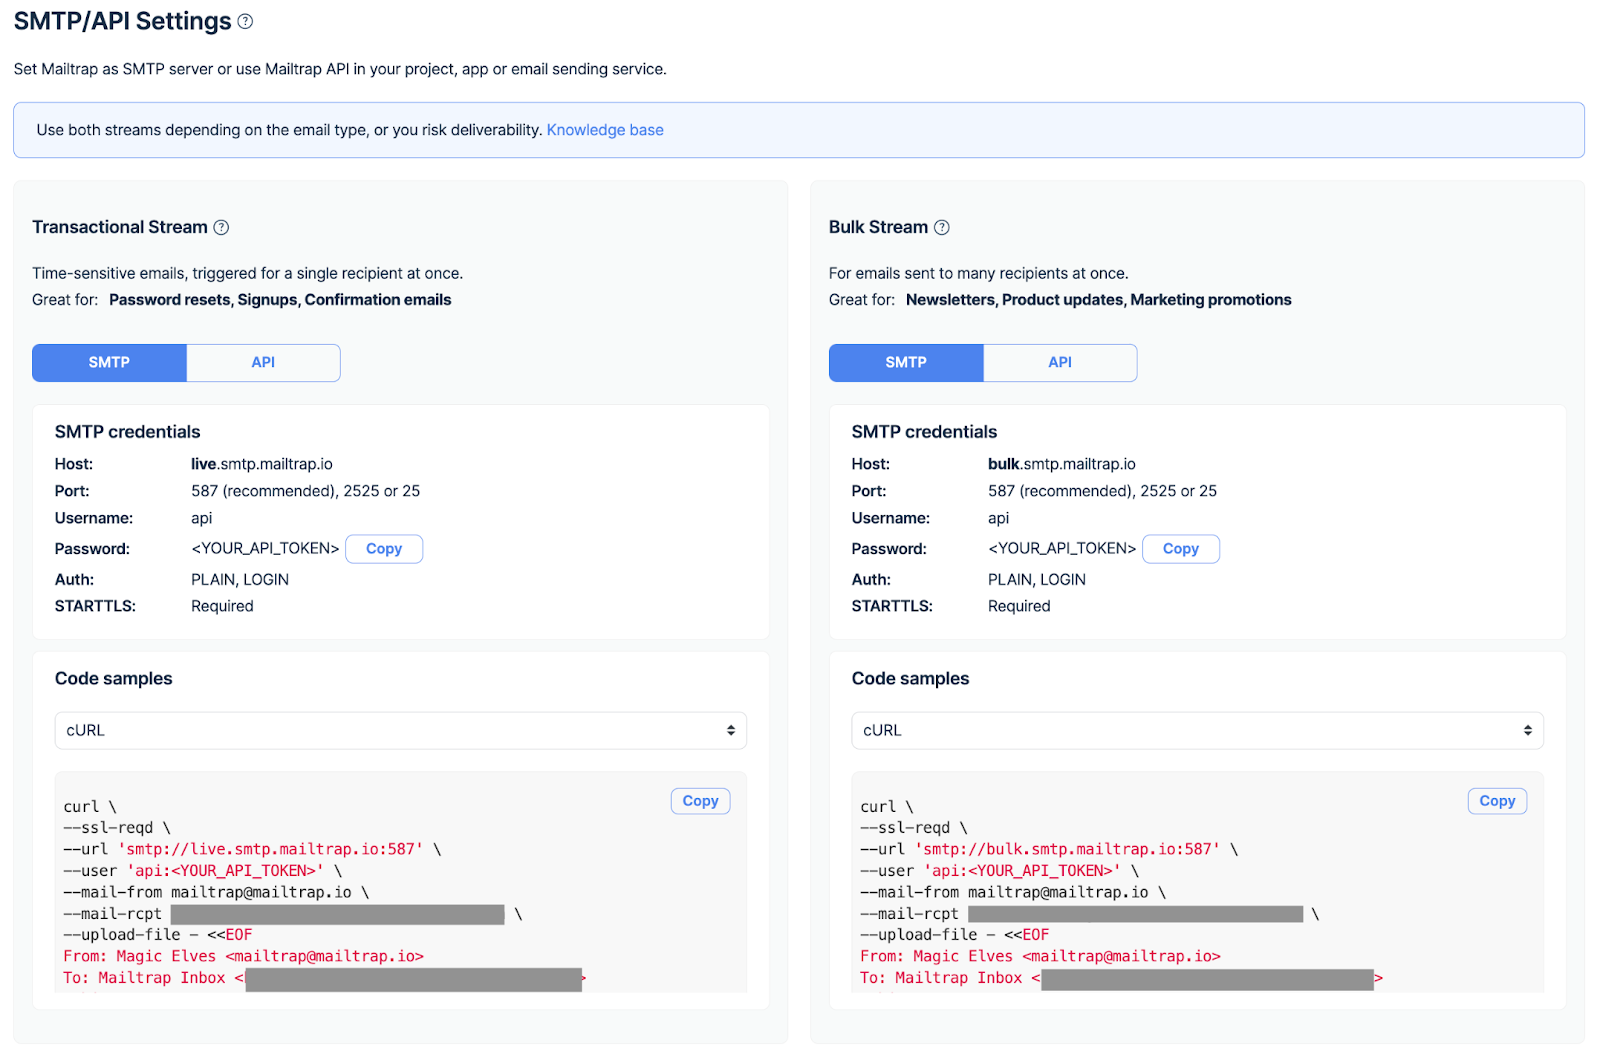
This is what the code piece above will look like once you configure it with Mailtrap SMTP settings.
$mail = new PHPMailer();
$mail->isSMTP();
$mail->Host = 'live.smtp.mailtrap.io';
$mail->SMTPAuth = true;
$mail->Username = 'api';
$mail->Password = 'YOUR_API_TOKEN'
$mail->SMTPSecure = 'tls';
$mail->Port = 587;
Specify the headers. Indicate the sending email address containing the verified domain using the setFrom method. Set the recipient’s email address with the addAddress method. Then, add the subject line using the Subject property.
$mail->setFrom(address: 'sender@example.com', name: 'Kate');
$mail->addAddress(address: 'recipient@example.com', name: John);
$mail->Subject = 'Your Email Subject!';
Set the email format to HTML using the isHTML property and add the HTML content. Use the AltBody property to indicate the text version of the email.
$mail->isHTML(isHtml: TRUE);
$mail->Body = '<html>Hi there, we are happy to <br>confirm your booking.<br>Please check the document in the attachment.</html>';
$mail->AltBody = 'Hi there, we are happy to confirm your booking. Please check the document in the attachment.';
Finally, send the email using the send method.
if (!$mail->send()) {
    echo 'Message could not be sent.';
    echo 'Mailer Error: ' . $mail->ErrorInfo;
} else {
    echo 'Message has been sent';
}
Check out the whole sample below:
<?php
use PHPMailer\PHPMailer\PHPMailer;

require 'path/to/composer/vendor/autoload.php';

$mail = new PHPMailer();
$mail->isSMTP();
$mail->Host = 'live.smtp.mailtrap.io';
$mail->SMTPAuth = true;
$mail->Username = 'api';
$mail->Password = 'YOUR_API_TOKEN';
$mail->SMTPSecure = 'tls';
$mail->Port = 587;

$mail->setFrom(address: 'sender@example.com', name: 'Kate');
$mail->addAddress(address: 'recipient@example.com', name: 'John');
$mail->Subject = 'Your Email Subject!';

$mail->isHTML(true);
$mail->Body = '<html>Hi there, we are happy to <br>confirm your booking.<br>Please check the details.</html>';
$mail->AltBody = 'Hi there, we are happy to confirm your booking. Please check the details.';

if (!$mail->send()) {
    echo 'Message could not be sent.';
    echo 'Mailer Error: ' . $mail->ErrorInfo;
} else {
    echo 'Message has been sent';
}
?>
Run the script with php send–mail-php-mailer.php command. The HTML email message should appear in the recipient’s inbox if you did everything correctly.
Send an HTML email with an embedded image
When it comes to embedding, you have a couple of options: base64 encoding (similar to how I did it with native PHP script), CID (Content ID), and linking images hosted on a web server.
Each method has its drawbacks, but CID is still a recommended option. It involves attaching an image and referencing it in HTML with CID.
So, to the previous PHP code, I’ll add addEmbeddedImage method. I’ll pass the image path and CID to it.
$mail->addEmbeddedImage('path/to/image.jpg', 'image_cid'); Then, I’ll include it in the src attribute of the <img> tag.
$mail->isHTML(true); // Set email format to HTML
$mail->Subject = 'Here is the subject';
$mail->Body    = '
<!DOCTYPE html>
<html>
<head>
    <title>Your Booking Confirmation</title>
</head>
<body>
    <p>Hi there, we are happy to <br>confirm your booking.<br>Please check the details:</p>
    <img src="cid:image_cid">
</body>
</html>';
Send an HTML email with attachments
To include an attachment in your HTML-formatted email, simply add the following lines of code after the HTML/text portion:
$attachmentPath = './confirmations/yourbooking.pdf';
if (file_exists($attachmentPath)) {
    $mail->addAttachment($attachmentPath, name: 'yourbooking.pdf');
}
If you want to add multiple attachments, repeat the code above as many times as you need. Don’t forget to specify the exact paths for each file.
Send HTML emails to multiple recipients
With PHPMailer, you can easily send HTML emails to multiple recipients. I’ll loop through an array of recipients and use the addAddress()method for each.
$recipients = [
    ['email' => 'recipient1@example.com', 'name' => 'John Doe'],
    ['email' => 'recipient2@example.com', 'name' => 'Jane Doe'],
    // Add more recipients as needed
];

foreach ($recipients as $recipient) {
    $mail->addAddress($recipient['email'], $recipient['name']);
}
$recipients is an array that contains the email addresses and names of all the recipients. The foreach loop iterates over this array, adding each recipient to the email. When I call the send() method, the email will be sent to each added recipient.
The rest of the code sample will essentially be the same as in the previous example.
If you want to send other types of emails, read the full tutorial on PHPMailer. Check out this blog post to learn how to send emails with PHPMailer and Gmail SMTP server.
Send HTML emails using Mailtrap PHP Client
An easy way to build and send complex HTML emails in PHP is Mailtrap PHP Client. It’s fully compatible with Laravel and Symfony frameworks and allows you to choose the desired HTTP client.
With Mailtrap PHP SDK, you can also send HTML emails in PHP using templates. You can store the templates in Mailtrap and reference them through API. Read this article for more information on template features and usages.
Note: At the time of writing, templates are available for transactional emails only. Soon, they will also be available for bulk emails.
Send HTML emails without templates
First, I’ll show you how to send HTML emails without templates. But, before sending the emails, I need to grab the API key from Mailtrap and store it securely in the .env file.
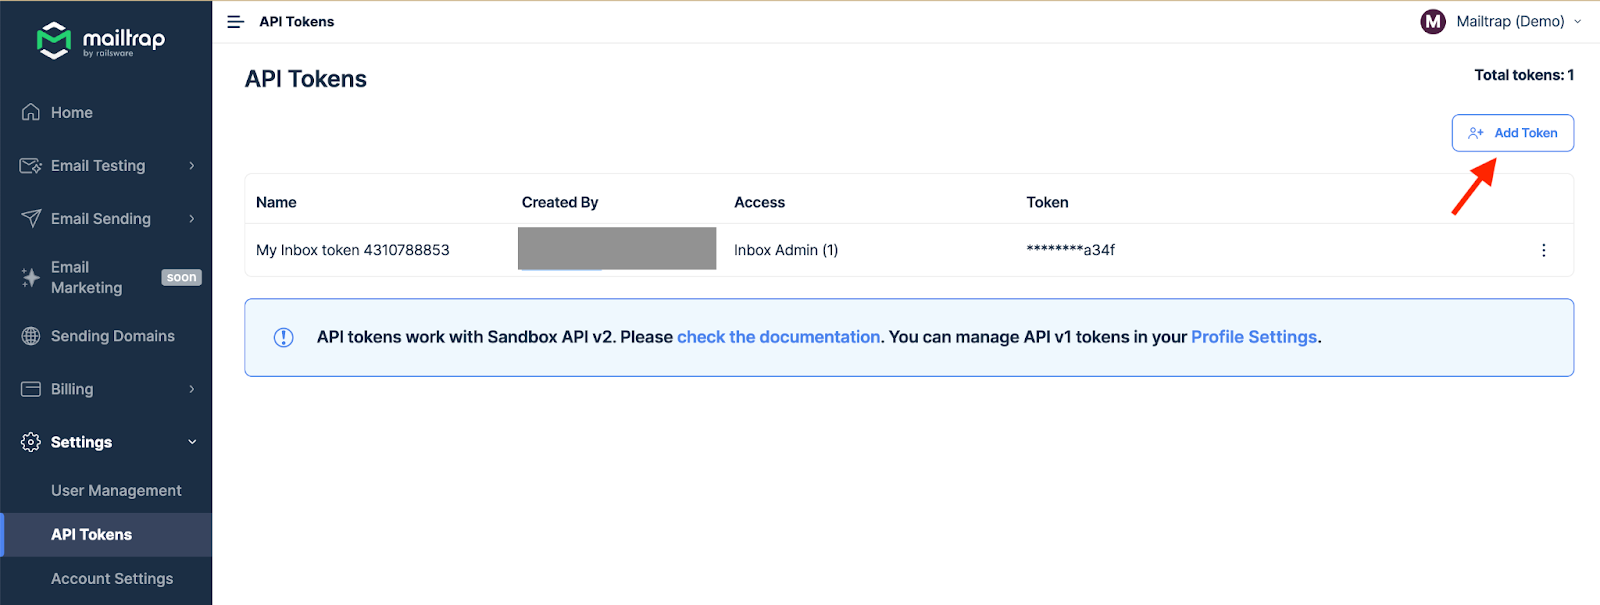
To access your API key, in your Mailtrap account, go to Settings → API Tokens, and click the Add Token button.
Choose the verified domain you want to send emails from, add the desired name, and click Save.
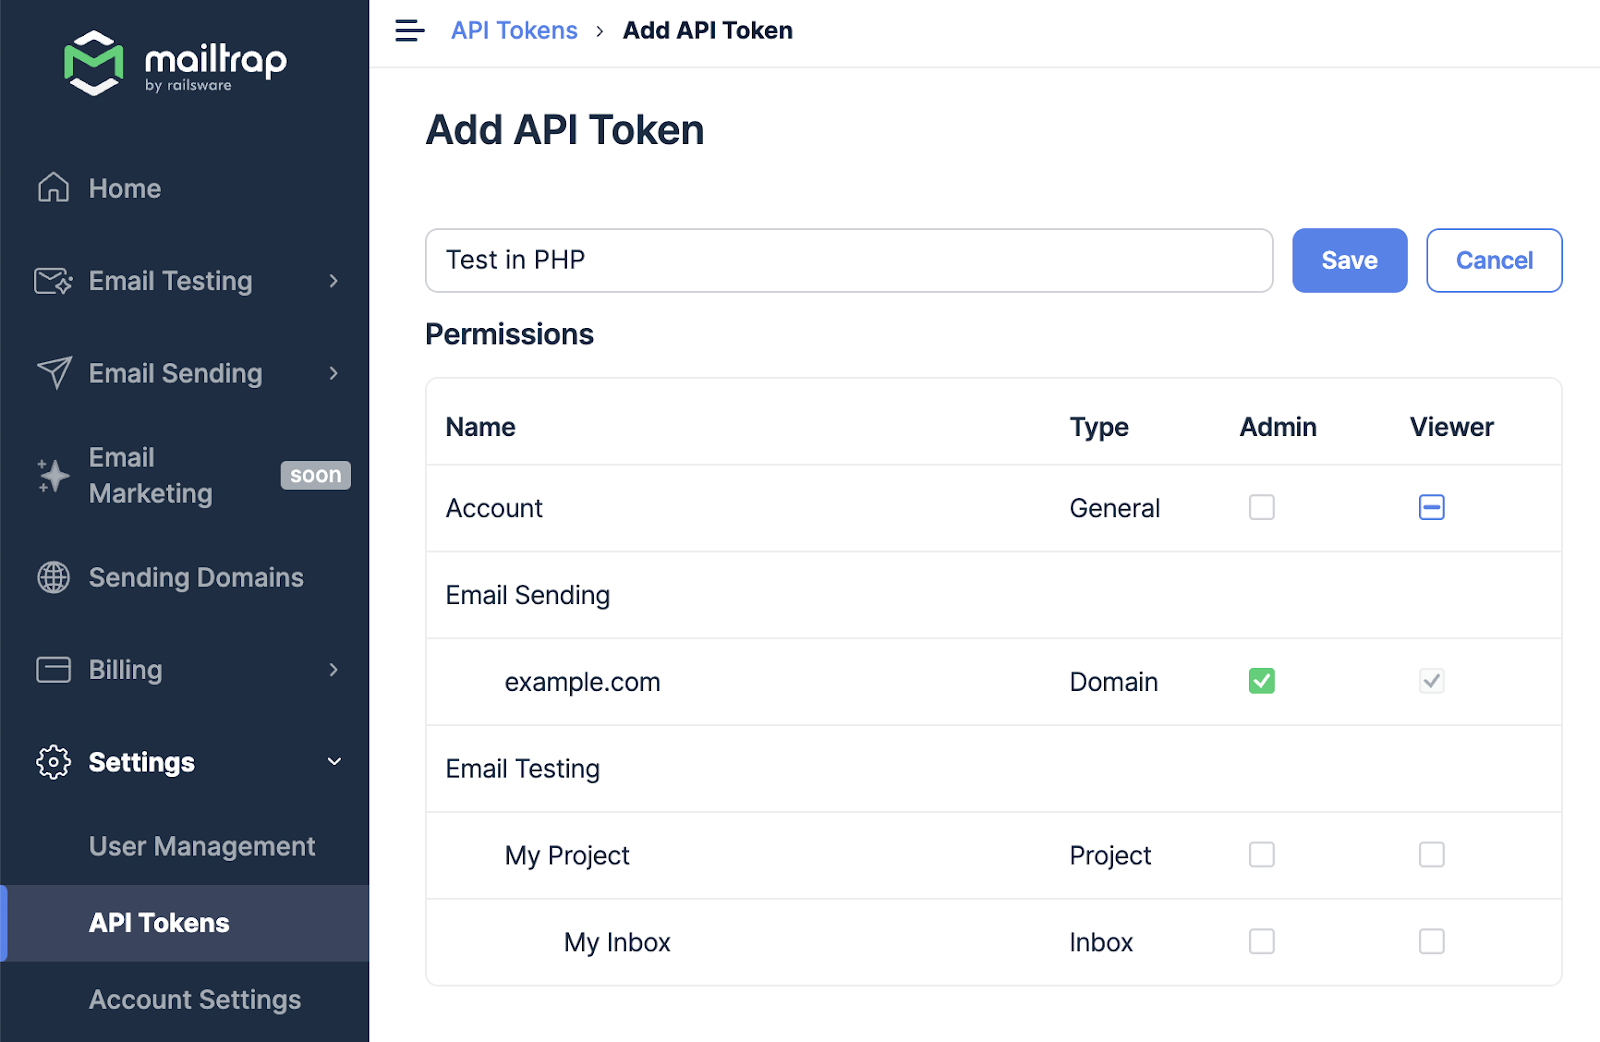
The API token will appear on the API Tokens page. Simply copy it. Return to your PHP project and create a .env file in the root directory. Add your Mailtrap API key to this file like so:
# .env file
MAILTRAP_API_KEY=your_mailtrap_api_key
Then, update your .gitignore file to exclude the .env file from version control and protect sensitive data.
At this point, we can install Mailtrap PHP Client. If you’re using Symfony HTTP client, use this command:
composer require railsware/mailtrap-php symfony/http-client nyholm/psr7 For the Guzzle HTTP client, install the package by running the following line of code:
composer require railsware/mailtrap-php guzzlehttp/guzzle php-http/guzzle7-adapter Once that’s done, copy the source code from GitHub and tweak it with the HTML content you want to use. With this SDK, you can set the reply-to address, add Cc or Bcc recipients, send HTML and plain text emails, embed images, set custom headers, and indicate the category (the latter is useful for analytics).
<?php

use Mailtrap\Config;
use Mailtrap\EmailHeader\CategoryHeader;
use Mailtrap\EmailHeader\CustomVariableHeader;
use Mailtrap\Helper\ResponseHelper;
use Mailtrap\MailtrapClient;
use Symfony\Component\Mime\Address;
use Symfony\Component\Mime\Email;
use Symfony\Component\Mime\Header\UnstructuredHeader;

require __DIR__ . '/vendor/autoload.php';

// your API token from here https://mailtrap.io/api-tokens
$apiKey = getenv('MAILTRAP_API_KEY');
$mailtrap = new MailtrapClient(new Config($apiKey));

$email = (new Email())
    ->from(new Address('example@your-domain-here.com', 'Mailtrap Test'))
    ->replyTo(new Address('reply@your-domain-here.com'))
    ->to(new Address('email@example.com', 'Jon'))
    ->priority(Email::PRIORITY_HIGH)
    ->cc('mailtrapqa@example.com')
    ->addCc('staging@example.com')
    ->bcc('mailtrapdev@example.com')
    ->subject('Best practices of building HTML emails')
    ->text('Hey! Learn the best practices of building HTML emails and play with ready-to-go templates. Mailtrap's Guide on How to Build HTML Email is live on our blog')
    ->html(
        '<html>
        <body>
        <p><br>Hey</br>
        Learn the best practices of building HTML emails and play with ready-to-go templates.</p>
        <p><a href="https://mailtrap.io/blog/build-html-email/">Mailtrap's Guide on How to Build HTML Email</a> is live on our blog</p>
        <img src="cid:logo">
        </body>
    </html>'
    )
    ->embed(fopen('https://mailtrap.io/wp-content/uploads/2021/04/mailtrap-new-logo.svg', 'r'), 'logo', 'image/svg+xml')
    ;

    // Headers
    $email->getHeaders()
    ->addTextHeader('X-Message-Source', 'domain.com')
    ->add(new UnstructuredHeader('X-Mailer', 'Mailtrap PHP Client')) // the same as addTextHeader
    ;

    // Custom Variables
    $email->getHeaders()
    ->add(new CustomVariableHeader('user_id', '45982'))
    ->add(new CustomVariableHeader('batch_id', 'PSJ-12'))
    ;

    // Category (should be only one)
    $email->getHeaders()
    ->add(new CategoryHeader('Integration Test'))
    ;

try {
    $response = $mailtrap->sending()->emails()->send($email); // Email sending API (real)

    var_dump(ResponseHelper::toArray($response)); // body (array)
} catch (Exception $e) {
    echo 'Caught exception: ',  $e->getMessage(), "\n";
}
Send HTML emails with templates
If you prefer to use an HTML template, you should first create it in Mailtrap and then call it with the SDK. Here’s how:
- In your Mailtrap account, go to Email Sending → Email Templates, and click the Create New Template button.
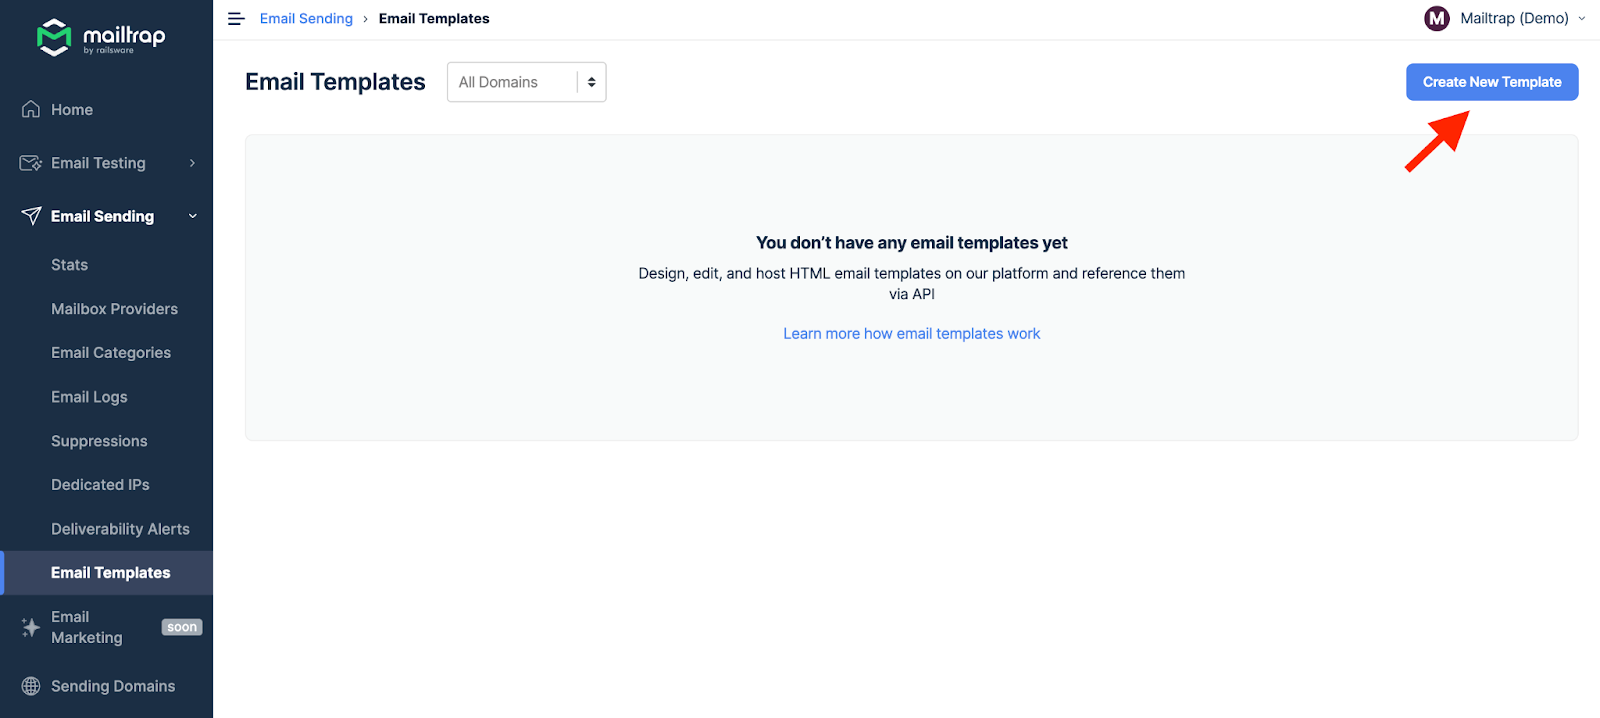
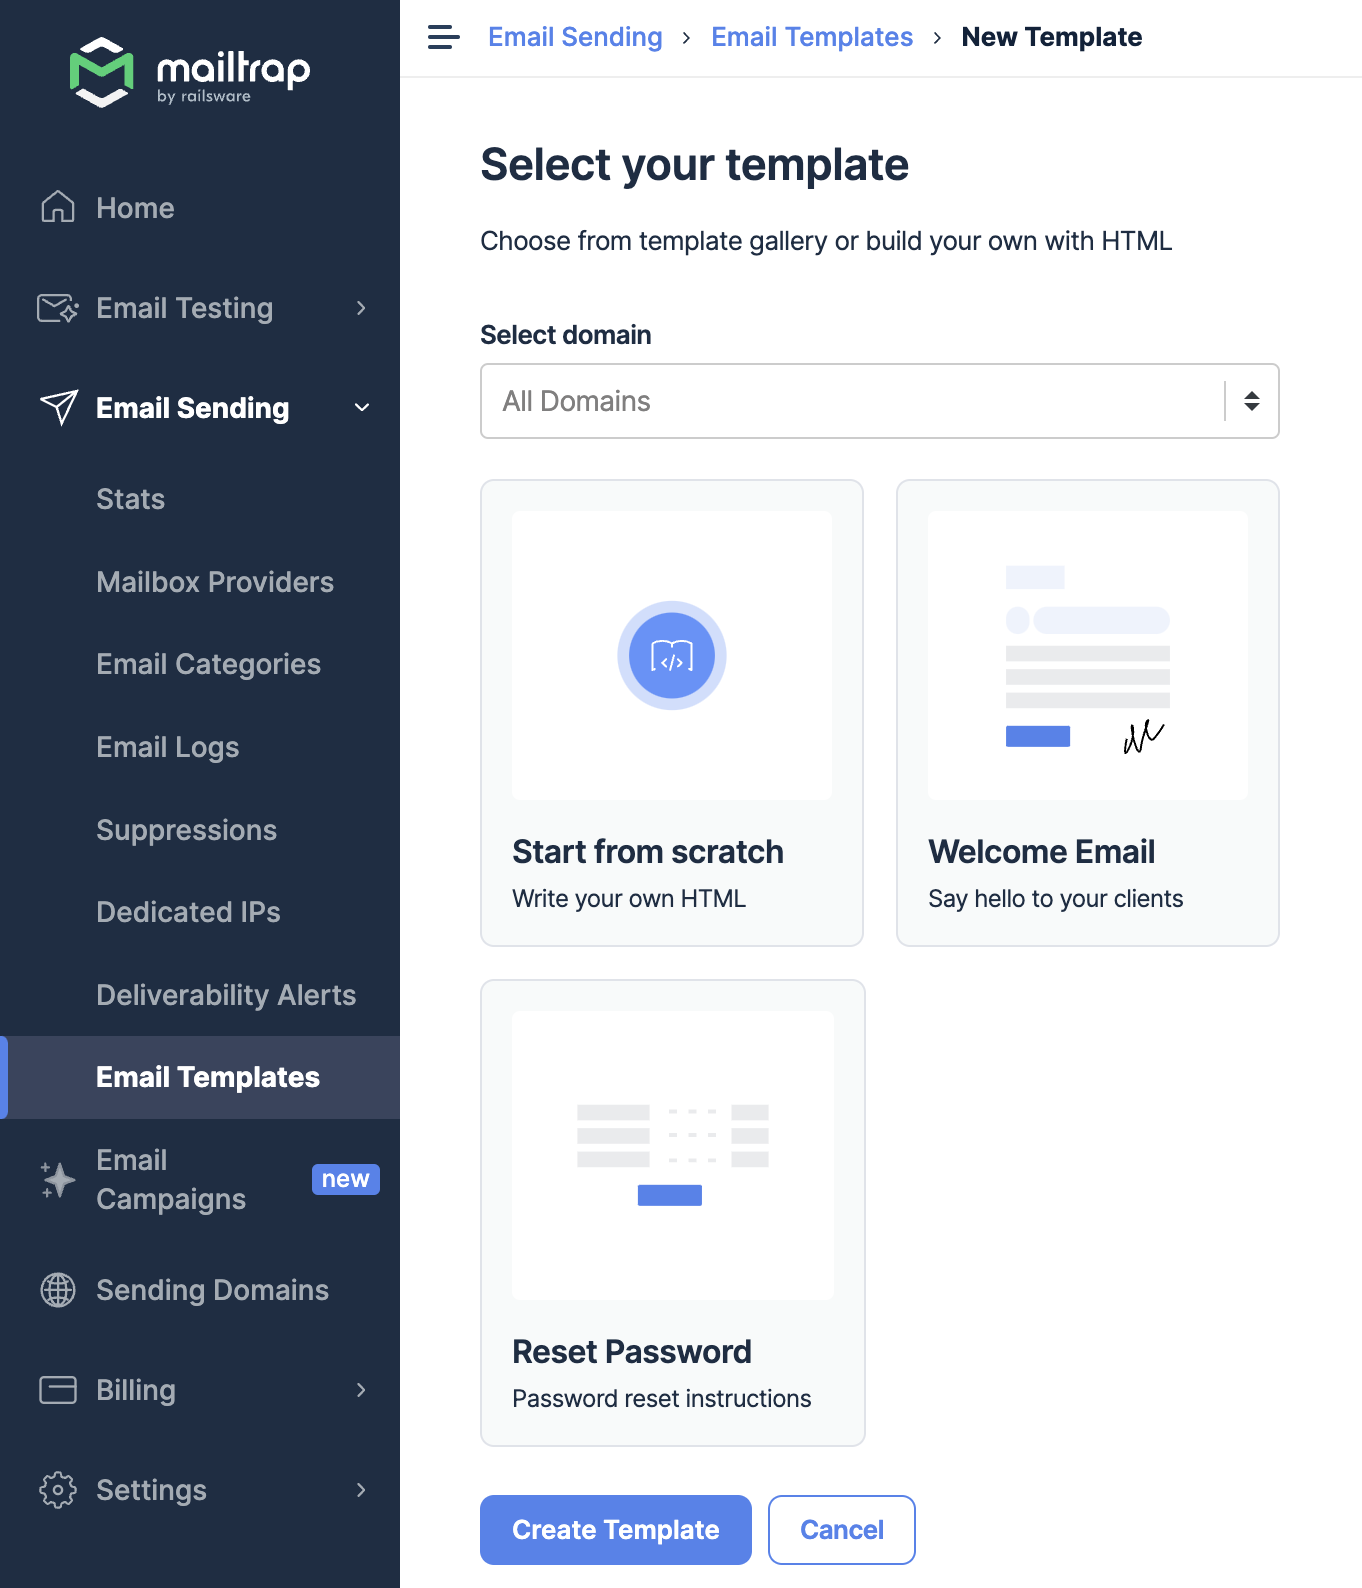
- Select the domain you want to create the template for, choose the ready-made template or select Start from scratch, and click Create Template.
- From the Details tab, specify the Email Category and add the template name. Then, go to Code Editor and modify the template or paste your own.
- Remember that Mailtrap Email Templates operate on the handlebars engine and support variables. This means that you can add, for example, {{user_name}} to your template and pass “John” as the “user_name” value via API.
- Once the template is ready, go to the Integrations tab and select PHP from the dropdown menu. You’ll see a sample configuration that uses PHP SDK and already contains your credentials.
For a Welcome Email template, this is what the code will look like:
<?php

use Mailtrap\Config;
use Mailtrap\Helper\ResponseHelper;
use Mailtrap\MailtrapClient;
use Symfony\Component\Mime\Address;
use Symfony\Component\Mime\Email;
use Mailtrap\EmailHeader\Template\TemplateUuidHeader;
use Mailtrap\EmailHeader\Template\TemplateVariableHeader;

require __DIR__ . '/vendor/autoload.php';

$apiKey = 'your_mailtrap_api_key';
$mailtrap = new MailtrapClient(new Config($apiKey));

$email = (new Email())
    ->from(new Address('sender@your-domain.com', 'Mailtrap Team'))
    ->to(new Address("recipient@example.com"))
;

$email->getHeaders()
    ->add(new TemplateUuidHeader('your_template_Uuid'))
    ->add(new TemplateVariableHeader('user_name', 'John Doe'))
    ->add(new TemplateVariableHeader('next_step_link', 'https://mailtrap.io/''))
    ->add(new TemplateVariableHeader('get_started_link', 'https://mailtrap.io/'))
    ->add(new TemplateVariableHeader('onboarding_video_link', 'some_video_link'))
;

$response = $mailtrap->sending()->emails()->send($email);

var_dump(ResponseHelper::toArray($response));
Send HTML emails using SymfonyMailer
The last sending method I’ll cover in this article is SymfonyMailer. It’s the mailer component of the Symfony framework (a popular PHP framework for web development). SymfonyMailer allows you to:
- Send emails in HTML format;
- Integrate your project with third-party sending providers;
- Use Twig templates;
- Use CSS inliner;
- Add attachments.
Send a basic HTML message
Before we start building the message body, we need to install SymfonyMailer. Run the following command:
$ composer require symfony/mailer The next step is configuring the transport, which is the method that will be used for delivering your emails. Symfony offers three built-in transports:
- SMTP that can be configured with any third-party SMTP server;
- Sendmail that uses local sendmail binary;
- And Native that uses the sendmail binary and the options configured in the
sendmail_pathof the php.ini. If thesendmail_pathisn’t configured, the mailer will fall back to SMTP andsmtp_portphp.ini settings (applies to Windows hosts).
And there are multiple third-party transports for various email service providers.
I’ll use the SMTP transport with Mailtrap Email Sending SMTP server. Once again, we’ll need to grab the credentials from the Mailtrap account and configure MAILER_DSN in the .env file.
MAILER_DSN=smtp://api:yourpassword@live.smtp.mailtrap.io:587/?encryption=ssl&auth_mode=loginOnce the transport is configured, we can start building the message.
First, configure the necessary namespaces like this:
use Symfony\Bundle\FrameworkBundle\Controller\AbstractController;
use Symfony\Component\Mailer\MailerInterface;
use Symfony\Component\Mime\Address;
use Symfony\Component\Mime\Email;
use Symfony\Component\Routing\Annotation\Route;
Then, use the MailerController class that extends to AbstractController. Specify the route, which will call the index method when you make a request to it.
class MailerController extends AbstractController
{
    #[Route('/mailer', name: 'app_mailer')]
    public function index(MailerInterface $mailer): Response
    {
Then, I’ll build the message with the Email object. I won’t use a template this time, so I’ll specify an HTML body. Let’s take a look at the complete code for the email:
use Symfony\Bundle\FrameworkBundle\Controller\AbstractController;
use Symfony\Component\Mailer\MailerInterface;
use Symfony\Component\Mime\Address;
use Symfony\Component\Mime\Email;
use Symfony\Component\Routing\Annotation\Route;

class MailerController extends AbstractController
{
    #[Route('/mailer', name: 'app_mailer')]
    public function index(MailerInterface $mailer): Response
    {
        $email = (new Email())
            ->from('mailtrap@example.com')
            ->to(new Address('newuser@example.com'))
            ->cc('mailtrapqa@example.com')
            ->addCc('staging@example.com')
            ->bcc('mailtrapdev@example.com')
            ->replyTo('mailtrap@example.com')
            ->subject('Here is the subject')
            ->text('Hey! Learn the best practices of building HTML emails and play with ready-to-go templates. Mailtrap's Guide on How to Build HTML Email is live on our blog')
            ->html('<html>
                        <body>
                            <p>Hey!<br>
                            Learn the best practices of building HTML emails and play with ready-to-go templates.</p>
                            <p><a href="https://blog.mailtrap.io/build-html-email/">Mailtrap's Guide on How to Build HTML Email</a> is live on our blog</p>
                        </body>
                    </html>');

        $mailer->send($email);

        return new Response(
            content: 'Email was sent'
        );
    }
}
Send an HTML mail with an embedded image
In terms of embedding, SymfonyMailer supports three methods: embedding an image from a PHP resource, embedding an image hosted locally or on a server, and embedding it with CID attachments. Here’s what each of these would look like:
$email = (new Email())
    // ...
    //image from a PHP resource, for example, GD
    ->embed(fopen('/path/to/newlogo.png', 'r'), 'logo')
    //image hosted locally or on some external resource
    ->embedFromPath('/path/to/newcover.png', 'new-cover-image')
    // CID attachment
    ->html('<img src="cid:logo"> ... <img src="cid:new-cover-image"> ...');
Send an email with HTML email template
As I mentioned above, SymfonyMailer supports Twig templates. These are integrated with the MIME component. Twig templates have several useful features, including CSS inlining and direct integration with HTML/CSS frameworks.
First, create a template and save it as a .twig file. Detailed instructions on creating Twig templates are available here.
Then, use the TemplatedEmail class, which extends the Email class to add new methods for Twig templates. Instead of the ->html and HTML body, add ->htmlTemplate('path/experiment.html.twig'). Of course, you should use an actual path to the template.
Remember that Mailtrap PHP SDK works with both Symfony and Laravel, which means you could use Mailtrap Email Templates instead of Twig.
Send HTML emails to multiple recipients
Sending emails to multiple recipients is pretty straightforward as well. You can either make multiple to calls or create an array of Address objects. I went with the latter and modified the previous code snippet like this:
use Symfony\Bundle\FrameworkBundle\Controller\AbstractController;
use Symfony\Component\HttpFoundation\Response;
use Symfony\Component\Mailer\MailerInterface;
use Symfony\Component\Mime\Address;
use Symfony\Component\Mime\Email;
use Symfony\Component\Routing\Annotation\Route;

class MailerController extends AbstractController
{
    #[Route('/mailer', name: 'app_mailer')]
    public function index(MailerInterface $mailer): Response
    {
        // Define the recipients
        $recipients = [
            new Address('firstuser@example.com', 'First User'),
            new Address('seconduser@example.com', 'Second User'),
            // ... Add more recipients as needed
        ];

        $email = (new Email())
            ->from('mailtrap@example.com')
            // Use the array of recipients for the 'To' field
            ->to(...$recipients) // The '...' is the spread operator, which unpacks the array elements
            ->cc('mailtrapqa@example.com')
            ->addCc('staging@example.com')
            ->bcc('mailtrapdev@example.com')
            ->replyTo('mailtrap@example.com')
            ->subject('Here is the subject')
            ->text('Hey! Learn the best practices of building HTML emails and play with ready-to-go templates. Mailtrap's Guide on How to Build HTML Email is live on our blog')
            ->html('<html>
                        <body>
                            <p>Hey!<br>
                            Learn the best practices of building HTML emails and play with ready-to-go templates.</p>
                            <p><a href="https://blog.mailtrap.io/build-html-email/">Mailtrap's Guide on How to Build HTML Email</a> is live on our blog</p>
                        </body>
                    </html>');

        $mailer->send($email);

        return new Response(
            'Email was sent'
        );
    }
}
Send an HTML email with attachments
Finally, let’s see how you can send emails with attachments. This process is similar to embedding images. You have three options:
- Use
attachFromPath()to include local files; - Use
attachFromPath()to include files from an external link; - And use
attach()to add files from a PHP resource.
Here are the examples for each option:
$email = (new Email())
    // ...
// local file
    ->attachFromPath('/path/to/yourconfirmation.pdf')
// external URL - make sure that allow_url_fopen is enabled in your PHP installation
->attachFromPath('http://mailtrap.io/path/to/yourconfirmation', 'Your Confirmation', 'application/msword')
// PHP resource
  ->attach(fopen('/path/to/yourconfirmation.pdf', 'r'));
Send HTML emails from an HTML form with PHP as a backend
If you want your PHP contact form to automatically send HTML email, you need to configure server-side script (PHP), JavaScript validation (with validate.js), and an HTML form itself.
For detailed instructions on building an HTML form and sending emails from it, read this article. Here, I’ll just leave you a script that collects contact form data, validates it, and sends an HTML email to the indicated email address.
Since I wanted the contact form to send an HTML email instead of a text message, I set isHTML to true and added HTML content.
<?php
use PHPMailer\PHPMailer\PHPMailer;
use PHPMailer\PHPMailer\Exception;

require 'vendor/autoload.php';

$errors = [];
$errorMessage = '';
$successMessage = '';
$siteKey = 'YOUR_RECAPTCHA_SITE_KEY';
$secret = 'YOUR_RECAPTCHA_SECRET_KEY';

if ($_SERVER['REQUEST_METHOD'] === 'POST') {
    $name = sanitizeInput ($_POST['name']);
    $email = sanitizeInput ($_POST['email']);
    $message = sanitizeInput ($_POST ['message']);
    $recaptchaResponse = sanitizeInput ($_POST['g-recaptcha-response']);

    $recaptchaUrl = "https://www.google.com/recaptcha/api/siteverify?secret={$secret]&response={$recaptchaResponse]";
    $verify = json_decode(file_get_contents($recaptchaUrl));

    if (!$verify->success) {
        $errors [ ] = 'Recaptcha failed';
    }
    if (empty ($name)) {
        $errors [ ] = 'Name is empty';
    }
    if (empty ($email)) {
        $errors [ ] = 'Email is empty';
    } else if (!filter_var($email, filter: FILTER_VALIDATE_EMAIL)) {
        $errors [ ] = 'Email is invalid';
    }
    if (empty ($message)) {
        $errors [ ] = 'Message is empty';
}

    if (!empty ($errors)) {
        $allErrors = join ( separator: '<br/>', $errors);
        $errorMessage = "<p style='color: red; '>{$allErrors}</p>";
    } else {
        $toEmail = 'myemail@example.com';
        $emailSubject = 'New email from your contact form';

        // Create a new PHPMailer instance
      $mail = new PHPMailer (exceptions: true);
      try {
            // Configure the PHPMailer instance
            $mail->isSMTP();
            $mail->Host = 'live.smtp.mailtrap.io';
            $mail->SMTPAuth = true;
            $mail->Username = 'api';
            $mail->Password = 'your_smtp_password';
            $mail->SMTPSecure = 'tls';
            $mail->Port = 587;

            // Set the sender, recipient, subject, and body of the message
            $mail->setFrom($email);
            $mail->addAddress($toEmail);
            $mail->Subject = $emailSubject;
            $mail->isHTML(true);
            $mail->Body = "<p>Name: {$name]</p><p>Email: {$email]</p><p>Message: {$message]</p>;

            // Send the message
            $mail->send () ;
            $successMessage = "<p style='color: green; '>Thank you for contacting us :)</p>";
      } catch (Exception $e) {
            $errorMessage = "<p style='color: red; '>Oops, something went wrong. Please try again later</p>";
      }
    }
}

function sanitizeInput($input) {
    $input = trim($input);
    $input = stripslashes($input);
    $input = htmlspecialchars($input, ENT_QUOTES, 'UTF-8');
    return $input;
}
?>

<html>
<body>
<script src="https://www.google.com/recaptcha/api.js" async defer></script>
<form action="/" method="post" id="contact-form">
    <h2>Contact us</h2>
    <?php echo (!empty($errorMessage) ? $errorMessage : ''); ?>
    <?php echo (!empty($successMessage) ? $successMessage : ''); ?>
    <p>
        <label>First Name:</label>
        <input name="name" type="text" required />
    </p>
    <p>
        <label>Email Address:</label>
        <input style="..." name="email" type="email" required />
    </p>
    <p>
        <label>Message:</label>
        <textarea name="message" required></textarea>
    </p>
    <p>
        <button class="g-recaptcha" type="submit" data-sitekey="<?php echo $siteKey ?>" data-callback="onRecaptchaSuccess">
            Submit
        </button>
    </p>
</form>

<script>
    function onRecaptchaSuccess() {
        document.getElementById('contact-form').submit();
    }
</script>
</body>
</html>
Final words
While I covered popular packages and frameworks for sending HTML emails in PHP, I didn’t mention WordPress as it’s a whole different topic. My dear colleague Veljko wrote an in-depth tutorial on sending emails in WordPress some time ago. There, you’ll find a section about sending HTML emails, which should have you covered for now.