
There it goes. Yet another email bounces because a user mistyped it or assumed (rightly so) that your site would accept hwebfdherw@fhberwfuy as a valid email address. If your list is flooded with such addresses, you are likely to experience poor deliverability or your users getting locked out of their accounts more often than you would wish. Luckily, it’s easy to set up a decent email validation in HTML5. Let’s see how.
Basics of input validation in HTML5
Before HTML5 was released, web developers had to make use of JavaScript functions or 3rd-party libraries to filter out unwanted emails. Some worked really well; some caused more harm than good. The bottom line is that HTML offered no functionalities whatsoever for form validation.
This changed with the creation and wide adoption of HTML5 that quickly followed. The new specification brought the new built-in methods for input validation, including email address validation. The methods are not bulletproof, but are a major step forward.
Whenever you want to get input from a visitor (usually via a form), you’ll probably use the typical HTML element of input. You’ll probably also specify the type attribute to let the browser know what sort of information you’re looking for. Some of the accepted values for type are url, name, number, password, and email.
Each comes with a built-in regular expression (Regex) that checks the input on the client side against the predefined criteria. If no input type is specified, the browser will assume the type is ‘text’, and whatever is inserted will be accepted.
Email validation in HTML5
To run a basic email validation, we can use the following code:
<form>
  	<label>Email: </label><input type="email" required /> <br />
  	<label>Website: </label><input type="url" /> <br />
	<input type="submit" value="Sign Up">
</form>
And now let’s try to insert something that doesn’t even resemble an email address:
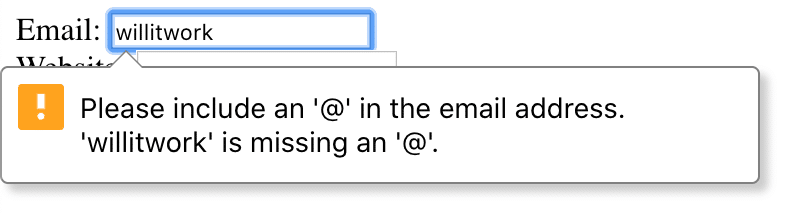
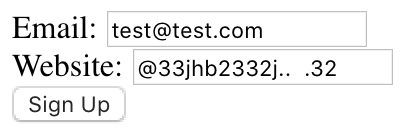
Note that the field needs to be set to ‘required’ for the validation to happen. We intentionally left out this parameter for the ‘website’ field and the following inputs were allowed (despite ‘URL’ being set as a ‘type’ parameter):
On another note, the validation will only work if the browser supports HTML5, which is the vast majority of modern browsers. But, if your form is rendered on, for example, IE 8.0 or older, no validation will be performed. For such cases, it may be worth having a backup JS library to run on HTML5-incompatible browsers.
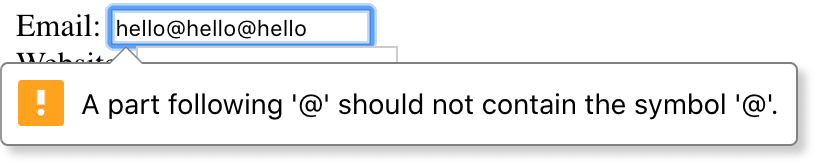
And, while we’re at it, the criteria of validation may vary across different browsers. Some will accept anything that contains ‘@’ – for example, test@test. Others will look for text inputs before and after ‘@’ and a dot after the second text and would reject test@test. Either way, the validation isn’t very strict. You can, however, make it harsher with the use of appropriate patterns.
How to use regex for email validation
Another great feature of HTML5 is the ability to specify a pattern that each input element will have to meet. This is done with popular regular expressions that determine the criteria for each field. And there are many ways one can accomplish this.
To insert a regex, we add a pattern attribute to a selected input. For example, we could enhance our earlier form with a popular regex from https://www.regular-expressions.info:
<form>
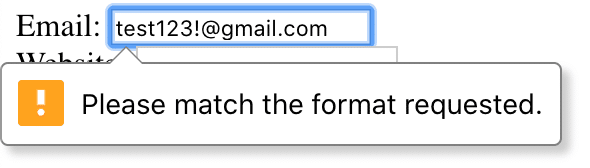
<label>Email: </label><input pattern="^[A-Z0-9._%+-]+@[A-Z0-9.-]+\.[A-Z]{2,4}$" type="email" required /> <br />
<label>Website: </label><input type="url" /> <br />
<input type="submit" value="Sign Up">
</form>This way, we force an input that contains only alphanumerical characters before and after ‘@’ (no spaces, no special characters). And require a top-level domain use only letters, and have a length of between 2 to 4 characters.
This will no longer go through:
And neither will this:
But none of the following will work either, while they could be legitimate:
- whatever@whatever.travel
- john.smith@westminster.co.uk
- peter+newsletters@microsoft.com
- kate@g.cn (Google China domain)
If you want to be more liberal with top-level domains, you can change the number of maximum characters allowed. The minimum is 1 (though rarely used) and the maximum is apparently 63 (also not a common choice). With this, you allow the first and last address in the list above to be used. But to get the British dude on board as well, you’ll need to do some more magic:
^[A-Z0-9._%+-]+@(?:[A-Z0-9-]+\.)+[A-Z]{2,}$This regex allows for more than one dot to be used after ‘@’ but not more than one at once (it eliminates john@lemmethink……com). Alternatively, if you want to allow the name+sth@ type of addresses, the following regex will work just fine:
/^[a-zA-Z0-9.!#$%&'*+/=?^_`{|}~-]+@[a-zA-Z0-9-]+(?:\.[a-zA-Z0-9-]+)*$/Keep in mind, though, that the more liberal the conditions you choose, the more false positives you’re likely to get.
There are a lot more trade-offs to consider when validating email addresses. This post from regular-expressions.info has got it all covered.
Ultimately, none of these patterns protect users from typos. You probably can’t offer much help if they can’t spell their name properly. But you can at least filter out typical ‘gmial’ or ‘hotnail’ types of mistakes, along with commas instead of dots and so on. The easiest way to go about this? With a JS function:
const example = "example@gmial.com"
if (/@gm(ia|a|i)l.com$/.test(example)) {
  alert("Maybe you meant @gmail.com?")
}Other considerations
Any user-generated inputs can be a security threat, both to your system and to the data real users have already provided. This is one more reason to have a proper validation in place and quickly filter out any malicious content that users submit (intentionally or not). This is true not only on the client-side, but also on the server-side. A clever hacker can always bypass any client-side measures, no matter how sophisticated they are. It’s important to have a solid, second layer of validation already in place if that happens.
And whenever users submit any inputs, you probably send them some automatic email – a confirmation of receipt, a follow-up step, or just a “thank you” note. Mailtrap Email Sandbox is a tool that simplifies the testing process of these emails, checking if they’re properly formatted and that they won’t fall into spam folders and if they arrive in the first place.

Using Email Sandbox you can quickly preview how your HTML emails render across different devices, validate HTML and see whether a certain email client supports a CSS rule.
Want more content on email validation topics? Make sure to explore our blog and YouTube channel featuring tutorials such as the one below: