


In this guide, I will walk you through setting up EmailJS in your frontend using JavaScript, and then I’ll show you how to send different types of emails in a secure way.
Since EmailJS doesn’t have a built-in sending functionality, we’ll have to use a 3rd party email service provider. As my SMTP and email API of choice, I’ll use Mailtrap Email Delivery Platform for its reliable email infrastructure with high deliverability rates by design.
If you feel like skipping ahead, use one of the following jump links:
- Install and configure EmailJS [jump ahead]
- Create a contact form [jump ahead]
- Send email using EmailJS [jump ahead]
- EmailJS alternative 1: Nodemailer + SMTP [jump ahead]
- EmailJS alternative 2: Node.js + Email API [jump ahead]
Disclaimer: Our developers have written and checked every line of code in this article.
EmailJS security considerations
With EmailJS, the primary concern is that any code running on the client (i.e., in your user’s browser) can be viewed and manipulated by anyone with basic developer tools. This exposes sensitive information and leaves you vulnerable to abuse.
Here’s how to lock down your EmailJS setup to prevent malicious activity.
- Never expose your private key (Access Token)
EmailJS uses a public key for emailjs.init() and an access token (private key) for sending. While the public key is safe to use in your front-end code, the access token should never be exposed on the client-side. This token gives full permission to send emails via your account. If a malicious actor gets hold of it, they can abuse your email service, potentially sending spam, exhausting your sending quota, or damaging your sender reputation.
- Move your sending logic to the server
The most reliable way to secure your integration is to move the emailjs.send() logic from the client to a server-side environment. This sounds complex, but it’s straightforward using serverless functions offered by platforms like Vercel, Netlify, or AWS Lambda.
The workflow is simple:
- Your front-end form sends a request to your serverless function.
- The serverless function securely holds your private key as an environment variable.
- The function uses your private key to make the
emailjs.send()call.
This approach ensures your sensitive credentials are never accessible from the user’s browser, making your email sending process much more secure.
- Implement ReCAPTCHA for bot protection
Even with a secure server-side setup, your API endpoint is a target for bots and automated scripts. Implementing a service like Google reCAPTCHA on your contact form is a critical step. This service helps verify that the request is coming from a human, not a bot, adding a crucial layer of defense against abuse and spam.
- Use EmailJS’s built-in security features
EmailJS also provides its own set of security features that you should leverage:
- Restrict origins: In your EmailJS dashboard, set a list of authorized domain origins. This prevents unauthorized websites from using your Public Key to make API calls.
- Enable multi-factor authentication (MFA): Protect your EmailJS account itself by enabling MFA to prevent unauthorized access to your templates and settings.
With all that in mind, let’s move to the installation and configuration.
Install and configure EmailJS
EmailJS is a service that allows you to send emails directly from JavaScript by connecting your client-side app to providers like Gmail, Outlook, or Mailtrap — all without needing a backend or setting up your own SMTP server.
This makes EmailJS a perfect choice for static sites or front-end-only applications where you want a quick way to send form submissions via email.
Now, let me show you how to set it up!
- Sign up for EmailJS
Start by visiting the EmailJS website and creating a free account. If you just want to demo how it works, you can use the free tier.
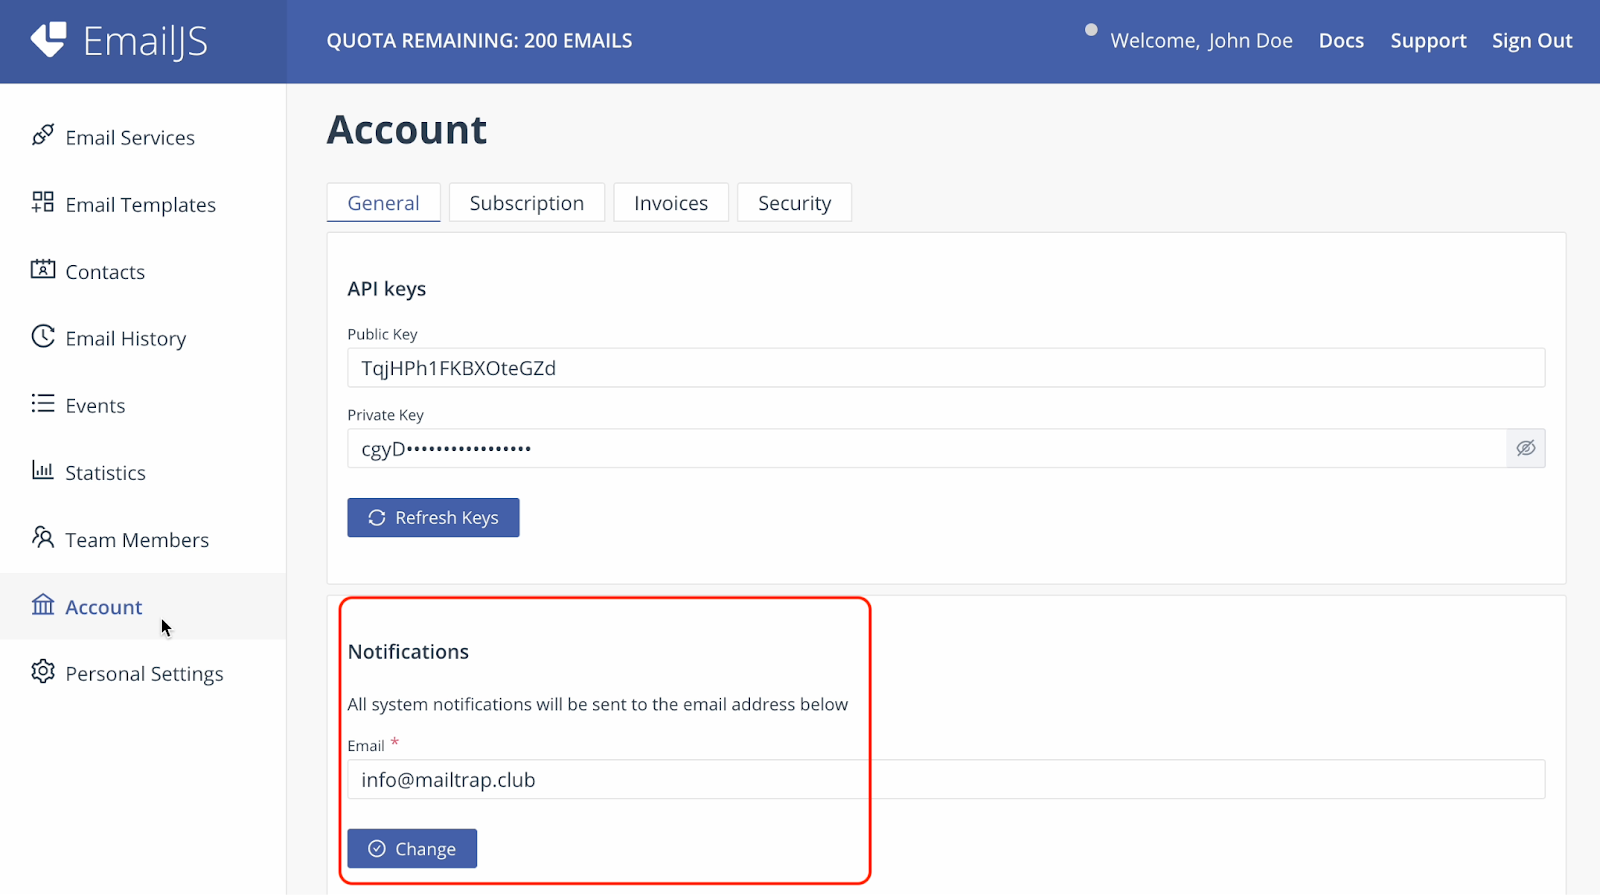
- Set notifications email
Once you sign in, make sure the Notifications section in the account tab has an email with the same domain as your Mailtrap’s account, just like so:
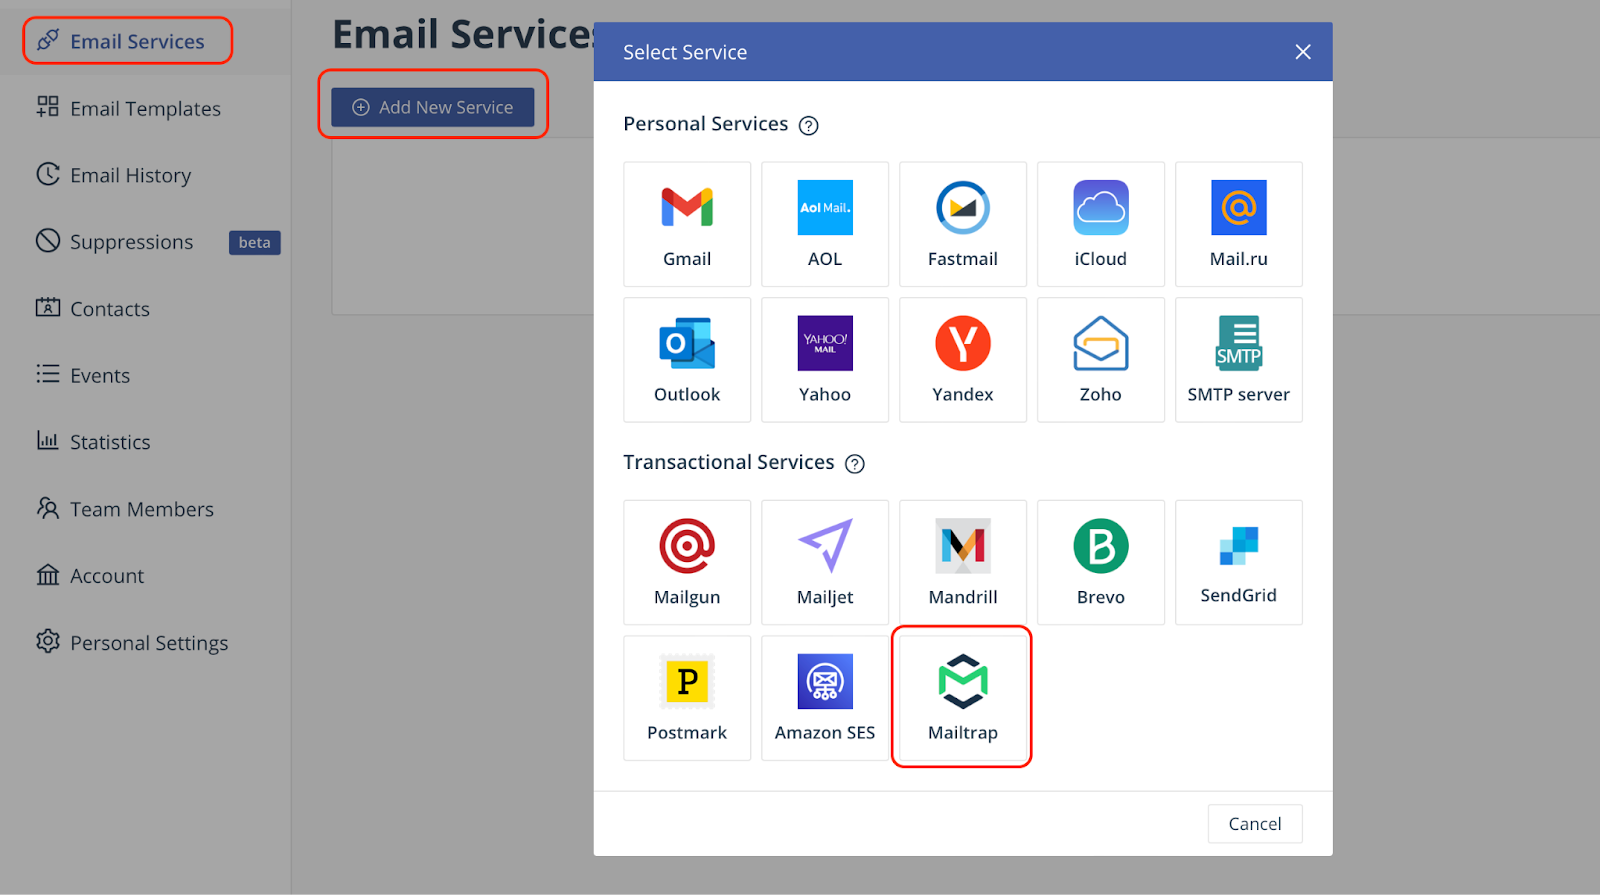
- Connect an Email Service
Then, navigate to Email Services and select Mailtrap as your email service provider (ESP).
Next, configure the service by providing the following details:
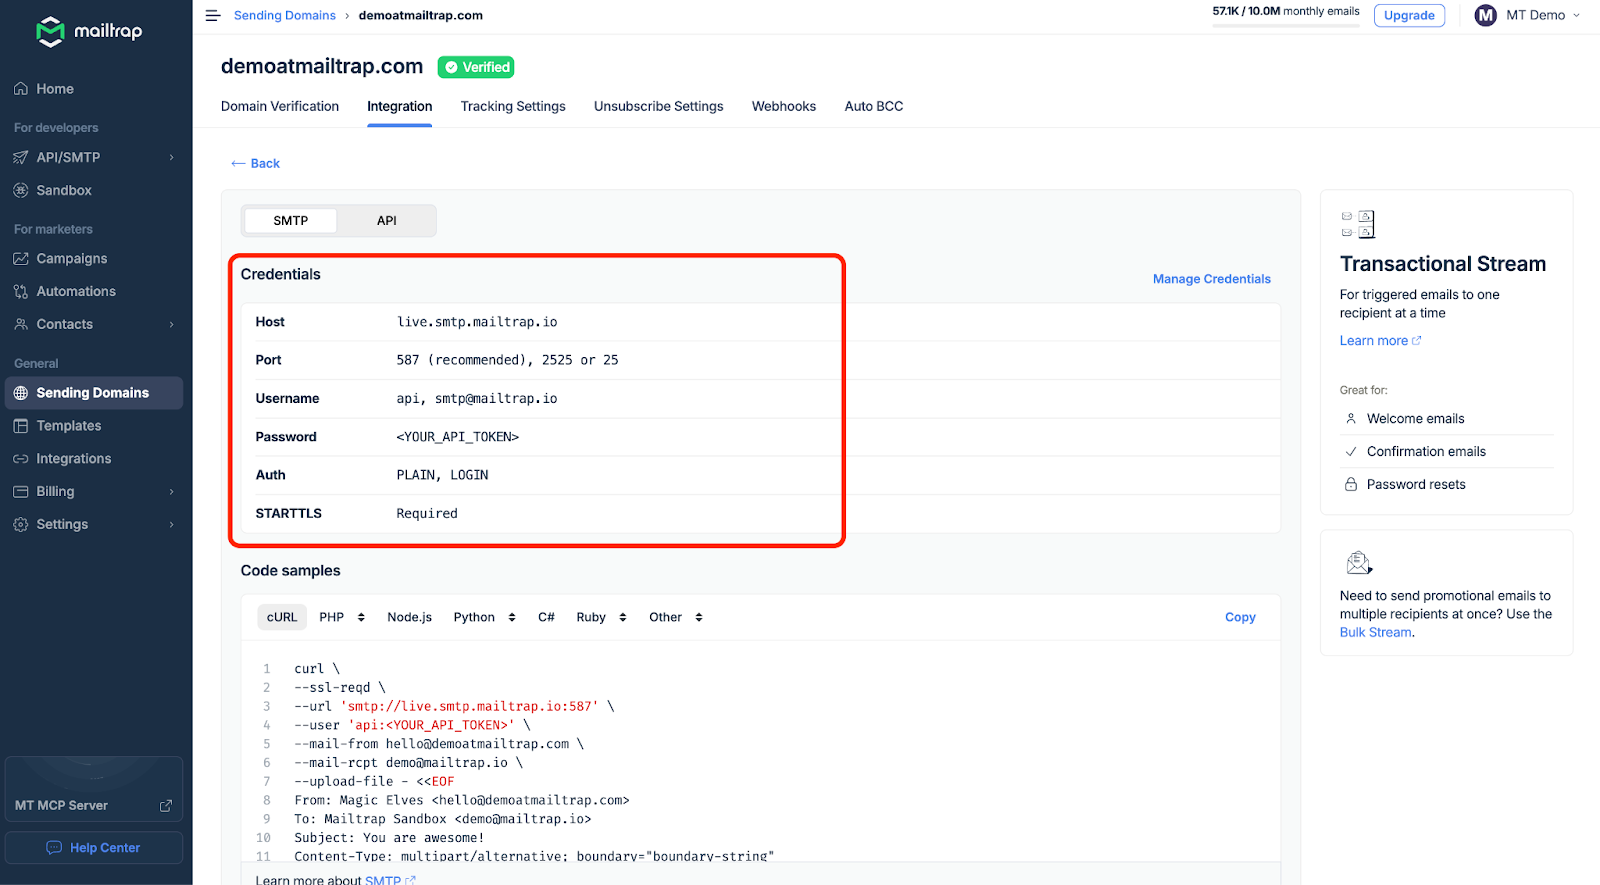
→ Username and Password: Find your credentials by going to your Mailtrap dashboard and then navigating to Sending Domains > Integration > SMTP. (if you can’t find your API key there, go to Settings > API Tokens)
→ Service ID: A unique identifier for this service. You can name it something like “mailtrap_service” or any name you like.
→ Email Feature – Select “Sending” from the dropdown menu.
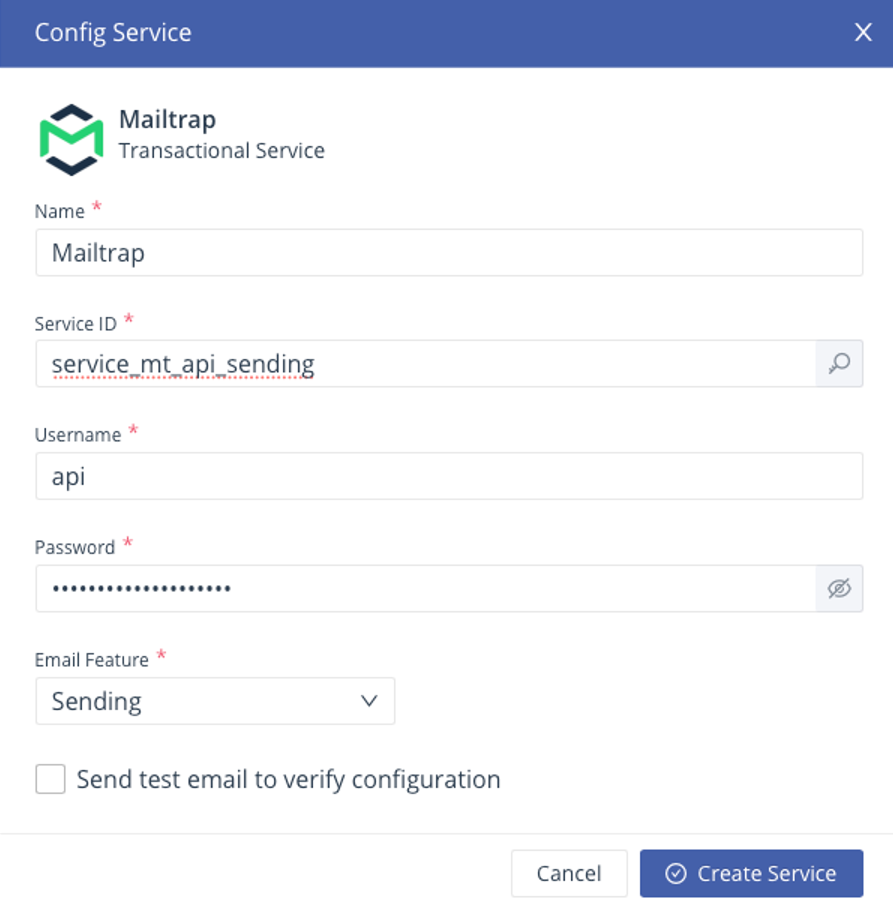
Note: If you experience issues when trying to configure Mailtrap in EmailJS, uncheck “Send test email to verify configuration”.
- Create an Email Template
Once you’re finished with the previous step, go to Email Templates and create a new template. Add placeholders like {{name}}, {{email}}, and {{{html_message}}} in the email body where the user input will go. When the emails are sent, these get replaced with the sender’s name, email and message HTML content accordingly.
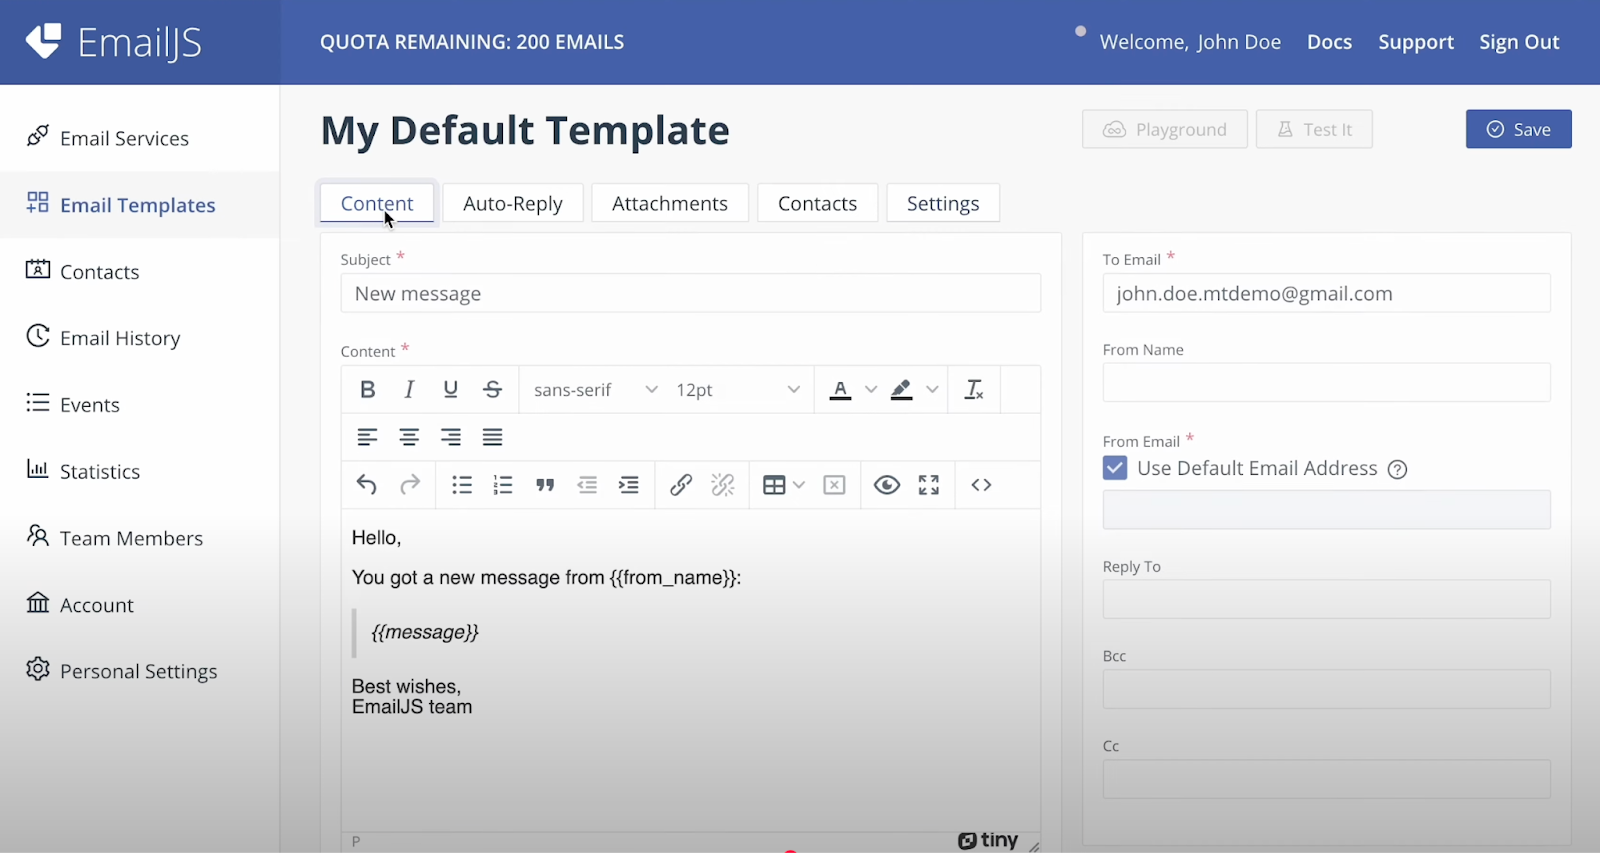
You can also check out how your template looks by clicking on the ‘Test it’ button.
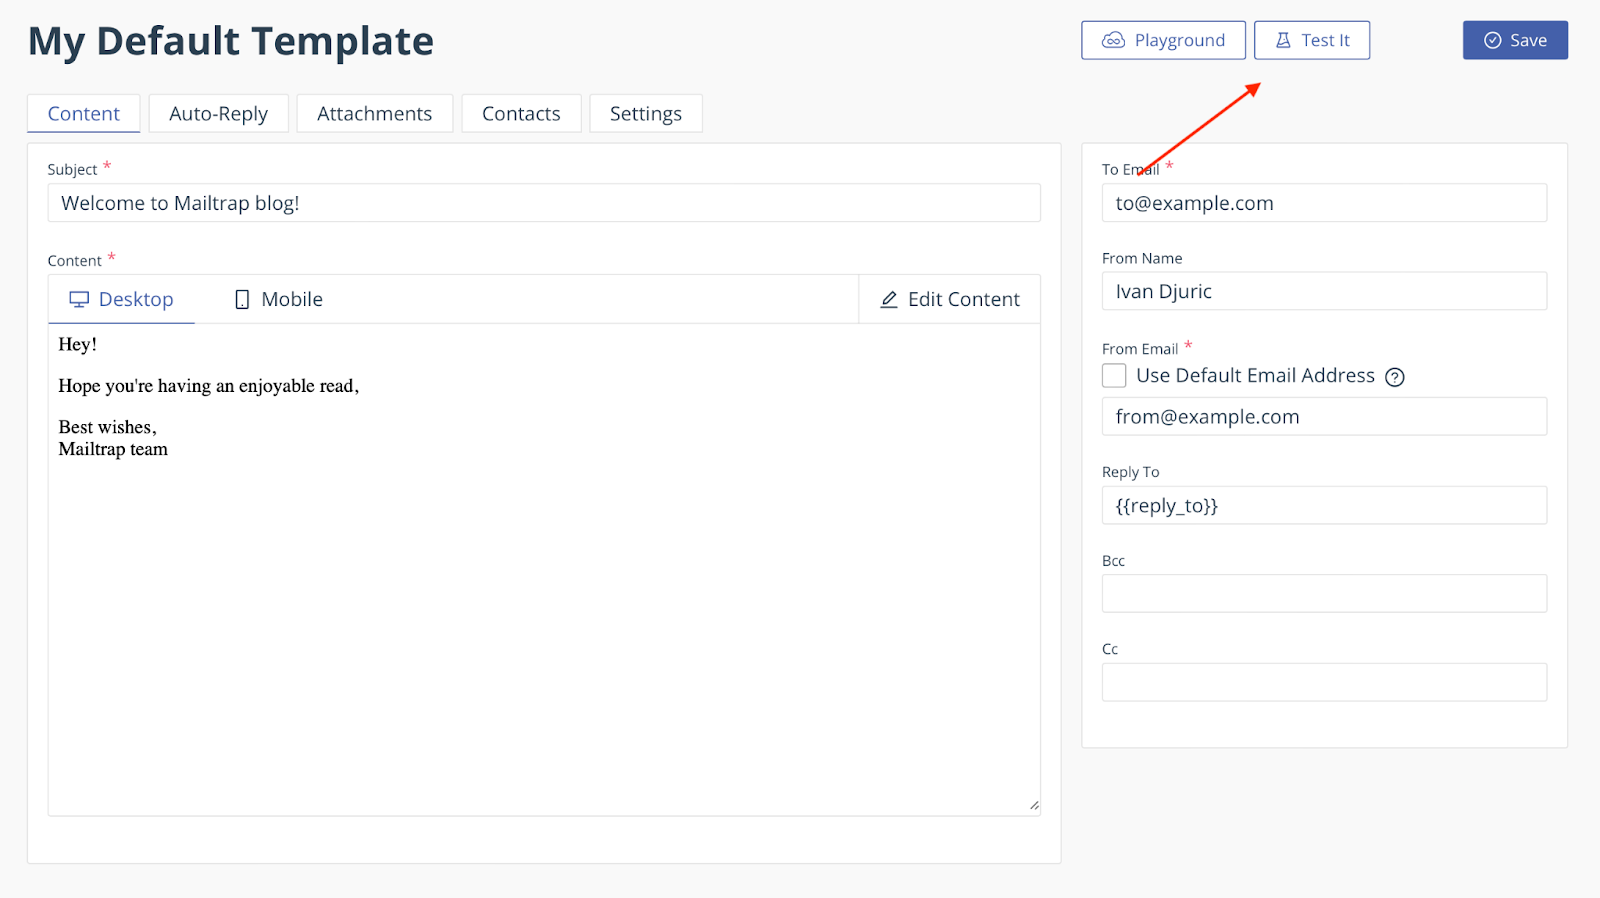
Important: Do not tick the “Use Default Email Address” box since there is currently an issue that makes the whole integration obsolete, and the EmailJS account won’t match the sending domain. Instead, enter your actual email-sending address.
Save the template and take note of its Template ID.
If not, go ahead, click Edit Content, choose Code Editor, and modify the template the way you want.
- Save your IDs and Keys
Last but not least, go to Account > API Keys and take note of your Public Key.
As a result, you should now have 2 IDs (Service and Template ID) and 1 Public Key.
Create a contact form
First, create a new directory where we’ll do all the work by running the following commands:
mkdir emailjs-client
cd emailjs-client
Then, in the directory, create a src folder where we’ll store our source code, that is, HTML and JavaScript files. You can do it manually or via terminal/bash:
mkdir srcIn the src folder, create a new file named index.html where we’ll write html code for the form. Here’s an example form I used for the purposes of this demo:
<html lang="en">
  <head>
    <meta charset="UTF-8" />
    <meta name="viewport" content="width=device-width, initial-scale=1.0" />
    <title>EmailJS</title>
  </head>
  <body>
    <h2 style="text-align: center">Send a Message</h2>
    <form
      id="contact-form"
      style="
        display: flex;
        flex-direction: column;
        gap: 12px;
        width: 300px;
        margin: 0 auto;
      "
    >
      <label for="name">Name:</label>
      <input type="text" name="name" required />

      <label for="email">Email:</label>
      <input type="email" name="email" required />

      <label for="html_message">Message:</label>
      <textarea name="html_message" required></textarea>

      <button type="submit">Send</button>
    </form>
  </body>
</html>
Important: Make sure all input names match the names you use in your EmailJS template.
Now, let’s make sure EmailJS is initialized properly in our application. To do that, create a script.js file in the src folder.
In the script.js file, we’re going to call the emailjs.init method, which will set everything up for us to use email sending methods later in the guide. Also, replace the placeholder string with your own EmailJS Public Key mentioned in previous steps:
emailjs.init("YOUR_PUBLIC_KEY");Next, modify the index.hml file to include the created script, which will load EmailJS in the application, so that it can be accessible by our JavaScript code. Last but not least, let’s connect the created JavaScript file before the closing body tag:
<html lang="en">
  <head>
    <meta charset="UTF-8" />
    <meta name="viewport" content="width=device-width, initial-scale=1.0" />
    <title>EmailJS</title>
    <script
      type="text/javascript"
      src="https://cdn.jsdelivr.net/npm/@emailjs/browser@4/dist/email.min.js"
    ></script>
  </head>
  <body>
    <h2 style="text-align: center">Send a Message</h2>
    <form
      id="contact-form"
      style="
        display: flex;
        flex-direction: column;
        gap: 12px;
        width: 300px;
        margin: 0 auto;
      "
    >
      <label for="name">Name:</label>
      <input type="text" name="name" required />

      <label for="email">Email:</label>
      <input type="email" name="email" required />

      <label for="html_message">Message:</label>
      <textarea name="html_message" required></textarea>

      <button type="submit">Send</button>
    </form>

    <script type="text/javascript" src="script.js"></script>
  </body>
</html>
Send email using EmailJS
Now, let’s add some email sending logic to the previously created script.js to make the html form work as intended and send the filled form fields on submit.
With the {{{html_message}}}, you can send both plain and HTML emails.
However, if you want your emails to strictly behave as plain-text, you can replace the triple brackets with double brackets {{message}} in your EmailJS dashboard when editing the template.
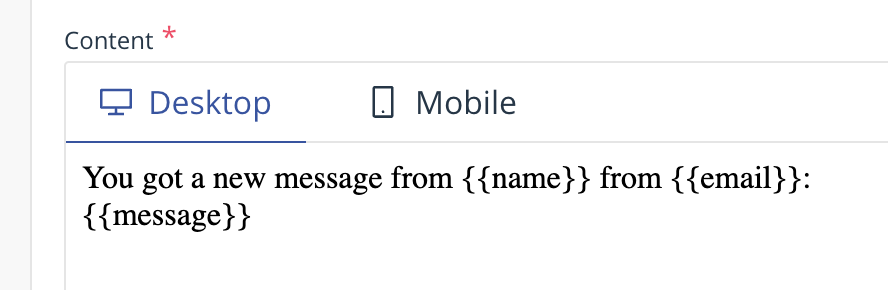
This is applicable for below examples, but if you decide to send plain-text messages, make sure to replace the html_message name in the message field with message in your index.html file, like so:
<label for="message">Message:</label>
<textarea name="message" required></textarea>
Send HTML email
To send HTML email, add the following code to your script.js file:
emailjs.init("YOUR_PUBLIC_KEY");

const sendEmail = async (event) => {
  event.preventDefault();

  const form = event.target;

  try {
    const response = await emailjs.sendForm(
      "YOUR_SERVICE_ID",
      "YOUR_TEMPLATE_ID",
      form,
    );
    console.log("Email sent successfully!", response);
  } catch (error) {
    console.error("Failed to send email:", error);
  }
};

document.addEventListener("DOMContentLoaded", () => {
  document
    .getElementById("contact-form")
    .addEventListener("submit", sendEmail);
});
You can read more about emailjs.sendForm method we used here, what parameters it accepts, and other information in the official EmailJS documentation.
As soon as it’s ready, open the html file in the browser. You should see a form, which would send the data that you typed in the inputs on submit.
Send email with attachment
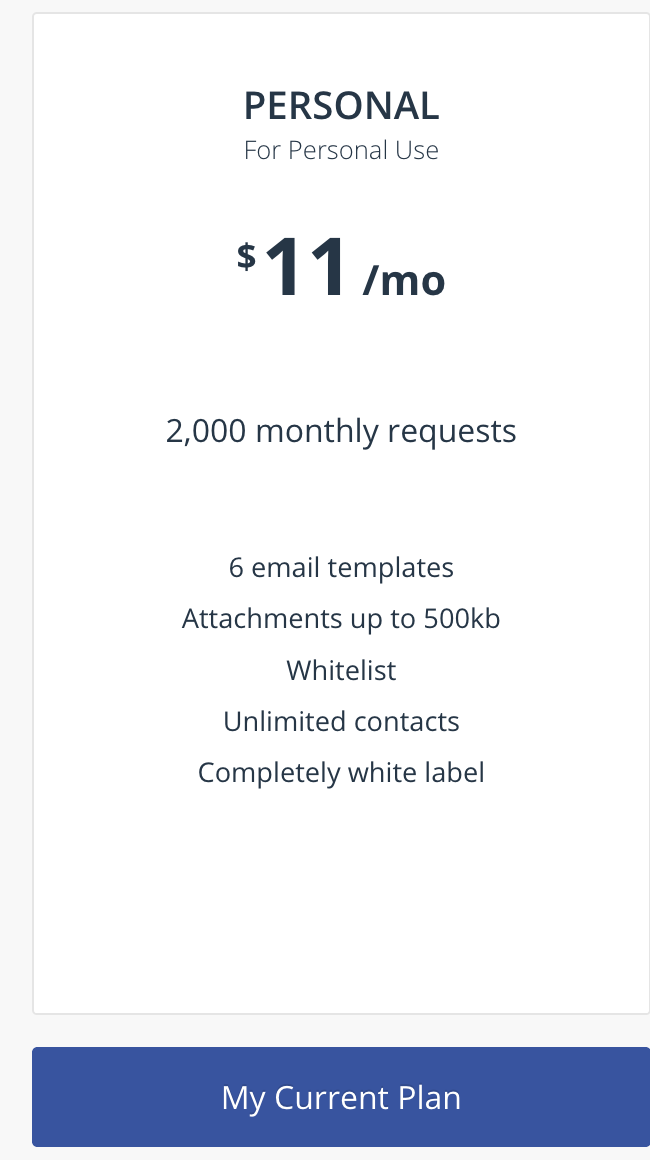
First of all, note that you can send attachments via EmailJS if you have at least a Personal Plan, otherwise, you won’t be able to configure it.
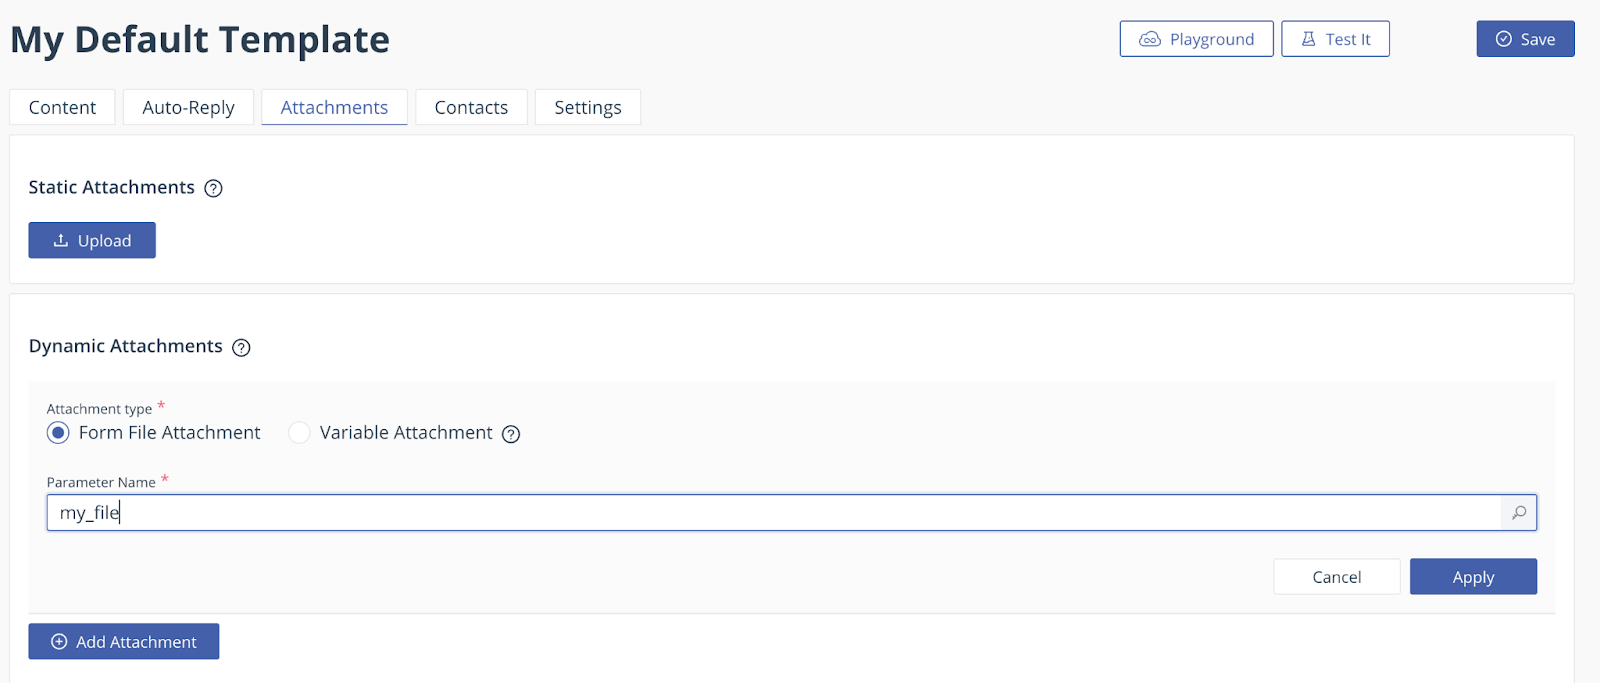
To make attachments work with the created template, open the Attachments tab in your selected template. Then, click Add Attachment, select Form File Attachment, and enter the parameter name that you’re going to use later in your HTML code.
Lastly, click Apply and Save the template.
We also won’t need to modify any JavaScript, we just add a new input in the index.html file that will be responsible for file selection. Check out the example below:
<!DOCTYPE html>
<html lang="en">
  <head>
    <meta charset="UTF-8" />
    <meta name="viewport" content="width=device-width, initial-scale=1.0" />
    <title>EmailJS</title>
    <script
      type="text/javascript"
      src="https://cdn.jsdelivr.net/npm/@emailjs/browser@4/dist/email.min.js"
    ></script>
  </head>
  <body>
    <h2 style="text-align: center">Send a Message</h2>
    <form
      id="contact-form"
      style="
        display: flex;
        flex-direction: column;
        gap: 12px;
        width: 300px;
        margin: 0 auto;
      "
    >
      <label for="name">Name:</label>
      <input type="text" name="name" required />

      <label for="email">Email:</label>
      <input type="email" name="email" required />

      <label for="html_message">Message:</label>
      <textarea name="html_message" required></textarea>

      <input type="file" name="my_file" />

      <button type="submit">Send</button>
    </form>

    <script type="text/javascript" src="script.js"></script>
  </body>
</html>Notes:
- As you see, we only added a new input with my_file name. The attachment is added to the sent email with the same file name as the file we selected in the input.
- Make sure the input’s name matches the name you provided in attachments tab in your template, similarly to how we did it on the previous steps
As soon as you’re ready, feel free to open the html file in your browser. You should see a form, now with a new file select field, which should send the data that you typed in the inputs on submit, as well as the attachment you selected.
Send emails using SMTP
If EmailJS does not meet your security requirements, or if you need more fluidity with creating content emails dynamically in code (which EmailJS doesn’t fully allow since it’s template-based), consider such backend-based solutions as Nodemailer (SMTP-based).
Nodemailer is a powerful and probably the most popular SMTP solution on the market, having over 4 million installations per week at the time of this article creation. In the example below, we’ll send a plain-text email using Nodemailer and Mailtrap SMTP.
For a detailed breakdown of differences between Nodemailer and EmailJS, click here. 👀
First, make sure to make a new folder with any name that you want. For example:
mkdir nodemailer-mailtrap
cd nodemailer-mailtrap
In the directory, create a src folder for storing the source code. You can do it manually or via terminal/bash:
mkdir srcNext, let’s install the dependencies using npm:
npm init -y
npm install nodemailer dotenv
or yarn:
yarn init -y
yarn add nodemailer dotenv
Now, let’s create a .env file and fill it with the Mailtrap credentials. This way, the credentials can be stored safely in the application.
MAILTRAP_USER=your_smtp_user
MAILTRAP_PASS=your_smtp_passTip: To find your Mailtrap credentials, go to Sending Domains, choose your domain, and select the Transactional Stream under Integration.
Also, if you plan to push your code to git, you should consider adding a .gitignore file in the root folder, so that your credentials won’t be pushed to your public git repository, otherwise, it can lead to credentials leakage. You can find the .gitignore template for Node.js right here.
Once you install the dependencies, create an index.js file in the src folder and copy/paste the following code there:
require("dotenv").config();

const nodemailer = require("nodemailer");

const transporter = nodemailer.createTransport({
  host: "live.smtp.mailtrap.io",
  port: 587,
  auth: {
    user: process.env.MAILTRAP_USER,
    pass: process.env.MAILTRAP_PASS,
  },
});

const mailOptions = {
  from: "your-email@your-domain.com",
  to: "recipient@example.com",
  subject: "Test Email",
  text: "This is a plain-text email from Mailtrap"
};

transporter.sendMail(mailOptions, (error, info) => {
  if (error) {
    console.log("Error:", error);
  } else {
    console.log("Email sent:", info.response);
  }
});Note: This code snippet is for sending plain-text email. I’ll show you how to send HTML in a minute.
Finally, run the code using the command below:
node src/index.jsSend HTML email
Now, let’s modify the above example to send an HTML email.
The only difference between the previous example is that we’ll use html property instead of text property, so that the html code is formatted correctly. Check it out:
require("dotenv").config();

const nodemailer = require("nodemailer");

const transporter = nodemailer.createTransport({
  host: "live.smtp.mailtrap.io",
  port: 587,
  auth: {
    user: process.env.MAILTRAP_USER,
    pass: process.env.MAILTRAP_PASS,
  },
});

const mailOptions = {
  from: "your-email@your-domain.com",
  to: "recipient@example.com",
  subject: "Test Email",
  html: `
    <h1>Hi from Mailtrap!</h1>
    <p>This is a test email sent from Node.js (Nodemailer) using Mailtrap.</p>
  `,
};

transporter.sendMail(mailOptions, (error, info) => {
  if (error) {
    console.log("Error:", error);
  } else {
    console.log("Email sent:", info.response);
  }
});
Feel free to run the code using the command below. If everything was configured correctly, you should see a response message as a result of sending the html email.
node src/index.jsP.S. Interested in learning more about Nodemailer and other sending cases? If so, check out our dedicated article on the topic.
Send emails using API
Using the official Mailtrap SDK for Node.js is another great EmailJS alternative. The library is developed and supported by the Mailtrap team and allows seamless integration with Mailtrap’s system and workflows.
To integrate it, make a new folder with a desired name, like so:
mkdir mailtrap-sdk
cd mailtrap-sdk
Then, in the same directory, create a src folder:
mkdir srcNext, let’s install the dependencies using npm or yarn. We will use the Mailtrap Node package as the primary Email API solution and dotenv library to safely store the Mailtrap’s API credentials.
npm:
npm init -y
npm install mailtrap dotenv
yarn:
yarn init -y
yarn add mailtrap dotenv
Now, let’s create an .env file and fill it with the Mailtrap API Token:
MAILTRAP_TOKEN=your_tokenWhen the dependencies are installed, create an index.js file in the src folder and insert the following code:
require("dotenv").config();

const { MailtrapClient } = require("mailtrap");

const TOKEN = process.env.MAILTRAP_TOKEN;
const SENDER_EMAIL = "sender@freelance.mailtrap.link";
const RECIPIENT_EMAIL = "recipient@example.com";

const client = new MailtrapClient({ token: TOKEN });

const sender = { name: "Mailtrap Test", email: SENDER_EMAIL };
const recipient = { email: RECIPIENT_EMAIL };

const sendEmail = async () => {
  try {
    const response = await client.send({
      from: sender,
      to: [recipient],
      subject: "Hi from Maitrap!",
      text: "Hi from Mailtrap! This is a test message",
    });
    console.log(response);
  } catch (error) {
    console.error(error);
  }
};

sendEmail();
Run the code using the following command:
node src/index.jsSend HTML email
Again, the only difference between sending an html email and a text email, is that we use the html property instead of the text property:
require("dotenv").config();

const { MailtrapClient } = require("mailtrap");

const TOKEN = process.env.MAILTRAP_TOKEN;
const SENDER_EMAIL = "sender@freelance.mailtrap.link";
const RECIPIENT_EMAIL = "recipient@example.com";

const client = new MailtrapClient({ token: TOKEN });

const sender = { name: "Mailtrap Test", email: SENDER_EMAIL };
const recipient = { email: RECIPIENT_EMAIL };

const sendEmail = async () => {
  try {
    const response = await client.send({
      from: sender,
      to: [recipient],
      subject: "Hi from Maitrap!",
      html: `<h1>Hi from Mailtrap! This is a test message</h1>`,
    });
    console.log(response);
  } catch (error) {
    console.error(error);
  }
};

sendEmail();
If you want to learn more about sending emails with Node.js, do read our in-depth tutorial.
Wrapping up
EmailJS is a convenient way to handle simple email sending tasks directly from the frontend, but it’s important to be mindful of limitations.
For more robust and secure solutions, I recommend leveraging server-side implementations, with EmailJS still being a solid option for specific use cases.
And if you want to take your Node.JS email infrastructure to the next level, visit our blog and check out our other articles on the topic, such as:


