How To Migrate
To Mailtrap
This guide will help you through the migration process step-by-step and answer frequently asked questions.


👋 New to Mailtrap? Check our 5 minute 🎥 overview of our Email API/SMTP.
Step 1: Prepare for Migration
Here’s how to do a simple prep to ensure you don’t lose important data before migrating to Mailtrap.
▶️ Export your current suppression list
Suppression lists contain all the email addresses you can’t email based on events such as bounces, spam complaints, and unsubscribes.
You need to export your suppression list from the current sending provider and import it to Mailtrap to protect your email deliverability and sender reputation. Skipping this step may cause high bounce rates and spam complaints, leading to your account being temporarily suspended.
So, one of the first steps during preparations is to export it from your current sending provider and have it on hand.
▶️ Export your sending stats (if possible)
Sometimes, we ask bulk and marketing customers to provide email-sending stats from the previous provider. If your provider allows exporting stats or reports, it would be beneficial to have those on hand.
Ensure you’ve set up Google Postmaster Tools for your domain, as the Mailtrap Compliance Team may ask for its stats. We recommend setting it up anyway, as it helps track your deliverability.
▶️ Estimate your maximum hourly sending rate
Estimate your maximum hourly sending rate and communicate it to our support team to avoid potential email delivery delays.
▶️ Get familiar with Mailtrap docs
Check the side-by-side comparisons between Mailtrap and other popular providers.
- SendGrid to Mailtrap
- Mailgun to Mailtrap
- Mailchimp Transactional Email to Mailtrap
- Amazon SES to Mailtrap
- Postmark to Mailtrap
Compare API endpoints, terminology, and technical features. This will help you familiarize yourself with Mailtrap and transfer all the data correctly. If you need more information, here are the official API docs.
▶️ Talk to our deliverability experts
If you’re a high-volume sender (>200K/month), talk to our Deliverability team before you start migration. They will help you through the process, assign a dedicated IP, and check if everything is set up correctly.
We provide automatic warm-ups for our dedicated IPs, so contact our support team to request one.
Note: In some cases, our deliverability team may ask you to enable a dedicated IP for lower volumes, too.
Dedicated IP is included in the Business plan or higher.
▶️ Contact our support team if you have a multi-tenant service
If you have a multi-tenant service (i.e., multiple domains or services), please contact our support team before you start sending. We’ll arrange a special compliance process and ensure one tenant’s (domain’s) bad reputation doesn’t block your whole account and other domains.
Step 2: Set up Mailtrap
Once you gather all the necessary data from your previous provider, you can start setting everything up in Mailtrap.
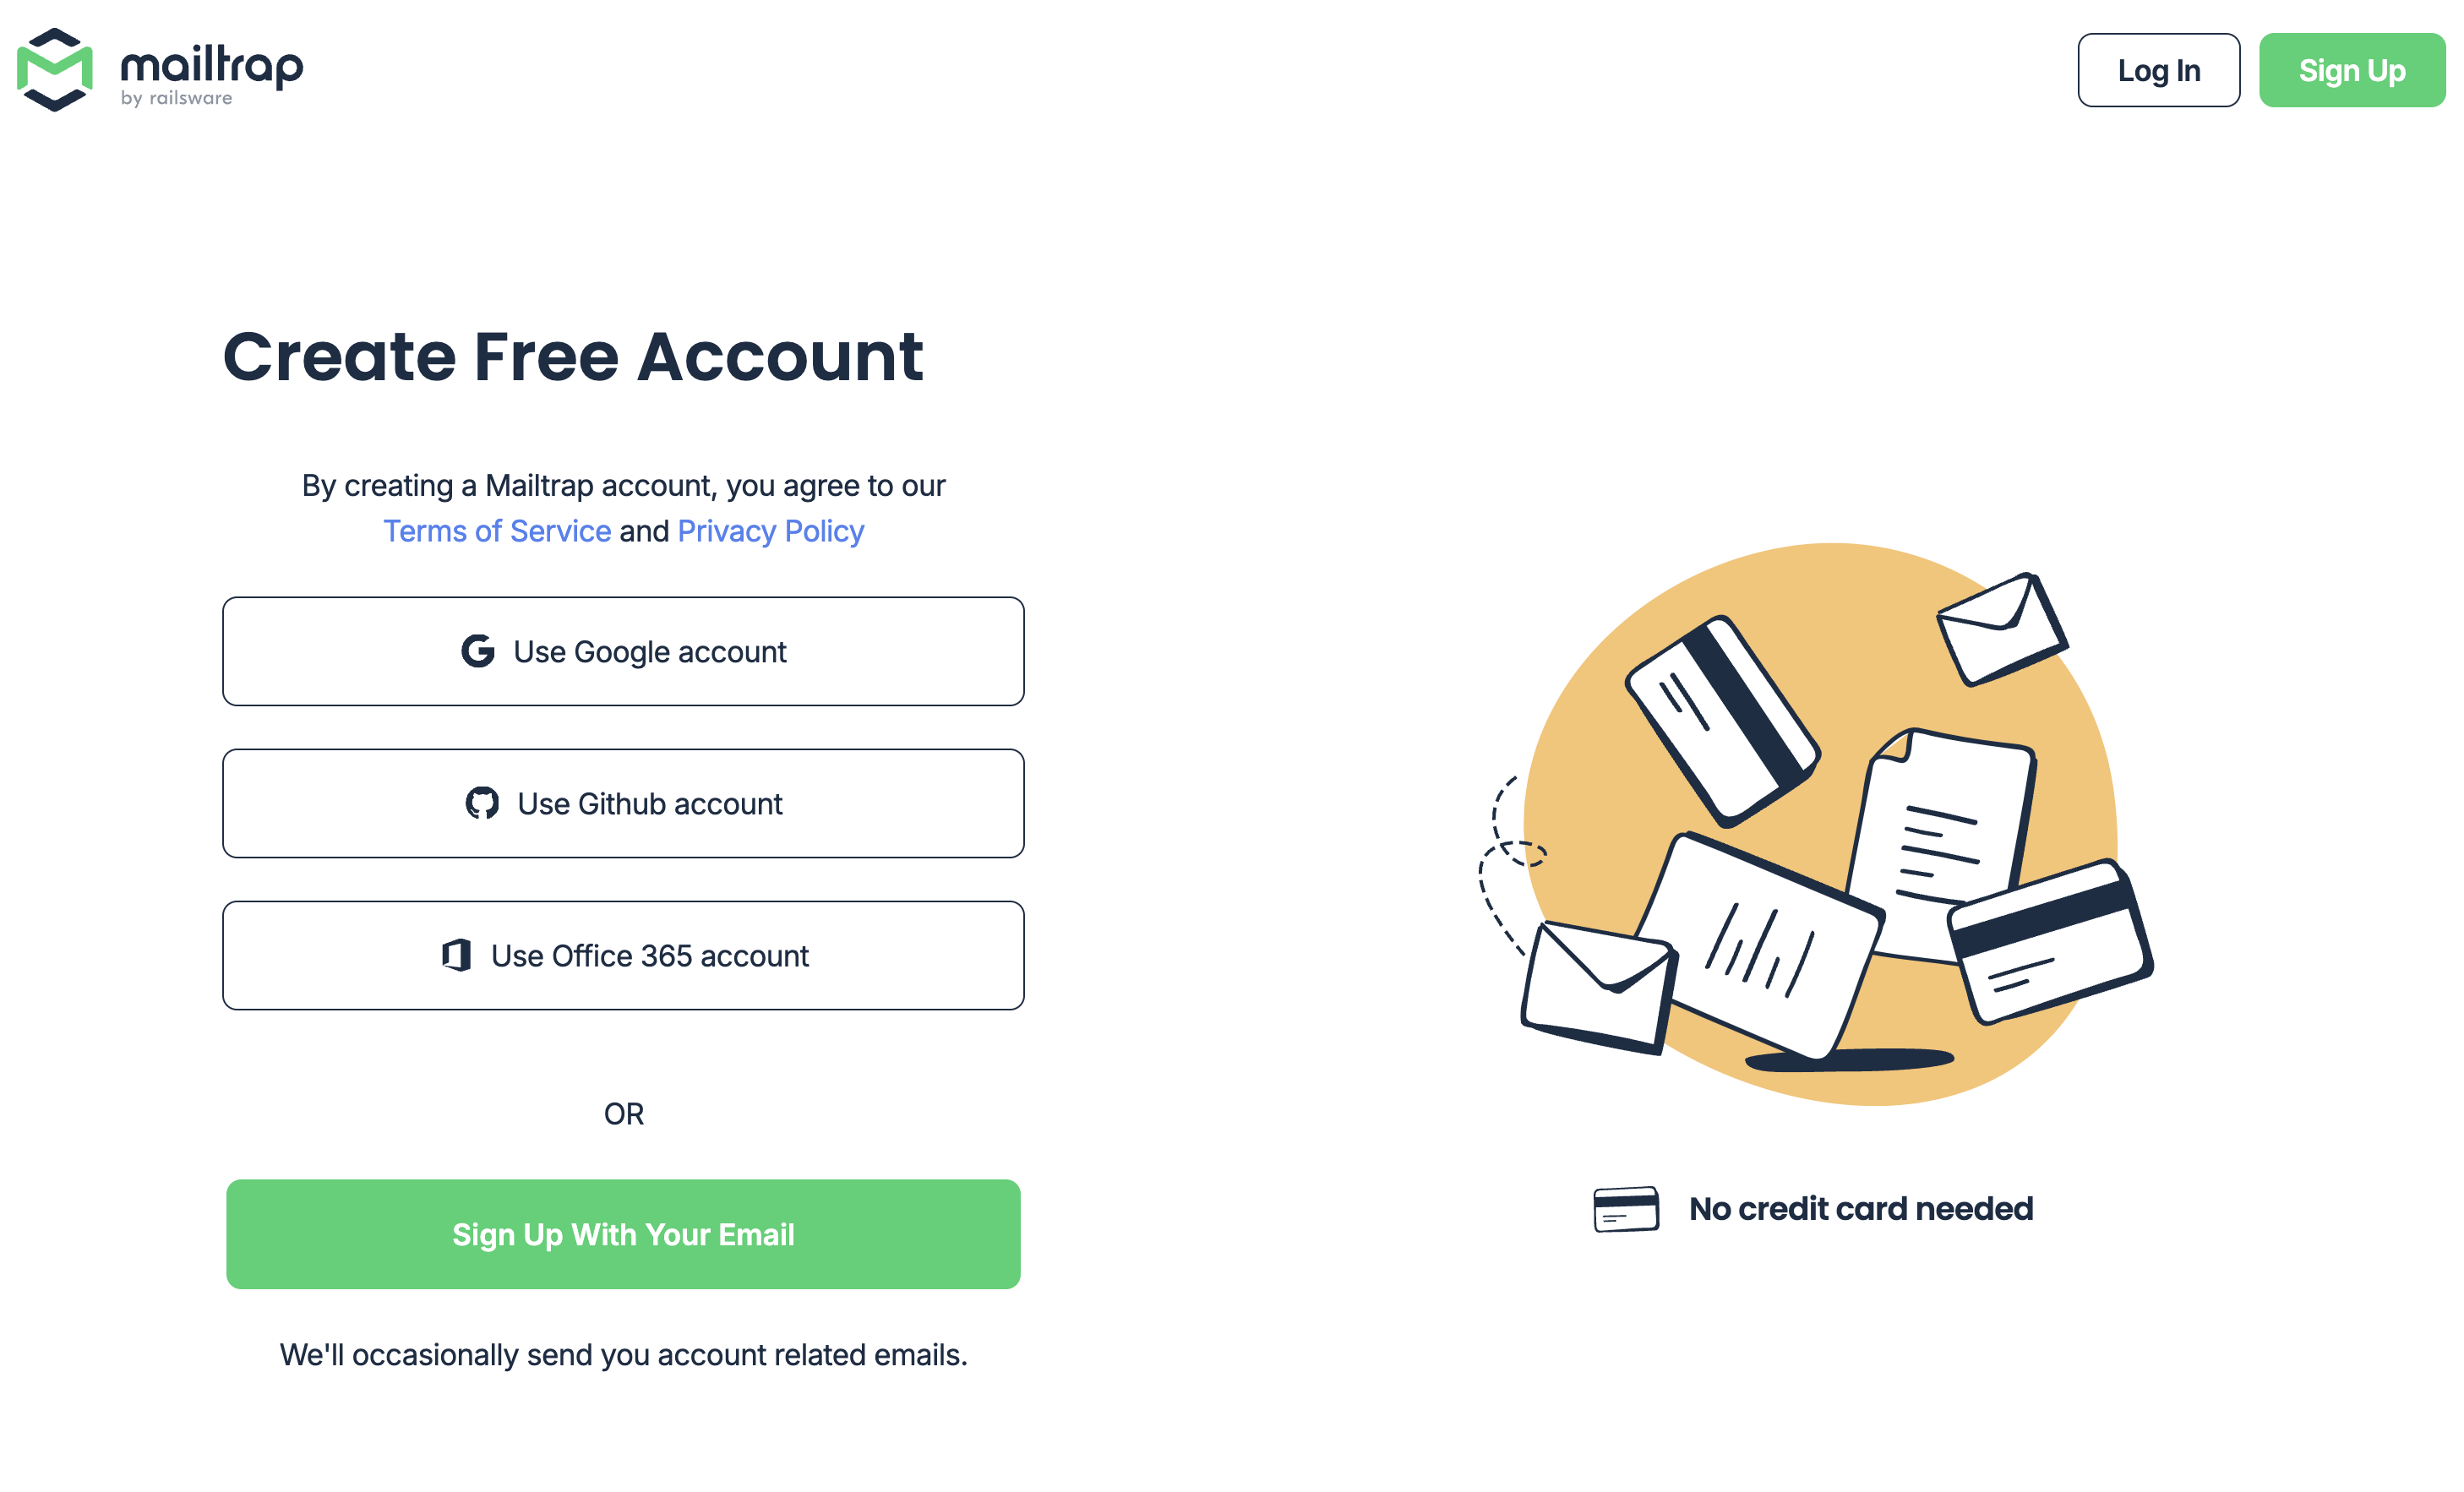
▶️ Create an account
This process is really easy. Simply go to the signup page, choose your preferred registration method, and fill out the necessary fields.
▶️ Add your billing information
If you’re using our paid plans, add billing data. Contact our support team if you need an annual plan or use a payment method different from a credit card.
▶️ Add and verify your domain
To start sending emails with Mailtrap, you must add and verify a sending domain you own. Verification means adding Mailtrap DNS records to your domain provider – read the detailed instructions here.
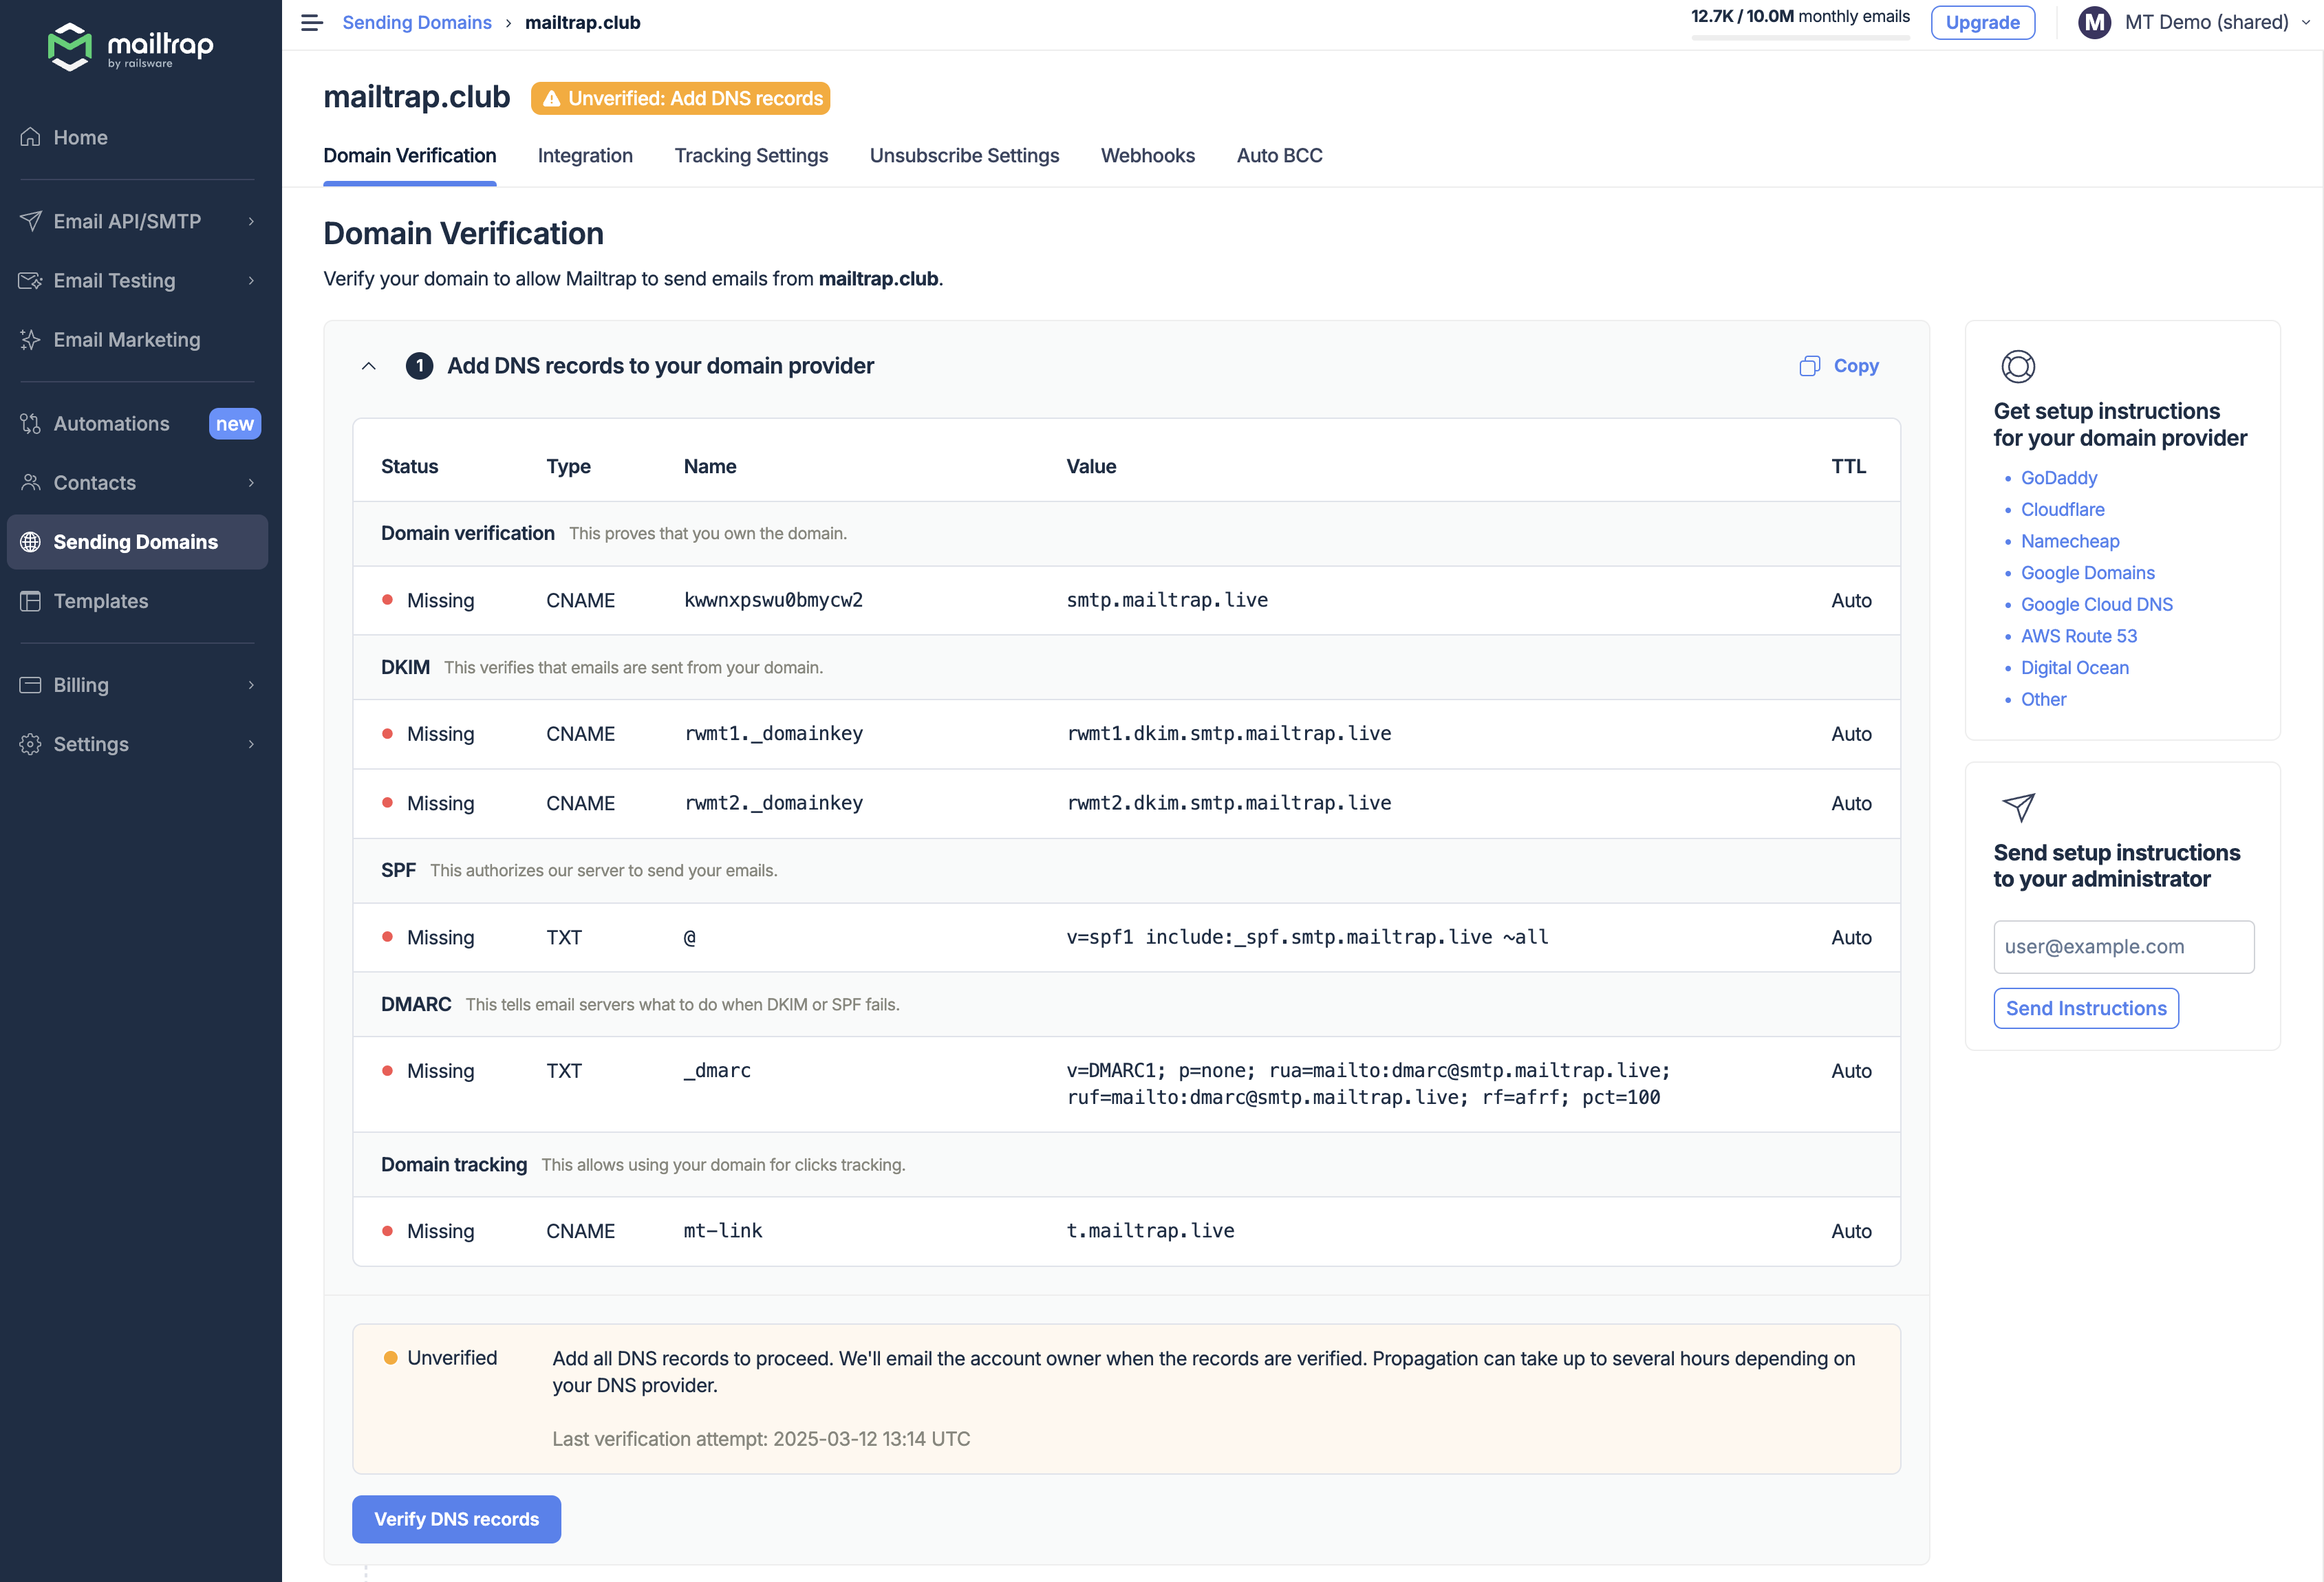
Domain verification usually takes a few minutes to a few hours if you add all the records correctly.
▶️ Fill in the Sender information
Proceed to fill out the form with your Sender information. Click the Edit icon to reveal the form.
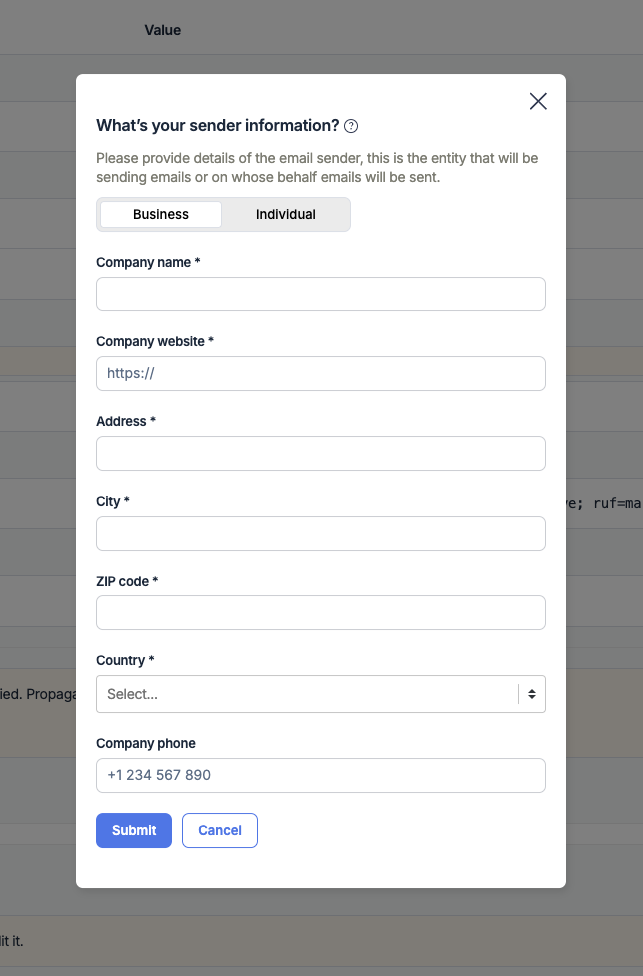
The information will be used in your email footers, as mandated by international laws for marketing emails. Note that even if you don’t send any marketing emails, you still need to provide us with the business information.
Also, make sure to select the tab that aligns with your use case, Business or Individual.
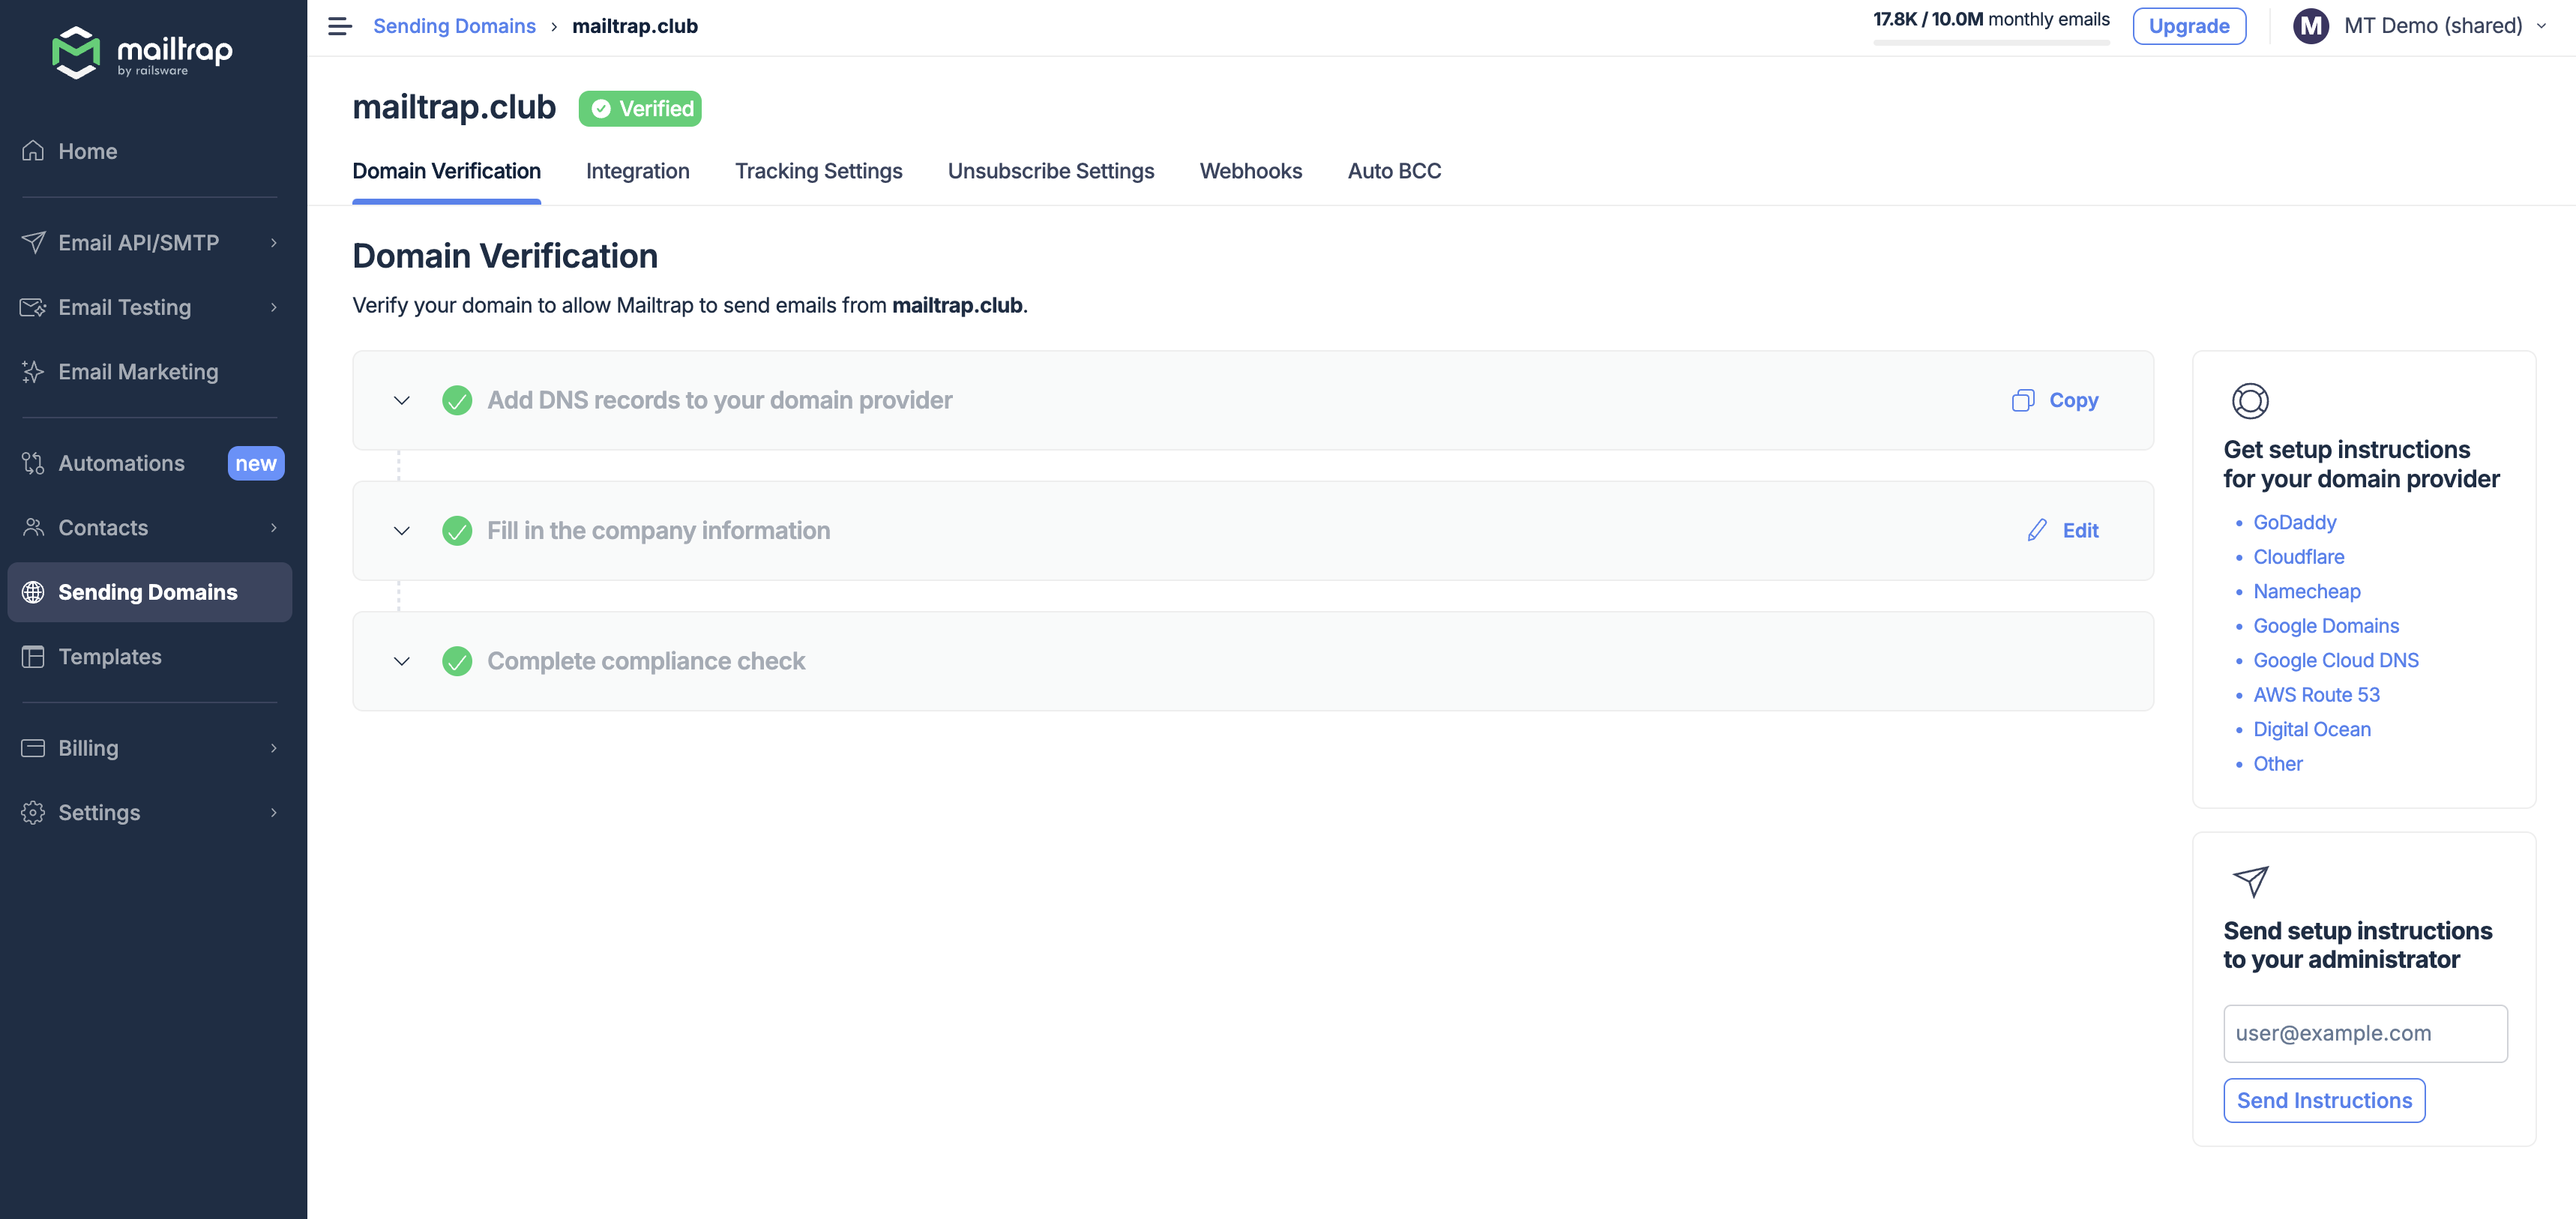
▶️ Wait until verification and Compliance Check are complete
The next step is Compliance Check. It’s the process of checking every new domain added to Mailtrap. Once all the DNS records are successfully verified, your domain will undergo an automatic review. This usually takes a couple of minutes. More information is available here.
Remember that, in some cases or high sending volumes, our deliverability team might require access to your Google Postmaster data. If you’re a bulk sender, we may ask for information about your email lists and stats from your previous sending solution.
Important note: We don’t allow cold outreach.
▶️ Import suppressions
As mentioned earlier, importing suppressions is highly recommended before you start sending emails with Mailtrap. You’ll find all the needed instructions here.
▶️ Integrate Mailtrap with your app, service, or platform
Next, integrate Mailtrap with your app, service, or platform using SMTP or API methods.
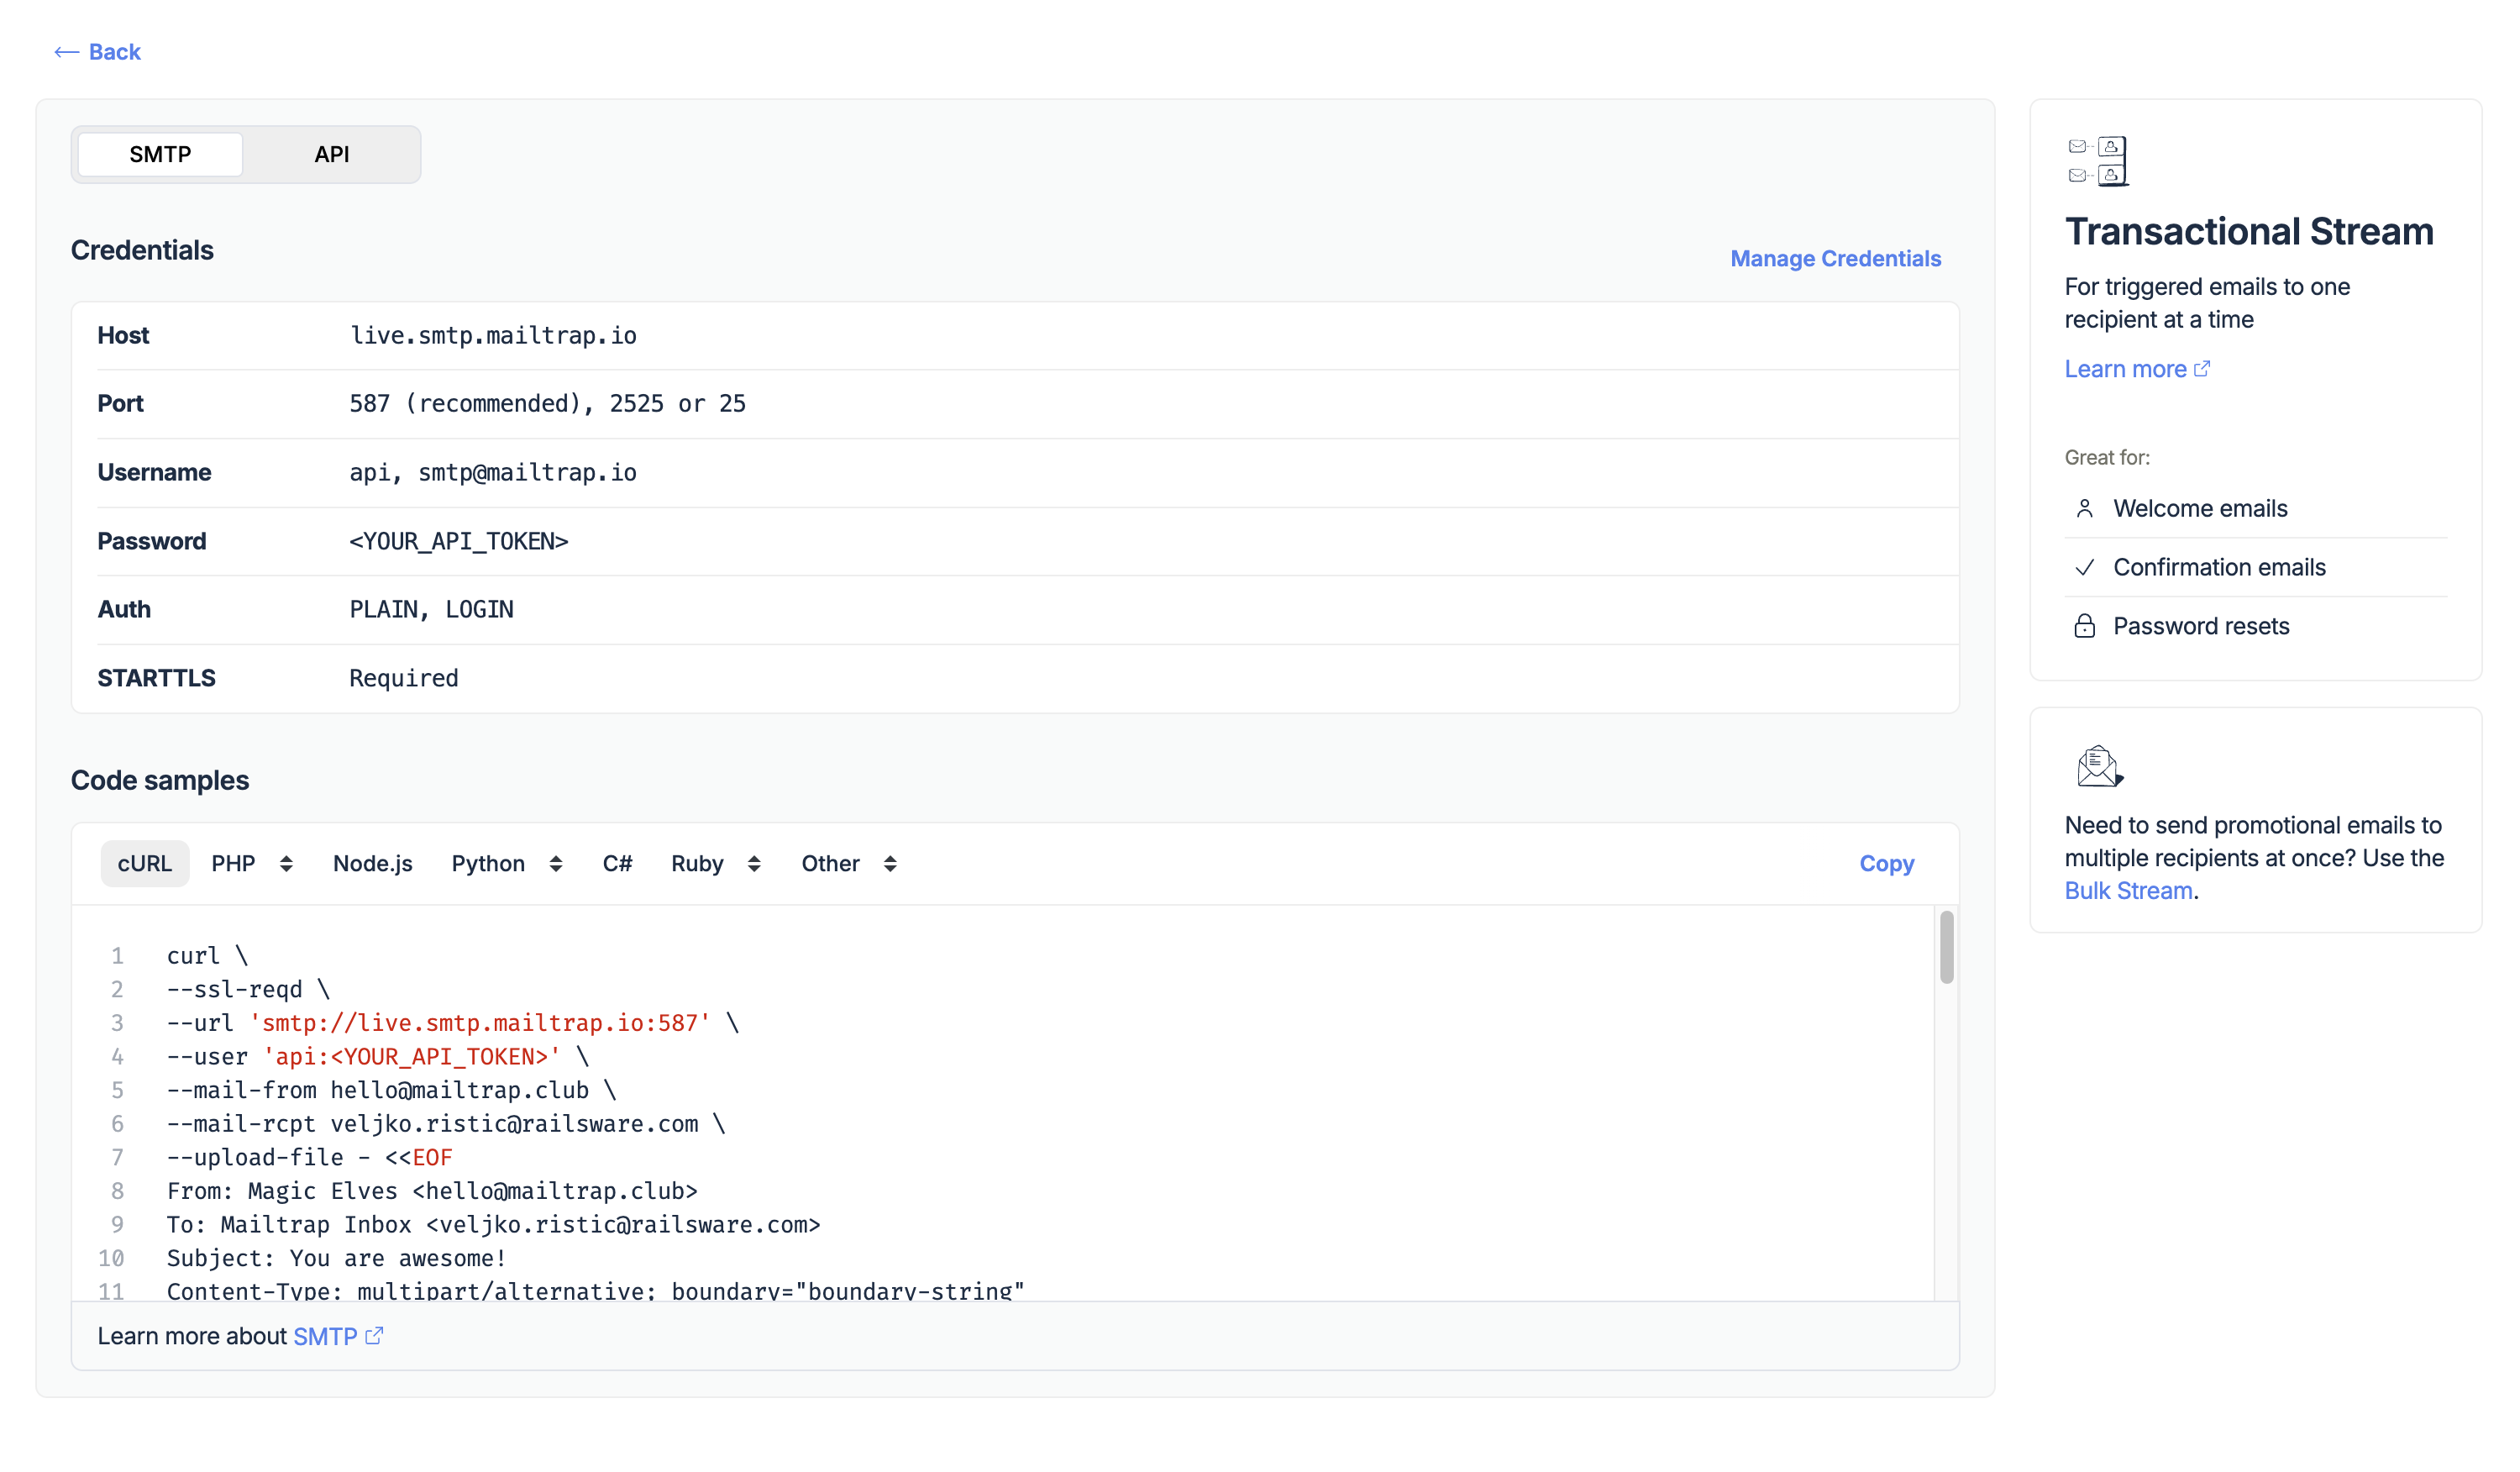
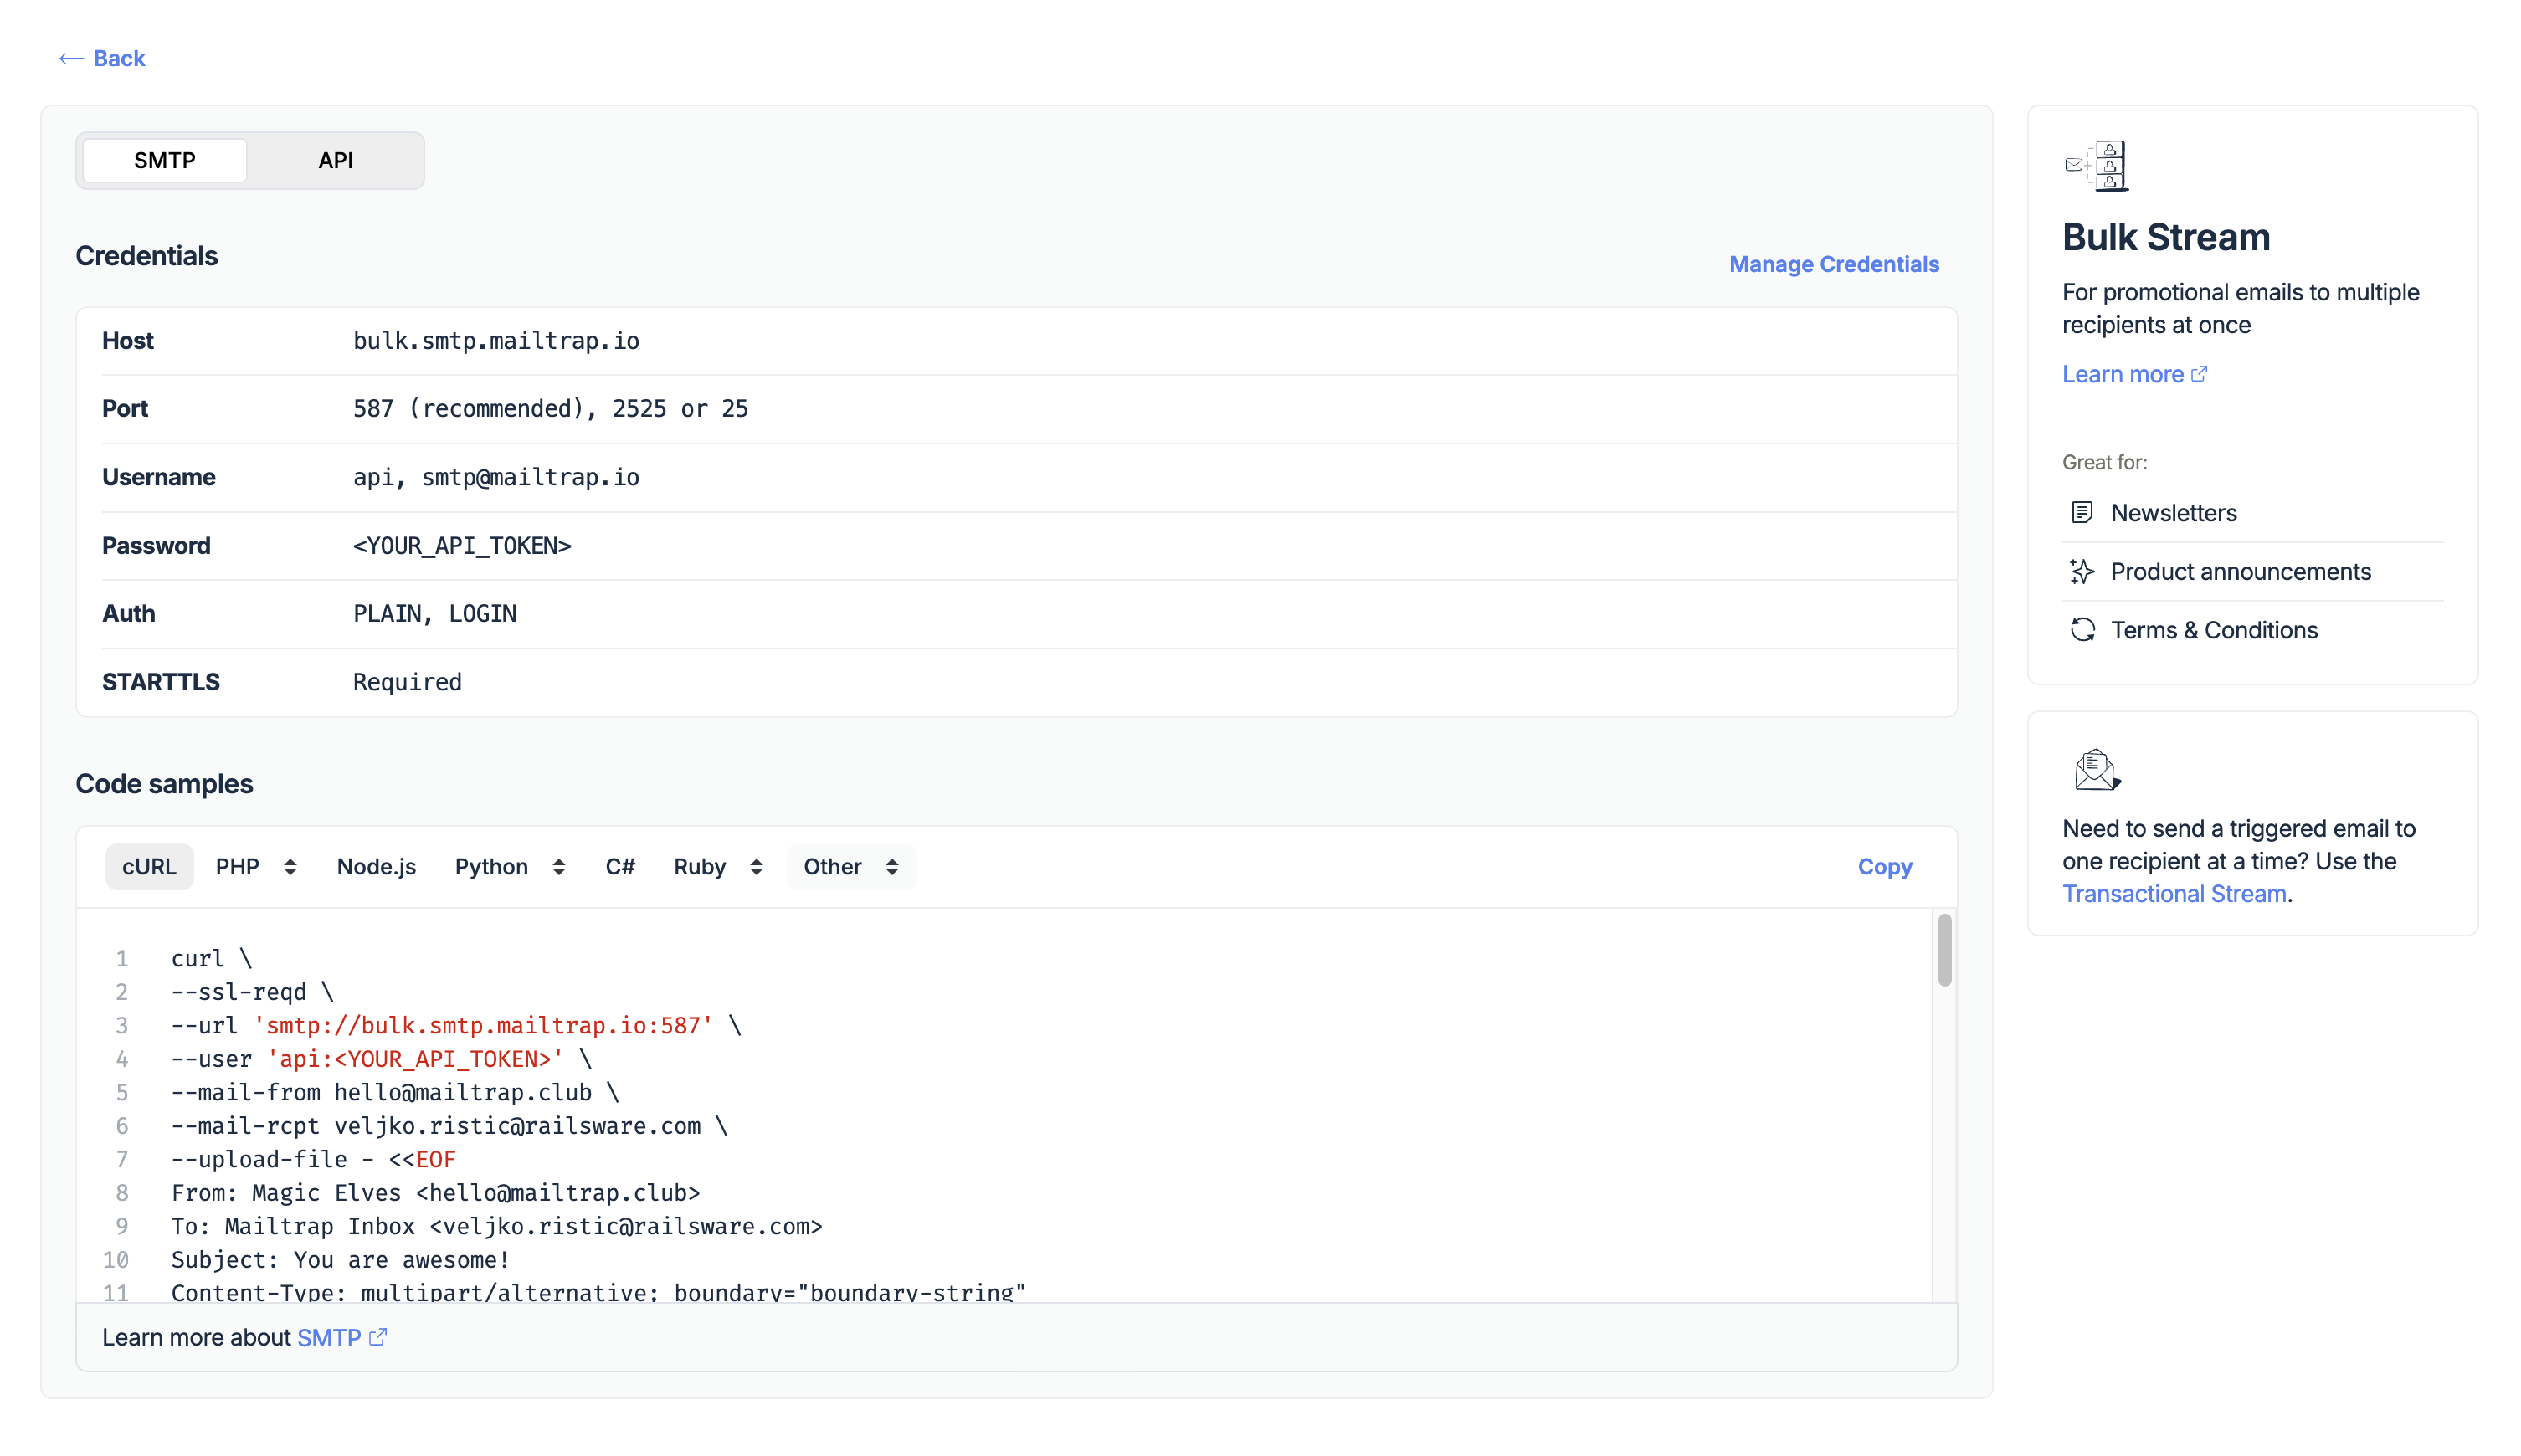
SMTP Integration
Under the Integration tab, choose the sending stream you’d like to use: Transactional or Bulk.
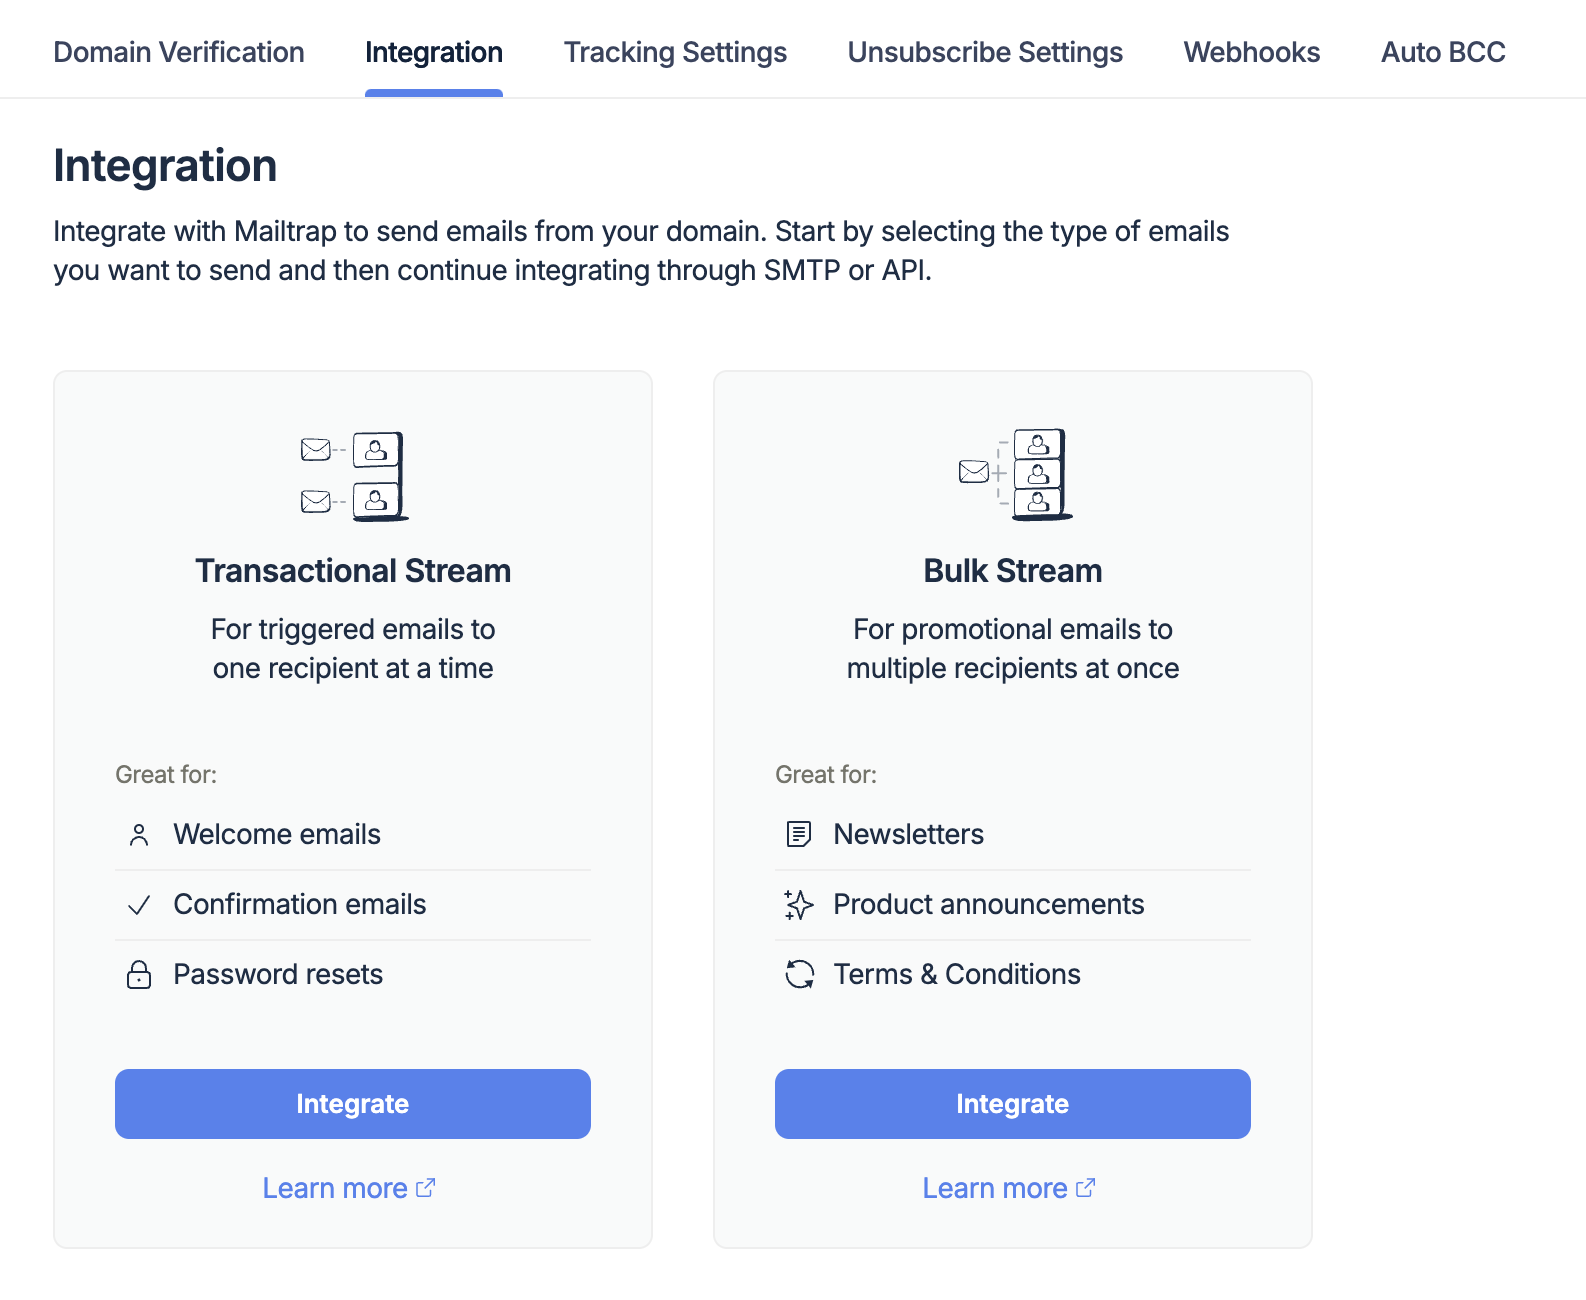
Open the SMTP configuration in your app or project and substitute the Host, Port, Username, and Password with Mailtrap credentials. You can access them in the Integration tab under Sending Domains. Follow the instructions in this article.
To send transactional emails, use the credentials for the corresponding stream.
To send bulk emails, use the Bulk Stream credentials.
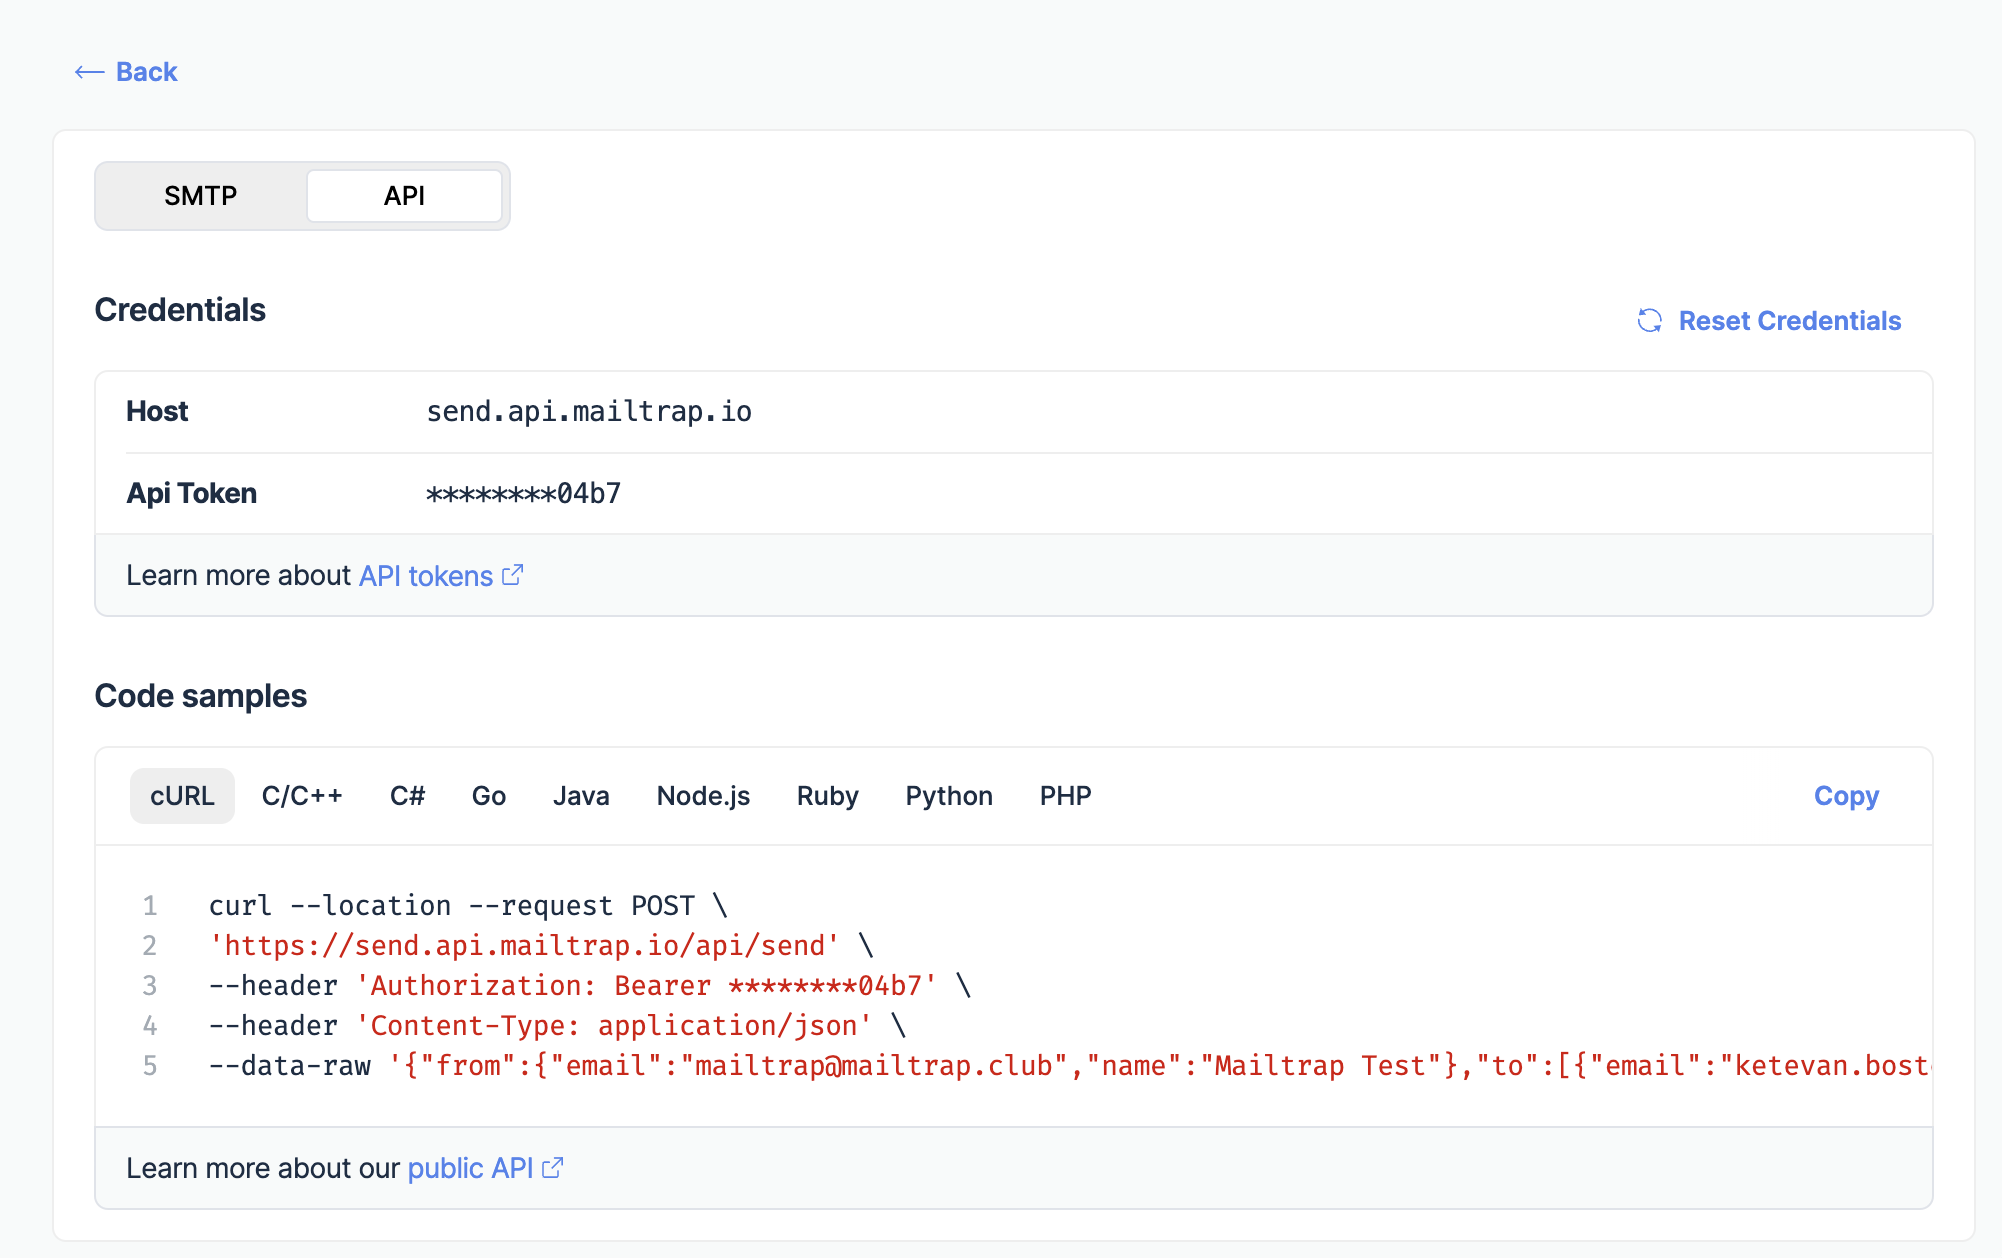
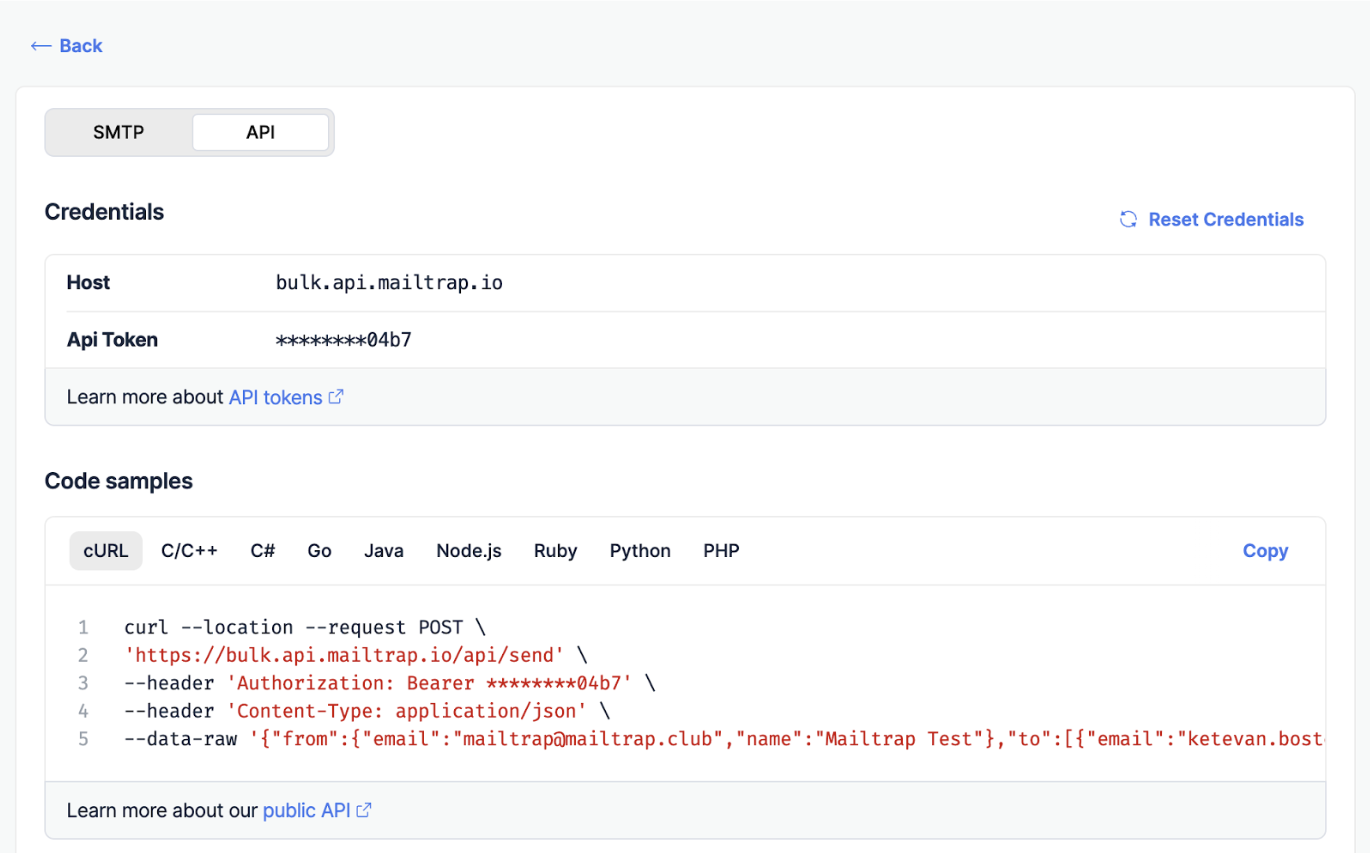
API integration
The API credentials are in the Integration tab under Sending Domains. You should substitute existing credentials with the Mailtrap Host (API endpoint) and the API Token. Detailed instructions are available here.
SDK integration
Mailtrap has SDKs for PHP, PHP (Laravel + Symphony), Node.js, NodeMailer, Python, Ruby, ActionMailer, Elixir, and Java. If your project is written in any of these languages, you can import the package and configure the email-sending script as shown on GitHub.
▶️ Import or rebuild your email templates
If you already have templates with your current provider, you can import them as HTML. Note that Mailtrap uses Handlebars as a template markup.
Also, Mailtrap has a drag-and-drop and HTML template builder – choose the option that best serves your needs. Additionally, there are ready-made templates, AI assistance to refine your copies and titles, and a free image library. Read more here.
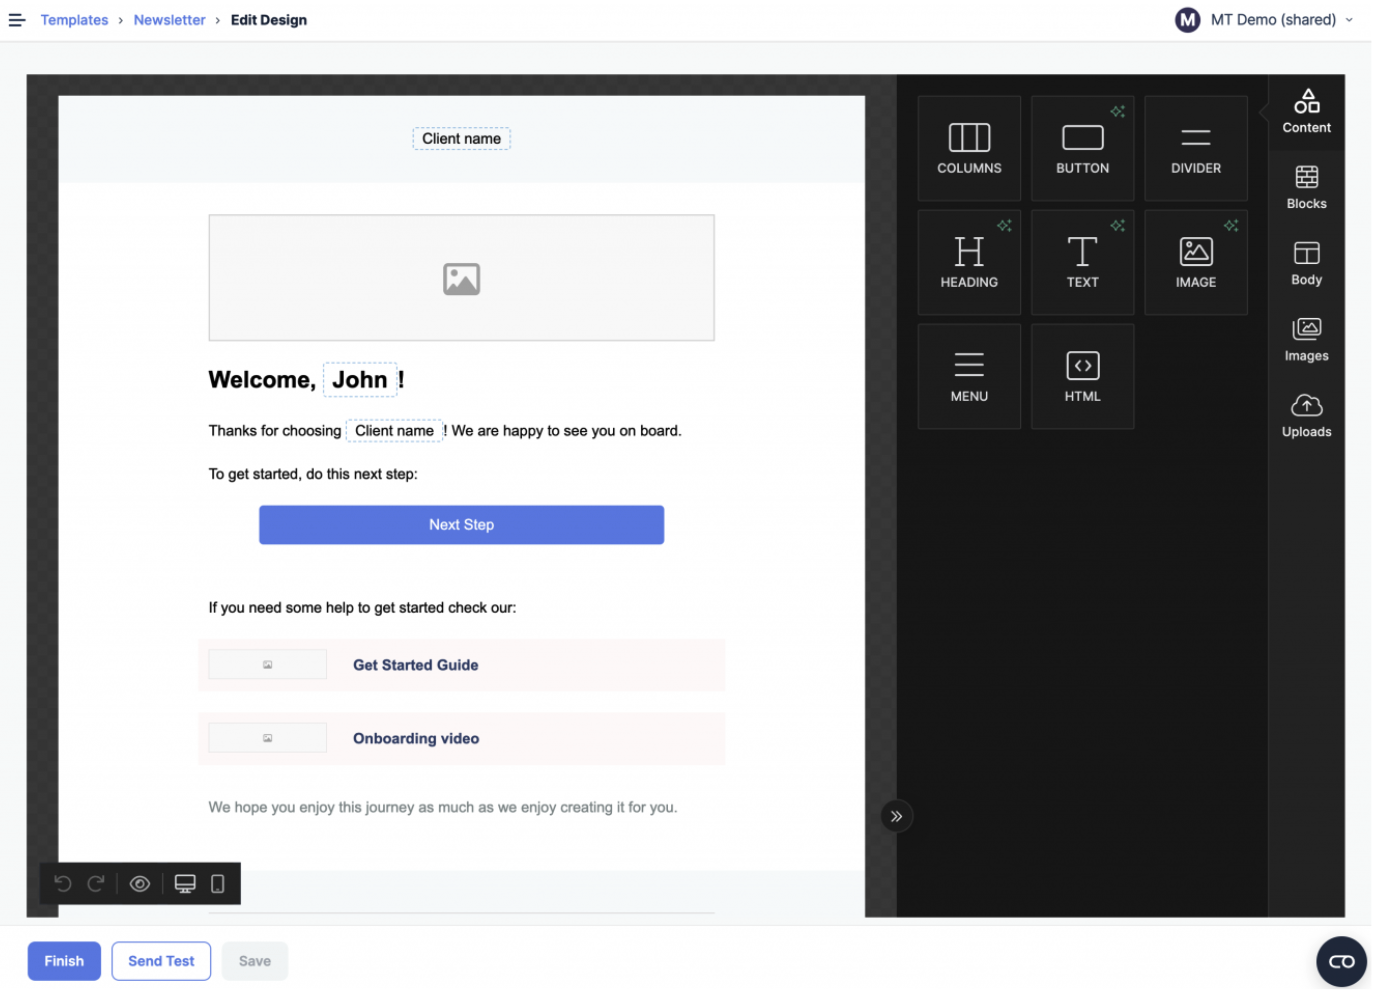
Our Templates can be used with all Mailtrap products: Email API/SMTP, Email Marketing, and Email Testing. For template schemas, refer to the API docs.
▶️ 2FA and User Management
Maitrap supports app-based 2FA (Microsoft Authenticator, Google Authenticator, etc.). It adds an additional log-in step but improves your overall account security.
Navigate to the Authentication tab under the My Profile menu in the account drop-down (upper right corner, below the account name). Click the Enable 2FA button and follow the prompts to complete the action.
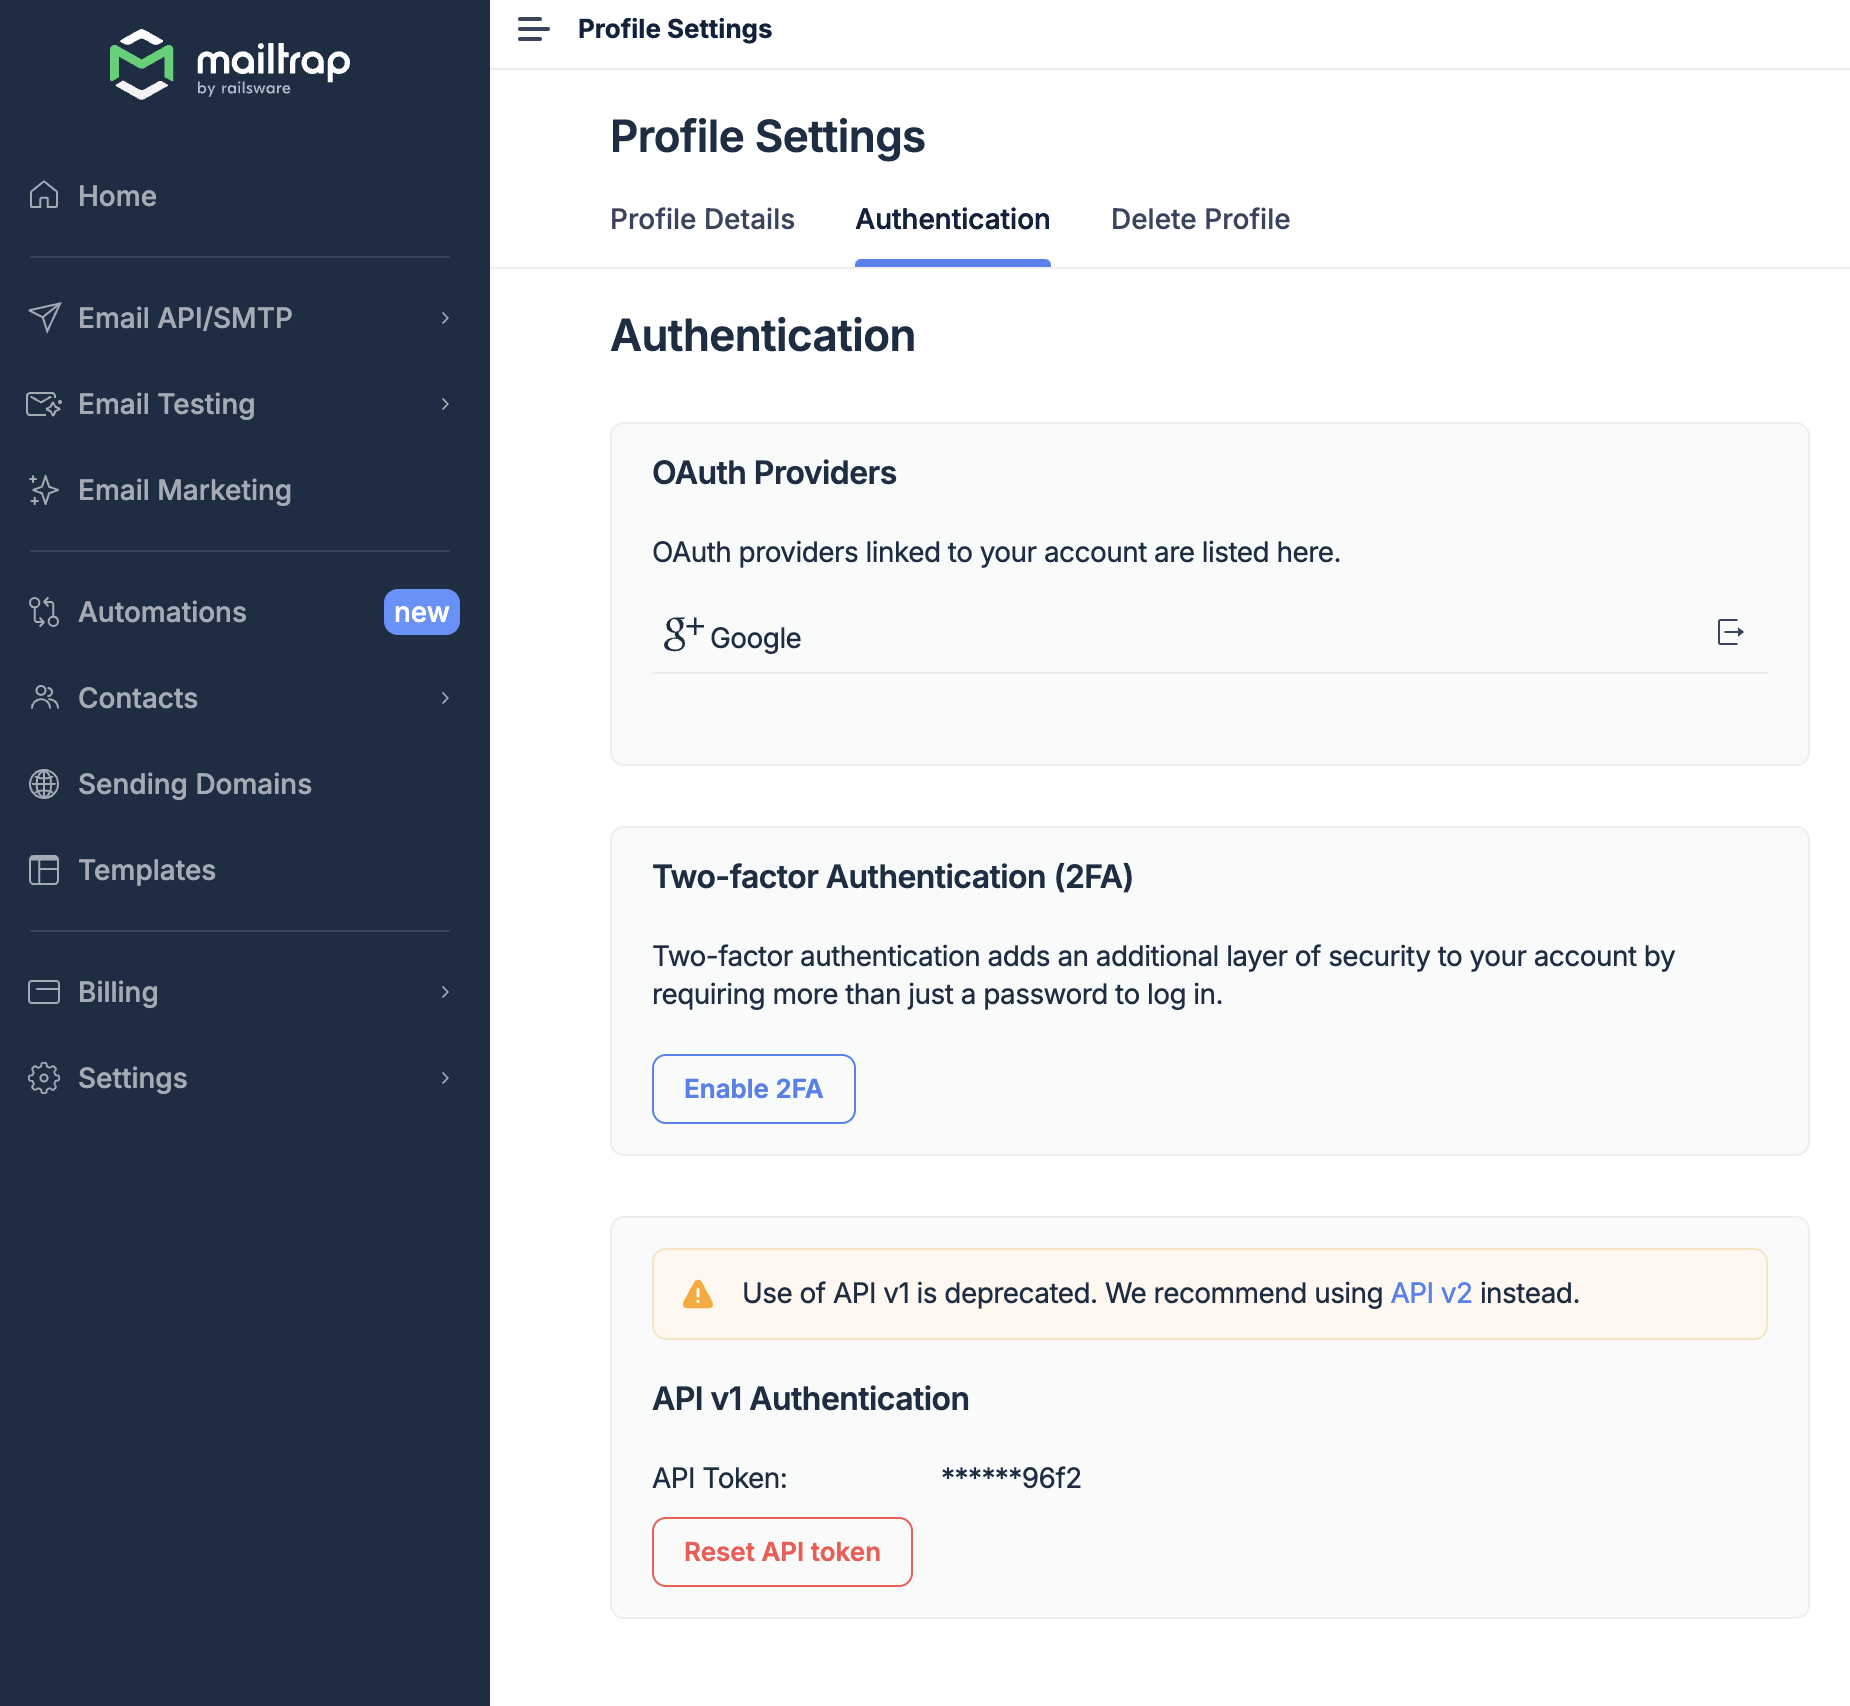
2FA is available on all plans (Free plan included), and from the Business plan and higher, you can enable or disable 2FA for individual team members or enforce it for all.
Note that without 2FA, we send you an OTP (One-Time Password) to your email whenever you log in from a new device. This step can’t be disabled.
For more information on 2FA, check our guide.
▶️ Optional steps
Mailtrap also allows you to configure the following features:
-
Tracking Settings that help you track opens and clicks.
-
Unsubscribe Settings that allow you to add an unsubscribe link to your emails.
-
Webhooks that provide deliverability data almost in real-time.
▶️ Test the setup
At this point, you’re ready to send emails with Mailtrap. However, to ensure everything runs smoothly, we recommend testing your setup in staging. That will help you check if you migrated all the credentials correctly and if your configuration has any errors.
Important: Don’t test your setup by sending emails to non-existent email addresses, as it increases your bounce rates and negatively affects your sender reputation. Instead, use Mailtrap Email Testing to test your emails in staging and dev environments, automate workflows, and validate HTML/CSS.
▶️ Other useful features
Here are other features you may find useful:
- User Management to manage user permissions;
- API Tokens to create different API keys for different applications;
- Email Marketing to create, schedule, and send email campaigns to your customers.
FAQs
How do I ensure my sending isn’t interrupted during migration?
If your sending volume is 500K or more, splitting the load between providers during the migration period is highly recommended. This means, for example, sending 70% of the emails with your current provider and 30% with Mailtrap, slowly shifting that ratio toward Mailtrap. For a detailed warm-up schedule, please contact our Deliverability team.
Do you offer discounts?
We offer discounts and custom pricing for high-volume senders. If you send more than 5 million emails per month, please contact our support.
We also offer the following discounts for non-profit organizations:
- Free Email Testing Team plan;
- Free Email API/SMTP Basic 10K plan;
- 50% discount on other paid plans.
Can I increase sending limits to match my current provider?
If you want to increase your sending limits, contact our support. We’ll try to find the best solution for you and your business needs.
I don’t have some of the features I need. Can you do anything about it?
Please contact our support. We’ll review your request and try to suggest possible workarounds.
I send emails from multiple subdomains. Should I verify each of them?
Yes, to comply with email authentication requirements, you need to verify each of your domains.
How many domains can I have in Mailtrap?
The Free plan allows you to have only 1 domain. All paid plans allow up to 1,000 domains. If you need more – contact us.
Do you block accounts for suspicious activity?
Yes. We block accounts immediately for severe violations of our Terms of Service (e.g., spam or cold outreach). In other cases, we temporarily suspend the account. We still accept their emails, but we don’t send them until the suspension is lifted. We take security and compliance very seriously, so make sure you use Mailtrap according to our ToS.
Such measures help us secure our systems and protect users (and their reputation) from spam abuse.
Do you receive Spam complaints from mailbox providers?
Yes, we do. We are integrated into the majority of feedback loops. However, as you might know, Gmail doesn’t provide that data. If you’re a paid customer, you can provide us with View access to your Google Postmaster Tools. We can add that data to our monitoring system, but it won’t be displayed in the interface for now.
Can you whitelist my IPs so that only I can send emails from them?
Yes, we have that feature for paid plans. Please contact our support.
