Skip to Navigation

This tutorial guides you through the essentials of building a Python contact form, collecting user data, and integrating email functionalities.
I’ll be using Mailtrap for SMTP and API-based email sending. And I’ll show you how to test emails to ensure they land in the recipients’ inboxes, not the spam folder.
By the end, you’ll gain practical insights into making a simple contact form functional and secure using backend validation and verification.
How to set up your Python environment?
As this tutorial is geared toward junior devs, I’ll briefly cover the Python setup, necessary libraries, and the virtual environment setup for MacOS, Linux, and Windows users.
But if you already have all that, feel free to jump to the “how to create a contact form” section.
Step 1:Python installation
At the time of writing, the stable Python version was 3.12.3. I’d generally recommend using Python 3.8xy or higher for optimal compatibility with the necessary libraries.
Here’s the installation for different operating systems.
Windows:
- Download the Python installer from the official Python website.
- Run the installer. Check the box that says “Add Python 3.x to PATH” before clicking “Install Now.”
MacOS:
- Install Python using Homebrew (a package manager for macOS). If you don’t have Homebrew installed, paste the following command in your terminal to do it:
/bin/bash -c "$(curl -fsSL https://raw.githubusercontent.com/Homebrew/install/HEAD/install.sh)"- Once Homebrew is installed, you can install Python by running:
brew install pythonLinux:
- Most Linux distributions come with Python pre-installed. You can check if Python is installed and its version by running:
python3 --version- If it’s not installed, you can install it via your distribution’s package manager. For example, on Ubuntu:
sudo apt update
sudo apt install python3
Step 2: Set up a virtual environment
You should be using a virtual environment because it allows you to manage separate dependencies for each project you’re working on. Here’s how to do it:
- Install the
virtualenvpackage if it’s not already installed:
pip install virtualenv- Create a new virtual environment in your project directory:
virtualenv venv- Activate the virtual environment:
- Windows
.\venv\Scripts\activate- MacOS/Linux
source venv/bin/activateOnce your virtual environment is activated, you’ll notice the environment name (venv) appears at the beginning of your terminal prompt indicating that you are working inside the virtual environment.
Also, depending on how you decide to handle form data and sending emails, you may need specific libraries like flask for a lightweight web server, or requests for handling HTTP requests if using APIs. You can install Python libraries using pip, for example:
pip install flask
pip install requests
How to create a Python contact form?
Here, I’ll show you a method to create a Python contact form that can be embedded in your contact page, for example.
The basic form below collects user input. It includes user name, email, message fields, and the submit button. For the given example, I’ll be saving the form in the HTML file called contact_form.html.
Note: For simplicity, I didn’t include CSS styles, div class, etc. But you can add any style, emailfield widget, or other custom elements as you deem fit.
<!DOCTYPE html>
<html lang="en">
<head>
    <meta charset="UTF-8">
    <meta name="viewport" content="width=device-width, initial-scale=1.0">
    <title>Contact Form</title>
</head>
<body>
    <h1>Contact Us</h1>
    <form action="/submit_form.py" method="post">
        <label for="name">Name:</label><br>
        <input type="text" id="name" name="name" required><br>
        <label for="email">Email:</label><br>
        <input type="email" id="email" name="email" required><br>
        <label for="message">Message:</label><br>
        <textarea id="message" name="message" required></textarea><br>
        <input type="submit" value="Submit">
    </form>
</body>
</html>
As for the next steps, we already blogged on how to create a Django contact form, so feel free to check it out.
How to collect data from a Python contact form?
Secure web form data handling protects against common security issues like SQL injection, XSS (Cross-Site Scripting), etc. In this section, I’ll show you how to safely receive and handle POST requests in Python, focusing on preventing common security vulnerabilities.
To handle POST requests securely, I’ll use a basic Python server-side framework Flask. It helps bootstrap the web development process because it simplifies receiving and processing web form data.
Below is a simple Flask application setup to handle a POST request.
Just a reminder on how to install Flask, if you haven’t already done it.
pip install FlaskThen, move on to create a new Python file, app.py, and write the following code:
from flask import Flask, request, render_template_string

app = Flask(__name__)

@app.route('/')
def form():
    return '''
        <form action="/submit" method="post">
            <label for="name">Name:</label><br>
            <input type="text" id="name" name="name" required><br>
            <label for="email">Email:</label><br>
            <input type="email" id="email" name="email" required><br>
            <label for="message">Message:</label><br>
            <textarea id="message" name="message" required></textarea><br>
            <input type="submit" value="Submit">
        </form>
    '''

@app.route('/submit', methods=['POST'])
def submit():
    # Use the request object to access the form data
    name = request.form['name']
    email = request.form['email']
    message = request.form['message']

    # Escape the input to prevent XSS
    safe_name = html.escape(name)
    safe_email = html.escape(email)
    safe_message = html.escape(message)

    return render_template_string('''
        <h1>Thank You!</h1>
        <p>Your name: {{name}}</p>
        <p>Your email: {{email}}</p>
        <p>Your message: {{message}}</p>
    ''', name=safe_name, email=safe_email, message=safe_message)

if __name__ == '__main__':
    app.run(debug=True)
Quick breakdown:
- The Flask
@app.route('/')decorator creates a simple HTML form on the home page. - The form submits data to
/submitwhere another route handles the POST request. - Data from the form is accessed via
request.form, which is a dictionary-like object. - The
html.escapefunction is used to sanitize the input data, mitigating the risk of XSS attacks by escaping HTML special characters. render_template_stringis a Flask function that allows rendering HTML directly from a string while safely injecting data using Jinja2 templating, which automatically escapes all variable content by default.
Pro Tip: If you’re using Django framework, the following py files are helpful.
forms.py– define form classes that represent HTML formsviews.py– contains the views of your Django applicationsettings.py– configure the settings for your Django projecturls.py– defining the URL configurations for your Django project
How to validate and verify data from a contact form?
I’ll be implementing basic validation in Python using Flask since the framework offers a straightforward methodology. It helps validate email addresses, prevents erroneous data processing, and malicious data.
If you need more details on validating email addresses in Python, click the link here ◀️.
Now, assuming you got Flask installed, I’ll continue using the app.py file where I previously set up the form submission. Here’s an example:
from flask import Flask, request, render_template_string, redirect, url_for
import re

app = Flask(__name__)

@app.route('/')
def form():
    return '''
        <form action="/submit" method="post">
            <label for="name">Name:</label><br>
            <input type="text" id="name" name="name" required><br>
            <label for="email">Email:</label><br>
            <input type="email" id="email" name="email" required><br>
            <label for="message">Message:</label><br>
            <textarea id="message" name="message" required></textarea><br>
            <input type="submit" value="Submit">
        </form>
    '''

@app.route('/submit', methods=['POST'])
def submit():
    name = request.form['name']
    email = request.form['email']
    message = request.form['message']

    # Validate the form data
    if not re.match(r"[^@]+@[^@]+\.[^@]+", email):
        return "Invalid email, please go back and enter a valid email."

    if not name.strip():
        return "Name is required, please go back and fill out the name field."

    if not message.strip():
        return "Message is required, please go back and fill out the message field."

    return render_template_string('''
        <h1>Thank You!</h1>
        <p>Your name: {{name}}</p>
        <p>Your email: {{email}}</p>
        <p>Your message: {{message}}</p>
    ''', name=name, email=email, message=message)

if __name__ == '__main__':
    app.run(debug=True)
Quick breakdown:
- I used a simple regular expression (regex) to validate email formats. This regex checks if the email contains characters before and after an “@” symbol and at least one period in the domain part. It’s a basic validation and may need to be extended based on your requirements.
- The code ensure that both the
nameandmessageform fields are not just filled but also contain non-whitespace characters. - If validation fails, the user gets an error message instructing them to go back and correct the input. In a more complex application, you might want to redirect back to the form with the fields pre-filled with the previous input and detailed error messages.
Now, I’d like to point out some examples of best practices that could further secure the form data.
- Always sanitize inputs to prevent security vulnerabilities, such as XSS attacks (check the next code example).
- Consider using client-side validation to improve user experience, but never rely only on it for security.
- Regular expressions for email validation can get quite complex if you aim for accuracy due to the variety of valid email formats. Consider using libraries designed for email validation if this becomes a limitation – a popular option is email-validator (compatible with Python 3.8 and higher).
Sanitizing inputs to prevent XSS attacks
I’ll enhance the previous Flask application by adding sanitization to the input handling process using Flask’s Markup utilities and the escape function.
This function converts special characters in the input (such as <, >, & ,',"), which have meaning in HTML, into their safe HTML entity equivalents.
from flask import Flask, request, render_template_string, escape

app = Flask(__name__)

@app.route('/')
def form():
    return '''
        <form action="/submit" method="post">
            <label for="name">Name:</label><br>
            <input type="text" id="name" name="name" required><br>
            <label for="email">Email:</label><br>
            <input type="email" id="email" name="email" required><br>
            <label for="message">Message:</label><br>
            <textarea id="message" name="message" required></textarea><br>
            <input type="submit" value="Submit">
        </form>
    '''

@app.route('/submit', methods=['POST'])
def submit():
    # Get form data
    name = request.form['name']
    email = request.form['email']
    message = request.form['message']

    # Sanitize inputs to prevent XSS
    safe_name = escape(name)
    safe_email = escape(email)
    safe_message = escape(message)

    # Continue processing or storing data
    return render_template_string('''
        <h1>Thank You!</h1>
        <p>Your name: {{ name }}</p>
        <p>Your email: {{ email }}</p>
        <p>Your message: {{ message }}</p>
    ''', name=safe_name, email=safe_email, message=safe_message)

if __name__ == '__main__':
    app.run(debug=True)
Quick breakdown:
- The
escapefunction from Flask’s utilities is used here to sanitize the name, email, and message fields. This function ensures that if the input includes HTML or JavaScript code, it will be escaped (converted to a safe format that browsers will not execute). - When these sanitized variables are then used in generating a response, even if an attacker tries to inject malicious scripts, the scripts won’t execute but will instead display as plain text.
Send an email from a Python contact form using SMTP
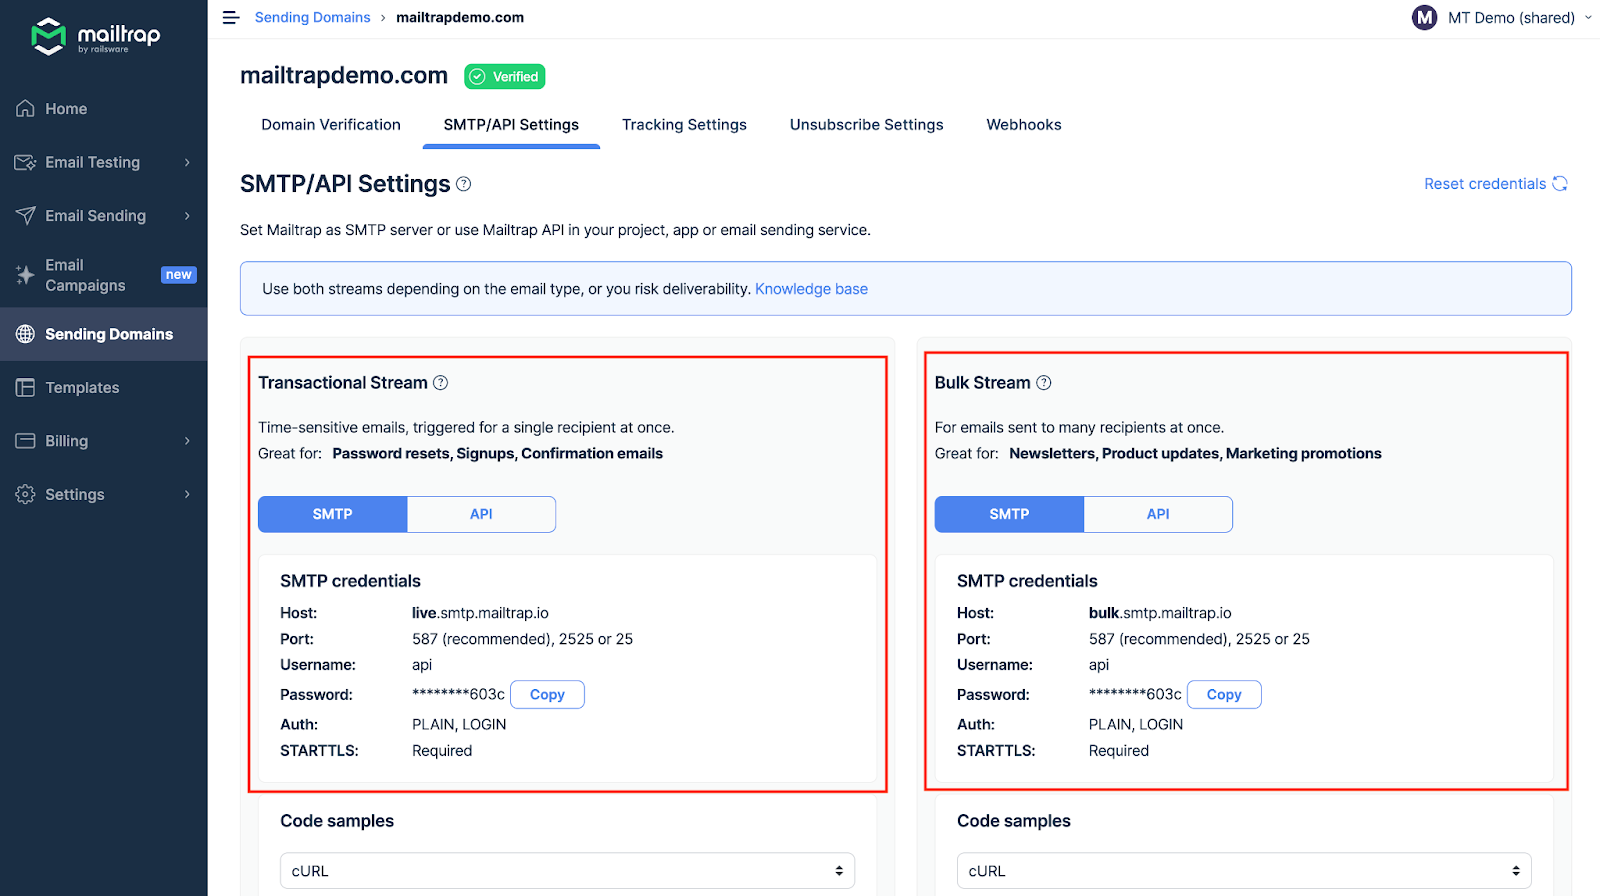
I’ll be using Mailtrap Email Sending SMTP, a part of Mailtrap Email Delivery Platform. It gives developers an infrastructure with high deliverability rates by default and by design.
If you’re not a Maltrap user, you can sign up here. Afterward, add and verify your domain (we provide you with all the necessary DNS records). Then, you can move to SMTP/API Settings, choose your preferred stream, Transactional or Bulk, and get the SMTP credentials.
Note: You can send Transactional and Bulk emails within the same Email Sending Plan, with no extra charges.
That out of the way, I’ll move to show you how to set up Python step by step.
Step 1: Install the necessary libraries
Make sure you have the email library to compose emails, in addition to smtplib for sending them. Usually, email is included in Python’s standard library.
pip install smtplib(Note: smtplib is part of the standard library, so you don’t need to install it. But you can run the given command to make sure your environment is correctly set up.)
Step 2: SMTP configuration
Extract the SMTP settings from your Mailtrap account. You can find a sample configuration under SMTP/API Settings tab (as shown in the image above).
- Host: live.smtp.mailtrap.io (or ‘bulk.smtp.mailtrap.io’ for bulk emails)
- Port: 587
- Username: api
- Password: {your_mailtrap_password}
Step 3: Create a script to send the email
Here, I’ll give you a basic example of a Python email-sending script.
import smtplib
from email.mime.text import MIMEText
from email.mime.multipart import MIMEMultipart

# Mailtrap credentials and server configuration
smtp_server = 'live.smtp.mailtrap.io'
smtp_port = 587
smtp_username = 'api'
smtp_password = 'your_mailtrap_password'

# Email content setup
sender_email = "from@example.com"
receiver_email = "to@example.com"
subject = "Python Contact Form Test"
body = "This is a test email from the Python contact form."

# Create a multipart message and set headers
message = MIMEMultipart()
message["From"] = sender_email
message["To"] = receiver_email
message["Subject"] = subject

# Add body to email
message.attach(MIMEText(body, "plain"))

# Connect to Mailtrap server and send email
try:
    with smtplib.SMTP(smtp_server, smtp_port) as server:
        server.login(smtp_username, smtp_password)
        server.sendmail(sender_email, receiver_email, message.as_string())
    print("Email sent successfully!")
except Exception as e:
    print(f"Failed to send email: {e}")
Quick breakdown:
- The script sets up an SMTP connection using Mailtrap’s credentials.
- It creates an email message using the
emaillibrary’sMIMEMultipartandMIMETextto handle plain text content. - The connection uses the
withstatement to ensure the server connection closes after sending the email, andserver.loginauthenticates with your Mailtrap credentials. server.sendmailsends the email. If there’s an error, it will be caught and printed out.
Send an email from a Python contact form using API
Mailrap Email Delivery Platform has its official Python SDK , and I’ll be using that to show you how to send via API.
The code below is a slimmed-down version adapted to the contact form needs. But if you need a more comprehensive integration with attachments, and maybe multiple recipients, refer to the SDK GitHub documentation linked above ⬆️.
Start by installing Mailtrap’s Python SDK.
pip install mailtrap Set up a basic email including HTML template along with plain text as a fallback.
import mailtrap as mt

# Create the email with HTML and plain text content
mail = mt.Mail(
    sender=mt.Address(email="mailtrap@example.com", name="Mailtrap Test"),
    to=[mt.Address(email="your@email.com", name="Your name")],
    cc=[mt.Address(email="cc@email.com", name="Copy to")],
    bcc=[mt.Address(email="bcc@email.com", name="Hidden Recipient")],
    subject="You are awesome!",
    text="Congrats for sending test email with Mailtrap!",
    html="""
    <!doctype html>
    <html>
      <head>
        <meta http-equiv="Content-Type" content="text/html; charset=UTF-8">
      </head>
      <body style="font-family: sans-serif;">
        <div style="display: block; margin: auto; max-width: 600px;" class="main">
          <h1 style="font-size: 18px; font-weight: bold; margin-top: 20px">
            Congrats for sending test email with Mailtrap!
          </h1>
          <p>Inspect it using the tabs you see above and learn how this email can be improved.</p>
          <p>Now send your email using our fake SMTP server and integration of your choice!</p>
          <p>Good luck! Hope it works.</p>
        </div>
      </body>
    </html>
    """,
    headers={"X-MT-Header": "Custom header"},
    custom_variables={"year": 2023},
)

# Set up and send the email using Mailtrap's API
client = mt.MailtrapClient(token="your-api-key")
client.send(mail)
Quick breakdown:
- The
htmlandtextfields in theMailobject provide both HTML and plain text versions of your email content. This ensures the email can be viewed on devices or clients that do not support HTML. - Custom headers and variables allow you to customize your email further and are useful for tracking or providing specific behaviors per email.
- The
MailtrapClientobject uses your Mailtrap API key to authenticate, andclient.send(mail)sends the email through Mailtrap’s service.
Further reading:
- Full tutorial – Send Emails in Python
- Full tutorial – Send Emails in Python with Gmail
- Full tutorial – Send HTML Emails in Python
How to test your emails before sending?
The quick answer is that you run your emails through a sandbox environment to ensure they look and perform as expected. At the same time, you should check if your emails are likely to trigger spam filters, or not.
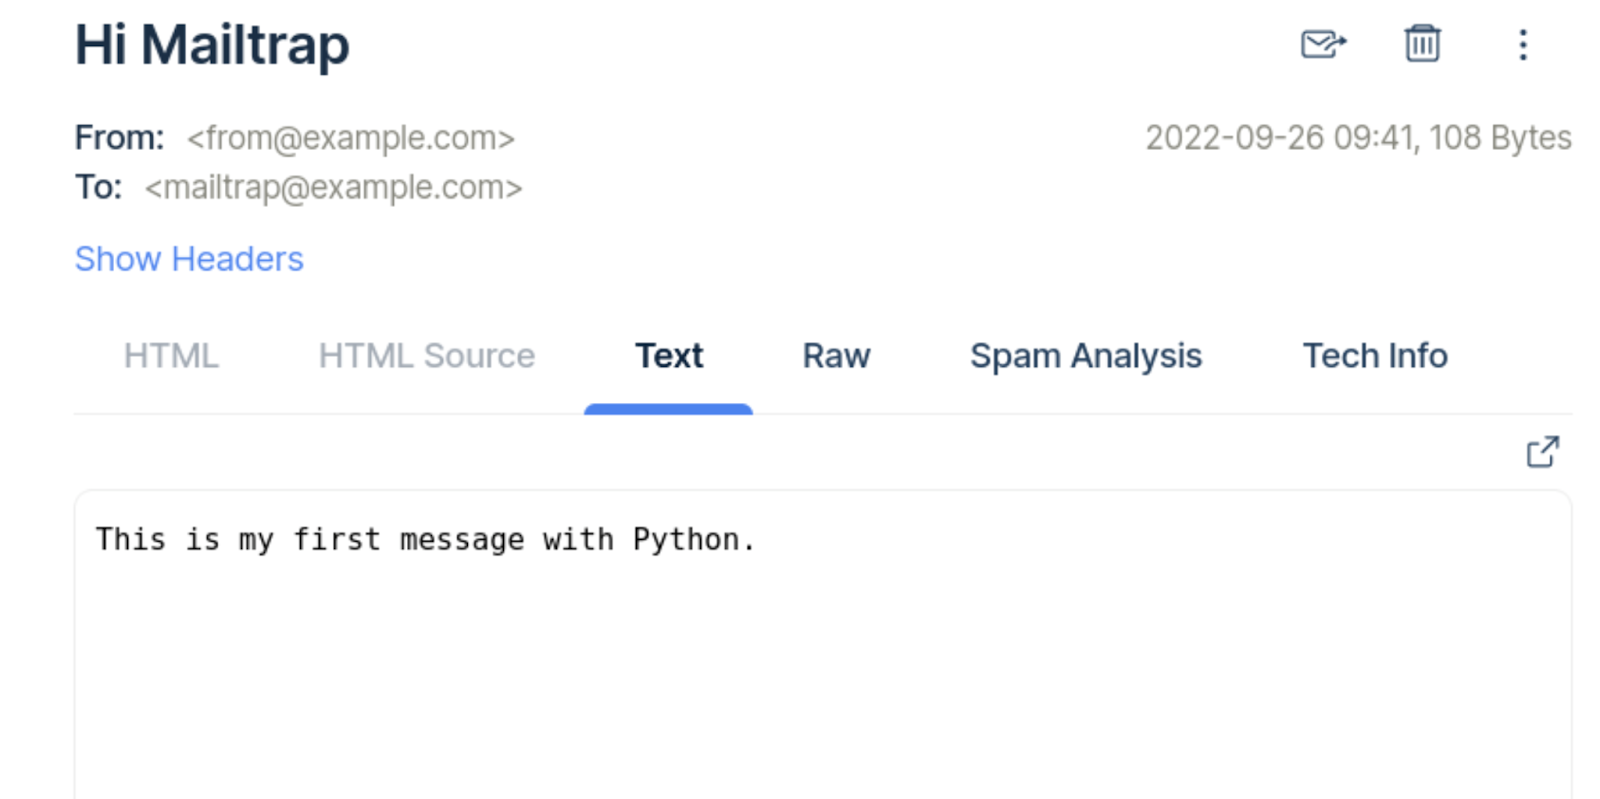
The solution I’ll be using here is Mailtrap Email Testing (also part of Mailtrap Email Delivery Platform). It’s a sandbox that captures outgoing emails (from staging and dev environments) and allows you to inspect them in a web browser without sending them to actual recipients.
This is useful for developers to verify and debug email functionality in applications. And, unlike production sending, the sandbox doesn’t require you to add and verify a domain.
Below, I’ll cover the SMTP and API methodology.
SMTP
The SMTP setup is pretty straightforward, and I’ll walk you through the process. Of course, I’m assuming that you’re already a Mailtrap user, if not click here to sign up.
So, launch Mailtrap, navigate to Email Testing, choose My Inbox, and hit “Show Credentials” under the SMTP Settings tab.
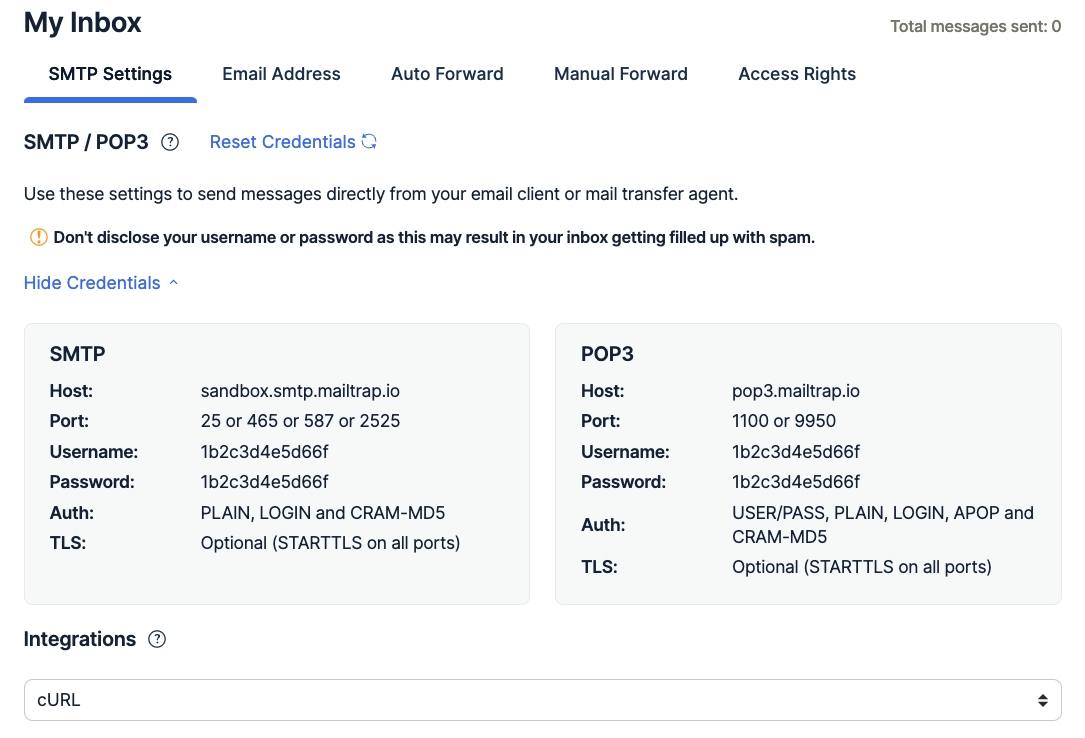
After you integrate the SMTP settings, go to the Integrations drop-down, and choose one of the available options for Python.
The most basic method is sendmail(), but you also have ready-to-use integrations for Django or Flask.
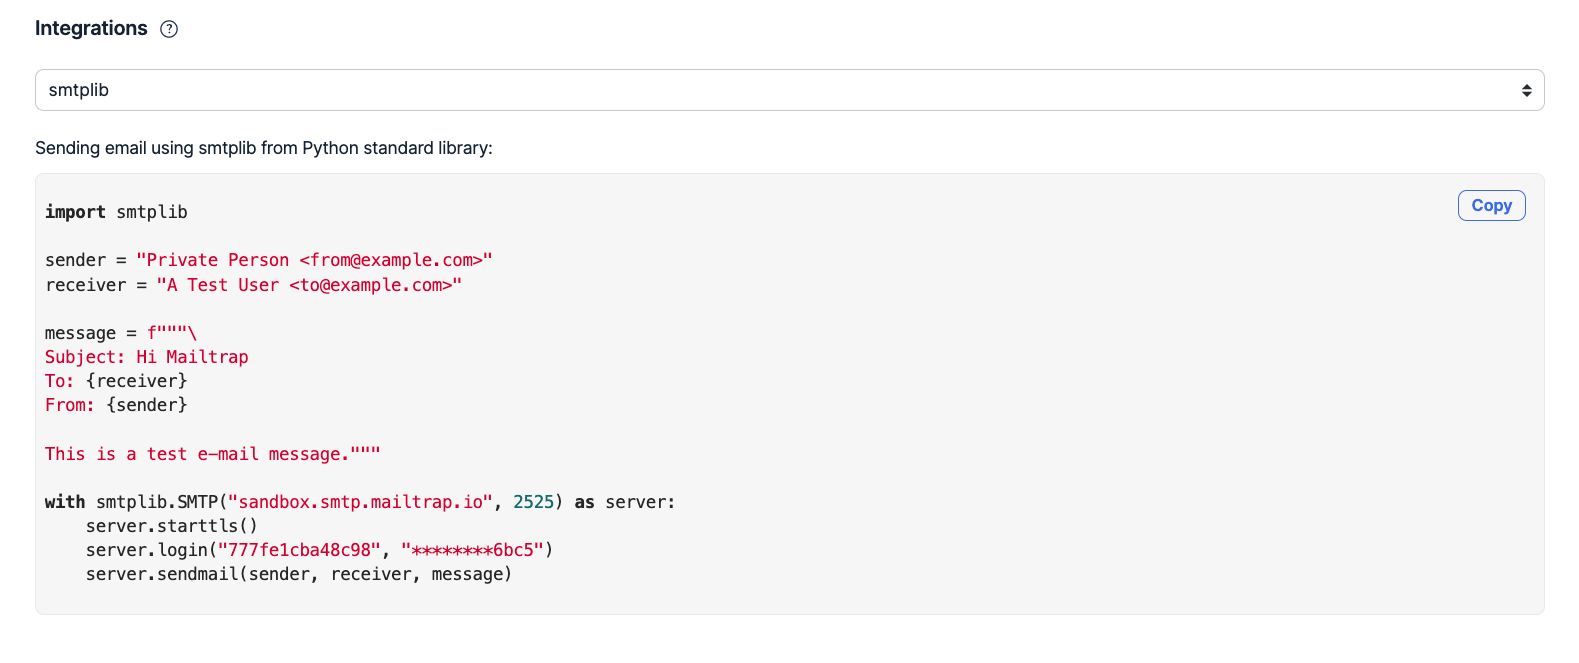
Proceed to send the test email in Shell (run the given integration), and you’ll get the response in your inbox, almost instantly.
API
First, you’ll need to establish the connection with Mailtrap Email Testing API using the http.client.HTTPSConnection. The endpoint itself is sandbox.api.mailtrap.io.
Next, you can define the email content, recipients, sender, text, etc. as a JSON payload.
Finally, make a POST request to the Mailtrap Email Testing API using the ready-made payload along with the necessary headers.
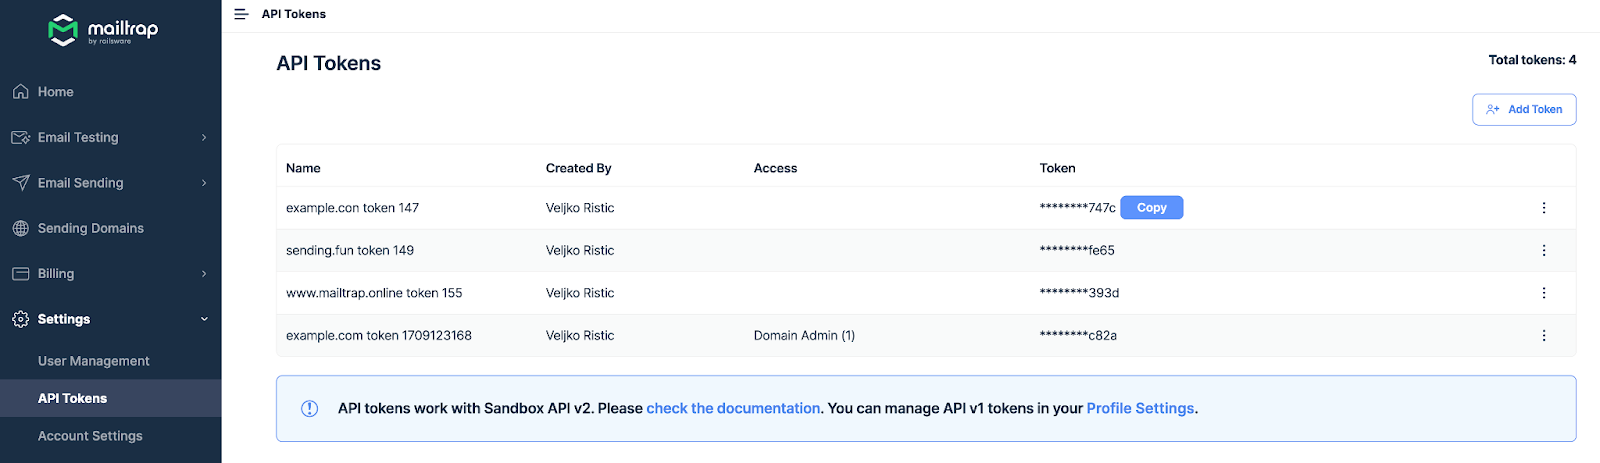
To stress, you’ll need an Email Testing API token to authorize the request. Access the API token under the Settings > API Tokens.
Here’s a full example of email testing via API:
import http.client
import json

def test_send_email():
    conn = http.client.HTTPSConnection("sandbox.api.mailtrap.io")

    payload = {
        "to": [{"email": "john_doe@example.com", "name": "John Doe"}],
        "cc": [{"email": "jane_doe@example.com", "name": "Jane Doe"}],
        "bcc": [{"email": "james_doe@example.com", "name": "Jim Doe"}],
        "from": {"email": "sales@example.com", "name": "Example Sales Team"},
        "attachments": [
            {
                "content": "base64_encoded_content_here",
                "filename": "index.html",
                "type": "text/html",
                "disposition": "attachment"
            }
        ],
        "custom_variables": {"user_id": "45982", "batch_id": "PSJ-12"},
        "headers": {"X-Message-Source": "dev.mydomain.com"},
        "subject": "Your Example Order Confirmation",
        "text": "Congratulations on your order no. 1234",
        "category": "API Test"
    }

    headers = {
        'Content-Type': "application/json",
        'Accept': "application/json",
        'Api-Token': "your_api_token_here"  # Replace with your real API token
    }

    # Convert the payload to a JSON string
    json_payload = json.dumps(payload)

    # Make the POST request
    conn.request("POST", "/api/send/inbox_id", json_payload, headers)  # Replace 'inbox_id' with your real inbox ID

    # Get the response
    response = conn.getresponse()
    data = response.read()

    print(data.decode("utf-8"))

if __name__ == "__main__":
    test_send_email()
If you need other details, or more information, feel free to refer to our official API docs. Also, you can check our full tutorial on testing emails in Python.
Wrapping up
I hope this tutorial helped you master creating and managing a Python contact form. So, you’re well-equipped to enhance user engagement on your website.
Continue exploring and refining your skills, and remember that every form you build increases your capability to interact meaningfully with your users.