Skip to Navigation

In this step-by-step Laravel send HTML email guide, I’ll show you how to send HTML emails in Laravel using both an SMTP server and an email API. Additionally, I’ll show you how to customize the HTML of a Mailable and create dynamic content.
To jump straight into the SMTP setup [click here], or for the API setup, [click here].
Note that the processes and code snippets I provide in this article are compatible with Laravel 9.x. and above.
Setting up Laravel email service and mailables
Before we start sending emails in Laravel, we first need to set up the project itself, generate, and then customize mailables.
Generating and writing mailables
To set up email services in Laravel, we’ll use the config.mail.php configuration file. It has a mailers section, which contains a sample configuration entry for each major mail drivers/transports supported by Laravel.
The default configuration value in config.mail.php file determines which mailers we’ll use by default when sending emails from our Laravel app. This gives us flexibility as the setup allows us to choose different email services for different types of emails.
To represent different email types, Laravel uses a mailable class, which is stored in the app/Mail directory by default. But, keep in mind that you won’t see it in your project from the get-go, as it’ll be generated when you create your first mailable instead.
To create a mailable class, use the following Artisan command:
php artisan make:mail MailableNameOnce you’ve created a mailable class, you can use the methods from the table below to see its contents and configure the class itself:
| Method | Explanation |
| Envelope | Returns the Illuminate\Mail\Mailables\Envelope object, which defines the subject and the recipients. |
| Content | Returns the Illuminate\Mail\Mailables\Content object, which defines the Blade template used for generating message content. |
| Attachments | Returns an array of attachments. |
Sender configuration
You can specify the sender or the from email address and name in either:
- The message Envelope object
use Illuminate\Mail\Mailables\Address;
use Illuminate\Mail\Mailables\Envelope;

/**
* Get the message envelope.
*
* @return \Illuminate\Mail\Mailables\Envelope
*/
public function envelope()
{
   return new Envelope(
       from: new Address('example@example.com', 'Test Sender'),
       subject: 'Test Email',
   );
}- The config/mail.php file
'from' => ['address' => 'example@example.com', 'name' => 'App Name']Note: I recommend you to use the global from address if you plan to use it in all of the emails your application sends. It can be pretty convenient as it can prevent you from having to call the from method in each of your mailable classes. Moreover, it will serve you as the default from address if you don’t specify any other.
Customize the Mailable layout
For emails rendered with Markdown, you can create your own themes for mailables by publishing the laravel-mail assets and adding your own CSS files to the resources/views/vendor/mail/html/themes folder.
Here’s the command you can use for publishing the assets:
php artisan vendor:publish --tag=laravel-mailThis Artisan command copies the default email HTML templates from Laravel’s framework to your application’s resources/views/vendor/mail directory, which allows you to modify them as needed.
Once you have your theme ready, you can specify it in the Mailable with public $theme = ‘customStyle’;
Keep in mind that this customization is for emails you render with Markdown, which Laravel then converts to HTML, applying the specified CSS theme.
Configure and customize Blade templates
To create dynamic HTML content for our emails, Laravel allows us to use Blade, a templating engine.
First, create a Blade view for your email, which will contain the HTML structure of your email.
For example, let’s create a file named myHtmlEmail.blade.php in the resources/views/emails directory:
<!doctype html>
<html lang="en">
<head>
    <meta charset="UTF-8">
    <meta name="viewport"
          content="width=device-width, user-scalable=no, initial-scale=1.0, maximum-scale=1.0, minimum-scale=1.0">
    <meta http-equiv="X-UA-Compatible" content="ie=edge">

    <style>
        p {
            font-size: 12px;
        }

        .signature {
            font-style: italic;
        }
    </style>
</head>
<body>
<div>
    <p>Hey {{ $name }},</p>
    <p>Can your Laravel app send HTML emails yet? 😉 </p>
    <p class="signature">Mailtrap</p>
</div>
</body>
</html>
Blade templates allow you to write your HTML emails and customize them with tables, styles, and other HTML elements.
For instance, you can make the file include the recipient’s name using the with attribute to pass it. Here’s how:
<?php

namespace App\Mail;

use Illuminate\Bus\Queueable;
use Illuminate\Contracts\Queue\ShouldQueue;
use Illuminate\Mail\Mailable;
use Illuminate\Queue\SerializesModels;

class MyTestEmail extends Mailable
{
    use Queueable, SerializesModels;

    private $name;

    /**
     * Create a new message instance.
     *
     * @param string $name
     */
    public function __construct(string $name)
    {
        $this->name = $name;
    }

    /**
     * Build the message.
     *
     * @return $this
     */
    public function build()
    {
        return $this->subject('My Test Email')
                    ->view('emails.myHtmlEmail')
                    ->with([
                        'name' => $this->name,
                    ]);
    }
}
This code ensures that the myHtmlEmail.blade.php view is correctly referenced in the Mailable class.
Further customization tips:
- For CSS styling, you can include
<style>tags within the<head>section of your HTML Blade template. - You can modify the Blade and CSS files directly if you publish the vendor templates with the following command:
php artisan vendor:publish --tag=laravel-mail
- Although you can link to external CSS files, keep in mind that many clients do not support external stylesheets.
- When you use dynamic data within emails, make sure that any user-generated content is escaped to prevent cross-site scripting (XSS) attacks. Laravel’s Blade syntax achieves this by automatically escaping output with
{{ }}, but be cautious in any case.
Send HTML email using SMTP
Now, let’s go to Mailtrap Email Sending and use the SMTP as a service provider in your application/project, create mailable classes, and see if everything works.
Step 1. Integrate Mailtrap SMTP server with your app
First, we need to insert the SMTP server credentials provided by Mailtrap Email Sending into the .env of our web application.
So, create a Mailtrap account, log in, and navigate to Sending Domains, where you’ll need to add and verify your domain.
After verifying your domain, you will be taken to the page from where you can copy the SMTP credentials. Depending on the types of email messages you want to send, choose a stream (Transactional or Bulk) and paste the credentials into your application or email-sending service.
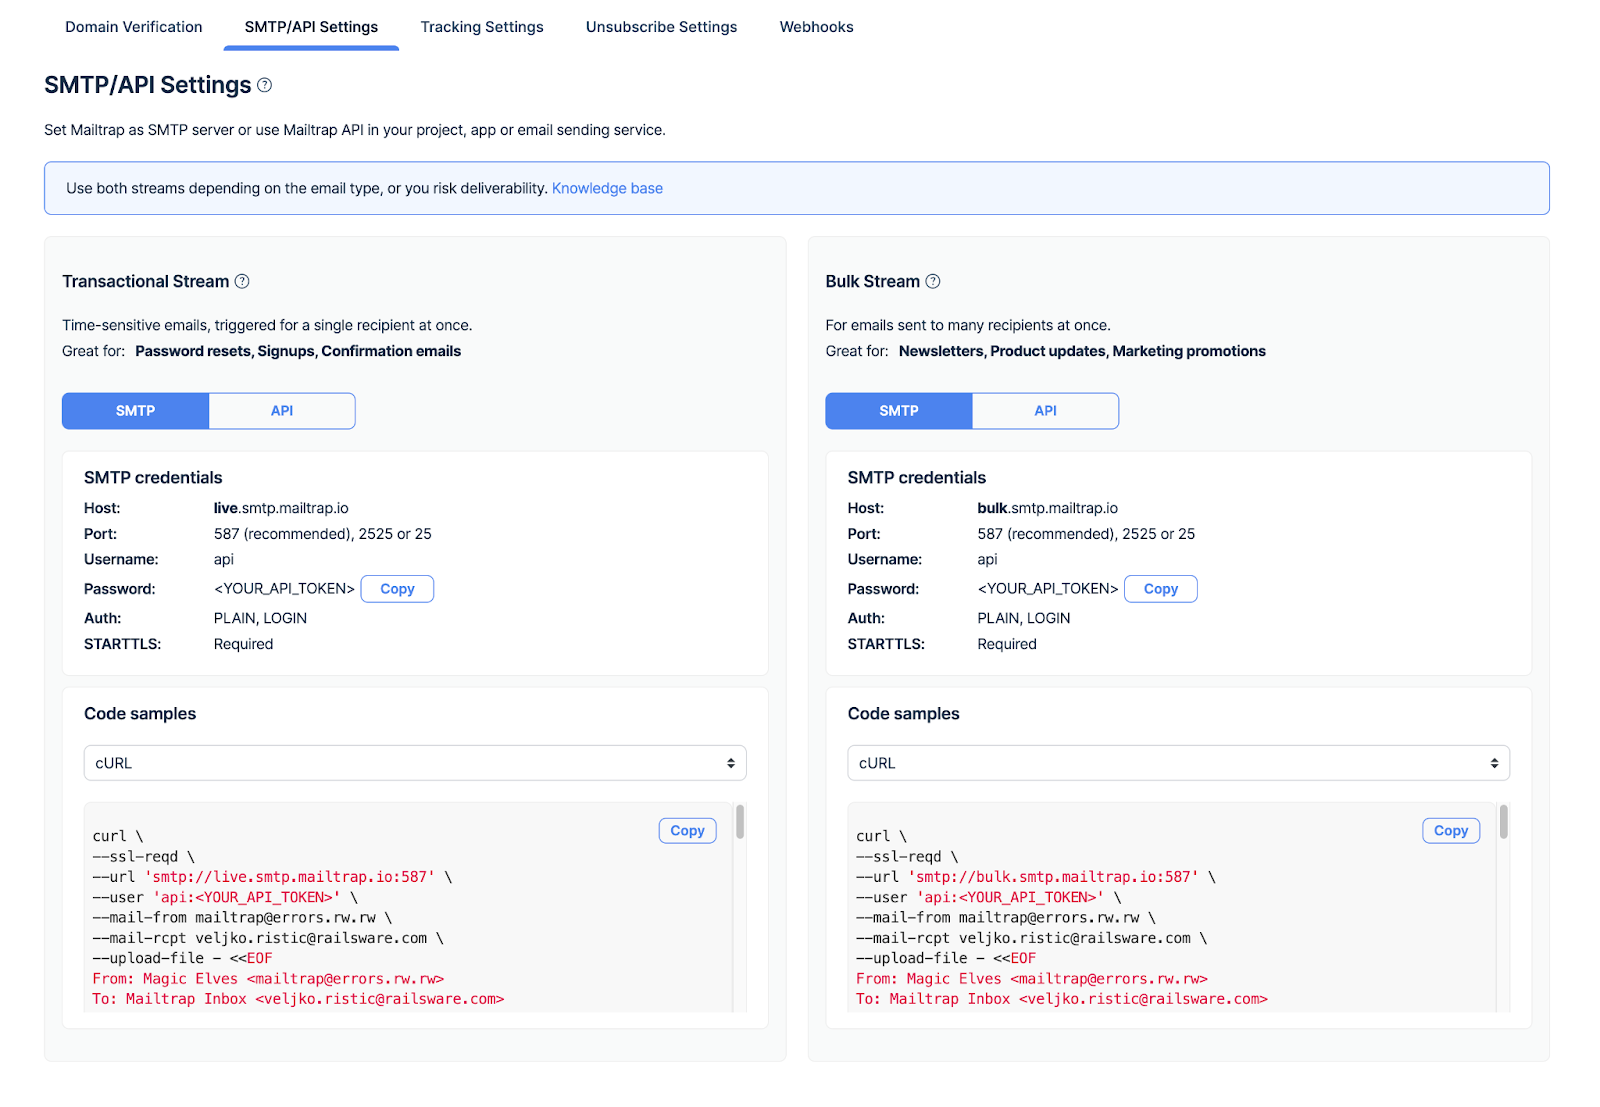
Here’s what your SMTP mail credentials should look like when pasted into the .env file:
// .env file

MAIL_MAILER=smtp
MAIL_HOST=live.smtp.mailtrap.io
MAIL_PORT=587
MAIL_USERNAME=//your username
MAIL_PASSWORD=// your password
MAIL_ENCRYPTION=tls
MAIL_FROM_ADDRESS=from@example.com
MAIL_FROM_NAME=//your app name
Step 2. Create mailable classes
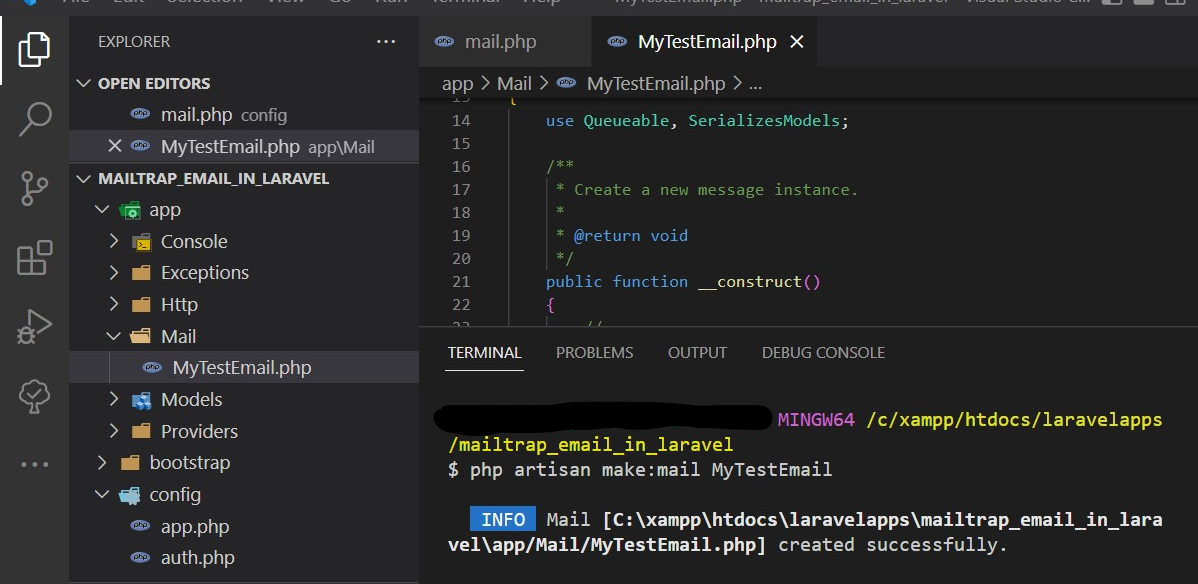
To create mailable classes I previously spoke about, use the following command:
php artisan make:mail MyTestEmailOnce you run this command, you should see the MyTestEmail class under “app/mailMyTestEmail.php”. Of course, you can name it as you wish, as MyTestEmail is just an example.
And here’s the class code:
<?php
namespace App\Mail;
use Illuminate\Bus\Queueable;
use Illuminate\Contracts\Queue\ShouldQueue;
use Illuminate\Mail\Mailable;
use Illuminate\Mail\Mailables\Content;
use Illuminate\Mail\Mailables\Envelope;
use Illuminate\Queue\SerializesModels;
class MyTestEmail extends Mailable
{
use Queueable, SerializesModels;
/**
* Create a new message instance.
*
* @return void
*/
public function __construct()
{
//
}
/**
* Get the message envelope.
*
* @return \Illuminate\Mail\Mailables\Envelope
*/
public function envelope()
{
return new Envelope(
subject: 'My Test Email',
);
}
/**
* Get the message content definition.
*
* @return \Illuminate\Mail\Mailables\Content
*/
public function content()
{
return new Content(
view: 'view.name',
);
}
/**
* Get the attachments for the message.
*
* @return array
*/
public function attachments()
{
return [];
}
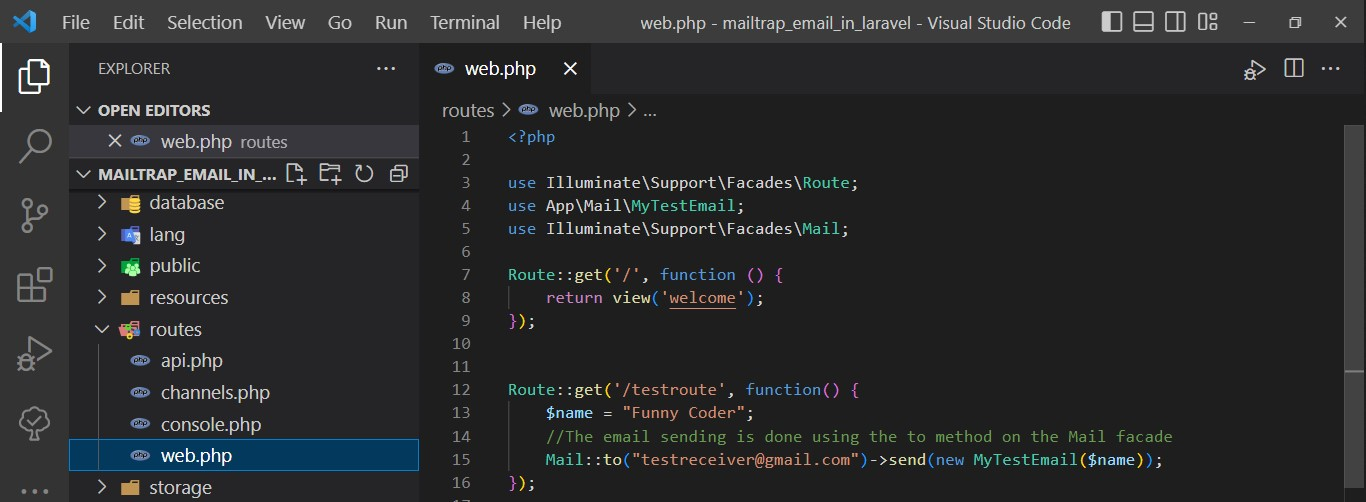
}And finally, let’s create a route in the routes/web.php file with the following code:
<?php

use Illuminate\Support\Facades\Route;
use App\Mail\MyTestEmail;
use Illuminate\Support\Facades\Mail;

Route::get('/testroute', function() {
    $name = "Funny Coder";

    // The email sending is done using the to method on the Mail facade
    Mail::to('testreceiver@gmail.com')->send(new MyTestEmail($name));
});
Here’s how the file should ultimately look like:
To test things out, you can run the php artisan serve command and go to your browser where you pasted the created route. For example, in my case, it was localhost:8000/testroute.
If everything is working as it should, your email should end up in the inbox of the “to” address you specified previously.
Note that with this code, your HTML email will have the default look. To style it further, click here.
Send HTML email with an embedded image
Laravel allows us to embed images directly into emails, displaying them inline, rather than attaching them as separate files. This can be super useful for logos, icons, or other elements you can add to make your email design unique.
To embed images in Laravel, we’ll use the Blade template again, or the embed method in it, more specifically. With this method, we can attach images directly and they will be displayed inline.
Let’s say that you have an image at public/images/logo.png. To add it, simply add the following line of code to your Blade template:
<img src="{{ $message->embed(public_path('images/logo.png')) }}" alt="Logo">This line essentially embeds the image located at public/images/logo.png into your email, and the embed method returns a URL that points to the image. The returned image is then used as the src attribute of the <img> tag, displaying the image inline in the email.
Here’s what your Blade template code should look like:
// resources/views/mail/test-email.blade.php

<!doctype html>
<html lang="en">
<head>
    <meta charset="UTF-8">
</head>
<body>
    <div>
        <p>Hey {{$name}},</p>
        <p>Can your Laravel app send emails yet? 😉</p>
        <img src="{{ $message->embed(public_path('images/logo.png')) }}" alt="Logo">
    </div>
</body>
</html>
Sending HTML emails with attachments
To send HTML emails with attachments, you can modify the attachments method in the code we used previously.
Check it out:
<?php

namespace App\Mail;

use Illuminate\Bus\Queueable;
use Illuminate\Mail\Mailable;
use Illuminate\Mail\Mailables\Content;
use Illuminate\Queue\SerializesModels;
use Illuminate\Mail\Mailables\Envelope;
use Illuminate\Mail\Mailables\Attachment;
use Illuminate\Contracts\Queue\ShouldQueue;

class MyTestEmail extends Mailable
{
    use Queueable, SerializesModels;

    /**
     * Create a new message instance.
     *
     * @return void
     */
    public function __construct(private $name, public $attachedFile){ }

    /**
     * Get the message envelope.
     *
     * @return \Illuminate\Mail\Mailables\Envelope
     */
    public function envelope()
    {
        return new Envelope(
            subject: 'My Test Email',
        );
    }

    /**
     * Get the message content definition.
     *
     * @return \Illuminate\Mail\Mailables\Content
     */
    public function content()
    {
        return new Content(
            view: 'mail.test-email',
            with: ['name' => $this->name],
        );
    }

    /**
     * Get the attachments for the message.
     *
     * @return array
     */
    public function attachments()
    {
        return [
            Attachment::fromPath($this->attachedFile),
        ];

    }
}
You also need to make changes in the testroute code under routes/web.php:
use Illuminate\Support\Facades\Route;
use App\Mail\MyTestEmail;
use Illuminate\Support\Facades\Mail; // Ensure Mail facade is imported

Route::get('/testroute', function () {
    $filePath = public_path('favicon.ico');
    $name = "Funny Coder";

    // Fixed syntax error in the email address
    Mail::to('testreceiver@gmail.com')->send(new MyTestEmail($name, $filePath));
});
If you use this code, your emails should come with an ICO attachment named favicon.ico, as seen in the code block above.
How to send HTML emails to multiple recipients
To send HTML emails to multiple recipients, you can use this code:
foreach (['First Coder' => 'first-recipient@gmail.com', 'Second Coder' => 'second-recipient@gmail.com'] as $name => $recipient) {
    Mail::to($recipient)->send(new MyTestEmail($name));
}
Basically, this code iterates over an array of recipients, creating the mailable instance each time. This prevents the sending of another email to every previous recipient at every iteration through the loop.
You can also send emails to just one recipient and cc and bcc others with the following MyTest Email class example:
return new Envelope(
    subject: 'My Test Email',
    cc: ['testreceiver-cc@gmail.com'],
    bcc: ['testreceiver-bcc@gmail.com']
);
Sending HTML emails with dynamic content
To send HTML emails with dynamic content, you can either use:
- A Mailable class
Simply define your view and data in the Mailable class we created earlier:
// app/Mail/MyTestEmail.php
namespace App\Mail;

use Illuminate\Bus\Queueable;
use Illuminate\Contracts\Queue\ShouldQueue;
use Illuminate\Mail\Mailable;
use Illuminate\Queue\SerializesModels;

class MyTestEmail extends Mailable
{
    use Queueable, SerializesModels;

    public $name;

    public function __construct($name)
    {
        $this->name = $name;
    }

    public function build()
    {
        return $this->view('emails.welcome')
                    ->with(['name' => $this->name])
                    ->from('me@gmail.com')
                    ->subject('Welcome!');
    }
}- The ‘mail::send()’ method
If you don’t feel like using the Mailable class, you can use the mail::send() method directly, like so:
use Illuminate\Support\Facades\Mail;

Mail::send('emails.welcome', ['name' => 'Charles'], function ($message) {
    $message->to('example@gmail.com')
            ->from('me@gmail.com', 'Your Name or Your Application Name')
            ->subject('Welcome!');
});
How to style HTML email
To style your HTML email, you can simply write static HTML code in the template file resources/views/emails/test-email.blade.php.
For this, you can use the following code:
<!DOCTYPE html>
<html lang="en">
<head>
<meta charset="UTF-8">
<meta name="viewport" content="width=device-width, initial-scale=1.0">
<title>Beautiful Theme</title>
<style>


body {
    font-family: 'Arial', sans-serif;
    margin: 0;
    padding: 0;
    background-color: #f4f4f4;
  }


  .container {
    max-width: 800px;
    margin: auto;
    padding: 20px;
    background-color: white;
    box-shadow: 0 0 10px rgba(0,0,0,0.1);
  }
  button {
    background-color: #008CBA; /* Blue */
    border: none;
    color: white;
    padding: 15px 32px;
    text-align: center;
    text-decoration: none;
    display: inline-block;
    font-size: 16px;
    margin: 4px 2px;
    cursor: pointer;
  }


  button:hover {
    background-color: #005f73;
  }
</style>
</head>
<body>


<header>
  <h1>Welcome to My Beautiful Themed Page! {{$name}}</h1>
</header>


<div class="container">
  <p>This is an example of an HTML page with a beautiful theme, using only inline styles for its layout and design.</p>
  <button>Click me!</button>
</div>


</body>
</html>
Pro Tip:
- If you want to send HTML email, embed everything into the email message itself. External links which automatically call back to the home server to load additional resources are one thing spam filters don’t like.
- I don’t recommend using external CSS libraries for styling as some email clients are likely to block external links. Therefore, your mail may not appear as it should.
Send HTML email using API
To automate your sending process, you can integrate Mailtrap email API into your Laravel application by using the official PHP SDK and documentation for Laravel framework bridge.
The Mailtrap library is fully compatible with Laravel 9.x. and above, and, most importantly, the integration is super easy.
All you have to do is:
- Register for a Mailtrap account
- Add and verify your domain.
- Install the Mailtrap PHP client and dependencies with Composer.
composer require railsware/mailtrap-php symfony/http-client nyholm/psr7- Add Mailtrap transport into your config.mail.php file.
<?php

return [
    /*
    |--------------------------------------------------------------------------
    | Mailer Configurations
    |--------------------------------------------------------------------------
    */
    'mailers' => [

            // start mailtrap transport
            'mailtrap' => [
                'transport' => 'mailtrap'
            ],
            // end mailtrap transport

    ]
];- Add your Mailtrap credentials to your Laravel .env file (choose Transactional or Bulk stream depending on your needs)
MAIL_MAILER="mailtrap"
MAILTRAP_HOST="send.api.mailtrap.io"
MAILTRAP_API_KEY="YOUR_API_KEY_HERE"
MAIL_FROM_ADDRESS="name@registered_domain.com"- Create a mailable class to send email.
php artisan make:mail WelcomeMail- Configure the app/Mail/WelcomeMail.php class, like so:
<?php

namespace App\Mail;

use Illuminate\Bus\Queueable;
use Illuminate\Mail\Attachment;
use Illuminate\Mail\Mailable;
use Illuminate\Mail\Mailables\Address;
use Illuminate\Mail\Mailables\Content;
use Illuminate\Mail\Mailables\Envelope;
use Illuminate\Mail\Mailables\Headers;
use Illuminate\Queue\SerializesModels;
use Mailtrap\EmailHeader\CategoryHeader;
use Mailtrap\EmailHeader\CustomVariableHeader;
use Symfony\Component\Mime\Email;
use Symfony\Component\Mime\Header\UnstructuredHeader;

class WelcomeMail extends Mailable
{
    use Queueable, SerializesModels;

    private string $name;

    /**
     * Create a new message instance.
     */
    public function __construct(string $name)
    {
        $this->name = $name;
    }

    /**
     * Get the message envelope.
     */
    public function envelope(): Envelope
    {
        return new Envelope(
            from: new Address('jeffrey@example.com', 'Jeffrey Way'),
            replyTo: [
                      new Address('taylor@example.com', 'Taylor Otwell'),
                  ],
            subject: 'Welcome Mail',
            using: [
                      function (Email $email) {
                          // Headers
                          $email->getHeaders()
                              ->addTextHeader('X-Message-Source', 'example.com')
                              ->add(new UnstructuredHeader('X-Mailer', 'Mailtrap PHP Client'))
                          ;

                          // Custom Variables
                          $email->getHeaders()
                              ->add(new CustomVariableHeader('user_id', '45982'))
                              ->add(new CustomVariableHeader('batch_id', 'PSJ-12'))
                          ;

                          // Category (should be only one)
                          $email->getHeaders()
                              ->add(new CategoryHeader('Integration Test'))
                          ;
                      },
                  ]
        );
    }

    /**
     * Get the message content definition.
     */
    public function content(): Content
    {
        return new Content(
            view: 'mail.welcome-email',
            with: ['name' => $this->name],
        );
    }

    /**
     * Get the attachments for the message.
     *
     * @return array<int, \Illuminate\Mail\Mailables\Attachment>
     */
    public function attachments(): array
    {
        return [
           Attachment::fromPath('https://mailtrap.io/app/uploads/2021/04/mailtrap-new-logo.svg')
                ->as('logo.svg')
                ->withMime('image/svg+xml'),
        ];
    }

    /**
     * Get the message headers.
     */
    public function headers(): Headers
    {
        return new Headers(
            'custom-message-id@example.com',
            ['previous-message@example.com'],
            [
                'X-Custom-Header' => 'Custom Value',
            ],
        );
    }
}- Create an email template under resources/views/mail/welcome-email.blade.php.
Hey, {{$name}} and welcome here 😉

<br>
Funny Coder- Add the CLI router to the app/routes/console.php file.
<?php

use App\Mail\WelcomeMail;
use Illuminate\Support\Facades\Artisan;
use Illuminate\Support\Facades\Mail;

/*
|--------------------------------------------------------------------------
| Console Routes
|--------------------------------------------------------------------------
|
*/

Artisan::command('send-welcome-mail', function () {
    Mail::to('testreceiver@gmail.com')->send(new WelcomeMail("Jon"));
    // Also, you can use a specific mailer if your default mailer is not "mailtrap" but you want to use it for welcome mails
    // Mail::mailer('mailtrap')->to('testreceiver@gmail.com')->send(new WelcomeMail("Jon"));
})->purpose('Send welcome mail');- Send your email by calling the CLI command.
php artisan send-welcome-mailAnd we’re done! After following these steps, you should be able to send emails through Mailtrap’s email API without getting any errors.
Send HTML emails with an embedded image
To add embedded images to your HTML emails, you can use the embed method in the Blade template.
Let’s say that you want to add an image from public/images/logo.php. Here’s what the code would look like in that case:
// resources/views/mail/test-email.blade.php

<!doctype html>
<html lang="en">
<head>
    <meta charset="UTF-8">
</head>
<body>
    <div>
        <p>Hey {{$name}},</p>
        <p>Can your Laravel app send emails yet? 😉</p>
        <img src="{{ $message->embed(public_path('images/logo.png')) }}" alt="Logo">
    </div>
</body>
</html>
Sending HTML emails with attachments
As with sending HTML emails with attachments through SMTP, you can modify the attachments method to add attachments to your HTML emails if you’re using an API.
First, let’s tweak the MyTestEmail class:
<?php

namespace App\Mail;

use Illuminate\Bus\Queueable;
use Illuminate\Mail\Mailable;
use Illuminate\Mail\Mailables\Content;
use Illuminate\Queue\SerializesModels;
use Illuminate\Mail\Mailables\Envelope;
use Illuminate\Mail\Mailables\Attachment;
use Illuminate\Contracts\Queue\ShouldQueue;

class MyTestEmail extends Mailable
{
    use Queueable, SerializesModels;

    /**
     * Create a new message instance.
     *
     * @return void
     */
    public function __construct(private $name, public $attachedFile){ }

    /**
     * Get the message envelope.
     *
     * @return \Illuminate\Mail\Mailables\Envelope
     */
    public function envelope()
    {
        return new Envelope(
            subject: 'My Test Email',
        );
    }

    /**
     * Get the message content definition.
     *
     * @return \Illuminate\Mail\Mailables\Content
     */
    public function content()
    {
        return new Content(
            view: 'mail.test-email',
            with: ['name' => $this->name],
        );
    }

    /**
     * Get the attachments for the message.
     *
     * @return array
     */
    public function attachments()
    {
        return [
            Attachment::fromPath($this->attachedFile),
        ];

    }
}
Then, let’s change the testroute code under routes/web.php, like so:
<?php

use Illuminate\Support\Facades\Route;
use App\Mail\MyTestEmail;

Route::get('/testroute', function () {

    $filePath = public_path('favicon.ico');

    $name = "Funny Coder";

    Mail::to('testreceiver@gmail.com')->send(new MyTestEmail($name, $filePath));
});
Again, if you followed everything correctly, your email should arrive with an ICO attachment called favicon.ico.
How to send HTML emails to multiple recipients
To send HTML emails to multiple recipients, use the following code:
foreach (['First Coder' => 'first-recipient@gmail.com', 'Second Coder' => 'second-recipient@gmail.com'] as $name => $recipient) {
    Mail::to($recipient)->send(new MyTestEmail($name));
}
Or, cc and bcc more recipients when sending an email to one person by adding the following code to the MyTestEmail class:
return new Envelope(
    subject: 'My Test Email',
    cc: ['testreceiver-cc@gmail.com'],
    bcc: ['testreceiver-bcc@gmail.com']
);
Sending HTML emails with dynamic content
Sending HTML emails with dynamic content via API is similar to SMTP sending.
You can do it with a Mailable class by defining your view and data in it, like so:
// app/Mail/MyTestEmail.php
namespace App\Mail;

use Illuminate\Bus\Queueable;
use Illuminate\Contracts\Queue\ShouldQueue;
use Illuminate\Mail\Mailable;
use Illuminate\Queue\SerializesModels;

class MyTestEmail extends Mailable
{
    use Queueable, SerializesModels;

    public $name;

    public function __construct($name)
    {
        $this->name = $name;
    }

    public function build()
    {
        return $this->view('emails.welcome')
                    ->with(['name' => $this->name])
                    ->from('me@gmail.com')
                    ->subject('Welcome!');
    }
}
Or, you can use the mail::send method:
use Illuminate\Support\Facades\Mail;

Mail::send('emails.welcome', ['name' => 'Charles'], function ($message) {
    $message->to('example@gmail.com')
            ->from('me@gmail.com')
            ->subject('Welcome!');
});
Wrapping up
And that’s it! We’ve come to the end of our ‘Laravel send HTML email’ guide.
Hopefully, you now have a better grasp of this popular PHP framework and can start sending your emails right away, both through SMTP and API.
If want to expand your knowledge even further, feel free to consult our other dedicated Laravel articles, such as:
- Laravel Mail Queue Tutorial | Mailtrap
- Laravel Email Notification Tutorial | Mailtrap
- Laravel Email Verification: Easy and Quick | Mailtrap
- Send Email in Laravel with Gmail SMTP: Code Snippets [2024]