If using Laravel to send email through Gmail is something you plan on doing within your current/future Laravel project, then you’ve come to the right place.
In this article, I show you how it’s done step by step.
To skip the setup and jump straight to sending with Gmail SMTP, [click here], and to skip to sending with Gmail API, [click here].
Setting up Laravel email service before sending emails
Note: The methods described are compatible with Laravel 8, Laravel 9, and Laravel 10. If you’re using earlier versions, further code modifications might be necessary.
Building your application
If you do not currently have a Laravel application, you can use the following steps to create one.
First, using the terminal, create a new Laravel project by running either laravel new app_email_in_laravel or the composer create-project laravel/app_email_in_laravel command (of course, within the commands, you should replace “app_email_in_laravel” with the name of your application).
Next, utilize the cd app_email_in_laravel command to switch to a directory named app_email_in_laravel (make sure this matches your actual directory name).
This step is essential in executing the Laravel command that creates mailable classes (more details in the next section).
Lastly, to view your Laravel application in a web browser, execute the php artisan serve command.
Configuration
In the Laravel framework, you can configure email services in the config/mail.php file. This file contains a mailers configuration array with sample configuration entries for various mail drivers/transports supported by Laravel.
The default configuration value in this file determines the default mailer when sending an email from your Laravel application.
Thanks to the multiple mailers that can be configured in the config/mail.php file, you can utilize different email-sending services for different types of emails.
Generating and writing mailables
Various types of emails in Laravel are represented by a class called “mailable”, which is stored in the app/Mail directory.
This directory is not present by default in your application, but it gets generated automatically when you create your first mailable class using this Artisan CLI command:
php artisan make:mail MailableName
After creating a mailable class, you can view its contents and configure the class using the following methods:
- Envelope – Returns an instance of the
Illuminate\Mail\Mailables\Envelopeobject, which allows you to define the subject and recipients of the email. - Content – Returns an instance of the
Illuminate\Mail\Mailables\Contentobject, which lets you define the Blade template used to generate the content of the email message. - Attachments – Returns an array of attachments that can be added to the email.
Sender configuration
To specify the sender – the “from” email address and name – you have two options: you can use the Envelope object of the message or set a global “from” address.
- Specifying the sender in the Envelope object:
use Illuminate\Mail\Mailables\Address;
use Illuminate\Mail\Mailables\Envelope;

/**
* Get the message envelope.
*
* @return \Illuminate\Mail\Mailables\Envelope
*/
public function envelope()
{
   return new Envelope(
       from: new Address('example@example.com', 'Test Sender'),
       subject: 'Test Email',
   );
}- Specifying the sender in
config/mail.phpusing a global “from” address:
'from' => ['address' => 'example@example.com', 'name' => 'App Name']Note: If you want to use the same “from” address for all the emails sent by your application, it is recommended to use the global “from” address method. This approach is convenient as it eliminates the need to call the from method in each of your mailable classes, and it serves as the default “from” address if no other address is specified.
How to send emails using Laravel and Gmail SMTP?
The initial step in sending emails using Gmail SMTP is adding your Gmail SMTP configuration to the .env file of your application.
MAIL_MAILER=smtp
MAIL_HOST=smtp.gmail.com
MAIL_PORT=465
MAIL_USERNAME=mygoogle@gmail.com
MAIL_PASSWORD=*************
MAIL_ENCRYPTION=tls
MAIL_FROM_ADDRESS=mygoogle@gmail.com
MAIL_FROM_NAME="${APP_NAME}"
After the SMTP setup is completed, it’s time to generate one of those mailable classes we mentioned earlier using the following command.
php artisan make:mail MyTestEmailUpon executing the command in the Artisan CLI, a new class named “MyTestEmail” will be generated in the app/Mail directory.
If you wish, you can inspect the class code below:
<?php

namespace App\Mail;

use Illuminate\Bus\Queueable;
use Illuminate\Contracts\Queue\ShouldQueue;
use Illuminate\Mail\Mailable;
use Illuminate\Mail\Mailables\Content;
use Illuminate\Mail\Mailables\Envelope;
use Illuminate\Queue\SerializesModels;

class MyTestEmail extends Mailable
{
    use Queueable, SerializesModels;

    /**
     * Create a new message instance.
     *
     * @return void
     */
    public function __construct()
    {
        //
    }

    /**
     * Get the message envelope.
     *
     * @return \Illuminate\Mail\Mailables\Envelope
     */

    public function envelope()
    {
        return new Envelope(
            subject: 'My Test Email',
        );
    }
 /**
     * Get the message content definition.
     *
     * @return \Illuminate\Mail\Mailables\Content
     */

    public function content()
    {
        return new Content(
            view: 'view.name',
        );
    }

    /**
     * Get the attachments for the message.
     *
     * @return array
     */
    public function attachments()
    {
        return [];
    }
}
As evident from the code above, the content() method will return a view. Therefore, you need to navigate to the resources/views directory, create a new folder, and within it, a blade.php file.
When the file has been generated, you can add content to it.
// resources/views/mail/test-email.blade.php
Hey,
Can your Laravel app send emails yet? 😉
Funny Coder
Then, return to the content() method and update the name of the view being returned by it with the name of the newly-created file.
If you wish to add dynamic content, you can use the with attribute to include the recipient’s name in your email template/blade.php file.
<?php

namespace App\Mail;

use Illuminate\Bus\Queueable;
use Illuminate\Contracts\Queue\ShouldQueue;
use Illuminate\Mail\Mailable;
use Illuminate\Mail\Mailables\Content;
use Illuminate\Mail\Mailables\Envelope;
use Illuminate\Queue\SerializesModels;

class MyTestEmail extends Mailable
{
    use Queueable, SerializesModels;

    /**
     * Create a new message instance.
     *
     * @return void
     */
    public function __construct(private $name)
    {
        //
    }

    /**
     * Get the message envelope.
     *
     * @return \Illuminate\Mail\Mailables\Envelope
     */
    public function envelope()
    {
        return new Envelope(
            subject: 'My Test Email',
        );
    }

    /**
     * Get the message content definition.
     *
     * @return \Illuminate\Mail\Mailables\Content
     */
    public function content()
    {
        return new Content(
            view: 'mail.test-email',
            with: ['name' => $this->name],
        );
    }
}
You will also need to make a minor modification in the test-email.blade.php view file as well and make it accept the $name variable as a parameter.
// resources/views/mail/test-email.blade.php

Hey {{$name}},
Can your Laravel app send emails yet? 😉
Mailtrap
As the final step, add a route in the routes/web.php file using the following code:
<?php

use Illuminate\Support\Facades\Route;
use App\Mail\MyTestEmail;
use Illuminate\Support\Facades\Mail;

Route::get('/testroute', function() {
    $name = "Funny Coder";

    // The email sending is done using the to method on the Mail facade
    Mail::to('testreceiver@gmail.com')->send(new MyTestEmail($name));
});
To test the functionality, you can run the php artisan serve command and then access your web browser. In the browser, paste the URL of the route you created.
Once you have done this, if everything is working properly, an email should be sent to the “to” address that you specified.
For learning how to send an email in HTML format, an email with an attachment, or an email with multiple recipients, check out our How to Send Emails in Laravel: A Complete SMTP & API Guide.
Send email to multiple recipients
To send emails to multiple recipients, via SMTP mail server, you can pass an array of email addresses to the to() method. This is a quick and simple method, but note that the recipients will see each other.
Route::get('/sendToMultiple', function() {
    $emails = ['first@example.com', 'second@example.com', 'third@example.com'];
    $name = "Funny Coder"; // Assuming you want to send the same content to all

    Mail::to($emails)->send(new MyTestEmail($name));
});
In the snippet above, $emails is an array of email addresses to which the email will be sent. The MyTestEmail is the mailable class that constructs the email, and as mentioned, all the recipients are listed under to() method.
If you want to manage different visibility levels, you can use cc() and bcc(). Here’s the snippet.
Route::get('/sendWithCCandBCC', function() {
    $mainRecipients = ['main1@example.com', 'main2@example.com'];
    $ccRecipients = ['cc1@example.com', 'cc2@example.com'];
    $bccRecipients = ['secret1@example.com', 'secret2@example.com'];
    $name = "Funny Coder"; // Dynamic content

    Mail::to($mainRecipients)
        ->cc($ccRecipients)
        ->bcc($bccRecipients)
        ->send(new MyTestEmail($name));
});
The $mainRecipients are the primary recipients who will see each other. The $ccRecipients can also see each other and know about the main recipients. Finally, the $bccRecipients recipients are hidden from all other recipients.
Send email with attachments
Adding attachments is relatively simple, and it starts by modifying the mailable class. I’ll be covering that here, but note that there are other methods as well.
- First, modify the
MyTestEmailclass to handle attachment data.
namespace App\Mail;

use Illuminate\Bus\Queueable;
use Illuminate\Contracts\Queue\ShouldQueue;
use Illuminate\Mail\Mailable;
use Illuminate\Mail\Mailables\Content;
use Illuminate\Mail\Mailables\Envelope;
use Illuminate\Queue\SerializesModels;
Use Illuminate\Mail\Mailables\Attachment;

class MyTestEmail extends Mailable
{
    use Queueable, SerializesModels;

    public $name;
    public $attachment;

    public function __construct($name, $attachment = null)
    {
        $this->name = $name;
        $this->attachment = $attachment;
    }

    public function envelope()
    {
        return new Envelope(
            subject: 'My Test Email',
        );
    }

    public function content()
    {
        return new Content(
            view: 'mail.test-email',
            with: [
                'name' => $this->name
            ],
        );
    }

    public function attachments()
    {
        if ($this->attachment) {
            return [$this->attachment];
            return [
                Attachment::fromPath($this->attachment),
            ];
        }

        return [];
    }
}- Attach the files when you instantiate the mailable class to send the email.
use Illuminate\Support\Facades\Route;
use App\Mail\MyTestEmail;
use Illuminate\Support\Facades\Mail;

Route::get('/sendWithAttachment', function() {
    $name = "Funny Coder";
    $filePath = 'path/to/your/file.pdf';  // Ensure the path is correct

    // The email sending is done using the to method on the Mail facade
    Mail::to('testreceiver@gmail.com')->send(new MyTestEmail($name, $filePath));
});
The $filePath variable should be set to the path of the file you want to attach to the email. Make sure the file exists and is accessible by your Laravel application. Then, the attachments method in the Mailable class checks if an attachment is present and includes it in the email.
There are a couple of things to be aware of when sending attachments:
- File permissions: Ensure that your Laravel application has the necessary permissions to read the file you wish to attach.
- File size: Be aware of the file size limits for attachments when using Gmail as your mail provider. Gmail has a limit of 25 MB per email; if your attachments exceed this size, you may need to send them using a file sharing service or compress them.
Send HTML email
I’ll be using the Mailable class to send an HTML email. Check the exemplary flow below.
- I’ll start with an HTML Blade template that will serve as the email body. You should create or modify a Blade file in the ‘resources/views/mail’ directory. For example, I’ll call it ‘html-email.blade.php’.
<!DOCTYPE html>
<html lang="en">
<head>
    <meta charset="UTF-8">
    <meta name="viewport" content="width=device-width, initial-scale=1.0">
    <title>Email</title>
    <style>
        body {
            font-family: 'Arial', sans-serif;
            margin: 0;
            padding: 0;
            color: #333;
        }
        .content {
            padding: 20px;
            background-color: #f4f4f4;
        }
    </style>
</head>
<body>
    <div class="content">
        <h1>Hello, {{$name}}!</h1>
        <p>This is a test HTML email sent from a Laravel application.</p>
        <p style="color: blue;">Enjoy coding!</p>
    </div>
</body>
</html>- I’ll adjust the
MyTestEmailclass to be able to use the HTML template. The critical thing here is to ensure thecontent()method points to the correct view.
public function content()
{
    return new Content(
        view: 'mail.html-email',
        with: [
            'name' => $this->name
        ],
    );
}- When you send the email using the route you’ve set up, it will render the ‘html-email.blade.php’ as an HTML email. Here’s how the sending function might look:
Route::get('/sendHtmlEmail', function() {
    $name = "Funny Coder";  // Assuming this is the dynamic content

    Mail::to('testreceiver@gmail.com')->send(new MyTestEmail($name));
});
You can write standard HTML and inline CSS directly in your Blade view file. Avoid external stylesheets because not all email clients support them. Also, make sure to pass any dynamic data required by using the with attribute in the content() method of your Mailable class.
Pro Tip:
You can write CSS in the <style> tag in the header, but, for better email client compatibility and immediate rendering, consider inlining your CSS styles. This way, your email won’t be stripped off the styles if the client removes the <head> and <body> tags from incoming HTML.
There are tools and Laravel packages available that can automate this process. For instance, the popular option is Laravel’s ‘fedeisas/laravel-mail-css-inliner’ package.
Queued email sending
Queueing email sending in Laravel is an efficient way to handle email delivery without delaying the response time of your web application. This is particularly useful for applications that need to send a high volume of emails or when the timing of the email delivery is not critical to the immediate user action.
Here’s how to set it up.
- Ensure your Laravel environment is configured to use a queue driver. Laravel supports several drivers such as Redis, Database, SQS, etc. You can set this in your ‘.env’ file, and I’ll be using Redis for this example.
QUEUE_CONNECTION=redis- Install ‘predis’ composer module in your laravel project by running
composer require predis/predis- Note, if you do all of that above and still see the error, try adding this to your Laravel .env configuration:
REDIS_CLIENT=predis
- Note, if you do all of that above and still see the error, try adding this to your Laravel .env configuration:
- Assuming you already have a mailable class like ‘MyTestEmail’ from my earlier examples, it has to implement the ‘ShouldQueue’ interface to allow for queuing. Here’s how I modified the ‘MyTestEmail’ class:
namespace App\Mail;

use Illuminate\Bus\Queueable;
use Illuminate\Contracts\Queue\ShouldQueue;
use Illuminate\Mail\Mailable;
use Illuminate\Mail\Mailables\Content;
use Illuminate\Mail\Mailables\Envelope;
use Illuminate\Queue\SerializesModels;

class MyTestEmail extends Mailable implements ShouldQueue
{
    use Queueable, SerializesModels;

    public $name;

    public function __construct($name)
    {
        $this->name = $name;
    }

    public function envelope()
    {
        return new Envelope(subject: 'My Test Email');
    }

    public function content()
    {
        return new Content(view: 'mail.test-email', with: ['name' => $this->name]);
    }
}- To send the email to the queue, you need to modify the controller or the route method.
use Illuminate\Support\Facades\Route;
use App\Mail\MyTestEmail;
use Illuminate\Support\Facades\Mail;

Route::get('/queueEmail', function() {
    $name = "Funny Coder";
    Mail::to('testreceiver@gmail.com')->queue(new MyTestEmail($name));
    print(“Email Sent Successfully”);
});
In queued sending, the ‘ShouldQueue’ interface tells Laravel that this mailable should be sent using the queue system. Then, the Mail facade uses the queue () method instead of the ‘send ()’ method.
Pro Tips:
- It’s important to have a strategy for handling failed jobs in the queue. For instance, Laravel allows you to set a max number of tries and timeouts for jobs.
- When developing and testing queued emails, you can use the ‘sync’ driver in your ‘.env’ file to handle jobs immediately without setting up a queue service. Set
QUEUE_CONNECTION=syncfor testing purposes.
Gmail SMTP limitations and possible issues
Gmail, although widely used, does come with limitations and issues that are not talked about so often.
So, to help you keep your Laravel project on the right track and avoid any potential pitfalls, we’ll now go over these limitations and issues one by one.
- Sending limit – With Gmail SMTP, users have a daily email sending limit, which depends on the Gmail account they use. Exceeding this limit will cause errors or a temporary suspension.
- Rate limit – Another limit Gmail SMTP users have to deal with is the limit on how many emails they can send per minute or per hour. Exceeding this limit will block or delay your email sending.
- Security – Sending emails through Gmail SMTP will require a secure connection such as SSL or TLS, which you need to configure correctly in the Gmail SMTP settings. Failing to do so will leave your emails and their data vulnerable to interception and tampering.
Google’s security settings also require proper configuration of things such as two-factor authentication to avoid the blocking of email sending.
- Custom domain – For sending emails from a custom domain such as johndoe@yourcompany.com with Gmail SMTP, you need to configure the correct DNS settings. Not doing so will cause your emails to fail SPF, DKIM, and DMARC authentication checks and thus be marked as spam or simply rejected.
Send email in Laravel using Gmail API
To send via API from your Google account, you need to set up OAuth 2.0 credentials in Google Cloud Console. The process takes a few steps and I’ll be starting with that.
Important note: Google is discontinuing the ‘less secure app’ options so you need OAuth.
1. Create a project in Google Cloud Console
- Go to Google Cloud Console.
- Click the project dropdown near the top of the dashboard and then click “New Project”. Provide a project name and location, then click “Create”.

2. Enable Gmail API
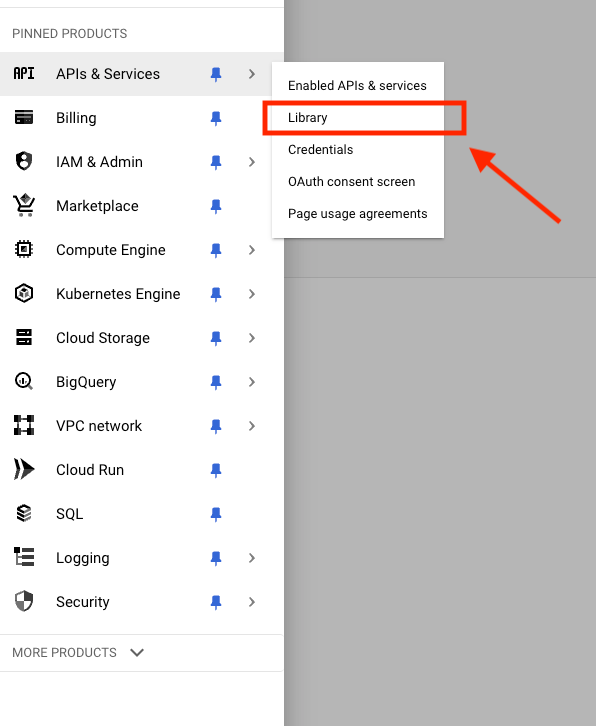
- Click on the navigation menu (three horizontal lines) in the upper left corner.
- Go to the API library – “APIs & Services” > “Library”.
- Type “Gmail” into the search box and select the Gmail API.
- Click the “Enable” button to enable Gmail API for your project.
3. Create OAuth 2.0 credentials
This action has a bunch of substeps, so I structured them separately to make it easier for you to follow.
OAuth consent screen configuration
- In the APIs & Services dashboard, navigate to “OAuth consent screen”.
- Select “External” for user type if you want to allow users outside of your organization to use your application. Then click “Create”.

- Fill in the app details like app name, user support email, and developer contact information. Save and continue.
- Add the scopes you require. For sending emails, add the scope ‘https://www.googleapis.com/auth/gmail.send’.
- Save and continue, and then submit for verification if needed (for production use).
Create credentials
- Go to “Credentials” on the APIs & Services dashboard.

- Click “Create Credentials” > “OAuth 2.0 Client IDs”.
- Select the application type (usually “Web application”).
- Name your OAuth 2.0 client.
- Set the authorized redirect URIs. This URI is where Google will send responses for your OAuth requests. For local development, you might use something like ‘http://localhost:8000/callback’.
Download credentials
- Once the credentials are created, you can download the JSON file by clicking the “Download” button (an icon that looks like a download arrow).
- Save this file securely; you will need the client ID and client secret for your Laravel application.
4. Integrate OAuth credentials into Laravel
Store the client ID and client secret in your Laravel ‘.env’ file:
GOOGLE_CLIENT_ID=your-google-client-id
GOOGLE_CLIENT_SECRET=your-google-client-secret
GOOGLE_REDIRECT_URI=http://localhost:8000/callback- Run ‘composer require google/apiclient’ in your Laravel project to install the Google Client Library.
- Create routes and a controller for handling OAuth callbacks and sending emails. Your controller will use the Google Client to authenticate users and store access tokens.
This setup will allow your Laravel application to authenticate with Google and send emails through the Gmail API. In the next sections, I’ll cover how to use these credentials to send emails to multiple recipients, with attachments, as HTML emails, and through queued jobs.
Send email to multiple recipients
Sending to multiple recipients via Gmail API, requires you to construct a MIME message that specifies all the recipients in the To, Cc, or Bcc headers. But that’s not all, since you’ll also need to set up a controller. Anyway, I’m listing all the steps below.
- The aforementioned controller handles the sending logic. I’ll create a method in the controller to send an email to multiple recipients. But a note before that:
- Ensure you have the Google Client set up in the controller. It involves loading the client with credentials and setting the access token, which should be retrieved from your storage (like a database or session, depending on your application’s authentication flow).
- If it is the first time for you to get access token for Gmail API, you need to be redirected to authenticate yourself for Google API on the browser. In this case, in the Laravel project, you need to add the handler for callback url from Google authenticator. And in the handler, we can get access code by parsing the url.
use Google\Client;
use Google\Service\Gmail;
use Google\Service\Gmail\Message;

class EmailController extends Controller
{
    private $client;

    public function __construct()
    {
        $this->client = new Client();
        $this->client->setClientId(env('GOOGLE_CLIENT_ID'));
        $this->client->setClientSecret(env('GOOGLE_CLIENT_SECRET'));
        $this->client->setRedirectUri(env('GOOGLE_REDIRECT_URI'));
$this->client->addScope(Gmail::GMAIL_SEND);- I’ll use a standard PHP library to create a MIME message. It’s convenient as it includes all the necessary headers and the email body.
public function handleCallback(Request $request)
    {
        if (!$request->has('code')) {
            return redirect('/')->with('error', 'Authorization code not available');
        }

        $token = $this->client->fetchAccessTokenWithAuthCode($request->query('code'));
        $this->client->setAccessToken($token);
        // Store the token in the user's session or database for making authenticated calls later

        $this->sendEmailToMultipleRecipients();

public function redirectToAuthUrl()
{
    $authUrl = $this->client->createAuthUrl();
        return redirect($authUrl);
}

public function sendEmailToMultipleRecipients()
{
    $to = ['recipient1@example.com', 'recipient2@example.com'];
    $subject = 'Hello from Gmail API';
    $messageText = 'This is a test email sent to multiple recipients using the Gmail API from a Laravel application.';

    $message = new Message();

    $rawMessageString = "To: " . implode(', ', $to) . "\r\n";
    $rawMessageString .= "Subject: {$subject}\r\n";
    $rawMessageString .= "MIME-Version: 1.0\r\n";
    $rawMessageString .= "Content-Type: text/html; charset=utf-8\r\n";
    $rawMessageString .= "Content-Transfer-Encoding: quoted-printable\r\n\r\n";
    $rawMessageString .= "<p>{$messageText}</p>";

    // URL-safe base64 encode the message
    $rawMessage = base64_encode($rawMessageString);
    $rawMessage = str_replace(['+', '/', '='], ['-', '_', ''], $rawMessage); // URL-safe

    $message->setRaw($rawMessage);

    $service = new Gmail($this->client);
    try {
        $service->users_messages->send('me', $message);
        return 'Email sent successfully to multiple recipients.';
    } catch (\Exception $e) {
        return 'An error occurred: ' . $e->getMessage();
    }
}- Finally, define a route in the ‘web.php’ or ‘api.php’ that triggers the email sending method:
Route::get('/send-email', [EmailController::class, redirectToAuthUrl]);
Route::get('/callback', [EmailController::class, 'handleCallback']);
Good to know:
- The email headers and body are constructed as a plain text string, which includes
To,Subject, andContent-Type. The recipients are concatenated into a single string separated by commas for theToheader. - The message must be base64 encoded and made URL-safe according to Gmail API specifications.
- Using the Gmail service, the constructed message is sent by the authenticated client.
Send email with attachments
Sending with attachments requires you to construct a multipart MIME message that includes both the base message and the attachments.
Check out the code snippet below:
use Google\Client;
use Google\Service\Gmail;
use Google\Service\Gmail\Message;

class EmailController extends Controller
{
    // Existing setup code...

    public function sendEmailWithAttachments()
    {
        $subject = 'Subject with Attachments';
        $to = 'recipient@example.com';
        $messageText = 'This is a test email with attachments sent through the Gmail API from a Laravel application.';

        // Construct the MIME message with attachment
        $boundary = uniqid(rand(), true);
        $subjectCharset = $charset = 'utf-8';

        $messageBody = "--{$boundary}\r\n";
        $messageBody .= "Content-Type: text/plain; charset={$charset}\r\n";
        $messageBody .= "Content-Transfer-Encoding: 7bit\r\n\r\n";
        $messageBody .= "{$messageText}\r\n";

        // Attachments
        $filePath = '/path/to/your/file.pdf'; // Example file path
        $fileName = 'example.pdf'; // Example file name
        $fileData = file_get_contents($filePath);
        $base64File = base64_encode($fileData);

        $messageBody .= "--{$boundary}\r\n";
        $messageBody .= "Content-Type: application/pdf; name={$fileName}\r\n";
        $messageBody .= "Content-Description: {$fileName}\r\n";
        $messageBody .= "Content-Disposition: attachment; filename={$fileName}; size=".filesize($filePath)."\r\n";
        $messageBody .= "Content-Transfer-Encoding: base64\r\n\r\n";
        $messageBody .= "{$base64File}\r\n";
        $messageBody .= "--{$boundary}--";

        $rawMessage = "To: {$to}\r\n";
        $rawMessage .= "Subject: =?{$subjectCharset}?B?" . base64_encode($subject) . "?=\r\n";
        $rawMessage .= "MIME-Version: 1.0\r\n";
        $rawMessage .= "Content-Type: multipart/mixed; boundary=\"{$boundary}\"\r\n\r\n";
        $rawMessage .= $messageBody;

        $rawMessage = base64_encode($rawMessage);
        $rawMessage = str_replace(['+', '/', '='], ['-', '_', ''], $rawMessage); // URL-safe

        $gmailMessage = new Message();
        $gmailMessage->setRaw($rawMessage);

        $service = new Gmail($this->client);
        try {
            $service->users_messages->send('me', $gmailMessage);
            return 'Email with attachments sent successfully.';
        } catch (\Exception $e) {
            return 'An error occurred: ' . $e->getMessage();
        }
    }
}
Here, the message is constructed with multiple parts separated by boundaries. Each part has appropriate headers for content type and encoding. Also, each attachment is read into memory, base64 encoded, and then added to the MIME message.
Headers for each attachment include details such as Content-Disposition and Content-Type to properly identify the file in the email. And lastly, the entire MIME message is encoded in base64 and modified to be URL-safe before being sent to Gmail.
Pro Tips:
- Make sure proper permissions are given to read files (be it via your app password or Gmail password or tokens). Also, consider security implications when handling file uploads from users.
- Uploading large files can be resource-intensive. Limiting the size of attachments and possibly offload the upload process to a background job if necessary.
Send HTML email
Now, we’re getting into the realm of rich formatting and styling, and here’s how to set it all up.
- I’ll continue using the
EmailControllerand add a method specifically for sending HTML content.
use Google\Client;
use Google\Service\Gmail;
use Google\Service\Gmail\Message;

class EmailController extends Controller
{
    // Existing setup code...

    public function sendHtmlEmail()
    {
        $to = 'recipient@example.com';
        $subject = 'Hello, HTML Email!';
        $htmlContent = '<h1>Welcome to Our Service</h1><p>This is a <strong>HTML</strong> email, sent via the <em>Gmail API</em>.</p>';

        // MIME Type message
        $boundary = uniqid(rand(), true);
        $subjectCharset = $charset = 'utf-8';

        $messageBody = "--{$boundary}\r\n";
        $messageBody .= "Content-Type: text/html; charset={$charset}\r\n";
        $messageBody .= "Content-Transfer-Encoding: quoted-printable\r\n\r\n";
        $messageBody .= "{$htmlContent}\r\n";
        $messageBody .= "--{$boundary}--";

        $rawMessage = "To: {$to}\r\n";
        $rawMessage .= "Subject: =?{$subjectCharset}?B?" . base64_encode($subject) . "?=\r\n";
        $rawMessage .= "MIME-Version: 1.0\r\n";
        $rawMessage .= "Content-Type: multipart/alternative; boundary=\"{$boundary}\"\r\n\r\n";
        $rawMessage .= $messageBody;

        $rawMessage = base64_encode($rawMessage);
        $rawMessage = str_replace(['+', '/', '='], ['-', '_', ''], $rawMessage); // URL-safe

        $gmailMessage = new Message();
        $gmailMessage->setRaw($rawMessage);

        $service = new Gmail($this->client);
        try {
            $service->users_messages->send('me', $gmailMessage);
            return 'HTML email sent successfully.';
        } catch (\Exception $e) {
            return 'An error occurred: ' . $e->getMessage();
        }
    }
}- Add a new route to trigger the HTML sending.
Route::get('/send-html-email', [EmailController::class, 'sendHtmlEmail']);The HTML content is included as a part of a MIME multipart message. It’s important to set the Content-Type to text/html and specify the correct character set (‘utf-8’ in this case).
The message includes HTML content and uses a boundary to separate different parts of the email. This is crucial when sending multipart messages, which might include plain text alternatives or attachments in addition to the HTML content.
Like with any content sent via the Gmail API, the message needs to be base64 encoded and made URL-safe to ensure it is transmitted correctly.
Pro Tips:
- This is more of a reminder 😀You can include CSS within HTML emails, but it’s recommended to use inline styles for better compatibility with various email clients.
- Be cautious when including dynamic content or user-generated HTML to avoid injection attacks. Sanitize any user input included in HTML emails.
Queued email sending
By queuing email tasks, your application can handle heavy loads and process emails in the background, improving response times for user interactions.
API queuing isn’t for the faint of heart, but I’ll lead you through it.
1. Setting up Laravel configuration
The Laravel project has to be configured to use queues. Like with the SMTP method, the supported drivers include database, Redis, SQS, etc.
To make things simple and focus on the workflow, I’ll use the database queue driver.
So, first, I need to edit the ‘.env’ file to use the database as the queue connection.
QUEUE_CONNECTION=databaseAlso, if you haven’t already set up the jobs table for the database queue, run these Artisan commands.
php artisan queue:table
php artisan migrate
2. Create email-sending jobs
Start by running the Artisan command to create a new job class.
php artisan make:job SendGmailApiEmailThen, edit the generated job class to send an email using the Gmail API.
namespace App\Jobs;

use Illuminate\Bus\Queueable;
use Illuminate\Contracts\Queue\ShouldQueue;
use Illuminate\Foundation\Bus\Dispatchable;
use Illuminate\Queue\InteractsWithQueue;
use Illuminate\Queue\SerializesModels;
use Google\Client;
use Google\Service\Gmail;
use Google\Service\Gmail\Message;

class SendGmailApiEmail implements ShouldQueue
{
    use Dispatchable, InteractsWithQueue, Queueable, SerializesModels;

    protected $to;
    protected $subject;
    protected $messageText;

    public function __construct($to, $subject, $messageText)
    {
        $this->to = $to;
        $this->subject = $subject;
        $this->messageText = $messageText;
    }

    public function handle()
    {
        $client = new Client();
        $client->setClientId(env('GOOGLE_CLIENT_ID'));
        $client->setClientSecret(env('GOOGLE_CLIENT_SECRET'));
        $client->setRedirectUri(env('GOOGLE_REDIRECT_URI'));
        $client->setAccessToken($this->getAccessToken()); // Ensure this method retrieves a valid token

        $gmail = new Gmail($client);
        $gmailMessage = new Message();

        $rawMessageString = "To: {$this->to}\r\n";
        $rawMessageString .= "Subject: {$this->subject}\r\n";
        $rawMessageString .= "Content-Type: text/plain; charset=utf-8\r\n\r\n";
        $rawMessageString .= $this->messageText;

        // Base64 encode and make it URL-safe
        $rawMessage = base64_encode($rawMessageString);
        $rawMessage = str_replace(['+', '/', '='], ['-', '_', ''], $rawMessage);
        $gmailMessage->setRaw($rawMessage);

        $result = $gmail->users_messages->send('me', $gmailMessage);
        return $result;
    }
}
3. Dispatch the job from your application
SendGmailApiEmail::dispatch($to, $subject, $messageText);I’d advise you to take full advantage of the job system. For instance, Laravel’s queue system allows you to defer the execution of a task, such as sendmail, until a later time, reducing the load on your web server and improving the user experience.
And you shouldn’t forget about the error handling. Set up automatic retries of failed jobs at a specified number of times.
Pro Tips:
- Make sure to run a queue worker that processes the jobs. You can use the ‘php artisan queue:work’ command to start a worker.
- Consider setting up a monitoring system to track the status of queued jobs to ensure they are processed successfully.
Gmail API limitations and possible issues
The limitations are quite similar between the Gmail API and traditional SMTP services in terms of rate limiting and message size restrictions.
However, the Gmail API provides a more granular control and detailed feedback mechanism through its quota units system, which can be both an advantage and a complexity depending on the application’s needs.
I’ll be covering the key limitations and offer a light comparison to the SMTP limitations discussed earlier.
Disclaimer: The limits covered below were valid at the time of writing, but could be subject to change based on Google’s policies.
- Rate limiting
Gmail API imposes a per-user rate limit of 250 quota units per user per second on average, allowing short bursts. This limit is calculated based on the number of quota units consumed by each API method.
SMTP services often have rate limits based on the number of emails sent per day or per hour. But usually there’s no complex quota system based on types of operations like the Gmail API.
- Quota units per operation
Different operations consume different amounts of quota units. For instance, sending an email (‘messages.send’) costs 100 units, whereas retrieving an email (‘messages.get’) costs only 5 units.
This detailed accounting of operations can impact how you manage your application’s email interactions, especially in bulk (marketing) operations. And there’s no comparable equivalent to SMTP due to the fundamental differences between the two methods.
- Daily usage limit
The Gmail API is subject to a daily usage limit, which applies to all requests made from your application (e.g. 1K emails a day for Gmail, and 10K for G Suite accounts). It’s crucial to monitor your usage to avoid exceeding these limits, which could result in your application being temporarily blocked from sending emails.
SMTP services offer a fixed limit on the number of emails per day (e.g. 500 emails per day to 100 addresses on Gmail, and 2K emails per day on Google Workspace accounts).
But usually the service won’t be disabled disable upon reaching the limit. Instead, your excess emails could get queued for future delivery. Though, you might need to restart the sending manually.
- Attachment and message size limits
Gmail API, like SMTP, will have limitations on the size of messages and attachments. Typically, Gmail allows up to 25 MB per email, and anything above that requires using Google Drive links.
- Handling limit errors
The documentation advises on handling limit errors effectively, which is crucial for maintaining a robust application. Implementing proper error handling and backoff strategies is essential to manage these limits and ensure continuous service.
SMTP services also require handling of delivery failures, often managed through bounce messages and retry mechanisms that are less transparent than API-based feedback.
Is there an alternative to Gmail email infrastructure?
After introducing you to the limitations and possible issues that come with using Gmail SMTP, it’s only natural that the question “Is there an alternative?” pops up in your head. And the answer is, yes, there is!
Along with the common but somewhat basic alternatives, such as Outlook SMTP, Yahoo Mail SMTP, and so on, at your disposal, you also have the SMTP server of Mailtrap Email Sending, a sending solution that gives developers an infrastructure with high deliverability rates by design.
Mailtrap Email Sending also facilitates effortless maintenance and troubleshooting through alerts (deliverability and critical) and unique monitoring tools, which include helicopter-view dashboards, drill-down reports with detailed stats on mailbox providers (Gmail, Google Workspace, O365, and Outlook), email categories, and extended email history with historical data from up to 60 days of email logs.
Other benefits of the sending solution are a smooth and secure setup, the option to use an email API or SMTP service, and an email delivery time of around 1 sec, which allows you to reach recipients’ inboxes just in time.
In the following sections, I’ll cover SMTP and API methods. Plus, I’ll show you how to send bulk emails with Mailtrap since we allow Transactional and Bulk streams under the same sending plan.
SMTP
To find the Mailtrap Email Sending SMTP credentials, you first need to create a Mailtrap account and log in.
Then, in your account, navigate to Sending Domains, where you need to add and verify your domain.
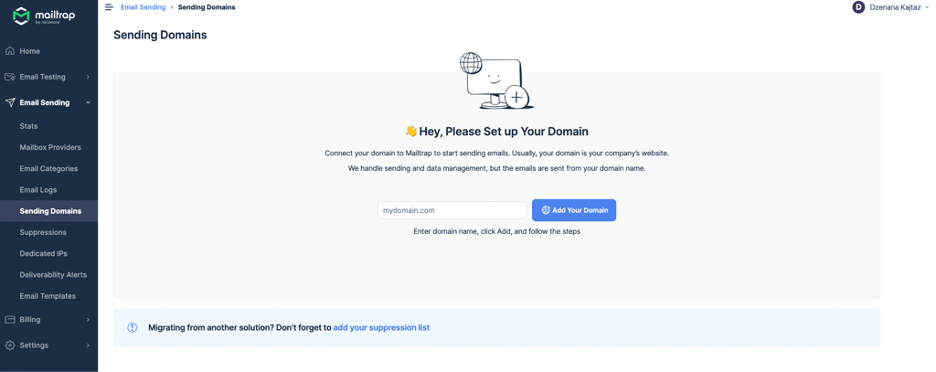
The process is described in detail in the video below:
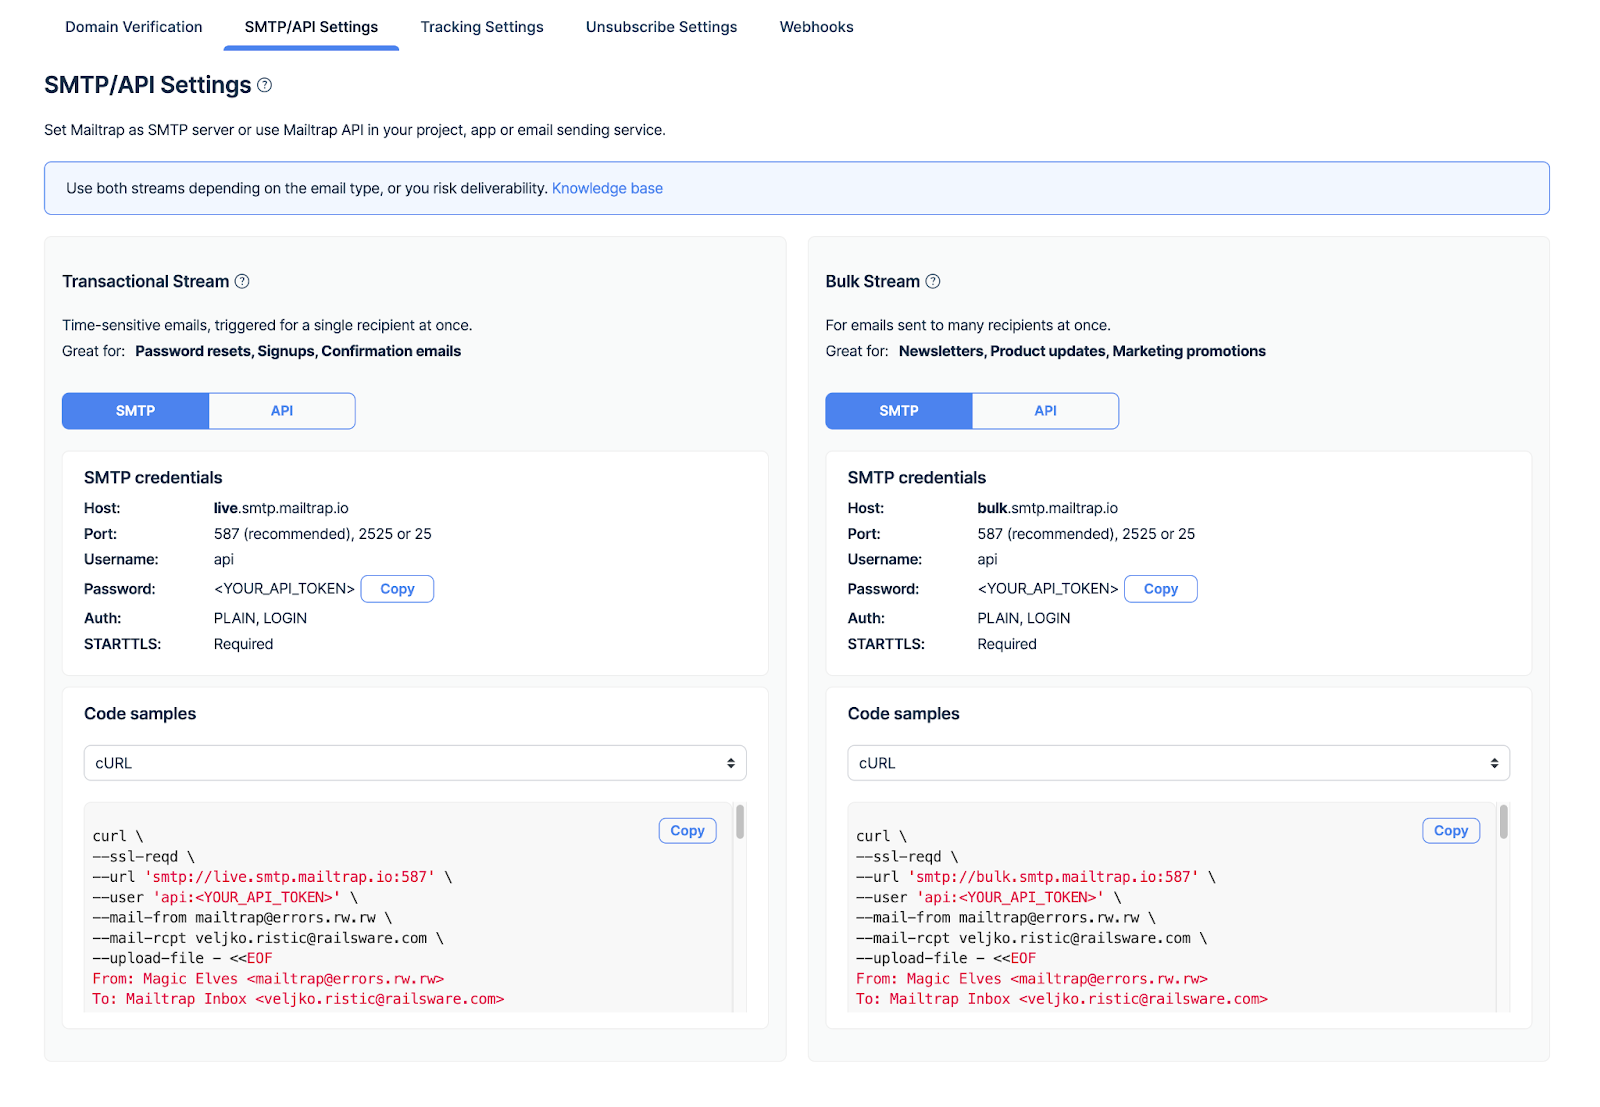
Upon domain verification, you will be taken to the SMTP/API Settings menu, where you can copy the SMTP credentials you need to paste into your Laravel app/project to start using Mailtrap’s SMTP server.
Of course, make sure to choose Transactional or Bulk Stream based on your needs.
API
As mentioned earlier, an email API is also available within Mailtrap Email Sending for those that want to automate the sending process and have better flexibility.
To integrate this email API into your Laravel application, you can use the Mailtrap PHP SDK, which makes the integration easier and more efficient than manually writing the integration code for your project.
These are the steps for using the SDK:
- Install the Mailtrap PHP client and dependencies using Composer:
composer require railsware/mailtrap-php symfony/http-client nyholm/psr7- Add the Mailtrap transport into your
config/mail.phpfile:
<?php

return [
    /*
    |--------------------------------------------------------------------------
    | Mailer Configurations
    |--------------------------------------------------------------------------
    */
    'mailers' => [
        // start mailtrap transport
        'mailtrap' => [
            'transport' => 'mailtrap'
        ],
        // end mailtrap transport
    ]
];- Add the Mailtrap credentials into your Laravel
.envfile:
MAIL_MAILER="mailtrap"
MAILTRAP_HOST="send.api.mailtrap.io"
MAILTRAP_API_KEY="YOUR_API_KEY_HERE"
MAILTRAP_INBOX_ID=1000001- Create a mailable class to send email:
php artisan make:mail WelcomeMail- Configure the
app/Mail/WelcomeMail.phpclass:
<?php

namespace App\Mail;

use Illuminate\Bus\Queueable;
use Illuminate\Mail\Attachment;
use Illuminate\Mail\Mailable;
use Illuminate\Mail\Mailables\Address;
use Illuminate\Mail\Mailables\Content;
use Illuminate\Mail\Mailables\Envelope;
use Illuminate\Mail\Mailables\Headers;
use Illuminate\Queue\SerializesModels;
use Mailtrap\EmailHeader\CategoryHeader;
use Mailtrap\EmailHeader\CustomVariableHeader;
use Symfony\Component\Mime\Email;
use Symfony\Component\Mime\Header\UnstructuredHeader;

class WelcomeMail extends Mailable
{
    use Queueable, SerializesModels;

    private string $name;

    /**
     * Create a new message instance.
     */
    public function __construct(string $name)
    {
        $this->name = $name;
    }

    /**
     * Get the message envelope.
     */
    public function envelope(): Envelope
    {
        return new Envelope(
            from: new Address('jeffrey@example.com', 'Jeffrey Way'),
            replyTo: [
                new Address('taylor@example.com', 'Taylor Otwell'),
            ],
            subject: 'Welcome Mail',
            using: [
                function (Email $email) {
                    // Headers
                    $email->getHeaders()
                        ->addTextHeader('X-Message-Source', 'example.com')
                        ->add(new UnstructuredHeader('X-Mailer', 'Mailtrap PHP Client'));

                    // Custom Variables
                    $email->getHeaders()
                        ->add(new CustomVariableHeader('user_id', '45982'))
                        ->add(new CustomVariableHeader('batch_id', 'PSJ-12'));

                    // Category (should be only one)
                    $email->getHeaders()
                        ->add(new CategoryHeader('Integration Test'));
                },
            ]
        );
    }

    /**
     * Get the message content definition.
     */
    public function content(): Content
    {
        return new Content(
            view: 'mail.welcome-email',
            with: ['name' => $this->name],
        );
    }

    /**
     * Get the attachments for the message.
     *
     * @return array<int, \Illuminate\Mail\Mailables\Attachment>
     */
    public function attachments(): array
    {
        return [
            Attachment::fromPath('https://mailtrap.io/wp-content/uploads/2021/04/mailtrap-new-logo.svg')
                ->as('logo.svg')
                ->withMime('image/svg+xml'),
        ];
    }

    /**
     * Get the message headers.
     */
    public function headers(): Headers
    {
        return new Headers(
            'custom-message-id@example.com',
            ['previous-message@example.com'],
            [
                'X-Custom-Header' => 'Custom Value',
            ],
        );
    }
}- Create an email template under
resources/views/mail/welcome-email.blade.php:
Hey, {{$name}} and welcome 😉

<br>
Funny Coder- Add the CLI router to the
app/routes/console.phpfile:
<?php

use App\Mail\WelcomeMail;
use Illuminate\Support\Facades\Artisan;
use Illuminate\Support\Facades\Mail;

/*
|--------------------------------------------------------------------------
| Console Routes
|--------------------------------------------------------------------------
|
*/

Artisan::command('send-welcome-mail', function () {
    Mail::to('testreceiver@gmail.com')->send(new WelcomeMail("Jon"));
    // Also, you can use a specific mailer if your default mailer is not "mailtrap", but you want to use it for welcome emails
    // Mail::mailer('mailtrap')->to('testreceiver@gmail.com')->send(new WelcomeMail("Jon"));
})->purpose('Send welcome mail');- Run the CLI command, which will send your email:
php artisan send-welcome-mailNow, let me show you how to integrate the bulk stream to send segmented marketing emails and newsletters, for example.
Bulk
To adjust your Laravel setup to send bulk emails using the Mailtrap Bulk Email API, you’ll need to change the host configuration. The method is very close to what’s been covered above, and I’ll lead you every step of the way.
1. Update the ‘.env’ configuration
You need to change the MAILTRAP_HOST to point to the Bulk Email API host.
MAILTRAP_HOST="bulk.api.mailtrap.io"2. Update the Mailable class
If the bulk email API uses a similar structure for sending emails, no changes may be needed in your ‘WelcomeMail’ mailable class. However, you should ensure that any specific headers or parameters required by the bulk API are included.
Check the Mailtrap API documentation for any additional headers or parameters required specifically for bulk operations. If such parameters are needed, you would modify the ‘envelope()’ method in your ‘WelcomeMail’ class to include these headers.
For example, I’ll suppose there are specific headers to handle the bulk requests better. So, I’ll add the following inside the ‘using’ lambda function in the ‘envelope’ method.
function (Email $email) {
    // Existing headers
    $email->getHeaders()
        ->addTextHeader('X-Message-Source', 'example.com')
        ->add(new UnstructuredHeader('X-Mailer', 'Mailtrap PHP Client'));

    // Bulk specific headers
    $email->getHeaders()
        ->addTextHeader('X-Bulk-Email', 'true')  // Hypothetical header for bulk processing
        ->addTextHeader('X-Campaign', 'SummerSaleCampaign');
}
3. Check the mail configuration
Make sure your config/mail.php is set to use the mailtrap mailer for the default or specify it when sending the email.
// Use default Mailtrap mailer
Mail::to('testreceiver@gmail.com')->send(new WelcomeMail("Jon"));

// Or specify the Mailtrap mailer explicitly if not set as default
Mail::mailer('mailtrap')->to('testreceiver@gmail.com')->send(new WelcomeMail("Jon"));
4. Test the configuration
Run the provided Artisan command to send an email through the bulk stream.
php artisan send-welcome-mailAnd that’s it! Mailtrap Email Sending API is now integrated with your Laravel app.
Wrapping things up
Laravel and Gmail have two major things in common – widespread usage and lots of educational resources. Hopefully, this article will now serve as your go-to resource for learning how to use Laravel to send email through Gmail or a great alternative like Mailtrap Email Sending.
To further expand your knowledge on using this framework for email sending, verification, and more, make sure to check out a couple of our other articles:
- Laravel Email Testing: Mailtrap vs. Other Options
- Laravel Mail Queue Tutorial
- Laravel Email Notification Tutorial
- Laravel Email Verification
As well as our YouTube channel featuring videos on Laravel-related topics: