In web development as well as email design, inserting a blank space in HTML while keeping the desired formatting is a tad bit trickier than hitting spacebar.
And let’s face it, you don’t want your HTML web and email designs to look messy or out of alignment simply because of your space formatting.
The secret ingredient that makes it possible to insert and control spaces in HTML is the character entity . And in this tutorial, I will explain:
To wrap things up, I’ll also show you how to test emails and ensure your code is flawless.
What are HTML entities?
Thanks to the modern UTF-8 encoding, many browsers render symbols correctly. However, for reserved characters such as <, >, &, we need to use HTML entities or strings used to represent many reserved and invisible characters in HTML.
For example, if you were to use ‘>’ (greater than) in the code, the browser would interpret it as HTML and treat it as the closing of an HTML tag.
So, to make it clear to each browser what it should render, we use HTML character entities, and wrap them in an ampersand (&) at the beginning and a semicolon (;) at the end. For ‘>’, or greater than, we would use the > HTML entity.
You can also use them for symbols not available on your keyboard, such as © – © or ® – ®.
Here are some of the most common characters:
| Name | HTML Entity |
| Less than (<) | < |
| More than (>) | > |
| Euro (€) | € |
| Pound (£) | £ |
| Ampersand (&) | & |
Tip: If you want to learn about other HTML entities, check out this list. 👀
What exactly is nbsp?
stands for non-breaking space, meaning that strings separated by this entity will not be separated and put into separate lines. It is actually one of the most frequently used HTML entities.
For example, let’s look at the following sentence:
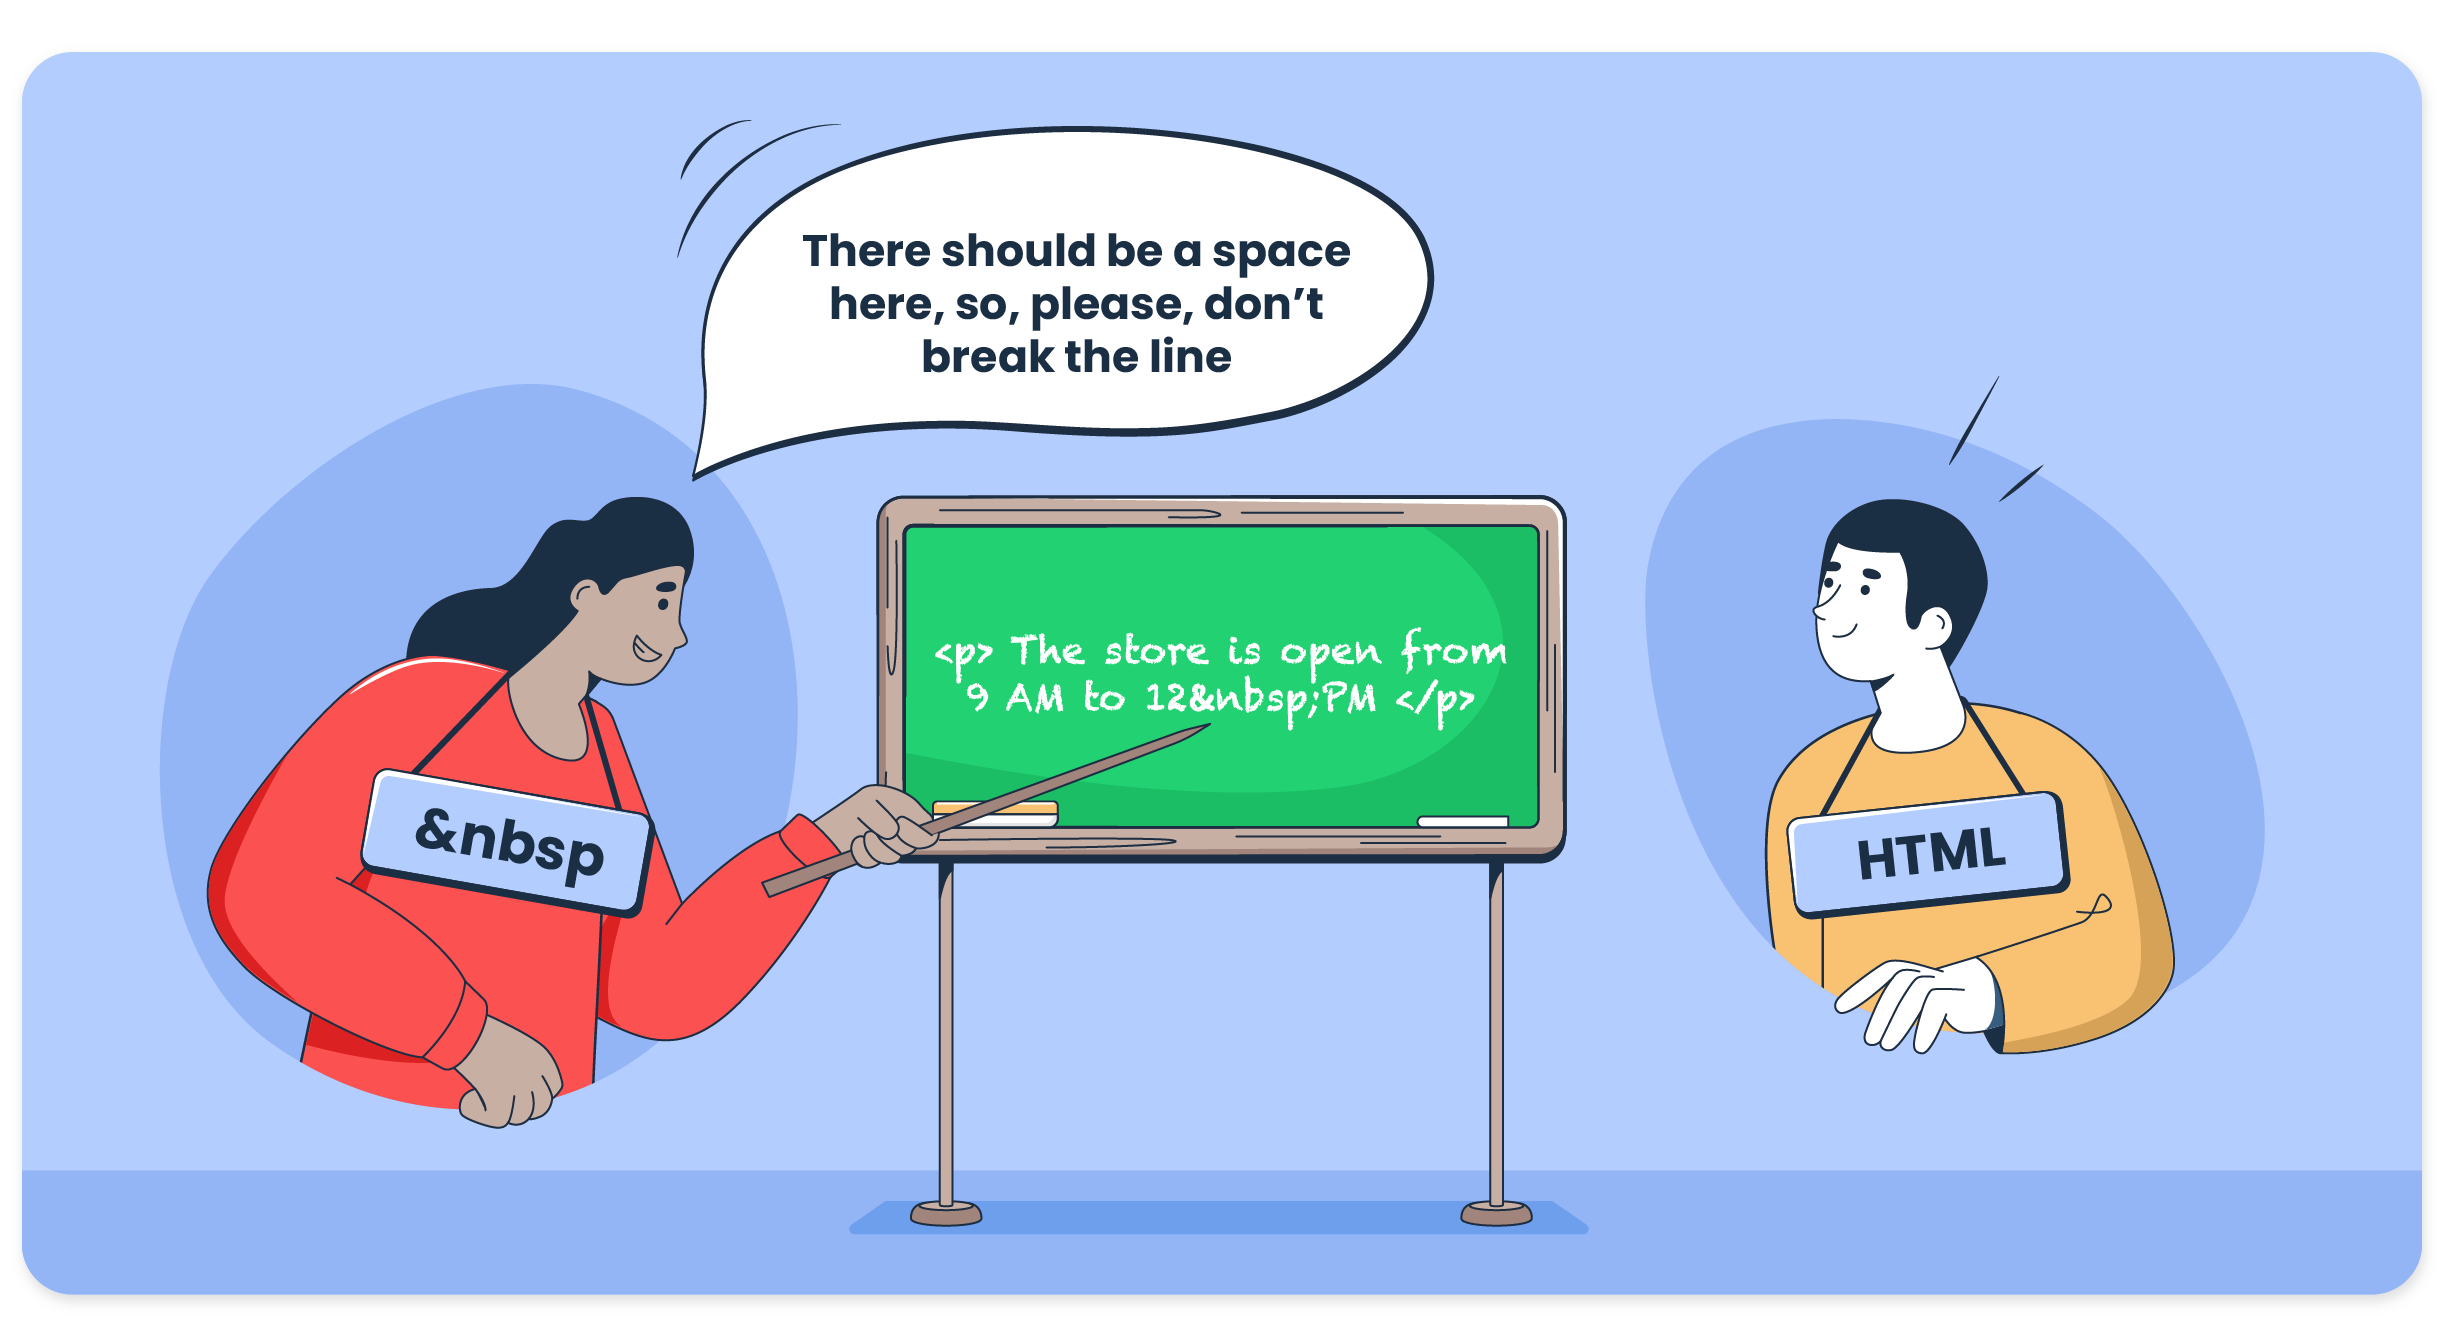
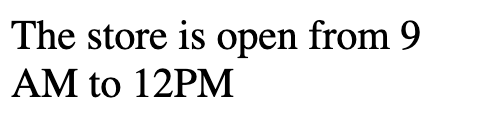
<p> The store is open from 9 AM to 12 PM</p>On bigger screens, this sentence would look like this:

However, the issue comes with smaller screens, as, due to resolution or word wrap, for instance, it could be cut into two parts, like this:
To avoid such awkward collapses and text heading into the next line, we avoid ‘normal space’ and use the entity to glue ‘12’ and ‘PM’ to each other, just like so:
<p> The store is open from 9 AM to 12 PM</p>Another, less common use for is for creating multiple spaces. If you were to use the regular ‘ ‘ space character multiple times, a web browser would always parse it down to just one single space.
So, the following code:
<p> I need more space. </p>would still be rendered as:

However, if you code it like this:
<p> I need more space. </p>you would get the desired result:

Tip: For playing around with and seeing how it works in HTML, I recommend CodePen 🖊. And if you want to see how your HTML code is rendered on mobile devices, simply right-click on the page → Inspect, and click on the button left to Elements.

When should I use   instead of a regular space?
Typically, you should use instead of a regular space in the following cases:
- In dates – E.g. Independence Day is celebrated on 4 July.
<p>Independence Day is celebrated on 4 July.</p>- In names – E.g. Awards were given to Johnny Depp and Samuel L. Jackson.
<p>Awards were given to Johnny Depp and Samuel L. Jackson.</p>- In speed marks – E.g. The car can reach speeds of 120 km/h.
<p>The car can reach speeds of 120 km/h.</p>- Between numbers and units – E.g. The weight of the package is 5kg.
<p>The weight of the package is 5 kg.</p>- After abbreviations – E.g. Me and Mrs. Jones.
<p>Me and Mrs. Jones.</p>- In paragraph signs and numbers – E.g. Refer to § 10 for detailed information.
<p>Refer to § 10 for detailed information.</p>- In software names – E.g. Do you use Adobe Photoshop and Microsoft Word?
<p>Do you use Adobe Photoshop and Microsoft Word?</p>How to use nbsp
So far, we’ve covered the basics of . But, let’s dive deeper!
- HTML elements
I’ve shown you the use of in <p> blocks, but it’s important to note that it can be used in all HTML elements that accept text content. This includes <span>, <a>, <b>, <i>, <div>.
For example:
<ul>
    <li>Item 1</li>
    <li>Item 2</li>
</ul>- CSS styling
When it comes to CSS styling, behaves like your regular character. This means that it inherits the font size, weight, color, and family of the parent element, occupies a fixed width, and so on. Most importantly, it affects text alignment, padding, and positioning, like any other character would.
and special characters
Lastly, you should know that you can use alongside special characters like ‘$’, or next to other HTML entities.
E.g. The price of this beer is $5.
<p>The price of this beer is $ 5.</p>nbsp in WordPress
Now, it’s also important to go over in WordPress, as there are multiple ways of going about it. Namely:
- WordPress text editors
The easiest way to insert non-breaking space in WordPress would be to use a text editor that supports . Personally, I use the Gutenberg Page Building Toolkit, with which you only need to press Option+Space on Mac or Ctrl+Shift+Space on Windows to insert non-breaking space.
Or, simply click on the Nonbreaking space option in the toolbar, like so:
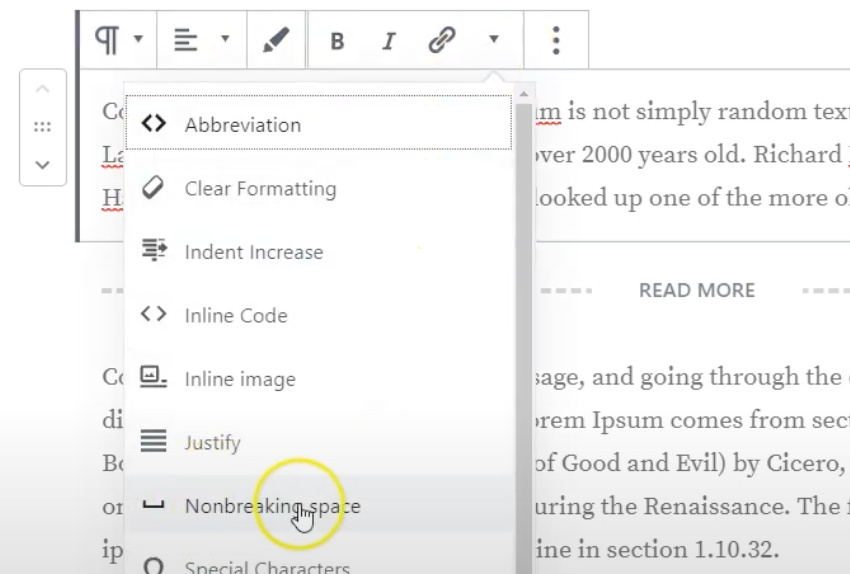
I also recommend wp-Typography or Advanced Editor Tools, two other popular text editors for WP that support .
- Default HTML editor
Using in WordPress is a double-edged sword when you’re using the default HTML editor, which doesn’t offer the convenient shortcuts or the NBSP option in the toolbar.
The only way to do it is to insert right into the editor. But, if your theme doesn’t have CSS rules specifying how it should be rendered (and many don’t), you’ll probably see a raw code displayed on the page.
- Using a shortcode
A more reliable solution may be a simple shortcode defined in the functions.php file of your theme:
//[nbsp] shortcode
function nbsp_shortcode( $atts, $content = null ) {
$content = ' ';
return $content;
}
add_shortcode( 'nbsp', 'nbsp_shortcode' );Then, whenever you need a non-breaking space, simply type in [nbsp] instead of in your content.
Also, kudos to @bncpeter for the code. 🙏
What are the common pitfalls or mistakes when using nbsp?
Here are some of the most common issues, mistakes, and myths regarding I’ve found all over the web while preparing this article:
- does not impact SEO – except if you overuse it. By overuse I mean ditch the regular space for
throughout your whole website, which can make it hard for search engines to parse content. - Most email clients render
correctly – except, older versions of Microsoft Outlook (2007-2019), which uses the Microsoft Word engine to render emails and Outlook.com and Outlook Mobile apps, which use Webkit-based engines.- If you’re struggling with Outlook, our article on fixing Outlook rendering issues may be of help. ⚒️
won’t impact the layout of your webpage/email – unless, that is, you copy-paste it from word processors (e.g., Microsoft Word). This is the only time can cause anomalies, such as unexpected new line breaks.- For tech-savvy readers, I recommend When A Space Is Not A Space, an excellent article on the topic written by Steve from Big Mess o’ Wires (BMOW).
- All modern browsers support
– however, you should ensure your character encoding is consistent across all parts of your web app or website to avoid mojibake (garbled text). When this happens, your might show up as “”.- Again, you can read more about this on BMOW in an article named Non-Breaking Spaces and UTF-8 Madness.
- There isn’t a limit to how many
you can use in a row – but, excessive use can cause readability issues. And let’s face it, do you really want your code to look like this?
<p> Price of this beer: wait for it... is 5$.</p>When not to use nbsp?
The most common cases when you shouldn’t use include:
- Extra spaces in the code
You’ve got to admit, the code above is not very readable. If you want to have a less clustered code, you can use alternatives such as   for 2 non-breaking spaces or   if you want 4-non breaking spaces.
And yes, you can combine both   and  . Also, here’s a list of available white space characters you can use as alternatives.
- Spacing between images in HTML
works only with words and doesn’t have a visible effect when placed between media of any type, including images. Break, or <br> is a viable option if you want to separate two or more vertically aligned images, but the gap between elements separated with <br> may vary.
So, we’re left with paddings and/or margins as the most reliable approach. Here’s an example of how you can use margins to create spacing above, below, on the left, and on the right side of an image:
<img src="(image1.jpg)" style="margin: 0px 0px 0px 0px;" >- Spaces in HTML emails
Email development, in general, is quite different from web and front-end development. All CSS goes inline. Buttons work differently. And, worst of all, everything is built on tables.
The tables, in particular, make using as well as its alternatives for spaces in HTML impractical. So, we have to resort to different approaches, which include cellpadding, empty cells, margins, etc.
Now, let me show you how to use them! ⚙️
How to create spaces in HTML emails
For showcasing how these alternatives look in emails, I’ve used Mailtrap Email Sandbox, which allowed me to see how my HTML emails are rendered.
Cellpadding
Cellpadding is an HTML attribute used to specify the distance in pixels between the cell content and the wall. Nearly all email clients support tables and recognize the cellpadding attribute and position the content according to its value.
Here’s how you could use cellpadding in your CSS template:
<!-- Example 2: cellpadding="10" -->
                            <h2>Example 2: cellpadding="10"</h2>
                            <table cellpadding="10" cellspacing="0" border="1" width="100%">
                                <tr>
                                    <td style="background-color: #f0f0f0;">Content</td>
                                </tr>
                            </table>
And here’s what it would look like when rendered by an email client:

Drawback: As cellpadding is an HTML attribute, CSS can’t override it, particularly with its media queries. However, keep in mind that modern email designs favor CSS-based spacing over HTML attributes due to better control, flexibility, and responsiveness.
Padding
Padding, on the other hand, is a CSS attribute that can be freely overridden. It’s incredibly helpful when designing HTML emails for both web and mobile devices. In such a case, it’s always a good idea to use media queries to specify individual paddings for either version of a message rather than rely on a one-size-fits-all approach.
The syntax of CSS padding is very straightforward style="padding:15px;", as well as implementing it in the code:
<!-- Example 2: padding="10" -->
                            <h2>Example 2: padding="10"</h2>
                            <table cellpadding="0" cellspacing="0" border="1" width="100%">
                                <tr>
                                    <td style="background-color: #f0f0f0; padding: 10px;">Content</td>
                                </tr>
                            </table>
Rendered by the email client:
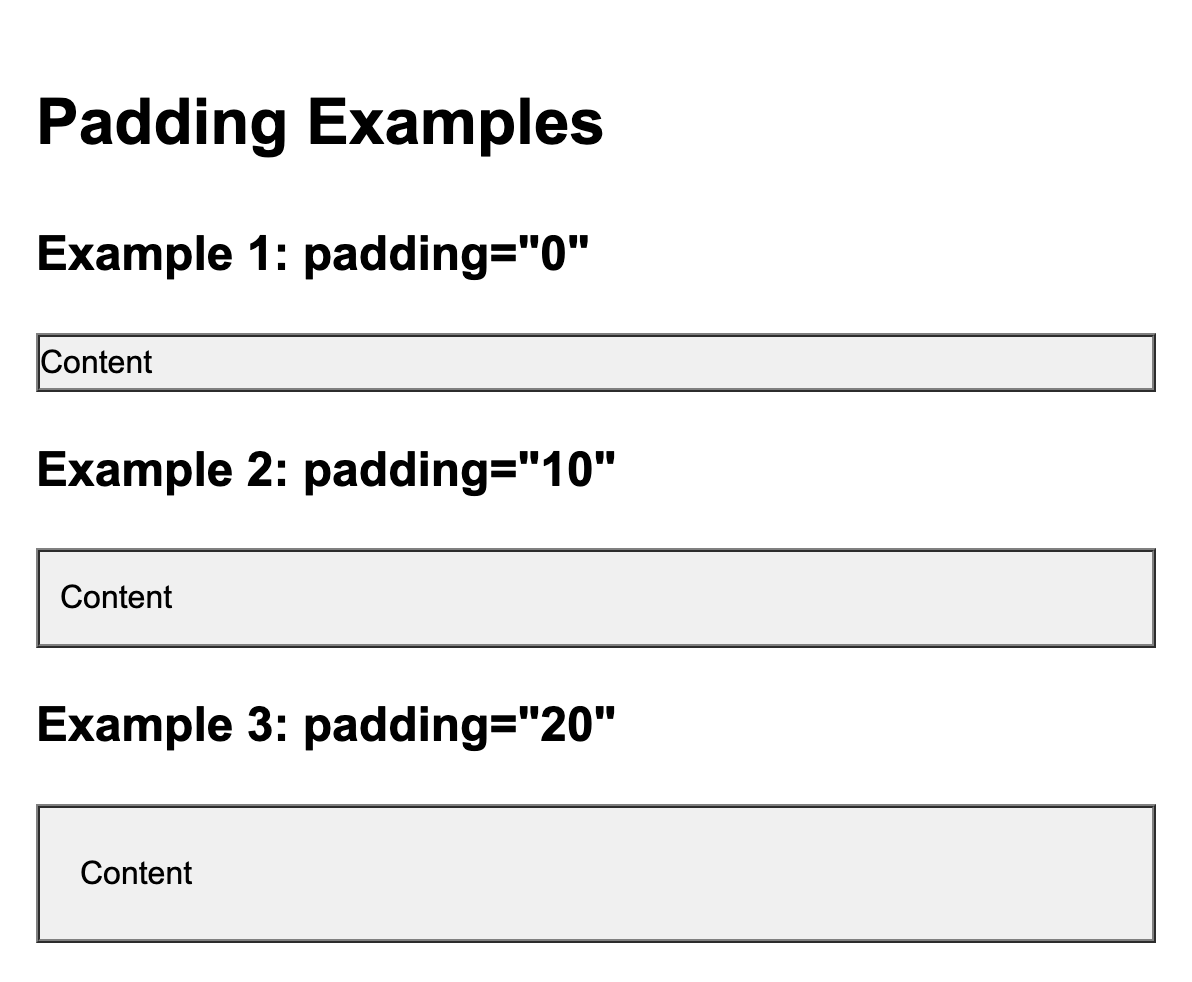
Note: As the approach lacks any significant drawbacks, it’s arguably the best way to add spacing, especially in table cells.
Empty cells
Normally, <td> tags define typical data cells. When left empty, they create invisible cells that can be used to create spacing. There are several reasons why this is a rarely used approach.
First, cells defined this way don’t always retain their height. Some clients will respect them; others will omit the spacing created this way. There’s a high probability that a carefully typed in <td> will result in no spacing at all, making your copy potentially unreadable.
Secondly, using them requires building entire tables that you potentially wouldn’t use otherwise. And, if you’re coding for mobile (and who isn’t?), you’ll need to write new classes to control the invisible cells’ height and width – all of these, with no guarantee that the spacing will render in the first place.
What’s more, it just looks clunky in the actual code:
<!-- Example 2: Using Multiple Empty <td> Cells -->
<h2>Example 2: Using Multiple <td> Cells</h2>
<table cellspacing="0" border="1" width="100%">
  <tr>
    <td style="background-color: #f0f0f0;">
      Content
    </td>
    <td></td> <!-- Empty <td> for spacing -->
    <td></td> <!-- Empty <td> for spacing -->
    <td></td> <!-- Empty <td> for spacing -->
    <td style="background-color: #f0f0f0;">
      Content
    </td>
  </tr>
</table>
Not clunky enough for you? Here’s an email client rendition:
Simply put, I would recommend staying away from empty cells if you want to create spaces in emails. I just wanted to show you an example of what not to do.
Margin
Moving on, we have margin, a CSS element that is, in a way, similar to padding. The difference between the two is that while padding adds spacing inside a cell, margin does so outside it. The example syntax of margin looks as follows style="margin:10px;".
And here it is in a code snippet:
<!-- Example 2: margin="10" -->
<h2>Example 2: margin="10"</h2>
<table cellspacing="0" border="1" width="100%">
  <tr>
    <td style="background-color: #f0f0f0;">
      <div style="margin: 10px;">Content</div>
    </td>
  </tr>
</table>
Looks clean, doesn’t it? Check it out all rendered:
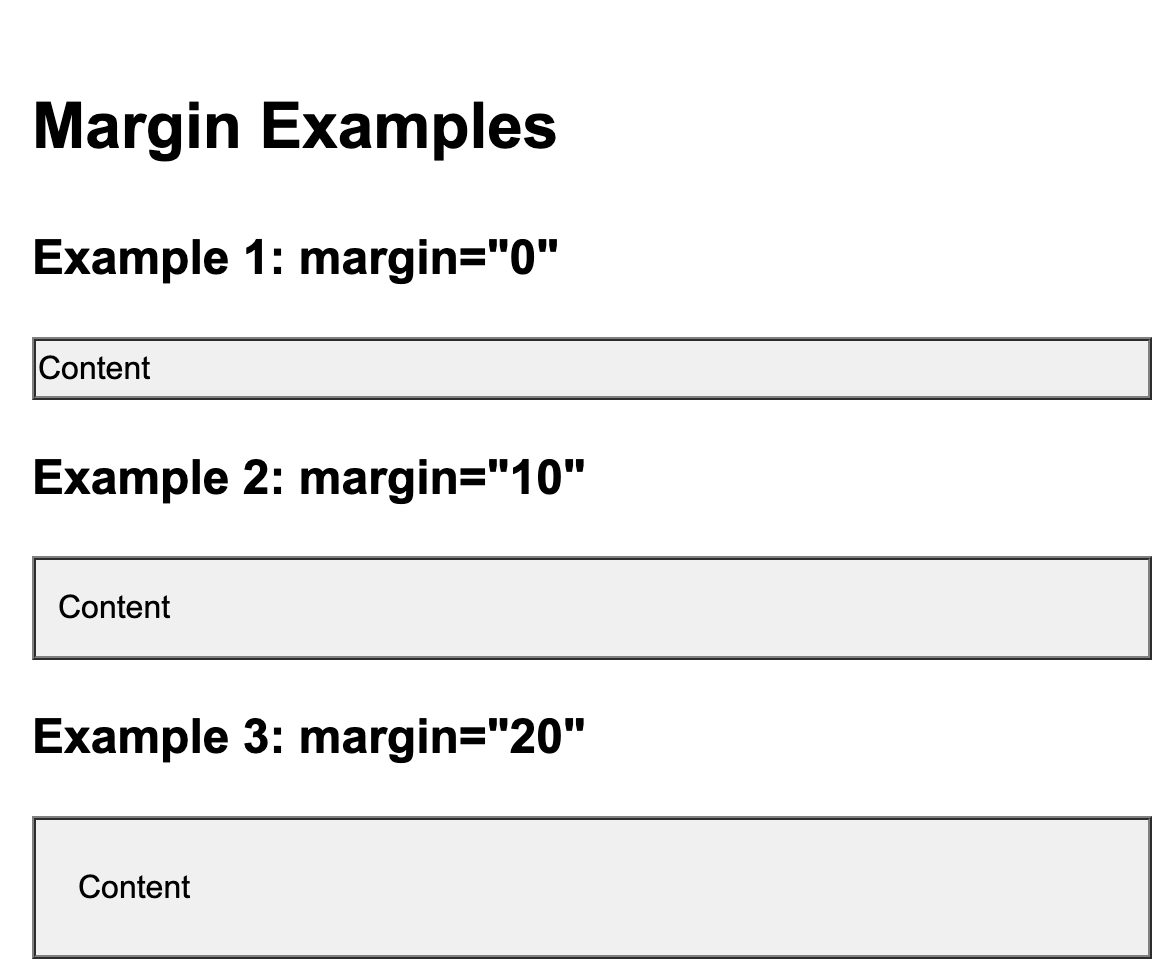
Drawback: Although both the code and the rendition of it look clean, in email development, margins fall short because of a lack of standards and inconsistencies between email clients.
Break
The <br> tag is a popular way of creating spaces in HTML. While it’s handy in blog posts such as this one, there’s a familiar problem that surfaces when trying to use it in emails. Again, email clients treat it very differently. Some render wider gaps; some opt for more narrow spaces. As a result, it’s virtually impossible to predict how an email will look on the recipient’s end.
Because of that, the <br> tag is only recommended when creating breaks between text.
Testing your HTML email
Regardless of how you decide to implement spaces in HTML emails, without testing them beforehand, you won’t be able to know whether they’ll be rendered properly by email clients or how the formatting and alignment will end up looking — there’s a lot of room for headache. 🤕
What’s more, your emails might be caught in the spam filters and miss the recipients’ main inbox folder. Or, even worse, your domain might be blacklisted. All of this without you knowing it.
My go-to solution for all of the above is Email Sandbox, which I’ve used for examples in the previous chapter.
With Email Sandbox, I was able to see how my emails would be rendered on different devices, including mobile phones, tablets, and laptops/desktops.
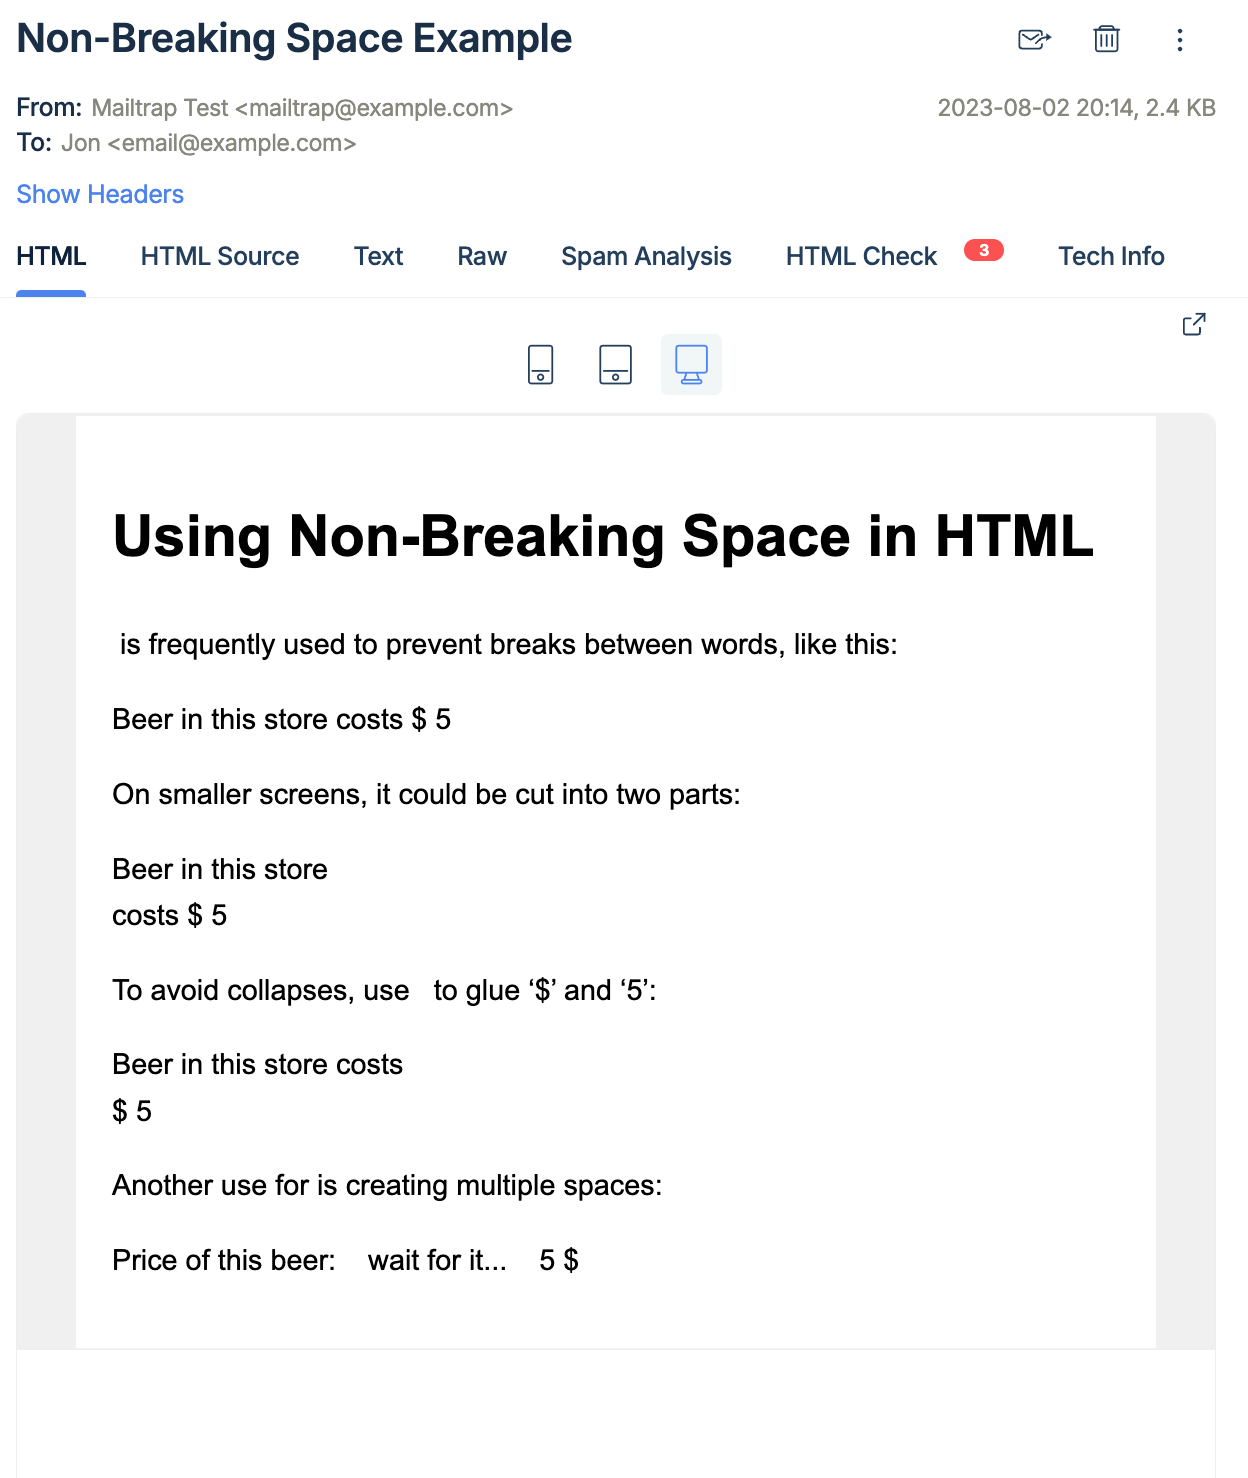
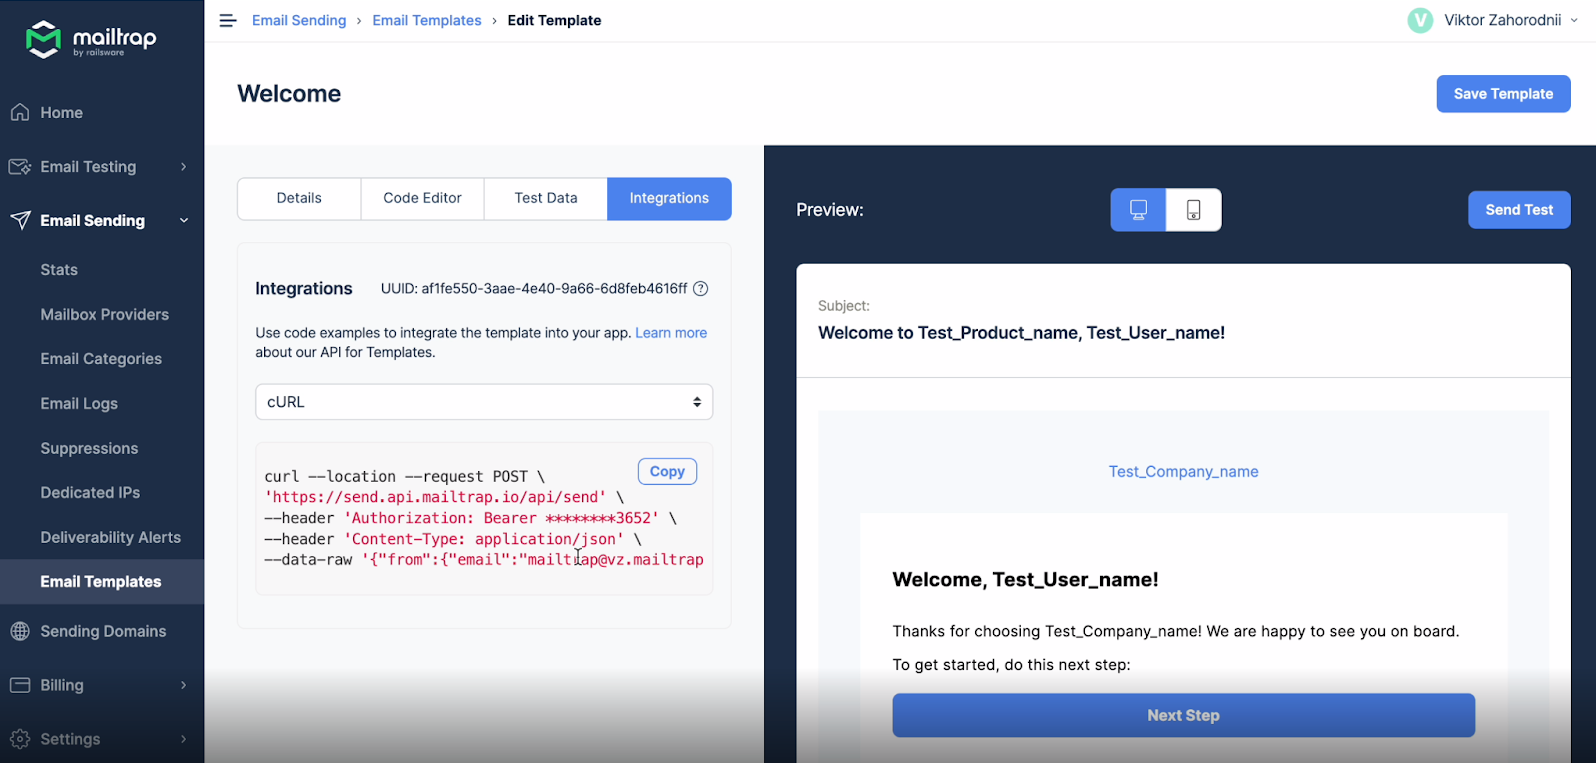
For example, here’s an email I sent to my Mailtrap Email Sandbox inbox to play around with :
And if I see that there’s something wrong with the layout or formatting, I can simply open my email in source HTML, and easily fix it.
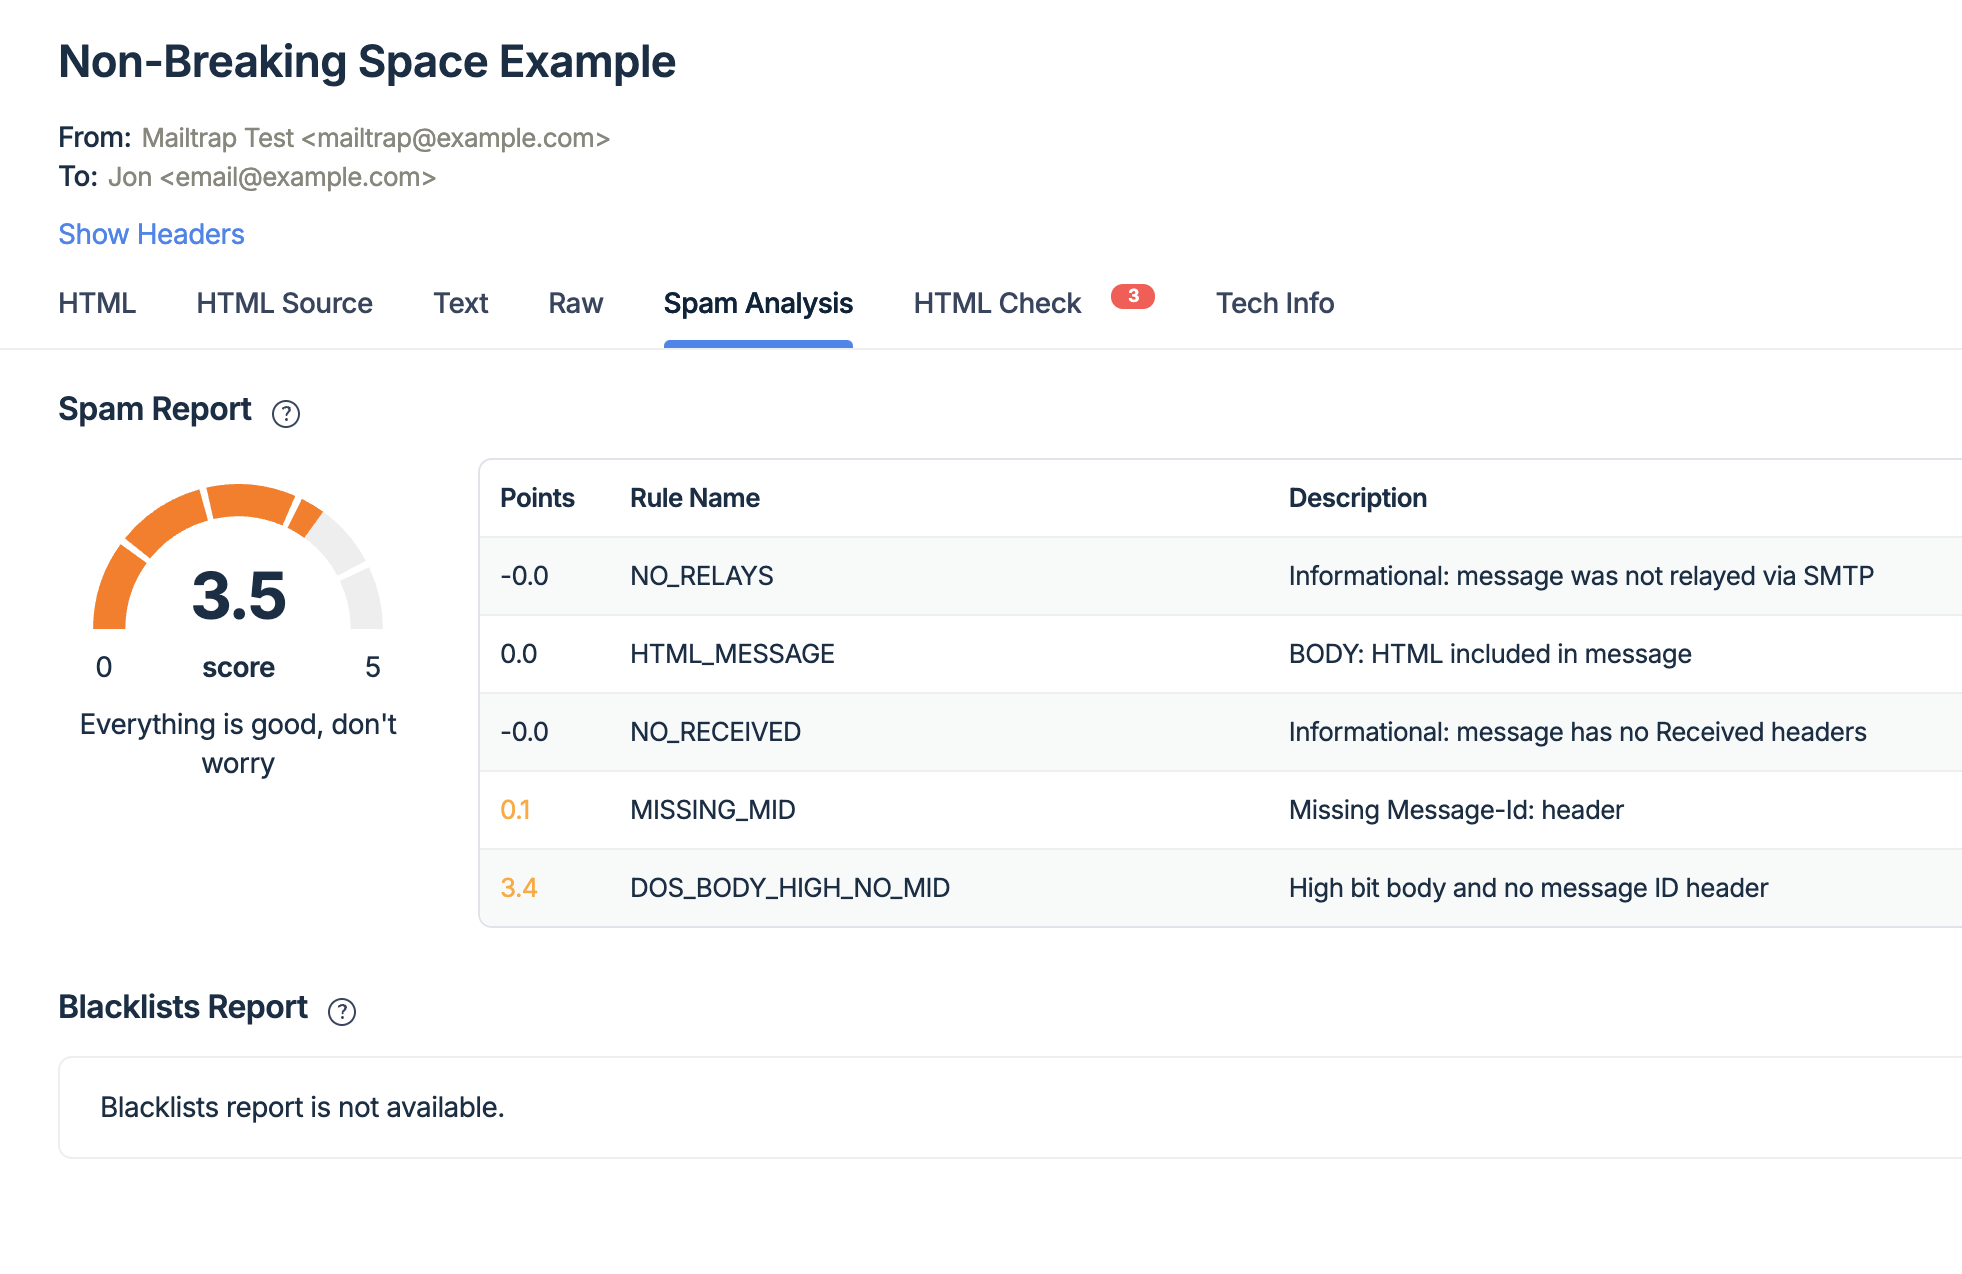
Similarly, I can use the HTML Check feature to make sure my email and is rendered correctly, not only by all clients but across all browsers:

And once you’ve made sure your HTML code looks good, you can then check your spam score. If you keep it below 5, you proactively prevent a significant amount of potential email deliverability issues that may arise in production.
And if you’ve settled on a design, you can design, edit, and host your email templates on Mailtrap Email Delivery Platform. Then, easily test them with our API before you move to production once everything’s ready for sending.
Lastly, Mailtrap Email Sandbox offers a free plan you can use indefinitely for a limited amount of emails every month, so be sure to give it a go! And, of course, you can set it all up in ~5 minutes, check it out. ⬇️
Wrapping up
As you can see, using is generally a good practice; just don’t overuse it or try to create spaces in emails with it.
And if you’re interested in diving deeper into the topic, then be sure to check out our blog, where you can read HTML-related articles such as: