
After tackling the Android Intent send email task, I have a newfound respect for this OS and its intricacies. The methodology is pretty straightforward and relatively simple to implement.
I’ll cover the steps I took and show you how to use Intent to send emails from an Android app (code examples included). Plus, I dedicate a special section to error handling and email testing.
Let’s start coding!
Android Intent send email
The Intent method is the native way to send email in Android programmatically.
So first, you need to make sure to have an Android project set up in your development environment. Here’s a quick overview of the steps:
- Launch Android Studio and select “Start a new Android Studio project”.
- Configure: Project name, Save Location, Language (Java or Kotlin), and Minimum API Level (the minimum Android version supported by your project).
- Select a template – you can go with “Empty Activity” to get the basic UI.
- Hit “Finish” and wait for the Studio to complete the setup.
- Inspect the project structure – with the setup complete, you’ll see a directory
like app/src/main, and it includes:
– java/: Your source code.
– res/: Resources like layouts, strings, and images.
– AndroidManifest.xml: Configuration file, where you can set the MainActivity.
- To test the configuration, hit the “Run” button (the green triangle). Then, choose a connected device or an emulator.
Pro Tips:
- Some emulators work well, but it’s best to have a genuine Android phone with the latest version of the software installed. Otherwise, emulators might throw unexpected errors.
- If you’re using an emulator, you’ll need to configure the email client. If the email client is not configured, it won’t respond to the Intent.
- To see a ‘chooser’ in action, you’ll need to configure a device using multiple messaging applications, for instance, use Gmail application and the Email application.
Now, I’ll use Intent to invoke an existing email client on the Android device. The Intent has to be set up using the correct action: ACTION_SEND or ACTION_SENDTO. Also, you’ll need the correct data: email address, subject, body, etc.
Note: I’m using Java in the examples below. This tutorial doesn’t cover SMS (optionally or otherwise), only an email message.
HTML email
The Intent system allows basic HTML via your Android application. Keep in mind that the final email rendering largely depends on the email client used by the recipient. (e.g. The rendering may look and perform differently on Gmail and Microsoft Outlook)
Pro Tip: You can run your email templates through Mailtrap Email Testing to check for support with the most popular email clients and debug the templates if necessary. I’ll show you how to do it at the end of this article.
Here’s the exemplary snippet for the HTML email:
// Method to send an HTML email to a single recipient without attachment
public void sendEmailSingleRecipient(String recipient, String subject, String htmlBody) {
    Intent emailIntent = new Intent(Intent.ACTION_SEND);
    emailIntent.setData(Uri.parse("mailto:")); // only email apps should handle this
    emailIntent.putExtra(Intent.EXTRA_EMAIL, new String[]{recipient}); // Single recipient
    emailIntent.putExtra(Intent.EXTRA_SUBJECT, subject);

    // Adding HTML body
    emailIntent.putExtra(Intent.EXTRA_TEXT, Html.fromHtml(htmlBody));
    emailIntent.setType("text/html");

           startActivity(emailIntent);
}
The method is tailored to a single email recipient, the recipient’s email address is passed a single-element array to the Intent.EXTRA_EMAIL field. Later, I’ll show how to include BCC for multiple recipients.
And with the startActivity(emailIntent); intent, any applications that support plaintext messaging will be able to handle this request. Once you have set the type data for the Intent, you can call the startActivity() method, passing in your Intent.
Email with attachment
To include attachments you need to fetch the file from storage and add it as an extra stream to the intent. Check the example below.
// Import necessary classes
import androidx.appcompat.app.AppCompatActivity;
import androidx.core.content.FileProvider;

import android.app.Activity;
import android.content.Intent;
import android.net.Uri;
import android.os.Bundle;
import android.widget.Button;
import android.widget.Toast;

import java.io.File;


public class EmailSender extends AppCompatActivity {

public static final int PICK_TEXT_FILE_REQUEST = 1;

    @Override
    protected void onCreate(Bundle savedInstanceState) {
        super.onCreate(savedInstanceState);
        setContentView(R.layout.activity_main);
        Button picker = findViewById(R.id.picker);
        picker.setOnClickListener(view -> {
            Intent intent = new Intent(Intent.ACTION_GET_CONTENT);
            intent.setType("text/plain");
            startActivityForResult(Intent.createChooser(intent, "Select Text File"), PICK_TEXT_FILE_REQUEST);
        });
    }

    public void onActivityResult(int requestCode, int resultCode, Intent data) {
        super.onActivityResult(requestCode, resultCode, data);
        if (requestCode == PICK_TEXT_FILE_REQUEST && resultCode == Activity.RESULT_OK) {
            if (data != null) {
                Uri uri = data.getData();
                if (uri != null) {
                    // Trigger file picker
                    sendEmailSingleRecipient("ghostdev030823@gmail.com",
                            "This is a test subject",
                            "This is a test email body using Android intent", uri);
                }
            }
        }
    }

    // Method to send an HTML email to a single recipient with an attachment
    public void sendEmailSingleRecipient(String recipient, String subject, String body, Uri filePath) {
        Intent emailIntent = new Intent(Intent.ACTION_SEND);
        emailIntent.addFlags(Intent.FLAG_GRANT_READ_URI_PERMISSION);
        emailIntent.putExtra(Intent.EXTRA_EMAIL, new String[]{recipient});
        emailIntent.putExtra(Intent.EXTRA_SUBJECT, subject);
        emailIntent.putExtra(Intent.EXTRA_TEXT, body);
        emailIntent.putExtra(Intent.EXTRA_STREAM, filePath);
        emailIntent.setType("message/rfc822"); // only email apps should handle this

        startActivity(emailIntent);
}

}
Also, remember to configure the FileProvider in your Android manifest and resource files to handle file attachments securely.
The correct configuration for the manifest file, particularly for the newer Android versions, is:
<application>
    …
<uses-permission android:name="android.permission.INTERNET" />
    <uses-permission android:name="android.permission.READ_EXTERNAL_STORAGE" />
    <uses-permission android:name="android.permission.READ_INTERNAL_STORAGE" />
    <uses-permission android:name="android.permission.ACCESS_NETWORK_STATE" />

    <provider
            android:name="androidx.core.content.FileProvider"
            android:authorities="${applicationId}.provider"
            android:exported="false"
            android:grantUriPermissions="true">
            <meta-data
                android:name="android.support.FILE_PROVIDER_PATHS"
                android:resource="@xml/provider_paths"/>
        </provider>
    ...
</application>
And in the res/xml/file_paths.xml, it’s:
<paths>
    <external-path name="external_files" path="."/>
</paths>
Configuration notes:
- Replace
your.authoritywith your app’s authority, typically your application’s package name. - Ensure the file paths and permissions are correctly set for the
FileProvider. - Test the functionality with various email clients to check the HTML rendering and attachment handling (Gmail app, Apple Mail, etc.).
Send to multiple recipients
For the sake of convenience, I’ll tweak the example above to include multiple recipients. Here’s the updated code.
// Import necessary classes
import android.content.Intent;
import android.net.Uri;
import android.support.v4.content.FileProvider;
import java.io.File;

public class EmailSender {

    // Method to send an HTML email to multiple recipients with an attachment
    public void sendEmailWithAttachment(String[] recipients, String subject, String htmlBody, File attachmentFile) {
        Intent emailIntent = new Intent(Intent.ACTION_SENDTO);
        emailIntent.setData(Uri.parse("mailto:")); // only email apps should handle this
        emailIntent.putExtra(Intent.EXTRA_EMAIL, recipients); // Multiple recipients
        emailIntent.putExtra(Intent.EXTRA_SUBJECT, subject);

        // Check if the attachment is not null and exists
        if (attachmentFile != null && attachmentFile.exists()) {
            // Add the attachment using FileProvider
            Uri uri = FileProvider.getUriForFile(context, "your.authority", attachmentFile);
            emailIntent.addFlags(Intent.FLAG_GRANT_READ_URI_PERMISSION);
            emailIntent.putExtra(Intent.EXTRA_STREAM, uri);
        }

        // Adding HTML body
        emailIntent.putExtra(Intent.EXTRA_TEXT, Html.fromHtml(htmlBody));
        emailIntent.setType("text/html");

        // Verify that the intent will resolve to an activity
        if (emailIntent.resolveActivity(getPackageManager()) != null) {
            startActivity(Intent.createChooser(emailIntent, "Send email..."));
        } else {
            // Handle the situation where no email client is installed
            // Show an error message or a notification
        }
    }
}
The recipients parameter is now an array of strings, allowing you to specify multiple email addresses. The rest of the method remains unchanged, supporting both HTML content and file attachments.
General guidelines on the Android Intent methodology
- Import statements: I imported necessary classes like
Intent,Uri,File, and others. sendEmailmethod: This method accepts the recipients’ email addresses, the email subject, the HTML body, and an optional file attachment.- Creating the Intent: We use
Intent.ACTION_SENDTOwithmailto:to ensure only email apps handle this intent. - Adding recipients and subject: I used
Intent.EXTRA_EMAILandIntent.EXTRA_SUBJECT. - Handling attachment: If an attachment is provided, I use a
FileProviderto get a content URI for the file and add it to the intent. This is a secure way to share files between apps starting from Android 7.0 (API level 24). As mentioned earlier, you’ll need to define aFileProviderin your manifest and create an XML file defining available paths. - HTML body: I used
Html.fromHtml(htmlBody)to add the HTML formatted text to the email body. The rendering depends on the email client’s capabilities. - Intent type: I set the type to
"text/html", it can also be"text/plain".
Other considerations
Here, I’d like to touch upon some functions, commands, and elements that didn’t make it into this tutorial. But, based on your specific use case, you might find them useful.
- EditText: It’s a UI element in Android that allows users to enter text. It’s part of the Android SDK and is typically used within layout XML files to design the UI.
- TextView: This is another Android UI element that displays read-only text to the user. Unlike
EditText,TextViewdoesn’t allow user input and is used primarily for displaying static text or text that changes dynamically - OnClickListener: It’s an Android interface that listens for click events on views such as buttons. By implementing the
OnClickListenerinterface and itsonClickmethod, you can define what happens when a user clicks on a particular view. - Public void onClick: It’s the declaration method for the
onClickmethod. When you implement the interface, you have to provide a corresponding implementation. It’s called when a view (with the listener attached) receives a click event.
Error handling
In the exemplary snippets, I didn’t include error handling to avoid bloating the code and help you focus only on the given methodology.
Nevertheless, it’s important to check if there’s an app to handle the email intent. If not, you should handle this gracefully, perhaps by showing an error message. There are two methods to do this.
Note: I won’t be rewriting the whole code, just what can be included under } else {...}
#1 – Simple error snippet
} else {
    // No email client is installed, handle this case
    Toast.makeText(context, "No email client installed.", Toast.LENGTH_SHORT).show();
}
In the snippet:
- A
Toastmessage is displayed to inform the user that no email client is installed. This is the simplest way to show a brief message. - Reminder: Remember to adjust the context (
context) appropriately based on where you’re calling this code from (e.g., Activity, Fragment, or other contexts).
#2 – AlertDialog method
This is a bit more complex, but it may provide a better user experience.
} else {
    // No email client is installed, handle this case with an AlertDialog
    AlertDialog.Builder builder = new AlertDialog.Builder(context);
    builder.setTitle("Error");
    builder.setMessage("No email client installed.");
    builder.setPositiveButton("OK", null);
    AlertDialog dialog = builder.create();
    dialog.show();
}
In this snippet:
- An
AlertDialogis created to notify the user more engagingly than aToast. - It sets a title and message to inform the user about the issue.
- A positive button is added with the label “OK” that does nothing but close the dialog when clicked (hence,
nullas the listener).
Pro Tip: If you want to take it a step further, you can use a specific constructor to designate a theme resource (it should be the second parameter) and customize the dialog. I won’t be covering that in this article.
Testing your emails with Mailtrap
As mentioned earlier, Android Intent supports only basic HTML, and the email rendering depends on the clients your recipients are using.
However, if you test the basic HTML email created for Intent purposes, you’ll have the upper hand to debug the template and ensure it displays well across different clients.
How?
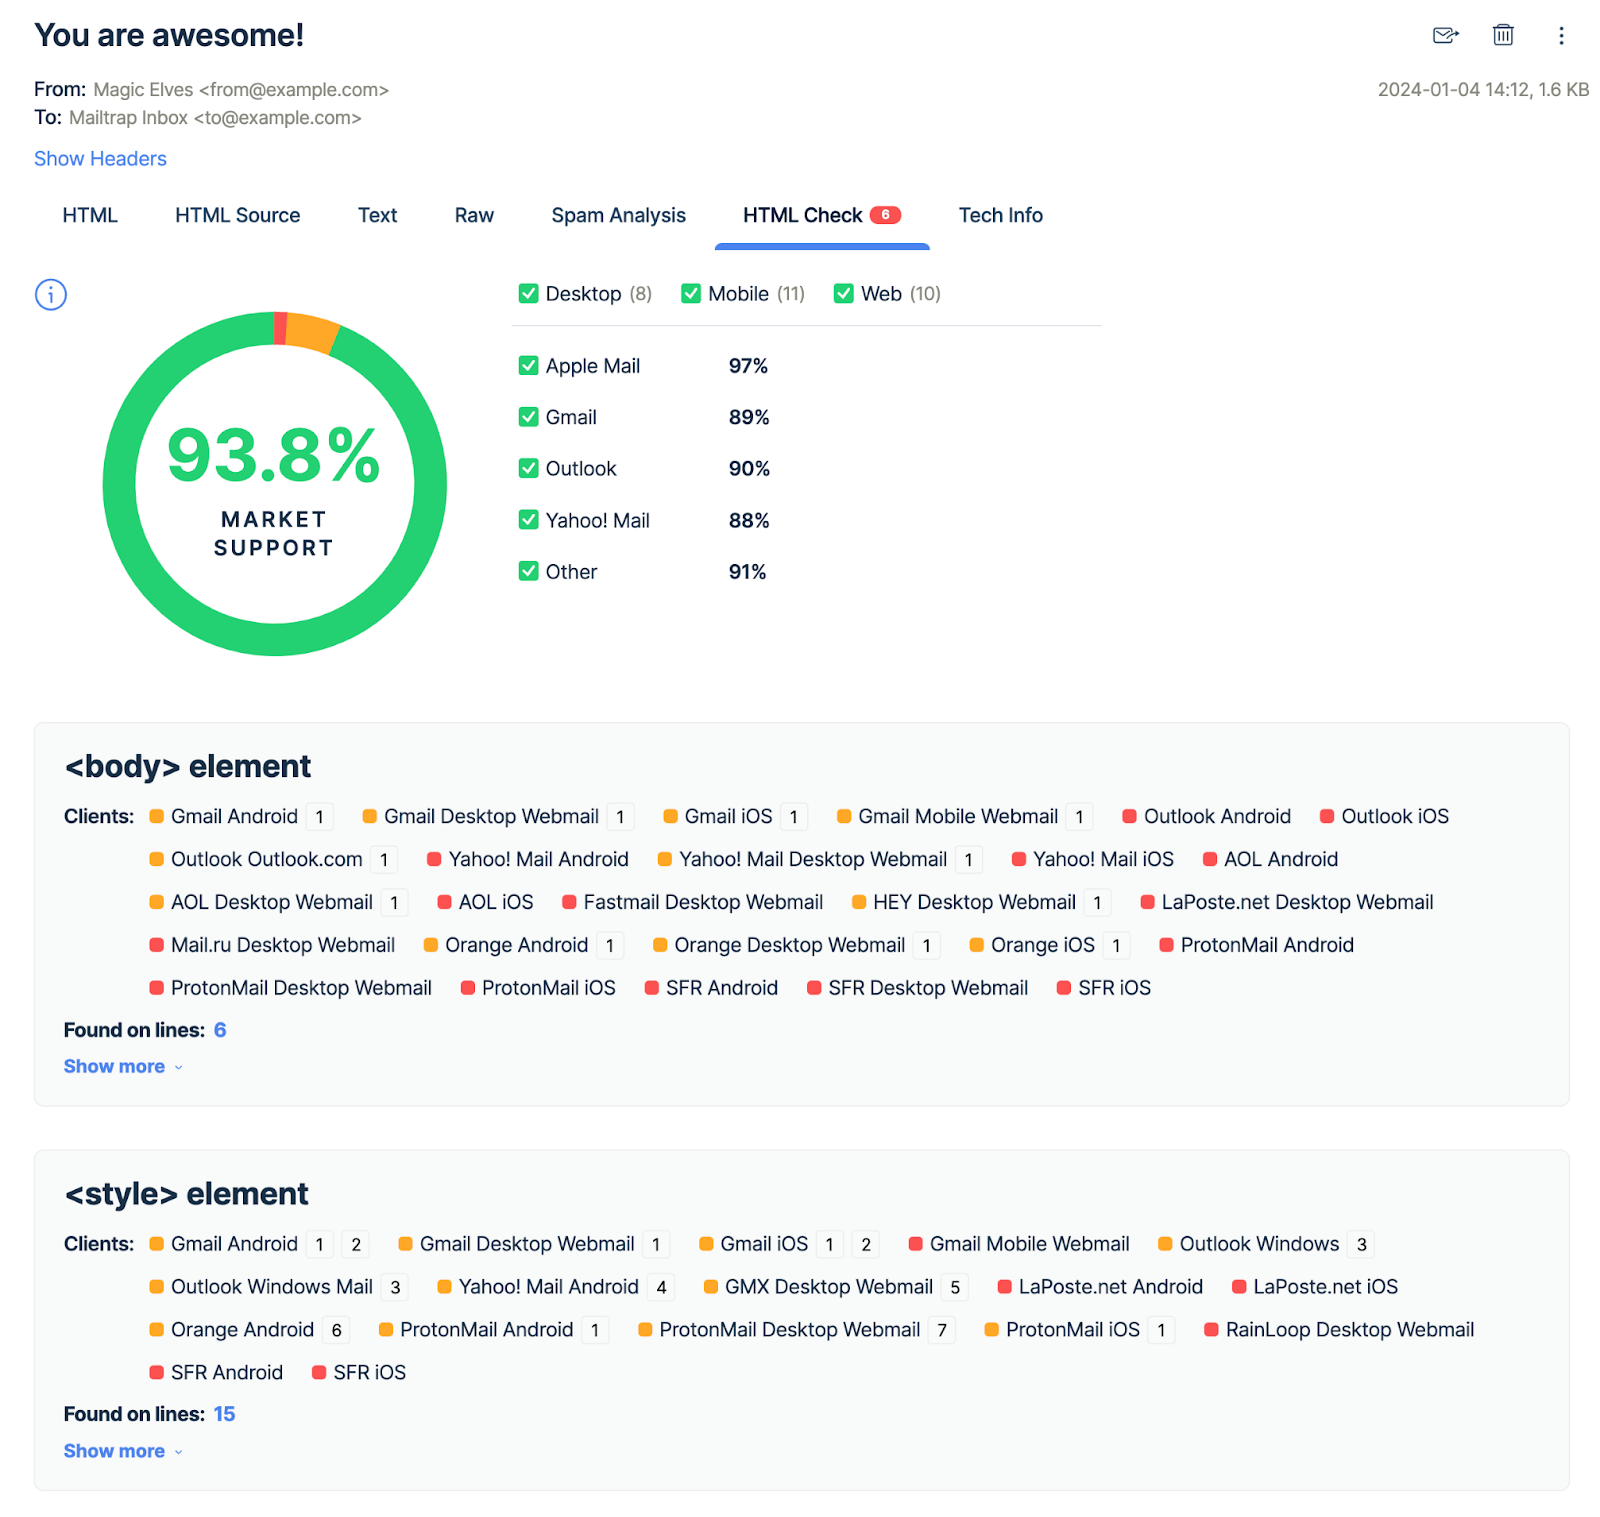
Mailtrap Email Testing is a sandbox to inspect and debug emails in staging, dev, and QA environments before sending them to recipients. It gives you percentile support for your emails with different email providers and you can preview the email on different devices.
Here’s the full list of features, and then, I’ll tell you how to use testing.
- Fake SMTP Server
- HTML/CSS check
- Spam score check
- API for QA automation
- Ready to use integrations in 20+ languages (Ruby, Python, PHP, Node.js, .Net, etc.)
- Emails preview
- Multiple inboxes for different projects and stages
- User management, SSO
Mailtrap Email Testing – SMTP quick tutorial
- Create a Mailtrap account: Sign up for a free account on Mailtrap if you don’t already have one.
- Access your Inbox: Once logged in, navigate to your first Inbox by clicking on “Email Testing”, then “Inboxes”, and finally “My Inbox”. Here, you’ll find a default inbox named “My Inbox”.

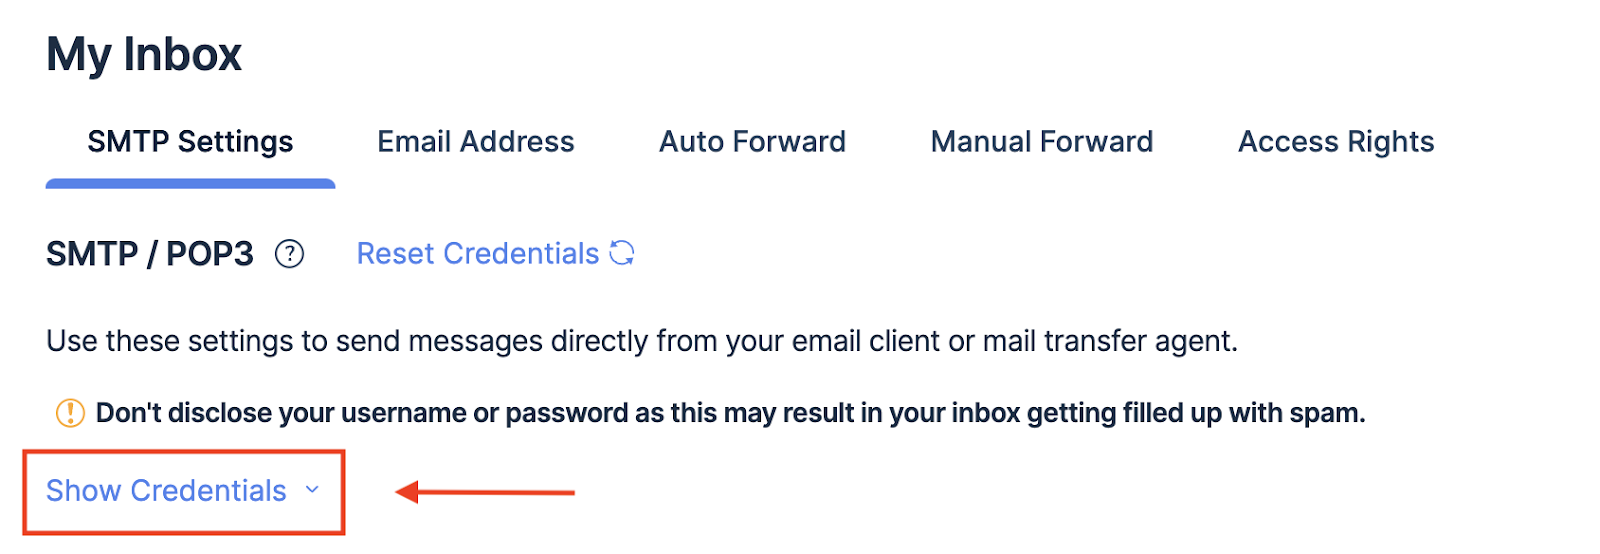
- Retrieve SMTP credentials: Inside “My Inbox”, click “Show credentials” to view the SMTP details for sandbox testing. These include the host (sandbox.smtp.mailtrap.io), port (25, 465, 587, or 2525), username (unique to your inbox), and password (also unique to your inbox).
- Configure your app: Use the SMTP credentials obtained from Mailtrap to configure your app’s email-sending feature. You will need to replace the SMTP settings in your app with these new ones.
- Send a test email: After setting up Mailtrap in your app, send a test email. This email will land in your Mailtrap inbox where you can inspect and debug it.
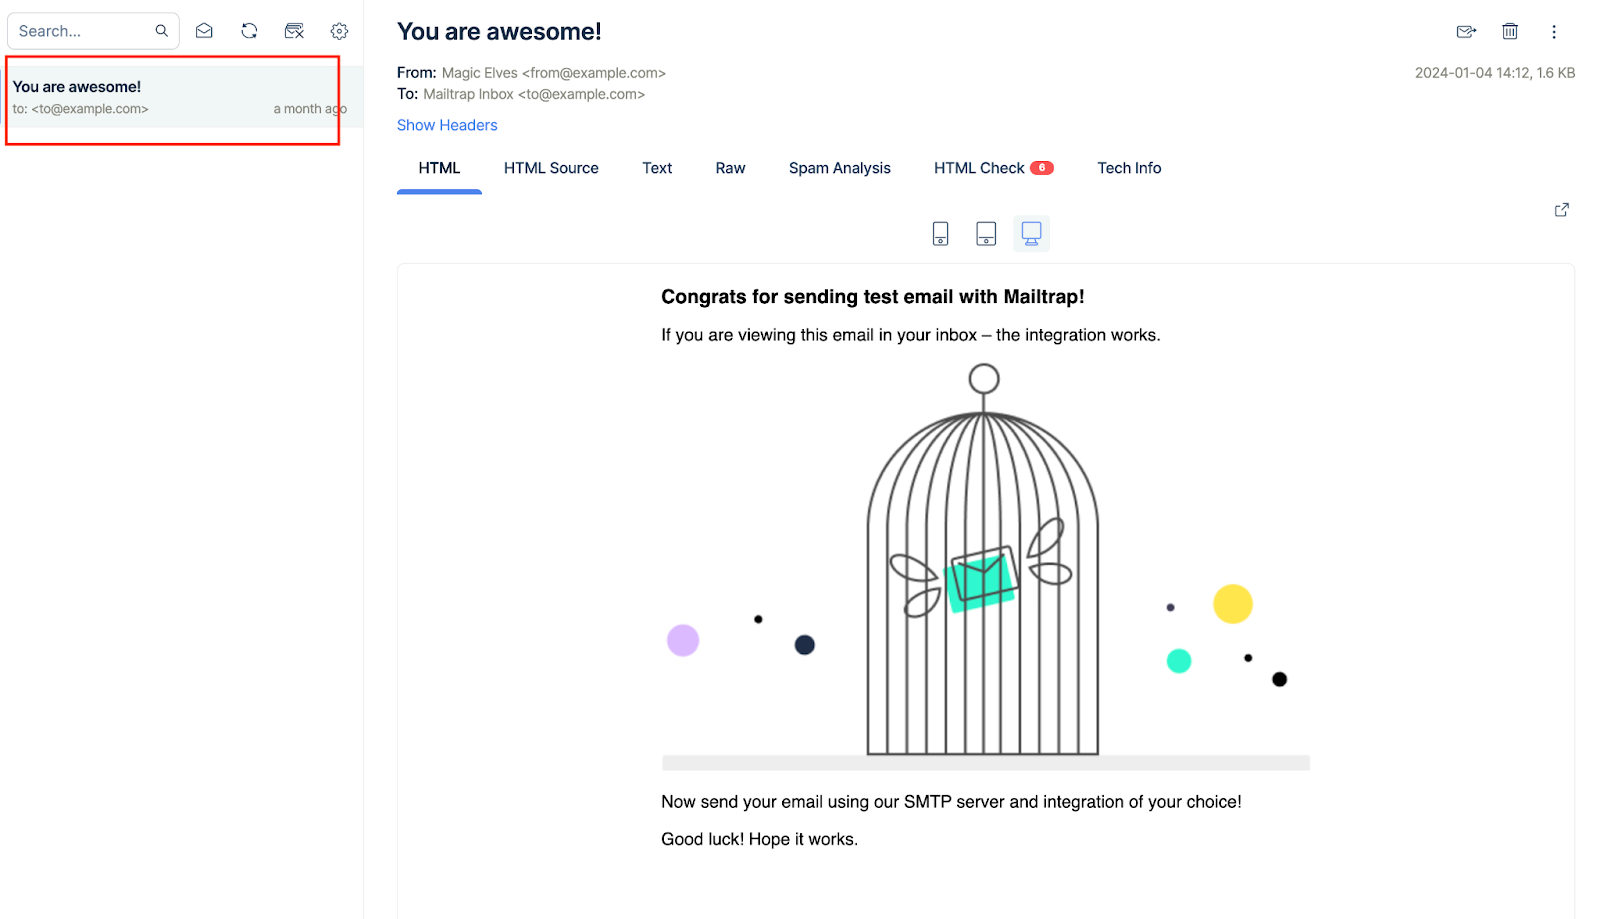
- Review and debug: Click on the received email in Mailtrap and review the HTML Check and Spam Analysis tabs to ensure the email renders correctly and doesn’t contain spam triggers.
Remember, Mailtrap’s SMTP is for testing purposes only and will not deliver emails to actual recipients. When you’re ready to send emails to live users, you’ll need to switch to a production SMTP server.
Further reading:
- Java Email Validation + Email Regex for Java
- Send emails in Java [Guide with Code Examples]
- Jakarta Mail Tutorial – How to Send an Email
- How to Send an Email with Firebase
Enjoy your Intent
At the end of the day, Android Intent send email is a convenient method to send emails from your application. But keep in mind that its effectiveness depends on the existence of an email client on your recipients’ devices.