 Skip to Navigation


Whether you’re confirming user signups, sending notifications, or automating workflows, Supabase makes it easy to integrate and send emails with SMTP or third-party APIs.
And in this guide, I’ll walk you through every step of the process, including:
- Sending emails using Supabase Auth [click here to jump ahead]
- Creating and configuring Edge Functions [click here to jump ahead]
- Sending emails using an SMTP service [click here to jump ahead]
- Sending emails using a dedicated API [click here to jump ahead]
Alternative, if you’d like to get the quick setup, feel free to check our knowledge base tutorial on how to send emails in Supabase as well as our dedicated video:
But, before we start, please make sure that you have:
Disclaimer: Every line of code in this article has been written and checked by our developers.
Send emails using Supabase Auth
Supabase Auth simplifies adding authentication and authorization to your app. With client SDKs and API endpoints, you can easily create and manage user accounts.
It supports a wide range of popular authentication methods, including password login, magic links, one-time passwords (OTP), social logins, and single sign-on (SSO).
Send emails using Supabase and Mailtrap SMTP
Supabase Auth simplifies adding authentication and authorization to your app. With client SDKs and API endpoints, you can easily create and manage user accounts. It supports a wide range of popular authentication methods, including password login, magic links, one-time passwords (OTP), social logins, and single sign-on (SSO).
By default, Supabase offers a built-in SMTP solution but you can send only 2 emails per day with it. Essentially, you can use it for basic testing purposes but if you need a production-ready solution, you’ll need to connect Supabase Auth to a 3rd party SMTP.
For this article, we’ll use Mailtrap, an email delivery platform for developer and product teams that comes with high inboxing rates and fast delivery. Most importantly, it can be connected to Supabase in a few simple steps.
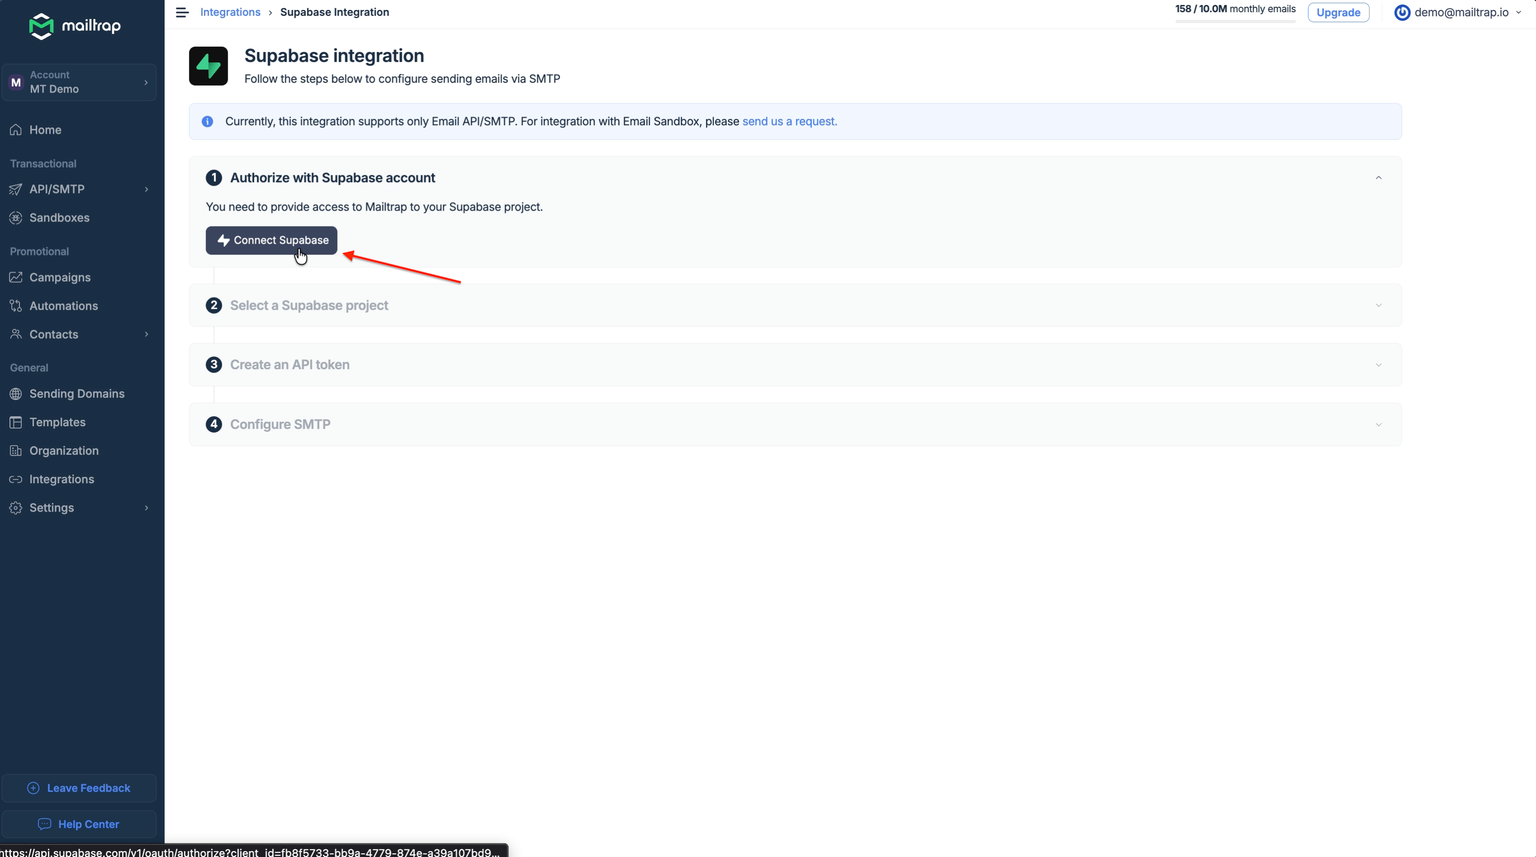
Step 1. Authorize with Supabase account
First, log in to your Mailtrap account, navigate to the Integrations page, find Supabase, and click the Integrate button. On the Supabase integration page, click Connect Supabase.
This will bring up an Authorization window, where you can review the permission for the access of your SUpabase organization and projects. To proceed to the next step, click on Authorize Mailtrap.
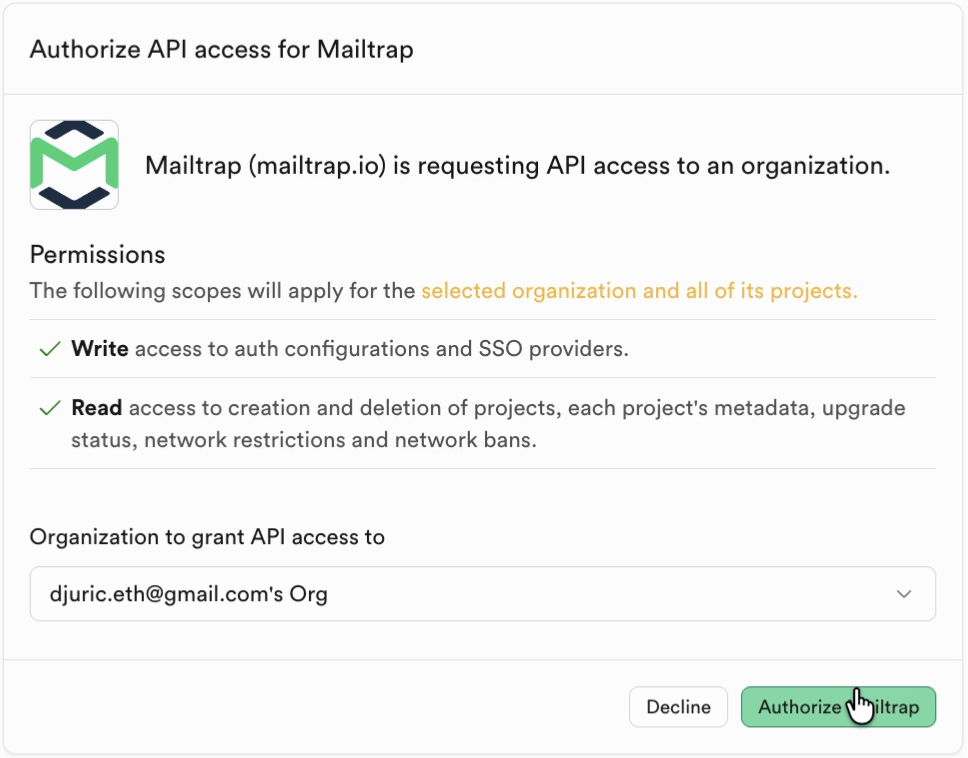
Note: To connect Supabase and Mailtrap, you will need to allow Write and Read access. If you’re not happy with this at any point, you can revoke the access.
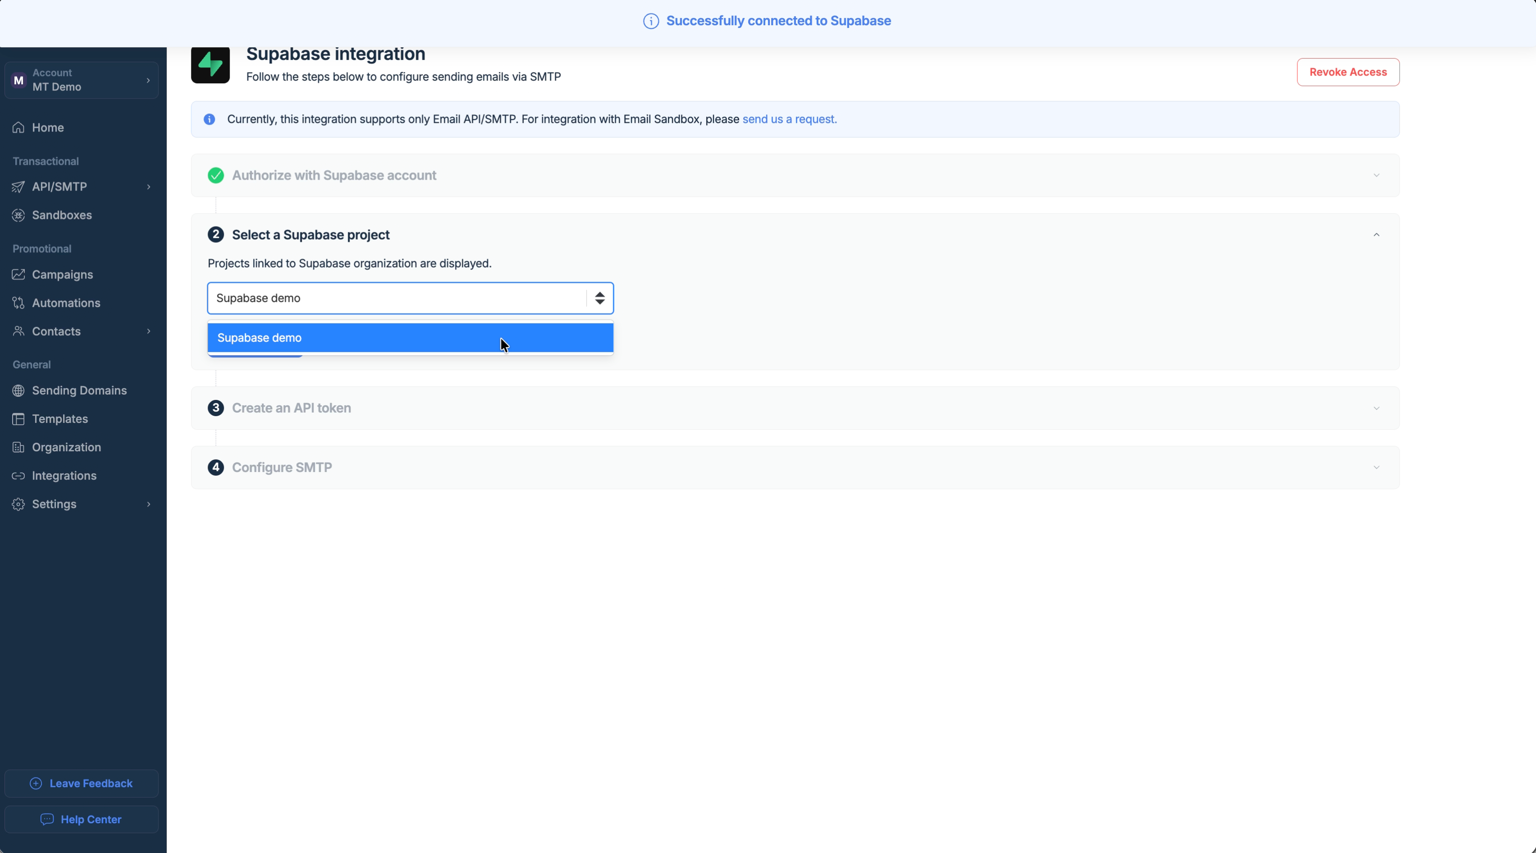
Step 2. Select a Supabase project
Once you provide Mailtrap the required access, it will load your available projects. Then, simply click on the Select a Supabase project menu and choose your project.
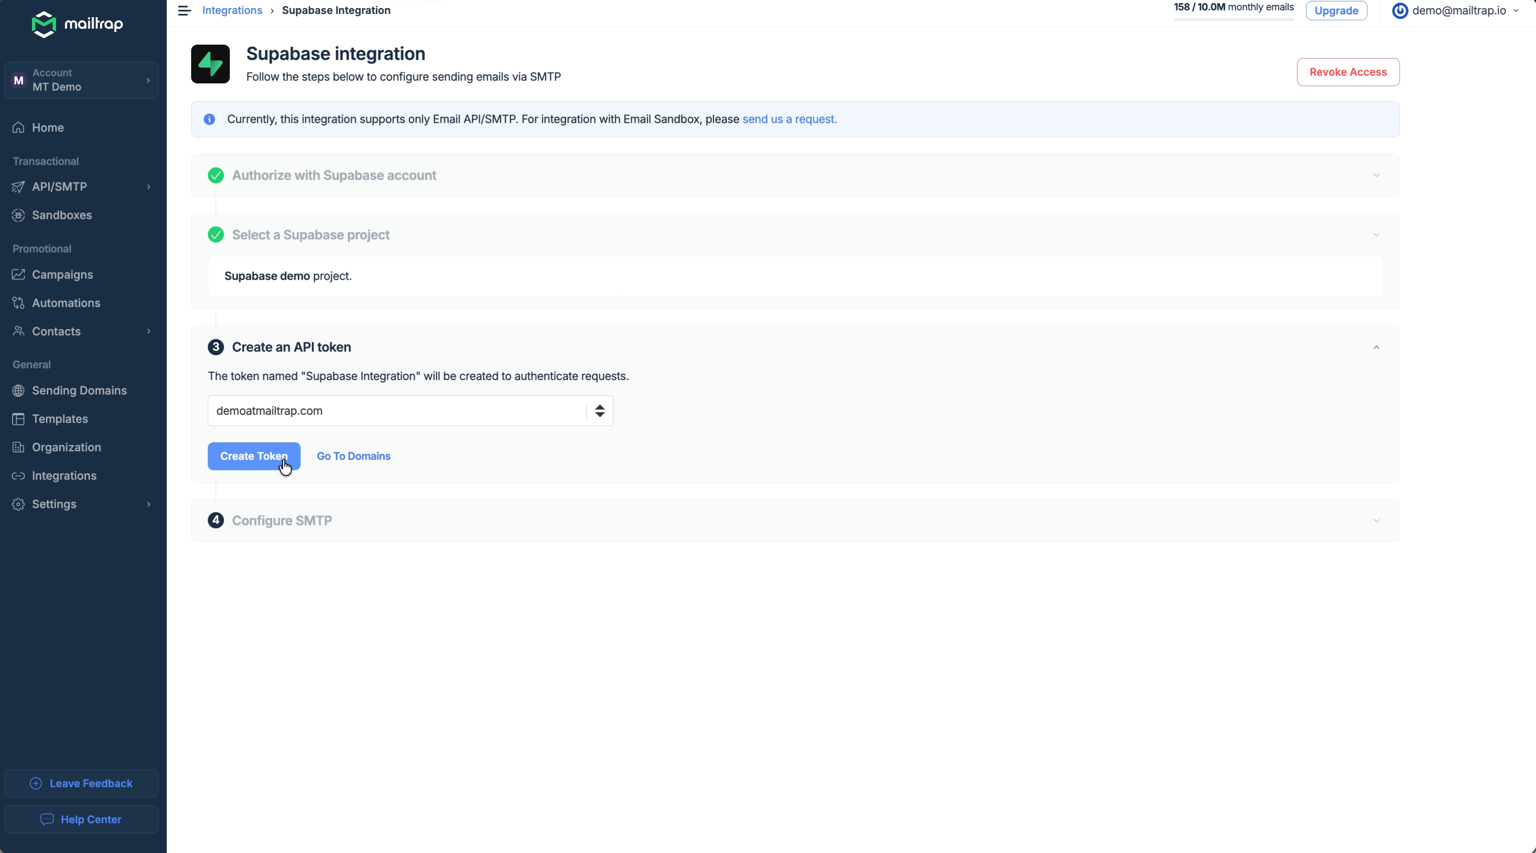
Step 3. Create an API token
Next, use the dropdown menu to select the domain you use for sending emails and click Create Token.
Step 4. Configure SMTP
Lastly, you need to enter your sender name and email, click on Configure SMTP, and Mailtrap will automatically configure your Custom SMTP settings in Supabase. This means you won’t have to manually enter details like host and port, minimizing the chance of typos and configuration errors.

Note: The integration works both with Cloud and self-hosted Supabase.
Sending the first email with Supabase and Mailtrap
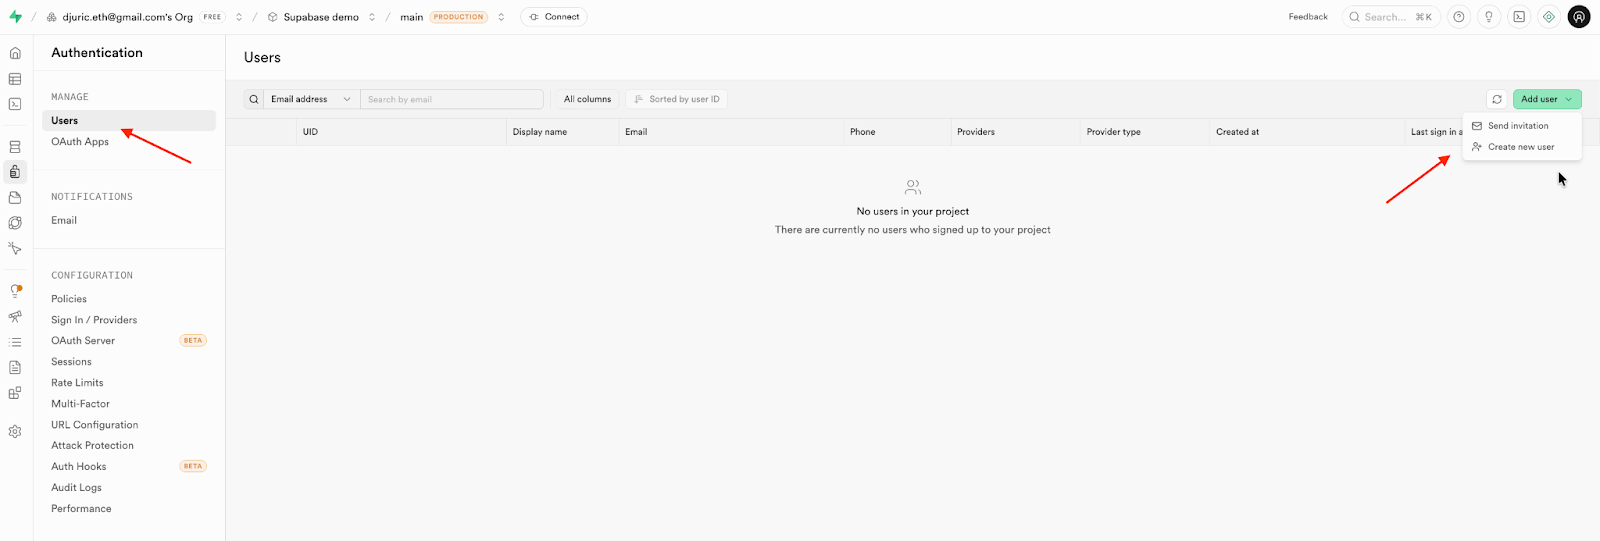
To test the integration and send the first email, navigate to Users under Authentication, and then click on the Add User button in the upper-right corner.
Next, click on Send invitation, which will send an email with a secure link for the recipient to complete signup and set their password. Add the user email, and click on Invite user.
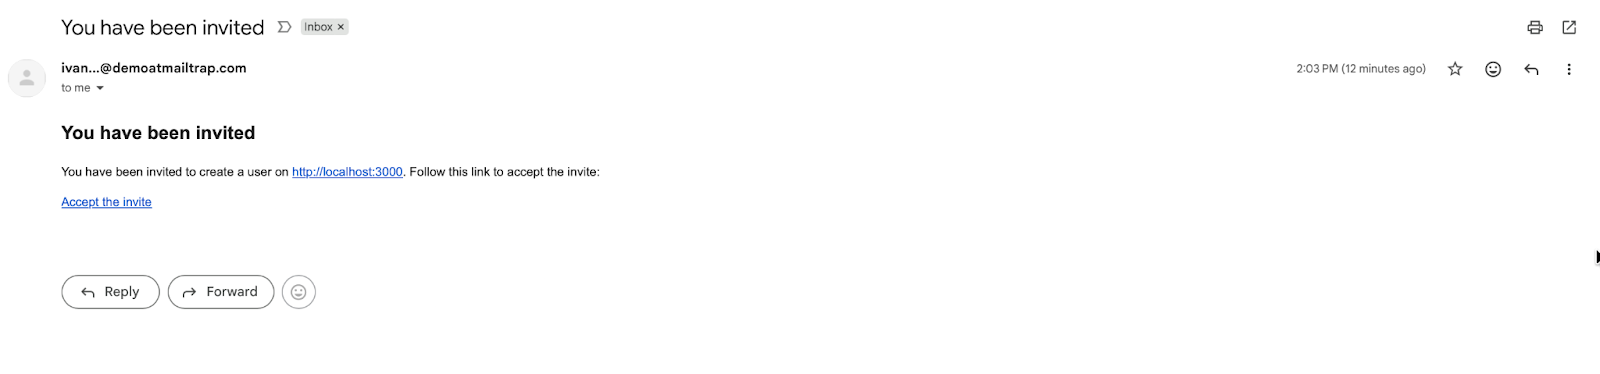
And here is the email in the address I added.
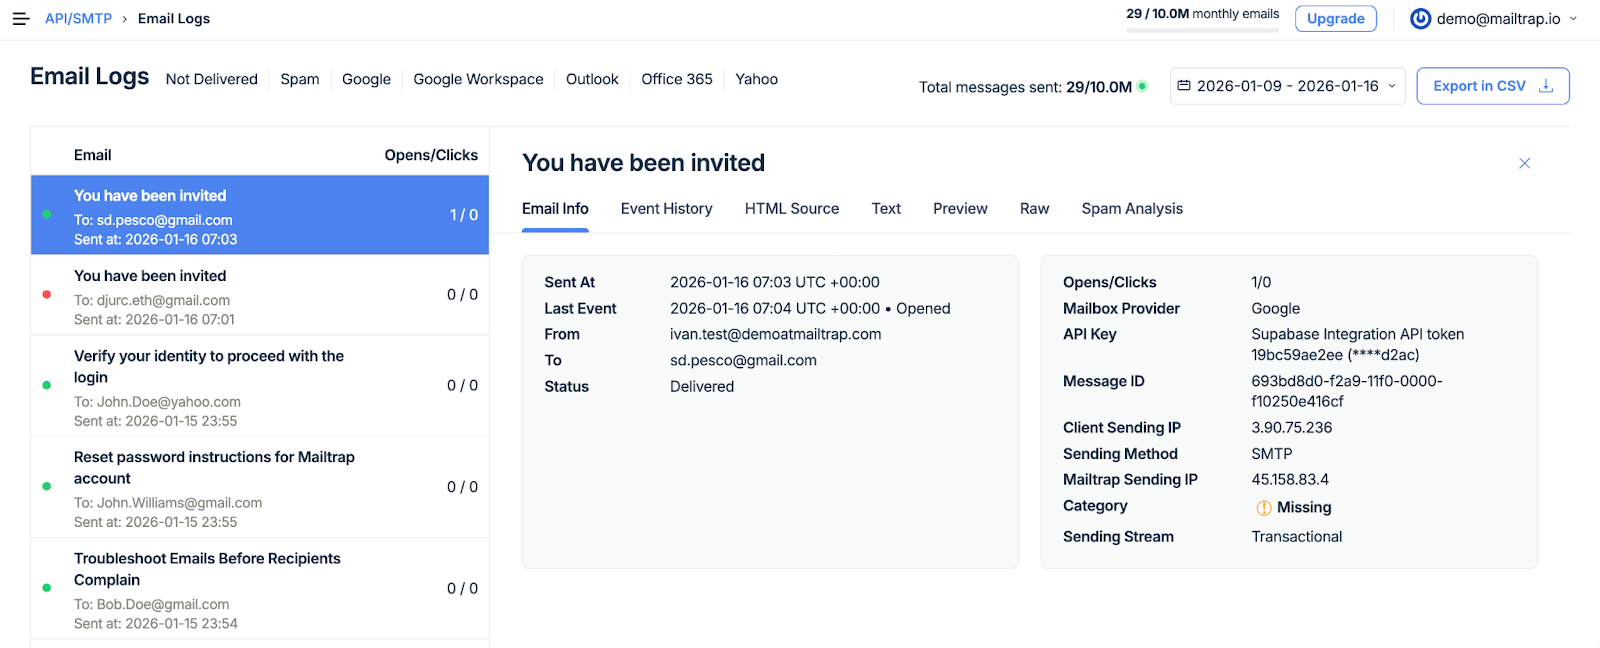
For more information and details on message transmission, such as event history or spam analysis, you can check out Mailtrap Email Logs.
Want to have more control and learn how to send emails via Auth manually? Keep reading the next part.
Configure custom SMTP settings
Let’s configure auth SMTP settings in the project dashboard. First, go to your Supabase Project. Navigate to Authentication → Emails → SMTP Settings. Set your SMTP credentials (host, port, user, password).
As you open the page, select the SMTP Settings Tab, and as it opens, make sure to turn on Enable Custom SMTP.

In the opened tab, you need to fill all fields with your Mailtrap SMTP credentials. For the Sender details section, make sure to provide an email with a domain matching your Mailtrap Sending Domains configuration.

In the SMTP Provider Settings section, your filled properties should be the same as in the image below (except you will have a unique password).

Make sure to click Save changes. Supabase handles these system emails automatically (e.g., signup confirmations, password resets, etc.) once your SMTP is configured with your Mailtrap credentials.
Setup a React authentication form
To integrate Supabase Auth, let’s first initialize a React application and conveniently bootstrap it with Vite.
npm:
npm create vite@latest supabase-auth -- --template react
cd supabase-auth
yarn:
yarn create vite@latest supabase-auth -- --template react
cd supabase-auth
Now, let’s install the @supabase/supabase-js package that we will use in our application to handle authentication flows. To simplify styling, we’ll use Auth UI. It is a ready-made React component from Supabase, designed for user authentication. It offers customizable themes and flexible styling options to align with your tastes.
npm:
npm install @supabase/supabase-js @supabase/auth-ui-react @supabase/auth-ui-sharedyarn:
yarn add @supabase/supabase-js @supabase/auth-ui-react @supabase/auth-ui-sharedTo store our keys safely, let’s create a .env file and specify the environment variables we’ll use when connecting to Supabase Auth. You can find your Project URL and public API (anon) key by following this link and selecting your project in the dashboard.
VITE_SUPABASE_URL=https://<your-project>.supabase.co
VITE_SUPABASE_ANON_KEY=your-anon-key
Important: Environment variables in Vite have to start with VITE_.
In the src folder, create a supabaseClient.js. We’ll use it to configure the supabase client, implementing Supabase Auth:
import { createClient } from "@supabase/supabase-js";
const supabase = createClient(
  import.meta.env.VITE_SUPABASE_URL,
  import.meta.env.VITE_SUPABASE_ANON_KEY
);
export { supabase };

Now, create an Auth.jsx file in the src folder. The file will have a simple setup.
import { useState, useEffect } from "react";
import { Auth as SupabaseAuth } from "@supabase/auth-ui-react";
import { ThemeSupa } from "@supabase/auth-ui-shared";

import { supabase } from "./supabaseClient";

export default function Auth() {
  const [session, setSession] = useState(null);

  useEffect(() => {
    supabase.auth.getSession().then(({ data: { session } }) => {
      setSession(session);
    });
    const {
      data: { subscription },
    } = supabase.auth.onAuthStateChange((_event, session) => {
      setSession(session);
    });

    return () => subscription.unsubscribe();
  }, []);

  if (!session) {
    return (
      <SupabaseAuth
        supabaseClient={supabase}
        appearance={{ theme: ThemeSupa }}
      />
    );
  } else {
    return <div>Logged in</div>;
  }
}
Code breakdown:
sessionstate tracks the user session and updates UI on any changes.useEffectchecks if a user already has an activesessionand subscribes for any session changes to update thesessionstate accordingly.- We display a form for authentication or Logged in if the user is logged in.
In your src/App.jsx file, replace the code to render our created Auth component.
import Auth from "./Auth";

import "./App.css";

function App() {
  return (
    <div className="App">
      <Auth />
    </div>
  );
}

export default App;
In App.css, let’s include some basic styling for the form to be positioned and sized correctly:
.App {
  width: 300px;
}
Now, let’s run the app and verify that everything works correctly.
npm:
npm run devyarn:
yarn devWhen users enter their email and hit the button, Supabase will send a login link to their inbox using your SMTP settings. At the bottom of the form click Sign up and enter your email and a password (has to be at least 6 characters) you want to create an account with.
As you click Sign up, a confirmation link will be sent to your email via configured Custom SMTP (with Mailtrap credentials that we used). Check the inbox of the email you provided.

Also, the confirmation email will be listed in the Email Logs section for your configured domain. Let’s click Confirm your email.

The page will refresh and will display Logged In, meaning we just logged into our application via Supabase Auth, using Mailtrap as our Custom SMTP solution to handle emails via the Mailtrap Dashboard.
Additionally, you can see and manage all the authenticated users in your Supabase dashboard.

For other authentication methods like Magic Link or OTP, I recommend checking the official documentation.
Configure Email Templates
You can personalize the email messages used in authentication flows by editing the following templates.
- Confirm Sign-Up
- Invite User
- Magic Link
- Change Email Address
- Reset Password
Also, Supabase Auth utilizes Go Templates, allowing you to conditionally render content based on available template properties. We’ll perform simple edits in the Confirm Sign-Up Email template. Meanwhile, you can find more information on the template properties here.
First, let’s open a Supabase Dashboard tab featuring Email Templates by opening this link. Then, select your project in an opened tab:

Next, select the template you want to edit. In our case, it’s the Confirm signup template. You can specify the subject heading as well as edit the message body. You can edit your template in any way you want, we’ll update the Subject heading and Message body to specify that the email has been handled by Mailtrap.
Subject heading:
Confirm Your Signup | Email From MailtrapMessage body:
<h2>Confirm your signup</h2>

<p>Follow this link to confirm your sign up:</p>
<p><a href="{{ .ConfirmationURL }}">Confirm your mail</a></p>
<p style="color:#50C878;">This email is handled by Mailtrap</p>
Let’s click Save changes to make sure our changes are successfully applied. From now on, users who will try to perform a Sign up, will receive an updated email.

Additionally, you can edit and deploy your Email Templates locally.
Security considerations of using Supabase Auth
First, let’s talk about passwords. A strong password is more secure because it’s harder to guess or crack through brute-force attacks. Generally, longer passwords and those that use a wider variety of characters are more difficult to compromise.
Detailed control
Supabase Auth gives you detailed control over password strength for your project. For example, you can:
- Configure the minimum password length (e.g., avoid anything under 8 characters)
- Enforce the use of digits, lowercase and uppercase letters, and symbols for stronger passwords.
Integrations
Also, Supabase Auth integrates with the open-source HaveIBeenPwned.org Pwned Passwords API to block known compromised passwords.
Multi-Factor Authentication (MFA)
Beyond configuring secure password rules, encourage users to use a password manager to generate and store passwords, avoid reusing passwords across different platforms, steer clear of using personal information in passwords, and enable Multi-Factor Authentication (MFA) for added security. You can read more about password security in the official documentation. 🔐
Rate limits
Supabase Auth also provides rate limits to protect our app from abuse. For Sign up confirmation, we get a 60 seconds window before a new request is allowed. For other authentication methods, you can check the official documentation.
CAPTCHA
Also, Supabase offers protection from bots using CAPTCHA. Supabase supports hCaptcha and Turnstile providers; you can find more information about how to enable CAPTCHA for your project in the official documentation.
Row Level Security (RLS)
Supabase makes it easy and secure to access data directly from the browser (like in our React form example), provided that Row Level Security (RLS) is enabled. RLS must always be enabled on any tables within an exposed schema (typically the public schema by default). When you create tables using the Table Editor in the Supabase dashboard, RLS is enabled automatically. However, if you’re creating tables using raw SQL or the SQL Editor, you’ll need to manually enable it.
alter table <schema_name>.<table_name>
enable row level security;
RLS is a powerful and flexible Postgres feature that lets you define complex SQL rules tailored to your business logic. Combined with Supabase Auth, RLS ensures full end-to-end user-level data security, from the client to the database.
Configure Supabase Edge Functions and Database Webhooks
Edge Functions are server-side TypeScript functions deployed globally at the edge, close to your users, providing ultra-low latency. They’re ideal for handling webhooks or connecting your Supabase project with third-party services like Stripe.
Built with Deno, Edge Functions offer several advantages, like the ability to run them locally or on any Deno-compatible (even self-hosted) platform.
They can also be used to send emails efficiently, which I will cover further in the article.
Set up and deploy Supabase Edge Function
Now, let’s use the same project from the previous example to implement Supabase Edge Functions (or, alternatively, you could create a new project in a similar way).
First, make sure to install Supabase CLI to use it in the local environment.
npm:
npm install supabase --save-devyarn:
yarn add supabase --devHaving set up Supabase CLI, let’s create our first Edge Function. You can do that by using the supabase functions new function-name command. This will create a new folder supabase/functions/send-email with a TypeScript starter file.
npm:
npx supabase functions new send-emailyarn:
yarn supabase functions new send-emailIf you open the supabase/functions/send-email/index.ts file, your code should look like this:
// Follow this setup guide to integrate the Deno language server with your editor:
// https://deno.land/manual/getting_started/setup_your_environment
// This enables autocomplete, go to definition, etc.

// Setup type definitions for built-in Supabase Runtime APIs
import "jsr:@supabase/functions-js/edge-runtime.d.ts";

console.log("Hello from Functions!");

Deno.serve(async (req) => {
  const { name } = await req.json();
  const data = {
    message: `Hello ${name}!`,
  };

  return new Response(JSON.stringify(data), {
    headers: { "Content-Type": "application/json" },
  });
});

/* To invoke locally:

  1. Run `supabase start` (see: https://supabase.com/docs/reference/cli/supabase-start)
  2. Make an HTTP request:

  curl -i --location --request POST 'http://127.0.0.1:54321/functions/v1/send-email' \
    --header 'Authorization: Bearer eyJhbGciOiJIUzI1NiIsInR5cCI6IkpXVCJ9.eyJpc3MiOiJzdXBhYmFzZS1kZW1vIiwicm9sZSI6ImFub24iLCJleHAiOjE5ODM4MTI5OTZ9.CRXP1A7WOeoJeXxjNni43kdQwgnWNReilDMblYTn_I0' \
    --header 'Content-Type: application/json' \
    --data '{"name":"Functions"}'

*/
Code breakdown:
- The first
importstatement is related to supabase internal configurations for Supabase Runtime APIs. - When the Edge Function file is executed, it will print “Hello from Functions!” in the console before initializing the Edge Function.
- We call Deno.serve to set up the actual Edge Function. In the example implementation, that allows us to send a greeting for the specified name when we call the Edge Function.
Before deploying your Edge Function to Supabase, make sure to link your project using your Project ID, which is a part of your Public URL (https://<project-id>.supabase.co). Before you link, you can get a list of your Project IDs by running the projects list command.
npm:
npx supabase projects list
npx supabase link --project-ref <project-id>
yarn:
yarn supabase projects list
yarn supabase link --project-ref <project-id>
Important: If you get asked to enter your database password, you can skip by pressing enter.
Now, let’s deploy the Edge Function to Supabase so that we can interact with it. By default, Edge Functions require a valid JWT in the authorization header. Since we want to use Edge Functions without Authorization checks, let’s pass --no-verify-jwt flag when deploying.
Before deploying, please make sure that you have installed Docker Desktop as I’ve mentioned in the beginning of the article, and then run one of the following commands:
npm:
npx supabase functions deploy send-email --no-verify-jwtyarn:
yarn supabase functions deploy send-email --no-verify-jwtYou should see the following message in your code editor:

And, as your Edge Function is deployed, it will appear in the Supabase Dashboard by the link mentioned in the logs in the terminal.
Set up Database Webhook for deployed Edge Function
Database Webhooks let you automatically send real-time data from your database to external systems whenever specific table events occur.
You can listen for three types of events: INSERT, UPDATE, and DELETE. Each event is triggered after a row in the table has been modified.
While similar to traditional database triggers, Webhooks are a more convenient abstraction built on top of the pg_net extension. Unlike standard triggers, pg_net operates asynchronously, so it won’t block or delay your database operations, even when making long-running network requests.
To set them up, first, you need to enable Database Hooks in your Supabase Dashboard:

Then, select the Webhooks tab and click Create a new hook:

In the opened window, let’s set up a basic webhook, which will trigger whenever a User gets deleted from the system. Then, choose a name, select users in Table, and under Events check Delete. ✅

In Webhook configuration, select Supabase Edge Functions, and leave other options the same as provided by default.

In the end, click Create webhook.

As you can see, the webhook has been successfully created and configured to work with our Edge Function.

To test that our webhook has been configured correctly, let’s open the Users table in the Authentication tab and try to delete a user.

Then, go to the Edge Function logs page. A new Edge Function call should be registered in the logs, which means we have successfully linked the webhook with our Edge Function.

Send emails using SMTP
To implement email sending using SMTP, we’ll use the previous example and modify it to include the email-sending logic. Having set up an Edge Function and a Database Webhook, we have the ability to trigger a custom email sending for specific events (e.g., user deletion) and notify about it by sending an email to our personal email.
We already have everything set up regarding that part, so for this part of the guide, we’ll focus on implementing the actual email sending using Nodemailer, a popular server-side SMTP solution.
To deploy your code correctly, you’ll also need to modify the supabase/functions/send-email/deno.json file and include the new nodemailer dependency. Like so:
{
  "imports": {
    "nodemailer": "https://esm.sh/nodemailer"
  }
}
Now, let’s set up environment variables to safely use the Mailtrap SMTP credentials in the code. When deploying our Edge Functions, we can use the Edge Function Secrets tab in the Supabase Dashboard.

Don’t forget to click Save when you finish setting up your credentials.
To send a plain-text email in Nodemailer, let’s modify the previously created Edge Function. Open the supabase/functions/send-email/index.ts file and add email-sending logic using Nodemailer. We’ll also remove unnecessary code like console.log and comments for more clarity.
import "jsr:@supabase/functions-js/edge-runtime.d.ts";
import nodemailer from "npm:nodemailer";

Deno.serve(async () => {
  try {
    const transporter = nodemailer.createTransport({
      host: "live.smtp.mailtrap.io",
      port: 587,
      auth: {
        user: Deno.env.get("SMTP_USER") ?? "",
        pass: Deno.env.get("SMTP_PASS") ?? "",
      },
    });

    await transporter.sendMail({
      from: "no-reply@yourdomain.com",
      to: "your-email@example.com",
      subject: "User deletion notification",
      text: "User has been successfully deleted",
    });

    return new Response(
      JSON.stringify({ message: "User deletion notification sent" }),
      {
        headers: { "Content-Type": "application/json" },
      }
    );
  } catch (error) {
    return new Response(JSON.stringify({ message: error.message }), {
      headers: { "Content-Type": "application/json" },
      status: 500,
    });
  }
});
Notes:
- Don’t forget to replace the placeholders and use your relevant Mailtrap SMTP credentials.
- Make sure to use your domain from Mailtrap Sending Domains in the
fromfield. - Since we run our Edge Function in a Deno environment, we have to use the
npm:prefix to import Nodemailer. For exampleimport nodemailer from "npm:nodemailer". nodemailer.createTransportmethod create a Nodemailer transport with preconfigured methods to work with our Mailtrap SMTP credentials.transporter.sendMailperforms the email sending- We use
try/catchstatements to return useful information in case of an error, or a success message in case of success. - We use
Deno.env.getto safely retrieve Mailtrap SMTP credentials previously configured in the Supabase dashboard.
Now, let’s make sure to deploy our Edge Function to verify that everything works correctly.
npm:
npx supabase functions deploy send-email --no-verify-jwtyarn:
yarn supabase functions deploy send-email --no-verify-jwtAs the Edge Function is deployed, let’s try to delete a user to make sure our Database Webhook works correctly and triggers the Edge Function responsible for sending a notification email.

If you have no users to delete, you can create a test user in Add user > Create new user.

As the user is deleted, an email should be successfully sent to your personal email stating that a user has been successfully deleted.
Send HTML email
To send an HTML email, we simply need to make a small tweak and specify the html property in the sendMail parameter values. This way, our HTML will be formatted and displayed correctly in the recipient’s inbox.
Feel free to use the following code snippet and modify it according to your liking:
import "jsr:@supabase/functions-js/edge-runtime.d.ts";
import nodemailer from "npm:nodemailer";

Deno.serve(async () => {
  try {
    const transporter = nodemailer.createTransport({
      host: "live.smtp.mailtrap.io",
      port: 587,
      auth: {
        user: Deno.env.get("SMTP_USER") ?? "",
        pass: Deno.env.get("SMTP_PASS") ?? "",
      },
    });

    await transporter.sendMail({
      from: "no-reply@yourdomain.com",
      to: "your-email@example.com",
      subject: "User deletion notification",
      html: "<h1>User has been successfully deleted</h1>",
      text: "User has been successfully deleted",
    });

    return new Response(
      JSON.stringify({ message: "User deletion notification sent" }),
      {
        headers: { "Content-Type": "application/json" },
      }
    );
  } catch (error) {
    return new Response(JSON.stringify({ message: error.message }), {
      headers: { "Content-Type": "application/json" },
      status: 500,
    });
  }
});
Send emails with attachments
Since our Edge Function runs in Supabase and not locally, we can’t store images locally in our project. To add file attachment (like images) to email sending logic in our Edge Function, we’ll first need to set up a storage.
On the storage page, click New bucket and provide a bucket name (it can only contain lowercase letters, numbers, dots, and hyphens).

Then, check the Public bucket checkbox, we’ll not need authorization for it (can depend on your project and how you want your files to be accessible).

After creating a Bucket, drag and drop a file accordingly.

Now, let’s modify the Edge Function in supabase/functions/send-email/index.ts to include the file attachment logic:
import "jsr:@supabase/functions-js/edge-runtime.d.ts";
import { createClient } from "jsr:@supabase/supabase-js@2";
import nodemailer from "npm:nodemailer";

Deno.serve(async () => {
  try {
    const supabaseClient = createClient(
      Deno.env.get("SUPABASE_URL") ?? "",
      Deno.env.get("SUPABASE_ANON_KEY") ?? ""
    );

    const { data, error } = await supabaseClient.storage
      .from("your.bucket.name")
      .download("/your-image.jpeg");

    if (error) {
      throw new Error(error.message);
    }

    const transporter = nodemailer.createTransport({
      host: "live.smtp.mailtrap.io",
      port: 587,
      auth: {
        user: Deno.env.get("SMTP_USER") ?? "",
        pass: Deno.env.get("SMTP_PASS") ?? "",
      },
    });

    const uint8Array = new Uint8Array(await data.arrayBuffer());

    await transporter.sendMail({
      from: "no-reply@yourdomain.com",
      to: "your-email@example.com",
      subject: "User deletion notification",
      html: "<h1>User has been successfully deleted</h1>",
      text: "User has been successfully deleted",
      attachments: [
        {
          filename: "image-attachment.jpeg",
          content: uint8Array,
          encoding: "base64",
        },
      ],
    });

    return new Response(
      JSON.stringify({ message: "User deletion notification sent" }),
      {
        headers: { "Content-Type": "application/json" },
      }
    );
  } catch (error) {
    return new Response(JSON.stringify({ message: error.message }), {
      headers: { "Content-Type": "application/json" },
      status: 500,
    });
  }
});
Code breakdown:
jsr:@supabase/supabase-js@2imports the Supabase client in the Edge Function.createClientmethod creates a Supabase client instance by accepting credentials.- Important: The
SUPABASE_URLandSUPABASE_ANON_KEYenvironment variables are included by default in your Supabase Edge Functions configuration when deploying. You can find them on this link.
- Important: The
supabaseClient.storage.fromretrieves the bucket and.downloadretrieves the image from the bucket.Uint8Arrayinstance passesdata.arrayBuffer()to get a compatible image data format.- In the attachment’s
contentfield, we provide the previously createdUint8Arrayinstance.
Send emails to multiple recipients
To send emails to multiple recipients, replace the to property in the transporter.sendMail parameter to be an array and add your recipients:
import "jsr:@supabase/functions-js/edge-runtime.d.ts";
import { createClient } from "jsr:@supabase/supabase-js@2";
import nodemailer from "npm:nodemailer";

Deno.serve(async () => {
  try {
    const supabaseClient = createClient(
      Deno.env.get("SUPABASE_URL") ?? "",
      Deno.env.get("SUPABASE_ANON_KEY") ?? ""
    );

    const { data, error } = await supabaseClient.storage
      .from("your-bucket-name")
      .download("/your-image.jpeg");

    if (error) {
      throw new Error(error.message);
    }

    const transporter = nodemailer.createTransport({
      host: "live.smtp.mailtrap.io",
      port: 587,
      auth: {
        user: Deno.env.get("SMTP_USER") ?? "",
        pass: Deno.env.get("SMTP_PASS") ?? "",
      },
    });

    const uint8Array = new Uint8Array(await data.arrayBuffer());

    await transporter.sendMail({
      from: "no-reply@yourdomain.com",
      to: ["recipient1@example.com", "recipient2@example.com"],
      subject: "User deletion notification",
      html: "<h1>User has been successfully deleted</h1>",
      text: "User has been successfully deleted",
      attachments: [
        {
          filename: "image-attachment.jpeg",
          content: uint8Array,
          encoding: "base64",
        },
      ],
    });

    return new Response(
      JSON.stringify({ message: "User deletion notification sent" }),
      {
        headers: { "Content-Type": "application/json" },
      }
    );
  } catch (error) {
    return new Response(JSON.stringify({ message: error.message }), {
      headers: { "Content-Type": "application/json" },
      status: 500,
    });
  }
});
Send emails using email API
Sending up email sending logic using the official Mailtrap API is not very different from the SMTP approach. The primary difference is that now we don’t need to specify the SMTP credentials, instead we’ll just pass the API key.
Also, the Mailtrap Node.js API is more platform-agnostic since it sends simple requests to REST APIs under the hood.
Let’s start by creating a new Edge Function, which will send a notification email on user creation.
npm:
npx supabase functions new send-email-user-createyarn:
yarn supabase functions new send-email-user-createTo make your code deploy correctly, you’ll also need to modify the supabase/functions/send-email-user-create/deno.json file and include the new mailtrap dependency:
{
  "imports": {
    "mailtrap": "https://esm.sh/mailtrap"
  }
}
Now, before we write any code in the Edge Function itself, let’s first deploy the example function generated by Supabase CLI.
npm:
npx supabase functions deploy send-email-user-create --no-verify-jwtyarn:
yarn supabase functions deploy send-email-user-create --no-verify-jwtNow, let’s create a new webhook and connect our Edge Function we created to it. Open the Webhooks page, and create a new Webhook for user creation action, similarly to how we did it in the previous steps. The type in Events should be Insert.

Make sure to select Supabase Edge Functions for Type of webhook, and select send-email-user-create in Select which edge function to trigger.

Lastly, let’s set up the environment API variable to safely use the Mailtrap API in the code. When deploying our Edge Functions, we can use the Edge Function Secrets tab in the Supabase Dashboard.
You can find your Mailtrap API token by navigating to Sending Domains > Integration > API.

Click Save when you finish setting up your credentials.

To send plain-text email using Mailtrap API, let’s modify the previously created Edge Function.
Open the supabase/functions/send-email-user-create/index.ts file and add email-sending logic using Mailtrap API:
import "jsr:@supabase/functions-js/edge-runtime.d.ts";
import { MailtrapClient } from "npm:mailtrap";

Deno.serve(async () => {
  try {
    const mailtrap = new MailtrapClient({
      token: Deno.env.get("API_KEY") ?? "",
    });

    await mailtrap.send({
      from: { email: "no-reply@your-domain", name: "Mailtrap" },
      to: [{ email: "recipient@example.com" }],
      subject: "User creation notification",
      text: "User has been successfully created",
    });

    return new Response(
      JSON.stringify({ message: "User creation notification sent" }),
      {
        headers: { "Content-Type": "application/json" },
      }
    );
  } catch (error) {
    return new Response(JSON.stringify({ message: error.message }), {
      headers: { "Content-Type": "application/json" },
      status: 500,
    });
  }
});
Notes:
- Don’t forget to use your relevant API credentials from Mailtrap.
- Make sure to use your domain from Mailtrap Sending Domains in the
fromfield. MailtrapClientto initialize a client preconfigured with our API token.- I’ve also removed unnecessary code like
console.logand comments for more clarity.
Now, let’s make sure to deploy our Edge Function to verify that everything works correctly.
npm:
npx supabase functions deploy send-email-user-create --no-verify-jwtyarn:
yarn supabase functions deploy send-email-user-create --no-verify-jwtNote: You can create a test user in Add user → Create new user
As the user is created, an email should be successfully sent to your personal email, stating that a user has been successfully created.

Send HTML email
To send an HTML email, we simply need to make a small tweak and specify the html property in the mailtrap.send parameter values. This way, our HTML will be formatted and displayed correctly in the recipient’s inbox.
Check it out:
import "jsr:@supabase/functions-js/edge-runtime.d.ts";
import { MailtrapClient } from "npm:mailtrap";

Deno.serve(async () => {
  try {
    const mailtrap = new MailtrapClient({
      token: Deno.env.get("API_KEY") ?? "",
    });

    await mailtrap.send({
      from: { email: "no-reply@your-domain", name: "Mailtrap" },
      to: [{ email: "recipient@example.com" }],
      subject: "User creation notification",
      html: "<h1>User has been successfully created</h1>",
      text: "User has been successfully created",
    });

    return new Response(
      JSON.stringify({ message: "User creation notification sent" }),
      {
        headers: { "Content-Type": "application/json" },
      }
    );
  } catch (error) {
    return new Response(JSON.stringify({ message: error.message }), {
      headers: { "Content-Type": "application/json" },
      status: 500,
    });
  }
});
Send emails with attachments
Before we modify the Edge Function, we’ll use the Buffer package to perform base64 encoding for the image, so let’s include it in the supabase/functions/send-email-user-create/deno.json file:
{
  "imports": {
    "mailtrap": "https://esm.sh/mailtrap",
    "buffer": "https://esm.sh/buffer"
  }
}
On the previous steps, we have already set up a bucket containing all the files for attachment. Let’s reuse it here to add file attachment logic to the email sending.
I typically do this by modifying the Edge Function in supabase/functions/send-email-user-create/index.ts to include the file attachment logic, like so:
import "jsr:@supabase/functions-js/edge-runtime.d.ts";
import { createClient } from "jsr:@supabase/supabase-js@2";
import { MailtrapClient } from "npm:mailtrap";
import { Buffer } from "npm:buffer";

Deno.serve(async () => {
  try {
    const supabaseClient = createClient(
      Deno.env.get("SUPABASE_URL") ?? "",
      Deno.env.get("SUPABASE_ANON_KEY") ?? ""
    );

    const mailtrap = new MailtrapClient({
      token: Deno.env.get("API_KEY") ?? "",
    });

    const { data, error } = await supabaseClient.storage
      .from("your.bucket.name")
      .download("/your-image.jpeg");

    if (error) {
      throw new Error(error.message);
    }

    const bufferBase64 = Buffer.from(await data.arrayBuffer()).toString(
      "base64"
    );

    await mailtrap.send({
      from: { email: "no-reply@your-domain", name: "Mailtrap" },
      to: [{ email: "recipient@example.com" }],
      subject: "User creation notification",
      html: "<h1>User has been successfully created</h1>",
      text: "User has been successfully created",
      attachments: [
        {
          filename: "image-attachment.jpeg",
          content: bufferBase64,
          disposition: "attachment",
          type: "image/jpeg",
        },
      ],
    });

    return new Response(
      JSON.stringify({ message: "User creation notification sent" }),
      {
        headers: { "Content-Type": "application/json" },
      }
    );
  } catch (error) {
    return new Response(JSON.stringify({ message: error.message }), {
      headers: { "Content-Type": "application/json" },
      status: 500,
    });
  }
});
Send emails to multiple recipients
To send emails to multiple recipients, you just need to replace the to property in the transporter.sendMail parameter to be an array. In the array, mention all the recipients you would like to send the email to.
Check it out in action:
import "jsr:@supabase/functions-js/edge-runtime.d.ts";
import { createClient } from "jsr:@supabase/supabase-js@2";
import { MailtrapClient } from "npm:mailtrap";
import { Buffer } from "npm:buffer";

Deno.serve(async () => {
  try {
    const supabaseClient = createClient(
      Deno.env.get("SUPABASE_URL") ?? "",
      Deno.env.get("SUPABASE_ANON_KEY") ?? ""
    );

    const mailtrap = new MailtrapClient({
      token: Deno.env.get("API_KEY") ?? "",
    });

    const { data, error } = await supabaseClient.storage
      .from("your.bucket.name")
      .download("/your-image.jpeg");

    if (error) {
      throw new Error(error.message);
    }

    const bufferBase64 = Buffer.from(await data.arrayBuffer()).toString(
      "base64"
    );

    await mailtrap.send({
      from: { email: "no-reply@your-domain", name: "Mailtrap" },
      to: [{ email: "recipient1@example.com" }, { email: "recipient2@example.com" }],
      subject: "User creation notification",
      html: "<h1>User has been successfully created</h1>",
      text: "User has been successfully created",
      attachments: [
        {
          filename: "image-attachment.jpeg",
          content: bufferBase64,
          disposition: "attachment",
          type: "image/jpeg",
        },
      ],
    });

    return new Response(
      JSON.stringify({ message: "User creation notification sent" }),
      {
        headers: { "Content-Type": "application/json" },
      }
    );
  } catch (error) {
    return new Response(JSON.stringify({ message: error.message }), {
      headers: { "Content-Type": "application/json" },
      status: 500,
    });
  }
});
Wrapping up
And that’s that folks!
With everything in place, your app is now ready to send emails, whether it’s signup confirmations, emails with file attachments, or real-time notification emails.
Happy building and emailing!
P.S. Interested in how email workflows compare across different developer platforms and hosting services? If so, we’ve covered the most popular tech, including:
- Bolt.new with a React App Using EmailJS
- Netlify using SMTP or Email API
- Vercel using Nodemailer and SMTP
- Retool with an Email API

