Skip to Navigation


PHPMailer is one of the most popular code libraries of the PHP web development language. It’s also used by CMS giants such as Drupal, WordPress, and Joomla to send email notifications, often using Gmail as the mail server.
With that in mind, after extensive research on my end, I decided to create this tutorial on how to send emails with PHPMailer via Gmail SMTP server.
Additionally, in the tutorial, I’ll explore the limitations of Gmail SMTP, look into alternative options, as well as show you how to do proper email testing.
Disclaimer: The PHPMailer library is primarily designed for SMTP communication and doesn’t natively support sending emails through the Gmail API. So, if you need to use this specific API for email sending, please check out our How to Send Emails in PHP tutorial to learn how.
Completing the PHPMailer setup for Gmail
Installing PHPMailer
To install the PHPMailer library, it’s recommended to use Composer, so that is the route I took as well.
There are two ways to go about it:
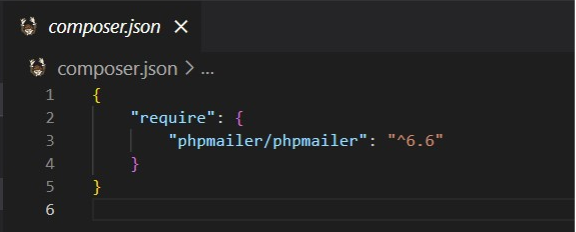
1. Include the following line in your composer.json file within the “require” {} section:
"phpmailer/phpmailer": "^6.9"2. Or open the command prompt in your project root directory and run:
composer require phpmailer/phpmailer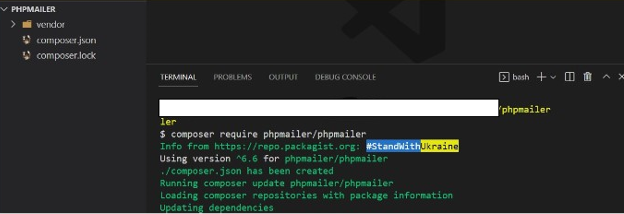
If the library is successfully installed, you should see PHPMailer included in the composer.json file.
Generating an “App Password” or setting up OAuth2 authentication
Sending emails through Gmail using PHPMailer has become a bit more complex since Google phased out the “Enable Less Secure Apps” feature. So now, as an extra step, you need to generate an App Password or set up OAuth2.
For me, as I only created small or testing projects, generating an App Password was more convenient, and this is how I did it:
- Go to your Google Account settings.
- Navigate to Security > Signing in to Google > App Passwords.
If you can’t find the option to add an app password but you’ve set up 2-Step Verification, it might be because your Google Account has 2-Step Verification set up only for security keys, you’re logged into a work, school, or another organization account, or your Google Account has Advanced Protection.
- Select “Mail” as the app and “Other (Custom name)” as the device, enter a name, and generate.
- Note down the generated 16-character password, as you’ll use it instead of your regular Gmail password for the Password field in the PHPMailer SMTP settings.
For a more detailed explanation, check out Google’s instructions.
If you want to implement a more robust and secure method for user authentication and authorization, go the OAuth2 route.
Oauth2-google is a package that supports Google OAuth 2.0 for the PHP League’s OAuth 2.0 Client as well as PHP 7.3 – PHP 8.3.
To use it, you need to first get a Google client ID and client secret.
Follow this Google guide to set everything up.
Once it is all set up, you can install the package using Composer with the following command and add the authorization details as shown below:
composer require league/oauth2-google

use League\OAuth2\Client\Provider\Google;
$provider = new Google([
    'clientId'     => '{google-client-id}',
    'clientSecret' => '{google-client-secret}',
    'redirectUri'  => 'https://example.com/callback-url',
    'accessType' => 'offline',
]);
        if (!empty($_GET['error'])) {
            // Got an error; probably user denied access
            exit('Got error: ' . htmlspecialchars($_GET['error'], ENT_QUOTES, 'UTF-8'));
        } elseif (empty($_GET['code'])) {
            // If we don't have an authorization code, then get one
            $authUrl = $provider->getAuthorizationUrl([
                'scope' => [
                    'https://mail.google.com/'
                ]
            ]);
            header('Location: ' . $authUrl);
            exit;
        } else {
            // Try to get an access token (using the authorization code grant)
            $token = $provider->getAccessToken('authorization_code', [
                'code' => $_GET['code']
            ]);
            // Use this to get a new access token if the old one expires
            $refreshToken = $token->getRefreshToken();
        }
Now you need to save $refreshToken, so it can be used in the email-sending code:
     $mail = new PHPMailer();
        $mail->isSMTP();
        $mail->Host = 'smtp.gmail.com';
        $mail->SMTPAuth = true;
        $mail->SMTPSecure = PHPMailer::ENCRYPTION_SMTPS;
        $mail->Port = 465;
        $mail->AuthType = 'XOAUTH2';

        $provider = new Google(
            [
                'clientId' => '{google-client-id}',
                'clientSecret' => '{google-client-secret}',
            ]
        );

        $mail->setOAuth(
            new OAuth(
                [
                    'provider' => $provider,
                    'clientId' => '{google-client-id}',
                    'clientSecret' => '{google-client-secret}',
                    'refreshToken' => $refreshToken,
                    'userName' => '{email of your gmail account}',
                ]
            )
        );
For more details, follow oauth2-google on GitHub. And if you’re new to PHPMailer and want to go beyond setting up PHPMailer for Gmail, feel free to read our PHPMailer Guide.
How to send email using PHPMailer and Gmail SMTP
With the setup done, I wasted no time and got right to the email sending.
The code I wrote does a few things.
First, it specifies the sender’s and recipient’s email addresses and names. Included but commented out of the code are also lines for specifying CC and BCC recipients.
After that, the code sets the email to a plain text format and defines the subject line and plain text content.
For the lines that are in charge of sending off the email, I used an if-else statement so a success or error message would be displayed depending on the result of the email-sending attempt. Like for instance, if an SMTP error is encountered.
Finally, to be in line with good practices and release resources associated with the connection to the SMTP server, I closed the SMTP connection.
Here is how it all looks together in PHP code:
<?php
//Import PHPMailer classes into the global namespace
use PHPMailer\PHPMailer\PHPMailer;
use PHPMailer\PHPMailer\SMTP;
use PHPMailer\PHPMailer\Exception;

require_once 'vendor/autoload.php';

$mail = new PHPMailer(true);

//sender information
$mail->setFrom('FROM_EMAIL_ADDRESS', 'FROM_NAME');

//receiver email address and name
$mail->addAddress('RECIPIENT_EMAIL_ADDRESS', 'RECIPIENT_NAME');

// Add cc or bcc
// $mail->addCC('email@mail.com');
// $mail->addBCC('user@mail.com');


$mail->isHTML(false);

$mail->Subject = 'PHPMailer SMTP test';
$mail->Body    = "PHPMailer the awesome Package\nPHPMailer is working fine for sending mail\nThis is a tutorial to guide you on PHPMailer integration";

// Attempt to send the email
if (!$mail->send()) {
    echo 'Email not sent. An error was encountered: ' . $mail->ErrorInfo;
} else {
    echo 'Message has been sent.';
}

$mail->smtpClose();
Send email to multiple recipients
I don’t know about you, but in my case, sending emails to more than one recipient is a very common occurrence. So, naturally, I wanted to implement the same functionality in my PHP project.
To do so, I expanded the previous code snippet with a few things:
- A line for defining multiple primary recipients:
$mail->addAddress('RECIPIENT_EMAIL_ADDRESS_2', 'RECIPIENT_NAME_2'); - A line for defining multiple CC recipients:
$mail->addCC('CC_EMAIL_ADDRESS_1', 'CC_NAME_1');
$mail->addCC('CC_EMAIL_ADDRESS_2', 'CC_NAME_2');- And a line for defining multiple BCC recipients:
$mail->addBCC('BCC_EMAIL_ADDRESS_1', 'BCC_NAME_1');
$mail->addBCC('BCC_EMAIL_ADDRESS_2', 'BCC_NAME_2');
The code in full:
<?php
use PHPMailer\PHPMailer\PHPMailer;
use PHPMailer\PHPMailer\SMTP;
use PHPMailer\PHPMailer\Exception;

require_once 'vendor/autoload.php';

$mail = new PHPMailer(true);

//Configure an SMTP
$mail->isSMTP();
$mail->Host = ‘smtp.gmail.com’;
$mail->SMTPAuth = true;
$mail->Username = ‘sender@gmail.com’;
$mail->Password = ‘App Password’;
$mail->SMTPSecure = PHPMailer::ENCRYPTION_STARTTLS;
$mail->Post = 587;

// Sender information
$mail->setFrom('FROM_EMAIL_ADDRESS', 'FROM_NAME');

// Multiple recipient email addresses and names
// Primary recipients
$mail->addAddress('RECIPIENT_EMAIL_ADDRESS_1', 'RECIPIENT_NAME_1');
$mail->addAddress('RECIPIENT_EMAIL_ADDRESS_2', 'RECIPIENT_NAME_2');

// Adding CC recipients
$mail->addCC('CC_EMAIL_ADDRESS_1', 'CC_NAME_1');
$mail->addCC('CC_EMAIL_ADDRESS_2', 'CC_NAME_2');

// Adding BCC recipients
$mail->addBCC('BCC_EMAIL_ADDRESS_1', 'BCC_NAME_1');
$mail->addBCC('BCC_EMAIL_ADDRESS_2', 'BCC_NAME_2');

$mail->isHTML(false);

$mail->Subject = 'PHPMailer SMTP test';

$mail->Body    = "PHPMailer the awesome Package\nPHPMailer is working fine for sending mail\nThis is a tutorial to guide you on PHPMailer integration";

// Attempt to send the email
if (!$mail->send()) {
    echo 'Email not sent. An error was encountered: ' . $mail->ErrorInfo;
} else {
    echo 'Message has been sent.';
}

$mail->smtpClose();
Send email with attachments
Including multiple recipients was easy. But do you know what (to my surprise) was even easier? Including attachments!
For this, I needed to expand the code with only one line:
$mail->addAttachment('/path/to/file1.pdf', 'CustomName1.pdf'); // Attachment 1The line calls the addAttachment function after defining the body and passes it the path to the file you wish to attach.
If necessary, you can attach multiple files by calling the function, you guessed it, multiple times.
$mail->addAttachment('/path/to/file1.pdf', 'CustomName1.pdf'); // Attachment 1
$mail->addAttachment('/path/to/file2.jpg', 'CustomName2.jpg'); // Attachment 2
The code in full:
<?php
use PHPMailer\PHPMailer\PHPMailer;
use PHPMailer\PHPMailer\SMTP;
use PHPMailer\PHPMailer\Exception;

require_once 'vendor/autoload.php';

$mail = new PHPMailer(true);

//Configure SMTP
$mail->isSMTP();
$mail->Host = ‘smtp.gmail.com’;
$mail->SMTPAuth = true;
$mail->Username = ‘sender@gmail.com’;
$mail->Password = ‘App Password’;
$mail->SMTPSecure = PHPMailer::ENCRYPTION_STARTTLS;
$mail->Port = 587;

//sender information
$mail->setFrom('FROM_EMAIL_ADDRESS', 'FROM_NAME');

//receiver email address and name
$mail->addAddress('RECIPIENT_EMAIL_ADDRESS', 'RECIPIENT_NAME');

// Add cc or bcc
// $mail->addCC('email@mail.com');
// $mail->addBCC('user@mail.com');


$mail->isHTML(false);

$mail->Subject = 'PHPMailer SMTP test';
$mail->Body    = "PHPMailer the awesome Package\nPHPMailer is working fine for sending mail\nThis is a tutorial to guide you on PHPMailer integration";

$mail->addAttachment('/path/to/file1.pdf', 'CustomName1.pdf'); // Attachment 1

// Attempt to send the email
if (!$mail->send()) {
    echo 'Email not sent. An error was encountered: ' . $mail->ErrorInfo;
} else {
    echo 'Message has been sent.';
}

$mail->smtpClose();
Note: PHPMailer can be used in a PHP contact form to send emails with attachments.
Send HTML email
Up until now, all the code snippets I showed you were intended to send a plain text message. Now, if you want to take things up a notch and convert the message from a plain text format to HTML, you’ll need to make two changes to the code.
First, the line $mail->isHTML(false); should be changed to $mail->isHTML(true);. This will tell PHPMailer to send the email as HTML and alter how the email content is interpreted and rendered by email clients.
Then, $mail->Body should be updated so it sets the email format to HTML.
Here is how the updated line for defining the body should look like:
$mail->Body    = "<h1>PHPMailer the awesome Package</h1>
                  <p>PHPMailer is working fine for sending mail.</p>
                  <p>This is a tutorial to guide you on PHPMailer integration.</p>";
The code in full:
<?php
// Import PHPMailer classes into the global namespace
use PHPMailer\PHPMailer\PHPMailer;
use PHPMailer\PHPMailer\SMTP;
use PHPMailer\PHPMailer\Exception;

require_once 'vendor/autoload.php';

$mail = new PHPMailer(true);

//Configure SMTP
$mail->isSMTP();
$mail->Host = ‘smtp.gmail.com’;
$mail->SMTPAuth = true;
$mail->Username = ‘sender.gmail.com’;
$mail->Password = ‘App Password’;
$mail->SMTPSecure = PHPMailer::ENCRYPTION_STARTTLS;
$mail->Port = 587;

// Sender information
$mail->setFrom('FROM_EMAIL_ADDRESS', 'FROM_NAME');

// Receiver email address and name
$mail->addAddress('RECIPIENT_EMAIL_ADDRESS', 'RECIPIENT_NAME');

// Add cc or bcc
// $mail->addCC('email@mail.com');
// $mail->addBCC('user@mail.com');


$mail->isHTML(true); // Set email format to HTML

$mail->Subject = 'PHPMailer SMTP test';
$mail->Body    = "<h1>PHPMailer the awesome Package</h1>
                  <p>PHPMailer is working fine for sending mail.</p>
                  <p>This is a tutorial to guide you on PHPMailer integration.</p>";

// Attempt to send the email
if (!$mail->send()) {
    echo 'Email not sent. An error was encountered: ' . $mail->ErrorInfo;
} else {
    echo 'Message has been sent.';
}

$mail->smtpClose();
?>
For more in-depth HTML email customization in PHP, be sure to check out our dedicated article.
Send bulk email
Last but not least, in terms of sending with PHPMailer via Gmail SMTP, I will cover mass emails.
Sending mass emails required me to make quite a few adjustments to my email-sending code:
- Recipient handling: Instead of a single hard-coded email address and name, I switched to an array that stores multiple recipient email addresses and names.
$recipients = [
    ['email' => 'recipient1@example.com', 'name' => 'Recipient 1'],
    ['email' => 'recipient2@example.com', 'name' => 'Recipient 2'],
    // Add more recipients as needed
];- Loop implementation: To apply the sending process for each recipient, I implemented a foreach loop that goes through the entire $recipients array. After each email is sent, I clear the recipient addresses to ensure that the next email goes only to the next intended recipient, thus preventing the accumulation of recipients.
foreach ($recipients as $recipient) {
    try {
        $mail->addAddress($recipient['email'], $recipient['name']); // Add a recipient

        // Attempt to send the email
        if (!$mail->send()) {
            echo 'Email not sent to ' . $recipient['email'] . '. An error was encountered: ' . $mail->ErrorInfo . "\n";
        } else {
            echo 'Message has been sent to ' . $recipient['email'] . ".\n";
        }

        $mail->clearAddresses(); // Clear addresses for the next iteration
    } catch (Exception $e) {
        echo "Message could not be sent to " . $recipient['email'] . ". Mailer Error: {$mail->ErrorInfo}\n";
}- Dynamic recipient setting: Inside the foreach loop, I dynamically set each recipient.
$mail->addAddress($recipient['email'], $recipient['name']);- Error handling and feedback: Also inside the foreach loop, I implemented messages providing feedback for each recipient and indicating whether the email was successfully sent or not.
    if (!$mail->send()) {
            echo 'Email not sent to ' . $recipient['email'] . '. An error was encountered: ' . $mail->ErrorInfo . "\n";
        } else {
            echo 'Message has been sent to ' . $recipient['email'] . ".\n";
}- Use of try-catch block: To handle exceptions for each email sending attempt, I used a try-catch block. This allows for more detailed error handling and ensures that the PHP file script can continue attempting to send to the rest of the recipients even if an error occurs with one.
The code in full:
<?php
use PHPMailer\PHPMailer\PHPMailer;
use PHPMailer\PHPMailer\SMTP;
use PHPMailer\PHPMailer\Exception;

require_once 'vendor/autoload.php';

// Define recipients
$recipients = [
    ['email' => 'recipient1@example.com', 'name' => 'Recipient 1'],
    ['email' => 'recipient2@example.com', 'name' => 'Recipient 2'],
    // Add more recipients as needed
];

$mail = new PHPMailer(true);

//Configure SMTP
$mail->isSMTP();
$mail->Host = ‘smtp.gmail.com’;
$mail->SMTPAuth = true;
$mail->Password = ‘App Password’;
$mail->SMTPSecure = PHPMailer::ENCRYPTION_STARTTLS;
$mail->Port = 587;

//sender information
$mail->setFrom('FROM_EMAIL_ADDRESS', 'FROM_NAME');

$mail->isHTML(false);
$mail->Subject = 'PHPMailer SMTP test';
$mail->Body    = "PHPMailer the awesome Package\nPHPMailer is working fine for sending mail\nThis is a tutorial to guide you on PHPMailer integration";

foreach ($recipients as $recipient) {
    try {
        $mail->addAddress($recipient['email'], $recipient['name']); // Add a recipient

        // Attempt to send the email
        if (!$mail->send()) {
            echo 'Email not sent to ' . $recipient['email'] . '. An error was encountered: ' . $mail->ErrorInfo . "\n";
        } else {
            echo 'Message has been sent to ' . $recipient['email'] . ".\n";
        }

        $mail->clearAddresses(); // Clear addresses for the next iteration
    } catch (Exception $e) {
        echo "Message could not be sent to " . $recipient['email'] . ". Mailer Error: {$mail->ErrorInfo}\n";
    }
}

$mail->smtpClose();
Gmail SMTP limitations
For most projects that are at the starting point, a regular Gmail account is enough. However, Gmail does have its own limitations, and thus, at a certain stage, you might need to switch to something else that fits your needs.
Here are the most important limitations you should keep in mind:
- 500 emails a day (1 recipient is counted as one email)
- 24-hour wait time to resume sending after reaching the threshold
- 25 MB for the total size of all attachments in a single email
- Enforced rate limiting or throttling of your emails (specific rate limiting and throttling criteria not publicly detailed)
For the most accurate and current information on Gmail’s sending limits, including rate limiting and throttling, I advise you to consult Google’s official documentation and guidelines for bulk senders, as well as Mailtrap’s detailed article.
Is there an alternative to Gmail SMTP?
Besides Gmail, the dominant choice for many, there are other free and affordable alternatives on the market. A great example is Mailtrap!
The Mailtrap Email Delivery Platform, among other useful features, offers a reliable and hassle-free SMTP service as well as an email API. The setup for both is smooth and secure.
With the Mailtrap Email Delivery Platform, developers get an infrastructure with high deliverability rates by design.
On top of all this, Mailtrap offers the best actionable analytics in the industry, which allows devs to get more control over their email infrastructure performance and speed up troubleshooting. Included in the actionable analytics are features such as a helicopter-view dashboard, 60 days of email logs, deliverability alerts, and more.
Note: Do keep in mind that below, I will showcase how to send transactional emails, which are emails sent to an individual recipient following a specific action or transaction. These emails often contain sensitive customer data and need to be delivered promptly and correctly. This is why using a reliable platform such as Mailtrap is crucial.
The integration of Mailtrap’s SMTP service into your PHP project can be done in a few simple and quick steps:
1. Create a Mailtrap account.
2. Add and verify your domain.
3. From the Sending Domains section, go to the SMTP/API Settings tab, where you’ll find the SMTP credentials. Please note that sending using an API doesn’t work with PHPMailer.
4. Copy and paste the Transactional Stream credentials into your PHP script.

You can use this script to send a plain text email using PHPMailer and the Mailtrap Email Sending SMTP service.
<?php
use PHPMailer\PHPMailer\PHPMailer;
use PHPMailer\PHPMailer\Exception;

require 'vendor/autoload.php'; // Adjust based on your installation method

$mail = new PHPMailer(true); // Enable exceptions

// SMTP Configuration
$mail->isSMTP();
$mail->Host = 'live.smtp.mailtrap.io'; // Your SMTP host server
$mail->SMTPAuth = true;
$mail->Username = 'your_username'; // Your Mailtrap username
$mail->Password = 'your_password'; // Your Mailtrap password
$mail->SMTPSecure = 'tls';
$mail->Port = 2525;

// Sender and recipient settings
$mail->setFrom('from@example.com', 'From Name');
$mail->addAddress('recipient@example.com', 'Recipient Name');

// Sending plain text email
$mail->isHTML(false); // Set email format to plain text
$mail->Subject = 'Your Subject Here';
$mail->Body    = 'This is the plain text message body';

// Send the email
if(!$mail->send()){
    echo 'Message could not be sent. Mailer Error: ' . $mail->ErrorInfo;
} else {
    echo 'Message has been sent';
}
As the Mailtrap Email Delivery Platform with Email Sending also offers a Bulk Stream feature, you can use this tool for bulk email campaigns sent using PHPMailer as well.
Bulk emails are typically marketing or promotional messages intended for a large number of recipients at once, such as newsletters, product promotions, service updates, etc.
The Bulk Stream credentials can be found on the right side of the page after you log in to your Mailtrap account and navigate to Sending Domains → SMTP/API Settings tab.
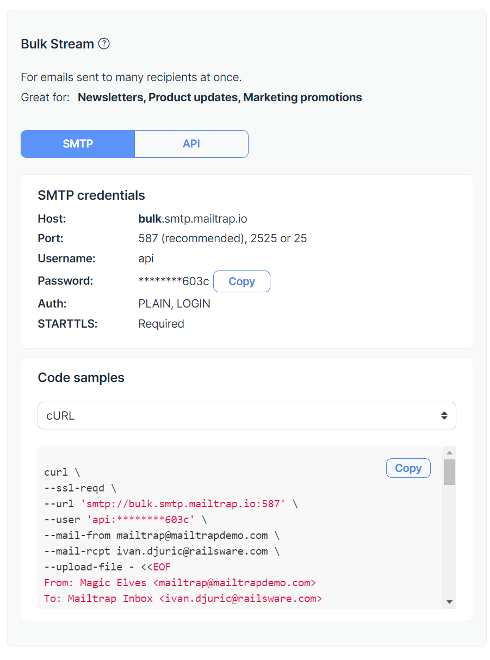
Simply insert these credentials into the following script to send bulk emails using PHPMailer and the Mailtrap Email Sending SMTP service:
<?php
use PHPMailer\PHPMailer\PHPMailer;
use PHPMailer\PHPMailer\Exception;

require 'vendor/autoload.php'; // Path to the Composer autoload file

$mail = new PHPMailer(true);

try {
    //Server settings
    $mail->isSMTP();
    $mail->Host       = 'your_smtp_server'; // Set the SMTP server to send through
    $mail->SMTPAuth   = true;               // Enable SMTP authentication
    $mail->Username   = 'your_smtp_username'; // SMTP username
    $mail->Password   = 'your_smtp_password'; // SMTP password
    $mail->SMTPSecure = PHPMailer::ENCRYPTION_STARTTLS; // Enable TLS encryption;
    $mail->Port       = 587; // TCP port to connect to

    // Sender and reply-to address
    $mail->setFrom('from@example.com', 'Mailer');
    $mail->addReplyTo('replyto@example.com', 'Mailer');

    // Content
    $mail->isHTML(true); // Set email format to HTML

    // Recipients list
    $recipients = [
        ['email' => 'person1@example.com', 'name' => 'Person One'],
        ['email' => 'person2@example.com', 'name' => 'Person Two'],
        // Add more recipients as needed
    ];

    foreach ($recipients as $recipient) {
        $mail->addAddress($recipient['email'], $recipient['name']); // Add a recipient

        // Personalize the message
        $mail->Subject = 'Here is the subject';
        $mail->Body    = 'This is the HTML message body <b>in bold!</b>';
        $mail->AltBody = 'This is the body in plain text for non-HTML mail clients';

        $mail->send();
        $mail->clearAddresses(); // Clear addresses for the next iteration
    }

    echo 'Messages have been sent';
} catch (Exception $e) {
    echo "Message could not be sent. Mailer Error: {$mail->ErrorInfo}";
}Testing emails before sending
Adding an email-sending functionality to your app is only the first step; testing that functionality is the second step that is equally, if not more important.
Whether it’s finding broken links, checking that the content gets rendered correctly, running spam tests, or checking your deliverability rate, these are just a few reasons why email testing in PHP apps, or any other app type for that matter, is critical.
Regardless if it’s PHP, Python, JavaScript, or another language being used to write an email library, the library will be designed specifically for sending and lack proper testing capabilities. To do the testing, I use the feature-rich tool, Mailtrap Email Testing, available within the Email Delivery Platform.
With the Email Delivery Platform’s Email Testing, you get an email sandbox where you can inspect and debug emails before sending them to recipients. And as this tool works on the principle of capturing SMTP traffic from staging and dev environments, when testing with it, you have no risks of spamming users with emails.
Email Testing comes with a range of features, such as:
- HTML/CSS check
- Spam score check
- Email preview
- Multiple inboxes for different projects and stages
- And more
To start using Email Testing, you can leverage ready-to-use integrations available in different languages (20+ like Ruby, Python, PHP, Node.js, .Net, etc.)
Let’s see how the integration process looks in the case of PHPMailer!
Within Email Testing, go to Inboxes → SMTP Settings and select PHPMailer from the list of integrations.
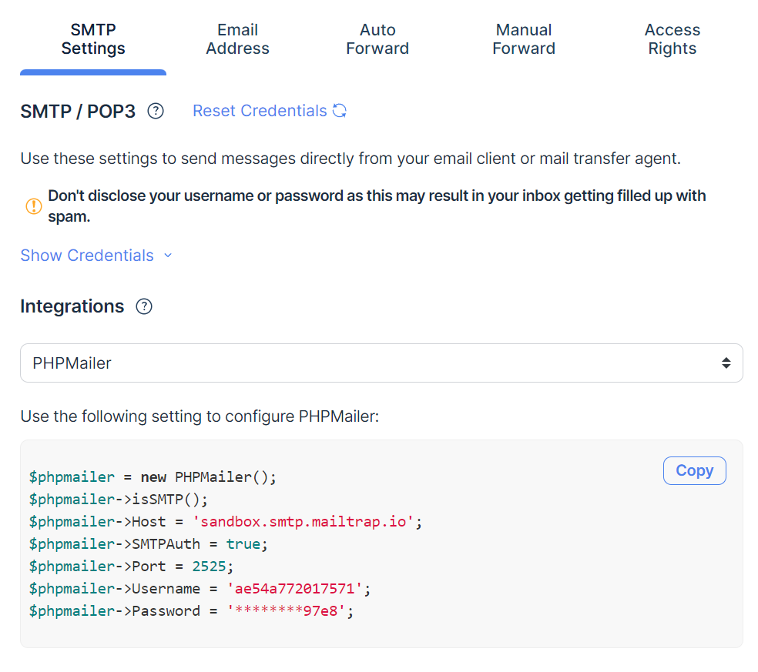
Then, once you’ve done that, simply paste the settings into your PHP script, which should look something like this:
<?php
use PHPMailer\PHPMailer\PHPMailer;
use PHPMailer\PHPMailer\Exception;

require 'vendor/autoload.php';

$phpmailer = new PHPMailer(true); // Create a new PHPMailer instance

try {
    // SMTP settings for Mailtrap
    $phpmailer->isSMTP(); // Set mailer to use SMTP
    $phpmailer->Host = 'sandbox.smtp.mailtrap.io'; // Specify main and backup SMTP servers
    $phpmailer->SMTPAuth = true; // Enable SMTP authentication
    $phpmailer->Username = '1234567891234'; // SMTP username
    $phpmailer->Password = '1234567891234'; // SMTP password
    $phpmailer->Port = 2525; // TCP port to connect to

    // Email content settings
    $phpmailer->setFrom('your_email@example.com', 'Mailer');
    $phpmailer->addAddress('recipient@example.com', 'Joe User'); // Add a recipient
    $phpmailer->isHTML(true); // Set email format to HTML
    $phpmailer->Subject = 'Here is the subject';
    $phpmailer->Body    = 'This is the HTML message body <b>in bold!</b>';
    $phpmailer->AltBody = 'This is the body in plain text for non-HTML mail clients';

    $phpmailer->send(); // Send the email
    echo 'Message has been sent';
} catch (Exception $e) {
    echo "Message could not be sent. Mailer Error: {$phpmailer->ErrorInfo}";
}
?>
Upon running the code, the testing email should land in your specified Email Testing virtual inbox, where you can then take a close look at it using the mentioned features and make the appropriate fixes.
At the point where you feel the email has been perfected, simply switch back to using Mailtrap Email Sending to deliver it just in time!
To wrap up
Whew! What a tutorial! Hopefully, it didn’t overwhelm you as much as figuring the ins and outs of PHPMailer and Gmail overwhelmed me 😅
I will for sure be referring back to this content every time there is a need for me to build the email-sending functionality with PHPMailer and Gmail. And as there are new additions made to the code library, I will do my best to expand the content accordingly.
For more PHPMailer use cases, be sure to have a look at the “examples” folder inside the PHPMailer documentation. Or, if you’re curious about email sending using other languages and frameworks, don’t forget to further explore the Mailtrap blog.
Here are some of my PHP-related article suggestions:
If you’re a visual learner, Mailtrap also has a YouTube channel with great tutorials, such as this one on how to send emails using PHP: