

Magento is one of the most commonly used e-commerce platforms. You might not even realize it, but you’re probably buying from a few Magento-powered web stores on a regular basis. When thinking about selling stuff online from a developer perspective, one of the first things that might come to your mind is figuring out how to send emails in Magento 2 and later versions. As is often the case, there are several possible approaches. Let’s explore them one by one.
What types of emails are sent from Magento?
It’s hard to imagine buying any item online without the associated transactional emails. These can be related to:
- Account creation
- Password reset
- Order confirmation
- Successful or failed payment
- Order dispatched
- Invoice creation
- Review reminder
- Feedback request
- and many others…
Being a customer, you’ll feel uneasy if you don’t receive these emails and might even consider looking at other stores’ offers in the meantime. That’s why all these emails need to be in place and properly configured. If you would like to learn more about transactional emails and how to make them more effective, check out our intro to transactional emails.
How does Magento handle transactional emails by default?
Luckily for many, Magento has built-in and enabled by default a number of transactional templates commonly used by providers of Magento developer service and non-core developers. If you don’t require any customizations and the default offer is sufficient, you won’t need to write any code.
If you have Magento installed on your server, you’ll find each template in the respective folder, following this path: <module_dir>/view/<area>/email. As an example, the template for confirming a new order is nested under <Your_Magento_dir>/view/frontend/email/order_new.html.
We strongly recommended against editing the default files. Instead, you can add a new template or customize an existing one by logging into your Magento backend and heading over to Marketing -> Email Templates menu. If you want to edit one, simply pick it from the list and click on ‘Load Template’. Edit the content and/or subject and optionally add styles. And then save.
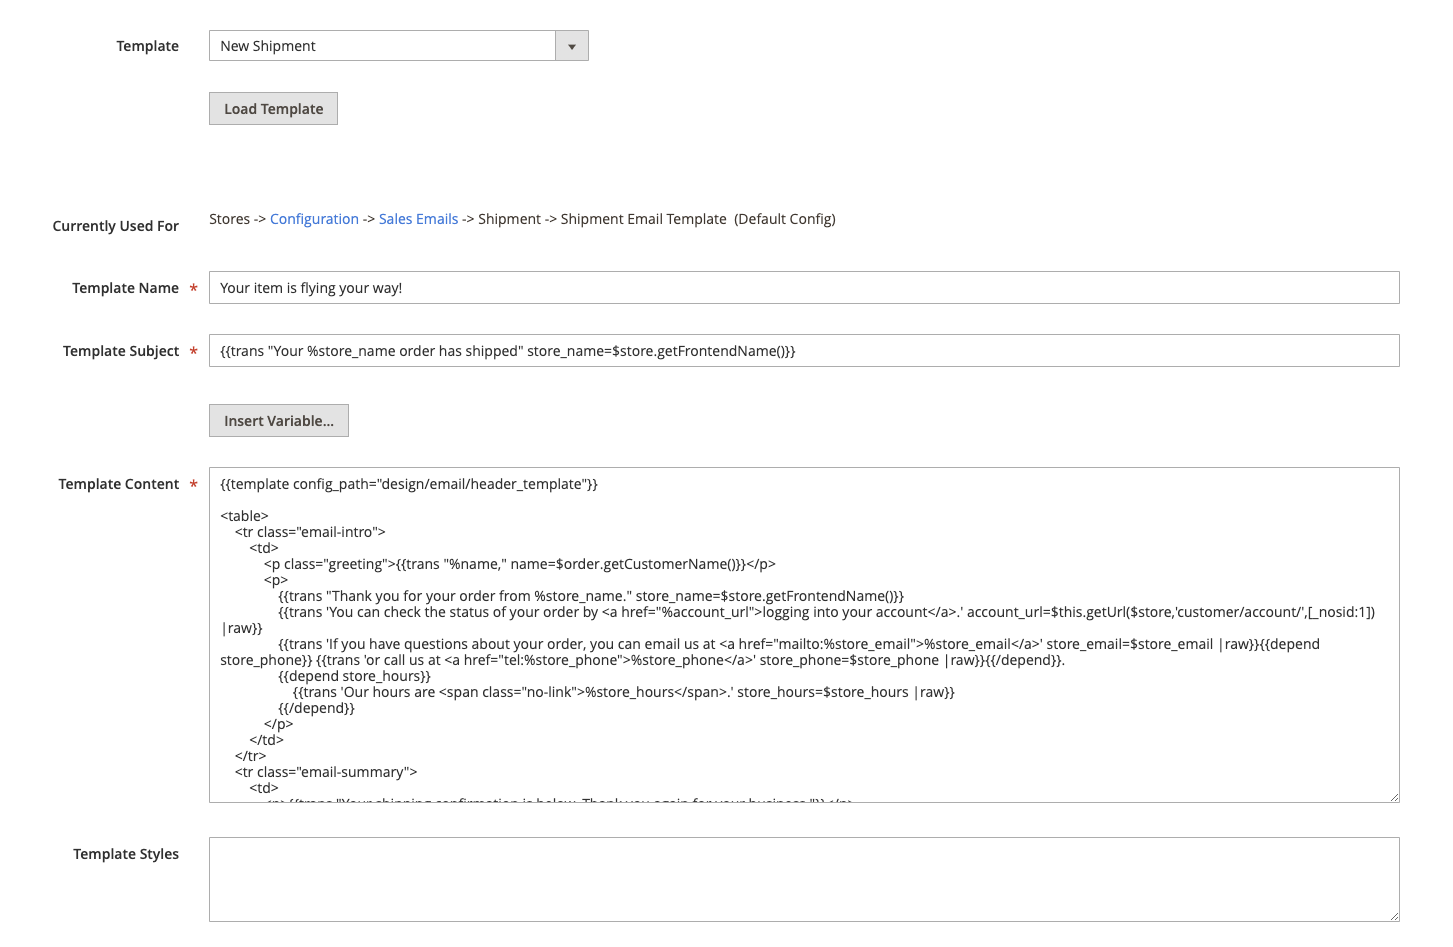
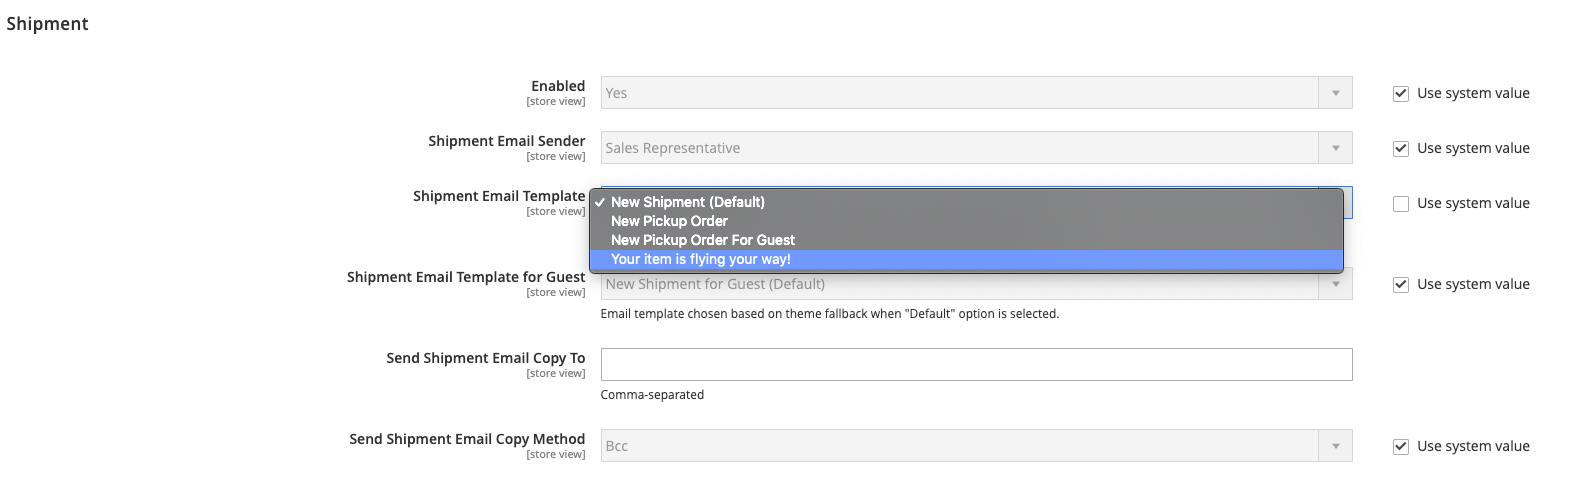
You can then set or activate it at: Stores -> Configuration -> Sales -> Sales Emails. In there, find the right email type, tick off “use system value”, choose your newly-created template and save.
Don’t forget to test if it works as expected, more about this below!
Note that the paths above come from Magento 2.3 which we used for the purpose of this article. If you use an earlier or a later version, the path to reach the screens above might differ. Either way, they should be there somewhere!
Sending emails programmatically in Magento
There might be situations when the default triggers added in Magento won’t be sufficient for your needs. Actually, these situations might become quite frequent when you start building on top of default features, and adding new modules or integrations with external services. Or maybe you just want to send an email on customer registration and it’s just not possible from the ‘Sales emails’ menu. This is when you’ll need to look into programming emails.
To do so, you’ll first need to create a new template or edit one of the default ones. You’ll do it in exactly the same way as we discussed above – in Marketing -> Email Templates menu. Let’s use the default, boring contact form for recommending a product to a friend.
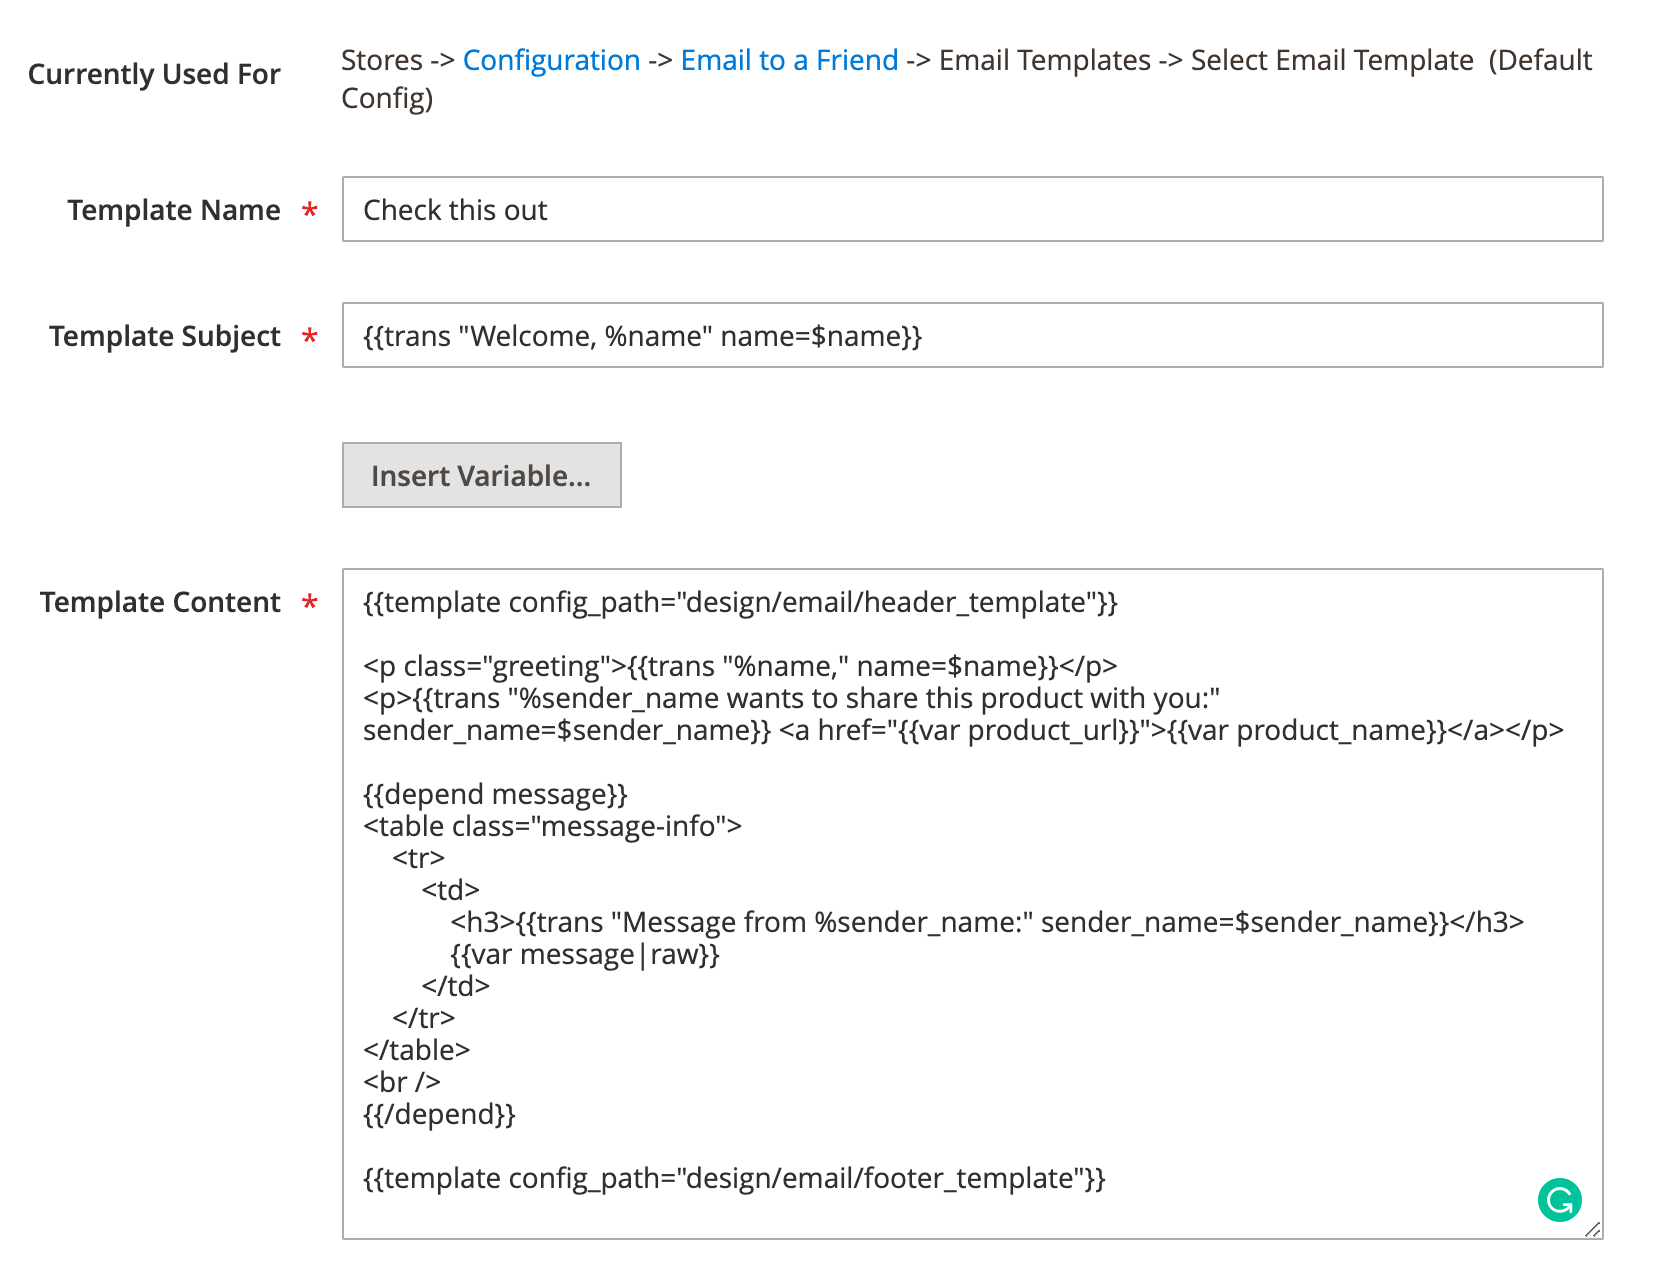
We named the template ‘Check this out’ so we’ll be referencing this name. First, let’s load the template:
<!-- wp:paragraph -->
<p>$templateId = “Check this out”;<br></p>
<!-- /wp:paragraph -->
<!-- wp:paragraph -->
<p>$emailTemplate = Mage::getModel('core/email_template')->loadByCode($templateId);<br></p>
<!-- /wp:paragraph -->
As you can see above, the template contains two variables – product_name and product_url. Let’s create an array with both of them.
$vars = [‘user_name’ => $userName, ‘product_name’ => $productName];
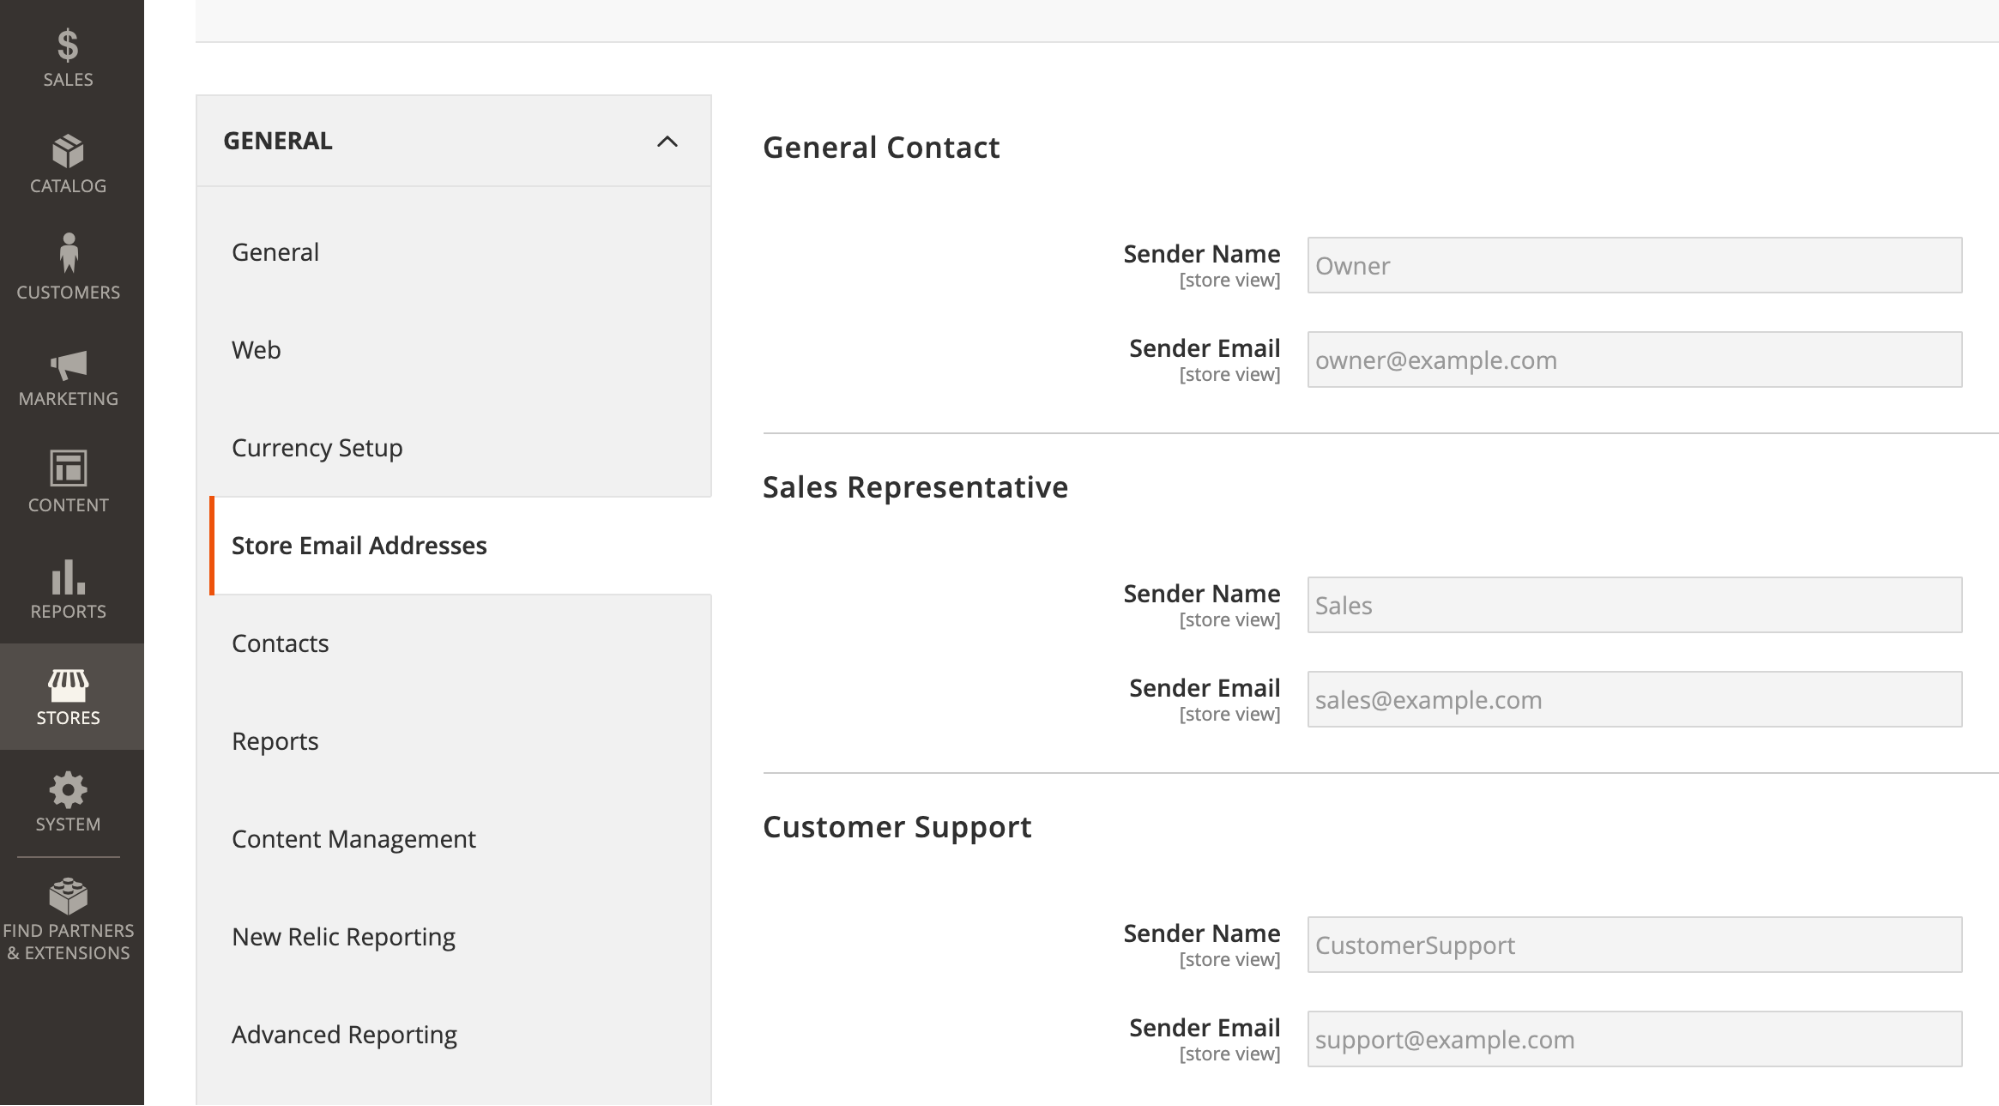
And now let’s add the sender’s details. You can add them manually or pull them from your Magento system. If you haven’t added any contacts yet, head over to Stores -> Configuration again and there, open the Store Email Addresses menu under General. Now add your contacts.
We’ll use this method and type in the following code:
<!-- wp:paragraph -->
<p>$emailTemplate->setSenderEmail(Mage::getStoreConfig('trans_email/ident_general/email’, $storeId));<br></p>
<!-- /wp:paragraph -->
<!-- wp:paragraph -->
<p>$emailTemplate->setSenderName(Mage::getStoreConfig('trans_email/ident_general/name', $storeId));<br></p>
<!-- /wp:paragraph -->
If you wish to preview the template before it’s sent, use the following:
$emailTemplate->getProcessedTemplate($vars);And the following code to send a message to a chosen recipient. Naturally, you could also fetch these details for a recipient who is also registered on your platform.
$emailTemplate->send($receiveEmail, $receiveName, $vars);Since Magento 2 is written with Zend Framework, you can use all the features of Zend Mail package. Check out its documentation here.
That’s all! Or is it? Well, your email was definitely sent but did it really arrive in the right inbox?
SMTP configuration for sending emails in Magento
By default, Magento uses the ‘mail’ PHP function to send transactional emails. Unfortunately, this frequently results in emails being delivered to a spam folder or not leaving your mail server in the first place. This happens because servers try to prevent spam from going out or into their client’s inboxes and these emails are often the first suspects. What’s more, this function doesn’t incorporate any encryption, making your emails susceptible to spoofing and data breaches.
For those reasons, we recommend sending your emails over SMTP – for better security and improved deliverability. Sadly, it’s not available by default, even with the latest Magento releases, so you’ll need to utilize custom extensions. Many of them are available for free and are really simple to add.
The popular tools in this segment are, for example, Magepal’s Custom SMTP or Mageplaza’s SMTP Extension. Alternatively, you can consider choosing Landofcoder’s SMTP Pro or the extensions by Aitoc, Amasty, and other companies. By comparing offers and functionality, you can choose the most suitable one.
In our case, we’ve added Magepal’s extension to our Magento to demonstrate the example configuration using the SMTP credentials provided by Mailtrap Email API/SMTP Service. If you prefer, you are free to use the credentials of a different SMTP server, such as Gmail’s for example, in your project.
The Mailtrap Email API/SMTP Service is an end-to-end sending solution used by devs who want a stable working email infrastructure and more control over their email deliverability with the help of dashboards, logs, and weekly reports.
For users of Mailtrap Email API/SMTP Service, retrieving the necessary credentials and setting up the sending solution takes only a few steps:
Step #1 – Create a Mailtrap account and log in.
Step #2 – Add a domain and complete the verification process as shown in the video below:
Step #3 – Navigate to the API and SMTP page of your Mailtrap account, where the SMTP server credentials will be displayed.

With the credentials retrieved, you can head over to your Magento backend and insert them under Stores -> Configuration -> Advanced -> System -> SMTP Configuration and Settings.
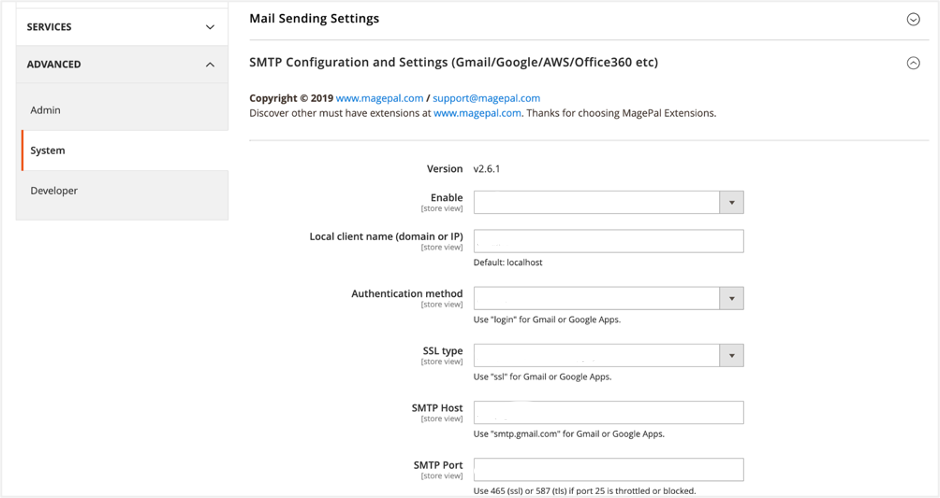
Save everything, and you’re all set to send your Magento emails using Mailtrap’s Email API/SMTP Service. Some email hosting companies have custom port, SMTP host, and mail server settings. If you don’t know what they are, you can get in touch with your host’s technical support agents, who should be able to help you configure your site correctly.
You also have the option to enable tracking settings (covers email opens and clicks) which can help you monitor email performance and enable unsubscribe settings in case you are sending marketing emails. If you do enable them, you will find the aggregated tracking data in your Mailtrap account under Stats.
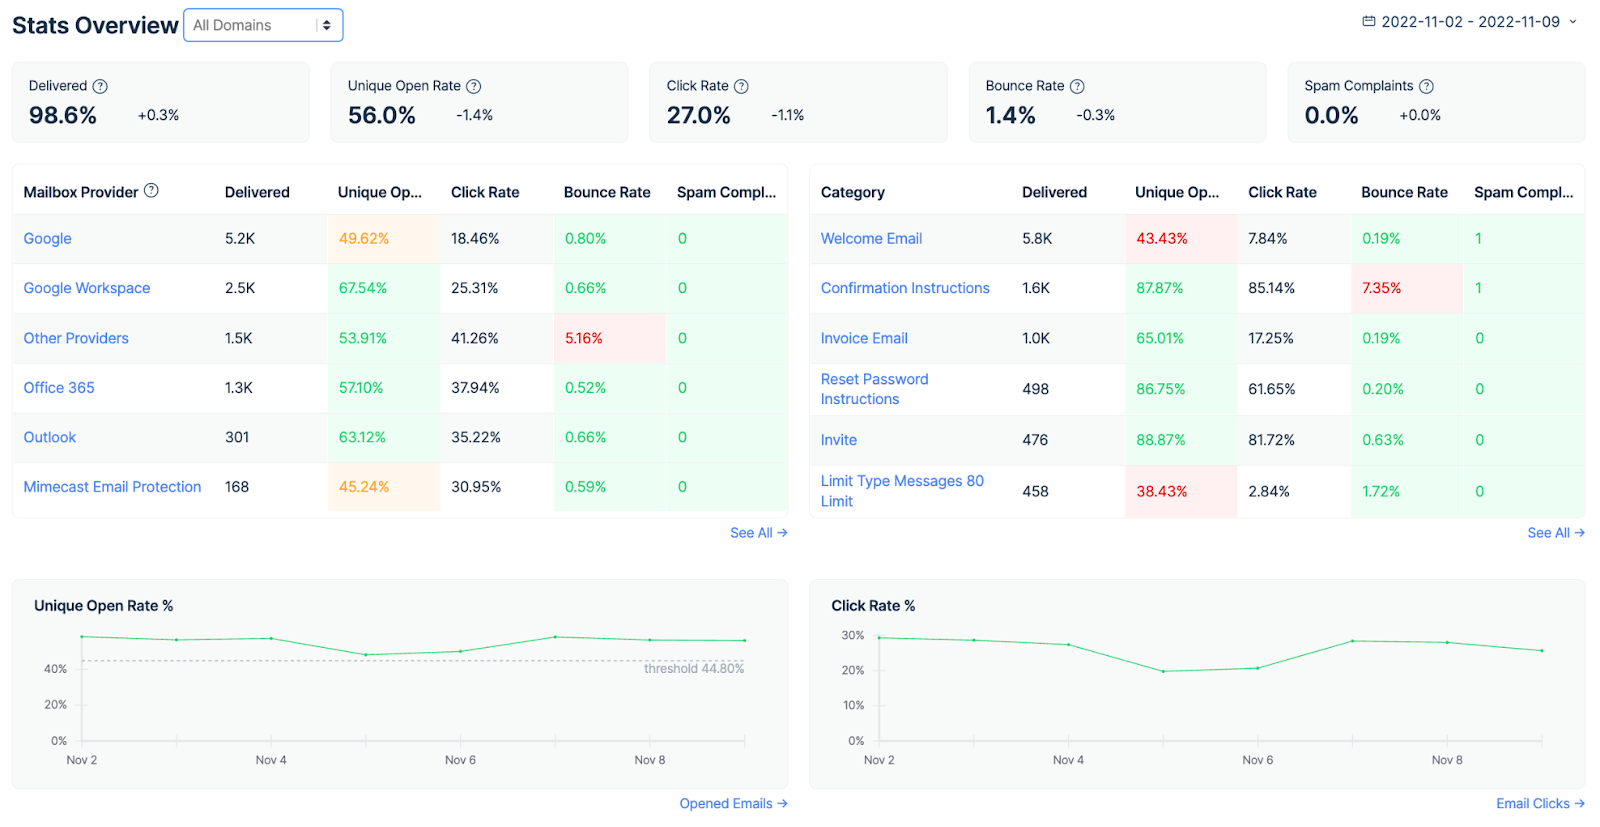
The tracking data can also be viewed for each email individually under Email Logs.

Check out Mailtrap knowledgebase to learn more about this end-to-end sending solution and its other features, which include suppression lists, dedicated IPs, IP auto warmup, email categories, webhooks, deliverability alerts for unexpected issues, and more.
Testing your Magento emails
We mentioned earlier that you should definitely test your emails before they’re sent to customers, and we haven’t changed our minds ;-). Testing should follow any new email configuration and any change in the code responsible for sending them. Otherwise, you risk sending invalid links, wrong order confirmations, and failed payment notifications when things actually went through.
For those of you looking to conduct safe email testing, we recommend trying Mailtrap Email Sandbox.
Mailtrap Email Sandbox is designed to capture all SMTP traffic from staging and dev environments, automate test flows and scenarios, analyze email content for spam, and validate HTML/CSS. Essentially, it will provide you with everything you need to inspect and debug your emails without spamming recipients while you are at it.
Thanks to the automation aspect of Mailtrap Email Sandbox, email testing doesn’t have to be done manually anymore, and it becomes much more simplified. Also, as this testing solution allows creating virtual inboxes for different projects and project stages to which testing emails can be sent, you can preserve domain reputation and avoid accumulating dev-junk-email in your personal inbox.
Feature-wise, Mailtrap Email Sandbox has a lot to offer, including:
- HTML/CSS check – estimate the support of popular email clients for your email HTML/CSS code and find any problematic elements.
- Email preview – see the rendering of your email by popular web browsers.
- Spam analysis – see what your overall spam score is and be alerted about any potentially suspicious rule.
- Blacklist report – learn if your sender IP or domain is present on any common blacklists.
- Tech info – get insight into SMTP transaction details and original values of headers.
- Email forwarding – forward (manually or automatically) any email to your whitelisted recipients.
To start using Email Sandbox, all you need is an active Mailtrap account which you already might have if Mailtrap Email API/SMTP Service is what you used to send out your Magento emails.
Debugging Magento’s transactional emails
Even if you spent a few days configuring your emails, likely something might have gone wrong. Maybe an order confirmation email was not sent to a customer? Or none of your carefully crafted messages are reaching the target inboxes?
This seems to be an issue mostly with the older versions of Magento. If possible, upgrade to the latest release. If you can’t or don’t want to, here are the most common fixes:
- Check if ‘Sales Representative’ email address is set in Stores -> Configuration -> General -> Store Email Addresses is correct
- If you’re on Magento 2.2.4, 2.2.5 or 2.2.6, and there is a bug, try this fix.
- Head back to Stores -> Configuration -> Advanced -> System and make sure that ‘Disable Email Communications’ is disabled.
- In the same menu, go to Sales -> Sales Emails -> General and set ‘Asynchronous sending’ to Disabled. Set also ‘Order’ tab’s ‘Enabled’ to ‘Yes’.
- If you’re using mail() function, ensure the correct host and port are set. Consult your server provider when in doubt.
- Check if any additional module is not interfering with the email sending. For example, a custom payment gateway could be blocking the sending.
After making any changes, clear the cache and check if the sending works in your testing environment.
If you’re using the default PHP mail() function, check the PHP error log or the Apache error log for more details.
If you’re using any SMTP extension as we described and none of the above helped, consult the developers of the module. Check also if your Gmail (or another email account) are properly configured, and have IMAP and POP enabled.
Finally, visit https://magento.com/security for the latest on discovered vulnerabilities and the available patches. Best of luck!


Comments
2 replies