In this article, I’m introducing Certonid. Certonid is a serverless SSH certificate authority deployed on the AWS Lambda serverless platform. Certonid is designed to streamline Linux servers access management using SSH.
For the Mailtrap infrastructure, security and automation are the two main principles. With the product growth, we have faced several challenges in account management. I was searching for a simple, safe, and easy-to-use solution, tried several tools, and after that Certonid was born.
Further, I will explain how SSH certificates work, describe account management problems, share my experience in solving them, and demonstrate how Certonid works, of course!
SSH certificates explained
SSH is omnipresent and can be called the standard for remote administration of the *nix systems. When a DevOps engineer is setting a Linux server, in most cases a couple of accounts that contain passwords are created. The local account management works well with small groups of servers. With the product growth, a centralized authentication authority such as LDAP and/or Kerberos becomes essential as it helps avoid manual account management on each server.
Further, a DevOps engineer can find out that the centralized authentication system is the only and potentially disruptive system breakdown point. If the system fails, all team members lose access to literally everything! Sure, you can create direct access accounts bypassing the authentication schema, but this can be quite insecure. Blocking your own system is one of the worst things that can happen during such an incident. For example, if your authentication system has been damaged by the service outages, you won’t be able to access it and make the necessary fixes.
In addition to the listed risks, SSH public key authentication means that all your software and/or DevOps engineers need to manage their public keys on all your servers. If authorized_keys files contain unknown public keys, the system security is jeopardized as well. (an authorized_keys file contains public keys data that can be used to get access to the system via SSH.) Furthermore, authorised_keys requires defining trust with a separate pair of keys, which can’t be scaled.
SSH certificate authentication is one of the ways of solving SSH public key authentication problems. Let’s see how it works.
Let’s start by creating our own CA (certificate authority), which, in fact, is a regular pair of keys:
$ mkdir sshca && cd sshca
$ ssh-keygen -C CA -f ca-key
Generating public/private rsa key pair.
Enter passphrase (empty for no passphrase):
Enter same passphrase again:
Your identification has been saved in ca-key.
Your public key has been saved in ca-key.pub.
Afterward, the ssh-keygen utility will require you to set a password for your key, and I highly recommend that you complete this step. It is still possible to create a key without a password, but this is an unreliable option. Such a password is used for private key encryption. This makes the key file useless for anyone trying to hack your system (for some time, at least). But note that it does mean that if a private key has been compromised, you don’t need to replace it (you have to do this in any case)! You just get extra time while an abuser will be trying to figure out the password to decrypt your private key.
So, you have two files: ca-key (private key) and ca-key.pub (public key). Now you need to distribute ca-key.pub for all servers where you need access using SSH via certificates. You are distributing the public key, so you don’t have to worry about its security (it’s not required to encrypt the distribution channel). Let’s put it to “/etc/ssh/ca-key.pub” on servers.
The next step is to configure SSH daemons on servers in order for them to trust this key. Add/edit this line in your config (and don’t forget to restart SSH daemon after applying changes):
TrustedUserCAKeys /etc/ssh/ca-key.pubYou now have a chain of trust and are able to create SSH certificates. It would be perfect if your CA is a highly protected server, which can be accessed only by your security team.
Important! The security best practice is that private keys never leave the systems where they were generated, irrelevant of the security level of the data distribution channel.
Afterward, generate SSH keys for a developer on their computer (if they don’t exist yet or you want to use separate keys):
$ ssh-keygen -t ecdsa # или “ssh-keygen -t rsa”
Generating public/private ecdsa key pair.
Enter file in which to save the key (/Users/leo/.ssh/id_ecdsa):
Enter passphrase (empty for no passphrase):
Enter same passphrase again:
Your identification has been saved in /Users/leo/.ssh/id_ecdsa.
Your public key has been saved in /Users/leo/.ssh/id_ecdsa.pub.
Now we have id_ecdsa (private key) and id_ecdsa.pub (public key). Copy the public key and paste it to the CA server. The distribution channel doesn’t matter here, just don’t pass the private key (id_ecdsa).
Finally, on a CA server, create an SSH certificate for the developer’s open key:
$ ssh-keygen -s ca-key -I leo -n deployer -V +1w -z 1 id_ecdsa.pub
Enter passphrase:
Signed user key id_ecdsa.pub: id "leo" serial 1 for deployer valid from 2019-11-07T00:32:00 to 2019-11-14T00:33:44
Here, we are signing id_ecdsa.pub via CA key, with “leo” as a certificate identifier and “deployer” as the only principal. This certificate is valid for one week and has its serial number: 1. Now you should have an id_ecdsa-cert.pub file. Copy and paste it back to the .ssh/ folder on the developer’s computer. The distribution channel doesn’t matter because it is public information, and the certificate is not valid without the appropriate private key (your id_ecdsa).
In our example, we have not configured servers for using a definite principal set. This is why a standard SSHD configuration will allow this certificate to enter the system with any registered username. I used “-n deployer” for the certificate creation, so I can access the system as a deployer-user. If you don’t have a dedicated authorization system on your servers, this method can be enough.
Now let’s check the certificate information using ssh-keygen:
$ ssh-keygen -Lf id_ecdsa-cert.pub
id_ecdsa-cert.pub:
        Type: ecdsa-sha2-nistp256-cert-v01@openssh.com user certificate
        Public key: ECDSA-CERT SHA256:Kz/8gC5dKLQaYsiAoQwnf7wAbEJLQ0R4TD4iCHwK9Bg
        Signing CA: RSA SHA256:Tk2tXG7mqDJS8Pzj8RiA3MgpqlgOUYG2i3Ju7wYN7QM
        Key ID: "leo"
        Serial: 1
        Valid: from 2019-11-07T00:32:00 to 2019-11-14T00:33:44
        Principals:
                deployer
        Critical Options: (none)
        Extensions:
                permit-X11-forwarding
                permit-agent-forwarding
                permit-port-forwarding
                permit-pty
                permit-user-rc
As I have already mentioned, a certificate has a validity period. If an error, improper usage, theft, or any other incident occurs, the compromised SSH certificate credentials expire automatically, without any action required, even if the incident was unnoticed. You can create certificates valid for several minutes because an SSH server doesn’t reject the user while they are connected, even if the certificate has expired during the session.
Now, when we have the certificate and private key, let’s connect as a deployer user to the SSH server, which trusts our CA:
$ ssh deployer@system-which-trust-ca-keyAs soon as connection to the server is established, you will find the following line in the authentication registry:
Nov 6 22:55:11 example sshd[1899]: Accepted publickey for deployer from 176.14.529.36 port 56223 ssh2: ED25519-CERT ID leo (serial 1) CA RSA SHA256:...You can easily see that, even when accessing the server as a deployer, the system is able to identify the certificate used for authentication. In our case, it is the certificate with the “leo” identifier. It means that using the right “-I” with ssh-keygen is extremely important because it identifies the certificate owner.
It is also recommended to use a unique serial number (here, it is serial 1), for you to be able to identify each issued certificate.
Pro Tip: Unique serial numbers are required if you want to use the RevokedKeys SSH parameter in config to revoke compromised certificates with private keys.
This is what you need to know about the functioning of SSH certificates. Such a solution is not some newly invented hipster tech – authentication with certificates was added to OpenSSH 5.4 almost ten years ago!
SSH certificates management automation
It is a bad idea to assign manual certificates signing to a separate specialist. There are many tools for managing SSH certificates:
- netflix/bless by Netflix, which runs on the serverless AWS Lambda platform and uses AWS IAM. It is built with Python.
- nsheridan/cashier by Intercom. It is a server and a client built with Golang.
- uber/pam-ussh by Uber, a pluggable authentication module (PAM). It is also built with Golang.
- hashicorp/vault by HashiCorp, a solution for managing secrets. It contains an SSH secrets engine with certificate support.
BLESS by Netflix looks the most attractive. First of all because, with it, you don’t need to set up a server for signing certificates. Otherwise, you need to:
- Find out how to protect it, as certificates for accessing this server don’t exist yet.
- Create redundancy so that this server doesn’t become a breakdown point for the whole infrastructure.
AWS Lambda with AWS regions allows avoiding both these problems. While the approach in general looks really interesting, BLESS itself has several drawbacks.
- BLESS is built with Python. There is nothing wrong with Python itself, but BLESS requires building a project. This should be done in a Docker container since there is native libraries building. Even after that, you have no guarantee that everything works as designed – dependencies can get broken. (It has nothing to do with the language!) You must remember about adding a CA-key to your build, and encrypting its password and the file itself.
- Setting up BLESS is not a piece of cake, especially when you need to add KMSAuth support. Documentation is not super friendly in this regard.
- BLESS doesn’t have a good official client, just a simple Python script only. There are some third-party solutions, but they can’t help when you have to switch between projects. When you have only one project (Netflix, for example), such a problem doesn’t exist.
- BLESS is designed for a bastion host, a special-purpose computer on a network, which is usually situated in an outer side of the organization demilitarized zone (DMZ). It is frequently used to access other servers located on a private network. I can’t agree with current best security practices propagating a bastion host. I believe that you don’t need it. Moreover, a bastion host can do more harm than good. This article is not the right place for listing the numerous arguments. The only advantage I fully support is that bastions slow down an attack, especially an automated one. This is like installing a very good and secure front door – when there are no doors that are impossible to pick, but a secure one is more work for burglars so that they may decide not to brother with it. The majority of software products don’t have a bastion host, and access via SSH should be provided from the user’s computer. In this case, setting a client to assist this should be simple.
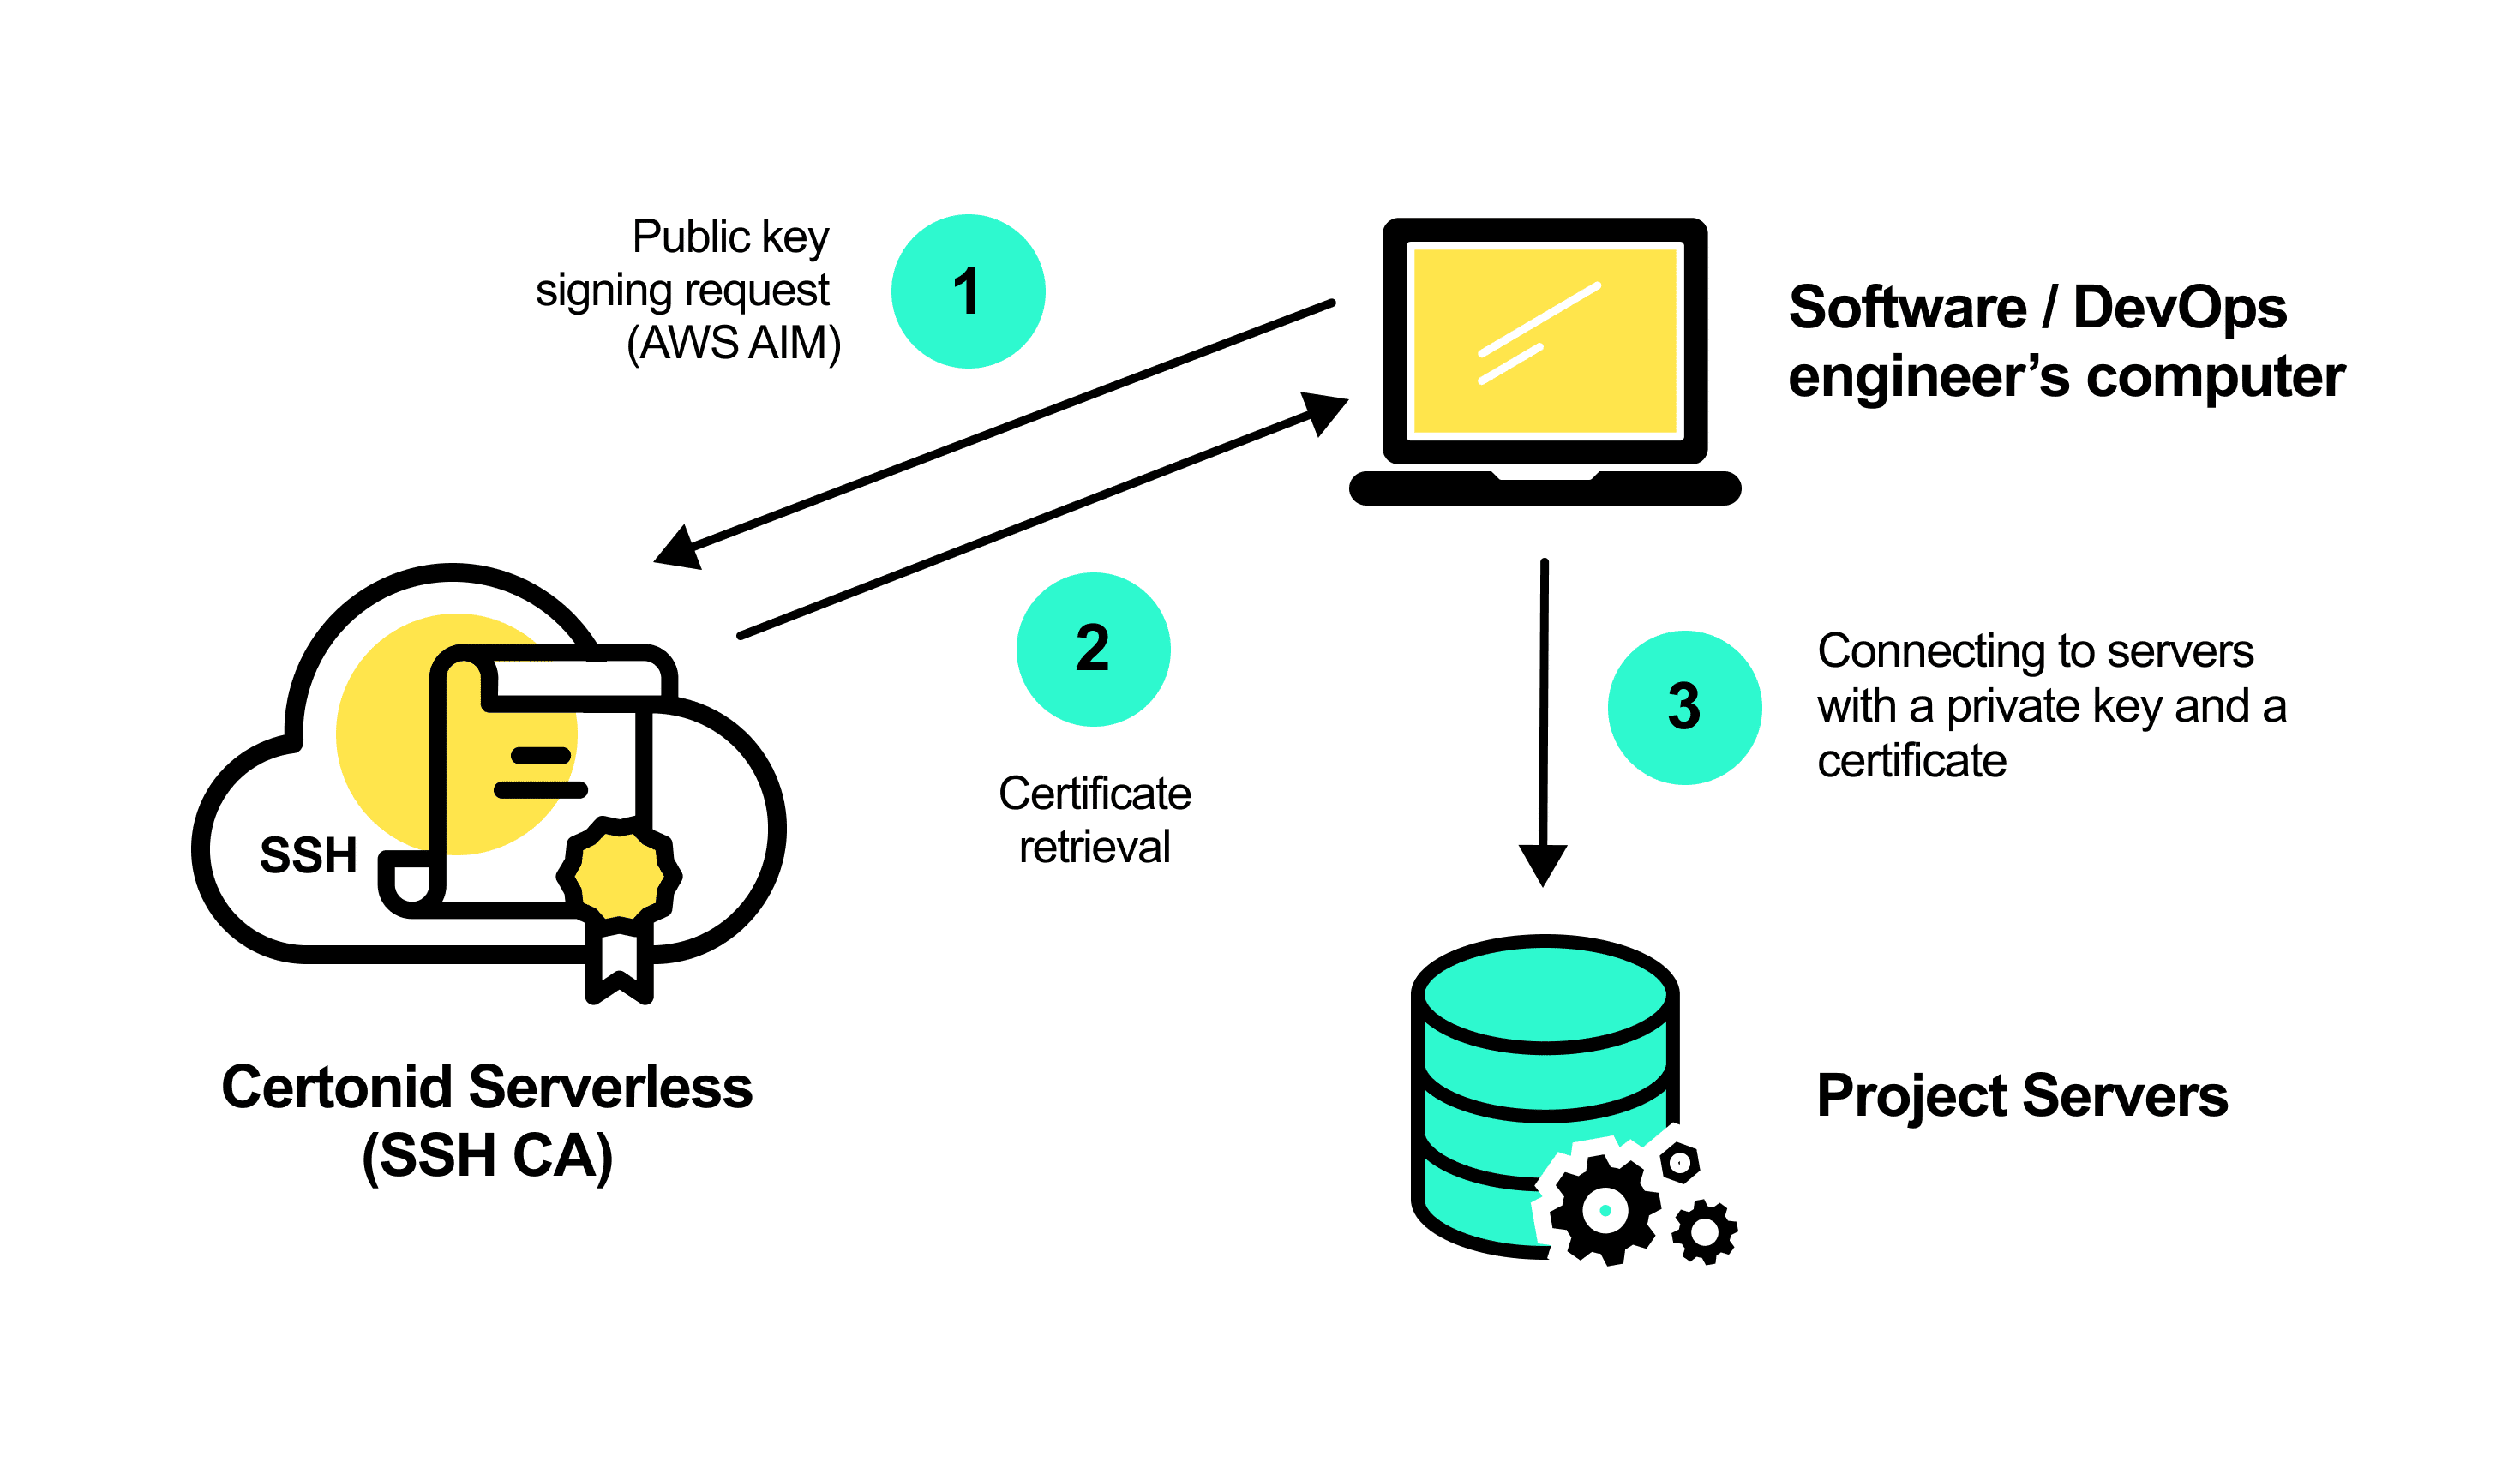
Introducing Certonid
Certonid, our own SSH serverless CA, was created after several failed attempts to set up BLISS. You get the ready-to-use build of binary files right away, as Certonid is built with Golang. It includes two parts: CLI and a serverless one. Follow these simple steps to start using Certonid.
STEP 1. Download CLI (select according to your system) and a serverless part (there is the only version: AWS Lambda running on Linux).
STEP 2. Create a .zip file that contains serverless.linux.amd64 (it’s recommended to name your file “serverless”), your ca-key, and certonid.yml. In config, specify how to access the ca-key – you can encrypt the file with symmetric encryption or using AWS KMS. Also, define how to get the key password (Certonid works with private keys with password only), which will be encrypted with symmetric encryption or using AWS KMS as well. To simplify this process, CLI has additional functions for encrypting lines or files:
ca:
  storage: file
  path: ca.pem
  encrypted:
    encryption: aws_kms
    region: us-east-1
  passphrase:
    encryption: aws_kms
    region: us-east-1
    content: AQICAHhBwiHijA5XW9EyanTVga4XbbwEVCmBLSUiWIxrCrxrUwGGt8JapxlfiJljay3FycLOAAAAZjBkBgkqhkiG9w0BBwagVzBVAgEAMFAGCSqGSIb3DQEHATAeBglghkgBZQMEAS4wEQQMtZxOyGi2foFM+y9SAgEQgCOY1N4sMr5RIiyQ4/8yloRIAi6vWaK3n/jEdgPfn3bdJjrkNQ==
certificates:
  user:
    max_valid_until: 2h
    additional_principals:
      - "ubuntu"
      - "ec2-user"
    critical_options:
      - "source-address 0.0.0.0/0"
    extensions:
    - "permit-X11-forwarding"
    - "permit-agent-forwarding"
    - "permit-port-forwarding"
    - "permit-pty"
    - "permit-user-rc"
logging:
  level: info
Config example
Step 3. Upload your newly created .zip file to AWS Lambda. “AWS Lambda Runtime” should be Go 1.x. “AWS Lambda Handler” should be the file name of the Certonid serverless component in the .zip file (the “serverless” file in the above code sample). Remember that this function requires access to AWS KMS keys if you used it to encrypt password and, optionally, the CA-key.
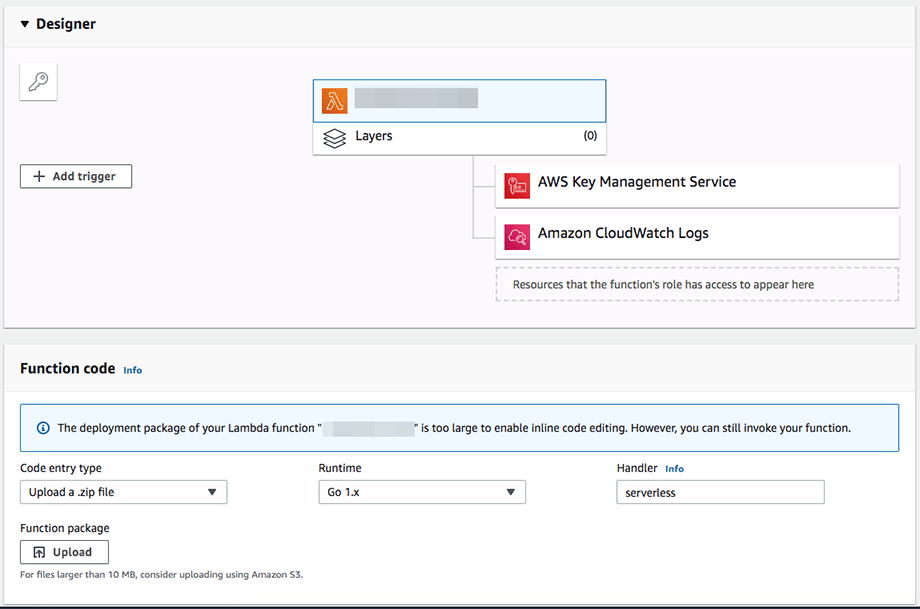
This function doesn’t require much time and memory – 10 seconds and 128 MB should be more than enough. See the CloudWatch logs line as an example:
REPORT RequestId: d7e99280-7860-426e-a6e1-e80d83176f83 Duration: 3223.70 ms Billed Duration: 3300 ms Memory Size: 128 MB Max Memory Used: 58 MB Init Duration: 124.16 ms
Step 4. Configure Certonid CLI. To trigger AWS Lambda function, AWS Identity and Access Management (IAM) is used. You should create an IAM account for each user that needs to access servers via SSH. If a user leaves the project, their account is blocked on AWS, and they won’t be able to request new certificates for accessing servers (the existing certificates expire after the validity period defined by you).
Pro Tip: If you already use AWS for your project, it is recommended to create a separate account for Certonid AWS Lambda and IAM management. That way, you won’t confuse instances and accesses for your product.
CLI config is stored in $HOME/.certonid.yml by default.
certificates:
  examplecom:
    public_key_path: ~/.ssh/id_ed25519.pub
    username: leopard
    runner: aws
    valid_until: 4h
    aws:
      profile: aws-profile
      region: us-east-1
      function_name: CertonidFunction
Config example
The Certificates section contains different projects/functions with certificates. This way one CLI can work with several serverless certification centers.
For access settings, you can specify AWS Access Key ID and Secret Access Key via environment variables. Alternatively, you can configure AWS CLI profiles and add the necessary profile for Certonid to configuration (demonstrated in the example).
Step 5. Retrieve a certificate for the public key with certonid gencert command:
$ certonid gencert examplecom
INFO[2019-11-07T17:57:20+02:00] Signing public key
certificate=/Users/leo/.projects_certs/examplecom-cert.pub
public key=/Users/leo/.ssh/id_ed25519.pub runner=aws
INFO[2019-11-07T17:57:25+02:00] Certificate generated and stored
certificate=/Users/leo/.projects_certs/examplecom-cert.pub
public_key=/Users/leo/.ssh/id_ed25519.pub valid until="2019-11-08 15:57:22 +0000 UTC"
If you run the command again, it will check the existing certificate and, if it’s still valid, CLI will shut down and won’t invoke AWS Lambda functions, saving your costs (AWS Lambda charges for these requests).
$ certonid gencert examplecom
INFO[2019-11-07T18:00:35+02:00] Current certificate still valid. Exiting...   certificate=/Users/leo/.projects_certs/examplecom-cert.pub valid until="2019-11-08 15:57:22 +0000 UTC"
To learn more about commands, refer to “certonid -h” or the project wiki.
SSH integration
There is a strong requirement that the certificate must be located in the same folder as the private key with a <private-key-name>-cert.pub filename. In this case, SSH agent will automatically pick the certificate in storage when adding a private key. This may be challenging when you use one and the same private key for different projects – you need to rewrite the certificate file and then add it to the SSH agent.
Certonid puts certificates in a separate folder by default. This allows you to use one private key for different projects without the need to rewrite one file over and over again. You can change this setting in config and save certificates in the folder of your choice. But how should you use these certificates stored out of OpenSSH format then? You can also ask another question: “That’s great, but do I need to launch this tool every time before I connect to the server via SSH?” There are several options to solve this kind of inconvenience.
The first way is to create a configuration for your SSH client. For instance, we need to connect to *.example.com domains using the examplecom certificate. We can add the following lines to the $HOME/.ssh/config config file:
Match Host *.example.com exec "certonid gencert examplecom"
    Port 22
    User deployer
    IdentityFile  ~/.ssh/id_ed25519
    CertificateFile ~/.projects_certs/examplecom-cert.pub
    PasswordAuthentication no
As you can see, SSH config supports exec option for comparison. It will run the command and, if completed successfully (result code is 0), the requirement is considered as true for the configuration. You can add the certonid gencert examplecom command to this parameter. With the CertificateFile parameter, you can specify the certificate, as it is located in a different folder. After such a configuration, you can write the following commands in the console to connect to servers:
$ ssh web1.example.com
$ ssh web4.example.com
Some software doesn’t support SSH config, and <private-key-name>-cert.pub is blind for it. If such a software product is compatible with an SSH agent, you can add the certificate to it:
$ certonid gencert examplecom --add-to-ssh-agent ~/.ssh/id_ed25519You can add a certificate to the SSH agent without a private key. That’s why you have to specify it as a value for the add-to-ssh-agent command. Alternatively, this parameter can be added to yml-config. (But, if your private keys are encrypted with a password, Certonid will require you to enter the password every time you use this command for launching. Obviously, it won’t work for you.)
Check your certificate in the agent:
$ ssh-add -l
4096 SHA256:... leo@Alexeys-MacBook-Air.local (RSA)
256 SHA256:... leo@Alexeys-MacBook-Air.local (ED25519)
256 SHA256:... leopard_1573142242 [Expires 2019-11-08 17:57:22 +0200 EET] (ED25519-CERT)
Certonid has added the certificate with its validity period to the SSH agent. As soon as the certificate expires, it will automatically disappear from the agent. After this, you can connect to servers or add the following to SSH config:
Host *.example.com
    Port 22
    User deployer
    ForwardAgent yes
    PasswordAuthentication no
To sum up
In this article, I have introduced Certonid to help you work securely with the Secure Shell protocol. Its functionally currently allows setting serverless SSH Certificate Authority for managing access to *nix servers in teams.
In the future releases, the following functionality is expected:
- Tests
- Google Cloud and Azure support (however, Azure doesn’t support Golang)
- Enhanced documentation
Stay tuned, and good luck with the SSH security!