 Skip to Navigation


In this article, I’ll show you how to send emails using an email API in various programming languages and frameworks.
I’ll also break down the differences between SMTP and email APIs, but if you’re already aware of them and your needs, feel free to skip ahead by clicking on some of the following links:
Note that as my API of choice, I’ll be using Email API, a part of the Mailtrap Email Delivery Platform. However, the core principles in this article can be applied to any email API provider.
Setting up Mailtrap Email API
Mailtrap Email API is based on the REST principles, which classifies it as REST, or RESTful API. These types of APIs offer greater flexibility and, as you’ll notice, are super easy to work with as they use standard HTTP methods (e.g., GET, POST, PUT, DELETE), which most developers are familiar with.
Here’s what you need to do to get started with Mailtrap API and integrate it into your project:
- Sign up for a free Mailtrap account: You can sign up using your Google, GitHub, or Office 365 accounts, or, if you prefer, simply use your email address.

- Verify your domain: Navigate to the “Sending Domains” tab and click “Add Domain.” Enter your domain name and confirm by clicking the “Add” button.
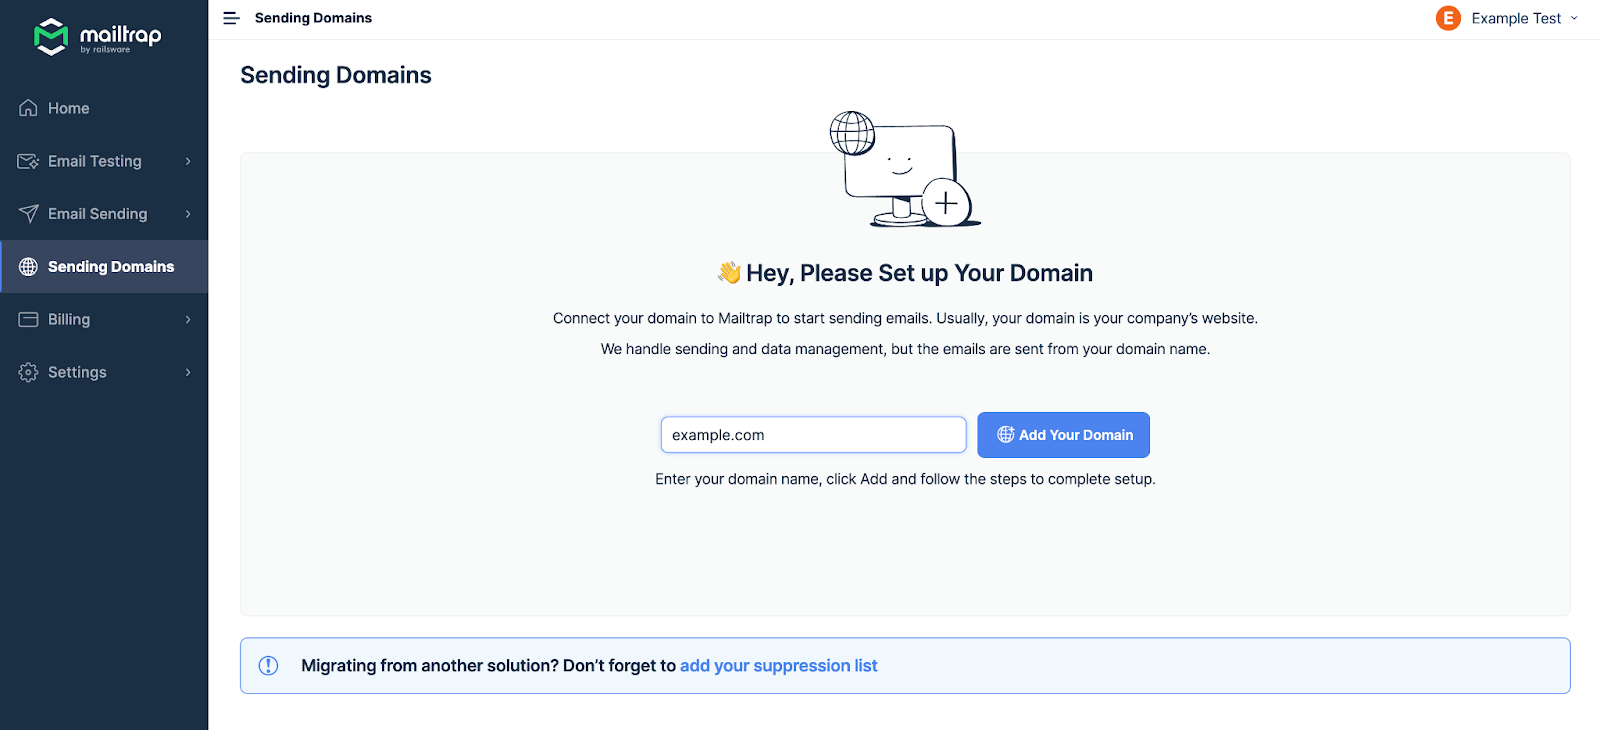
- Update DNS records: Mailtrap will provide and automatically authenticate specific DNS records (SPF, DKIM, DMARC) that should be added to your domain provider’s DNS settings.
Tip: here’s a detailed Getting Started Guide to help you out. 👀
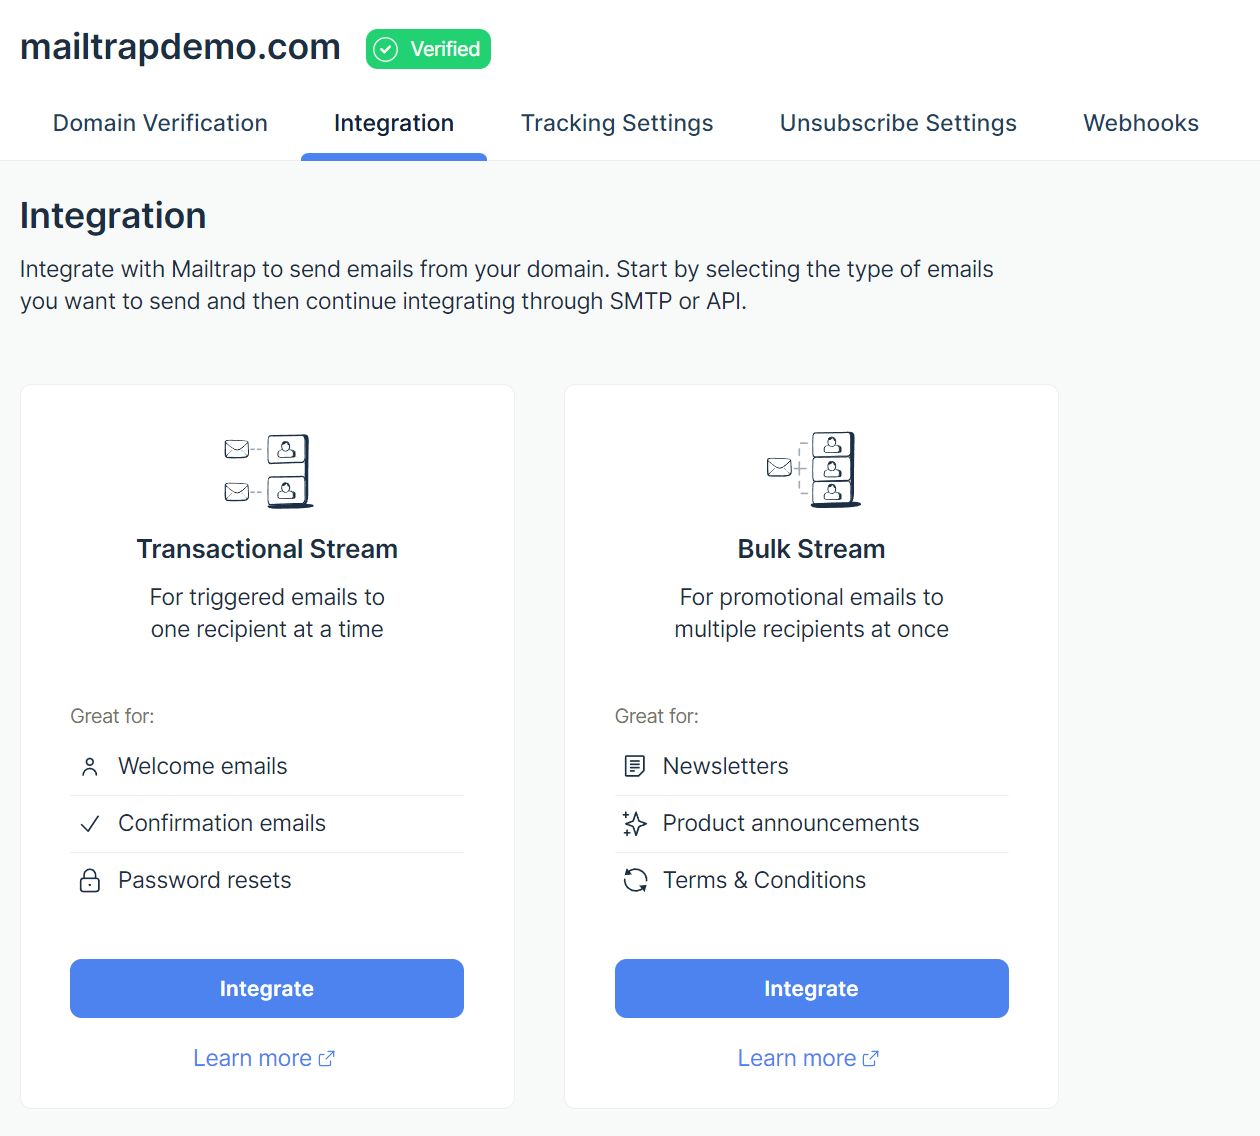
Once your domain is verified, you can integrate your application with Mailtrap’s Email API.
- Access API credentials: Go to the Sending Domains tab, select your verified domain, and open the “Integration” tab. Here, you’ll find credentials for both Transactional and Bulk streams.
- Build your HTTP request: Use the provided API credentials to configure an authenticated HTTP request in your preferred programming language or framework.
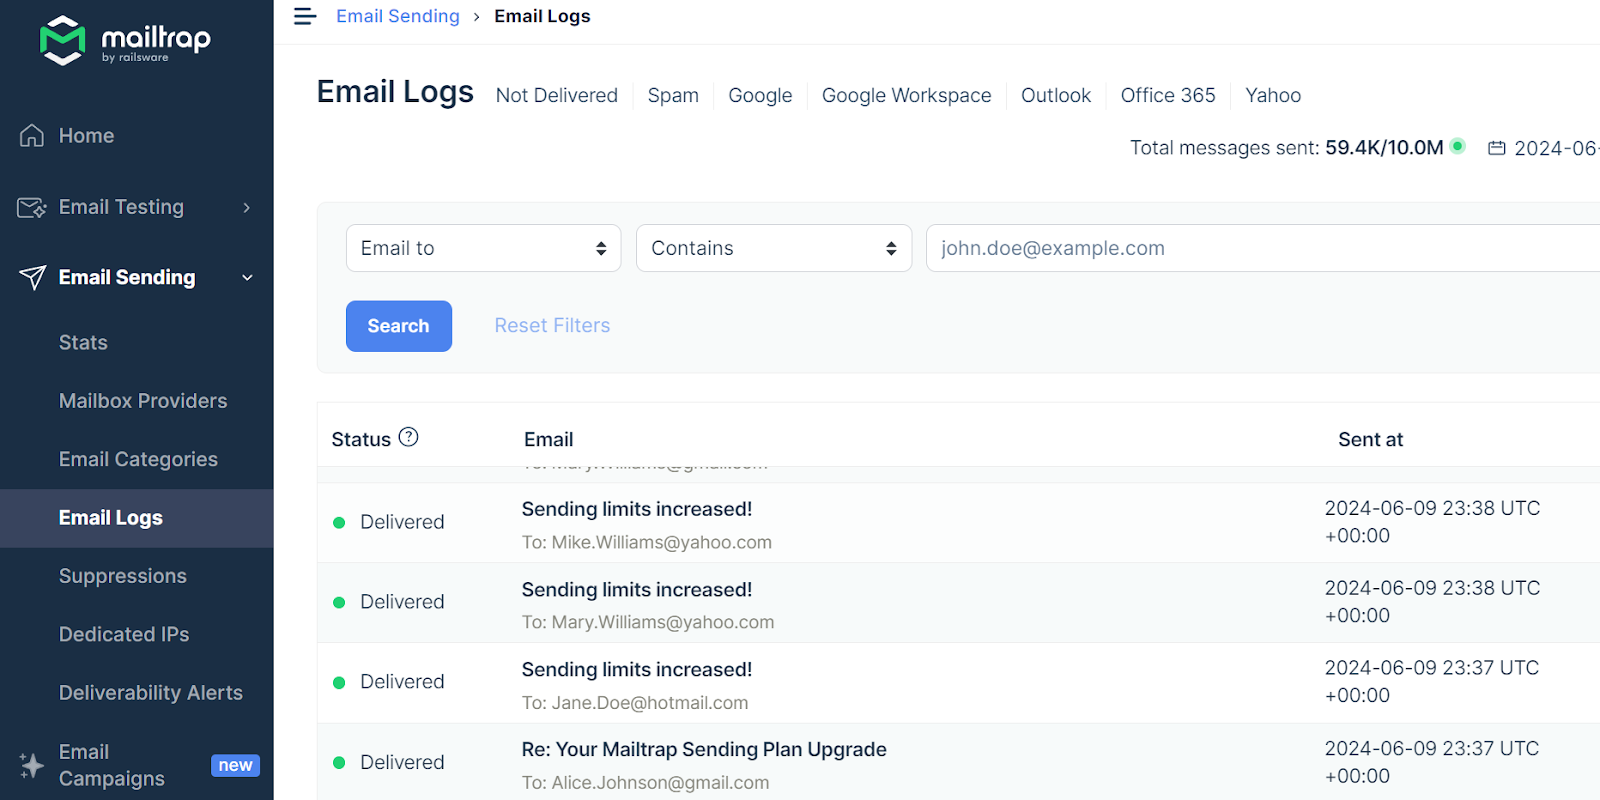
- Run your script: Execute your email sending script. If everything is set up correctly, your email will land in the recipient’s inbox, and you will see it in the “Email Logs” section.
Note: Each domain has unique API tokens. To manage these, go to Settings → API Tokens and click “Add Token” if you need additional tokens. Additionally, Mailtrap’s API supports email templates, attachments, custom variables, and email categories. For detailed information, check the API documentation.
Send emails in PHP
For a comprehensive guide on sending emails in PHP, read the full article here
Since we already covered the Mailtrap installation process, let’s start by integrating the Mailtrap PHP SDK.
First, install Mailtrap PHP SDK using one of the following Composer commands:
- With Symfony HTTP client:
composer require railsware/mailtrap-php symfony/http-client nyholm/psr7- With Guzzle HTTP client:
composer require railsware/mailtrap-php guzzlehttp/guzzle php-http/guzzle7-adapterNote: Mailtrap API Client uses PSR-18 client abstraction and is thus not hard-coupled to any library that sends HTTP messages. It gives you the flexibility to choose which HTTP client you want to use.
However, it’s recommended to use Symfony for its fast performance, ease of use, flexibility, and strong community support.
Next, using the below code, you can send a plain text email using the Mailtrap PHP SDK:
<?php

use Mailtrap\Config;
use Mailtrap\EmailHeader\CategoryHeader;
use Mailtrap\EmailHeader\CustomVariableHeader;
use Mailtrap\Helper\ResponseHelper;
use Mailtrap\MailtrapClient;
use Symfony\Component\Mime\Address;
use Symfony\Component\Mime\Email;
use Symfony\Component\Mime\Header\UnstructuredHeader;

require __DIR__ . '/vendor/autoload.php';

// Your API token from here https://mailtrap.io/api-tokens
$apiKey = getenv('MAILTRAP_API_KEY');
$mailtrap = new MailtrapClient(new Config($apiKey));

$email = (new Email())
    ->from(new Address('example@your-domain-here.com', 'Mailtrap Test'))
    ->replyTo(new Address('reply@your-domain-here.com'))
    ->to(new Address('email@example.com', 'Jon')) // Single recipient
    ->priority(Email::PRIORITY_HIGH)
    ->subject('Best practices of building HTML emails')
    ->text('Hey! Learn the best practices of building HTML emails and play with ready-to-go templates. Mailtrap's Guide on How to Build HTML Email is live on our blog');

// Headers
$email->getHeaders()
    ->addTextHeader('X-Message-Source', 'domain.com')
    ->add(new UnstructuredHeader('X-Mailer', 'Mailtrap PHP Client')); // the same as addTextHeader

// Custom Variables
$email->getHeaders()
    ->add(new CustomVariableHeader('user_id', '45982'))
    ->add(new CustomVariableHeader('batch_id', 'PSJ-12'));

// Category (should be only one)
$email->getHeaders()
    ->add(new CategoryHeader('Integration Test'));

try {
    $response = $mailtrap->sending()->emails()->send($email); // Email sending API (real)

    var_dump(ResponseHelper::toArray($response)); // body (array)
} catch (Exception $e) {
    echo 'Caught exception: ',  $e->getMessage(), "\n";
}
This script initializes the Mailtrap client with your API key, which can be found in the Integration tab under the Sending Domains section.
It then creates a new email message and sets various properties, such as the sender, recipient, subject, and content. Additionally, it adds custom headers and variables.
Finally, the script sends the email using the send() function and outputs the response or an error message if the email fails to send.
HTML email
Sending HTML emails in PHP couldn’t be easier as all you need to do is add the ->html() method.
To save you some time, I’ve prepared a code you can use to send an HTML email to multiple recipients and attach files to it:
<?php

use Mailtrap\Config;
use Mailtrap\EmailHeader\CategoryHeader;
use Mailtrap\EmailHeader\CustomVariableHeader;
use Mailtrap\Helper\ResponseHelper;
use Mailtrap\MailtrapClient;
use Symfony\Component\Mime\Address;
use Symfony\Component\Mime\Email;
use Symfony\Component\Mime\Header\UnstructuredHeader;
use Symfony\Component\Mime\Part\DataPart;

require __DIR__ . '/vendor/autoload.php';

// Your API token from here https://mailtrap.io/api-tokens


$apiKey = “MAILTRAP_API_KEY”;
$mailtrap = new MailtrapClient(new Config($apiKey));

$email = (new Email())
    ->from(new Address('example@your-domain-here.com', 'Mailtrap Test'))
    ->replyTo(new Address('reply@your-domain-here.com'))
    ->to(new Address('email@example.com', 'Jon'))
    ->priority(Email::PRIORITY_HIGH)
    ->cc('mailtrapqa@example.com')
    ->addCc('staging@example.com')
    ->bcc('mailtrapdev@example.com')
    ->subject('Best practices of building HTML emails')
    ->text('Hey! Learn the best practices of building HTML emails and play with ready-to-go templates. Mailtrap's Guide on How to Build HTML Email is live on our blog')
    ->html(
        '<html>
        <body>
        <p><br>Hey</br>
        Learn the best practices of building HTML emails and play with ready-to-go templates.</p>
        <p><a href="https://mailtrap.io/blog/build-html-email/">Mailtrap's Guide on How to Build HTML Email</a> is live on our blog</p>
        <img src="cid:logo">
        </body>
    </html>'
    )
    ->embed(fopen('https://mailtrap.io/wp-content/uploads/2021/04/mailtrap-new-logo.svg', 'r'), 'logo', 'image/svg+xml');

// Add an attachment
$email->attachFromPath('/path/to/your/file.pdf', 'Filename.pdf', 'application/pdf');

// Headers
$email->getHeaders()
    ->addTextHeader('X-Message-Source', 'domain.com')
    ->add(new UnstructuredHeader('X-Mailer', 'Mailtrap PHP Client')); // the same as addTextHeader

// Custom Variables
$email->getHeaders()
    ->add(new CustomVariableHeader('user_id', '45982'))
    ->add(new CustomVariableHeader('batch_id', 'PSJ-12'));

// Category (should be only one)
$email->getHeaders()
    ->add(new CategoryHeader('Integration Test'));

try {
    $response = $mailtrap->sending()->emails()->send($email); // Email sending API (real)

    var_dump(ResponseHelper::toArray($response)); // body (array)
} catch (Exception $e) {
    echo 'Caught exception: ',  $e->getMessage(), "\n";
}
Send emails in Laravel
To quickly integrate the Mailtrap email API into your Laravel application, you can use the official PHP SDK and docs for the Laravel framework bridge. The Mailtrap library is also fully compatible with Laravel 9.x and above.
For more information, read our complete guide on sending emails in Laravel which covers different sending methods as well.
Nonetheless, here’s an example of sending plain-text emails in Laravel;
- Install the Mailtrap PHP client and dependencies using composer:
composer require railsware/mailtrap-php symfony/http-client nyholm/psr7- Next, add Mailtrap transport into your config/mail.php file:
<?php

return [
    /*
    |--------------------------------------------------------------------------
    | Mailer Configurations
    |--------------------------------------------------------------------------
    */
    'mailers' => [

            // start mailtrap transport
            'mailtrap' => [
                'transport' => 'mailtrap'
            ],
            // end mailtrap transport

    ]
];- Now, to the Laravel .env file, add your Mailtrap credentials:
MAIL_MAILER="mailtrap"
MAILTRAP_HOST="send.api.mailtrap.io"
MAILTRAP_API_KEY="YOUR_API_KEY_HERE"
MAIL_FROM_ADDRESS="name@registered_domain.com"- To send the email, create a mailable class:
php artisan make:mail WelcomeMail- Open the newly created WelcomeMail.php file in app/Mail directory, and configure it as follows:
<?php

namespace App\Mail;

use Illuminate\Bus\Queueable;
use Illuminate\Mail\Attachment;
use Illuminate\Mail\Mailable;
use Illuminate\Mail\Mailables\Address;
use Illuminate\Mail\Mailables\Content;
use Illuminate\Mail\Mailables\Envelope;
use Illuminate\Mail\Mailables\Headers;
use Illuminate\Queue\SerializesModels;
use Mailtrap\EmailHeader\CategoryHeader;
use Mailtrap\EmailHeader\CustomVariableHeader;
use Symfony\Component\Mime\Email;
use Symfony\Component\Mime\Header\UnstructuredHeader;

class WelcomeMail extends Mailable
{
    use Queueable, SerializesModels;

    private string $name;

    /**
     * Create a new message instance.
     */
    public function __construct(string $name)
    {
        $this->name = $name;
    }

    /**
     * Get the message envelope.
     */
    public function envelope(): Envelope
    {
        return new Envelope(
            from: new Address('jeffrey@example.com', 'Jeffrey Way'),
            replyTo: [
                      new Address('taylor@example.com', 'Taylor Otwell'),
                  ],
            subject: 'Welcome Mail',
            using: [
                      function (Email $email) {
                          // Headers
                          $email->getHeaders()
                              ->addTextHeader('X-Message-Source', 'example.com')
                              ->add(new UnstructuredHeader('X-Mailer', 'Mailtrap PHP Client'))
                          ;

                          // Custom Variables
                          $email->getHeaders()
                              ->add(new CustomVariableHeader('user_id', '45982'))
                              ->add(new CustomVariableHeader('batch_id', 'PSJ-12'))
                          ;

                          // Category (should be only one)
                          $email->getHeaders()
                              ->add(new CategoryHeader('Integration Test'))
                          ;
                      },
                  ]
        );
    }

    /**
     * Get the message content definition.
     */
    public function content(): Content
    {
        return new Content(
            view: 'mail.welcome-email',
            with: ['name' => $this->name],
        );
    }

    /**
     * Get the attachments for the message.
     *
     * @return array<int, \Illuminate\Mail\Mailables\Attachment>
     */
    public function attachments(): array
    {
        return [
           Attachment::fromPath('https://mailtrap.io/wp-content/uploads/2021/04/mailtrap-new-logo.svg')
                ->as('logo.svg')
                ->withMime('image/svg+xml'),
        ];
    }

    /**
     * Get the message headers.
     */
    public function headers(): Headers
    {
        return new Headers(
            'custom-message-id@example.com',
            ['previous-message@example.com'],
            [
                'X-Custom-Header' => 'Custom Value',
            ],
        );
    }
}- Create a Blade view template for your email in resources/views/emails/welcome.blade.php:
<p>Hey {{$name}}!</p>
<br>
<p>Welcome to the party! You've just joined the coolest club in town.</p>- To the app/routes/console.phpfile, add the CLI router:
<?php

use App\Mail\WelcomeMail;
use Illuminate\Support\Facades\Artisan;
use Illuminate\Support\Facades\Mail;

/*
|--------------------------------------------------------------------------
| Console Routes
|--------------------------------------------------------------------------
|
*/

Artisan::command('send-welcome-mail', function () {
    Mail::to('testreceiver@gmail.com')->send(new WelcomeMail("Jon"));
    // Also, you can use specific mailer if your default mailer is not "mailtrap" but you want to use it for welcome mails
    // Mail::mailer('mailtrap')->to('testreceiver@gmail.com')->send(new WelcomeMail("Jon"));
})->purpose('Send welcome mail');- Lastly, to send your email, call the CLI command:
php artisan send-welcome-mailHTML email
To send an HTML email via Laravel, all you have to do is add HTML code to the Blade file we previously created (e.g., welcome.blade.php).
For a basic HTML message, use the code below:
<!doctype html>
<html lang="en">
<head>
    <meta charset="UTF-8">
    <meta name="viewport"
          content="width=device-width, user-scalable=no, initial-scale=1.0, maximum-scale=1.0, minimum-scale=1.0">
    <meta http-equiv="X-UA-Compatible" content="ie=edge">

    <style>
        p {
            font-size: 12px;
        }

        .signature {
            font-style: italic;
        }
    </style>
</head>
<body>
<div>
    <p>Hey {{ $name }},</p>
    <p>Can your Laravel app send emails yet? 😉 </p>
    <p class="signature">Mailtrap</p>
</div>
</body>
</html>
If you want to customize your HTML emails further, be sure to give our Laravel HTML article a read.
Send emails in Python
Below I’ll show a basic example of how to send an email in Python. However, if you’d like to understand how to handle more complex email-sending scenarios in Python, I recommend reading our dedicated article on this topic.
Similarly to other languages and frameworks, once the Mailtrap account is all set, I’ll use Mailtrap’s official Python SDK to streamline the process of sending emails via the API in Python.
Here’s how it works:
- Open your terminal and run the following command:
pip install mailtrap- Send a plain-text email by running this script:
from mailtrap import Mail, Address, MailtrapClient

# Create a Mail object with basic details for a plain text email
mail = Mail(
    # Specify the sender's email address and optional name
    sender=Address(email="mailtrap@example.com", name="Mailtrap Test"),
    # Specify one or more recipients; here we use a list with a single recipient
    to=[Address(email="your@email.com", name="Your Name")],
    # Subject of the email
    subject="Simple Plain Text Email",
    # The plain text content of the email
    text="This is a plain text email sent using the Mailtrap SDK. Simple and straightforward.",
    # Optional: categorize this email for easier sorting or management in the Mailtrap service
    category="Test",
    # Optional: Additional headers can be specified, but are not required for plain text emails
    headers={"X-Example-Header": "HeaderValue"}
)

# Initialize the MailtrapClient with your API token
client = MailtrapClient(token="your-api-key")

# Send the email using the client's send method
client.send(mail)

print("Plain text email sent successfully.")
Don’t forget to insert your Mailtrap credentials (e.g., verified sending domain and API key).
HTML email
To send an HTML email, simply adjust the script above by specifying the html parameter in the Mail object with the HTML content. Like so:
from mailtrap import Mail, Address, MailtrapClient

# Create a Mail object for sending an HTML email
mail = Mail(
    sender=Address(email="mailtrap@example.com", name="Mailtrap Test"),
    to=[Address(email="recipient@email.com", name="Recipient Name")],
    subject="Your HTML Email Subject Here",
    text="This is a fallback text for email clients that don't render HTML",
    html="""
    <!DOCTYPE html>
    <html>
        <head>
            <title>Email Title</title>
        </head>
        <body>
            <h1>Hello, World!</h1>
            <p>This is an <strong>HTML email</strong> sent from the Mailtrap Python SDK.</p>
            <p>Here's a link: <a href="https://example.com">Visit Example.com</a></p>
        </body>
    </html>
    """,
    # You can categorize this email or add custom headers as needed
    category="HTML Email",
    headers={"X-Custom-Header": "Value"}
)

# Initialize the MailtrapClient with your API token
client = MailtrapClient(token="your-api-key")

# Send the email
client.send(mail)

print("HTML email sent successfully.")
Send emails in Node.js
In this chapter, I’ll show you how to add email-sending functionality to your Node.js application with Mailtrap’s official SDK that allows easy integration.
The examples I’ll show you will be basic, but, if you’re feeling dev-savvy, feel free to check out our detailed article on sending emails in Node.js.
Now, let’s start by installing Mailtrap Node.js package with either npm or yarn:
npm install mailtrap

# or, if you are using yarn:

yarn add mailtrap
Then, send a plain text email by running the following code:
import { MailtrapClient } from "mailtrap"

/**
 * For this example to work, you need to set up a sending domain,
 * and obtain a token that is authorized to send from the domain.
 */

const TOKEN = "<YOUR-TOKEN-HERE>";
const SENDER_EMAIL = "<SENDER ADDRESS@YOURDOMAIN.COM>";
const RECIPIENT_EMAIL = "<RECIPIENT@EMAIL.COM>";

const client = new MailtrapClient({ token: TOKEN });

const sender = { name: "Mailtrap Test", email: SENDER_EMAIL };

client
  .send({
    from: sender,
    to: [{ email: RECIPIENT_EMAIL }],
    subject: "Hello from Mailtrap!",
    text: "Welcome to Mailtrap Sending!",
  })
  .then(console.log)
  .catch(console.error);
As Mailtrap’s Node.js package uses ECMAScript (ES) modules, I suggest adding “type:” “module” in your package.json file.
HTML email
Use the following code snippet to send an HTML email:
import { MailtrapClient } from "mailtrap"

/**
 * For this example to work, you need to set up a sending domain,
 * and obtain a token that is authorized to send from the domain.
 * @see https://help.mailtrap.io/article/69-sending-domain-setup
 */

const TOKEN = "<YOUR-TOKEN-HERE>";
const SENDER_EMAIL = "<SENDER@YOURDOMAIN.COM>";
const RECIPIENT_EMAIL = "<RECIPIENT@EMAIL.COM>";

const client = new MailtrapClient({ token: TOKEN });

client
  .send({
    category: "test",
    custom_variables: {
      hello: "world",
      year: 2022,
      anticipated: true,
    },
    from: { name: "Mailtrap Test", email: SENDER_EMAIL },
    to: [{ email: RECIPIENT_EMAIL }],
    subject: "Hello from Mailtrap!",
    html: `
    <!doctype html>
    <html>
      <head>
        <meta http-equiv="Content-Type" content="text/html; charset=UTF-8">
      </head>
      <body style="font-family: sans-serif;">
        <div style="display: block; margin: auto; max-width: 600px;" class="main">
          <h1 style="font-size: 18px; font-weight: bold; margin-top: 20px">Congrats for sending test email with Mailtrap!</h1>
          <p>Inspect it using the tabs you see above and learn how this email can be improved.</p>
          <p>Now send your email using our fake SMTP server and integration of your choice!</p>
          <p>Good luck! Hope it works.</p>
        </div>
        <!-- Example of invalid for email html/css, will be detected by Mailtrap: -->
        <style>
          .main { background-color: white; }
          a:hover { border-left-width: 1em; min-height: 2em; }
        </style>
      </body>
    </html>
  `,
  })
  .then(console.log)
  .catch(console.error);
How to choose an email API provider
So far in the article, we’ve used Mailtrap Email API to send emails. However, I know that not every email API can fit all teams out there.
To see how Mailtrap compares to other APIs and help you choose the best solution for your team, we researched the top email API providers, focusing on flexibility. That is, the provider’s ability to send your emails reliably while allowing you to fine-tune your sending process.
So, we sent emails with each API, tried different sending configurations, set up webhooks, played around with templates, and more, all the while taking the following into consideration:
- Infrastructure and scalability
- Sending logic and performance
- Integration and extensibility
- Templates and personalization
- Customer support
As a sneak peek, here’s a brief flexibility comparison between Mailtrap and Mailgun:
| Feature | Mailtrap | Mailgun |
| Dedicated IPs | Available from 100k emails/month with auto warm-up. | Available from 50k emails/month as an add-on and included from 100k emails/month. |
| Separate streams | ✅ Bulk and transactional | ❌ |
| Rate handling | ✅ No limits, customizable throttling | ✅ Yes, limit not specified |
| Webhooks | ✅ Full events + logs | ✅ Full events |
| SDKs | Node.js, PHP, Ruby, Python, Elixir, Java | Python, Go, Node.js, PHP, Java, Ruby |
| Templates | ✅ Handlebars | ✅ Handlebars + versioning |
| Customer support | Ticket, chat, priority support | Ticket, chat, and phone |
To learn more about our methodology and get more in-depth information on technical tidbits like IP infrastructure, throttling, retry logic, etc., read our full comparison. 👀
Wrapping up
Whether you’ve opted for sending emails with API or, perhaps, with SMTP, I hope you now have a better understanding of the intricacies involved in the email backend.
And one more thing: I heartily invite you to further explore our blog, where you can learn how to send emails in various languages and frameworks and read articles such as:
