In this tutorial, I’ll show you how to create a Flask contact form, collect and validate it’s data, and finally send an email via the contact form.
As a bonus, I’ve included a section on email testing to help you set up an error-free contact form.
Let’s get started!
How to create a Flask contact form
Like in other web frameworks, setting up a contact form in Flask involves several key steps. These range from the initial installation of Flask to coding the functionality that captures and submits user data from the form.
I’ll use a basic HTML form as an example. But you can, of course, change its appearance and functionality by adding CSS styles, span classes, and other HTML elements as needed.
- First, using pip in your terminal, install Flask:
pip install flask- Once installed, create a new file named app.py and initialize your Flask application with the following code:
from flask import Flask, render_template, request, redirect, flash, url_for

app = Flask(__name__)
app.secret_key = 'your_secret_key_here'
This code creates a new instance used to define routes and other app configurations.
- Next, create a new folder named templates and add a contact.html file to it.
<!DOCTYPE html>
<html>
<head>
    <title>Contact Form</title>
</head>
<body>
    <h1>Contact Us</h1>
    <form method="POST">
        <label for="name">Name:</label><br>
        <input type="text" id="name" name="name" required><br>
        <label for="email">Email:</label><br>
        <input type="email" id="email" name="email" required><br>
        <label for="message">Message:</label><br>
        <textarea id="message" name="message" required></textarea><br>
        <input type="submit" value="Submit">
    </form>
</body>
</html>
This is a simple HTML form with fields for a user’s name, email, and message. The method=”POST” attribute ensures that data is securely transmitted from the client to the server.
Tip: If you want to use JavaScript with Flask, you need to include the JS code directly in your Jinja2 templates or reference external JavaScript files. Flask does not automatically inject JavaScript into your templates during rendering.
- Back in your app.py file, define a route that will render the contact form:
from flask import render_template

@app.route('/contact', methods=['GET'])
def contact():
    return render_template('contact.html')
This function responds to a GET request by rendering the contact.html template when users visit the ‘/contact’ page. This is sufficient for displaying the form but does not handle the submission of data back to the server.
To enable the form to send data back to the server and ensure proper handling of the data, you’ll need to modify the route to handle POST requests.
How to add reCAPTCHA
To to prevent automated bots from submitting spam, I usually add reCAPTCHA verification to my Flask contact forms.
Let’s quickly go over how to do this:
- Register at Google reCAPTCHA and get a secret key.
- If not installed yet, install the flask-wtf library.
pip install flask-wtf- Add the reCAPTCHA secret key to your app configuration:
app.config['RECAPTCHA_PUBLIC_KEY'] = 'your_site_key'
app.config['RECAPTCHA_PRIVATE_KEY'] = 'your_secret_key'- Modify forms.py to include the reCAPTCHA field:
from flask_wtf import FlaskForm, RecaptchaField

class ContactForm(FlaskForm):
    name = StringField('Name', validators=[DataRequired(), Length(min=2, max=50)])
    email = StringField('Email', validators=[DataRequired(), Email()])
    message = TextAreaField('Message', validators=[DataRequired(), Length(min=10)])
recaptcha = RecaptchaField()- Add server-side validation and process the form submission within the /contact route.
@app.route('/contact', methods=['GET', 'POST'])
def contact():
    form = ContactForm()

    if request.method == 'POST':
        name = request.form['name']
        email = request.form['email']
        message = request.form['message']
        # Add server-side validation or processing here
      return redirect(url_for('contact'))
return render_template('contact.html', form=form)- Lastly, update the HTML form template with the reCAPTCHA field:
<!DOCTYPE html>
<html>
  <head>
    <title>Contact Form</title>
  </head>
  <body>
    {% with messages = get_flashed_messages() %} {% if messages %}
    <div>
      <h5>{{ messages[-1] }}</h5>
    </div>
    {% endif %} {% endwith %}
    <h1>Contact Us</h1>
    <form method="POST">
      {{ form.recaptcha }}<br />
      <label for="name">Name:</label><br />
      <input type="text" id="name" name="name" required /><br />
      <label for="email">Email:</label><br />
      <input type="email" id="email" name="email" required /><br />
      <label for="message">Message:</label><br />
      <textarea id="message" name="message" required></textarea><br />
      <input type="submit" value="Submit" />
    </form>
  </body>
</html>
How to collect data from a Flask contact form
Unlike GET requests, which append data to the URL, POST requests send data in the body of the HTTP request. This method is preferable for sensitive information, like personal details, as it is not exposed in the URL.
Here’s how you update your route to handle both GET and POST methods effectively:
@app.route('/contact', methods=['GET', 'POST'])
def contact():
    if request.method == 'POST':
        name = request.form['name']
        email = request.form['email']
        message = request.form['message']
        # Add server-side validation or processing here
        flash('Thank you for submitting your message!')
        return redirect(url_for('contact'))
    return render_template('contact.html')
Once the form is submitted, the data is processed (saved to a database or sent via email), and the user is given feedback through a flash message and redirected back to the form.
The form is set up to handle submissions, so it’s important that the information submitted is accurate and valid.
Let’s go over how to add a layer of checks to catch any errors or incomplete details right from the start.
How to validate data from a contact form
Before going over these, let’s clarify the difference: email validation focuses only on the email format, while email verification confirms the authenticity and ownership of the email address.
Here, I’ll show you the two main validation approaches that are widely used:
- Via WTForms, a flexible Python forms validation and rendering library
- Creating custom Flask validation functions
As a bonus, I’ll also briefly touch on additional validation methods.
Using WTForms
I prefer using WTForms for handling form validation in Flask applications because it provides a robust set of built-in validators, making it easy to ensure data security.
Additionally, WTForms integrates with Flask-WTF, an extension that simplifies working with forms in Flask by adding useful features like CSRF protection, which helps prevent unauthorized form submissions.
By using this integration, I always end up with cleaner and more maintainable code, making the development process more efficient.
- To start, install the flask-wtf library:
pip install flask-wtf
pip install email-validator- Next, create a form class in a new file named forms.py:
from flask_wtf import FlaskForm
from wtforms import StringField, TextAreaField
from wtforms.validators import DataRequired, Email, Length

class ContactForm(FlaskForm):
    name = StringField('Name', validators=[DataRequired(), Length(min=2, max=50)])
    email = StringField('Email', validators=[DataRequired(), Email()])
message = TextAreaField('Message', validators=[DataRequired(), Length(min=10)])- Now, update your app.py file to use this form:
from forms import ContactForm

@app.route('/contact', methods=['GET', 'POST'])
def contact():
    form = ContactForm()
    if form.validate_on_submit():
        name = form.name.data
        email = form.email.data
        message = form.message.data
        # Add server-side processing or send email here
        flash('Thank you for submitting your message!')
        return redirect(url_for('contact'))
    return render_template('contact.html', form=form)
This setup ensures that the data entered into the form is validated on the server side before any processing occurs.
Custom Validation Functions
In addition to using WTForms, you can create custom validation functions in your route to ensure the data meets your specific requirements. Here’s an example:
@app.route('/contact', methods=['GET', 'POST'])
def contact():
    if request.method == 'POST':
        name = request.form['name']
        email = request.form['email']
        message = request.form['message']

        # Custom validation
        if not name or not email or not message:
            flash('All fields are required!')
            return redirect(url_for('contact'))

        if len(name) < 2 or len(name) > 50:
            flash('Name must be between 2 and 50 characters.')
            return redirect(url_for('contact'))

        if not re.match(r"[^@]+@[^@]+\.[^@]+", email):
            flash('Invalid email address.')
            return redirect(url_for('contact'))

        if len(message) < 10:
            flash('Message must be at least 10 characters long.')
            return redirect(url_for('contact'))

        # Add server-side processing or send email here
        flash('Thank you for submitting your message!')
        return redirect(url_for('contact'))
    return render_template('contact.html')
In this example, I’ve added custom validation checks for the name, email, and message fields directly in the route. This approach gives you flexibility if you need specific validation logic that isn’t covered by WTForms.
You can create other custom validation functions for different fields. For example:
- Validating phone numbers:
if not re.match(r"^\+?1?\d{9,15}$", phone): flash('Invalid phone number.')- Checking for unique usernames:
if User.query.filter_by(username=username).first(): flash('Username already exists.')- Ensuring passwords meet certain complexity criteria:
if not re.match(r"^(?=.*[A-Za-z])(?=.*\d)[A-Za-z\d]{8,}$", password): flash('Password must be at least 8 characters long and contain both letters and numbers.')Additional Validation Methods
Besides WTForms and different custom validation functions, there are other libraries and techniques you can use for form validation in Flask:
- Client-Side Validation: Using HTML5 validation attributes like required, minlength, and type=”email”. Additionally, you can use JavaScript with regex to provide immediate feedback to users when the form is being submitted. Here is an example of how this would look like:
<form id="contactForm" method="POST" onsubmit="return validateForm()">
    <label for="name">Name:</label><br>
    <input type="text" id="name" name="name" required minlength="2" maxlength="50"><br>
    <label for="email">Email:</label><br>
    <input type="email" id="email" name="email" required><br>
    <label for="message">Message:</label><br>
    <textarea id="message" name="message" required minlength="10"></textarea><br>
    <input type="submit" value="Submit">
</form>

<script>
    function validateForm() {
        var name = document.getElementById('name').value;
        var email = document.getElementById('email').value;
        var message = document.getElementById('message').value;

        if (name.length < 2 || name.length > 50) {
            alert('Name must be between 2 and 50 characters.');
            return false;
        }

        var emailPattern = /^[^\s@]+@[^\s@]+\.[^\s@]+$/;
        if (!emailPattern.test(email)) {
            alert('Invalid email address.');
            return false;
        }

        if (message.length < 10) {
            alert('Message must be at least 10 characters long.');
            return false;
        }

        return true;
    }
</script>
These two additional libraries are also useful for validation in specific scenarios, particularly those involving APIs or complex data structures.
How to verify an email address in a contact form
Adding verification to a contact form ensures the authenticity of the submitted email address and helps prevent spam.
Here is how you can send a verification email with a link:
- Install Flask-Mail and configure it with an SMTP server of your choice (more on this below).
- Next, generate and confirm a verification token:
from itsdangerous import URLSafeTimedSerializer

s = URLSafeTimedSerializer(app.secret_key)

def generate_verification_token(email):
    return s.dumps(email, salt='email-confirm')

def confirm_verification_token(token, expiration=3600):
    try:
        email = s.loads(token, salt='email-confirm', max_age=expiration)
    except:
        return False
return email- Now, update the contact route to send a verification email and create the verification route:
@app.route('/contact', methods=['GET', 'POST'])
def contact():
    if request.method == 'POST':
        name = request.form['name']
        email = request.form['email']
        message = request.form['message']

        if not name or not email or not message:
            flash('All fields are required!')
            return redirect(url_for('contact'))

        token = generate_verification_token(email)
        verify_url = url_for('verify_email', token=token, _external=True)
        html = render_template('verify_email.html', verify_url=verify_url)
        subject = "Please verify your email"
        send_email(email, subject, html)

        flash('A verification email has been sent to your email address.')
        return redirect(url_for('contact'))
    return render_template('contact.html')

@app.route('/verify/<token>')
def verify_email(token):
    email = confirm_verification_token(token)
    if not email:
        flash('The verification link is invalid or has expired.', 'danger')
        return redirect(url_for('contact'))

    flash('Your email has been verified successfully!', 'success')
return redirect(url_for('contact'))- Create a simple email template with the verification link:
<!DOCTYPE html>
<html>
<head>
    <title>Email Verification</title>
</head>
<body>
    <p>Hi,</p>
    <p>Please click the link below to verify your email address:</p>
    <p><a href="{{ verify_url }}">{{ verify_url }}</a></p>
    <p>If you did not make this request, you can ignore this email.</p>
</body>
</html>- Lastly, define your send email function:
def send_email(to, subject, template):
    msg = Message(
        subject,
        recipients=[to],
        html=template,
        sender='your_email@example.com'
    )
    mail.send(msg)
Send emails from a Flask contact form using SMTP
To send an email from your Flask contact form, you’ll need to configure Flask to use an SMTP server.
I typically use a reliable SMTP server provided by Mailtrap Email Sending, which is part of the Mailtrap Email Delivery Platform. It also gives developers an infrastructure with high deliverability rates by default and design.
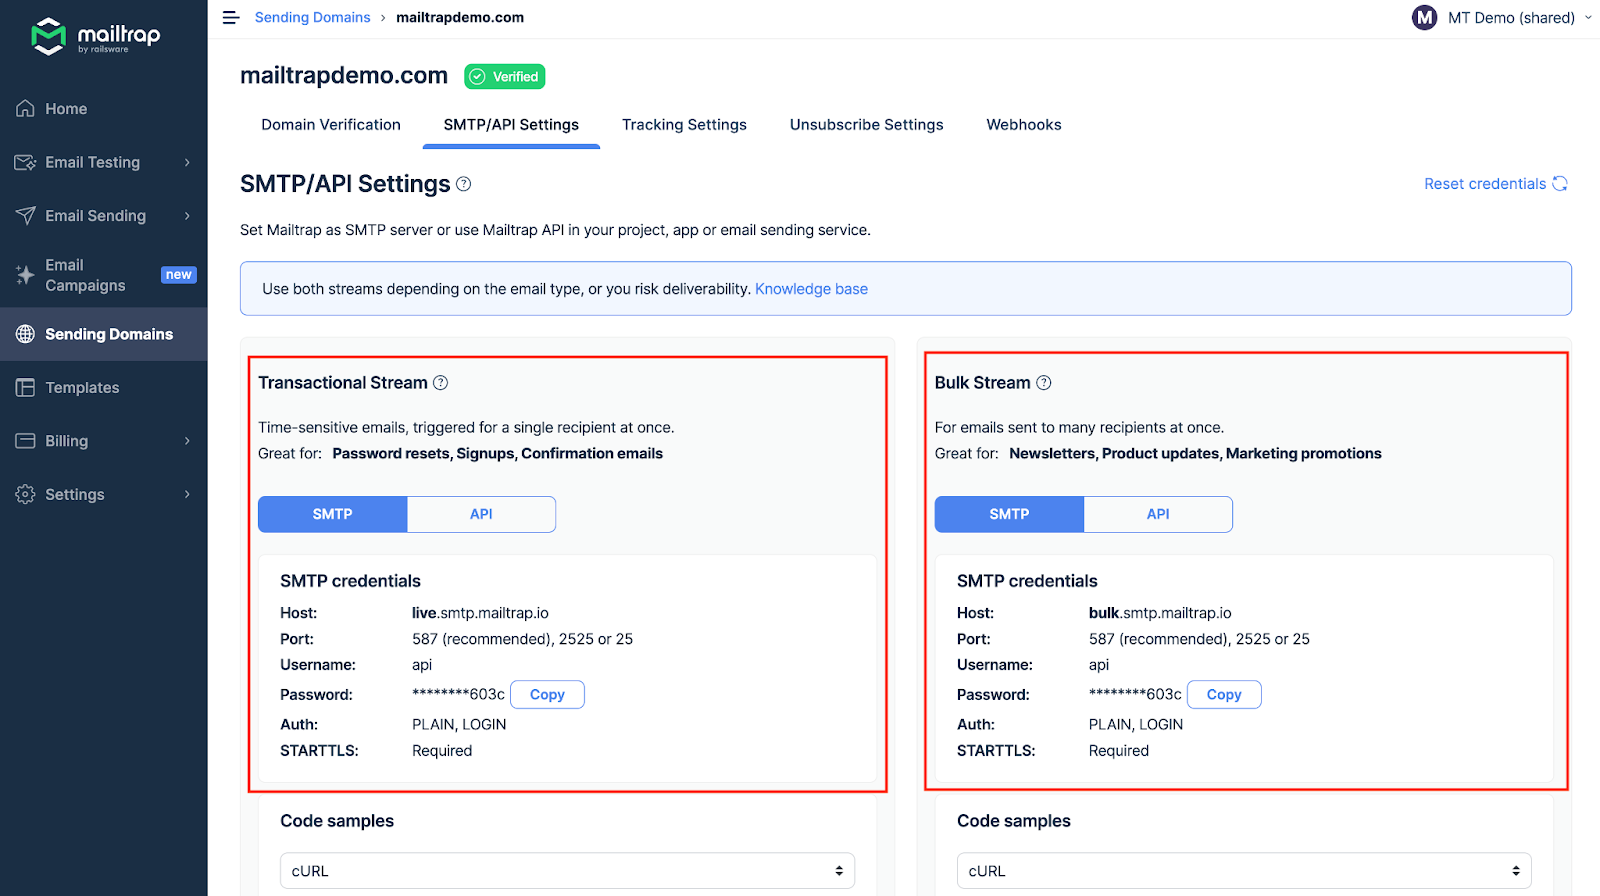
- First, you’ll need to sign up for Mailtrap and then add and verify your domain. Once that’s done, navigate to SMTP/API Settings to choose your preferred stream—either Transactional or Bulk—and find the SMTP credentials. For more details, check out the Getting Started guide.
- Next, install Flask-Mail, a Flask extension for sending emails:
pip install Flask-Mail- Now, configure Flask-Mail with your SMTP server details in your app.py file:
from flask import Flask, render_template, request, redirect, flash, url_for
from flask_mail import Mail, Message

app = Flask(__name__)
app.secret_key = 'your_secret_key_here'

# Mailtrap configuration for production
app.config['MAIL_SERVER'] = 'live.smtp.mailtrap.io'
app.config['MAIL_PORT'] = 587  # You can also use 2525 or 25
app.config['MAIL_USERNAME'] = 'api'
app.config['MAIL_PASSWORD'] = 'your_mailtrap_password'  # Replace with your actual password
app.config['MAIL_USE_TLS'] = True
app.config['MAIL_USE_SSL'] = False

mail = Mail(app)
Note: Replace ‘your_mailtrap_password‘ with the actual password obtained from your Mailtrap account. The same goes for ‘your_mailtrap_password‘.
- In your app.py, create a route that will handle displaying the contact form and sending the email:
@app.route('/contact', methods=['GET', 'POST'])
def contact():
    if request.method == 'POST':
        name = request.form['name']
        email = request.form['email']
        message = request.form['message']

        # Validate form data
        if not name or not email or not message:
            flash('All fields are required!')
            return redirect(url_for('contact'))

        # Compose email
        msg = Message(subject='Contact Form Submission',
                      sender=email,
                      recipients=['your_recipient@example.com'],
                      body=f"Name: {name}\nEmail: {email}\nMessage: {message}")

        # Send email
        mail.send(msg)
        flash('Thank you for your message!')
        return redirect(url_for('contact'))
    return render_template('contact.html')
This code will collect form data, validate that the required fields are filled out, compose an email, and send it via Mailtrap’s SMTP server. The recipient’s field should contain the email address where you want to receive the form submissions.
Send emails from a Flask contact form using API
Mailtrap provides an official Python client for its Email Sending API, which can be more flexible than SMTP. Here’s how you can set it up and use it with Flask.
Note: The example code is a simplified version. If you need a more comprehensive integration with attachments and multiple recipients, refer to the above Mailtrap SDK GitHub documentation.
- Install the official Mailtrap Python client:
pip install mailtrap- Create a Function in your app.py to configure the API call:
import mailtrap as mt
from flask import Flask, render_template, request, redirect, flash, url_for

app = Flask(__name__)
app.secret_key = 'your_secret_key_here'

MAILTRAP_API_TOKEN = 'your_api_token_here'

def send_email_via_api(to_email, subject, body):
    mail = mt.Mail(
        sender=mt.Address(email="sender@example.com", name="Sender Name"),
        to=[mt.Address(email=to_email)],
        subject=subject,
        text=body,
    )
    client = mt.MailtrapClient(token=MAILTRAP_API_TOKEN)
    client.send(mail)
    return True
Note: Replace ‘your_api_token_here‘ with your Mailtrap API token, which can be found under the API section in SMTP/API Settings. Modify the sender’s email and name as needed.
- Lastly, update the contact route to use the Mailtrap API for sending emails:
@app.route('/contact', methods=['GET', 'POST'])
def contact():
    if request.method == 'POST':
        name = request.form['name']
        email = request.form['email']
        message = request.form['message']

        # Validate form data
        if not name or not email or not message:
            flash('All fields are required!')
            return redirect(url_for('contact'))

        # Compose email
        subject = 'Contact Form Submission'
        body = f"Name: {name}\nEmail: {email}\nMessage: {message}"

        # Send email via Mailtrap API
        if send_email_via_api('your_recipient@example.com', subject, body):
            flash('Thank you for your message!')
        else:
            flash('Failed to send message.')

        return redirect(url_for('contact'))
    return render_template('contact.html')
Here are some more resources on the topic that you might find useful:
- How to Send Emails in Flask using SMTP or API
- How to Send Emails in Flask Using Gmail Email Infrastructure
How to test your emails before sending?
If there is one thing that everyone hates, it’s spam emails.
That’s why I never want my emails to be associated with any of that and use a sandbox environment that allows me to check if everything looks and performs in a way that does not trigger spam filters.
My go-to tool is Mailtrap Email Testing, which is also part of the Mailtrap Email Delivery Platform. It allows me to capture outgoing emails from staging and dev environments in a sandbox where I inspect them, knowing that no recipient is unintentionally spammed or receives test emails.
SMTP
Assuming you already have a Mailtrap account, you can open the Email Testing page in Mailtrap and click on “Show Credentials” under the SMTP Settings tab.
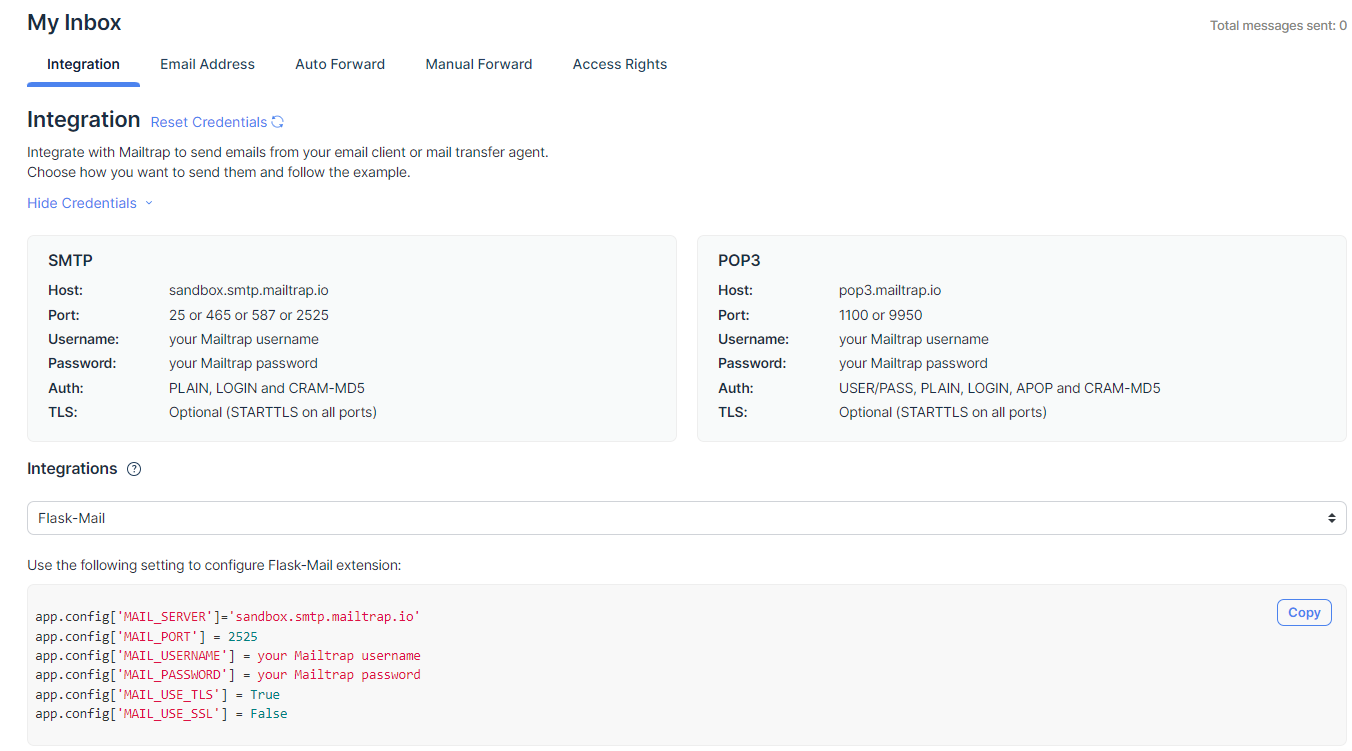
From here, you can copy and paste the credentials into the app.py file. Alternatively, for convenience, go to the Integrations drop-down below and choose Flask-Mail. This will provide you with the configuration code right away:
app.config['MAIL_SERVER']='sandbox.smtp.mailtrap.io'
app.config['MAIL_PORT'] = 2525
app.config['MAIL_USERNAME'] = 'your Mailtrap username'
app.config['MAIL_PASSWORD'] = 'your Mailtrap password'
app.config['MAIL_USE_TLS'] = True
app.config['MAIL_USE_SSL'] = False
Now, just create a route to send a test email:
@app.route('/send-test-email')
def send_test_email():
    msg = Message(subject='Test Email',
                  sender='from@example.com',
                  recipients=['to@example.com'],
                  body='This is a test email sent from Flask.')
    mail.send(msg)
    return 'Test email sent!'
Run your Flask application and visit http://localhost:5000/send-test-email in your browser. Check your Mailtrap inbox to see the received email and inspect its contents!
API
Here, I’ll break down the code into smaller sections to help you understand Mailtrap Email Testing API integration better. If you’re already familiar with the main concepts, you can skip ahead to the full code.
- Start by connecting with the Mailtrap Email Testing API using the http.client.HTTPSConnection module, the API endpoint is sandbox.api.mailtrap.io.
import http.client
import json

def send_email_via_mailtrap_api(to_email, subject, body):
conn = http.client.HTTPSConnection("sandbox.api.mailtrap.io")- Now, define the email content (recipients, sender, subject, body, etc.,) in a JSON payload.
  payload = {
        "to": [{"email": to_email}],
        "from": {"email": "mailtrap@example.com", "name": "Mailtrap Test"},
        "subject": subject,
        "text": body,
"category": "API Test"- Finally, send a POST request to the Mailtrap Email Testing API with the JSON payload and required headers.
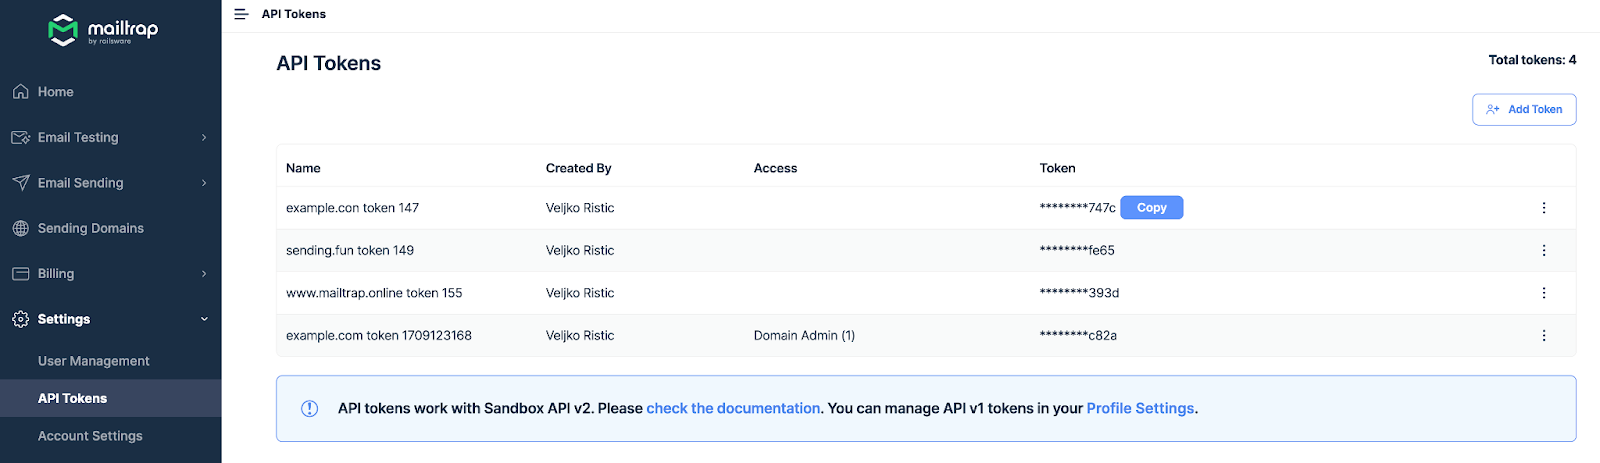
You’ll need an Email Testing API token to authorize the request, which can be found under Settings > API Tokens in your Mailtrap account.
headers = {
        'Content-Type': "application/json",
        'Accept': "application/json",
        'Api-Token': "your_api_token_here"  # Replace with your actual API token
    }

    json_payload = json.dumps(payload)
    conn.request("POST", "/api/send/your_inbox_id", json_payload, headers)  # Replace 'your_inbox_id' with your actual inbox ID
    response = conn.getresponse()
    data = response.read()
    return response.status_code == 200, data.decode("utf-8")
Here’s how the full Mailtrap Email Testing API integration code in a Flask application looks like:
from flask import Flask, render_template, request, redirect, flash, url_for
import http.client
import json

app = Flask(__name__)
app.secret_key = 'your_secret_key_here'

def send_email_via_mailtrap_api(to_email, subject, body):
    conn = http.client.HTTPSConnection("sandbox.api.mailtrap.io")

    payload = {
        "to": [{"email": to_email}],
        "from": {"email": "mailtrap@example.com", "name": "Mailtrap Test"},
        "subject": subject,
        "text": body,
        "category": "API Test"
    }

    headers = {
        'Content-Type': "application/json",
        'Accept': "application/json",
        'Api-Token': "your_api_token_here"  # Replace with your actual API token
    }

    json_payload = json.dumps(payload)
    conn.request("POST", "/api/send/your_inbox_id", json_payload, headers)  # Replace 'your_inbox_id' with your actual inbox ID
    response = conn.getresponse()
    data = response.read()
    return response.status_code == 200, data.decode("utf-8")

@app.route('/contact', methods=['GET', 'POST'])
def contact():
    if request.method == 'POST':
        name = request.form['name']
        email = request.form['email']
        message = request.form['message']

        # Validate form data
        if not name or not email or not message:
            flash('All fields are required!')
            return redirect(url_for('contact'))

        # Prepare email content
        subject = 'Contact Form Submission'
        body = f"Name: {name}\nEmail: {email}\nMessage: {message}"

        # Send email via Mailtrap API
        success, response = send_email_via_mailtrap_api('your_recipient@example.com', subject, body)
        if success:
            flash('Thank you for your message!')
        else:
            flash(f'Failed to send message: {response}')

        return redirect(url_for('contact'))
    return render_template('contact.html')

@app.route('/send-test-email-api')
def send_test_email_api():
    subject = 'Test Email'
    body = 'This is a test email sent from Flask using the Mailtrap Email Testing API.'
    success, response = send_email_via_mailtrap_api('to@example.com', subject, body)
    if success:
        return 'Test email sent via API!'
    else:
        return f'Failed to send test email via API: {response}'

if __name__ == '__main__':
    app.run(debug=True)
For more information and advanced usage, refer to Mailtrap’s official API docs.
Wrapping up
I found that creating a contact form with Flask and having fun while doing so improves your web development skills, so hopefully, this tutorial will be a great help in your learning journey.
While this tutorial focused on the coding aspects, remember that user experience is crucial and should not be forgotten in your projects. Always validate input, guard against spam, and provide clear feedback to users once the form is submitted. These steps will make your applications reliable and professional.
May the Force be with you! 🖖
