Skip to Navigation


To add email-sending functionality in your Node.js application, you can either pair packages like Nodemailer or emailjs with an SMTP service or simply use an email API.
In this article, I provide you with a step-by-step tutorial for all available methods, and, of course, a little bit of extra.
The code snippets I’ll show you in this article are compatible with Node.js version 6.0 and above.
Send emails using packages and SMTP
Although you can send emails in Node.js with an SMTP (Simple Mail Transfer Protocol) server only, I won’t go over it in this article. Namely, using SMTPs alone without modules that secure the connection makes your app vulnerable to cyber threats like data breaches and DDoS attacks.
So, I’ll show you how to use the most popular (and efficient) email-sending libraries for Node.js: Nodemailer and emailjs, which not only make your life easier but also add a layer of protection.
Before we start, if you already don’t have a Node.js application, you can create one with the following code:
mkdir email-nodeapp && cd email-nodeapp
    npm init -y
Nodemailer
Nodemailer is a module with zero dependencies for Node.js, designed for sending emails. It supports Unicode, HTML content, embedded images, and different transport methods besides SMTP (e.g., Sendmail, ses, stream transports, etc.)
Now, let me show you how to leverage it and send emails with it in Node.js using SMTP.
1. Install Nodemailer
To install the Nodemailer module, you can use the npm package manager:
npm install nodemailerOr Yarn package manager:
yarn add nodemailer2. Include Nodemailer in your application
For this step, you can use the following code:
const nodemailer = require('nodemailer');Or, if you’re using ES modules:
import nodemailer from 'nodemailer';3. Configure Nodemailer and send emails
Then, you’ll need to:
- Create a transporter object
- Configure the mailoptions object
- Deliver a message with
sendMail()
Don’t worry — I’ve got you covered. Here’s a code snippet you can paste into your web application file (e.g., index.js):
// Import the Nodemailer library
const nodemailer = require('nodemailer');

// Create a transporter object
const transporter = nodemailer.createTransport({
  host: 'live.smtp.mailtrap.io',
  port: 587,
  secure: false, // use SSL
  auth: {
    user: '1a2b3c4d5e6f7g',
    pass: '1a2b3c4d5e6f7g',
  }
});

// Configure the mailoptions object
const mailOptions = {
  from: 'yourusername@email.com',
  to: 'yourfriend@email.com',
  subject: 'Sending Email using Node.js',
  text: 'That was easy!'
};

// Send the email
transporter.sendMail(mailOptions, function(error, info){
  if (error) {
    console.log('Error:', error);
  } else {
    console.log('Email sent:', info.response);
  }
});
Pro tip:
- With this code snippet, you can send plain text and HTML emails with your Gmail account or any other email service you prefer.
- As you can see, as my transporter I’m using ‘live.smtp.mailtrap.io‘, provided by Mailtrap Email Sending, a part of Mailtrap Email Delivery Platform. Besides a generous free plan, it also has various features to make sure my emails reach my recipients, including in-depth analytics, auto IP warmups, dedicated IPs, suppression lists, and more.
For more details, refer to our dedicated Nodemailer article, where you can learn how to use Nodemailer with an SMTP to send asynchronous and bulk emails, messages to multiple recipients, and more.
Emailjs library
If you’re looking for a similar package to Nodemailer, I recommend Emailjs. It’s a lightweight alternative you should go for if you need an even more straightforward email-sending solution and you don’t plan on sending large files or relying on community or any support.
Check out the table below for a quick comparison between the two packages:
| Feature | Nodemailer | emailjs |
| SMTP Support | ✅ | ✅ |
| SSL/TLS Support | ✅ | ✅ |
| HTML Emails | ✅ | ✅ |
| Attachments | Strings, buffers, streams, and file paths, MIME type | Strings, buffers, streams, and file paths, MIME type |
| Asynchronous Sending | Callbacks, promises, or async/await | Typically only through callbacks or async/await |
| UTF-8 Support | Headers and body | Headers and body |
| OAuth2 Authentication | ✅ | Limited support |
| Connection Pooling | ✅ | ❌ |
| Frontend Compatibility | ❌ | ❌ |
| Template Support | Built-in support with plugins | No built-in template handling (relies on external templates) |
| Community and Support | Quite active and extensive | Less extensive |
Important: Don’t confuse the emailjs Node.js module with EmailjJS, a backend email service that allows you to connect your email client in the browser, build a template, and send it via API. This solution is geared towards frontend-only apps that aren’t supported by a backend server. We’ve talked about it more in-depth here.
But, going back to the main topic; let me show you how to send emails with the emailjs package:
1. Install the emailjs package
Similar to Nodemailer, you can install the emailjs package with either npm:
npm install emailjsOr Yarn:
yarn add emailjs2. Configure emailjs and send emails
Then, set up the email server configuration and use the client.send method to dispatch messages. Here’s a code snippet you can change according to your preferences and send emails with:
import { SMTPClient } from 'emailjs';

const client = new SMTPClient({
	user: 'user',
	password: 'password',
	host: 'live.smtp.mailtrap.io',
	ssl: true,
});

// send the message and get a callback with an error or details of the message that was sent
client.send(
	{
		text: 'i hope this works',
		from: 'you <username@your-email.com>',
		to: 'someone <someone@your-email.com>, another <another@your-email.com>',
		cc: 'else <else@your-email.com>',
		subject: 'testing emailjs',
	},
	(err, message) => {
		if (err) {
            console.log('Error sending email:', err);
        } else {
            console.log('Email successfully sent:', message);
        }

	}
);Note: For emailjs to work correctly and to be treated as an ES6 module, you should add “type”: “module” in the package.json file.
For more information, consult the official emailjs GitHub repository.
Send HTML email with dynamic content
Transactional emails such as registration confirmation, password resets, and other notifications, often best work when they include some dynamic content.
For this, I recommend the email-templates package, which has a plethora of useful features, including:
- Support for different template engines (Pug is a default one)
- Email preview (by default) in the development environment
- Direct email sending. So, you don’t need extra packages like Nodemailer for email sending.
For explanatory purposes, let’s create a template for new user registration in Pug and send it via the email-templates package.
First, install the template engine with either of the following commands:
npm install email-templates pug

# or, if you’re using yarn:

yarn add email-templates pug
Then, create two files: subject and HTML body:
subject.pug:
| Hi #{firstName} #{lastName}, happy to see you at My App!
html.pug:
h1 Hello #{firstName} #{lastName}
p.
    Welcome to My App! Now your test emails will be safe. We just need to make sure your account is real.
    Please, click the button below and start using your account.
    a(href='https://example.com/confirmation') Confirm!
Now, make sure that your directory has all the .pug and .js files in the following structure:
├── app.js
├── emails
│   └── welcome (the template name)
│       ├── html.pug
│       ├── subject.pug
│ └── text.pugTip: If you don’t include the text part of your message, it will be generated automatically. However, if you do add it, it will be rendered automatically, meaning that the content of the text and HTML parts may differ, so watch out.
And finally, let’s write some code to gather all the elements together and add transport:
const Email = require('email-templates');
const email = new Email({
 message: {
   from: 'hi@example.com'
 },
 send: true,
 transport: {
   host: 'sandbox.mailtrap.io',
   port: 2525,
   ssl: false,
   tls: true,
   auth: {
     user: '1a2b3c4d5e6f7g', // your Mailtrap username
     pass: '1a2b3c4d5e6f7g' //your Mailtrap password
   }
 }
});

const people = [
 {firstName: 'Diana', lastName: 'One'},
 {firstName: 'Alex', lastName: 'Another'}
];

people.forEach((person) => {
 email
   .send({
     template: 'welcome',
     message: {
       to: 'test@example.com'
     },
     locals: person
   })
   .then(console.log)
   .catch(console.error);
})
Additional tips:
- To avoid clutter or performance issues with a large number of recipients in staging, you can turn off the preview option by specifying
options.openasfalse. - You can place your credentials in an .env file so your credentials don’t get pushed in production.
- As I don’t want to send a faulty HTML message with dynamic content, I use sandbox.mailtrap.io, a fake SMTP server provided by Mailtrap Email Testing, another inseparable part of Mailtrap Email Delivery Platform. With it, I not only avoid the risk of spamming recipients, but I can preview my HTML emails and templates, ensuring they look correct before I dispatch them. But, more on Mailtrap Email Testing later in the article.
Send emails using API
Another straightforward way of adding email-sending functionality to your app is to use Mailtrap’s very own sending package. It’s regularly maintained and updated by a team of developers and it lets you easily automate your sending process.
First, start by creating a free Mailtrap account and verifying your domain. The process takes only a couple of minutes and we’ve even prepared a video for your convenience.
Once you’ve verified your domain, install the Mailtrap Node.js package with the following code:
npm install mailtrap

# or, if you are using yarn:

yarn add mailtrap
Then, use this code to start sending plain-text email messages:
import { MailtrapClient } from "mailtrap"

/**
 * For this example to work, you need to set up a sending domain,
 * and obtain a token that is authorized to send from the domain.
 */

const TOKEN = "<YOUR-TOKEN-HERE>";
const SENDER_EMAIL = "<SENDER ADDRESS@YOURDOMAIN.COM>";
const RECIPIENT_EMAIL = "<RECIPIENT@EMAIL.COM>";

const client = new MailtrapClient({ token: TOKEN });

const sender = { name: "Mailtrap Test", email: SENDER_EMAIL };

client
  .send({
    from: sender,
    to: [{ email: RECIPIENT_EMAIL }],
    subject: "Hello from Mailtrap!",
    text: "Welcome to Mailtrap Sending!",
  })
  .then(console.log)
  .catch(console.error);
Notes:
- Don’t forget to replace the placeholders such as
TOKENorSENDER_EMAILwith the actual API key and credentials provided by Mailtrap. - As it’s an ES module, don’t forget to add
“type:” “module”, in your package.json file.
And that’s it, your Node.js app can send emails via API. For more use cases, refer to the examples folder in the GitHub repository or keep reading this guide. ⬇️
Send HTML email
With Mailtrap’s Node.js package, sending HTML email is easy. Here’s a code snippet you can use:
import { MailtrapClient } from "mailtrap"

/**
 * For this example to work, you need to set up a sending domain,
 * and obtain a token that is authorized to send from the domain.
 * @see https://help.mailtrap.io/article/69-sending-domain-setup
 */

const TOKEN = "<YOUR-TOKEN-HERE>";
const SENDER_EMAIL = "<SENDER@YOURDOMAIN.COM>";
const RECIPIENT_EMAIL = "<RECIPIENT@EMAIL.COM>";

const client = new MailtrapClient({ token: TOKEN });

client
  .send({
    category: "test",
    custom_variables: {
      hello: "world",
      year: 2022,
      anticipated: true,
    },
    from: { name: "Mailtrap Test", email: SENDER_EMAIL },
    to: [{ email: RECIPIENT_EMAIL }],
    subject: "Hello from Mailtrap!",
    html: `
    <!doctype html>
    <html>
      <head>
        <meta http-equiv="Content-Type" content="text/html; charset=UTF-8">
      </head>
      <body style="font-family: sans-serif;">
        <div style="display: block; margin: auto; max-width: 600px;" class="main">
          <h1 style="font-size: 18px; font-weight: bold; margin-top: 20px">Congrats for sending test email with Mailtrap!</h1>
          <p>Inspect it using the tabs you see above and learn how this email can be improved.</p>
          <p>Now send your email using our fake SMTP server and integration of your choice!</p>
          <p>Good luck! Hope it works.</p>
        </div>
        <!-- Example of invalid for email html/css, will be detected by Mailtrap: -->
        <style>
          .main { background-color: white; }
          a:hover { border-left-width: 1em; min-height: 2em; }
        </style>
      </body>
    </html>
  `,
  })
  .then(console.log)
  .catch(console.error);
Send email to multiple recipients
To send email to multiple recipients, simply add multiple addresses in the to field, like so:
to: [
  { email: "recipient1@example.com", name: "Recipient One" },
  { email: "recipient2@example.com", name: "Recipient Two" },
  { email: "recipient3@example.com", name: "Recipient Three" }
]
Send email with attachments
If you want to attach files to your emails, you can use the attachments array. Let’s say that you want to send invoices along with your messages. In such a case, you would use a code that looks something like this:
attachments: [
  {
    filename: "invoice.pdf",
    disposition: "attachment",  // Makes the PDF a downloadable file
    content: invoicePDFContent,  // The actual binary content of the PDF file, loaded into memory
  },
]
Send email with embedded image
To embed an image, we’ll use the attachments array again. Check it out:
attachments: [
  {
    filename: "welcome.png",
    content_id: "welcome.png",
    disposition: "inline",  // Can be "inline" for display within the email or "attachment" for a downloadable file
    content: welcomeImage,  // The actual binary content of the file, loaded into memory
  },
]
Asynchronous email sending
To send asynchronous emails, you can use the code snippets I provided in the send emails with API and HTML emails sections. They are already configured for asynchronous sending because when you call the send method on the client object, it returns a Promise, which is resolved when the email is sent successfully, or rejected in case there’s an error.
The .then(console.log) part of the code logs the result of the send operation when the Promise is resolved, and .catch(console.error) logs any errors that occur.
But, if you want to send emails to multiple recipients asynchronously, you can use Promise.all to wait for all email-sending operations to complete. Here’s an example:
import { MailtrapClient } from "mailtrap";

const TOKEN = "<YOUR-TOKEN-HERE>";
const SENDER_EMAIL = "<SENDER@YOURDOMAIN.COM>";

const client = new MailtrapClient({ token: TOKEN });

const sender = { name: "Mailtrap Test", email: SENDER_EMAIL };

// Define multiple recipients
const recipients = [
 { email: "<RECIPIENT1@EMAIL.COM>" },
 { email: "<RECIPIENT2@EMAIL.COM>" },
 // Add more recipients as needed
];

// Prepare an array of Promises for sending emails
const emailPromises = recipients.map(recipient =>
 client.send({
    from: sender,
    to: [recipient],
    subject: "Hello from Mailtrap!",
    text: "Welcome to Mailtrap Sending!",
 })
);

// Use Promise.all to wait for all emails to be sent
Promise.all(emailPromises).then(results => {
    console.log("All emails sent successfully:", results);
}).catch(error => {
    console.error("Error sending one or more emails:", error);
});
Quick explanation:
recipients– an array of objects, each containing an email address.map– the function used to create an array of Promises, each representing an email-sending operation to a different recipient.promise.all– function used to wait for the operations to complete.
Send bulk email
To send bulk email, slightly modify the code from the previous section by:
- Preparing your recipient list – You need an array of recipient objects, with each object containing the
emailfield and optionally including anamefield. - Creating email sending promises – With the
.map()method, you can iterate over your array of recipients and create a sending operation for each one. - Using
Promise.allto send all emails concurrently – This function takes an array of promises, or email sending operations, and returns a new promise that’s resolved only when all of the input promises have been resolved, or reacts if any promise fails.
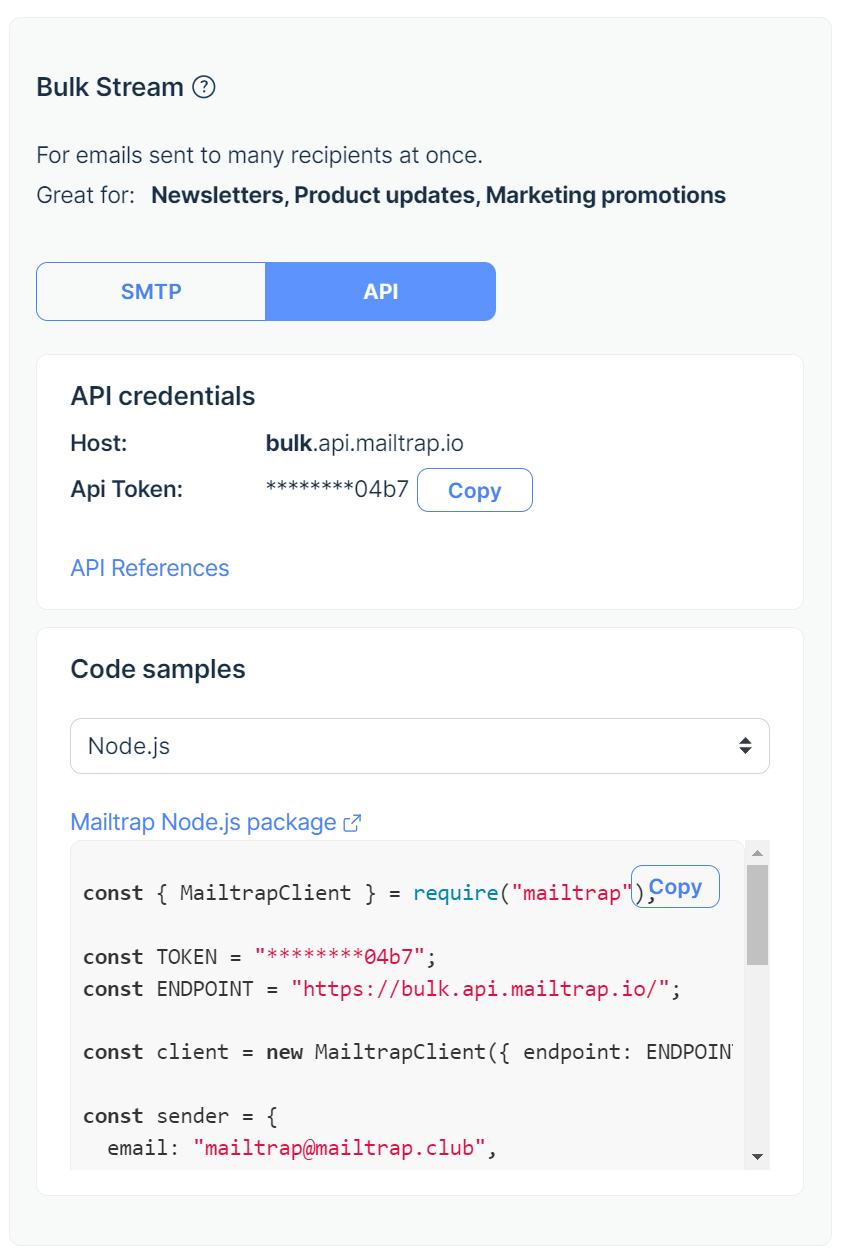
Most importantly, you should use a separate stream for bulk email sending. Luckily, Mailtrap’s API is bulk-aware and allows you to send marketing emails on top of transactional, all the while keeping your deliverability high without any additional costs. Simply choose the Bulk Stream in the SMTP/API settings tab and copy the code sample to start sending.
Test emails and email sending
Now, even though the email-sending methods I’ve shown you so far are quite straightforward, just imagine writing all this code down only to notice your dynamic emails or templates don’t look correctly in all browsers. 🤕
If you don’t want your coding efforts to go to waste and if you want to ensure your neatly crafted emails look impeccable, I recommend you test them before dispatching them. Testing is an industry-standard process and an inseparable stage of any rock-solid email-sending cycle.
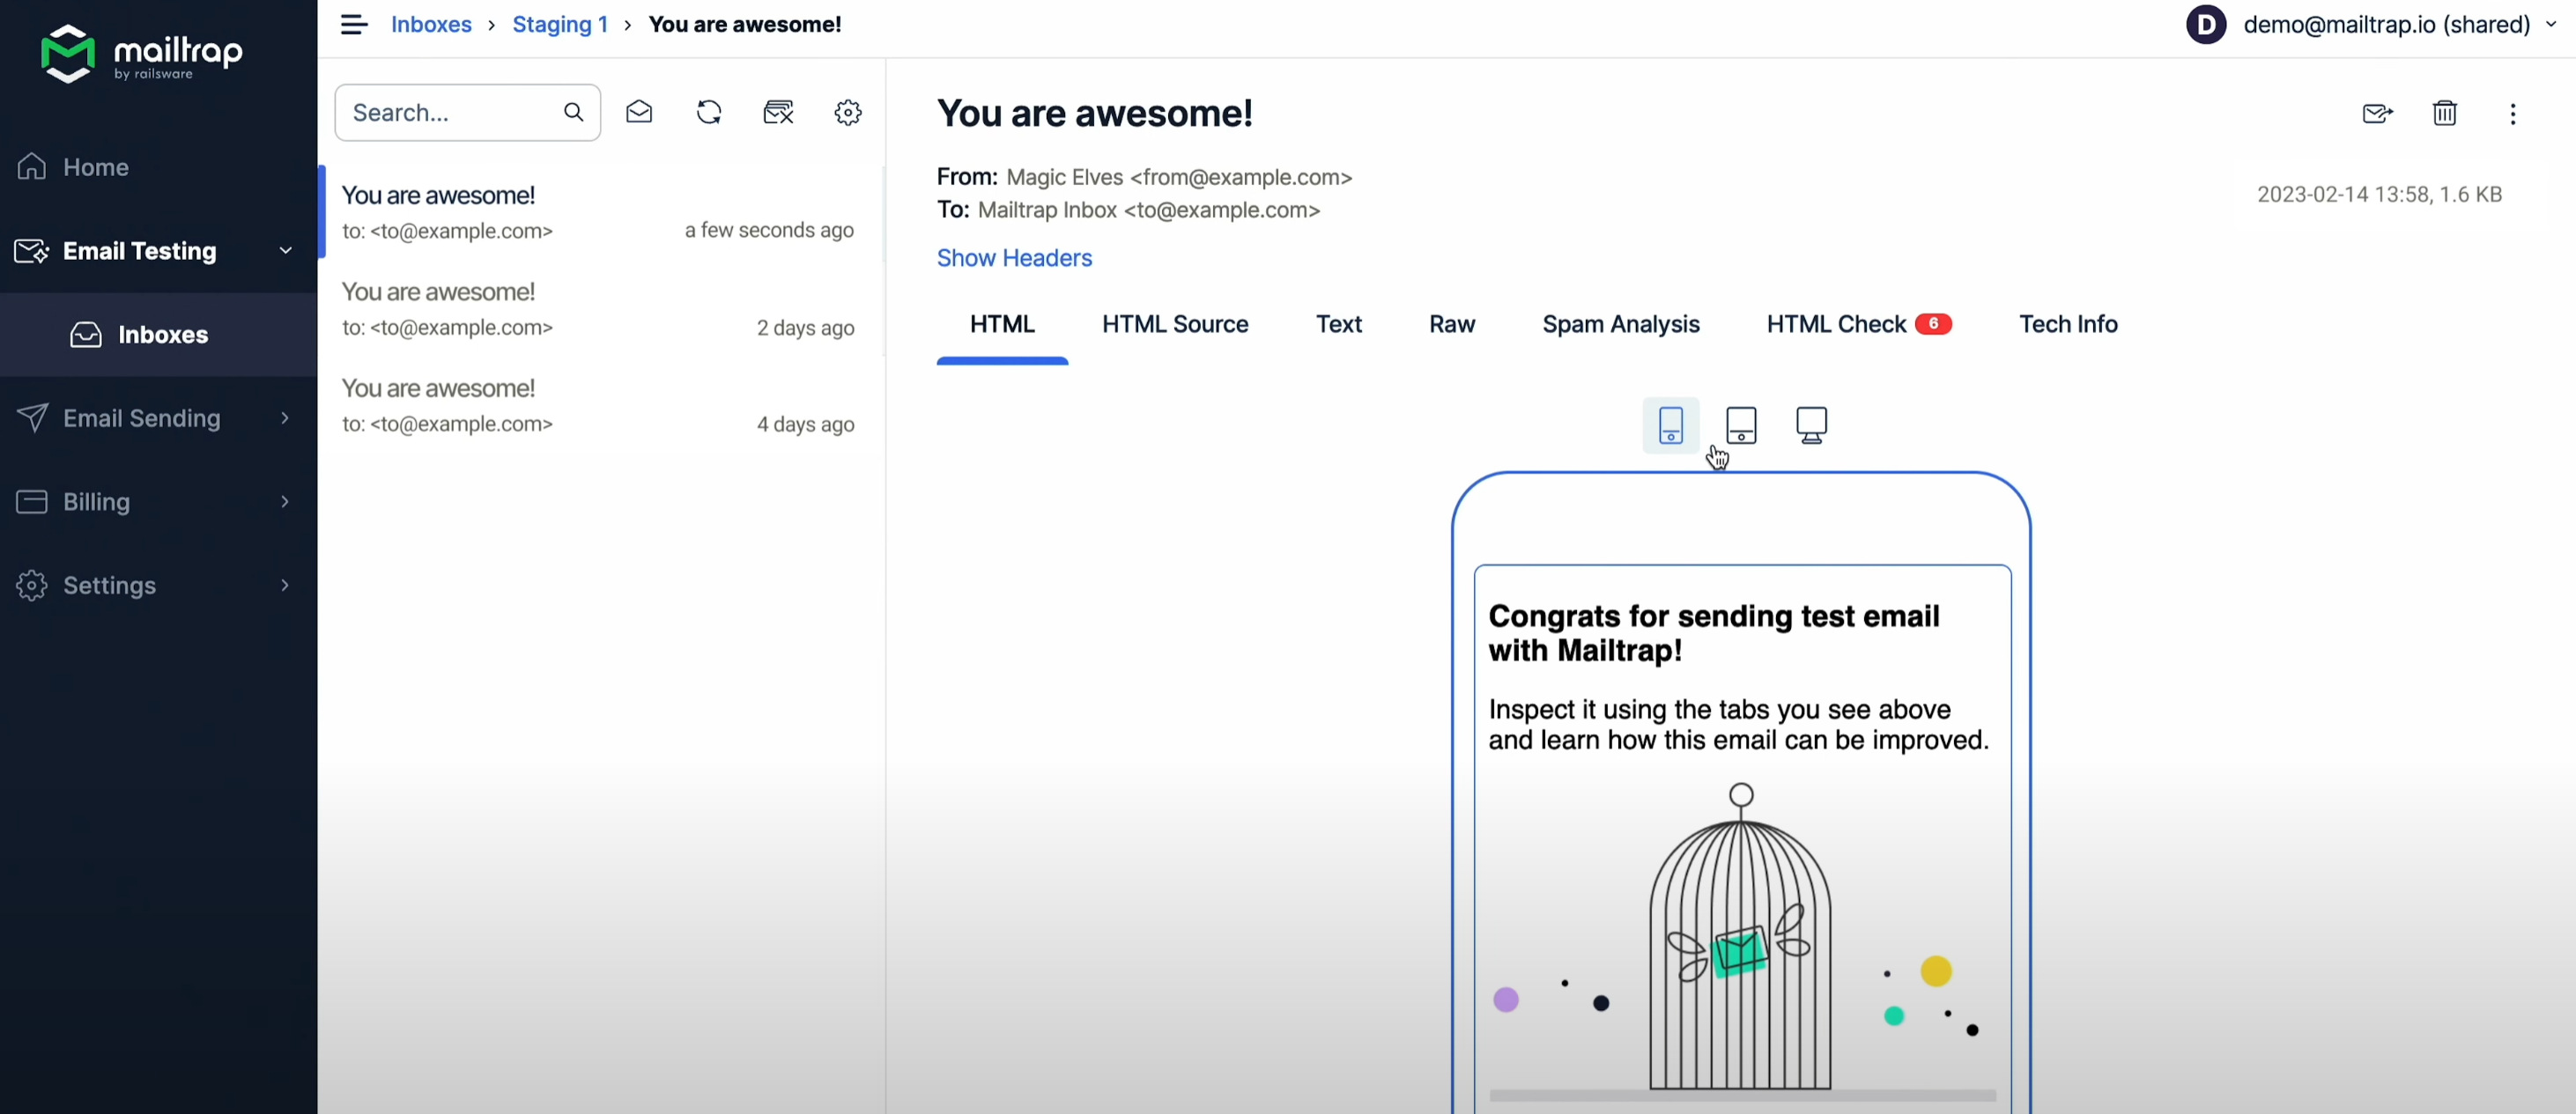
Personally, I use Mailtrap Email Testing, which I already mentioned previously in the article.
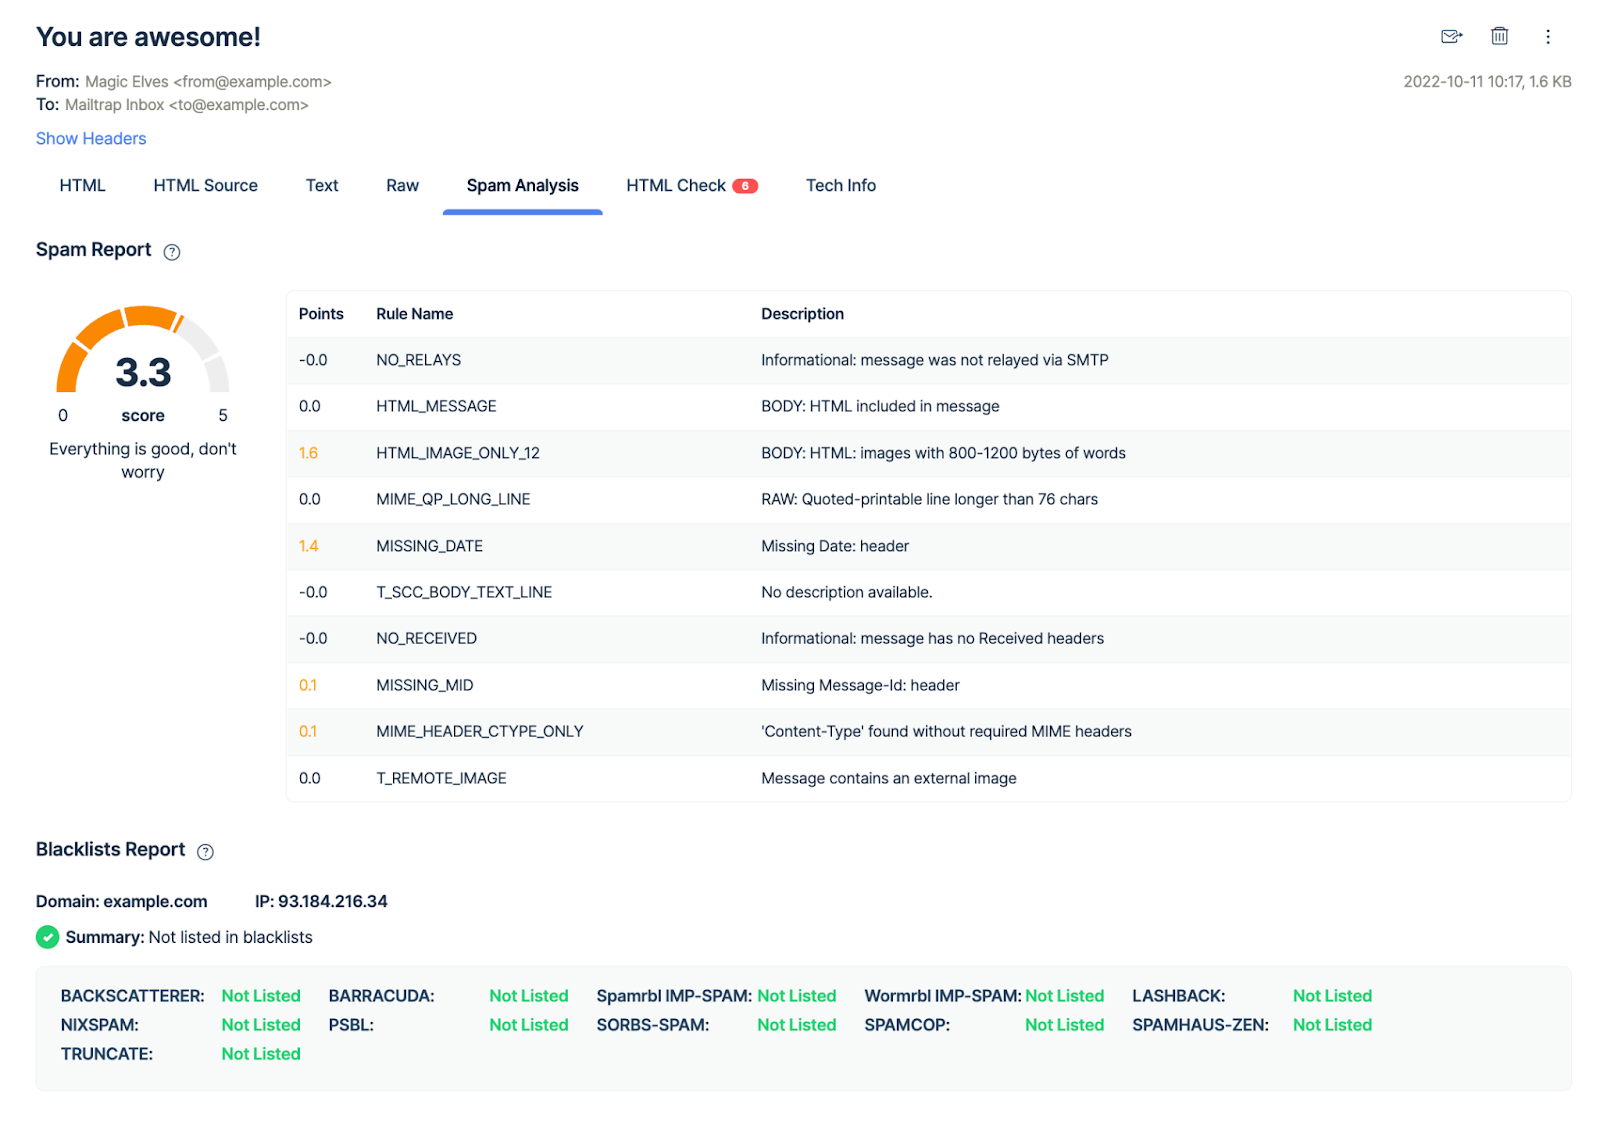
With Mailtrap Email Testing, I can inspect the HTML/CSS of my emails and easily spot any faulty lines of code and then fix/remove them. By doing this, I make sure that my template-based HTML/CSS designs are compatible with different browsers and email clients.
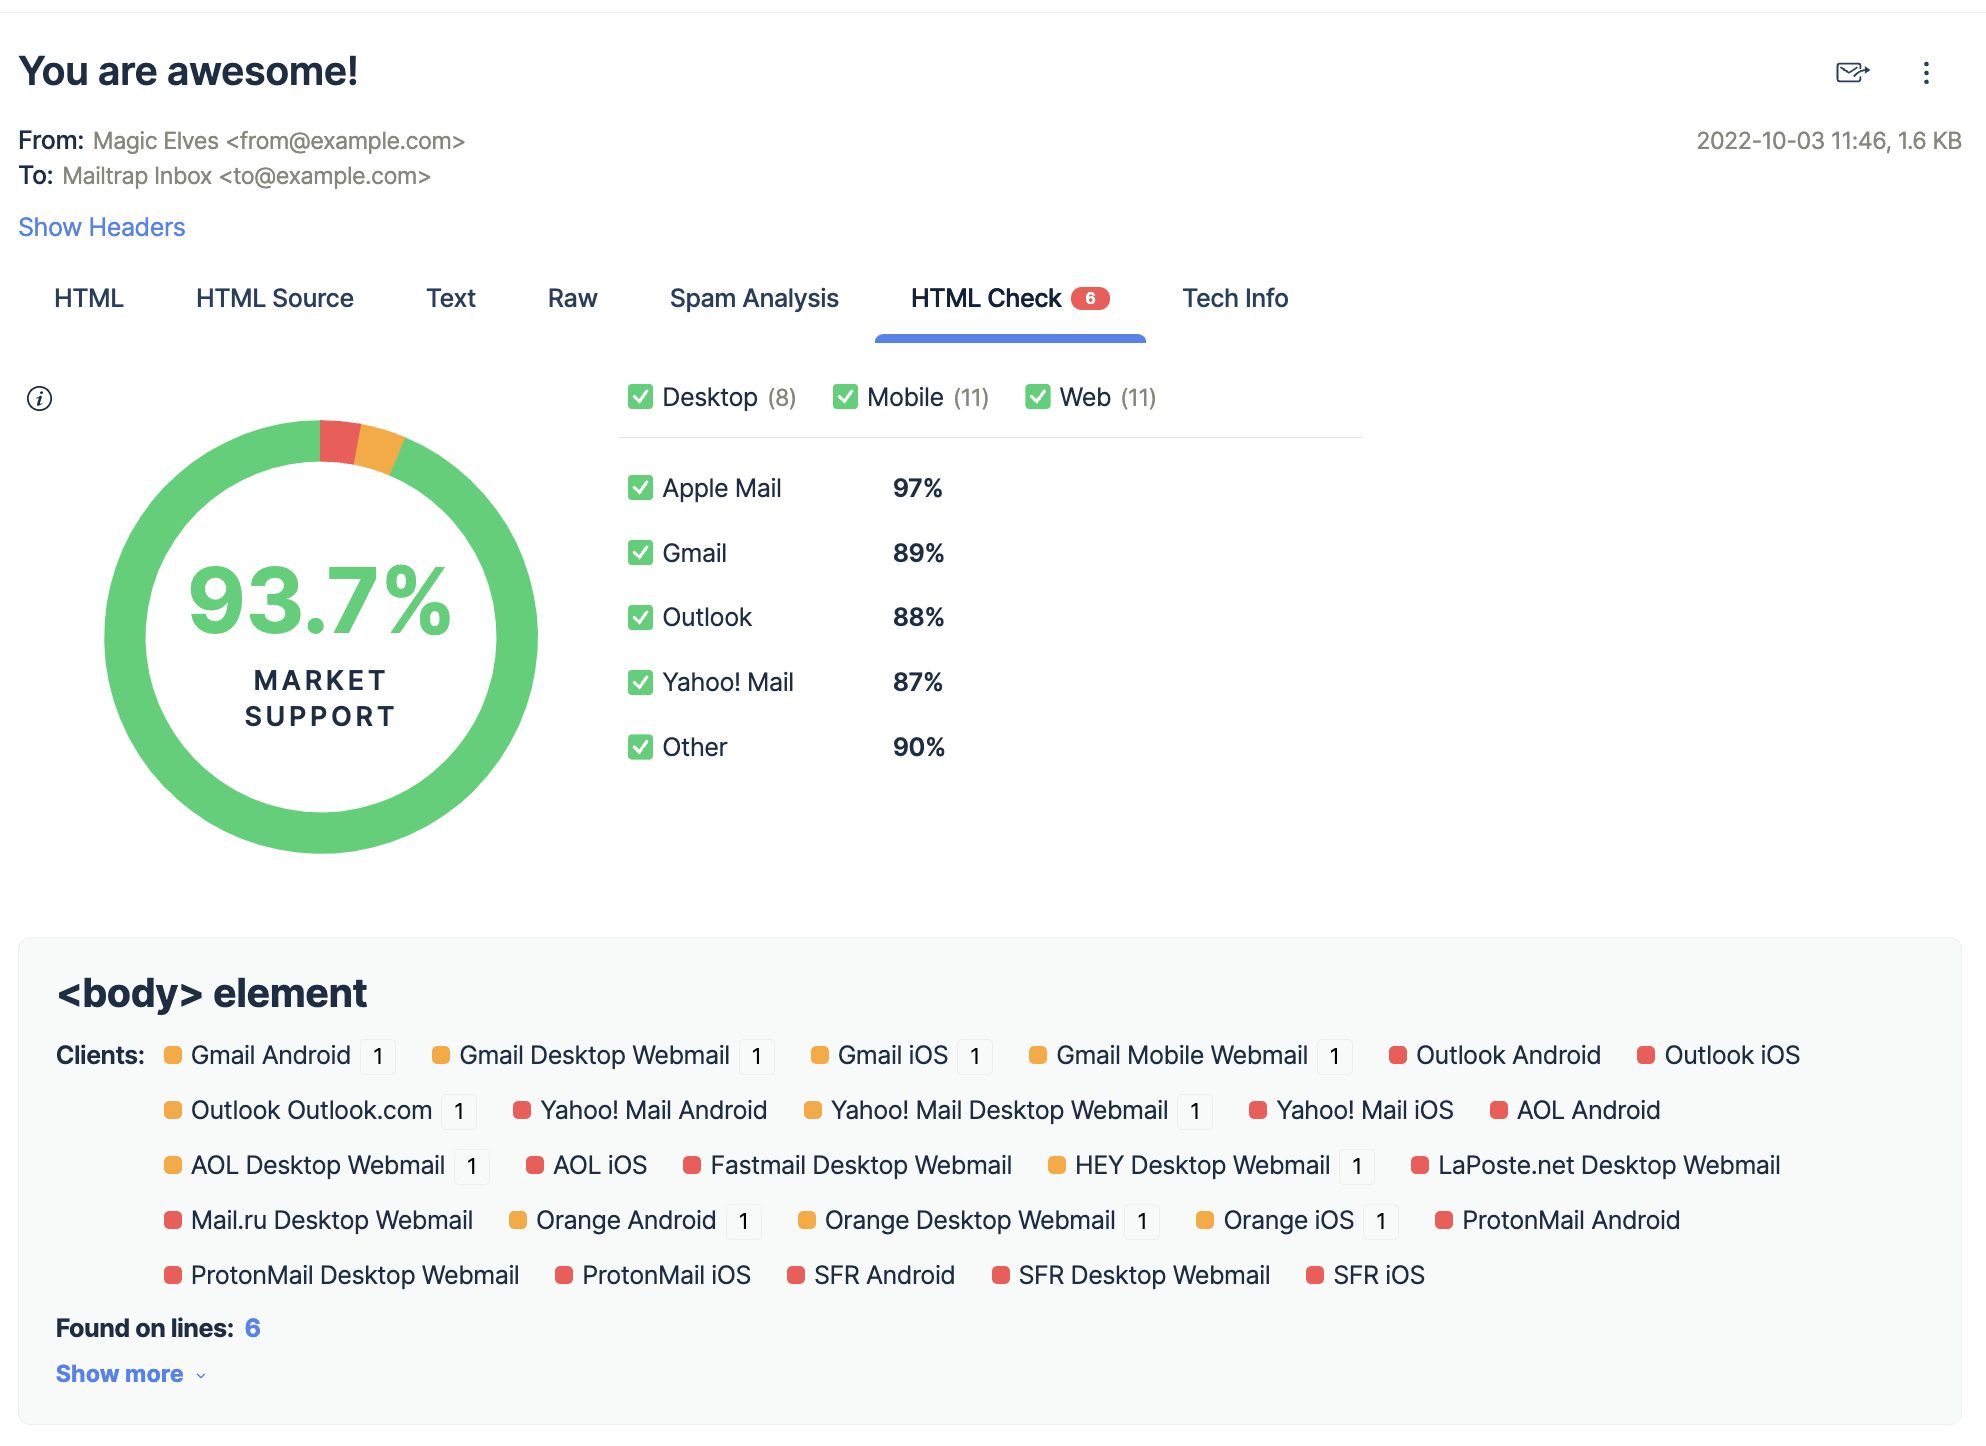
Additionally, I can check both HTML and text versions of my messages, inspect the source code, and more.
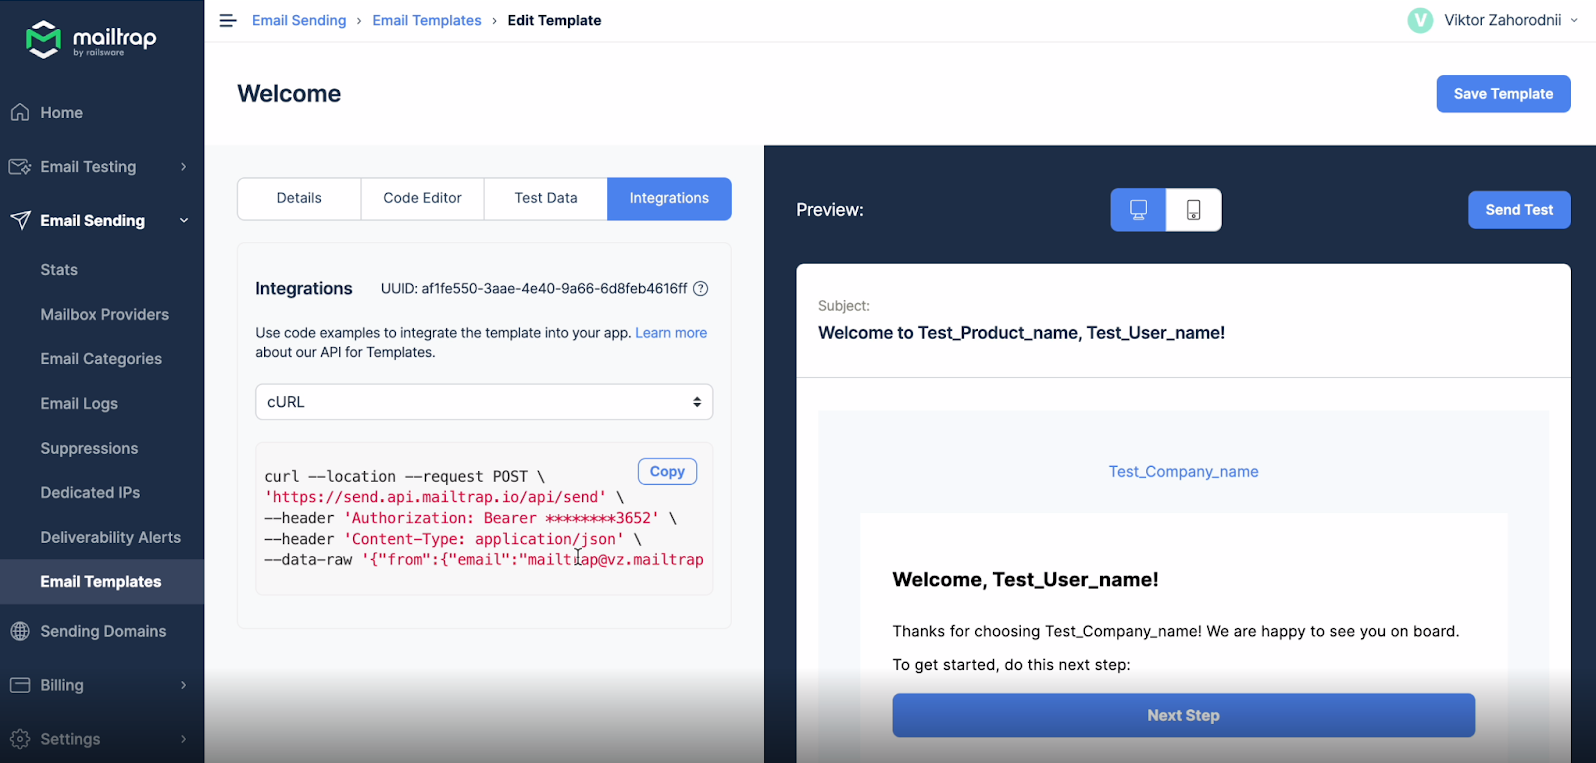
You can also design, edit, and host HTML email templates on the Mailtrap Email Delivery Platform and then test them with our API. This way, you can easily switch from staging to production once you’re ready to start sending.
But making sure your emails look the way you want them to isn’t everything. With the Spam Report feature, you can proactively solve a significant number of potential email deliverability issues by keeping your spam score below 5.
Having said that, let me show you how Email Testing works.
SMTP
To start testing your emails, follow these steps:
- Create a free Mailtrap account
- Navigate to Email Testing → Inboxes → Integration
- Select ‘Nodemailer’ on the list of integrations.
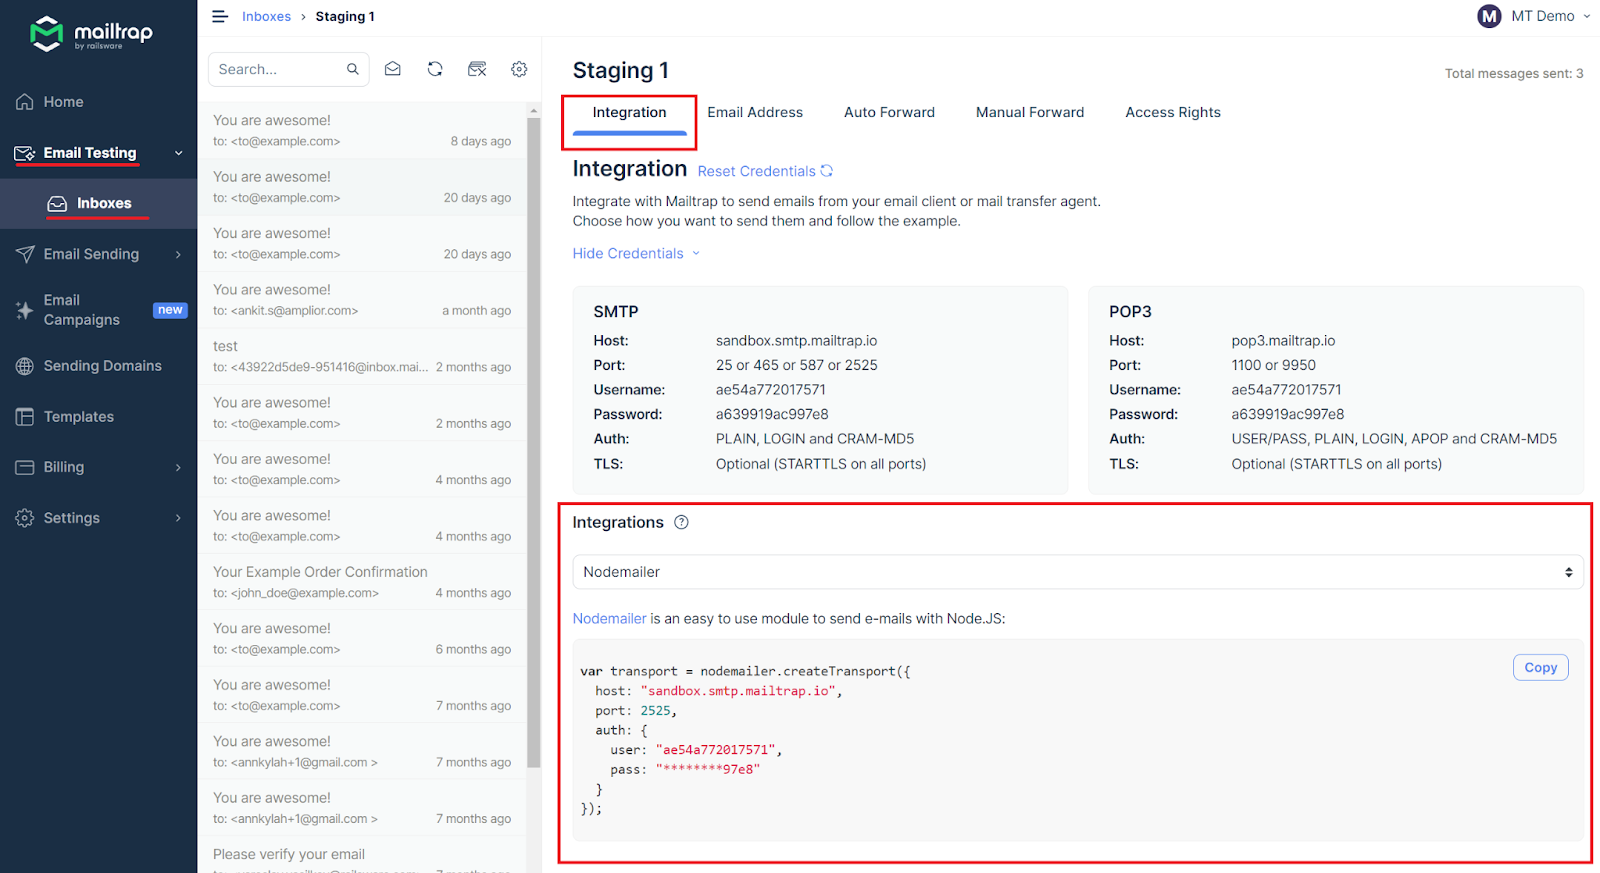
- Paste the provided credentials into your Nodemailer configuration and set Mailtrap as your transporter. The code should look something like this:
const transport = nodemailer.createTransport({
  host: "sandbox.smtp.mailtrap.io",
  port: 2525,
  auth: {
    user: "1a2b3c4d5e6f7g",
    pass: "1a2b3c4d5e6f7g"
  }
});API
Prefer integrating Mailtrap API for testing, automation, and testing automated sequences? If so, you can use the following code snippet:
import { MailtrapClient } from "mailtrap"

const TOKEN = "<YOUR-TOKEN-HERE>";
const TEST_INBOX_ID = "<YOUR-TEST-INBOX-ID-HERE>"
const ACCOUNT_ID = "<YOUR-ACCOUNT-ID-HERE>"

const client = new MailtrapClient({ token: TOKEN, testInboxId: TEST_INBOX_ID, accountId: ACCOUNT_ID });

const inboxesClient = client.testing.inboxes
const messagesClient = client.testing.messages

inboxesClient.getList()
  .then(async (inboxes) => {
    if (inboxes && inboxes.length > 0) {
      const firstInboxId = inboxes[0].id

      const messages = await messagesClient.get(firstInboxId)

      if (messages && messages.length > 0) {
        const firstMessageId = messages[0].id

        await messagesClient.get(firstInboxId)
        await messagesClient.getHtmlAnalysis(firstInboxId, firstMessageId)
        await messagesClient.getHtmlMessage(firstInboxId, firstMessageId)
        await messagesClient.getTextMessage(firstInboxId, firstMessageId)
        await messagesClient.getMailHeaders(firstInboxId, firstMessageId)
        await messagesClient.getMessageAsEml(firstInboxId, firstMessageId)
        await messagesClient.getMessageHtmlSource(firstInboxId, firstMessageId)
        await messagesClient.getRawMessage(firstInboxId, firstMessageId)
        await messagesClient.getSpamScore(firstInboxId, firstMessageId)
        await messagesClient.showEmailMessage(firstInboxId, firstMessageId)
        await messagesClient.updateMessage(firstInboxId, firstMessageId, {
          isRead: false
        })
        await messagesClient.forward(firstInboxId, firstMessageId, 'mock@mail.com')
        const response = await messagesClient.deleteMessage(firstInboxId, firstMessageId)

        console.log(response)
      }
    }
  })
What this code does is it fetches all inboxes, selects the first one, retrieves messages from it, and then performs multiple operations on the first message received (e.g., checks HTML).
For more information, consult the official Mailtrap API GitHub. ⬅️
Wrapping up
And with that, we wrap up our ‘Node.js send email’ tutorial!
I went over sending emails both via SMTP and API and showed you how to leverage Mailtrap’s powerful email testing and sending capabilities to optimize your deliverability.
But, if you wish to upgrade your Node.js email infrastructure, visit our blog and read our other articles on Node.js, such as
- Node.js Email Validation: 2024 Guide
- Nodemailer Gmail Tutorial
- JavaScript Send Email – Read This First