
In web development, email validation in JavaScript rules the game. Be it form validation, or a sign-up sequence email validation, you need to be sure users type the right thing.
Here, I cover JavaScript email validation front-end and back-end (server-side). And this “full-stack” tutorial is geared towards beginners, but there are also nuggets of wisdom for more advanced users.
As always, there are JavaScript code snippets you can easily copy-paste to your project.
Validate emails with basic JS function
Email validation serves multiple purposes:
- Ensures data integrity in your database
- Improves user experience by catching typos early
- It’s the first line of defense against common types of form submission spam
Plus, an incorrectly formatted email address can lead to failed communication, resulting in a poor user experience and potential loss of users or customers.
In this section, I’ll cover a basic validation step – checking for the presence of the ‘@’ symbol. See the function below:
function isValidEmail(email) {
  return email.includes('@');
}
The isValidEmail function takes a single argument email and uses the includes method to check if the @ symbol is present. It returns true if the symbol is found, indicating a potentially valid email address, and false otherwise.
Of course, the method has its limitations due to its simplicity. But there’s a silver lining, understanding the limitations helps set the scene for more complex validation methods in the following sections. Here’s what the limitations are:
- Limited use: It checks only for the presence of the “@” symbol, meaning that “example@” would be considered valid, despite being incomplete.
- No domain name verification: It does not verify if the email’s domain part (e.g., gmail.com, yahoo.com) is valid or exists. The same goes for the top level domain (TDL)
- Local part nuances: The local part of an email address (the first part before the “@”) can contain dots, plus signs, and other special characters, which this method does not account for.
- False positives/negatives: Because of its simplicity, it might allow many invalid addresses or block potentially valid but unusual email formats.
Tip: You can apply the basic validation as the first step, but don’t rely solely on it.
JavaScript regular expression for email validation
Regular expressions (regex) are tools for pattern matching and text manipulation.
They enable you to define a search pattern that can be used to perform various text operations such as search, replace, and validation. Here’s a simple example of a regex:A-za-z0-9
- The
a-za-zsection matches any letter from A to Z (uppercase and lowercase) - The
0-9section matches digits from 0 to 9
Note that the above is just for shows, you need a more complex regex for email validation.
To catch an invalid email address, a regex can be designed to match the general structure of an address, ensuring it conforms to standard email formatting rules.
A widely accepted pattern that adheres to most email validation standards is as follows:
const emailRegex = /^[^\s@]+@[^\s@]+\.[^\s@]+$/;It covers:
- The presence of an “@” symbol, separating the local part from the domain part.
- The presence of a domain part with at least one dot, indicating a domain extension.
- No leading, trailing, or consecutive whitespace characters within the email address.
Here’s how you can use the above regex pattern within a JavaScript function to validate email addresses:
function validateEmail(email) {
  const emailRegex = /^[^\s@]+@[^\s@]+\.[^\s@]+$/;
  return emailRegex.test(email);
}
The validateEmail function takes an email address as input and returns true if the email matches the regex pattern, indicating a valid email format, or false otherwise.
In our Mailtrap tutorial, we also cover how to use regex and Vue.js for email validation:
The common regex pitfalls and how to avoid them
As said, regex isn’t bulletproof, unless you make it a mile-long, attempting to cover all edge cases. So, check what to keep in mind:
- Complexity: Email address standards are complex, and no regex can validate every possible valid email address. For instance, the official specification allows for quoted strings and comments in email addresses, which are rarely used and often not considered in regex patterns.
- Performance: Overly complex regex patterns can be slow and inefficient, especially when processing large volumes of data.
- Readability: Complex regex patterns can be difficult to read and maintain, making it hard to understand what is being validated.
How to avoid the pitfalls?
- [Suggested] Consider using built-in validation functions or third-party libraries for more complex validation needs, as they may handle edge cases and performance issues. You can jump on lib validation and server-side validation by clicking on these links.
- Stick to simple and well-understood patterns for most use cases, understanding that some edge cases will be missed.
- Test the regex thoroughly with a wide range of email addresses to ensure it meets your specific needs.
Tip: regexp can be used to define more specialized filters, note that it’s not common in email validation.
Email validation in HTML using JavaScript
Email validation within an HTML form helps ensure data integrity and enhances user experience.
Real-time feedback within modern web apps guides users to correct errors immediately, rather than after form submission. It helps avoid user frustration that might lead to form abandonment.
This immediate feedback implementation can be achieved by listening to user input events and validating them on the fly.
I’ll be using the oninput or onchange HTML event attributes trigger real-time email validation functions.
oninputevent triggers every time the user types or deletes something in the input field, providing immediate feedback.onchangeevent triggers after the element loses focus, which is useful for final validation before submission.
In this JavaScript tutorial, I’ll use the oninput event trigger and integrate regex-based validation. It’s a simple doctype html registration form without form name, textarea, CSS styles, div class, li class, etc. Nonetheless, if you add them the address validation logic is still the same.
Check the steps below:
- Create a basic HTML form with an email input field:
<form id="registrationForm">
  <label for="emailInput">Email:</label>
  <input type="email" id="emailInput" oninput="validateEmailInput()">
  <span id="emailFeedback" style="color: red;"></span>
</form>- Implement the
validateEmailInputfunction that uses the regex pattern for email validation:
function validateEmailInput() {
  const emailInput = document.getElementById('emailInput').value;
  const feedbackElement = document.getElementById('emailFeedback');
  const emailRegex = /^[^\s@]+@[^\s@]+\.[^\s@]+$/;

  if (emailRegex.test(emailInput)) {
    feedbackElement.textContent = ""; // Email is valid
  } else {
    feedbackElement.textContent = "Please enter a valid email address.";
  }
}
Pro Tips:
- Performance and UX: For a better user experience, ensure the validation feedback is clear and not overly intrusive. Real-time validation should not distract or annoy the user.
- Accessibility: When designing real-time feedback, consider accessibility. Ensure that feedback is accessible to users of assistive technologies.
- Fallbacks: Remember that client-side validation is not a substitute for server-side validation. Always validate data on the server to ensure security and data integrity. I’ll talk about that in detail in later sections.
- Avoid using ‘onclick’ attribute for better UX.
If you’re interested in a full HTML5 email validation tutorial, check the linked article.
JavaScript email validation with jQuery
jQuery is a fast, small, and feature-rich JavaScript library, and it can help a lot with the following:
- HTML document traversal and manipulation
- Event handling
- Animation
Also, it has one of the easiest-to-use APIs that work across different browsers.
But, in the context of validation, jQuery’s greatest strength is the ability to abstract complex tasks into methods that can be called with just a few lines of code.
To put it plainly, it simplifies selecting and manipulating elements and attaching event listeners. In turn, it’s a great choice for email validation within web apps, so here’s how to use it.
- Again, we’re starting with a basic HTML form
<form id="registrationForm">
  <label for="emailInput">Email:</label>
  <input type="email" id="emailInput">
  <span id="emailFeedback" style="color: red;"></span>
</form>
<script src="https://ajax.googleapis.com/ajax/libs/jquery/3.5.1/jquery.min.js"></script>- Use jQuery to select the input field and bind an input event to perform validation
$(document).ready(function() {
  $('#emailInput').on('input', function() {
    const emailRegex = /^[^\s@]+@[^\s@]+\.[^\s@]+$/;
    if (emailRegex.test($(this).val())) {
      $('#emailFeedback').text(''); // Email is valid
    } else {
      $('#emailFeedback').text('Please enter a valid email address.');
    }
  });
});
Using ‘validator’ for email validation
validator is a lightweight JavaScript library that offers a range of string validation and sanitazation functions. It is designed to be simple, efficient, and flexible, making it an excellent tool for various validation scenarios, including email validation.
For me, the main highlights include:
- Clean and simple function calls: Each validation type, like checking if a string is an email, is performed through a straightforward function call, which makes the code easy to understand and maintain.
- Supports both client and server-side:
validatorcan be used in both browser and Node.js environments, ensuring versatility in deployment. - No dependencies: It operates independently without reliance on other libraries, making it a lightweight choice for projects.
- Reduces boilerplate code: While it doesn’t provide a declarative setup for validation rules, the simplicity of its function calls can still help reduce the complexity in code, focusing purely on the validation logic.
With all the goodies listed, I’ll now show you how to implement it.
- Include
validatorin your project. If you’re working in a browser environment, you can add it directly with a script tag.
<script src="https://unpkg.com/validator@latest/validator.min.js"></script>- Define the validation rules and the custom error message for email validation.
const form = document.getElementById('registrationForm');
form.addEventListener('submit', function(event) {
  event.preventDefault();

  const email = form.elements.email.value;
  let errorMessages = [];

  // Email validation
  if (!validator.isEmail(email)) {  // Checks if the email is in a valid format
    errorMessages.push('Invalid email format.');
  }

  // Display error messages or submit the form
  if (errorMessages.length > 0) {
    const errorMessage = errorMessages.join(', ');
    document.getElementById('emailFeedback').textContent = errorMessage;
  } else {
    // No errors, proceed with form submission or further processing
    document.getElementById('emailFeedback').textContent = '';
    // form.submit(); Uncomment this line if you wish to submit the form upon validation
  }
});
- As always, you’ll need an HTML form with an input field for the email and a place to display the validation error message:
<form id="registrationForm">
  <label for="emailInput">Email:</label>
  <input type="email" name="email" id="emailInput">
  <span id="emailFeedback" style="color: red;"></span>
  <button type="submit">Submit</button>
</form>
Server-side validation using Ajax
Server-side validation acts as the final checkpoint before data is processed or stored. It offers a layer of protection against invalid or malicious data that might bypass client-side checks.
To that, Ajax (Asynchronous JavaScript and XML) allows web pages to be updated asynchronously by exchanging data with a web server in the background. It means you can validate form data on the server without reloading the web page, offering a seamless experience to the users.
Here’s how to implement it:
- Here’s an example of how you might set up an Ajax call using vanilla JavaScript to validate an email address against the server.
function validateEmailServerSide(email) {
  fetch('/validate-email', {
    method: 'POST',
    headers: {
      'Content-Type': 'application/json'
    },
    body: JSON.stringify({ email: email })
  })
  .then(response => {
    if (!response.ok) {
      throw new Error('Network response was not ok');
    }
    return response.json();
  })
  .then(data => {
    if (data.isValid) {
      alert('Email is valid!');
    } else {
      alert('Email is invalid!');
    }
  })
  .catch(error => {
    console.error('There was a problem with your fetch operation:', error);
  });
}
This function sends the email to a server endpoint (/validate-email) via a POST request and processes the response.
- On the server side, you can set up a simple Node.js server using Express to handle the validation request.
const express = require('express');
const app = express();
const port = 3000;

// Middleware to parse JSON bodies
app.use(express.json());

// Route to handle email validation
app.post('/validate-email', (req, res) => {
  const { email } = req.body;
  // Simple regex for demonstration purposes
  const emailRegex = /^[^\s@]+@[^\s@]+\.[^\s@]+$/;
  const isValid = emailRegex.test(email);
  // In a real scenario, you might check against a database here
  res.send({ isValid });
});

app.listen(port, () => {
  console.log(`Server running at http://localhost:${port}`);
});
Pro Tips:
- Always sanitize and validate incoming data to prevent SQL injection, cross-site scripting (XSS), and other types of attacks.
- Use existing validation libraries and frameworks to simplify the validation logic syntax and ensure robustness.
Bonus section: email verification in JS
For starters, I’d like to point out the difference between email validation and email verification.
- Email validation checks if an email address is formatted correctly according to standard email formatting rules (as part of RFC standards). And validation is a part of email verification; meanwhile verification is consist of emal address validation, domain validation, mx checks. Validation can be achieved through regular expressions in JavaScript, as discussed previously. The formatting rules may include:
- ASCII characters (in email addresses typically hyphen, or full stop)
- UTF-8 for Unicode characters
- Email verification goes a step further to check if the email address exists and can receive emails on top of being formatted correctly. This usually involves querying the email server without sending an actual email.
Several services offer API-based email verification, and popular examples include Hunter, ZeroBounce, and NeverBounce.
Of course, these platforms provide detailed documentation on how to integrate their APIs into your applications.
And here, I’ll show you how to verify email address using Hunter.io API. For this exemplary integration, I’m using fetch, which should work regardless of your chosen service.
function verifyEmail(email) {
  const apiKey = 'YOUR_API_KEY'; // Replace with your actual API key
  const url = `https://api.hunter.io/v2/email-verifier?email=${email}&apiKey=${apiKey}`;

  fetch(url)
    .then(response => response.json())
    .then(({data}) => {
      if (data.status === 'valid') {
        console.log('Email is verified and active.');
      } else {
        console.log('Email cannot be verified.');
      }
    })
    .catch(error => {
      console.error('Error verifying email:', error);
    });
}
Some tips on applying email verification:
- User experience: Inform users if their email address cannot be verified but avoids blocking registrations solely based on verification results to prevent excluding valid users due to temporary server issues or false negatives.
- Privacy and compliance: Ensure that the email verification service complies with privacy laws and regulations, such as GDPR, to protect user data.
- Cost and quotas: Be mindful of the costs associated with using third-party verification services, especially if your application verifies a large volume of email addresses. Plan accordingly to stay within budget and quota limits.
Further reading on email validation:
Important Note on using Hunter API:
Hunter.io API email verification response doesn’t directly return ‘isVerified’ field. It actually provides a data object with various email verification details.
You can do the following to destructure the data object and get the status:
.then(response => response.json())
.then(({data}) => {
if (data.status === 'valid') {
console.log('Email is verified and active.');
} else {
console.log('Email cannot be verified.');
}
})
Email Validation as a part of email testing
While email validation focuses on confirming the correctness and existence of an email address, it’s just the beginning of a comprehensive email testing strategy. Here’s the spectrum of email testing to consider:
- Deliverability testing: This involves verifying that emails not only get sent but also successfully reach the recipient’s inbox, bypassing spam filters and other barriers. Deliverability issues can stem from various factors, including the sender’s reputation, the content of the email, and the configuration of email servers.
- Content and layout testing: Ensuring that the email content displays correctly across different email clients and devices is crucial. This type of testing checks for formatting issues, broken links, or problematic images that could affect the user’s ability to engage with the email.
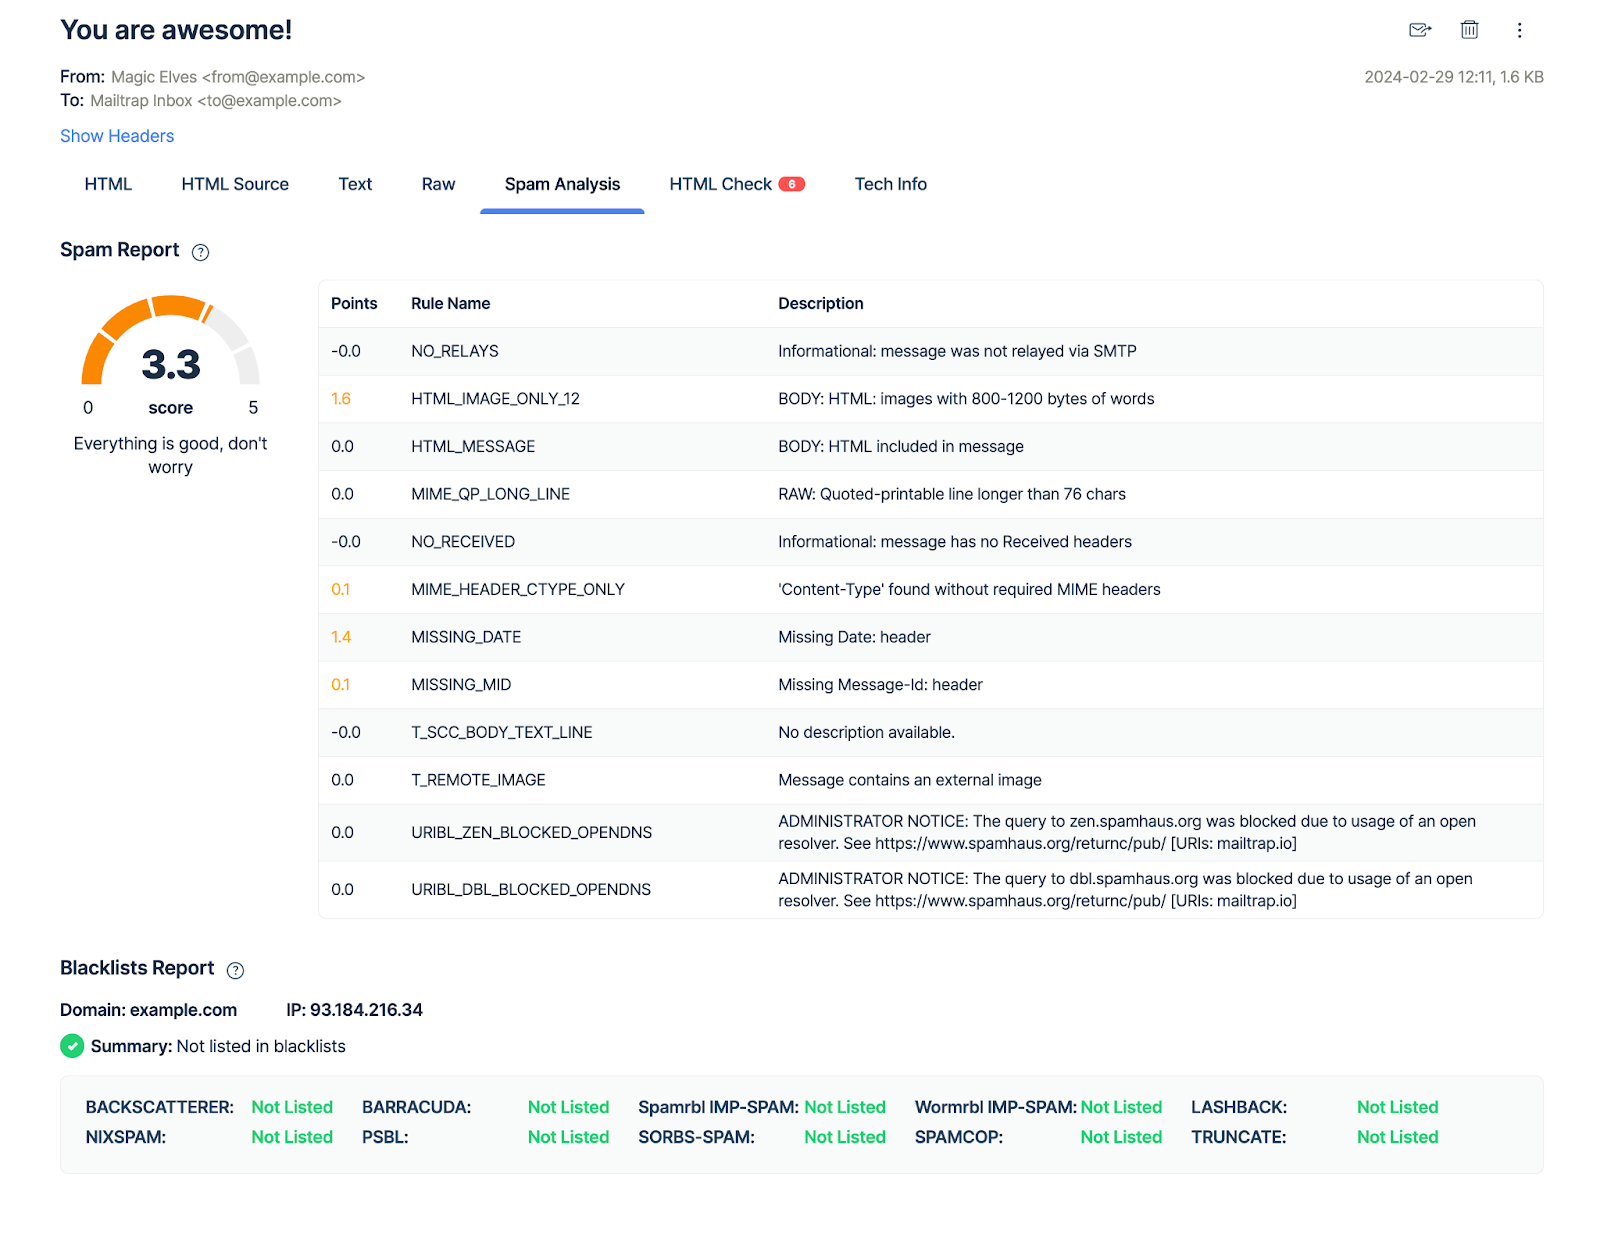
- Spam and blacklist testing: This tests whether your emails are being marked as spam or if your domain has been blacklisted, which could severely impact your email deliverability rates.
Mailtrap Email Delivery Platform, with its Email Testing feature, allows you to check all of the above without spamming your recipients. It’s a sandbox where developers test and debug email functionality via a fake SMTP server.
Mailtrap Email Testing captures emails sent from your development or staging environment into a safe space to conduct comprehensive email testing. It’s also easy to integrate and we provide read-made snippets in 20+ languages (PHP, Python, C#, etc.)
And you can do the following:
- Test email sending capabilities: Verify that your application correctly sends emails in various scenarios, such as registration confirmations, password resets, and notifications.
- Analyze email content and formatting: Mailtrap allows you to inspect the HTML and text versions of your emails, ensuring they look and function as intended across different email clients.

- Checking deliverability and spam scores: Mailtrap evaluates your emails against common spam filters, offering insights into how likely your emails are to be marked as spam and providing tips for improvement.
But as an Email Delivery Platform, we also offer Email Sending via SMTP or API. For instance, you can easily integrate it with your web or contact form and enjoy high deliverability rates by design.
If you want to know how to do contact form email validation, check out our video tutorial.