
If you’re a beginner like me and have spent hours unsuccessfully searching for the right piece of content or GitHub page that covers how to use Google App Script to send email, you’re in the right place!
In this article, I will take you step by step through the process of sending emails via Google Scripts.
So hold tight; we’re in for a ride!
Know your options: MailApp vs GmailApp
During my research on the topic of sending emails with Google Apps Script – the JavaScript cloud scripting language – I noticed two services repeatedly mentioned. Those services are MailApp and GmailApp.
What I discovered after looking into them was that both are intended to send emails but come with different functionalities and cater to different needs. So, let’s break them down so you can confidently choose the best service for your specific use case!
Snapshot comparison:
- Use MailApp if your email-sending tasks have minimal requirements and are straightforward.
- Use GmailApp when you need to interact with Gmail features and complex email functionalities.
MailApp:
- Great for sending plain text or HTML emails that don’t require you to interact with the full Gmail features
- Does not directly interact with the Gmail interface, and emails sent through MailApp don’t appear in the Gmail “Sent” folder
- Has an email sending limit based on your Google account type (e.g., free, Google Workspace) and is separate from the Gmail account sending limits
- Intended for heavy Gmail users
GmailApp:
- Comes with a rich set of features for completing more complex email-sending tasks, such as sending from aliases, changing the status of an email to read/unread, email search, and label manipulation
- Has full integration with the sender’s Gmail account, and emails sent with GmailApp appear in the Gmail “Sent” folder
- Provides high flexibility for handling complex email compositions such as rich email formatting and including inline images
- Has an email sending limit based on your Gmail account sending limit
- Not suitable for bulk email senders and heavy Gmail users
How to send emails using Google Apps Script
To send my emails from Google Apps Script, I decided to go with the GmailApp service. Why? Well, simply because it’s more advanced. So, for the rest of this tutorial and in the code snippets, you’ll see me using this service.
With that out of the way, let’s get into the email-sending process, starting with plain text emails.
Step 1 – Get your Google Apps Script Editor ready
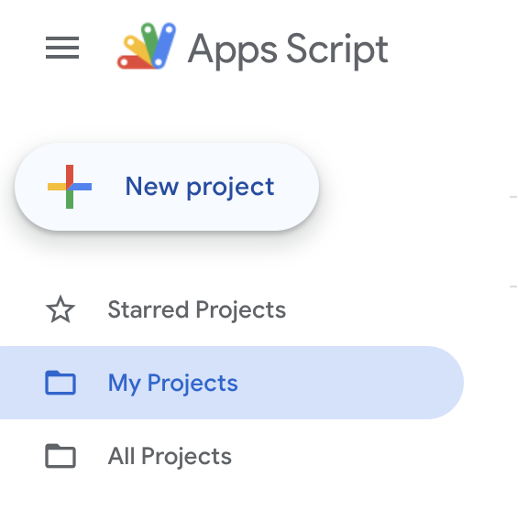
To write the code that will facilitate the email sending, you need to head over to the Google Apps Script website and log in with your Google account.
Then, click on New Project to create a new script.
Step 2 – Start writing the script
The script I used to send emails is pretty simple.
In the script code, I first set the email recipient and subject. Then, I define the message body before calling the sendEmail function and passing it all the necessary parameters.
function sendPlainTextEmailDirectlyWithGmailApp() {
var emailaddress = 'recipient@example.com'; // Replace with the actual recipient's email address
var subject = 'Test Email Subject'; // Replace with your desired subject
var message = 'This is a plain text email body.'; // Replace with your plain text message
// Send the email directly
GmailApp.sendEmail(emailaddress, subject, message);
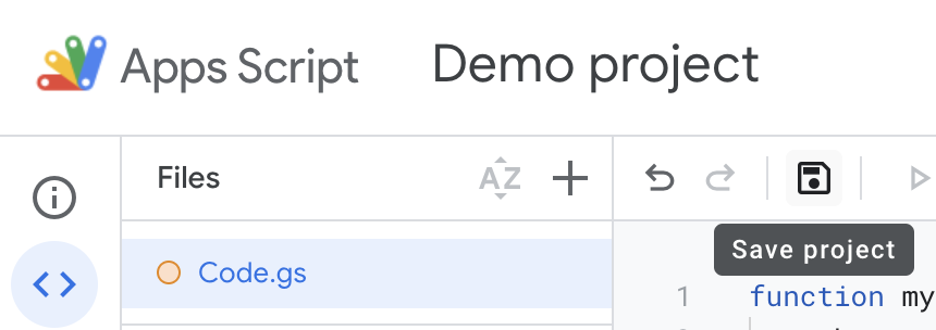
}Step 3 – Save your project and give it a name
Before you run your code, the project created needs to be saved and named. This can be done by clicking on the good old floppy disk icon.
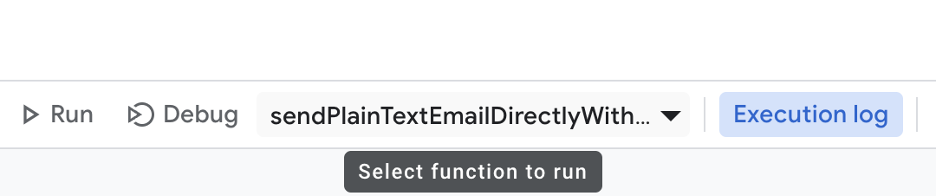
Step 4 – 3, 2, 1…Run the script
And just like that, your code is ready to run! So, now, go into your script editor, select the function you want to run from the dropdown, and click the play (▶️) icon.
Step 5 – Authorize the script
If it’s your first time running your script, Google will ask you to give the application authorization for sending on your behalf.
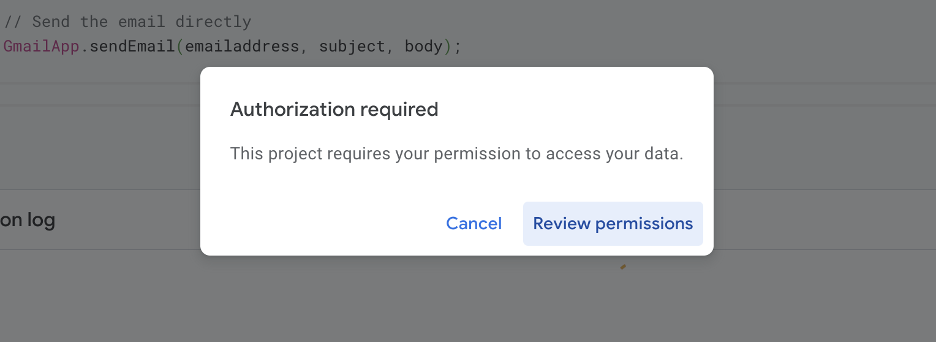
Once this happens, review permissions, choose your account, and grant the permissions necessary for the script to send emails and manage them for you.
Note: Steps such as opening the script editor, saving and running your project, as well as authorizing the script will be essentially the same for all the other email types I cover in this article. So, to avoid repetition, I will mostly skip including these steps from this point on.
HTML emails
In the previous section, I focussed only on plain text email. Now, I’ll take it a level up by showing you how I sent HTML emails.
As the code for sending plain text and HTML emails is not that significantly different, I simply modified what I had already written to fit my HTML email-sending needs.
function sendHtmlEmailWithGmailApp() {
  var recipient = 'recipient@example.com'; // Replace with the actual recipient's email address
  var subject = 'Test HTML Email Subject'; // Replace with your desired subject

  // Define the HTML body of the email
  var htmlBody = '<h1>Hello!</h1>' +
                 '<p>This is an <strong>HTML</strong> email.</p>';

  // Send the email with the HTML body
  GmailApp.sendEmail(recipient, subject, '', {
    htmlBody: htmlBody
  });
}
When inspecting the modified code above, you will notice that while setting the body of the email, I formatted it as HTML. I then called the same sendEmail function and passed it the four instead of three parameters – recipient, subject, an empty string, and an object.
The object passed to the function contains a single property called htmlBody, which is set to the variable containing the body of the email. Thanks to this property, GmailApp knows how to use HTML content as the email body.
The empty string is passed instead of a regular parameter typically used to set the plain text body of the email, which, in this case, is not necessary.
Emails with attachments
Adding an attachment when sending an email using Google Apps Script is a two-step process – first, you retrieve the file from Google Drive or another source, and then you attach it to the email message.
To retrieve the file, I used the following code snippet:
DriveApp.getFilesByName("Example.pdf").next()This snippet uses the DriveApp Google Apps Script service and its getFilesByName function. As the getFilesByName function returns a collection of files that match a specific name, another function, next, is called on the returned object.
Then, to attach the retrieved file, I passed a fourth parameter to the sendEmail function. This parameter represents an array that can include one or more attachments.
 GmailApp.sendEmail(recipient, subject, body, {
    attachments: [file.getAs(MimeType.PDF)] // Adjust the MIME type as necessary
  });
In my code, you will also see the getAs function. This function converts an attached file into a specific format. Here are some examples of how to use getAs to complete various file conversions:
- file.getAs(MimeType.MICROSOFT_WORD);
- file.getAs(MimeType.PLAIN_TEXT);
- file.getAs(MimeType.JPEG);
- file.getAs(MimeType.PNG);
- file.getAs(MimeType.CSV);
- file.getAs(MimeType.HTML);
And here is the full email-sending code:
function sendEmailWithAttachment() {
  var recipient = "recipient@example.com"; // Replace with the recipient's email address
  var subject = "Email with Attachment"; // Replace with your email subject
  var body = "Please find the attached file."; // Plain text body of the email
  var file = DriveApp.getFilesByName("Example.pdf").next(); // Replace 'Example.pdf' with your file's name

  GmailApp.sendEmail(recipient, subject, body, {
    attachments: [file.getAs(MimeType.PDF)] // Adjust the MIME type as necessary
  });
}
getFileById route
Google Apps Script facilitates more than one way of adding an attachment. So, besides the getFilesByName function paired with passing the attachments as an array, there is also the getFileById function and Blob (yes, you read that right :D) combination.
So, instead of retrieving the file by name, you can also retrieve it by ID. And instead of attaching an array, you can attach a Blob – a binary large object representing data that can be treated as a file.
Using a Blob is a straightforward way to attach files without needing to adjust or specify the file format explicitly. And this is what it looks like when implemented in my code:
function sendEmailWithAttachment() {
  // Define the email parameters
  var recipient = 'recipient@example.com';
  var subject = 'Test Email with Attachment';
  var body = 'This is a plain text email with an attachment.';

  // Get the file from Google Drive (replace 'fileId' with the actual file ID)
  var file = DriveApp.getFileById('fileId');

  // Create a blob from the file
  var blob = file.getBlob();

  // Send the email with the attachment
  GmailApp.sendEmail(recipient, subject, body, {
    attachments: [blob]
  });
}
Emails with multiple recipients
HTML content covered, attachments covered, and single-recipient emails covered. But what if you want to share your email with more than one person? For that, I found two options:
- separating the email addresses with commas within a single string
- using an array of email addresses and then joining them into a string
Let me show you both!
When it comes to the first option, you need to modify the recipient variable in your script by setting its value to be a string containing email addresses separated by commas.
Then, simply pass the variable to the function sendEmail as you did earlier.
function sendEmailToMultipleRecipients() {
  var recipients = "recipient1@example.com,recipient2@example.com"; // Separate email addresses with commas
  var subject = "Email to Multiple Recipients";
  var body = "This is a test email sent to multiple recipients.";

  GmailApp.sendEmail(recipients, subject, body);
}
The second option also involves modifying the recipient variable in your script. Only this time, the variable’s value will be set to an array of strings, each representing an email address.
The array is then combined into a single string, separated by commas, using the join function.
function sendEmailToArrayOfRecipients() {
  var recipientArray = ["recipient1@example.com", "recipient2@example.com", "recipient3@example.com"]; // An array of email addresses
  var recipients = recipientArray.join(","); // Join the array into a comma-separated string
  var subject = "Email to Multiple Recipients";
  var body = "This is a test email sent to multiple recipients.";

  GmailApp.sendEmail(recipients, subject, body);
}
The latter approach is particularly useful if the list of recipients is dynamic or large.
CC and BCC recipients
If you want to include CC or BCC recipients in the emails you send from Google Apps Script, at your disposal are the CC and BCC fields in the optional parameters object.
Here is how I made use of them:
function sendEmailWithCCAndBCC() {
  var primaryRecipient = "primary@example.com"; // Primary recipient
  var ccRecipients = "cc1@example.com,cc2@example.com"; // CC recipients
  var bccRecipients = "bcc1@example.com,bcc2@example.com"; // BCC recipients
  var subject = "Email with CC and BCC";
  var body = "This email is sent with CC and BCC recipients.";

  GmailApp.sendEmail(primaryRecipient, subject, body, {
    cc: ccRecipients,
    bcc: bccRecipients
  });
}
How to send condition-based emails using Google Apps Script
With manual email-sending out of the way, it’s time for some automation.
In Google Apps Script, automation is used when sending condition-based emails. What’s particularly interesting about these emails is that they leverage the ability of Google Apps Script to interact with Google Services such as Gmail, Sheets, Docs, etc.
Personally, I like to use condition-based emails for tasks such as automating email notifications, reminders, or alerts. And here’s how!
Sending email based on cell value
Let’s imagine you have an Excel or Google spreadsheet containing data on inventory levels. Once those levels drop below a certain threshold, you want to send out an automatic notification or alert to whoever is responsible.
To do so in Google Apps Script, you’ll need the following code:
function checkCellValueAndSendEmail() {
  // ID of the Google Sheet you want to check
  var sheetId = 'YOUR_SHEET_ID_HERE';
  var sheet = SpreadsheetApp.openById(sheetId).getActiveSheet();

  // Assuming the value to check is in cell A1
  var cellValue = sheet.getRange('A1').getValue();

  // Condition to send email
  if (cellValue === 'Send Email') {
    var email = 'recipient@example.com'; // Replace with the recipient's email
    var subject = 'Alert from Google Sheet';
    var body = 'The condition to send an email has been met.';

    GmailApp.sendEmail(email, subject, body);
  }
}
What this code does is open a sheet based on an ID you define and pass to the openById function. It then selects a data range within the sheet. In the case of my code, that range is specified as “A1”, which refers to the cell located in column A and row 1 of the spreadsheet.
If the cell value equals “Send Email”, my code then composes and sends an email in the same manner I covered in the previous sections. Cool, huh?
Automate your script further (Optional)
Within the Google Apps Script editor, you can set a script to run according to a schedule or after an event.
This is done by:
- Clicking on the clock icon (Triggers icon) in the left sidebar.
- Clicking + Add Trigger in the bottom right corner.
- Choosing the function you want to run and setting the event source (for the code to run at specific intervals, Time-driven should be the event source)
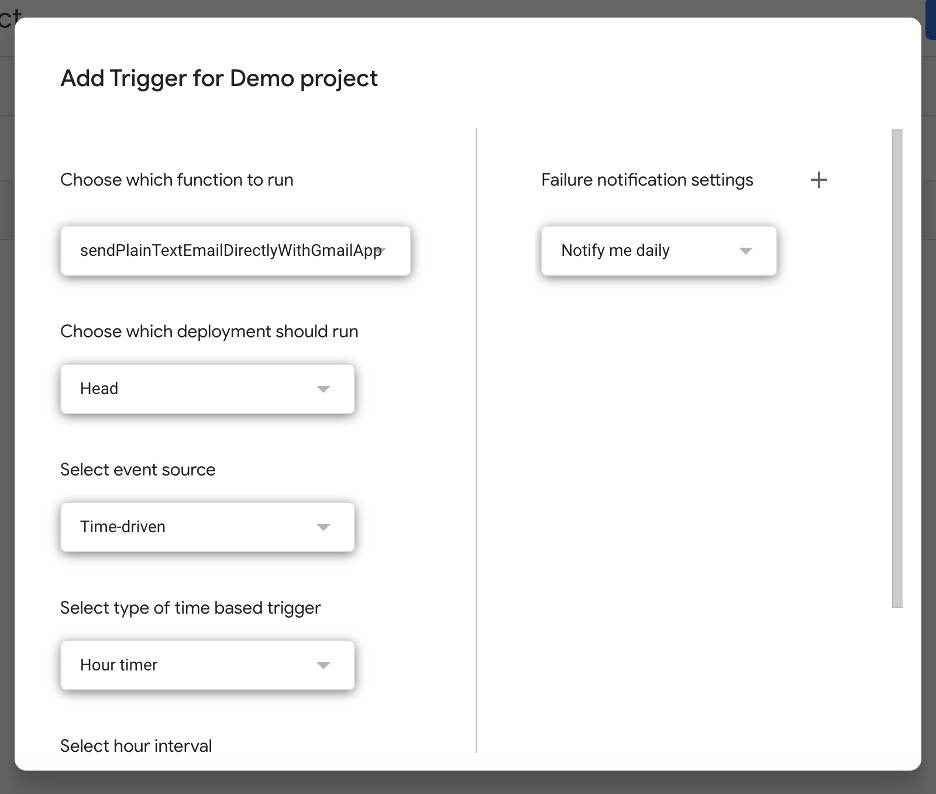
- Clicking Save.
I should note that when you are setting up the script and email triggers, you’ll need to make sure all necessary permissions are granted for the script to run. For the example I provided, these permissions would include accessing Google Sheets data and sending emails.
Sending email after form submission
Another use case of Google Apps Script that I found particularly cool is the creation of automated emails after a Google Form submission.
To do so, all you need is to create a trigger that runs a code snippet after each response you receive. The code, you guessed it, will send an email using the GmailApp service.
This is how I linked my Google Form and email-sending code:
Step 1 – Retrieve the form ID
The unique ID of each Google form can be found in its URL. These URLs should have the following format:
https://docs.google.com/forms/d/e/[FORM_ID]/viewformOnce you have the ID, copy and save it, as you’ll need to incorporate it into the code soon.
Step 2 – Get the code ready
The code I used for this task is just slightly different from the code used for plain text email sending. So, along with the standard tasks of defining the recipient, subject, and body as well as calling the sendEmail function, at the top of the code you’ll extract all the form responses and then access a specific response.
The extracting is done using the getItemResponses function. Accessing a specific response, on the other hand, is done by calling the getResponse function on a variable holding an array of responses from a form submission.
This is how it all looks in code:
function sendEmailAfterFormSubmit() {
var form = FormApp.openById(‘TARGET_FORM_ID’);
var responsesCount = form.getResponses().length;
var responses = form.getResponses();
var response = responses[responsesCount-1];
var responseItems = response.getItemResponses();
var firstResponse = responseItems[0].getResponse();
// Email details
var email =recipient@example.com';
var subject = 'New Form Submission';
var body = 'A new form has been submitted. First question response: ' + firstResponse;
GmailApp.sendEmail(email, subject, body);
If you want to customize the email content further based on a form response, you can do so by accessing different parts of the responses array.
My form consisted of 3 questions:
- What is your name?
- What is your favorite color?
- Please provide your feedback.
And to customize my email, I used the following code:
function sendCustomEmailAfterFormSubmit() {
  // Access the form responses from the event object
  var form = FormApp.openById(‘TARGET_FORM_ID’);
var responsesCount = form.getResponses().length;
var responses = form.getResponses();
var response = responses[responsesCount-1];
var responseItems = response.getItemResponses();


  // Extracting individual responses
  var nameResponse = responseItems[0].getResponse(); // Response to the first question (name)
  var colorResponse = responseItems[1].getResponse(); // Response to the second question (favorite color)
  var feedbackResponse = responseItems[2].getResponse(); // Response to the third question (feedback)

  // Email details
  var recipient = 'recipient@example.com'; // Replace with the actual recipient's email
  var subject = 'Thank You for Your Feedback';

  // Customizing the email body with the form responses
  var body = "Hello " + nameResponse + ",\n\n" +
             "Thank you for submitting your feedback. " +
             "We are glad to know that your favorite color is " + colorResponse + ". " +
             "Here's the feedback we received from you:\n" +
             "\"" + feedbackResponse + "\"\n\n" +
             "We appreciate your input and will get back to you shortly.";

  // Sending the customized email
  GmailApp.sendEmail(recipient, subject, body);
}
Limitations of sending with Google Apps Script
By this point in the article, you’re probably thinking, “Man, you can do a lot with Google Apps Script”. And yes, you’re right, but there are limitations.
Let me introduce you to the key ones!
- Daily quota – daily quota limits are enforced by Google Apps Script on sending emails and these vary based on the account type (e.g., personal Gmail vs. Google Workspace). Along with the number of emails, these limits also extend to the number of recipients.
- Execution time – limits are posed on the total execution time per day for scripts as well as individual script executions. For most accounts, 6 minutes is the maximum execution time per script.
- Concurrent executions – the number of scripts that can execute concurrently is limited, affecting scripts designed to handle high volumes of requests or operations simultaneously.
- URL fetch calls and external requests – the number of calls and the size of the request, as well as the response, are limited for scripts that make external network calls, such as ones to APIs and web services.
- Script project and storage size – Google Apps Script has a maximum size limit for each script and the data stored by it when using various services within the platform (Properties Service, Cache Service, etc.).
- Libraries and dependencies – per project, there is a limit on the number and the size of libraries used.
How to send emails with Google Apps Script and email API?
While sending through the Gmail service is pretty simple and effective, I like to have a bit more flexibility and features. For this, the option I gravitate to the most is using an email API.
In Google Apps Script, HTTP requests to external email APIs are made using the UrlFetchApp service. And I will now show you how to make such a request to a reliable email API offered by Mailtrap Email Sending.
With Mailtrap Email Sending, you get an email infrastructure with high deliverability rates by design. On top of that, you can expect each email you send through this sending solution to reach a recipient’s inbox in seconds.
What’s especially great about Email Sending is the actionable analytics it comes with. These will help you catch and fix unexpected sending issues quickly and easily, as well as gain more control over your email infrastructure.
The analytics consist of features such as a helicopter view dashboard, drill-down reports, email logs, and deliverability alerts.

Impressive, right? So, let’s break down how I used the Mailtrap Email Sending’s email API in Google Apps Script!
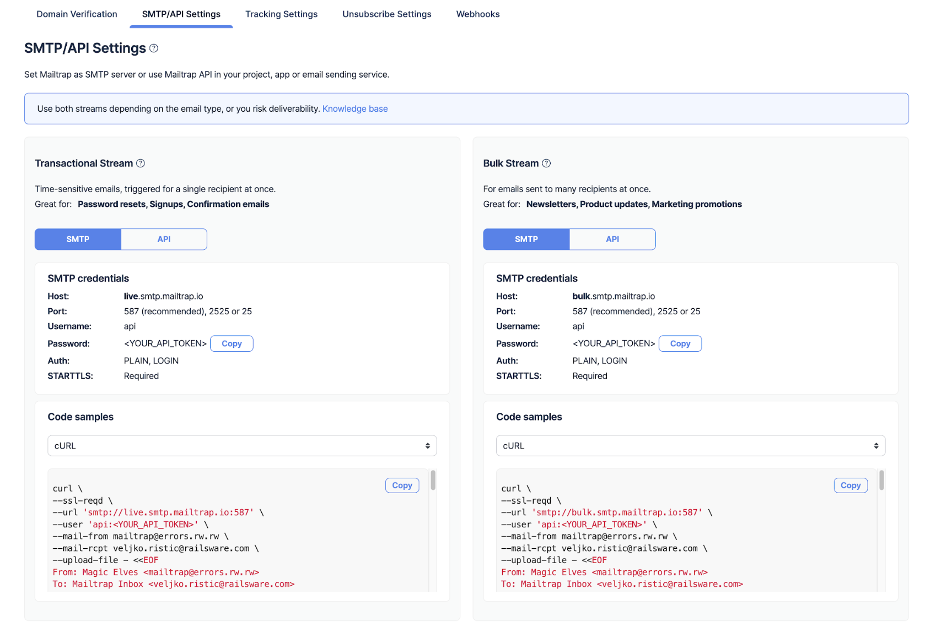
Step 1 – Retrieve the credentials
To get your Mailtrap email API details and password, signing up for an account is the first step.
Then, simply add and verify your domain. And once that’s done, head over to Sending Domains -> SMTP/API Settings.
The SMTP/API Settings page, which holds your credentials, will allow you to choose between a bulk and transactional sending stream.
You’ll also have the option of going with an SMTP service or the mentioned email API. But, as Google Apps Script doesn’t natively support sending emails through an SMTP server due to it being a cloud-based scripting language, this time, you can only go the email API route.
Step 2 – Write the script
For the email-sending code, you’ll still be sticking to the basics, meaning the code should start off by initializing the email details (sender, recipient, and body). Then, for the API request, the API endpoint and payload – necessary details structured according to Mailtrap email API requirements – should be prepared.
Also, before calling the UrlFetchApp.fetch function, which sends the email by sending a POST request, you’ll need to set the headers and configure the request options.
The finished code should look like this:
function sendEmailViaExternalApi() {
  var apiKey = 'YOUR_MAILTRAP_API_KEY';
  var senderEmail = 'your-email@example.com'; // Must be verified with Mailtrap
  var recipientEmail = 'recipient@example.com';
  var subject = 'Hello from Google Apps Script!';
  var bodyText = 'This is a simple email sent via Mailtrap Email API using Google Apps Script.';

  var apiKey = '20a792b9bbc2ec39f9792a3ec4f5f891';
  var senderEmail = 'inminds@invminds.com';
  var recipientEmail = 'recipient@example.com';
  var subject = 'Hello from Google Apps Script!';
  var bodyText = 'This is a simple email sent via Mailtrap Email API using Google Apps Script.';

  var apiEndpoint = 'https://send.api.mailtrap.io/api/send';

  const emailData = {
    from: {
      email: senderEmail,
      name: "Mailtrap Test"
    },
    to: [
      {
        email: recipientEmail
      }
    ],
    subject: subject,
    text: bodyText
  };

  var payload = JSON.stringify(emailData);

  var headers = {
    'Authorization': 'Bearer ' + apiKey,
    'Content-Type': 'application/json'
  };

  var options = {
    'method': 'post',
    'headers': headers,
    'payload': payload,
    'muteHttpExceptions': true // to prevent throwing exceptions for non-2xx responses
  };

  var response = UrlFetchApp.fetch(apiEndpoint, options);
  Logger.log(response.getContentText()); // Log the API response for debugging
}
Note: For debugging sending issues and monitoring the output of the API call, at the end of the script, I included the Logger.log() function. But this is totally optional and maybe even unnecessary, as Mailtrap Email Sending will provide you with in-depth analytics and email logs anyway.
HTML emails
To send an HTML format email with an email API, your code should stay basically the same, with the addition of two things:
- defining a variable to hold your HTML code
- adjusting the email’s payload structure to use the htmlContent variable and specify the content type as text/html
function sendHtmlEmailViaExternalApi() {
  var apiKey = 'YOUR_MAILTRAP_API_KEY';
  var senderEmail = 'your-email@example.com'; // Must be verified with   Mailtrap
  var recipientEmail = 'recipient@example.com';
  var subject = 'Hello from Google Apps Script!';

  // HTML content
  var htmlContent = "<html><body><h1>Hello, World!</h1><p>This is a test email sent via <strong>Mailtrap Email API</strong> using Google Apps Script, with HTML content.</p></body></html>";

var apiEndpoint = 'live.smtp.mailtrap.io';
  var payload = JSON.stringify({
    personalizations: [{ to: [{ email: recipientEmail }] }],
    from: { email: senderEmail },
    subject: subject,
    content: [{ type: 'text/html', value: htmlContent }]
  });

  var headers = {
    'Authorization': 'Bearer ' + apiKey,
    'Content-Type': 'application/json'
  };

  var options = {
    'method': 'post',
    'headers': headers,
    'payload': payload,
    'muteHttpExceptions': true // to prevent throwing exceptions for non-2xx responses
  };

  var response = UrlFetchApp.fetch(apiEndpoint, options);
  Logger.log(response.getContentText()); // Log the API response for debugging
}
Emails with attachments
Adding an attachment to a Google Apps Script email sent via an email API involves adding an attachment field to the API request payload.
In the field, you’ll define the actual content, file name, attachment type, disposition, and unique identifier. However, do keep in mind that this can vary from email API to email API and that the code I’ll show is a general approach based on common practices.
For obtaining the content of the attachment in base64 format, there are two methods:
Method #1
var fileContent = "Hello, this is the content of the file."; // Example file content
var encodedContent = Utilities.base64Encode(fileContent);
Intended for small files already accessible within Google Apps Script.
Method #2
var fileId = 'YOUR_FILE_ID_HERE'; // Replace with your actual file ID from Google Drive
var file = DriveApp.getFileById(fileId);
var fileBlob = file.getBlob();
var encodedContent = Utilities.base64Encode(fileBlob.getBytes());
Intended for files stored on Google Drive and/or larger files.
Once you pick a method and obtain the content, proceed to write the email-sending function, which should look something like this:
function sendPlainTextEmailWithAttachment() {
var apiKey = 'YOUR_MAILTRAP_API_KEY';
var senderEmail = 'your-email@example.com'; // Must be verified with Mailtrap
var recipientEmail = 'recipient@example.com';
var subject = 'Email with Attachment';
var bodyText = 'This is a test email with an attachment sent via Mailtrap Email API using Google Apps Script.';
var attachmentContent = encodedContent; // Use the base64 encoded content from Step 1
var apiEndpoint = 'live.smtp.mailtrap.io';
var payload = JSON.stringify({
personalizations: [{ to: [{ email: recipientEmail }] }],
from: { email: senderEmail },
subject: subject,
content: [{ type: 'text/plain', 'value': bodyText }],
attachments: [
{
content: attachmentContent,
filename: "example.txt", // Specify the filename of the attachment
type: "text/plain", // Specify the MIME type of the attachment
disposition: "attachment", // Specify how you want the attachment to be displayed
content_id: "Attachment" // A unique identifier for the attachment
}
]
});
var headers = {
'Authorization': 'Bearer ' + apiKey,
'Content-Type': 'application/json'
};
var options = {
'method': 'post',
'headers': headers,
'payload': payload,
'muteHttpExceptions': true // to prevent throwing exceptions for non-2xx responses
};
var response = UrlFetchApp.fetch(apiEndpoint, options);
Logger.log(response.getContentText()); // Log the API response for debugging
}
Emails with multiple recipients
Last but not least, we have the process of sending emails to multiple recipients via an email API, which will require modifying the payload of the request.
For most email APIs, this is done in the personalization field of the API request. But before you move on to do that, make sure you define an array of recipient email addresses outside the function code like so:
var recipients = [
  'recipient1@example.com',
  'recipient2@example.com',
  // Add more recipients as needed
];
The function code:
function sendPlainTextEmailToMultipleRecipients() {
var apiKey = 'YOUR_MAILTRAP_API_KEY';
var senderEmail = 'your-email@example.com'; // Must be verified with Mailtrap

var subject = 'Email to Multiple Recipients';
var bodyText = 'This is a test email sent to multiple recipients via Mailtrap Emai API using Google Apps Script.';
var apiEndpoint = 'live.smtp.mailtrap.io';
// Create personalizations array for multiple recipients
var personalizations = recipients.map(function(email) {
return { to: [{ email: email }] };
});
var payload = JSON.stringify({
personalizations: personalizations,
from: { email: senderEmail },
subject: subject,
content: [{ type: 'text/plain', 'value': bodyText }],

});
var headers = {
'Authorization': 'Bearer ' + apiKey,
'Content-Type': 'application/json'
};
var options = {
'method': 'post',
'headers': headers,
'payload': payload,
'muteHttpExceptions': true // to prevent throwing exceptions for non-2xx responses
};
var response = UrlFetchApp.fetch(apiEndpoint, options);
Logger.log(response.getContentText()); // Log the API response for debugging
}
CC and BCC recipients can also be included through the cc and bcc fields within the personalization array.

 var payload = JSON.stringify({
    personalizations: [{
      to: toRecipients,
      cc: ccRecipients, // Include CC recipients
      bcc: bccRecipients // Include BCC recipients
    }],
    from: { email: senderEmail },
    subject: subject,
    content: [{ type: 'text/plain', value: bodyText }]
  });
Wrapping things up
And just like that, you should be ready to send mail from Google Scripts!
Whether you send through your Gmail account with the help of GmailApp or MailApp, or through an email API is up to you. But, do keep in mind that using email APIs such as the one from Mailtrap Email Sending might be more advantageous in terms of sending volume, features, deliverability, customization, integration, and so on.
For more email sending, be sure to explore the Mailtrap blog. Or, if you prefer to gather your information through video tutorials, then visit the Mailtrap YouTube channel!