 Skip to Navigation


Adding email-sending functionality to your Node.js backend with the Nodemailer module is super straightforward.
In this tutorial, I break down the process, from installation to sending various types of emails and even testing them to make sure they reach your recipients’ inboxes pitch-perfect.
If you already have Nodemailer installed and are ready to start sending emails, [click here].
How to install Nodemailer
To install and start using Nodemailer, you first need to install Node.js — download it from the official website or check out this updated guide on installing Node.js.
For installing Nodemailer, you can either use the npm package manager:
npm install nodemailerOr Yarn package manager:
yarn add nodemailerOnce installed, include it in your web application with the following code:
const nodemailer = require('nodemailer');Or this code, if you’re using ES modules:
import nodemailer from 'nodemailer';How to send emails with Nodemailer
To start sending emails with Nodemailer, all you need to is:
- Create a transporter object
- Configure the mailoptions object
- Deliver a message with sendMail()
To make it simple for you, I’ve created a code snippet you can use — simply paste it into your JavaScript config file (e.g., index.js):
// Import the Nodemailer library
const nodemailer = require('nodemailer');

// Create a transporter object
const transporter = nodemailer.createTransport({
  host: 'live.smtp.mailtrap.io',
  port: 587,
  secure: false, // use SSL
  auth: {
    user: '1a2b3c4d5e6f7g',
    pass: '1a2b3c4d5e6f7g',
  }
});

// Configure the mailoptions object
const mailOptions = {
  from: 'yourusername@email.com',
  to: 'yourfriend@email.com',
  subject: 'Sending Email using Node.js',
  text: 'That was easy!'
};

// Send the email
transporter.sendMail(mailOptions, function(error, info){
  if (error) {
    console.log(‘Error:’ error);
  } else {
    console.log('Email sent: ' + info.response);
  }
});
And voila, your app can now send emails!
With this code snippet, you can send plain text and HTML emails using any email service you wish (e.g., Gmail, Office, etc.). But, as you can see in the ‘transporter’ object, I used Mailtrap Email Sending, which offers a reliable SMTP with robust sending capabilities.
Moreover, Mailtrap has a generous free plan, and unlike Gmail for example, provides me with in-depth analytics, dedicated IPs, auto IP warmups, suppression lists, and other advanced features for fine-tuning my email infrastructure.
Tip: To verify that your SMTP connection is correct, add verify(callback) call to test the connection and authentication, like so:
transporter.verify(function(error, success) {
  if (error) {
        console.log(‘Connection error:’ error);
  } else {
        console.log('Server is ready to take our messages');
  }
});
If you keep facing issues, refer to the official Nodemailer documentation on GitHub.
Send HTML email
To send an email with HTML content in Nodemailer, add the html field to your message options and use appropriate tags (e.g., <h1>, <p>, etc.).
Here’s an example:
const mailOptions = {
  from: 'youremail@email.com',
  to: 'yourfriend@yahoo.com',
  subject: 'Sending HTML email using Node.js is a piece of cake',
  text: 'That was easy!',
  html: '<h1>Welcome</h1><p>That was easy!</p>'
}
Alternatively, you can add any kind of data as content of the main body, besides text and HTML.
For instance:
let message = {
    ...
    html: '<b>Hello world!</b>',
    alternatives: [
        {
            contentType: 'text/x-web-markdown',
            content: '**Hello world!**'
        }
    ]
}
Note that you can add as many alternatives as you want.
Send email to multiple recipients
In other programming languages and frameworks, you use cc and bcc for adding multiple recipients. With Nodemailer however, it’s much simpler, as you can add the addresses in the same to field, like so:
const mailOptions = {
  from: 'youremail@email.com',
  to: 'yourfriend@email.com, yourotherfriend@email.com',
  subject: 'Sending Email using Node.js',
  text: 'That was easy!'
}
Send email with attachments
To add attachments in Nodemailer, you can use the attachments option in the message object:
Check it out:
let message = {
    ...
    attachments: [
        {   // utf-8 string as an attachment
            filename: 'text1.txt',
            content: 'hello world!'
        },
        {   // binary buffer as an attachment
            filename: 'text2.txt',
            content: Buffer.from('hello world!','utf-8')
        },
        {   // file on disk as an attachment
            filename: 'text3.txt',
            path: '/path/to/file.txt' // stream this file
        },
        {   // filename and content type is derived from path
            path: '/path/to/file.txt'
        },
        {   // stream as an attachment
            filename: 'text4.txt',
            content: fs.createReadStream('file.txt')
        },
        {   // define custom content type for the attachment
            filename: 'text.bin',
            content: 'hello world!',
            contentType: 'text/plain'
        },
        {   // use URL as an attachment
            filename: 'license.txt',
            path: 'https://raw.github.com/nodemailer/nodemailer/master/LICENSE'
        },
        {   // encoded string as an attachment
            filename: 'text1.txt',
            content: 'aGVsbG8gd29ybGQh',
            encoding: 'base64'
        },
        {   // data uri as an attachment
            path: 'data:text/plain;base64,aGVsbG8gd29ybGQ='
        },
        {
            // use pregenerated MIME node
            raw: 'Content-Type: text/plain\r\n' +
                 'Content-Disposition: attachment;\r\n' +
                 '\r\n' +
                 'Hello world!'
        }
    ]
}
Send email with embedded image
For adding an embedded image in the HTML body, you can also use the attachments option. All you have to do is set an additional property of the attachment ‘cid’ that references the attachment file.
Keep in mind that the cid value must be used as the image URL in HTML, like so:
let message = {
    ...
    html: 'Embedded image: <img src="cid:unique@nodemailer.com"/>',
    attachments: [{
        filename: 'image.png',
        path: '/path/to/file',
        cid: 'unique@nodemailer.com' //same cid value as in the html img src
    }]
}
Asynchronous email sending
To send emails asynchronously in Nodemailer, we’ll have to use a message-queueing software, such as RabbitM.
Here’s what the whole process looks like:
1. Set up RabbitMQ
To install and set up RabbitMQ, visit the official website and follow the instructions for your operating system. You can use Consult the detailed instructions provided by RabbitMQ as your go-to guide.
2. Install amqlib
To communicate with RabbitMQ, your application will need a messaging protocol such as amqplib. Install it with the following command:
npm install amqplib3. Create a producer to queue messages
Then, we need a producer that will send messages to the queue. For this, you can play around with the following code snippet and add it to your configuration file:
const amqp = require('amqplib');

async function sendToQueue(emailData) {
    const conn = await amqp.connect('amqp://localhost'); // Connect to RabbitMQ server
    const channel = await conn.createChannel(); // Create a channel
    const queue = 'emails'; // Name of the queue

    await channel.assertQueue(queue, { durable: true }); // Ensure the queue exists and is durable
    channel.sendToQueue(queue, Buffer.from(JSON.stringify(emailData)), { persistent: true }); // Send email data to the queue

    console.log('Email request sent to queue');
    setTimeout(() => {
        channel.close();
        conn.close();
    }, 500);
}

// Example email data
const emailData = {
    from: 'sender@example.com',
    to: 'receiver@example.com',
    subject: 'Test Email',
    text: 'This is a test email sent asynchronously using RabbitMQ and Nodemailer.'
};

sendToQueue(emailData);
4. Create a worker to send messages
And finally, let’s create a worker that listens for messages on the queue and sends them via Nodemailer:
const amqp = require('amqplib');
const nodemailer = require('nodemailer');

async function startWorker() {
    try {
        const conn = await amqp.connect('amqp://localhost');
        const channel = await conn.createChannel();
        const queue = 'emails';

        await channel.assertQueue(queue, { durable: true });
        console.log("Waiting for messages in %s. To exit press CTRL+C", queue);

        channel.consume(queue, async msg => {
            if (msg !== null) {
                const emailData = JSON.parse(msg.content.toString());
                await sendEmail(emailData);
                channel.ack(msg);
            }
        });
    } catch (error) {
        console.error('Error starting worker:', error);
    }
}


async function sendEmail(emailData) {
    let transporter = nodemailer.createTransport({
        service: 'gmail', // or your email service
        auth: {
            user: 'sender address (e.g., youremail@email.com)’,
            pass: 'your-password'
        }
    });

    try {
        let info = await transporter.sendMail(emailData);
        console.log('Email Sent: %s', info.messageId);
    } catch (error) {
        console.error('Error sending email:', error);
    }
}

startWorker();
Don’t forget to replace variables such as user and pass with your actual email credentials.
Send bulk emails
Sending bulk emails with Nodemailer is pretty much the same as sending asynchronous messages, with, of course, a few twists.
Namely, you should:
- Use pooled SMTP – To avoid having your code doing the SMTP handshake dance for every email you send in bulk, set the [pool] option to [true] if you use the same credentials.
- Increase the default sending value – The default value for [maxMessages] is 100, which means the connection will be aborted once 100 messages are sent from the pool. To go about this, simply set the [maxMessages] option to [Infinity].
- Adjust the maximum number of connections – Depending on the amount of connections your system can handle, you should set the [maxConnections] value accordingly.
- Use file paths instead of URLs for attachments – Reading the same file from the disk a bunch of times when sending emails in bulk is way faster than using URLs, in which case all new messages have to make a fresh HTTP request to receive the file from the server.
- Use a dedicated bulk delivery provider – One of the reasons I don’t use my Gmail account is that it isn’t built for bulk email sending. If you don’t want to hit hard limits or get labelled as a spammer, you should use a provider that offers a dedicated SMTP for bulk email.
For this, I also use Mailtrap Email Sending, as it provides me with a stream for transactional messages and a separate stream for bulk email sending. This way, I can keep my email deliverability high on both streams without any additional costs.

Moreover, Mailtrap offers a bulk-aware email API, which means you can send a customized HTML email to 1,000,000 recipients with a single API call, and it will compile the information into emails itself.
Nodemailer debugging
For successful testing of mail sending, let’s use native debugging.
It is simple with Nodemailer: set both debug and logger to true and you will be able to see all the data which is passed to the server as an output in the console.
This way, you will be able to analyze the email-sending process and quickly fix errors, if there are any.
Specify debug options in the transporter section of the mail script in your Node.js app:
const transport = nodemailer.createTransport({
  host: "live.smtp.mailtrap.io",
  port: 2525,
  auth: {
    user: "1a2b3c4d5e6f7g",
    pass: "1a2b3c4d5e6f7g"
  },
  debug: true, // show debug output
  logger: true // log information in console
});
Here is what you will get in the console:
[2018-12-28 18:05:10] DEBUG Creating transport: nodemailer (5.0.0; +https://nodemailer.com/; SMTP/5.0.0[client:5.0.0])
[2018-12-28 18:05:10] DEBUG Sending mail using SMTP/5.0.0[client:5.0.0]
[2018-12-28 18:05:10] DEBUG [nJWMVEIqQCE] Resolved smtp.mailtrap.io as 54.87.153.8 [cache miss]
[2018-12-28 18:05:10] INFO  [nJWMVEIqQCE] Connection established to 54.87.153.8:2525
[2018-12-28 18:05:10] DEBUG [nJWMVEIqQCE] S: 220 smtp.mailtrap.io ESMTP ready
[2018-12-28 18:05:10] DEBUG [nJWMVEIqQCE] C: EHLO [127.0.0.1]
[2018-12-28 18:05:10] DEBUG [nJWMVEIqQCE] S: 250-smtp.mailtrap.io
[2018-12-28 18:05:10] DEBUG [nJWMVEIqQCE] S: 250-SIZE 5242880
[2018-12-28 18:05:10] DEBUG [nJWMVEIqQCE] S: 250-PIPELINING
[2018-12-28 18:05:10] DEBUG [nJWMVEIqQCE] S: 250-ENHANCEDSTATUSCODES
[2018-12-28 18:05:10] DEBUG [nJWMVEIqQCE] S: 250-8BITMIME
[2018-12-28 18:05:10] DEBUG [nJWMVEIqQCE] S: 250-DSN
[2018-12-28 18:05:10] DEBUG [nJWMVEIqQCE] S: 250-AUTH PLAIN LOGIN CRAM-MD5
[2018-12-28 18:05:10] DEBUG [nJWMVEIqQCE] S: 250 STARTTLS
[2018-12-28 18:05:10] DEBUG [nJWMVEIqQCE] C: STARTTLS
[2018-12-28 18:05:10] DEBUG [nJWMVEIqQCE] S: 220 2.0.0 Start TLS
[2018-12-28 18:05:10] INFO  [nJWMVEIqQCE] Connection upgraded with STARTTLS
[2018-12-28 18:05:10] DEBUG [nJWMVEIqQCE] C: EHLO [127.0.0.1]
[2018-12-28 18:05:11] DEBUG [nJWMVEIqQCE] S: 250-smtp.mailtrap.io
[2018-12-28 18:05:11] DEBUG [nJWMVEIqQCE] S: 250-SIZE 5242880
[2018-12-28 18:05:11] DEBUG [nJWMVEIqQCE] S: 250-PIPELINING
[2018-12-28 18:05:11] DEBUG [nJWMVEIqQCE] S: 250-ENHANCEDSTATUSCODES
[2018-12-28 18:05:11] DEBUG [nJWMVEIqQCE] S: 250-8BITMIME
[2018-12-28 18:05:11] DEBUG [nJWMVEIqQCE] S: 250-DSN
[2018-12-28 18:05:11] DEBUG [nJWMVEIqQCE] S: 250 AUTH PLAIN LOGIN CRAM-MD5
[2018-12-28 18:05:11] DEBUG [nJWMVEIqQCE] SMTP handshake finished
[2018-12-28 18:05:11] DEBUG [nJWMVEIqQCE] C: MAIL FROM:<from@example.com>
[2018-12-28 18:05:11] DEBUG [nJWMVEIqQCE] S: 250 2.1.0 Ok
[2018-12-28 18:05:11] DEBUG [nJWMVEIqQCE] C: RCPT TO:<user1@example.com>
[2018-12-28 18:05:11] DEBUG [nJWMVEIqQCE] C: RCPT TO:<user2@example.com>
[2018-12-28 18:05:11] DEBUG [nJWMVEIqQCE] S: 250 2.1.0 Ok
[2018-12-28 18:05:11] DEBUG [nJWMVEIqQCE] S: 250 2.1.0 Ok
[2018-12-28 18:05:11] DEBUG [nJWMVEIqQCE] C: DATA
[2018-12-28 18:05:11] DEBUG [nJWMVEIqQCE] S: 354 Go ahead
…
[2018-12-28 18:05:12] DEBUG [nJWMVEIqQCE] S: 250 2.0.0 Ok: queued
[2018-12-28 18:05:12] DEBUG [nJWMVEIqQCE] Closing connection to the server using "end"
Message sent: <74bfe12e-92fa-91f8-8643-a166b66c62d7@example.com>
[2018-12-28 18:05:12] INFO  [nJWMVEIqQCE] Connection closed
Test email and email sending in staging
Debugging ensures your email-sending functionality works, but how do you make sure your messages look the way you want them and that they are landing in your recipients’ inboxes?
You can use Ethereal, a fake SMTP service for testing emails in Nodemailer. Or, you can use NodemailerApp, which has local POP3 and SMTP servers. Although these two solutions work just fine, you should keep in mind that they’re limited in features.
For example, Ethereal doesn’t have email preview capabilities and NodemailerApp doesn’t have any anti-spam features, among other things.
Now, if you want to use them, knock yourself out, but as they’re quite minimalistic, I personally use Mailtrap Email Testing, a part of the Mailtrap Email Delivery Platform. Unlike Ethereal, it allows me to inspect the HTML/CSS of my emails and easily fix any faulty lines of code, preview my messages, and more.

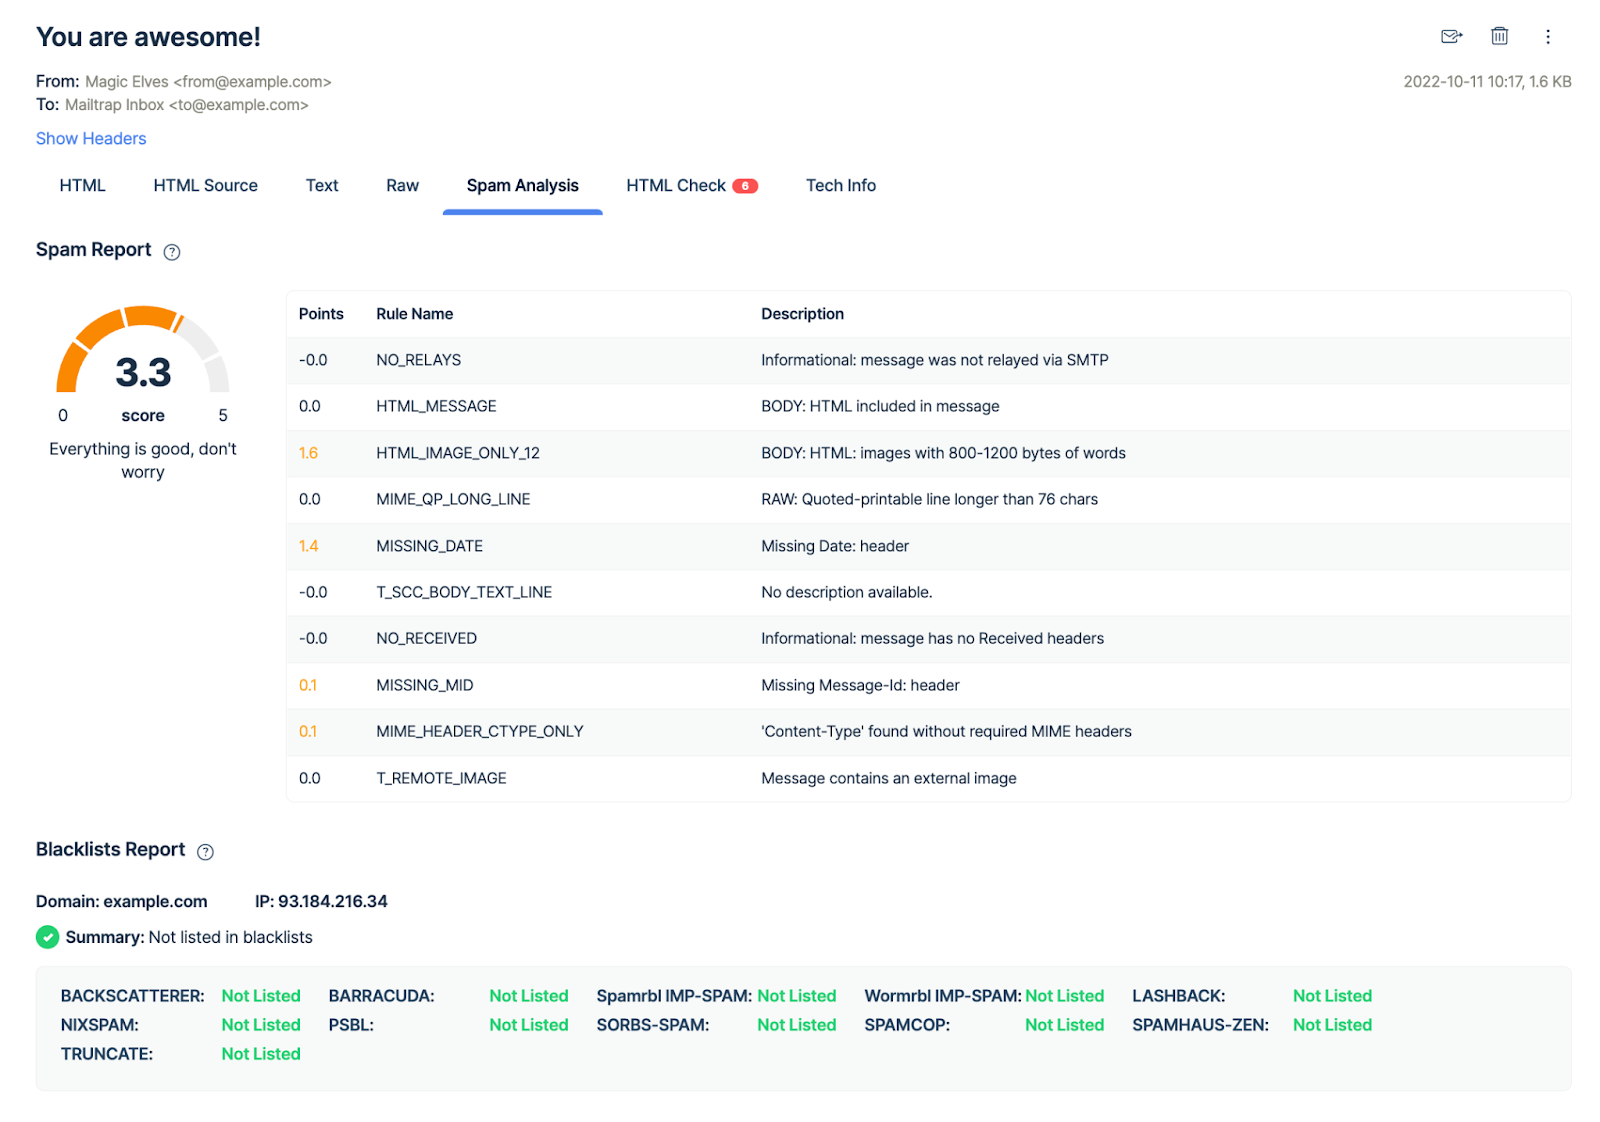
And unlike NodemailerApp, Mailtrap I can check my spam score, which, if I keep below 5, prevents a significant amount of deliverability issues I could face once my app moves to production.
Mailtrap also offers an email API, which lets you easily test your email templates and switch from staging to production once you’re ready to start sending. All you have to do is enable sandbox, specify the inbox ID, receive the template test, and then dispatch it through API.
It’s also super easy to use!
First, create a free Mailtrap account and then:
- Navigate to Email Testing and choose your inbox
- Copy your credentials from the SMTP Settings tab
- Insert the credentials into your Node.js application script
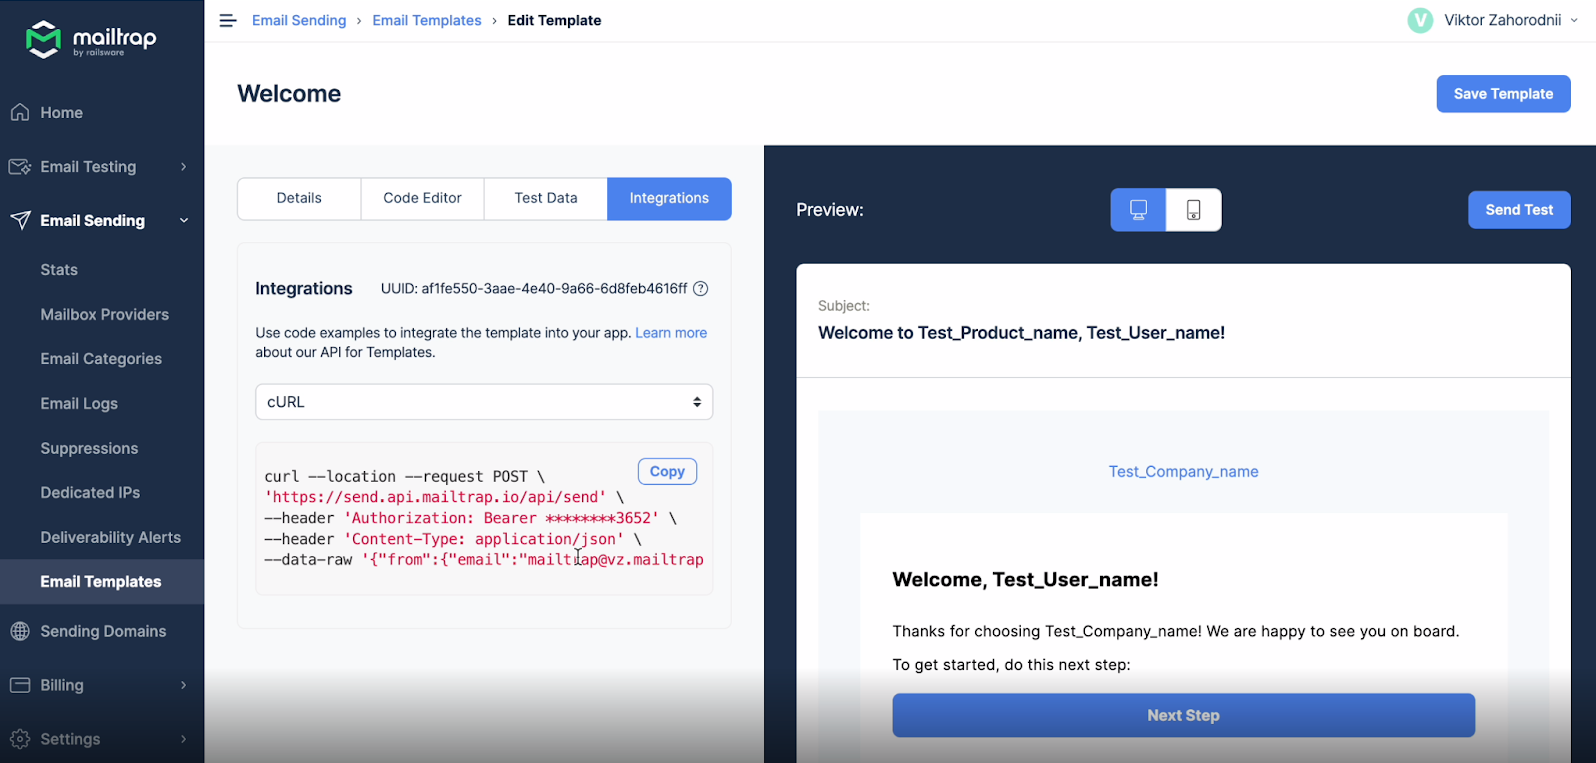
Additionally, you can use Mailtrap’s ready-to-use integration with Nodemailer:
- Select Nodemailer from the list of Integrations
- Copy and paste the snippet into your application code
The code snippet contains transporter and syntaxis attributes, and looks something like this:
const transport = nodemailer.createTransport({
  host: "sandbox.smtp.mailtrap.io",
  port: 2525,
  auth: {
    user: "1a2b3c4d5e6f7g",
    pass: "1a2b3c4d5e6f7g"
  }
});Wrapping up
As you can see, sending emails with the open-source Nodemailer really is, like its creator says, ‘a piece of cake.’ 🎂
Now, to make it even easier, be sure to leverage Mailtrap’s email testing and sending capabilities, and ensure your messages land when and where they’re supposed to.
Also, if this piece of Nodemailer cake has made you hungry for more knowledge, check out our blog, where you can find other related articles such as:


Comments
6 replies