


In this tutorial, I show you how to send emails in Express.js by leveraging various libraries with an SMTP. Or, if you prefer, by simply using an email API and Node.js wrapped in Express.
Send emails using packages and SMTP
Nodemailer
Nodemailer is a widely used Node.js module for sending emails. It offers a straightforward way to integrate email functionality into your application as you configure it with SMTP settings directly.
Here’s how you can set it up with Express to send emails:
1. Set the project up
Open your preferred code editor and run the following in the terminal to create a new directory named nodejs-express-nodemailer:
mkdir nodejs-express-nodemailerNow, move into the newly created directory to start working on your project with the following command:
cd nodejs-express-nodemailerInitialize a new Node.js project using npm with default settings:
npm init -y
Install Express framework, CORS middleware, Nodemailer library, and dotenv using the npm command:
npm install express cors nodemailer dotenv
Lastly, create a new file named server.js where you will write your Node.js code. You can either do this manually or run touch server.js.
2. Write the server code
Now it’s time to configure environment variables, and middleware, and create an endpoint to handle email sending.
To save you the hassle, I’ve prepared the code for you, so you can simply copy/paste it to your configuration file and send emails with it. Check it out:
require('dotenv').config(); // Load environment variables from .env file.
const express = require('express'); // Import the Express framework.
const cors = require('cors'); // Enable CORS middleware for cross-origin requests.
const nodemailer = require('nodemailer'); // Import the nodemailer library for email sending functionality.


const app = express();
const PORT = process.env.PORT || 3000; // Set the server port from environment variable or default to 3000.
const corsOptions = {
   origin: '*',  // Allows requests from all domains. Specify actual domain in production for security.
   optionsSuccessStatus: 200 // Ensure compatibility by setting OPTIONS success status to 200 OK.
};


// Apply JSON parsing and CORS with configured options as global middleware.
app.use(express.json());
app.use(cors(corsOptions));


// Create a reusable transporter object using SMTP transport.
const transporter = nodemailer.createTransport({
   host: process.env.SMTP_HOST,
   port: 587,
   secure: false, // use false for STARTTLS; true for SSL on port 465
   auth: {
       user: process.env.SMTP_USER,
       pass: process.env.SMTP_PASS
   }
});


// Email sending endpoint.
app.post('/send-email', async (req, res) => {
   try {
       const { name, subject, email, message } = req.body; // Destructure and retrieve data from request body.


       // Validate required fields.
       if (!name || !subject || !email || !message) {
           return res.status(400).json({ status: 'error', message: 'Missing required fields' });
       }


       // Prepare the email message options.
       const mailOptions = {
           from: process.env.SENDER_EMAIL, // Sender address from environment variables.
           to: `${name} <${email}>`, // Recipient's name and email address.
           replyTo: process.env.REPLY_TO, // Sets the email address for recipient responses.
           subject: subject, // Subject line.
           text: message // Plaintext body.
       };


       // Send email and log the response.
       const info = await transporter.sendMail(mailOptions);
       console.log('Email sent:', info.response);
       res.status(200).json({ status: 'success', message: 'Email sent successfully' });
   } catch (err) {
       // Handle errors and log them.
       console.error('Error sending email:', err);
       res.status(500).json({ status: 'error', message: 'Error sending email, please try again.' });
   }
});


// Start the server and log the port.
app.listen(PORT, () => {
   console.log(`Server is running on port ${PORT}`);
});
I’ve added annotations in this code snippet so you can navigate through it easier, but here’s some additional explanation just in case:
- Middleware – For security purposes, I’ve added the following middleware that will also handle incoming requests:
- JSON parsing, which handles data sent in JSON format, making it readable for the server.
- CORS (Cross-Origin Resource Sharing), which makes sure that requests are allowed only from specified domains.
console.error– I’ve added this line so that in case of any potential errors, the server will catch and log them, and respond with a message.- Environment variables – Instead of hardcoding sensitive data such as login credentials and server information, I’ve stored all of the sensitive information in a .env file, which acts like a vault. It makes the code more secure, + it provides you with flexibility when moving between different environments (e.g., development, testing, production).
- For example, here’s what my .env file looks like:
SMTP_USER=1a2b3c4d5e6f7g
SMTP_PASS=***********F56
SMTP_HOST=live.smtp.mailtrap.io
SMTP_PORT=587
SENDER_EMAIL=daria.roshchyna@railsware.com
REPLY_TO=reply.to.email@example.com- SMTP server settings – As Express and Nodemailer can’t send messages without a mail service, I’ve used Mailtrap SMTP, which offers a reliable SMTP with robust sending capabilities, ensuring my emails reach recipients’ inboxes just in time. Moreover, it’s got a generous free plan, so be sure to check it out.
3. Run the script and send emails
With all said and done, you can run the code with the simple node server.js. If you’ve followed everything correctly, you should see a message in your terminal indicating that the server is running and listening on the specified port (e.g., “Server is running on port 3000”). This approach is especially beneficial for Nodejs developers working with Express, as it streamlines email integration without complicating framework logic.
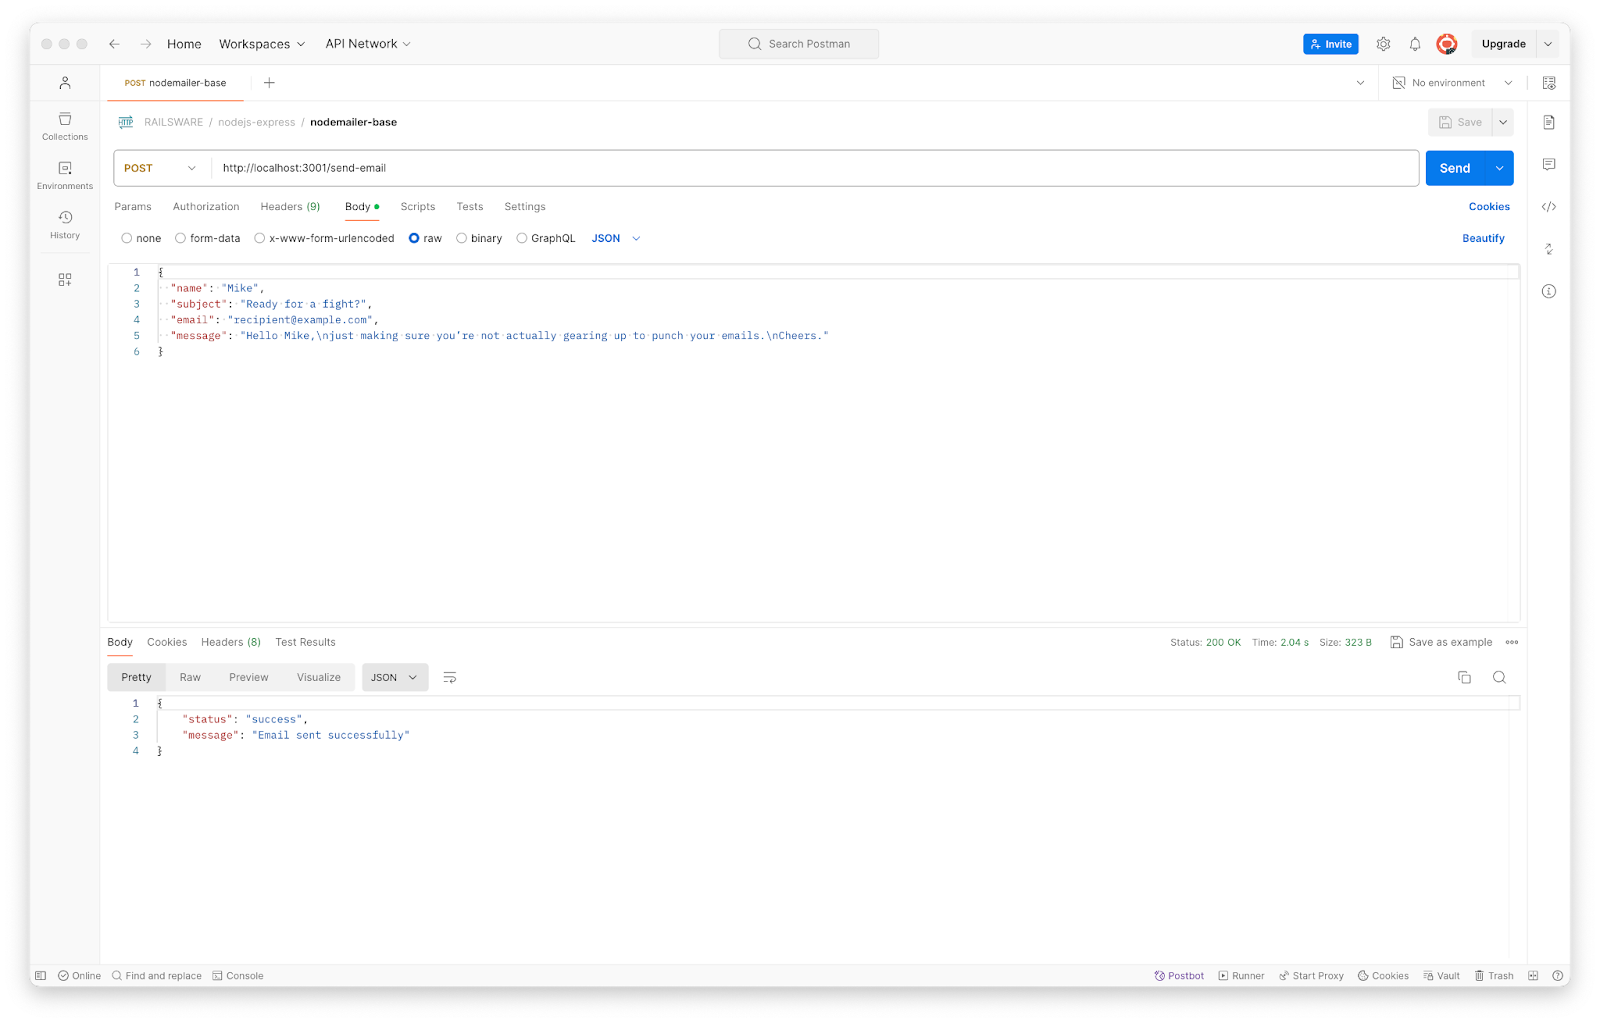
Once the server is running, you can test your email-sending functionality by making requests to your server’s email endpoint. You can send an email from another application, such as a frontend or a tool like Postman, Bruno, or Insomnia. Just make a request to the endpoint http://localhost:3000/send-email, specifying name, subject, email, and message as JSON data.

If you’d like to learn about other, more complex, sending scenarios in Nodemailer (e.g., asynchronous or bulk email sending), be sure to check out our dedicated article, or if you’re a visual learner, watch our video tutorial. 👀
Emailjs library
Another simple way to send emails in your Express.js app is by using the emailjs library.
The emailjs library (please don’t confuse it with Email.js service for client-side emails sending) provides a streamlined approach to sending emails with attachments or dynamic content.
It’s great for simpler email-sending needs, small projects, personal websites, or situations requiring quick and easy email functionality without extensive setup.
Here’s how you can leverage it with Express.js:
1. Set the project up
Install the necessary packages:
npm install express cors emailjs dotenv
Since emailjs is an ES module, you need to specify "type": "module" in your package.json.
2. Write the server code
To add email-sending functionality to your Express.js app with emailjs, use the following code:
import dotenv from 'dotenv'; // Load environment variables from the .env file.
import express from 'express'; // Import the Express framework for server functionality.
import cors from 'cors'; // Include CORS middleware to handle cross-origin requests.
import { SMTPClient } from 'emailjs'; // Import the SMTPClient from emailjs for email functionality.


dotenv.config();


const app = express();
const PORT = process.env.PORT || 3000; // Set the server port from environment variables or default to 3000.
const corsOptions = {
   origin: '*',  // Allows requests from all domains. Specify actual domain in production for security.
   optionsSuccessStatus: 200 // For compatibility, set OPTIONS request success status to 200 OK.
};


// Use JSON parsing and CORS middleware with the specified options.
app.use(express.json());
app.use(cors(corsOptions));


// Initialize emailjs SMTP client with configuration.
const client = new SMTPClient({
   user: process.env.SMTP_USER,
   password: process.env.SMTP_PASS,
   host: process.env.SMTP_HOST,
   ssl: true
});


// Endpoint to send emails.
app.post('/send-email', (req, res) => {
   const { name, subject, email, message } = req.body; // Extract data from request body.


   // Check for the presence of all required fields.
   if (!name || !subject || !email || !message) {
       return res.status(400).json({ status: 'error', message: 'Missing required fields' });
   }


   // Define the email message.
   const messageToSend = {
       from: process.env.SENDER_EMAIL,
       to: `${name} <${email}>`,
       "reply-to": process.env.REPLY_TO,
       subject: subject,
       text: message
   };


   // Send the email using a callback to handle the response.
   client.send(messageToSend, (err) => {
       if (err) {
           console.error('Error sending email:', err);
           return res.status(500).json({ status: 'error', message: 'Failed to send email, please try again.' });
       } else {
           return res.status(200).json({ status: 'success', message: 'Email sent successfully' });
       }
   });
});


// Listen on the specified port and log the server status.
app.listen(PORT, () => {
   console.log(`Server is running on port ${PORT}.`);
});
Now, let me walk you through this configuration:
- SSL configuration – The
ssl: truesetting in theSMTPClientconfiguration ensures secure email transmission using SSL. This is crucial for protecting sensitive information during email delivery, as your credentials will be encrypted. - Callback for email sending – Unlike Nodemailer, which uses Promises for async/await, the emailjs library uses a callback function to handle the response of the email-sending process. This callback is used to log errors or confirm successful email sending.
- Response handling – The code ensures proper HTTP status codes are returned based on the success or failure of the email sending process, enhancing error handling and client communication.
3. Run the script and send emails
And of course, to run the script, you can use the simple:
node server.js
Send HTML emails with dynamic content
To send emails with dynamic content, that is, emails with recipients’ names, items in their shopping cart, personalized offers, etc., we’ll use the email-templates package with the Pug template engine. This setup will be wrapped in a route to enable external requests for sending HTML email with templates.
Here’s what you need to do:
1. Set up the project
First, run the following commands to create a new directory and navigate to it, initialize a new Node.js project with default settings, and install the necessary packages:
mkdir nodejs-express-email-templates && cd nodejs-express-email-templates
npm init -y
npm i express cors email-templates pug dotenv
Then, organize your folder as follows:
emails
    welcome
        html.pug
        subject.pug
        text.pug
Now, let’s create them templates:
- Email template (html.pug)
h1 Hello #{name}
p.
   Welcome to My App!<br>
   Feel free to explore all the awesome features.<br>
   Don't hesitate to get back to us for any questions.
Quick note: In the template #{name} is a variable that will be dynamically replaced with the recipient’s name when the email is sent, allowing you to personalize the content for each user.
- Subject email template (subject.pug)
| Hi #{name}, happy to see you at My App!
- Text email template (text.pug):
| Hello #{name},
|
| Welcome to My App!
| Feel free to explore all the awesome features.
| Don't hesitate to get back to us for any questions.
And finally, add this code to .env file, and insert your credentials to safely store them:
PORT=3000
SMTP_USER=1a2b3c4d5e6f7g
SMTP_PASS=***********F56
SMTP_HOST=live.smtp.mailtrap.io
SMTP_PORT=2525
SENDER_EMAIL=<YOUR_SENDER_EMAIL>
REPLY_TO=<YOUR_REPLY_TO_EMAIL>
2. Set up the server
To integrate the email templates we just created into your application, you need to set up a server that will handle email-sending requests. For that, you can use the following code:
require('dotenv').config();
const express = require('express');
const cors = require('cors');
const Email = require('email-templates');

const app = express();
const PORT = process.env.PORT || 3000;

app.use(express.json());
app.use(cors({ origin: '*', optionsSuccessStatus: 200 }));

// Initialize email-templates with Mailtrap configuration
const email = new Email({
   message: {
       from: `"NodeJS" <${process.env.SENDER_EMAIL}>`
   },
   //textOnly: true,
   send: true,
   //preview: false
   transport: {
       host: process.env.SMTP_HOST,
       port: process.env.SMTP_PORT,
       ssl: false,
       tls: true,
       auth: {
           user: process.env.SMTP_USER,
           pass: process.env.SMTP_PASS
       }
   }
});

app.post('/send-email', async (req, res) => {
   const { recipients } = req.body;

   // Check if at least one recipient is provided
   if (!recipients || recipients.length === 0) {
       return res.status(400).json({ status: 'error', message: 'Missing required fields' });
   }

   // Create email promises for each recipient
   const emailPromises = recipients.map(recipient => {
       return email.send({
           template: 'welcome',
           message: {
               to: recipient.email
           },
           locals: {
               name: recipient.name
           }
       });
   });

   // Execute all email send promises in parallel with proper error handling
   const results = await Promise.allSettled(emailPromises);
   const failedEmails = results.filter(result => result.status === 'rejected');
   const successfulEmails = results.filter(result => result.status === 'fulfilled');

   if (failedEmails.length > 0) {
       console.error("Error sending one or more emails:", failedEmails);
       return res.status(500).json({
           status: 'error',
           message: `Failed to send ${failedEmails.length} emails`,
           errors: failedEmails
       });
   }

   console.log("All emails sent successfully:", successfulEmails);
   res.status(200).json({
       status: 'success',
       message: 'All emails sent successfully',
       details: successfulEmails
   });
});


app.listen(PORT, () => {
   console.log(`Server running on port ${PORT}`);
});
Here’s a breakdown of the key points in the code:
- Email templates initialization – The
Emailclass fromemail-templatesis configured with Mailtrap settings to handle the sending of emails. - Error handling – The code uses
Promise.allSettledto handle multiple email-sending promises, ensuring that all attempts are tracked, and errors are properly logged. - Response handling – Proper HTTP status codes are returned based on the success or failure of the email-sending process, enhancing error handling and client communication.
3. Run the server
Once you run this code with node server.js, you can make requests by passing a recipients array containing multiple objects with name and email properties. Each recipient specified in the array will receive an email with their name in the title, as we used the #{name} template variable.
Send emails using email API
If you want to automate your sending process in Express.js, you can use Mailtrap’s official Node.js sending package and wrap it inside a route with Express — it’s as simple as that!
The Mailtrap sending package is regularly maintained and updated, and is super straightforward to use thanks to the abundance of documentation, and, of course, the fact that you don’t have to write the integration code yourself.
Here’s how it works:
- Create a free Mailtrap account
- Verify your domain and update DNS records
- Don’t worry, this part takes ~5 minutes to complete, and you can follow the video we prepared for you:

- Install the Mailtrap sending package, along with Express, CORS, and dotenv with the following command:
npm i express cors mailtrap dotenv- Insert the following code in your server.js file to start sending plain-text email messages.
require('dotenv').config(); // Load environment variables from the .env file.
const express = require('express'); // Import the Express framework for server functionality.
const cors = require('cors'); // Include CORS middleware to handle cross-origin requests.
const { MailtrapClient } = require('mailtrap'); // Import the MailtrapClient from mailtrap


const app = express();
const PORT = process.env.PORT || 3000; // Set the server port from environment variables or default to 3000.
const corsOptions = {
   origin: '*',  // Allows requests from all domains. Specify actual domain in production for security.
   optionsSuccessStatus: 200 // For compatibility, set OPTIONS request success status to 200 OK.
};


// Use JSON parsing and CORS middleware with the specified options.
app.use(express.json());
app.use(cors(corsOptions));


// Initialize mailtrap client with token.
const client = new MailtrapClient({ token: process.env.MAILTRAP_TOKEN });
const sender = { name: 'NodeJS', email: process.env.SENDER_EMAIL };


// Endpoint to send emails.
app.post('/send-email', (req, res) => {
   const { name, subject, email, message } = req.body; // Extract data from request body.


   // Check for the presence of all required fields.
   if (!name || !subject || !email || !message) {
       return res.status(400).json({ status: 'error', message: 'Missing required fields' });
   }


   // Define the email message.
   const messageToSend = {
       from: sender,
       to: [{ name, email }],
       subject: subject,
       text: message
   };


   // Send the email.
   client.send(messageToSend).then((result) => {
       console.log('Email sent...', 'Message ids: ' + result.message_ids);
       res.status(200).json({ status: 'success', message: 'Email sent successfully' });
   }).catch((err) => {
       console.error('Error sending email:', err);
       res.status(500).json({ status: 'error', message: 'Failed to send email, please try again.' });
   })
});


// Listen on the specified port and log the server status.
app.listen(PORT, () => {
   console.log(`Server is running on port ${PORT}.`);
});
Of course, don’t forget to add your Mailtrap credentials (e.g., port, API key/token, sender email) to a .env file, which should look something like this:
PORT=<SERVER_PORT>
MAILTRAP_TOKEN=<MAILTRAP_API_TOKEN>
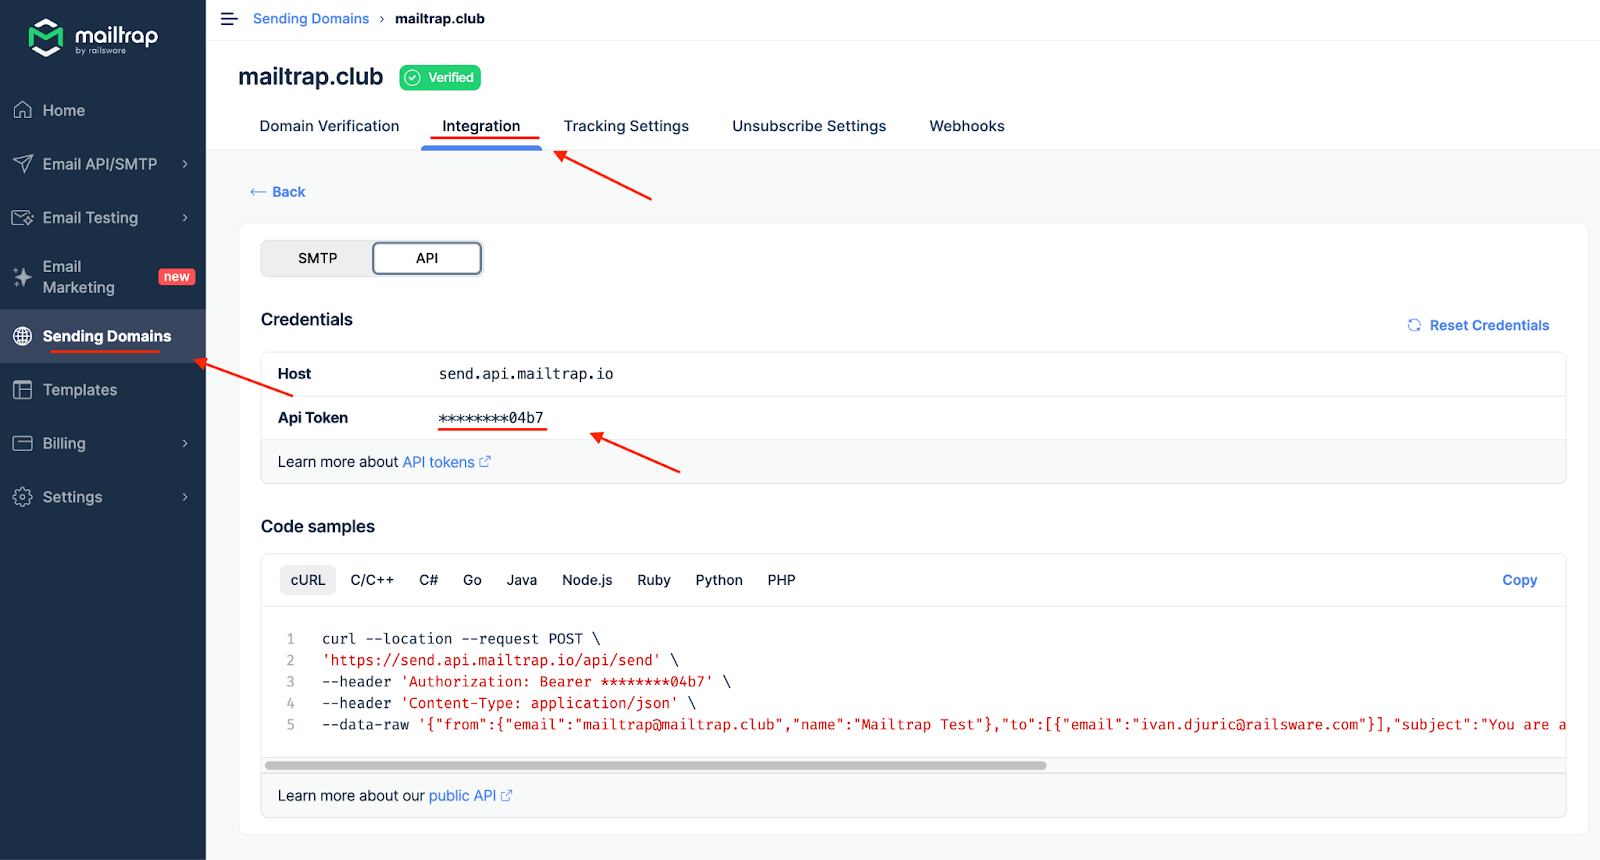
SENDER_EMAIL=<MAILTRAP_LINKED_EMAIL>To find your Mailtrap API credentials, navigate to the Sending Domains tab, select your verified domain, and open the “Integration” tab.

And to start the server and make requests, simply run node server.js.
Send HTML email
Sending HTML email is also easy with Express and Mailtrap’s Node.js package. All you need to do is replace text with HTML in the messageToSend object, like so:
// Define the email message.
   const messageToSend = {
       from: sender,
       to: [{ name, email }],
       subject: subject,
       html: message // Message content provided by the request as HTML
   };
Send email to multiple recipients
To send to multiple recipients, we need to change multiple parts in our /send-email endpoint. First, we remove “name” and “email”, since we will now provide “recipients,” and then we store them in a recipientList that we pass to the messageToSend.
Check it out in action:
// Endpoint to send emails.
app.post('/send-email', (req, res) => {
   const { subject, recipients, message } = req.body; // Extract data from request body.


   // Check for the presence of all required fields.
   if (!recipients || recipients.length === 0 || !subject || !message) {
       return res.status(400).json({ status: 'error', message: 'Missing required fields' });
   }


   // Format recipients; you should add validation for production environments.
   const recipientList = recipients.map(recipient => ({
       name: recipient.name,
       email: recipient.email
   }));


   // Define the email message.
   const messageToSend = {
       from: sender,
       to: recipientList,
       subject: subject,
       html: message // Message content provided by the request as HTML
   };


   // Send the email.
   client.send(messageToSend).then((result) => {
       console.log('Email sent...', 'Message ids: ' + result.message_ids);
       res.status(200).json({ status: 'success', message: 'Email sent successfully' });
   }).catch((err) => {
       console.error('Error sending email:', err);
       res.status(500).json({ status: 'error', message: 'Failed to send email, please try again.' });
});
Send email with attachments
To send emails with attachments using Express and the Mailtrap’s API, we will use Multer, a Node.js middleware that will help us handle multipart/form data, particularly file uploads.
npm install multerOnce you’ve installed this super handy package, you can use the following code to send emails with attachments:
require('dotenv').config(); // Loads .env configuration.
const express = require('express'); // Sets up the Express app.
const cors = require('cors'); // Enables CORS for cross-origin allowance.
const { MailtrapClient } = require('mailtrap'); // Provides email service integration.
const multer = require('multer'); // Handles file uploads.


const app = express();
const PORT = process.env.PORT || 3000;


// Multer handles multipart/form-data, which includes files and text fields, so express.json() is not needed.
// app.use(express.json());
// Configure CORS to accept all domains (restrict in production).
app.use(cors({ origin: '*', optionsSuccessStatus: 200 }));


// Sets up multer to handle memory storage for file uploads.
const upload = multer({ storage: multer.memoryStorage() });


// Initializes Mailtrap client with environment-specific token.
const client = new MailtrapClient({ token: process.env.MAILTRAP_TOKEN });
const sender = { name: 'NodeJS', email: process.env.SENDER_EMAIL };


// Defines endpoint for sending emails with optional file attachments.
app.post('/send-email', upload.array('files', 3), async (req, res) => {
   const { name, subject, email, message } = req.body;


   // Validates mandatory fields.
   if (!name || !subject || !email || !message) {
       return res.status(400).json({ status: 'error', message: 'Missing required fields' });
   }


   // Prepares file attachments if available.
   const attachments = req.files ? req.files.map(file => ({
       filename: file.originalname,
       content: file.buffer,
       type: file.mimetype
   })) : [];


   // Composes the email message.
   const messageToSend = {
       from: sender,
       to: [{ name, email }],
       subject,
       html: message,
       attachments
   };


   // Attempts to send the email and handles response.
   try {
       const result = await client.send(messageToSend);
       console.log('Email sent:', result.message_ids);
       res.status(200).json({ status: 'success', message: 'Email sent successfully' });
   } catch (err) {
       console.error('Error sending email:', err);
       res.status(500).json({ status: 'error', message: 'Failed to send email, please try again.' });
   }
});


// Starts server and listens on the configured port.
app.listen(PORT, () => {
   console.log(`Server running on port ${PORT}`);
});Notes:
- Note that the code above can handle 1 or multiple attachments. We limited the max files that can be uploaded at once to 3 with
upload.array('files', 3). However, you can change this according to your preferences. - Since we are using multipart/form data, we will not be sending the request as json, but as form data. And, of course, to run the code, use
node server.js.
Send email with embedded image
To embed an image in an email, modify how attachments are processed by setting their disposition to “inline” and adding a content ID. Use the filename as the content ID and reference this ID in the email content to display the image inline.
Here’s an example:
// Prepares file attachments if available.
   const attachments = req.files ? req.files.map(file => ({
       filename: file.originalname,
       content: file.buffer,
       type: file.mimetype,
       disposition: 'inline',  // Set disposition as inline for all files
       content_id: file.originalname  // We pass the filename as content_id
   })) : [];
Asynchronous email sending
To send emails asynchronously, simply use the following code in your server.js file:
require('dotenv').config(); // Load environment variables from the .env file.
const express = require('express'); // Import the Express framework for server functionality.
const cors = require('cors'); // Include CORS middleware to handle cross-origin requests.
const { MailtrapClient } = require('mailtrap'); // Import the MailtrapClient from mailtrap


const app = express();
const PORT = process.env.PORT || 3000; // Set the server port from environment variables or default to 3000.
const corsOptions = {
   origin: '*',  // Allows requests from all domains. Specify actual domain in production for security.
   optionsSuccessStatus: 200 // For compatibility, set OPTIONS request success status to 200 OK.
};


// Use JSON parsing and CORS middleware with the specified options.
app.use(express.json());
app.use(cors(corsOptions));


// Initialize mailtrap client with token.
const client = new MailtrapClient({ token: process.env.MAILTRAP_TOKEN });
const sender = { name: 'NodeJS', email: process.env.SENDER_EMAIL };


// Endpoint to send emails.
app.post('/send-email', async (req, res) => {
   const { subject, recipients, message } = req.body; // Extract data from request body.


   // Check for the presence of all required fields.
   if (!recipients || recipients.length === 0 || !subject || !message) {
       return res.status(400).json({ status: 'error', message: 'Missing required fields' });
   }


   // Format recipients; you should add validation for production environments.
   const recipientList = recipients.map(recipient => ({
       name: recipient.name,
       email: recipient.email
   }));


   // Create email promises for each recipient
   const emailPromises = recipients.map(recipient => {
       const personalizedMessage = message.replace("{name}", recipient.name);
       return client.send({
           from: sender,
           to: [{ name: recipient.name, email: recipient.email }],
           subject: subject,
           html: personalizedMessage // Message content provided by the request as HTML
       });
   });


   // Execute all email send promises in parallel, with proper error handling
   // Using async/await for more conventional error handling integrating better with express
   try {
       const results = await Promise.all(emailPromises);
       console.log("All emails sent successfully:", results);
       res.status(200).json({ status: 'success', message: 'Emails sent successfully' });
   } catch (error) {
       console.error("Error sending one or more emails:", error);
       res.status(500).json({ status: 'error', message: 'Failed to send one or more emails, please try again' });
   }
});


// Listen on the specified port and log the server status.
app.listen(PORT, () => {
   console.log(`Server is running on port ${PORT}.`);
});
Code breakdown:
- Each email is sent using a promise, and the
Promise.allhandles these promises parallelly. - Thanks to the
Promise.allmethod, the app waits for all email-sending operations to complete and parallelly handle multiple sending promises. - The
async/awaitsyntax manages these asynchronous operations cleanly and allows for proper error handling.
Send bulk email
To send bulk email, you can re-use the code from the previous chapter and do it asynchronously. However, you’ll also need an array of recipients objects, with each object containing the email field and, optionally, a name field.
To efficiently manage large volumes of email recipients, especially for tasks like sending newsletters, while avoiding any potential email deliverability issues, I advise you to use Mailtrap’s bulk stream.

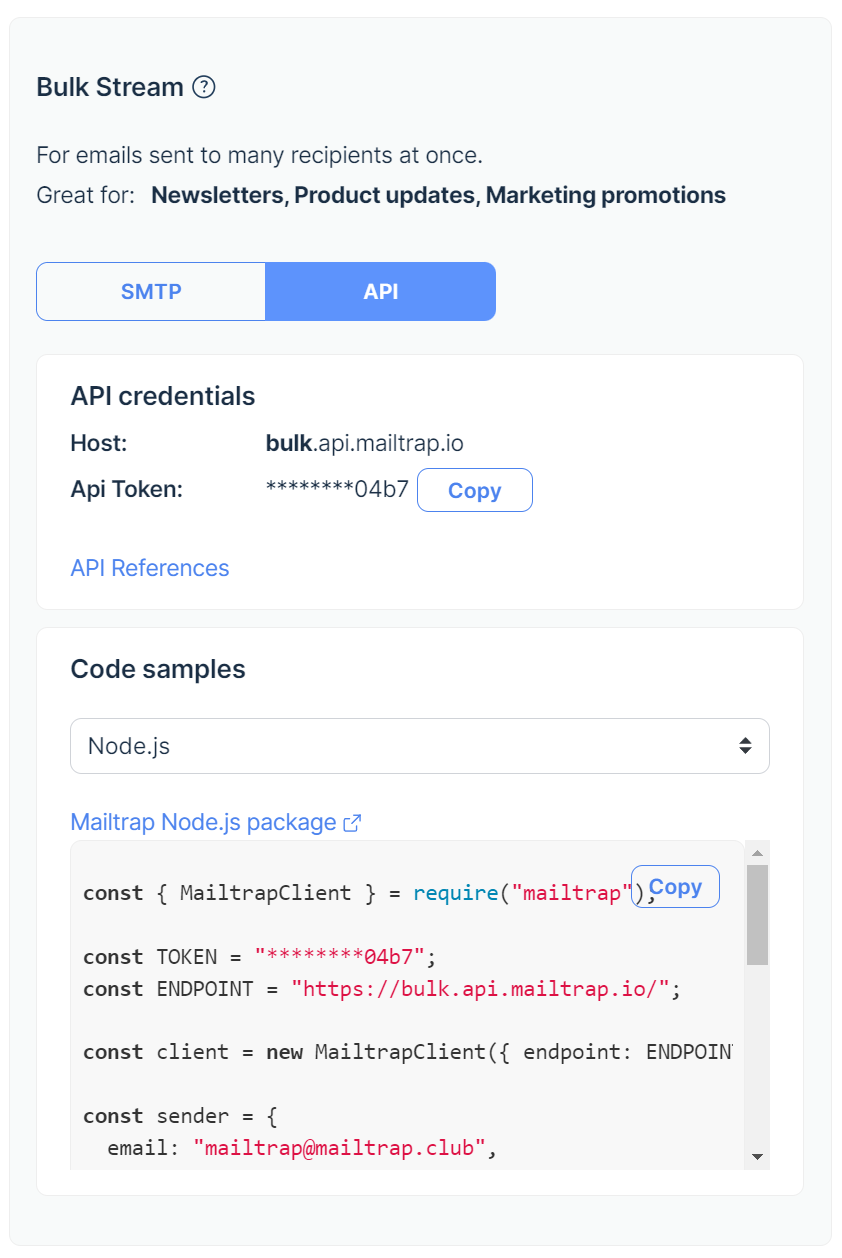
So, essentially, the code is the same, and all you have to do is change the Host name and Api Token. Simple as that! 🍸
Note: Mailtrap’s API is bulk-aware, which means you can send marketing emails on top of transactional without compromising your deliverability, and, of course, without any additional costs.
Wrapping up
And that concludes our guide on sending emails with Express.js!
We’ve covered a range of methods, from SMTP and API-based approaches to Mailtrap for effective email sending.
If you’re looking to further enhance your Node.js email capabilities, don’t forget to explore more of our blog, where you can find articles such as: